AR-5516S/5520S Operation-Manual GB - Sharp
AR-5516S/5520S Operation-Manual GB - Sharp
AR-5516S/5520S Operation-Manual GB - Sharp

Create successful ePaper yourself
Turn your PDF publications into a flip-book with our unique Google optimized e-Paper software.
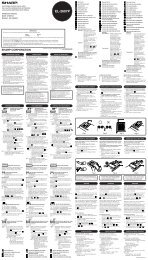
MODEL:<br />
<strong>AR</strong>-<strong>5516S</strong><br />
<strong>AR</strong>-<strong>5520S</strong><br />
DIGITAL MULTIFUNCTIONAL SYSTEM<br />
OPERATION GUIDE
CONTENTS<br />
1 BEFORE USING THE MACHINE<br />
P<strong>AR</strong>T NAMES AND FUNCTIONS ..................... 4<br />
● OPERATION PANEL ........................................6<br />
POWER ON AND OFF....................................... 8<br />
● POWER ON ......................................................8<br />
● POWER OFF ....................................................8<br />
LOADING PAPER.............................................. 9<br />
● PAPER..............................................................9<br />
● LOADING PAPER...........................................10<br />
● CHANGING A TRAY'S PAPER SIZE SETTING ....12<br />
OPERATION IN COPY AND PRINTER MODES .... 14<br />
2 COPY FUNCTIONS<br />
NORMAL COPYING ........................................ 15<br />
● MAKING A COPY D<strong>AR</strong>KER OR LIGHTER ....18<br />
● SELECTING THE TRAY.................................18<br />
● SETTING THE NUMBER OF COPIES ...........19<br />
REDUCTION/ENL<strong>AR</strong>GEMENT/ZOOM............ 19<br />
● AUTOMATIC RATIO SELECTION .................19<br />
● MANUAL RATIO SELECTION........................20<br />
● SELECTING THE VERTICAL AND<br />
HORIZONTAL COPY RATIOS SEP<strong>AR</strong>ATELY<br />
(XY ZOOM Copying).......................................21<br />
TWO-SIDED COPYING USING THE BYPASS<br />
TRAY................................................................ 23<br />
DUAL PAGE COPYING................................... 24<br />
INTERRUPTING A COPY RUN (Interrupt<br />
Copying) .......................................................... 25<br />
3 PRINTER FUNCTIONS<br />
BASIC PRINTING ............................................ 26<br />
● OPENING THE PRINTER DRIVER FROM THE<br />
"Start" BUTTON ............................................. 27<br />
PRINTER DRIVER SETTING SCREEN .......... 28<br />
SETTING ADVANCED PRINT FUNCTIONS... 29<br />
● PRINTING MULTIPLE PAGES ON ONE PAGE<br />
(N-Up Printing) ............................................... 29<br />
● FITTING THE PRINTED IMAGE TO THE<br />
PAPER (Fit To Paper Size)............................ 30<br />
● ROTATING THE PRINT IMAGE 180 DEGREES<br />
(Rotate 180 degrees) ..................................... 30<br />
● ENL<strong>AR</strong>GING/REDUCING THE PRINT IMAGE<br />
(Zoom) ........................................................... 31<br />
● PRINTING FAINT TEXT AND LINES IN BLACK<br />
(Text To Black/Vector To Black) .................... 31<br />
● ADJUSTING THE BRIGHTNESS AND<br />
CONTRAST OF THE IMAGE (Image<br />
Adjustment).................................................... 32<br />
● ADDING A WATERM<strong>AR</strong>K TO PRINTED PAGES<br />
(Watermark) .....................................................32<br />
SAVING FREQUENTLY USED PRINT<br />
SETTINGS ....................................................... 33<br />
● SAVING SETTINGS AT THE TIME OF<br />
PRINTING (User Settings)............................. 33<br />
OUTLINE OF THE PRINT STATUS WINDOW.... 34<br />
4 USER SETTINGS<br />
ADJUSTING THE AUTOMATIC EXPOSURE<br />
LEVEL.............................................................. 35<br />
CUSTOMISING SETTINGS (System Settings).... 36<br />
● SYSTEM SETTINGS ..................................... 36<br />
● SELECTING A SETTING FOR A SYSTEM<br />
SETTING ....................................................... 38<br />
SETTINGS FOR AUDITING MODE................. 39<br />
● AUDITING MODE .......................................... 39<br />
● AUDITING MODE SETTINGS ....................... 39<br />
● SELECTING AUDITING MODE SETTINGS ..... 40<br />
1
5 TROUBLESHOOTING<br />
TROUBLESHOOTING ..................................... 43<br />
● MACHINE/COPYING PROBLEMS.................44<br />
● PRINTING PROBLEMS..................................47<br />
INDICATORS AND DISPLAY MESSAGES .... 49<br />
MISFEED REMOVAL....................................... 50<br />
● MISFEED IN THE SPF ...................................50<br />
● MISFEED IN THE BYPASS TRAY .................51<br />
● MISFEED IN THE MACHINE..........................52<br />
● MISFEED IN THE UPPER PAPER TRAY ......55<br />
● MISFEED IN THE LOWER PAPER TRAY .....56<br />
REPLACING THE TONER C<strong>AR</strong>TRIDGE ........ 57<br />
6 ROUTINE MAINTENANCE<br />
CHECKING THE TOTAL OUTPUT COUNT AND<br />
TONER LEVEL ................................................ 58<br />
● CHECKING THE TOTAL OUTPUT COUNT...58<br />
● CHECKING THE TONER LEVEL ...................59<br />
ROUTINE MAINTENANCE.............................. 60<br />
● CLEANING THE DOCUMENT GLASS AND<br />
SPF/DOCUMENT COVER .............................60<br />
● CLEANING THE ORIGINAL SCANNING GLASS<br />
(ONLY WHEN AN SPF IS INSTALLED).............. 60<br />
● CLEANING THE BYPASS TRAY PAPER FEED<br />
ROLLER..........................................................61<br />
● CLEANING THE TRANSFER CH<strong>AR</strong>GER ......61<br />
7 PERIPHERAL DEVICES AND SUPPLIES<br />
PERIPHERAL DEVICES.................................. 62<br />
● SINGLE PASS FEEDER.................................63<br />
● 250-SHEET PAPER FEED UNIT/2 X 250-<br />
SHEET PAPER FEED UNIT...........................63<br />
STORAGE OF SUPPLIES ............................... 64<br />
● PROPER STORAGE ......................................64<br />
2
INTRODUCTION<br />
This manual describes the copier and printer functions of the <strong>AR</strong>-<strong>5516S</strong>/<strong>AR</strong>-<strong>5520S</strong> digital multifunctional system.<br />
Note<br />
• Where "<strong>AR</strong>-XXXX" appears in this manual, please substitute the name of your model for "XXXX". For the name<br />
of your model, see "DIFFERENCES BETWEEN MODELS" in the Start Guide.<br />
• The screen images and procedures that appear in this manual are mainly for Windows Vista. With other<br />
versions of Windows, some screen images may be different from those in this manual.<br />
• For information on using your operating system, refer to your operating system's manual or online Help.<br />
The display screens, messages, and key names shown in the manual may differ from those on the actual machine<br />
due to product improvements and modifications.<br />
3
1<br />
Chapter<br />
1<br />
BEFORE USING THE MACHINE<br />
This chapter contains basic information that should be read before using the machine.<br />
P<strong>AR</strong>T NAMES AND FUNCTIONS<br />
2<br />
1<br />
7<br />
6<br />
2<br />
3<br />
4<br />
4<br />
16<br />
15<br />
5<br />
8<br />
10<br />
11<br />
1<br />
2<br />
3<br />
4<br />
5<br />
6<br />
7<br />
8<br />
4<br />
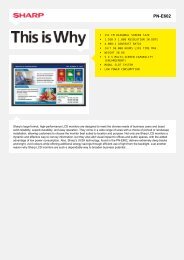
Glass cleaner (when the SPF is installed)<br />
Use to clean the original scanning glass. (p.60)<br />
Document feeder cover (when the SPF is installed)<br />
/document cover<br />
Open to make copies from the document glass.<br />
(p.15)<br />
Document glass<br />
Place an original that you wish to scan face down<br />
here. (p.15)<br />
Handles<br />
Use to move the machine.<br />
Power switch<br />
Press to turn the machine power on and off. (p.8)<br />
<strong>Operation</strong> panel<br />
Contains operation keys and indicator lights. (p.6)<br />
Paper output tray<br />
Copies and prints are deposited to this tray.<br />
Front cover<br />
Open to remove paper misfeeds and perform<br />
machine maintenance. (p.53, p.57)<br />
9<br />
10<br />
11<br />
12<br />
13<br />
14<br />
15<br />
16<br />
9<br />
13 14<br />
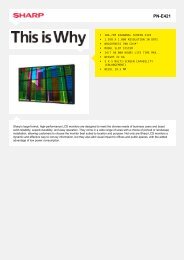
Paper trays<br />
Each tray holds 250 sheets of paper. (p.10)<br />
Side cover<br />
Open to remove paper misfeeds and perform<br />
machine maintenance. (p.51, p.52)<br />
Side cover handle<br />
Pull to open the side cover. (p.51)<br />
Bypass tray guides<br />
Adjust to the width of the paper. (p.11)<br />
Bypass tray<br />
Paper including special paper (such as transparency<br />
film) can be fed from the bypass tray. (p.11, p.23)<br />
Bypass tray extension<br />
Pull out when feeding large paper such as B4 and<br />
A3. (p.11)<br />
Charger cleaner<br />
Use to clean the transfer charger. (p.61)<br />
USB 2.0 connector<br />
Connect to your computer to use the printer<br />
function. (Start Guide)<br />
12
BEFORE USING THE MACHINE<br />
17<br />
18<br />
19<br />
20<br />
21<br />
1<br />
22<br />
24 25<br />
26<br />
27<br />
23<br />
17<br />
18<br />
19<br />
20<br />
21<br />
22<br />
23<br />
24<br />
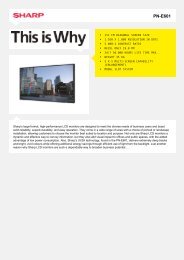
Document feeder tray (when the SPF is<br />
installed)<br />
Place the original(s) that you wish to scan face up<br />
here. Holds up to 40 originals.<br />
Original guides (when the SPF is installed)<br />
Adjust to the size of the originals.<br />
Feeding roller cover (when the SPF is installed)<br />
Open to remove misfed originals. (p.50)<br />
Right side cover (when the SPF is installed)<br />
Open to remove misfed originals. (p.50)<br />
Exit area (when the SPF is installed)<br />
Originals exit the machine here after copying.<br />
Toner cartridge lock release lever<br />
To replace the toner cartridge, pull out the toner<br />
cartridge while pushing on this lever.<br />
Toner cartridge<br />
Contains toner. (p.57)<br />
Roller rotating knob<br />
Turn to remove misfed paper. (p.52, p.53)<br />
25<br />
26<br />
27<br />
Fusing unit release levers<br />
To remove a paper misfeed from the fusing unit, push<br />
down on these levers and remove the paper. (p.53)<br />
Warning<br />
The fusing unit is hot. Do not touch<br />
the fusing unit when removing misfed<br />
paper. Doing so may cause a burn or<br />
injury.<br />
Photoconductive drum<br />
Copy images are formed on the photoconductive<br />
drum.<br />
Fusing unit paper guide<br />
Open to remove misfed paper.<br />
Note<br />
The model name can be seen on the machines<br />
front cover.<br />
5
BEFORE USING THE MACHINE<br />
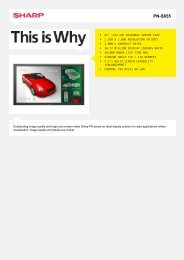
OPERATION PANEL<br />
1 2 3<br />
1 ON LINE key ( ) / indicator<br />
Press to toggle the machine between online and<br />
off-line. The indicator lights up when the machine<br />
is online, and goes off when the machine is off-line.<br />
The indicator blinks while the machine is receiving<br />
print data and while printing is paused. (p.26)<br />
2 XY-ZOOM key ( ) / indicator<br />
Press to change the horizontal and vertical copy<br />
ratios independently. (p.21)<br />
3 DUAL PAGE COPY key ( ) / indicator<br />
Use to make individual copies of the two pages of<br />
an open book or other two-page original. (p.24)<br />
4 AUTO/TEXT/PHOTO key ( AUTO / / ) /<br />
indicators<br />
Use to select the exposure mode:<br />
"AUTO", "TEXT", or "PHOTO". (p.18)<br />
5 ORIGINAL key ( ) / ORIGINAL SIZE<br />
indicators<br />
Use to enter the original size. (p.12) The selected<br />
original size will light up.<br />
6 PAPER SIZE indicators<br />
Light up to show the selected copy paper size. (p.12)<br />
7<br />
8<br />
9<br />
10<br />
11<br />
12<br />
Paper feed location / misfeed location<br />
indicators<br />
The selected paper feed location is shown by a lit<br />
indicator ( ). (p.15)<br />
The general location of misfed paper is shown by a<br />
blinking red indicator ( ). (p.50)<br />
Alarm indicators<br />
[ ] Maintenance indicator (p.49)<br />
[ ] Toner cartridge replacement required<br />
indicator (p.49)<br />
[ ] Developer replacement required indicator<br />
(p.49)<br />
[ ] Paper required indicator (p.49)<br />
[ ] Misfeed indicator (p.49)<br />
Display<br />
Shows the set number of copies, as well as the<br />
copy ratio, system setting function or setting code,<br />
or an error code when an error occurs.<br />
Numeric keys<br />
Use to select the desired copy quantity or to make<br />
system setting entries. (p.19)<br />
To display the total number of pages output by the<br />
machine, hold the [0] key down. (p.58)<br />
CLE<strong>AR</strong> key ( )<br />
Clears the copy quantity display or terminates a<br />
copy run.<br />
INTERRUPT key ( ) / indicator<br />
Interrupts a copy run. (p.25)<br />
6
BEFORE USING THE MACHINE<br />
4 5 6 7 8 9 10 11 12<br />
1<br />
13 14<br />
16 17 18 19 20 21 22 23 24 26 27<br />
15 When there are two or more paper trays<br />
25<br />
13 Light and Dark keys ( , ) / indicators<br />
Use to adjust the TEXT or PHOTO exposure level.<br />
(p.18)<br />
14 PAPER SELECT key ( )<br />
Use to set the paper size in the paper trays. (p.12)<br />
15 AUTO PAPER SELECT indicator ( AUTO )<br />
Paper of the proper size will be automatically<br />
selected depending on the original size and<br />
selected copy ratio when this indicator is on. (p.17)<br />
16 TRAY SETTING key ( )<br />
Use to manually select a paper tray. (p.12)<br />
17 AUTO IMAGE key ( AUTO %) / indicator<br />
Press for automatic copy ratio selection. (p.19)<br />
18 SPF indicator (when the SPF is installed)<br />
Lights up when originals are set in the document<br />
feeder tray. (p.16)<br />
19 PRESET RATIO selector keys ( , ) /<br />
indicators<br />
Use to select preset reduction/enlargement copy<br />
ratios. (p.20)<br />
20 Zoom keys ( , )<br />
Use to select any reduction or enlargement copy ratio<br />
from 25% to 400% in increments of 1%. (p.21)<br />
21 Copy ratio display key ( )<br />
Hold down when the machine is not in use to<br />
display the copy ratio in the display. (p.21)<br />
22 ZOOM indicator<br />
Lights up when a zoom ratio is set. (p.21)<br />
23 Audit clear key ( ) ( ACC.#-C )<br />
Closes an open account. (p.42)<br />
24 ( ) key<br />
Use to check the total number of copies made.<br />
(p.58)<br />
25 CLE<strong>AR</strong> ALL key ( )<br />
Clears all selected settings and returns the<br />
machine to the initial settings. (p.8)<br />
26 POWER SAVE indicator ( )<br />
Lights up when the machine is in a power save mode.<br />
(p.8)<br />
27 ST<strong>AR</strong>T key ( ) / indicator<br />
Press to make a copy (p.15). Also press to exit<br />
"Auto power shut-off" mode and to set a system<br />
setting. Copying is possible when the indicator is<br />
on.<br />
7
POWER ON AND OFF<br />
The power switch is located on the left side of the machine.<br />
POWER ON<br />
Turn the power switch to the "ON"<br />
position.<br />
It will take about 45<br />
seconds for the machine<br />
to warm up. While the<br />
machine is warming up,<br />
the POWER SAVE<br />
indicator ( ) will blink.<br />
(The POWER SAVE<br />
indicator ( ) will go off<br />
when the machine is<br />
ready to copy.)<br />
However, you can make desired settings and press<br />
the [ST<strong>AR</strong>T] key ( ) during warm-up. Copying will<br />
start after warm-up.<br />
POWER OFF<br />
Make sure that the machine is not in<br />
operation and then turn the power switch<br />
to the "OFF" position.<br />
If the power switch is<br />
turned off while the<br />
machine is in operation,<br />
a misfeed may occur and<br />
the job that was in<br />
progress will be<br />
cancelled.<br />
Check the following to make sure the machine is not in<br />
operation:<br />
• The ST<strong>AR</strong>T indicator is lit. (Initial state)<br />
• The POWER SAVE indicator ( ) is lit. ("Preheat<br />
mode" or "Auto power shut-off" mode)<br />
Note<br />
• The machine reverts to the initial settings when it is first turned on, when the [CLE<strong>AR</strong> ALL] key ( ) is pressed,<br />
or when no keys are pressed for the preset "Auto clear" time following the end of a copy job. When the machine<br />
reverts to the initial settings, all settings and functions selected to that point are cancelled. The "Auto clear" time<br />
can be changed in the user settings. (p.36)<br />
• The machine is initially set to automatically enter power save mode if not used for copying or printing, for a<br />
preset period of time. This setting can be changed in the system settings. (p.36)<br />
Power save modes<br />
The machine has two power save modes to reduce overall power consumption thereby reducing the cost of<br />
operation. In addition, these modes conserve natural resources and help reduce environmental pollution. The two<br />
power save modes are "Preheat mode" and "Auto power shut-off mode".<br />
Preheat mode<br />
This function automatically switches the machine to a low power consumption state if the set duration of time<br />
elapses without the machine being used when the power is on. The POWER SAVE indicator ( ) lights up,<br />
however, the keys on the operation panel can be used. Normal operation automatically resumes when a key on the<br />
operation panel is pressed, an original is placed, or a print job is received.<br />
Auto power shut-off mode<br />
This function automatically switches the machine to a state that consumes even less power than preheat mode if the<br />
set duration of time elapses without the machine being used when the power is on. All lights except the POWER<br />
SAVE indicator ( ) and ON LINE indicator go off. To resume normal operation, press the [ST<strong>AR</strong>T] key ( ).<br />
Normal operation also resumes automatically when a print job is received. While in auto power shut-off mode, no<br />
keys (except the [ST<strong>AR</strong>T] key ( )) can be used.<br />
Note<br />
The preheat activation time and the "Auto power shut-off timer" can be changed using system settings. It is<br />
suggested that you set times that are appropriate for your usage of the machine. (p.36)<br />
Initial settings<br />
The machine assumes the initial settings when it is first turned on, when the [CLE<strong>AR</strong> ALL] key ( ) is pressed,<br />
and approximately one minute after the last copy is made in any mode.<br />
Copy ratio: 100%, Exposure: Automatic<br />
Copy quantity: 0, All special copier modes: Off<br />
Auto paper selection: On, Paper feed station: The tray selected in the "Default tray setting" in the system settings. (p.37)<br />
8
LOADING PAPER<br />
The paper required indicator ( ) will light up when there is no copy paper in the selected paper feed tray, or when<br />
the selected paper tray is not installed or is improperly installed.<br />
PAPER<br />
For best results, use only SH<strong>AR</strong>P recommended paper.<br />
Paper tray type Paper type Size Weight Capacity<br />
Paper tray<br />
250-sheet paper<br />
feed unit<br />
2 x 250-sheet<br />
paper<br />
feed unit<br />
Bypass tray<br />
* 1 A5 can be used in the upper paper tray but cannot be used in other trays (including trays in optional paper feeding unit).<br />
* 2 When making a large number of copies or prints using 90 g/m 2 paper, remove the output from the paper output tray when<br />
about 100 pages have been printed. The output may not stack correctly if more than 100 pages are allowed to accumulate.<br />
* 3 The number of sheets of the paper which can be set changes with the weight of a paper.<br />
Special papers<br />
Standard paper<br />
Recycled paper<br />
Standard paper<br />
Recycled paper<br />
A5* 1<br />
B5<br />
A4<br />
B4<br />
A3<br />
56 g/m 2 to 90 g/m 2 * 2 250 sheets<br />
(Load paper lower<br />
than the line on the<br />
tray)<br />
A6R to A3 56 g/m 2 to 90 g/m 2 100 sheets * 3<br />
Thick paper Max. 128 g/m 2 Load one sheet of<br />
these papers at a<br />
Transparency film<br />
time to the bypass<br />
Labels<br />
tray.<br />
Envelopes International DL<br />
(110 mm x 220 mm)<br />
International C5<br />
(162 mm x 229 mm)<br />
Commercial 9<br />
(3-7/8" x 8-7/8")<br />
Commercial 10<br />
(4-1/8" x 9-1/2")<br />
5 sheets<br />
Follow these guidelines when using special papers.<br />
● Use SH<strong>AR</strong>P recommended transparency film and label sheets. Using other than SH<strong>AR</strong>P recommended<br />
paper may result in misfeeds or smudges on the output. If other than SH<strong>AR</strong>P recommended media must<br />
be used, feed each sheet one at a time using the bypass tray (do not attempt continuous copying or<br />
printing).<br />
● There are many varieties of special paper available on the market, and some cannot be used with this<br />
machine. Before using special paper, contact your authorised service representative.<br />
● Before using other than SH<strong>AR</strong>P recommended paper, make a test copy to see if the paper is suitable.<br />
1<br />
9
BEFORE USING THE MACHINE<br />
LOADING PAPER<br />
Make sure that the machine is not copying or printing, and then follow these steps to load paper.<br />
Loading the paper tray<br />
1<br />
Gently lift and pull out the paper tray<br />
until it stops.<br />
4<br />
Gently push the paper tray into the<br />
machine.<br />
2<br />
Push the pressure plate down until it<br />
locks in place.<br />
Push the centre of the<br />
pressure plate down until<br />
it locks into place.<br />
Note<br />
• If you loaded a different size of paper than<br />
was loaded previously in the tray, go to<br />
"CHANGING A TRAY'S PAPER SIZE<br />
SETTING" (p.12).<br />
• When misfeed occurs, rotate the paper 180<br />
degrees and reload it.<br />
• Straighten curled paper before using it.<br />
3<br />
Load paper into the tray.<br />
• Open the package of<br />
the paper and load it<br />
without fanning the<br />
paper.<br />
• Make sure the stack of<br />
paper is straight before<br />
loading it.<br />
Make sure that the paper<br />
fits under the tabs on the<br />
right side of the tray.<br />
Note<br />
• Do not load paper higher than the line on<br />
the tray (up to 250 sheets).<br />
• Do not add paper to the loaded paper. It<br />
may cause multiple feed of paper.<br />
• A5 can be used in the upper paper tray but<br />
cannot be used in other trays (including<br />
trays in optional paper feeding unit).<br />
10
BEFORE USING THE MACHINE<br />
Loading the bypass tray<br />
1<br />
Unfold the bypass tray.<br />
3<br />
Insert the paper (print face down) all<br />
the way into the bypass tray.<br />
To prevent a misfeed,<br />
verify once more that the<br />
paper guides are<br />
adjusted to the width of<br />
the paper.<br />
2<br />
When feeding large<br />
paper such as B4 and<br />
A3, pull out the bypass<br />
tray extension.<br />
Set the paper guides to the copy<br />
paper width.<br />
Note<br />
• If you loaded paper in the bypass tray,<br />
press the [PAPER SELECT] key ( ) to<br />
select the bypass tray. The bypass tray will<br />
not be selected automatically.<br />
• If you set thick paper in the bypass tray, hold<br />
down the [TRAY SETTING] key ( ) for<br />
more than 5 seconds, use the [PAPER<br />
SELECT] key ( ) to select the bypass tray,<br />
and press [AUTO IMAGE] key ( AUTO % ).<br />
When [AUTO IMAGE] key ( AUTO % ) lights<br />
up, the paper type is set to thick paper.<br />
1<br />
Important points when inserting paper in the bypass tray<br />
• Up to 100 sheets of standard copy paper can be set in the bypass tray.<br />
• Be sure to place A6 or A5 size paper or envelopes horizontally as shown in the following diagram ( ).<br />
Available<br />
Not<br />
available<br />
• When loading envelopes, make sure that they are straight and flat and do not have loosely glued construction flaps<br />
(not the closure flap).<br />
• Special papers except SH<strong>AR</strong>P recommended transparency film, labels, and envelopes must be fed one sheet at a<br />
time through the bypass tray.<br />
• When adding paper, first remove any paper remaining in the tray, combine it with the paper to be added and then<br />
reload as a single stack. The paper to be added must be the same size and type as the paper already in the tray.<br />
• Do not use paper that is smaller than the original. This may cause smudges or unclean images.<br />
• Do not use paper that has already been printed on by a laser printer or plain paper fax machine. This may cause<br />
smudges or unclean images.<br />
11
BEFORE USING THE MACHINE<br />
Envelopes<br />
Do not use the following envelopes, as misfeeds will occur.<br />
• Envelopes with metal tabs, clasps, strings, holes, or windows.<br />
• Envelopes with rough fibres, carbon paper, or glossy surfaces.<br />
• Envelopes with two or more flaps.<br />
• Envelopes with tape, film, or paper attached to the flap.<br />
• Envelopes with a fold in the flap.<br />
• Envelopes with glue on the flap to be moistened for sealing.<br />
• Envelopes with labels or stamps.<br />
• Envelopes that are slightly inflated with air.<br />
• Envelopes with glue protruding from the seal area.<br />
• Envelopes with part of the seal area peeled off.<br />
CHANGING A TRAY'S PAPER SIZE SETTING<br />
Follow these steps to change a tray's paper size setting.<br />
Note<br />
• The paper size setting cannot be changed when the machine has stopped temporarily due to running out of<br />
paper or a misfeed, or during interrupt copying.<br />
• During printing (even in copy mode), the paper size setting cannot be changed.<br />
• A5 size paper can only be selected in upper paper tray.<br />
• Do not load paper that is a different size than the paper size setting. Copying will not be possible.<br />
1<br />
Hold down the [TRAY SETTING] key<br />
( ) for more than 5 seconds to set<br />
the selected paper size.<br />
The currently selected<br />
paper feed location<br />
indicator will blink and the<br />
corresponding paper size<br />
(which is currently set)<br />
indicator will light steadily.<br />
All other indicators will go<br />
out.<br />
2<br />
If the machine has two or more paper<br />
trays, use the [PAPER SELECT] key<br />
( ) to select the paper tray for which<br />
you wish to change the paper size<br />
setting.<br />
Each time the [PAPER<br />
SELECT] key ( ) is<br />
pressed, a paper tray will<br />
be indicated with a<br />
blinking paper feed<br />
location indicator.<br />
12
BEFORE USING THE MACHINE<br />
3<br />
Use the [ORIGINAL] key ( ) to<br />
select the paper size.<br />
The indicator of the<br />
selected paper size lights<br />
up.<br />
4<br />
Squeeze the lock lever of the front<br />
guide and slide the front guide to<br />
match the width of the paper, and<br />
move the left guide to the appropriate<br />
slot as marked on the tray.<br />
Left guide<br />
Customise the bypass tray setting<br />
• Enter a value for the horizontal/vertical direction by<br />
pressing the numeric keys.<br />
Press the [ ] key to switch the horizontal/vertical<br />
direction.<br />
The horizontal direction is selected:<br />
zoom indicator lights up<br />
The vertical direction is selected:<br />
zoom indicator does not light up<br />
When finished, press and hold [ ].<br />
Available value<br />
Direction min. (mm) max. (mm)<br />
horizontal 100 297<br />
vertical 139 420<br />
• The front guide is a slide-type guide. Grasp the<br />
locking knob on the guide and slide the guide to the<br />
indicator line of the paper to be loaded.<br />
• The left guide is an insert-type guide. Remove it and<br />
then insert it at the indicator line of the paper to be<br />
loaded.<br />
• If the bypass tray is selected, set the paper guides to<br />
the copy paper width.<br />
5<br />
Front guide<br />
Press the [ST<strong>AR</strong>T] key ( ) and then<br />
the [TRAY SETTING] key ( ).<br />
To change the paper size<br />
setting of another tray,<br />
repeat steps 2 to 5 after<br />
pressing the [ST<strong>AR</strong>T]<br />
key ( ).<br />
1<br />
Note<br />
Affix the paper size label for the paper size<br />
selected in step 3 to the label position on the<br />
right end of the tray.<br />
Important points when using the printer mode<br />
Make sure that the tray's paper size setting is the<br />
same as the tray's paper size setting in the printer<br />
driver. For example, if the tray's paper size setting is<br />
A4R, set "Set Paper Size" to "A4R". For more<br />
information, see "CONFIGURING THE PRINTER<br />
DRIVER" in the Start Guide.<br />
13
OPERATION IN COPY AND<br />
PRINTER MODES<br />
Some operations cannot be performed simultaneously when the machine is being used in printer mode or copy<br />
mode.<br />
Modes Copying Printing<br />
Copy key input Yes Yes<br />
Copy<br />
During copying Yes* 1 No* 2<br />
Printer During printing Yes* 3 No<br />
* 1 Can be used after pressing the [INTERRUPT] key ( ).<br />
* 2 Printing will begin when the [CLE<strong>AR</strong> ALL] key ( ) is pressed after the copy job is finished, or when the [ON<br />
LINE] key ( ) is pressed to switch the machine online. Printing will also begin after the set auto clear time<br />
elapses, or after 60 seconds if "Auto clear time" is disabled.<br />
* 3 The print job is paused and copying begins.<br />
14
2<br />
Chapter<br />
2<br />
COPY FUNCTIONS<br />
This chapter explains how to use the copy functions.<br />
NORMAL COPYING<br />
This section explains how to make a regular copy.<br />
If "Auditing mode" has been enabled (p.39), enter your 3-digit account number.<br />
Copying from the document glass<br />
1<br />
Open the document cover/SPF, and<br />
place the original.<br />
3<br />
Press the [ORIGINAL] key ( ) and<br />
select the original size.<br />
When the original size is<br />
selected, the tray with the<br />
same size of paper is<br />
automatically selected.<br />
(When there are two or<br />
more paper trays)<br />
Place the original face<br />
down on the document<br />
glass.<br />
[How to place the original]<br />
Align the edge of the original with the original size<br />
scale, to be centred with the centring mark ( ).<br />
mark<br />
Original size scale<br />
mark<br />
Original size scale<br />
● Make sure that the PAPER SIZE indicator lights up.<br />
If the indicator is not lit, no tray has the same size of<br />
paper as the original. Load paper of the required size<br />
in a tray, or select the bypass tray with the [PAPER<br />
SELECT] key ( ) and copy from the bypass tray.<br />
● The bypass tray must be manually selected.<br />
● To copy on paper of a different size than the original,<br />
select the paper with the [PAPER SELECT] key ( ).<br />
● If the ORIGINAL SIZE indicator is blinking, rotate the<br />
original so that it is in the same orientation as the<br />
blinking ORIGINAL SIZE indicator.<br />
4<br />
5<br />
Set the number of copies.<br />
Press the [ST<strong>AR</strong>T] key ( ) to begin<br />
copying.<br />
The copy is delivered to<br />
the paper output tray.<br />
Note<br />
An original up to A3 can be placed on the<br />
document glass.<br />
2<br />
Close the document cover/SPF.<br />
After placing the original,<br />
be sure to close the<br />
document cover/SPF. If<br />
left open, parts outside of<br />
the original will be copied<br />
black, causing excessive<br />
use of toner.<br />
Note<br />
• The paper output tray can hold up to 250<br />
sheets of paper.<br />
• About one minute after copying ends, "Auto<br />
clear" activates and restores the copy<br />
settings to the initial settings. (p.8) The<br />
setting for "Auto clear time" can be changed<br />
in the system settings. (p.36)<br />
• Press the [CLE<strong>AR</strong>] key ( ) to stop<br />
copying in the middle of a run.<br />
15
COPY FUNCTIONS<br />
Copying from the SPF<br />
1 Make sure that an original has not 5<br />
been left on the document glass.<br />
Close the SPF.<br />
2 Adjust the original guides to the size<br />
of the original(s).<br />
3 Set the original(s) face up in the<br />
document feeder tray.<br />
size in a tray, or select the bypass tray with the<br />
[PAPER SELECT] key ( ) and copy from the<br />
Do not place originals of different sizes<br />
Note together in the document feeder tray. This<br />
may cause misfeeds.<br />
4 Set the number of copies.<br />
● Insert the original into the document feeder tray as<br />
far as it will go. When the original is set, the SPF<br />
indicator will light up.<br />
● The ORIGINAL SIZE indicator corresponding to the<br />
size of the original lights up.<br />
● If the ORIGINAL SIZE indicator is blinking, rotate the<br />
original so that it is in the same orientation as the<br />
blinking ORIGINAL SIZE indicator.<br />
● Make sure that the PAPER SIZE indicator is lit.<br />
If the indicator is not lit, no tray has the same size of<br />
paper as the original. Load paper of the required<br />
bypass tray.<br />
● The bypass tray must be manually selected.<br />
● To copy on paper of a different size than the<br />
original, select the paper with the [PAPER<br />
SELECT] key ( ).<br />
Press the [ST<strong>AR</strong>T] key ( ) to begin<br />
copying.<br />
Note<br />
The copy is delivered to<br />
the paper output tray.<br />
• The paper output tray can hold up to 250<br />
sheets of paper.<br />
• About one minute after copying ends, "Auto<br />
clear" activates and restores the copy<br />
settings to the initial settings. (p.8) The<br />
setting for "Auto clear" time can be changed<br />
in the system settings. (p.36)<br />
• Press the [CLE<strong>AR</strong>] key ( ) to stop<br />
copying in the middle of a run.<br />
• If you find it difficult to remove the original<br />
from the document feeder tray, open the<br />
feeding roller cover first and then remove<br />
the original. If you remove the original<br />
without opening the feeding roller cover, the<br />
original may become dirty.<br />
16
COPY FUNCTIONS<br />
Auto paper select mode (when there are two or more paper trays)<br />
When the AUTO PAPER SELECT indicator ( AUTO ) lights up, "Auto paper select mode" is enabled. This function<br />
automatically selects the paper that is the same size as the original A5, B5, B5R, A4, A4R, B4, A3 paper. "Auto<br />
paper select mode" can be disabled in the system settings. (p.36)<br />
• If a zoom setting is selected after placing the original, the paper size that is appropriate for the zoom setting will<br />
be automatically selected.<br />
• "Auto paper select mode" is cancelled if the automatic ratio selection is enabled (p.19) or if a tray is selected<br />
with the [PAPER SELECT] key ( ). Auto paper select resumes operation when the [CLE<strong>AR</strong> ALL] key ( ) is<br />
pressed or when "Auto clear time" activates.<br />
Removing the document cover<br />
To copy large originals like newspapers, remove the<br />
document cover. To remove the cover, lift straight<br />
up as shown. To replace the cover, do the reverse.<br />
The SPF cannot be removed.<br />
Copying books or originals with folds or<br />
creases<br />
Press down on the document cover/SPF while<br />
copying as shown. If the document cover/SPF is not<br />
completely closed, shadows may appear on the<br />
copy or it may be fuzzy. Straighten originals with<br />
folds or creases well before placing.<br />
Originals that can be used in the SPF<br />
Originals that are A5 to A3 and 56 g/m 2 to 90 g/m 2<br />
can be used. A maximum of 40 pages can be<br />
placed at once.<br />
For originals that are B4 or larger (B4, A3), a<br />
maximum of 30 pages can be placed at once.<br />
Note<br />
• Make sure that there are no paper clips or<br />
staples on the original.<br />
• Straighten curled originals before placing<br />
them in the document feeder tray. Curled<br />
originals may cause misfeeds.<br />
• When you set multiple sheets of thick<br />
original, if the original is not fed, reduce<br />
the number of the set originals.<br />
Originals that cannot be used in the SPF<br />
The following originals cannot be used. These may<br />
cause misfeeds or smudging and unclear images.<br />
• Transparencies, tracing paper, other transparent or<br />
translucent paper, and photographs.<br />
• Carbon paper, thermal paper.<br />
• Originals that are creased, folded, or torn.<br />
• Glued originals, cut-out originals.<br />
• Originals with binder holes.<br />
• Originals printed using an ink ribbon (thermal<br />
transfer printing), originals on thermal transfer<br />
paper.<br />
Stream feeding mode<br />
If "Stream feeding mode" is enabled in the system<br />
settings (p.36), the SPF indicator will blink for about<br />
5 seconds after all originals are fed. If a new original<br />
is placed in the SPF during this time, the original will<br />
be automatically fed in and copying will begin.<br />
2<br />
17
COPY FUNCTIONS<br />
MAKING A COPY D<strong>AR</strong>KER OR LIGHTER<br />
Automatic exposure adjustment is initially enabled. This function automatically adjusts the copy image according to<br />
the original being copied. If you wish to select the exposure level yourself, follow the steps below. (Select from two<br />
original types and five exposure levels for each original type.) The exposure level used in automatic exposure<br />
adjustment can also be changed. ("ADJUSTING THE AUTOMATIC EXPOSURE LEVEL" (p.35))<br />
Original types<br />
● AUTO......Automatic exposure adjustment is enabled and the exposure is automatically adjusted according to the<br />
original being copied. The exposure is lowered for coloured areas and background shadows.<br />
● TEXT.......The exposure is raised for light areas and lowered for dark backgrounds to make text easier to read.<br />
● PHOTO ...Halftones in the photo are reproduced with greater clarity.<br />
1<br />
Press the [AUTO/TEXT/PHOTO] key<br />
( AUTO / / ) to select the original<br />
type.<br />
To adjust the exposure of<br />
a text original manually,<br />
press until the TEXT<br />
indicator ( ) lights.<br />
To copy a photo, press<br />
until the PHOTO<br />
indicator ( ) lights.<br />
2<br />
Press the [Light] key ( ) or [Dark]<br />
key ( ) to adjust the exposure.<br />
For a darker image,<br />
press the [Dark] key<br />
( ). For a lighter<br />
image, press the [Light]<br />
key ( ).<br />
If exposure level 2 or 4 is<br />
selected, the two<br />
indicators will light<br />
simultaneously.<br />
Note<br />
To return to automatic adjustment, press until<br />
the AUTO indicator ( AUTO ) lights.<br />
Note<br />
Exposure value guidelines<br />
1 – 2 Dark originals like newspapers<br />
3 Normal originals<br />
4 – 5 Coloured text or text written in pencil<br />
SELECTING THE TRAY<br />
Auto paper select mode (p.17) normally operates (unless it has been disabled), and thus when the original is placed<br />
on the document glass and the original size is selected, or when the original is placed in the SPF, the tray with the<br />
same size of paper as the original is automatically selected. If you wish to use a tray other than the automatically<br />
selected tray (for example you wish to enlarge or reduce the copy or use the bypass tray), press the [PAPER<br />
SELECT] key ( ) to select the desired tray.<br />
Note<br />
• If the desired PAPER SIZE indicator does not light up, change the paper in the tray to the desired paper size.<br />
(p.12)<br />
• Automatic ratio selection (p.19) does not operate when the bypass tray or a tray set for a special paper size is<br />
selected.<br />
Auto tray switching (when there are two or more paper trays)<br />
If the tray runs out of paper during copying and there is another tray with the same size of paper and the same<br />
feeding orientation (horizontal or vertical), the other tray is automatically selected and copying continues. "Auto tray<br />
switching" can be disabled in the system settings (p.36).<br />
18
COPY FUNCTIONS<br />
SETTING THE NUMBER OF COPIES<br />
Press the numeric keys to set the number of copies.<br />
● The set number of copies appears in the display. A<br />
maximum of 999 copies (factory default setting)<br />
can be set.<br />
● If you wish to make only a single copy, copying is<br />
possible with the display showing "0".<br />
Note<br />
If you enter the wrong number, press the<br />
[CLE<strong>AR</strong>] key ( ) and enter the correct<br />
number.<br />
Important note when making a large number<br />
of copies<br />
When the maximum number of pages (about 250<br />
pages) that can be held in the paper output tray are<br />
output, copying will temporarily stop. When this<br />
happens, promptly remove the copies and press the<br />
[ST<strong>AR</strong>T] key ( ) to resume copying. Copying will<br />
also stop after about 500 pages and 750 pages.<br />
Remove the pages and resume copying in the same<br />
way.<br />
Note<br />
The maximum number of copies can<br />
be changed in the system settings.<br />
(p.37)<br />
2<br />
REDUCTION/ENL<strong>AR</strong>GEMENT/ZOOM<br />
The zoom function enables precise copy ratio selection from 25% to 400% in increments of 1%.<br />
There are three ways to enlarge and reduce copies, as explained below.<br />
• Reduction and enlargement ratios can be selected automatically with the [AUTO IMAGE] key ( AUTO % ).<br />
"AUTOMATIC RATIO SELECTION" (below)<br />
• Reduction and enlargement ratios can be selected manually with the [PRESET RATIO] selector keys<br />
( , ) and/or the [ZOOM] keys ( , ).<br />
"MANUAL RATIO SELECTION" (p.20)<br />
• Separate settings can be selected for the vertical and horizontal ratios.<br />
"SELECTING THE VERTICAL AND HORIZONTAL COPY RATIOS SEP<strong>AR</strong>ATELY (XY ZOOM Copying)" (p.21)<br />
Ratios that can be selected will vary depending on whether the original is placed on the document glass or in the<br />
SPF.<br />
Original position<br />
Selectable ratios<br />
Document glass 25% – 400%<br />
SPF 50% – 200%<br />
AUTOMATIC RATIO SELECTION<br />
1<br />
2<br />
Place the original(s) in the document<br />
feeder tray or on the document glass.<br />
If the original is placed on the document<br />
glass, select the original size. (p.15)<br />
Note<br />
• Automatic ratio selection can be used when<br />
the original size is A5, B5, B5R, A4, A4R,<br />
B4, A3. It cannot be used for other sizes.<br />
• After placing the original, be sure to close<br />
the document cover/SPF. If left open, parts<br />
outside of the original will be copied black,<br />
causing excessive use of toner.<br />
3<br />
Use the [PAPER SELECT] key ( ) to<br />
select the paper tray with the desired<br />
paper size.<br />
This feature will not work<br />
when using copy paper<br />
of non-standard size or<br />
when using the bypass<br />
tray.<br />
19
COPY FUNCTIONS<br />
4<br />
Press the [AUTO IMAGE] key ( ).<br />
AUTO %<br />
The AUTO IMAGE<br />
indicator ( AUTO % ) lights<br />
up and the appropriate<br />
ratio for the original size<br />
and paper size is<br />
selected. (The indicator<br />
of the selected ratio will<br />
light up.)<br />
5<br />
Set the number of copies and other<br />
copy settings, and then press the<br />
[ST<strong>AR</strong>T] key ( ).<br />
The copy will be delivered to the paper output<br />
tray.<br />
To cancel automatic ratio selection, press the<br />
Note [AUTO IMAGE] key ( AUTO % ) again.<br />
Note<br />
• If the ORIGINAL SIZE indicator blinks,<br />
change the orientation of the placed original.<br />
• If the copy is made when a PRESET RATIO<br />
selector indicator is blinking, the copied<br />
image may run off the page.<br />
MANUAL RATIO SELECTION<br />
Copies can be reduced down to 25% or enlarged up to 400%. The [PRESET RATIO] selector keys ( , ) can<br />
be pressed to quickly select a ratio from among eight preset ratios. In addition, the [Zoom] keys ( , ) can be<br />
pressed to select the ratio in increments of 1%.<br />
1<br />
2<br />
3<br />
Place the original(s) in the document<br />
feeder tray or on the document glass.<br />
If the original is placed on the document<br />
glass, select the original size. (p.15)<br />
Note<br />
After placing the original, be sure to close the<br />
document cover/SPF. If left open, parts<br />
outside of the original will be copied black,<br />
causing excessive use of toner.<br />
Use the [PRESET RATIO] selector<br />
keys ( , ) and [Zoom] keys ( ,<br />
) to select the desired copy ratio.<br />
Selecting a preset ratio<br />
Press the [PRESET<br />
RATIO] selector key<br />
( ) to move up<br />
through the preset ratios.<br />
Press the [PRESET<br />
RATIO] selector key<br />
( ) to move down<br />
through the preset ratios.<br />
Fine adjustment of the<br />
ratio<br />
Any ratio from 25% to<br />
400% can be set in<br />
increments of 1%.<br />
Press a [PRESET RATIO] selector key ( or )<br />
to set the approximate ratio, then press the [Zoom]<br />
keys ( or ) to increase or decrease the ratio.<br />
To decrease or increase the zoom ratio rapidly, hold<br />
down the [Zoom] keys ( or ).<br />
When a [Zoom] key ( or ) is pressed, the<br />
ZOOM indicator will light up and the zoom ratio will<br />
appear in the display for about two seconds.<br />
4<br />
Note<br />
• To verify a zoom setting without changing<br />
the zoom ratio, Hold down the [Copy ratio<br />
display] key ( ). When the key is<br />
released, the display will return to the<br />
number of copies display.<br />
• If the copy is made when a PRESET RATIO<br />
selector indicator or the ZOOM indicator is<br />
blinking, the copied image may run off the<br />
page. To ensure that the image fits on the<br />
page, lower the copy ratio until the indicator<br />
stops blinking and lights steadily.<br />
• If the PAPER SIZE indicator is not lit, there<br />
is no appropriate paper. Load appropriate<br />
paper in a paper tray. (p.10)<br />
Set the number of copies and other<br />
copy settings, and then press the<br />
[ST<strong>AR</strong>T] key ( ).<br />
The copy will be delivered to the paper output<br />
tray.<br />
Note<br />
To return the ratio to 100%, press the<br />
[PRESET RATIO] selector key ( or )<br />
until the 100% indicator lights up.<br />
20
COPY FUNCTIONS<br />
SELECTING THE VERTICAL AND HORIZONTAL COPY<br />
RATIOS SEP<strong>AR</strong>ATELY (XY ZOOM Copying)<br />
The XY ZOOM feature allows the horizontal and vertical copy ratios to be changed independently.<br />
Example: Reduction only in the horizontal direction.<br />
Original<br />
Copy<br />
Note<br />
• To use the XY ZOOM feature with the DUAL PAGE COPY feature, set the DUAL PAGE COPY feature first and<br />
then the XY ZOOM feature.<br />
• The XY ZOOM feature cannot be used in combination with the AUTO IMAGE function.<br />
Ratios that can be selected will vary depending on the position of the original.<br />
2<br />
Original position<br />
Selectable ratios<br />
Document glass 25% – 400%<br />
SPF 50% – 200%<br />
1<br />
2<br />
3<br />
Place the original(s) in the document<br />
feeder tray or on the document glass.<br />
If the original is placed on the<br />
document glass, select the original<br />
size. (p.15)<br />
Note<br />
After placing the original, be sure to close the<br />
document cover/SPF. If left open, parts<br />
outside of the original will be copied black,<br />
causing excessive use of toner.<br />
Press the [XY-ZOOM] key ( ).<br />
4<br />
Use the [PRESET RATIO] selector<br />
keys ( , ) and [Zoom] keys ( ,<br />
) to change the copy ratio in the<br />
vertical direction.<br />
Press the [PRESET<br />
RATIO] selector keys<br />
( , ) to select a<br />
ratio close to the desired<br />
ratio, and then press the<br />
[Zoom] keys ( , )<br />
to adjust the ratio in<br />
increments of 1%.<br />
The ratio appears in the<br />
display.<br />
XY-ZOOM Indicator ( )<br />
lights up.<br />
The current value for the<br />
vertical direction will<br />
appear in the display.<br />
5<br />
Press the [Copy ratio display] key<br />
( ).<br />
The selected ratio for the<br />
vertical direction will be<br />
entered.<br />
21
COPY FUNCTIONS<br />
6<br />
7<br />
8<br />
Use the [PRESET RATIO] selector<br />
keys ( , ) and [Zoom] keys ( ,<br />
) to change the copy ratio in the<br />
horizontal direction.<br />
Press the [PRESET RATIO] selector keys ( ,<br />
) to select a ratio close to the desired ratio,<br />
and then press the [Zoom] keys ( , ) to<br />
adjust the ratio in increments of 1%.<br />
The ratio appears in the display.<br />
Press the [Copy ratio display] key<br />
( ).<br />
The selected ratio for the horizontal direction will<br />
be entered and the display will change to the<br />
number of copies display.<br />
Set the number of copies and other<br />
copy settings, and then press the<br />
[ST<strong>AR</strong>T] key ( ).<br />
The copy will be delivered to the paper output<br />
tray.<br />
Note<br />
• To verify the copy ratios, press and hold<br />
down the [Copy ratio display] key ( ).<br />
The vertical and horizontal ratios will be<br />
alternately displayed.<br />
• If you need to change the ratios, press the<br />
[PRESET RATIO] selector keys ( ,<br />
) and the [Zoom] keys ( , ) to<br />
reset the ratios, beginning with the vertical<br />
ratio. (step 4)<br />
• To cancel XY ZOOM copy, press the<br />
[XY-ZOOM] key ( ). The XY-ZOOM<br />
indicator ( ) will go off, indicating that the<br />
function is cancelled.<br />
22
1<br />
2<br />
1<br />
TWO-SIDED COPYING USING THE<br />
BYPASS TRAY<br />
To perform manual two-sided copying, follow these steps.<br />
Example: Copying originals A and B onto each side of one sheet of paper<br />
Original A Original B Copy<br />
1<br />
Copy original A.<br />
3<br />
Turn the copy of original A over, and<br />
without changing the position of the edge<br />
closest to you, insert it in the bypass tray.<br />
2<br />
Insert the paper all the<br />
way in.<br />
1<br />
1<br />
2<br />
2<br />
1<br />
1<br />
Copied original A<br />
Original A<br />
Original B<br />
Copied<br />
original A<br />
1<br />
1<br />
Copied original A Original A<br />
2<br />
Place original B as shown below.<br />
Original B<br />
Copied<br />
original A<br />
2<br />
Original B<br />
Vertically-oriented<br />
original:<br />
If the original is oriented<br />
vertically, place it in the<br />
same orientation as<br />
original A.<br />
Original B<br />
Horizontally-oriented<br />
original:<br />
If the original is oriented<br />
horizontally, place it with<br />
the top and bottom and<br />
left and right sides<br />
reversed with respect to<br />
the placement of original<br />
A.<br />
4<br />
Note<br />
• Copies made on the back side of paper<br />
should always be made one sheet at a time<br />
using the bypass tray.<br />
• Straighten curled or wavy paper before<br />
using it. Curled paper may cause misfeeds,<br />
creases, or a poor-quality image.<br />
• After placing the original, be sure to close<br />
the document cover/SPF. If left open, parts<br />
outside of the original will be copied black,<br />
causing excessive use of toner.<br />
Select the bypass tray with the<br />
[PAPER SELECT] key ( ), and then<br />
press the [ST<strong>AR</strong>T] key ( ).<br />
The copy is delivered to the paper output tray.<br />
23
DUAL PAGE COPYING<br />
A dual page original can be automatically separated into two pages during copying. This feature is convenient for<br />
making copies of books and other dual page originals on individual sheets of paper.<br />
Original<br />
Copy<br />
Note<br />
• A4 paper is used for dual page copying.<br />
• When used in combination with XY ZOOM copying, enlargement is not possible.<br />
• Dual page copying cannot be used in combination with the enlargement copying.<br />
• Automatic ratio selection cannot be used when dual page copying is used.<br />
• Dual page copying cannot be selected when an original is placed in the SPF.<br />
1 Place the original on the document 3<br />
glass, aligning the division between<br />
the pages with the size marker ( A4).<br />
Close the document cover SPF.<br />
Copying will begin from<br />
the page to the right of<br />
the size marker.<br />
A4<br />
• To keep the copies in the correct page order<br />
4<br />
Note when performing dual page copying over<br />
multiple pages, make sure that the original<br />
is always placed on the document glass<br />
with the smaller page number to the right. 5<br />
• After placing the original, be sure to close<br />
the document cover/SPF. If left open, parts<br />
outside of the original will be copied black,<br />
causing excessive use of toner.<br />
2 Set the original size to A3.<br />
Press the [DUAL PAGE COPY] key<br />
( ) and make sure that the DUAL<br />
PAGE COPY indicator ( ) is lit.<br />
Make sure that a paper tray with A4<br />
size paper is selected.<br />
Set the number of copies and other<br />
copy settings, and press the [ST<strong>AR</strong>T]<br />
key ( ).<br />
The copy will be delivered to the paper output<br />
tray.<br />
Note<br />
To cancel dual page copying, press the<br />
[DUAL PAGE COPY] key ( ). The<br />
DUAL PAGE COPY indicator ( ) will go<br />
off, indicating that the function is cancelled.<br />
24
INTERRUPTING A COPY RUN<br />
(Interrupt Copying)<br />
A copy run can be temporarily interrupted to allow another copy job to be performed. When the other job is finished,<br />
the copy run will resume using the original copy settings.<br />
Note<br />
Interrupt copying is not possible when the system settings are being configured.<br />
1<br />
Press the [INTERRUPT] key ( ) to<br />
interrupt the copy run.<br />
Note<br />
The INTERRUPT<br />
indicator will light up and<br />
the machine will revert to<br />
the initial settings. (p.8)<br />
The INTERRUPT<br />
indicator will blink until<br />
the current copy run<br />
stops.<br />
If "Auditing mode" is enabled:<br />
"- - -" will appear in the number of copies<br />
display. Enter your 3-digit account number.<br />
Copying will not be possible unless a correct<br />
account number is entered. (p.36)<br />
4<br />
5<br />
When the copy job is finished, press<br />
the [INTERRUPT] key ( ) and remove<br />
the original(s).<br />
The INTERRUPT indicator will go off, indicating<br />
that the interrupt function is no longer operating.<br />
The copy settings will automatically revert to the<br />
settings selected for the copy run before the run<br />
was interrupted.<br />
Replace the previous original(s) and<br />
press the [ST<strong>AR</strong>T] key ( ).<br />
The interrupted copy run will resume.<br />
2<br />
2<br />
Remove the previous original(s) and<br />
place the original(s) of the interrupt<br />
copy job.<br />
3<br />
Set the number of copies and other<br />
copy settings and then press the<br />
[ST<strong>AR</strong>T] key ( ).<br />
25
3<br />
Chapter<br />
3<br />
PRINTER FUNCTIONS<br />
This chapter explains how to use the printer functions.<br />
The procedure for loading paper is the same as for loading copy paper. See "LOADING PAPER" (p.9).<br />
Note<br />
• Print jobs received while the machine is copying will be stored in memory. When the copy job is finished, the<br />
print jobs will begin printing.<br />
• Printing is not possible when the front or side cover is opened for machine maintenance, or when a misfeed<br />
occurs or the machine runs out of paper or toner, or when the drum cartridge reaches its replacement time.<br />
• If an original misfeed occurs in the SPF, printing will not be possible until the misfed original is removed and the<br />
SPF is restored to a usable state.<br />
BASIC PRINTING<br />
The following example explains how to print a document from WordPad.<br />
Before printing, make sure that the correct size of paper for your document has been loaded in the machine.<br />
1<br />
Make sure that the ON LINE indicator<br />
on the operation panel is lit.<br />
If the ON LINE indicator is<br />
not lit, press the [ON<br />
LINE] key ( ).<br />
When the indicator is:<br />
• Lit, the machine is online and ready to print, or is<br />
printing.<br />
• Blinking, the machine is processing print data in<br />
memory or printing has been paused.<br />
• Off, the machine is off-line and cannot print.<br />
2<br />
Start WordPad and open the<br />
document that you wish to print.<br />
4<br />
Make sure that "SH<strong>AR</strong>P <strong>AR</strong>-XXXX" is<br />
selected as the printer.<br />
If you need to change any print settings, click the<br />
"Preferences" button to open the printer driver<br />
setup screen.<br />
The printer driver<br />
setup screen will<br />
appear.<br />
Windows 2000 does not have the "Preferences" button<br />
in this dialog box. Select settings as needed on each<br />
of the tabs in the setup screen and click the "OK"<br />
button.<br />
"PRINTER DRIVER SETTING SCREEN" (p.28)<br />
"SETTING ADVANCED PRINT FUNCTIONS" (p.29)<br />
3<br />
Select "Print" from the application's<br />
"File" menu.<br />
The "Print" dialog box will appear.<br />
5<br />
Click the "Print" button.<br />
Printing begins. When printing begins, the Print<br />
Status Window automatically opens.<br />
"OUTLINE OF THE PRINT STATUS WINDOW"<br />
(p.34)<br />
The print job will be delivered to the output tray.<br />
26
PRINTER FUNCTIONS<br />
If the tray runs out of paper during printing<br />
Add paper to the tray or press the [PAPER SELECT] key ( ) to select a different tray, and then press the [ON<br />
LINE] key ( ) to resume printing.<br />
Note that if the "Auto tray switching" setting in the system settings is enabled on a model that has two or more paper<br />
trays and there is the same size of paper in another tray, the machine will automatically switch to the other tray and<br />
continue printing.<br />
Pausing a print job<br />
To pause a print job during printing, press the [ON LINE] key ( ) on the operation panel to switch the machine<br />
off-line. Printing will be paused and the ON LINE indicator will blink.<br />
• To cancel a print job, press the [CLE<strong>AR</strong>] key ( ) or the [CLE<strong>AR</strong> ALL] key ( ).<br />
• To resume printing, press the [ON LINE] key ( ) to switch the machine online.<br />
When "Paper Source" is set to "Auto Select"<br />
If "Paper Source" is set to "Auto Select" in the "Paper" tab of the printer driver setup screen and the correct size of<br />
paper for a print job is not loaded in the machine, the printing procedure will vary depending on the "Use Close<br />
Paper Size" setting in the system settings (p.37).<br />
When "Use close paper size" is disabled<br />
The PAPER SIZE indicator on the operation panel will blink. You can press the [PAPER<br />
SELECT] key ( ) to select a tray manually, or load paper in the bypass tray and press<br />
the [ON LINE] key ( ) to begin printing.<br />
3<br />
When "Use close paper size" is enabled<br />
Printing will take place using a size of paper that is close to the size of the print image.<br />
Note<br />
• For limitations on copying in print mode, and print mode limitations in copy mode, see "OPERATION IN COPY<br />
AND PRINTER MODES" (p.14).<br />
• The print image is automatically rotated to fit the paper in the event that the paper is loaded in an orientation<br />
different from the print image.<br />
OPENING THE PRINTER DRIVER FROM THE "Start"<br />
BUTTON<br />
You can open the printer driver and change the printer driver settings from the Windows "Start" button. Settings<br />
adjusted in this way will be the initial settings when you print from an application. (If you change the settings from the<br />
printer driver setup screen at the time of printing, the settings will revert to the initial settings when you quit the<br />
application.)<br />
1<br />
Click the "Start" button and select<br />
"Control Panel" and then select<br />
"Printer".<br />
• In Windows XP, click the "start" button, and<br />
then click "Printers and Faxes".<br />
• In Windows 2000, click the "Start" button and<br />
point to "Settings", and then select "Printers".<br />
•<br />
Note<br />
In Windows XP, if "Printers and Faxes" does<br />
not appear in the "start" menu, select "Control<br />
Panel", select "Printers and Other Hardware",<br />
and then select "Printers and Faxes".<br />
2<br />
3<br />
4<br />
Click the "SH<strong>AR</strong>P <strong>AR</strong>-XXXX" printer<br />
driver icon.<br />
Select "Properties" from the<br />
"Organize" menu.<br />
In Windows XP/2000, select "Properties" from the<br />
"File" menu.<br />
Click the "Printing Preferences"<br />
button in the "General" tab.<br />
The printer driver setup screen will appear.<br />
"PRINTER DRIVER SETTING SCREEN" (p.28)<br />
27
PRINTER DRIVER SETTING<br />
SCREEN<br />
Some restrictions exist on the combinations of settings that can be selected in the printer driver setup screen. When<br />
a restriction is in effect, an information icon ( ) will appear next to the setting. Click the icon to view an<br />
explanation of the restriction.<br />
1<br />
2<br />
3<br />
4<br />
5<br />
6<br />
7 8 9 10<br />
Note<br />
The settings and the image of the machine will vary depending on the model.<br />
1<br />
2<br />
3<br />
4<br />
5<br />
6<br />
Tab<br />
The settings are grouped on tabs. Click on a tab to<br />
bring it to the front.<br />
Checkbox<br />
Click on a checkbox to activate or deactivate a<br />
function.<br />
Print setting image<br />
This shows the effect of the selected print settings.<br />
Drop-down list<br />
Allows you to make a selection from a list of<br />
choices.<br />
Image of paper trays<br />
The tray selected in "Paper Selection" in the<br />
"Paper" tab appears in blue. You can also click on<br />
a tray to select it.<br />
Check button<br />
Allows you to select one item from a list of options.<br />
7<br />
8<br />
9<br />
10<br />
"OK" button<br />
Click this button to save your settings and exit the<br />
dialog box.<br />
"Cancel" button<br />
Click this button to exit the dialog box without<br />
making any changes to the settings.<br />
"Apply" button<br />
Click to save your settings without closing the<br />
dialog box.<br />
"Help" button<br />
Click this button to display the help file for the<br />
printer driver.<br />
28
SETTING ADVANCED PRINT<br />
FUNCTIONS<br />
This section explains major advanced print functions.<br />
The explanations assume that the paper size and other basic settings have already been selected. For the basic<br />
procedure for printing and the steps for opening the printer driver, see "BASIC PRINTING" (p.26).<br />
PRINTING MULTIPLE PAGES ON ONE PAGE (N-Up Printing)<br />
This function can be used to reduce the print image and print multiple pages on a single sheet of paper.<br />
This is convenient when you want to print multiple images such as photos on a single sheet of paper, and when you<br />
want to conserve paper.<br />
The following print results will be obtained, depending on the order selected.<br />
N-Up<br />
(Pages per sheet)<br />
Left To Right<br />
Print results<br />
Right To Left<br />
Top To Bottom<br />
(when the print orientation is<br />
landscape)<br />
2-Up<br />
(2 pages per<br />
sheet)<br />
3<br />
N-Up<br />
(Pages per sheet)<br />
Right, and Down Down, and Right Left, and Down Down, and Left<br />
4-Up<br />
(4 pages per<br />
sheet)<br />
6-Up<br />
(6 pages per<br />
sheet)<br />
1<br />
Click the "Main" tab in the printer<br />
driver setup screen.<br />
3<br />
Select the order of the pages.<br />
2<br />
Select the number of pages per sheet.<br />
If you wish to print<br />
borderlines, check the<br />
"Border" box.<br />
29
PRINTER FUNCTIONS<br />
FITTING THE PRINTED IMAGE TO THE PAPER<br />
(Fit To Paper Size)<br />
The printer driver can adjust the size of the printed image to match the size of the paper loaded in the machine.<br />
Follow the steps shown below to use this function. The explanation below assumes that you intend to print an A3<br />
size document on A4 size paper.<br />
1 Click the "Paper" tab in the printer 4<br />
driver setup screen.<br />
2 Select the original size (A3) of the<br />
print image in "Paper Size".<br />
3 Check the "Fit To Paper Size" button.<br />
Select the actual size of paper to be<br />
used for printing (A4).<br />
The size of the printed image will be<br />
automatically adjusted to match the paper loaded<br />
in the machine.<br />
Paper Size: A3<br />
Fit To Paper Size: A4<br />
A3 size<br />
document<br />
(Paper Size)<br />
A4 size paper<br />
(Fit To Paper<br />
Size)<br />
ROTATING THE PRINT IMAGE 180 DEGREES<br />
(Rotate 180 degrees)<br />
The feature rotates the image 180 degrees so that it can be printed correctly on paper that can only be loaded in one<br />
orientation (such as envelopes).<br />
ABCD<br />
ABCD<br />
1<br />
Click the "Main" tab in the printer<br />
driver setup screen.<br />
2<br />
Check the "Rotate 180 degrees" box.<br />
30
PRINTER FUNCTIONS<br />
ENL<strong>AR</strong>GING/REDUCING THE PRINT IMAGE (Zoom)<br />
This function is used to enlarge or reduce the image to a selected percentage. This allows you to enlarge a small<br />
image or add margins to the paper by slightly reducing an image.<br />
Note<br />
The "Zoom" setting is not available when "N-Up Printing" is selected.<br />
1<br />
2<br />
Click the "Paper" tab in the printer<br />
driver setup screen.<br />
Select "Zoom" and click the<br />
"Settings" button.<br />
The actual paper size to be<br />
used for printing can be<br />
selected from the pop-up<br />
menu.<br />
3<br />
Select the zoom ratio.<br />
Directly enter a number or<br />
click the button to<br />
change the ratio in<br />
increments of 1%.<br />
3<br />
PRINTING FAINT TEXT AND LINES IN BLACK<br />
(Text To Black/Vector To Black)<br />
When printing a colour image, colour text and lines that are faint can be printed in black. (Raster data such as bitmap<br />
images cannot be adjusted.) This allows you to bring out colour text and lines that are faint and difficult to see.<br />
ABCD<br />
ABCD<br />
1<br />
Click the "Advanced" tab in the printer<br />
driver setup screen.<br />
2<br />
Check the "Text To Black" box and/or<br />
the "Vector To Black" box.<br />
• "Text To Black" can be<br />
selected to print all text<br />
other than white text in<br />
black.<br />
• "Vector To Black" can be<br />
selected to print all vector<br />
graphics other than white<br />
lines and areas in black.<br />
31
PRINTER FUNCTIONS<br />
ADJUSTING THE BRIGHTNESS AND CONTRAST OF<br />
THE IMAGE (Image Adjustment)<br />
The brightness and contrast can be adjusted in the print settings when printing a photo or other image. These<br />
settings can be used for simple corrections when you do not have image editing software installed on your<br />
computer.<br />
1 Click the "Advanced" tab in the printer 3<br />
driver setup screen.<br />
2 Click the "Image Adjustment" button.<br />
Adjust the image settings.<br />
To adjust a<br />
setting, drag the<br />
slide bar or<br />
click the or<br />
button.<br />
ADDING A WATERM<strong>AR</strong>K TO PRINTED PAGES (Watermark)<br />
Faint shadow-like text can be added to the background of the printed image as a watermark. The size, density, and<br />
angle of the watermark text can be adjusted. The text can be selected from a pre-stored list, or entered to create an<br />
original watermark.<br />
1<br />
Click the "Watermarks" tab in the<br />
printer driver setup screen.<br />
2<br />
Select the watermark settings.<br />
Select a stored<br />
watermark from<br />
the pull-down<br />
menu. You can<br />
click the "Edit"<br />
button to edit the<br />
font and select<br />
other detailed<br />
settings.<br />
Note<br />
If you wish to create a new watermark, enter<br />
the text of the watermark in the "Text" box and<br />
click the "Add" button.<br />
32
SAVING FREQUENTLY USED PRINT<br />
SETTINGS<br />
Settings configured on each of the tabs at the time of printing can be saved as user settings. Saving frequently used<br />
settings or complex colour settings under an assigned name makes it easy to select those settings the next time you<br />
need to use them.<br />
SAVING SETTINGS AT THE TIME OF PRINTING<br />
(User Settings)<br />
Settings can be saved from any tab of the printer driver properties window. Settings configured on each tab are<br />
listed at the time of saving, allowing you to check the settings as you save them.<br />
For the steps for opening the printer driver, see "BASIC PRINTING" (p.26).<br />
1<br />
Configure print settings on each tab<br />
and click the "Save" button on any<br />
tab.<br />
2<br />
After checking the displayed settings,<br />
enter a name for the settings<br />
(maximum of 20 characters).<br />
3<br />
Note<br />
• Up to 30 sets of user settings can be saved.<br />
• A watermark that you created cannot be<br />
saved in user settings.<br />
3<br />
Click the "OK" button.<br />
Using saved settings<br />
Select the user settings that you wish to use on any tab.<br />
Deleting saved settings<br />
Select the user settings that you want to delete in "Using saved settings" (above), and click the "Delete" button.<br />
33
OUTLINE OF THE PRINT STATUS<br />
WINDOW<br />
When printing begins, the Print Status Window automatically opens.<br />
The Print Status Window is a utility that monitors the machine and shows the name of the document being printed<br />
and any error messages that occur.<br />
1<br />
2<br />
3<br />
4<br />
5<br />
6<br />
7<br />
1<br />
2<br />
Status window<br />
Provides information on the current status of the<br />
printer.<br />
Status icon<br />
The status icons appear to alert you to printer<br />
errors. Nothing appears when printing is taking<br />
place normally.<br />
The icons are explained below. Follow the<br />
instructions in the status window to solve the<br />
problem.<br />
Icon<br />
Print Status<br />
An error has occurred that requires<br />
immediate attention.<br />
3<br />
4<br />
5<br />
6<br />
7<br />
Tab<br />
Click a tab to bring it to the front. The "Options" tab<br />
allows you to select display options for the Print<br />
Status Window.<br />
Document Name<br />
Shows the name of the document currently being<br />
printed.<br />
"Cancel Job" button<br />
Printing can be cancelled by clicking this button<br />
before the machine receives the job.<br />
"Help" button<br />
Click this button to display the help file for the Print<br />
Status Window.<br />
"Close" button<br />
Click this button to close the Print Status Window.<br />
An error has occurred that requires<br />
attention soon.<br />
34
4<br />
Chapter<br />
4<br />
USER SETTINGS<br />
This chapter explains how to set the automatic exposure level and the system settings, which are custom settings<br />
that control fine points of the machine's operation.<br />
ADJUSTING THE AUTOMATIC<br />
EXPOSURE LEVEL<br />
The exposure level used in automatic exposure adjustment, which automatically adjusts the copy exposure<br />
according to the original, can be adjusted. If copies tend to be too dark or too light when automatic exposure<br />
adjustment is used, follow the steps below to adjust the automatic exposure level.<br />
The automatic exposure level can be adjusted separately for the document glass and the SPF.<br />
Note<br />
The copy and printer functions cannot be used while the automatic exposure level is being adjusted.<br />
1<br />
To adjust the automatic exposure<br />
level in the SPF, place the original in<br />
the SPF. (p.16)<br />
Make sure that the SPF indicator is lit.<br />
4<br />
Press the [Light] key ( ) or [Dark]<br />
key ( ) to lighten or darken the<br />
automatic exposure level as desired.<br />
Note<br />
To adjust the automatic exposure level for<br />
copies made from originals placed on the<br />
document glass, proceed to step 2.<br />
2<br />
3<br />
Press the [AUTO/TEXT/PHOTO] key<br />
( AUTO / / ) to select "PHOTO"<br />
( ).<br />
Hold down the [AUTO/TEXT/PHOTO]<br />
key ( AUTO / / ) until the AUTO<br />
indicator ( ) blinks.<br />
AUTO<br />
The exposure level<br />
indicators show the<br />
current setting.<br />
5<br />
Press the [AUTO/TEXT/PHOTO] key<br />
( AUTO / / ) to complete the<br />
setting.<br />
The AUTO indicator ( AUTO ) stops blinking and<br />
lights steadily.<br />
Note<br />
After adjusting the automatic exposure level, it<br />
is recommended that you make a test copy to<br />
check the new level.<br />
35
CUSTOMISING SETTINGS (System Settings)<br />
The system settings allow you to customise the machine to match your needs.<br />
SYSTEM SETTINGS<br />
Program<br />
number<br />
Program name<br />
1 Auto clear time<br />
2 Preheat mode<br />
3<br />
Auto power shut-off<br />
timer<br />
Setting codes<br />
(factory default setting<br />
appears in bold)<br />
1: OFF<br />
2: 10 sec.<br />
3: 20 sec.<br />
4: 60 sec.<br />
5: 90 sec.<br />
6: 120 sec.<br />
1: 1 min.<br />
2: 5 min.<br />
3: 30 min.<br />
4: 60 min.<br />
5: 120 min.<br />
6: 240 min.<br />
1: 5 min.<br />
2: 30 min.<br />
3: 60 min.<br />
4: 120 min.<br />
5: 240 min.<br />
4 Stream feeding mode *1 0: OFF<br />
1: ON<br />
5<br />
8<br />
Auto power shut-off<br />
setting<br />
Auto paper select<br />
mode *2<br />
0: OFF<br />
1: ON<br />
0: OFF<br />
1: ON<br />
9 Auto tray switching *2 0: OFF<br />
1: ON<br />
Explanation<br />
• "Auto clear time" automatically returns the<br />
copy settings to the initial settings (p.8) when a<br />
certain period of time elapses after a copy is<br />
made. This program is used to select the<br />
period of time. "Auto clear time" can also be<br />
disabled.<br />
• This function automatically switches the<br />
machine to a low power consumption state if<br />
the set duration of time elapses without the<br />
machine being used when the power is on.<br />
The POWER SAVE indicator ( ) lights up,<br />
however, the keys on the operation panel can<br />
be used. Normal operation automatically<br />
resumes when a key on the operation panel is<br />
pressed, a print job is received or an original is<br />
placed.<br />
• This function automatically switches the<br />
machine to a state that consumes even less<br />
power than preheat mode if the set duration of<br />
time elapses without the machine being used<br />
when the power is on. All lights except the<br />
POWER SAVE indicator ( ) and ON LINE<br />
indicator go off. To resume normal operation,<br />
press the [ST<strong>AR</strong>T] key ( ).<br />
Normal operation also resumes automatically<br />
when a print job is received. While in auto<br />
power shut-off mode, no keys (except the<br />
[ST<strong>AR</strong>T] key ( )) can be used.<br />
• When copying using the SPF, during the<br />
period of time that the SPF indicator blinks<br />
after an original has been scanned<br />
(about 5 seconds), a subsequent original can<br />
be placed and automatically fed into the<br />
machine.<br />
• Use this setting to enable or disable auto<br />
power shut-off.<br />
• This function automatically selects paper that<br />
is the same size as the original placed in the<br />
SPF, or the same size as that selected with the<br />
[ORIGINAL] key ( ). The function can be<br />
disabled.<br />
• If the paper runs out during printing and there<br />
is paper of the same size and orientation in<br />
another tray, this function automatically<br />
switches to that tray (excluding the bypass<br />
tray). The function can be disabled.<br />
10 to 15 Auditing mode – See "AUDITING MODE SETTINGS" (p.39).<br />
* 1 When the SPF is installed.<br />
* 2 When there are two or more paper trays.<br />
36
USER SETTINGS<br />
Program<br />
number<br />
23<br />
Resolution in Auto/Text<br />
mode<br />
25 Key auto repeat<br />
26 Key press time<br />
27 Audible signals volume<br />
28<br />
Base setting beep<br />
signal<br />
29 Number of copies limit<br />
30 Use close paper size<br />
1: 300 dpi<br />
2: 600 dpi<br />
0: OFF<br />
1: ON<br />
1: Minimum<br />
(current response<br />
speed)<br />
2: 0.5 sec.<br />
3: 1.0 sec.<br />
4: 1.5 sec.<br />
5: 2.0 sec.<br />
1: Short beep<br />
2: Long beep<br />
3: OFF<br />
0: OFF<br />
1: ON<br />
1: 99 copies<br />
2: 999 copies<br />
0: OFF<br />
1: ON<br />
31 Default tray setting *3 1: Upper paper tray<br />
2: Lower paper tray<br />
3: 250-sheet paper<br />
feed unit/<br />
Upper paper tray of 2<br />
x 250-sheet paper<br />
feed unit<br />
4: Lower paper tray of 2<br />
x 250-sheet paper<br />
feed unit<br />
5: Bypass tray<br />
32<br />
33<br />
Program name<br />
Default exposure<br />
mode<br />
USB 2.0 mode<br />
switching<br />
Setting codes<br />
(factory default setting<br />
appears in bold)<br />
1: AUTO<br />
2: TEXT<br />
3: PHOTO<br />
1: Full-Speed<br />
2: Hi-Speed<br />
Explanation<br />
• This setting is used to change the copy<br />
resolution in AUTO and TEXT mode from 600<br />
x 300 dpi to 600 x 600 dpi (high-quality mode).<br />
Scanning is slower when high-quality mode is<br />
used.<br />
• Use this setting to select whether or not<br />
holding down a key causes repeated input of<br />
the key. For keys that normally cause a set<br />
value to increase when held down (for<br />
example, holding down the [ZOOM] key ( ,<br />
)), this program can be used to have the<br />
set value not change when the key is held<br />
down.<br />
• Use this setting to select how long a key must<br />
be pressed for the input to be accepted. By<br />
selecting a longer time, you can prevent<br />
settings from being changed by the accidental<br />
pressing of a key.<br />
• This sets the volume of beep signals. (p.38)<br />
• Use this to sound a beep when a base setting<br />
is selected. (p.38)<br />
• Use this setting to select 99 or 999 for the<br />
maximum number of copies.<br />
• When this function is enabled, printing in<br />
printer mode will automatically continue using<br />
a different size of paper if the specified size of<br />
paper runs out in all trays. This feature does<br />
not function in copy mode.<br />
• Use this program to select a default tray. This<br />
tray is automatically selected each time the<br />
power is turned on or each time the machine<br />
reverts to the initial settings.<br />
• Use this program to set "AUTO", "TEXT", or<br />
"PHOTO" as the default exposure mode.<br />
• This sets the USB 2.0 data transfer speed. If<br />
your computer is not compatible with USB 2.0<br />
(Hi-Speed), use this program to change the<br />
USB 2.0 mode to "Full-Speed".<br />
4<br />
* 3 <strong>AR</strong>-<strong>5516S</strong> is as follows:<br />
1: Upper tray (factory default),<br />
2: 250-sheet paper feed unit/Upper paper tray of 2 x 250-sheet paper feed unit,<br />
3: Lower paper tray of 2 x 250-sheet paper feed unit,<br />
5: Bypass tray<br />
37
USER SETTINGS<br />
SELECTING A SETTING FOR A SYSTEM SETTING<br />
1<br />
Hold down the [Light] key ( ) until<br />
the alarm indicators ( , , , ,<br />
) blink.<br />
The display shows "- -"<br />
with the left hyphen<br />
blinking.<br />
4<br />
Enter the desired setting code by<br />
pressing a numeric key.<br />
• For the setting codes,<br />
see "SYSTEM<br />
SETTINGS". (p.36 to<br />
p.37)<br />
• The selected setting<br />
code blinks.<br />
• For example, to select<br />
90 seconds, press the<br />
[5] key.<br />
2<br />
Enter the program number with the<br />
numeric keys.<br />
Note<br />
If you enter the wrong number, press the<br />
[CLE<strong>AR</strong>] key ( ) and return to step 2.<br />
• See "SYSTEM<br />
SETTINGS" (p.36 to<br />
p.37) for the program<br />
numbers.<br />
• The selected program<br />
number blinks.<br />
• For example, to select<br />
"Auto clear timer",<br />
press the [1] key.<br />
5<br />
Press the [ST<strong>AR</strong>T] key ( ).<br />
The selected setting<br />
code stops blinking and<br />
lights steadily.<br />
3<br />
Note<br />
If you enter the wrong number, press the<br />
[CLE<strong>AR</strong>] key ( ) and then enter the correct<br />
number.<br />
Press the [ST<strong>AR</strong>T] key ( ).<br />
Note<br />
To select a setting for another system setting,<br />
press the [CLE<strong>AR</strong>] key ( ) and then return<br />
to step 2.<br />
• The selected program<br />
number stops blinking<br />
and lights steadily.<br />
• The currently selected<br />
setting code blinks on<br />
the right side of the<br />
display.<br />
6<br />
Press the [Light] key ( ) to complete<br />
the settings.<br />
The alarm indicators ( , , , , ) go<br />
off and the display returns to the number of<br />
copies display.<br />
Audible signals (key entry beep, invalid key beep, base setting beep)<br />
The machine sounds three different types of beep signals: a key entry beep that sounds when a valid key is<br />
pressed, an invalid key beep that sounds when an invalid key is pressed, and a base setting beep that sounds<br />
when a setting is the same as the base setting (base settings are explained below). The base setting beep is<br />
initially disabled. If you wish to enable the base setting beep, see "Base setting beep signal" on page 37. If you<br />
wish to change the volume of the beep signals or disable them, see "Audible signals volume" on page 37.<br />
The beep patterns of each type of beep signal are as follows:<br />
Key entry beep ......................... One beep<br />
Base setting beep ................Three beeps<br />
Invalid key beep ......................Two beeps<br />
Base settings<br />
The base settings are preset standard selections for each copy setting. The base settings are as follows:<br />
Copy ratio ........................................ 100%<br />
ORIGINAL SIZE........................................A4<br />
Light and Dark indicator........................ 3<br />
AUTO/TEXT/PHOTO ( AUTO / / )<br />
Paper feed location....... Upper paper tray<br />
............................................................ AUTO<br />
38
SETTINGS FOR AUDITING MODE<br />
AUDITING MODE<br />
When "Auditing mode" is enabled, a count is kept of the number of copies made by each account (up to 20 accounts<br />
can be established), and the counts can be displayed and totalled as necessary. In "Auditing mode", the display<br />
shows "- - -", and this indicates that a 3-digit account number must be entered in order to use the machine for<br />
copying.<br />
Note<br />
The administrator of the machine should complete the following settings:<br />
• Enable "Auditing mode" (p.41)<br />
• Account number entry (p.41)<br />
AUDITING MODE SETTINGS<br />
Program<br />
number<br />
Program name<br />
10 Auditing mode<br />
Setting codes<br />
(factory default settings<br />
are indicated in bold)<br />
0: OFF<br />
1: ON<br />
11 Account number entry None<br />
12<br />
13<br />
14<br />
Account number<br />
change<br />
Account number<br />
deletion<br />
Number of copies per<br />
account<br />
15 Resetting account<br />
None<br />
0: Delete single account<br />
1: Delete all accounts<br />
None<br />
0: Reset single account<br />
1: Reset all accounts<br />
Explanation<br />
Use to enable or disable "Auditing mode".<br />
"Auditing mode" is initially disabled.<br />
Use to set up account numbers. Up to 20<br />
accounts can be established.<br />
Use to change an account number.<br />
Use to delete an account number.<br />
A single account number can be deleted, or all<br />
account numbers at once.<br />
This displays the number of copies made by each<br />
account.<br />
The maximum count is 49,999. If this number is<br />
exceeded, the count will start over from 0.<br />
Use to reset the copy count of an account to 0.<br />
The copy count of a single account or of all<br />
accounts can be reset.<br />
4<br />
39
USER SETTINGS<br />
SELECTING AUDITING MODE SETTINGS<br />
1<br />
Hold down the [Light] key ( ) until<br />
the alarm indicators ( , , , ,<br />
) blink.<br />
The display shows "- -"<br />
with the left hyphen<br />
blinking.<br />
5<br />
Press the [Light] key ( ) to complete<br />
the settings.<br />
The alarm indicators ( , , , , ) go<br />
off and the display returns to the number of<br />
copies display.<br />
2<br />
Enter the program number with the<br />
numeric keys.<br />
• See "AUDITING MODE<br />
SETTINGS" (p.39) for<br />
the program numbers.<br />
• The selected program<br />
number blinks.<br />
• For example, to select<br />
"Auditing mode", enter<br />
"10".<br />
Note<br />
If you enter the wrong number, press the<br />
[CLE<strong>AR</strong>] key ( ) and then enter the correct<br />
number.<br />
3<br />
4<br />
Press the [ST<strong>AR</strong>T] key ( ).<br />
• The selected program<br />
number stops blinking<br />
and lights steadily.<br />
• The currently selected<br />
setting code blinks on<br />
the right side of the<br />
display.<br />
Enter the desired setting code for the<br />
program as explained in the detailed<br />
procedures on the following pages.<br />
For the setting codes, see "AUDITING MODE<br />
SETTINGS" (p.39).<br />
Note<br />
• If you enter the wrong number, press the<br />
[CLE<strong>AR</strong>] key ( ) and return to step 2.<br />
• If "E" (error code) blinks in the first digit of<br />
the display, press the [CLE<strong>AR</strong>] key ( )<br />
and return to step 2.<br />
40
USER SETTINGS<br />
Auditing mode<br />
(program No.10)<br />
1 Press the [1] key to enable "Auditing<br />
mode" or the [0] key to disable it, and then<br />
press the [ST<strong>AR</strong>T] key ( ).<br />
Note<br />
2 Press the [CLE<strong>AR</strong>] key ( ).<br />
Account number entry<br />
(program No.11)<br />
If 20 accounts have already been established, the<br />
error code "11E" will appear in the display.<br />
1 Use the numeric keys to enter a 3-digit<br />
number (any number except "000") and<br />
then press the [ST<strong>AR</strong>T] key ( ).<br />
Note<br />
2 Press the [CLE<strong>AR</strong>] key ( ).<br />
Account number change<br />
(program No.12)<br />
Use this procedure to change an account number. If<br />
no account numbers have been established, the error<br />
code "12E" will appear in the display.<br />
1 Press the [Copy ratio display] key ( ) to<br />
select the account number that you wish to<br />
change, and then press the [ST<strong>AR</strong>T] key<br />
( ).<br />
The display will show 3 blinking hyphens "- - -".<br />
2 Press the numeric keys to enter a new<br />
account number (any 3-digit number<br />
except "000"), and then press the [ST<strong>AR</strong>T]<br />
key ( ).<br />
Note<br />
After enabling "Auditing mode", use "Account<br />
number entry" to establish account numbers<br />
for each account (up 20 accounts can be<br />
established).<br />
• If you enter "000" or a number that has<br />
already been stored, the number will blink<br />
in the display. Enter a different number. (Up<br />
to 20 accounts can be established.)<br />
• Repeat the same procedure to enter any<br />
other account numbers that you wish to<br />
establish.<br />
• Keep a record of what group is using each<br />
account number (account names cannot be<br />
stored, so keep a record to prevent<br />
confusion when totalling account values).<br />
• If you enter "000" or a number that has<br />
already been stored, the number will blink<br />
in the display. Enter a different number.<br />
• To change another account number, repeat<br />
steps 1 and 2.<br />
3 When finished, press the [CLE<strong>AR</strong>] key<br />
( ).<br />
Account number deletion<br />
(program No.13)<br />
Use this procedure to delete account numbers. A<br />
single account number can be deleted, or all account<br />
numbers at once.<br />
If no account numbers have been established, the<br />
error code "13E" will appear in the display.<br />
[Deleting all accounts at once]<br />
Press the [1] key and then press the [ST<strong>AR</strong>T]<br />
key ( ).<br />
All account numbers will be deleted.<br />
[Deleting a single account]<br />
1 Press the [0] key, and then press the<br />
[ST<strong>AR</strong>T] key ( ).<br />
2 Select the account number to be deleted<br />
with the [Copy ratio display] key ( ) and<br />
then press the [ST<strong>AR</strong>T] key ( ).<br />
Note<br />
Number of copies per account<br />
(program No.14)<br />
Use this procedure to display the copy count of each<br />
account. If no account numbers have been<br />
established, the error code "14E" will appear in the<br />
display.<br />
1 Select the account number with the [Copy<br />
ratio display] key ( ).<br />
2 Hold down the [0] key.<br />
The copy count of the selected account will appear in<br />
the display while you hold down the [0] key. The count<br />
is displayed sequentially as shown below.<br />
Example: 12,345 copies<br />
Note<br />
To delete another account number, enter the<br />
program number (13) for account number<br />
deletion and then repeat the procedure for<br />
"Deleting a single account".<br />
• Each A3 size page is counted as two<br />
pages.<br />
• To view the copy count of another account,<br />
repeat steps 1 and 2.<br />
3 When finished, press the [CLE<strong>AR</strong>] key<br />
( ).<br />
4<br />
41
USER SETTINGS<br />
Resetting account<br />
(program No.15)<br />
The copy count of a single account or all accounts can<br />
be reset to 0. If no account numbers have been<br />
established, the error code "15E" will appear in the<br />
display.<br />
[Resetting all accounts]<br />
Press the [1] key and then press the [ST<strong>AR</strong>T]<br />
key ( ).<br />
The copy counts of all accounts will be deleted.<br />
[Resetting a single account]<br />
1 Press the [0] key, and then press the<br />
[ST<strong>AR</strong>T] key ( ).<br />
2 Select the account number to be reset with<br />
the [Copy ratio display] key ( ) and<br />
then press the [ST<strong>AR</strong>T] key ( ).<br />
Copying when "Auditing mode" is<br />
enabled<br />
When "Auditing mode" is enabled, "- - -" appears in the<br />
display.<br />
1<br />
Enter your 3-digit account number<br />
with the numeric keys.<br />
When you enter your account number, "0"<br />
appears in the display to indicate that copying is<br />
possible.<br />
Note<br />
To reset another account number, enter the<br />
program number (15) for account number<br />
deletion and then repeat the procedure for<br />
"Resetting a single account".<br />
Note<br />
If you enter an incorrect number, press the<br />
[CLE<strong>AR</strong>] key ( ) and then enter the correct<br />
number.<br />
2<br />
Follow the appropriate steps to make<br />
the copy.<br />
Note<br />
If you are performing an interrupt copy (p.25),<br />
be sure to press the [INTERRUPT] key ( )<br />
when finished to exit interrupt mode.<br />
3<br />
When finished, press the [ ] key<br />
( ).<br />
ACC.#-C<br />
Note<br />
If a misfeed occurs or the paper runs out<br />
during copying, your session will not end even<br />
if the [ ] key ( ACC.#-C ) is pressed.<br />
42
5<br />
Chapter<br />
5<br />
TROUBLESHOOTING<br />
This chapter describes troubleshooting and misfeed removal.<br />
TROUBLESHOOTING<br />
If you experience difficulty using the machine, check the following troubleshooting guide before calling for service.<br />
Many problems can be easily resolved by the user. If you are unable to solve the problem using the troubleshooting<br />
guide, turn off the power switch and unplug the machine, and contact your authorised service representative.<br />
MACHINE/COPYING PROBLEMS<br />
The machine does not operate. ................................................................................................................. 44<br />
Copies are too dark or too light.................................................................................................................. 44<br />
Blank copies............................................................................................................................................... 44<br />
Part of the image is cut off or there is too much blank space. ................................................................... 44<br />
Wrinkles appear in the paper or the image disappears in places. ............................................................. 44<br />
Paper misfeed............................................................................................................................................ 45<br />
Original size not selected automatically. (When the SPF is installed.) ...................................................... 45<br />
Copies are smudged or dirty...................................................................................................................... 46<br />
White or black lines appear on copies. ...................................................................................................... 46<br />
Paper size for a paper tray cannot be set. ................................................................................................. 46<br />
A copy job stops before it is finished.......................................................................................................... 46<br />
The POWER SAVE indicator ( ) is lit. .................................................................................................... 46<br />
Any one of the alarm indicators ( , , , , ) is lit or blinking. ..................................................... 46<br />
Lighting fixture flickers. .............................................................................................................................. 46<br />
PRINTING PROBLEMS<br />
The machine does not print. (ON LINE indicator does not blink.).............................................................. 47<br />
The machine does not print. (ON LINE indicator was blinking.) ................................................................ 47<br />
Printing is slow. .......................................................................................................................................... 48<br />
The printed image is light and uneven. ...................................................................................................... 48<br />
The printed image is dirty........................................................................................................................... 48<br />
The printed image is skewed or it runs off the paper. ................................................................................ 48<br />
The printed image is darker or lighter than expected................................................................................. 48<br />
Any one of the alarm indicators ( , , , , ) is lit or blinking. ................................................... 48<br />
INDICATORS AND DISPLAY MESSAGES.................................................. 49<br />
MISFEED REMOVAL .................................................................................... 50<br />
REPLACING THE TONER C<strong>AR</strong>TRIDGE...................................................... 57<br />
43
TROUBLESHOOTING<br />
MACHINE/COPYING PROBLEMS<br />
The following problems are related to the general operation of the machine and copying.<br />
44<br />
Problem Cause and solution Page<br />
The machine does not operate.<br />
Copies are too dark or too light.<br />
Blank copies.<br />
Part of the image is cut off or there<br />
is too much blank space.<br />
Wrinkles appear in the paper or<br />
the image disappears in places.<br />
The machine is not plugged into a power outlet.<br />
→ Plug the machine into a grounded outlet.<br />
Power switch OFF.<br />
→ Turn the power switch ON.<br />
The POWER SAVE indicator ( ) is blinking.<br />
→ Indicates that the machine is warming up. Copies cannot be<br />
made until the machine has finished warming up.<br />
The front cover or the side cover is not completely<br />
closed.<br />
→ Close the front cover or the side cover.<br />
The machine is in auto power shut-off mode.<br />
→ In auto power shut-off mode, all lights are off except the POWER<br />
SAVE indicator ( ) and ON LINE indicator. Press the [ST<strong>AR</strong>T]<br />
key ( ) to resume normal operation.<br />
PAPER SIZE indicator is blinking.<br />
→ A blinking PAPER SIZE indicator means that the size of paper<br />
loaded in the tray is different from the paper size setting for the<br />
tray. Change the paper size setting.<br />
To clear the display, do one of the following:<br />
• Use the [PAPER SELECT] key ( ) to change the tray<br />
selection.<br />
• Open and close the tray.<br />
• Press the [CLE<strong>AR</strong> ALL] key ( ).<br />
Select the correct original type for the original.<br />
→ Select AUTO with the [AUTO/TEXT/PHOTO] key or press the<br />
[Light] key ( ) and [Dark] key ( ) to manually select an<br />
appropriate exposure.<br />
→ If the copy is too light or too dark even though AUTO was selected<br />
with the [AUTO/TEXT/PHOTO] key ( AUTO / / ), adjust<br />
the automatic exposure level.<br />
The original is not placed face up in the SPF or face down<br />
on the document glass.<br />
→ Place the original face up in the SPF or face down on the<br />
document glass.<br />
The original was not placed in the correct position.<br />
→ Place the original correctly.<br />
An appropriate ratio was not used for the size of the<br />
original and the size of the paper.<br />
→ Press the [AUTO IMAGE] key ( AUTO % ) to have the copy made<br />
using the appropriate ratio for the original and paper.<br />
The size of paper loaded in the tray was changed without<br />
changing the tray's paper size setting.<br />
→ Be sure to change the tray's paper size setting whenever you<br />
change the size of paper loaded in the tray.<br />
The paper is outside of the specified size and weight<br />
range.<br />
→ Use copy paper within the specified range.<br />
Paper curled or damp.<br />
→ Do not use curled or crimped paper. Replace with dry copy paper.<br />
During periods when the machine is not used for a long time,<br />
remove the paper from the tray and store it in a dark place in a<br />
bag to prevent moisture absorption.<br />
–<br />
8<br />
8<br />
–<br />
8<br />
12, 18<br />
18<br />
35<br />
15, 16<br />
15, 16<br />
19<br />
12<br />
9<br />
–
TROUBLESHOOTING<br />
Paper misfeed.<br />
Problem Cause and solution Page<br />
Original size not selected<br />
automatically.<br />
(When the SPF is installed.)<br />
Misfeed occurs.<br />
→ To remove the misfeed, see "MISFEED REMOVAL".<br />
The paper is outside of the specified size and weight<br />
range.<br />
→ Use copy paper within the specified range.<br />
Paper curled or damp.<br />
→ Do not use curled or crimped paper. Replace with dry copy paper.<br />
During periods when the machine is not used for a long time,<br />
remove the paper from the tray and store it in a dark place in a<br />
bag to prevent moisture absorption.<br />
Paper is not loaded properly.<br />
→ Make sure the paper is properly installed.<br />
Pieces of paper inside machine.<br />
→ Remove all pieces of misfed paper.<br />
Too much paper is loaded in the tray.<br />
→ If the stack of paper is higher than the indicator line on the tray,<br />
remove some of the paper and reload so that the stack does not<br />
exceed the line.<br />
Some sheets of paper stick together.<br />
→ Fan the paper well before loading it.<br />
The guides on the bypass tray do not match the width of<br />
the paper.<br />
→ Adjust the guides to match the width of the paper.<br />
The bypass tray extension is not pulled out.<br />
→ When loading a large size of paper, pull out the extension.<br />
The bypass paper feed roller is dirty.<br />
→ Clean the roller.<br />
A5 paper is loaded in lower paper tray or in the 250-sheet<br />
or 2 x 250-sheet paper feed unit.<br />
→ A5 size paper must be loaded in upper paper tray or the bypass<br />
tray.<br />
Original(s) curled.<br />
→ The original size cannot be correctly detected if the original is<br />
curled or folded. Straighten the original.<br />
The machine is directly exposed to sunlight.<br />
→ Install in a location that is not exposed to sunlight.<br />
50<br />
9<br />
–<br />
10<br />
50<br />
10<br />
10<br />
11<br />
11<br />
61<br />
9, 10<br />
–<br />
–<br />
5<br />
45
TROUBLESHOOTING<br />
Copies are smudged or dirty.<br />
White or black lines appear on<br />
copies.<br />
Paper size for a paper tray cannot<br />
be set.<br />
A copy job stops before it is<br />
finished.<br />
The POWER SAVE indicator (<br />
lit.<br />
Any one of the alarm indicators<br />
( , , , , ) is lit or<br />
blinking.<br />
Lighting fixture flickers.<br />
Problem Cause and solution Page<br />
) is<br />
The document glass or the underside of the document<br />
cover/SPF is dirty.<br />
→ Clean regularly.<br />
Original smudged or blotchy.<br />
→ Use a clean original.<br />
The scanner glass for the SPF is dirty.<br />
→ Clean the long, narrow scanning glass.<br />
The transfer charger is dirty.<br />
→ Clean the transfer charger.<br />
Copying or printing is performed.<br />
→ Set the paper size after copying or printing is complete.<br />
The machine has stopped temporarily due to running out<br />
of paper or a misfeed.<br />
→ Load paper or remove the misfeed, and then set the paper size.<br />
An interrupt copy job is in progress.<br />
→ Set the paper size after the interrupt copy job is finished.<br />
The paper output tray is full.<br />
→ Long copy runs are automatically paused every 250 copies.<br />
Remove the copies in the paper output tray and press the<br />
[ST<strong>AR</strong>T] key ( ) to resume copying.<br />
The tray is out of paper.<br />
→ Load paper.<br />
Any other indicators are lit.<br />
→ If other indicators are lit, the machine is in "Preheat mode". Press<br />
any key on the operation panel to resume normal operation.<br />
The POWER SAVE indicator ( ) and ON LINE indicator<br />
are only lit.<br />
→ If only the POWER SAVE indicator ( ) and ON LINE indicator<br />
are lit, the machine is in auto power shut-off mode. Press the<br />
[ST<strong>AR</strong>T] key ( ) to resume normal operation.<br />
See "INDICATORS AND DISPLAY MESSAGES" to check<br />
the meaning of the alarm indicator and error message in<br />
the display, and take appropriate action.<br />
The same power outlet being used is for the lighting<br />
fixture and the machine.<br />
→ Connect the machine to a power outlet which is not used for other<br />
electric appliances.<br />
60<br />
–<br />
60<br />
61<br />
–<br />
10, 50<br />
25<br />
19<br />
10<br />
8<br />
8<br />
49<br />
–<br />
46
TROUBLESHOOTING<br />
PRINTING PROBLEMS<br />
In addition to this section, troubleshooting information can also be found in the README files for each of the<br />
software programs. To view a README file, see "INSTALLING THE SOFTW<strong>AR</strong>E" in the Start Guide.<br />
Problem Cause and solution Page<br />
The machine does not print.<br />
(ON LINE indicator does not blink.)<br />
The machine does not print.<br />
(ON LINE indicator was blinking.)<br />
The machine is set to off-line mode.<br />
→ Press the [ON LINE] key ( ) to turn on the ON LINE<br />
indicator.<br />
The machine is not correctly connected with your<br />
computer.<br />
→ Check both ends of the printer cable and make sure you have a<br />
solid connection. Try a known good cable. For information on<br />
cables, see "SPECIFICATIONS".<br />
Copy job is performed.<br />
→ Wait until the copy job is complete.<br />
Your machine is not selected correctly in the current<br />
application for the print job.<br />
→ When choosing "Print" from the "File" menu located in<br />
applications, be sure you have selected "SH<strong>AR</strong>P <strong>AR</strong>-XXXX"<br />
(where XXXX is the model name of your machine) printer<br />
displayed in the "Print" dialog box.<br />
The printer driver has not been installed properly.<br />
→ Follow these steps to check and see if the printer driver is<br />
installed.<br />
1 Click the "Start" button, click "Control Panel", and then click<br />
"Printer".<br />
In Windows XP, click the "start" button, and then click "Printer<br />
and Faxes".<br />
In Windows 2000, click the "Start" button, select "Settings"<br />
and then click "Printers".<br />
2 If the "SH<strong>AR</strong>P <strong>AR</strong>-XXXX" printer driver icon is shown but you<br />
still cannot print, the printer driver may not have been installed<br />
correctly. In this case, delete the software and then reinstall it.<br />
The tray size settings are not the same on the machine<br />
and in the printer driver.<br />
→ Make sure that the same tray paper size is set on the machine<br />
and in the printer driver. To change the tray's paper size setting on<br />
the machine, see "CHANGING A TRAY'S PAPER SIZE<br />
SETTING" or see "CONFIGURING THE PRINTER DRIVER" in<br />
the Start Guide to change it in the printer driver.<br />
The specified size of paper has not been loaded.<br />
→ Load the specified size of paper in the paper tray.<br />
The PAPER SIZE indicator is blinking.<br />
→ When "Use close paper size (system setting)" is disabled, the<br />
PAPER SIZE indicator on the operation panel will blink. You can<br />
press the [PAPER SELECT] key ( ) to select a tray manually, or<br />
load paper in the bypass tray and press the [ON LINE] key<br />
( ) to begin printing.<br />
→ When "Use close paper size" is enabled, printing will take place<br />
using a size of paper that is close to the size of the print image.<br />
26<br />
Start<br />
Guide<br />
–<br />
–<br />
–<br />
12,<br />
Start<br />
Guide<br />
10<br />
12, 18<br />
–<br />
5<br />
47
TROUBLESHOOTING<br />
Printing is slow.<br />
Problem Cause and solution Page<br />
The printed image is light and<br />
uneven.<br />
The printed image is dirty.<br />
The printed image is skewed or it<br />
runs off the paper.<br />
The printed image is darker or<br />
lighter than expected.<br />
Any one of the alarm indicators<br />
( , , , , ) is lit or<br />
blinking.<br />
Simultaneous use of two or more application software<br />
programs.<br />
→ Start printing after quitting all unused application software programs.<br />
The paper is loaded so that printing takes place on the<br />
back side of the paper.<br />
→ Some paper types have a front and back side. If the paper is<br />
loaded so that printing takes place on the back side, toner will not<br />
adhere well to the paper and a good image will not be obtained.<br />
You are using paper that is outside the specified size and<br />
weight range.<br />
→ Use copy paper within the specified range.<br />
Paper curled or damp.<br />
→ Do not use curled or crimped paper. Replace with dry copy paper.<br />
During periods when the machine is not used for a long time,<br />
remove the paper from the tray and store it in a dark place in a<br />
bag to prevent moisture absorption.<br />
You did not set sufficient margins in the paper settings of<br />
your application.<br />
→ The top and bottom of the paper may be dirty if the margins are<br />
set outside of the specified print quality area.<br />
→ Set the margins in the software application within the specified<br />
print quality area.<br />
The paper loaded in the tray is not the same size as that<br />
specified in the printer driver.<br />
→ Check if the "Paper Size" options suit the size of the paper loaded<br />
in the tray.<br />
→ If the "Fit To Paper Size" setting is activated, make sure that the<br />
paper size selected from the drop-down list is the same as the<br />
size of the loaded paper.<br />
The orientation of document setting is not correct.<br />
→ Click the "Main" tab in the printer driver setup screen, and verify if<br />
the "Image Orientation" option is set to your requirements.<br />
Paper is not loaded properly.<br />
→ Make sure the paper is properly loaded.<br />
You did not correctly specify the margins for the<br />
application in use.<br />
→ Check the layout of the document margins and the paper size<br />
settings for the application you are using. Also check if the print<br />
settings are specified correctly to suit the paper size.<br />
The setting for the print density is not appropriate.<br />
→ You can adjust the print density on the printer driver. Click the<br />
"Advanced" tab in the printer driver setup screen, and click the<br />
"Compatibility" button. Select the "Print Density Level" from<br />
1 (light) to 5 (dark).<br />
See "INDICATORS AND DISPLAY MESSAGES" to check<br />
the meaning of the alarm indicator and error message in<br />
the display, and take appropriate action.<br />
–<br />
10<br />
9<br />
–<br />
–<br />
–<br />
–<br />
10<br />
–<br />
–<br />
49<br />
48
INDICATORS AND DISPLAY MESSAGES<br />
If one of the following indicators lights up or one of the following messages appears in the display, check the<br />
meaning of the indicator or message in the following table and take appropriate action.<br />
Maintenance indicator<br />
Paper required indicator<br />
Misfeed indicator<br />
Toner cartridge replacement<br />
required indicator<br />
Developer replacement<br />
required indicator<br />
Display<br />
Indication Cause and solution Page<br />
Maintenance Steadily Service by an authorised SH<strong>AR</strong>P service technician is<br />
indicator<br />
lit required.<br />
–<br />
Developer<br />
Steadily Developer is required. Contact your authorised service<br />
replacement<br />
lit representative.<br />
required indicator<br />
–<br />
Toner cartridge Steadily Replacement of toner cartridge will be needed soon. Prepare a<br />
replacement<br />
lit new cartridge.<br />
–<br />
required indicator Blinking Toner cartridge must be replaced. Replace it with a new one. 57<br />
Paper required<br />
indicator<br />
Misfeed indicator<br />
ORIGINAL SIZE indicator<br />
PAPER SIZE indicator<br />
[CH] appears in display<br />
Steadily<br />
lit<br />
Blinking<br />
Blinking<br />
Blinking<br />
Steadily<br />
lit<br />
Blinking<br />
Letters and numbers appear<br />
in the display<br />
When "Use close paper size" is disabled<br />
The tray is out of paper. Load paper. It is also possible that the<br />
tray is not inserted completely into the machine. Make sure it is<br />
inserted correctly.<br />
A paper misfeed has occurred. Remove the misfeed as<br />
explained in "MISFEED REMOVAL".<br />
The original is not placed in the correct orientation. Rotate the<br />
original so that it is in the same orientation as the blinking<br />
ORIGINAL SIZE indicator.<br />
A blinking PAPER SIZE indicator means that the size of paper loaded<br />
in the tray is different from the paper size setting for the tray. Change<br />
the paper size setting.<br />
To clear the display, do one of the following:<br />
• Use the [PAPER SELECT] key ( ) to change the tray selection.<br />
• Open and close the tray.<br />
• Press the [CLE<strong>AR</strong> ALL] key ( ).<br />
The front cover or the side cover is open. Close the front cover<br />
or the side cover.<br />
The toner cartridge is not installed correctly. Reinstall the toner<br />
cartridge. If [CH] still blinks in the display after reinstalling the toner<br />
cartridge, contact your authorised service representative.<br />
Turn off the power switch, wait about 10 seconds, and then turn on<br />
the switch again. If this does not clear the message, write down the<br />
code that appears and then unplug the power cord and contact<br />
your authorised service representative. Tell your authorised<br />
service representative what code appeared and the circumstances<br />
under which it appeared.<br />
10<br />
50<br />
15,16<br />
12<br />
–<br />
57<br />
–<br />
5<br />
Press the [PAPER SELECT] key ( ) to manually select the<br />
tray and then press the [ON LINE] key ( ). Printing will<br />
begin. If you are selecting the bypass tray, load paper in the<br />
bypass tray.<br />
27<br />
Misfeed location indicator lights up at<br />
the optional 2 x 250-sheet/250-sheet<br />
paper feed unit<br />
The side cover of the 2 x 250-sheet/250-sheet paper feed unit<br />
is open. Close the side cover.<br />
–<br />
49
MISFEED REMOVAL<br />
When a misfeed occurs, the misfeed indicator ( ) and a misfeed location indicator ( ) will blink and the machine<br />
will automatically stop.<br />
Check the blinking misfeed location indicator to identify the location of the misfeed and remove it.<br />
Note<br />
The paper may tear when you remove a misfeed. In this event, be sure to remove all torn pieces of paper from the<br />
machine, taking care not to touch the photoconductive drum (the green part). Any scratches or damage to the<br />
surface of the drum will cause dirty copies.<br />
(p.50)<br />
(p.51)<br />
(p.55)<br />
(p.56)<br />
MISFEED IN THE SPF<br />
1<br />
Remove the misfed original.<br />
Check sections A, B, and<br />
C in the left shows the<br />
illustration (see the next<br />
page), and remove the<br />
misfed original.<br />
Section B<br />
Open the SPF and rotate the two release rollers<br />
in the direction of the arrow to feed the original<br />
out. Close the SPF and then remove the<br />
original.<br />
Section A<br />
Open the feeding roller cover and remove the<br />
misfed original from the document feeder tray.<br />
Close the feeding roller cover.<br />
Roller<br />
Feeding roller cover<br />
If a small original (A5 etc.) is misfed, or if an<br />
original misfeed occurs in the reversing tray of<br />
the SPF (if installed), open the right side cover<br />
and remove the original. Close the right side<br />
cover.<br />
Right side cover<br />
50
TROUBLESHOOTING<br />
Section C<br />
Remove the misfed original from the exit area.<br />
If the misfed original cannot be easily removed<br />
from the exit area, open the moveable part of the<br />
document feeder tray and remove the original.<br />
2<br />
3<br />
Open and close the SPF to make the<br />
misfeed location indicator stop<br />
blinking.<br />
You can also make the<br />
misfeed indicator stop<br />
blinking by opening and<br />
closing the feeding roller<br />
cover or the right side<br />
cover.<br />
Return the originals indicated by the<br />
minus number in the display to the<br />
document feeder tray and press the<br />
[ST<strong>AR</strong>T] key ( ).<br />
Copying will resume from the originals that still<br />
remained when the misfeed occurred.<br />
MISFEED IN THE BYPASS TRAY<br />
1 Gently pull the misfed paper out. 2<br />
Open and close the side cover.<br />
5<br />
The misfeed indicator<br />
( ) will go out.<br />
Note<br />
• When closing the side cover, press down on<br />
the handle.<br />
• If the misfeed indicator ( ) does not stop<br />
blinking, check for torn pieces of paper in<br />
the machine.<br />
51
TROUBLESHOOTING<br />
MISFEED IN THE MACHINE<br />
1<br />
Open the bypass tray and the side<br />
cover.<br />
2<br />
Check the misfeed location. Remove<br />
the misfed paper following the<br />
instructions for each location in the<br />
illustration below.<br />
If paper is misfed here, go to<br />
"B. Misfeed in the fusing area".<br />
If the misfed paper is visible<br />
here, go to "C. Misfeed in the<br />
transport area".<br />
If paper is misfed here, go to<br />
"A. Misfeed in the paper feed<br />
area".<br />
A. Misfeed in the paper feed area<br />
1<br />
Push gently on both ends of the front<br />
cover and open it.<br />
3<br />
Close the front cover and side cover.<br />
The misfeed indicator<br />
( ) will go out.<br />
2<br />
Carefully remove the misfed paper.<br />
Turn the roller rotating knob in the<br />
direction of the arrow to assist in<br />
removing it.<br />
Roller rotating knob<br />
Be careful not to tear the<br />
misfed paper during<br />
removal.<br />
Note<br />
• When closing the front cover, gently hold<br />
both ends.<br />
• When closing the side cover, press on the<br />
handle.<br />
• If the misfeed indicator ( ) does not stop<br />
blinking, check for torn pieces of paper in<br />
the machine.<br />
Warning<br />
The fusing unit is hot. Do not touch<br />
the fusing unit when removing misfed<br />
paper. Doing so may cause a burn or<br />
injury.<br />
Caution<br />
Do not touch the photoconductive drum<br />
(green portion) when removing the misfed<br />
paper. Doing so may damage the drum and<br />
cause smudges on copies.<br />
52
TROUBLESHOOTING<br />
B. Misfeed in the fusing area<br />
1<br />
Push gently on both ends of the front<br />
cover and open it.<br />
4<br />
Lift the fusing unit release levers, to<br />
return them to their operating<br />
positions.<br />
2<br />
Turn the roller rotating knob in the<br />
direction of the arrow.<br />
Roller rotating knob<br />
5<br />
Close the front cover and side cover.<br />
The misfeed indicator<br />
( ) will go out.<br />
3<br />
Carefully remove the misfed paper.<br />
Lower the fusing unit release levers to<br />
allow easier removal.<br />
Fusing unit<br />
release lever<br />
Be careful not to tear the<br />
misfed paper during<br />
removal.<br />
Note<br />
• When closing the front cover, gently hold<br />
both ends.<br />
• When closing the side cover, press on the<br />
handle.<br />
• If the misfeed indicator ( ) does not stop<br />
blinking, check for torn pieces of paper in<br />
the machine.<br />
5<br />
Warning<br />
The fusing unit is hot. Do not touch<br />
the fusing unit when removing misfed<br />
paper. Doing so may cause a burn or<br />
injury.<br />
Caution<br />
• Do not touch the photoconductive drum<br />
(green portion) when removing the misfed<br />
paper. Doing so may damage the drum and<br />
cause smudges on copies.<br />
• Be careful about unfixed toner on the<br />
misfed paper not to soil your hands or<br />
clothes.<br />
53
TROUBLESHOOTING<br />
C. Misfeed in the transport area<br />
1<br />
Open the fusing paper guide by<br />
pressing down the green-labeled<br />
projection on the guide and remove<br />
the misfed paper.<br />
Be careful not to tear the<br />
misfed paper during<br />
removal.<br />
Warning<br />
The fusing unit is hot. Do not touch<br />
the fusing unit when removing misfed<br />
paper. Doing so may cause a burn or<br />
injury.<br />
2<br />
If the misfed paper cannot be removed<br />
by the previous step but is visible in<br />
the paper output area, remove the<br />
paper by pulling it into the paper<br />
output area.<br />
Be careful not to tear the<br />
misfed paper during<br />
removal.<br />
3<br />
Close the side cover.<br />
The misfeed indicator<br />
( ) will go out.<br />
Note<br />
• When closing the side cover, press on the<br />
handle.<br />
• If the paper was torn, make sure that no<br />
torn pieces remain in the machine.<br />
• If the misfeed indicator ( ) does not stop<br />
blinking, check for torn pieces of paper in<br />
the machine.<br />
54
TROUBLESHOOTING<br />
MISFEED IN THE UPPER PAPER TRAY<br />
Note<br />
Make sure that there is no misfed paper in the tray before pulling it out. (p.52)<br />
1<br />
Lift and pull out the upper paper tray<br />
and remove the misfed paper.<br />
Be careful not to tear the<br />
misfed paper during<br />
removal.<br />
2<br />
Open and close the side cover.<br />
The misfeed indicator<br />
( ) will go out.<br />
Note<br />
• When closing the side cover, press on the<br />
handle.<br />
• If the misfeed indicator ( ) does not stop<br />
blinking, check for torn pieces of paper in<br />
the machine.<br />
5<br />
3<br />
Close the upper paper tray.<br />
Push the upper paper<br />
tray in completely.<br />
55
TROUBLESHOOTING<br />
MISFEED IN THE LOWER PAPER TRAY<br />
Note<br />
• Make sure that there is no misfed paper in the tray before pulling it out. (p.52)<br />
• Use the following procedure to remove misfeeds that occur in the 250-sheet paper feed unit/2 x 250-sheet paper<br />
feed unit.<br />
1<br />
Open the lower side cover.<br />
5<br />
Close the lower paper tray.<br />
Grasp the handle to open<br />
the lower side cover.<br />
2<br />
Remove the misfed paper.<br />
Be careful not to tear the<br />
misfed paper during<br />
removal.<br />
3<br />
If the misfed paper is not seen in step<br />
2, lift and pull out the lower paper tray<br />
and remove the misfed paper.<br />
Be careful not to tear the<br />
misfed paper during<br />
removal.<br />
4<br />
Close the lower side cover.<br />
The misfeed indicator<br />
( ) will go out.<br />
Note<br />
If the misfeed indicator ( ) does not stop<br />
blinking, check for torn pieces of paper in the<br />
machine.<br />
56
REPLACING THE TONER C<strong>AR</strong>TRIDGE<br />
When the toner cartridge replacement required indicator ( ) lights up, the toner cartridge will need replacement<br />
soon. Obtain a new cartridge. When the toner cartridge replacement required indicator ( ) blinks, the toner<br />
cartridge must be replaced before copying can be resumed.<br />
Replace the toner cartridge by following the procedure below.<br />
Note<br />
When the toner cartridge replacement indicator (<br />
) lights up, little toner remains and thus copies may be faint.<br />
1<br />
Push on both ends of the front cover<br />
and open it.<br />
4<br />
Insert the toner cartridge along the<br />
guides until it locks in place while<br />
pushing the lock release lever.<br />
If there is any dirt or dust<br />
on the toner cartridge,<br />
remove it before<br />
installing the cartridge.<br />
2<br />
3<br />
Pull the toner cartridge out while<br />
pressing the lock release lever.<br />
Caution<br />
Toner cartridge<br />
lock release lever<br />
When pulling out the<br />
toner cartridge, place<br />
your other hand on the<br />
indentation of the<br />
cartridge.<br />
After removing the toner cartridge, do not<br />
shake it or tap on it. Doing so may cause<br />
toner to leak from the cartridge. Put the old<br />
cartridge immediately in the bag contained in<br />
the box of the new cartridge. Dispose of the<br />
old toner cartridge in accordance with local<br />
regulations.<br />
Remove the new toner cartridge from<br />
the bag. Grasp the cartridge on both<br />
sides and shake it horizontally four or<br />
five times.<br />
5<br />
Close the front cover.<br />
Note<br />
The toner cartridge<br />
replacement required<br />
indicator ( ) will go<br />
out.<br />
• Even after a new toner cartridge is<br />
installed, the toner cartridge replacement<br />
required indicator ( ) may still light up,<br />
indicating that copying cannot be resumed<br />
(toner is not fed sufficiently). In this case,<br />
open and close the front cover. The<br />
machine will feed toner again for about two<br />
minutes and then copying can be resumed.<br />
• Before closing the front cover, make sure<br />
that the toner cartridge is correctly installed.<br />
• When closing the front cover, gently hold<br />
both ends.<br />
5<br />
4 or 5 times<br />
Caution<br />
Grasp the grip when holding the cartridge.<br />
57
6<br />
Chapter<br />
6<br />
ROUTINE MAINTENANCE<br />
This chapter explains how to keep the machine operating smoothly, including viewing copy count, the toner level<br />
indicator, and cleaning the machine.<br />
CHECKING THE TOTAL OUTPUT<br />
COUNT AND TONER LEVEL<br />
CHECKING THE TOTAL OUTPUT COUNT<br />
When "Auditing mode" is "ON":<br />
From the "- - -" display, you can check the total output count and total copy count as explained below.<br />
When "Auditing mode" is "OFF":<br />
From the " 0" display, you can check the total output count and total copy count as explained below.<br />
The total output count is all pages (for both printing and copying) printed by the machine and the total output count<br />
can be counted up to 999,999.<br />
[Total output count]<br />
Hold down the [0] key.<br />
The total output count<br />
appears sequentially in<br />
two parts while you hold<br />
down the [0] key.<br />
Example: Total number of pages output is 12,345.<br />
[Total copy count]<br />
Hold down the (<br />
Note<br />
) key.<br />
The total copy count<br />
appears in the display<br />
while you hold down the<br />
key.<br />
The count display and<br />
counting method are the<br />
same as for the total<br />
output count.<br />
The total number of pages printed in printer<br />
mode can be calculated by subtracting the<br />
total copy count from the total output count.<br />
Note<br />
• Each A3 size page is counted as two<br />
pages.<br />
• During a copy run, pressing the [0] key<br />
shows the number of completed copy<br />
pages, not the total output count.<br />
58
ROUTINE MAINTENANCE<br />
CHECKING THE TONER LEVEL<br />
The toner level is indicated by a 6-level display. Use it as a guideline for replacing the toner cartridge.<br />
1<br />
Hold down the [Light] key ( ) until<br />
the alarm indicators ( , , , , )<br />
blink.<br />
The display will show<br />
"- -".<br />
2<br />
3<br />
Hold down the [Copy ratio display] key<br />
( ) for more than 5 seconds.<br />
The approximate quantity<br />
of toner remaining will be<br />
indicated in the display<br />
as a percentage. ("100",<br />
"75", "50", "25", "10" is<br />
displayed.) When the<br />
percentage is less than<br />
10%, "LO" will be<br />
displayed.<br />
Press the [Light] key ( ) to return to<br />
the normal display.<br />
The alarm indicators ( , , , , ) go off.<br />
The display returns to the number of copies<br />
display.<br />
6<br />
59
ROUTINE MAINTENANCE<br />
CLEANING THE DOCUMENT GLASS AND<br />
SPF/DOCUMENT COVER<br />
If the document glass, underside of the document cover/SPF, or the scanner for originals coming from the SPF (the<br />
long narrow glass surface on the right side of the document glass) become dirty, the dirt may appear on copies.<br />
Always keep these parts clean.<br />
Stains or dirt on the document glass/SPF will also be copied. Wipe the document glass, underside of the document<br />
cover/SPF and the scanning window on the document glass with a soft, clean cloth.<br />
If necessary, dampen the cloth with water. Do not use thinner, benzene, or similar volatile cleaning agents.<br />
Warning<br />
Do not spray flammable cleaner gas. Gas from the spray may come in contact with the internal<br />
electrical components or high-temperature parts of the fusing unit, creating a risk of fire or<br />
electrical shock.<br />
CLEANING THE ORIGINAL SCANNING GLASS (ONLY<br />
WHEN AN SPF IS INSTALLED)<br />
If white or black lines appear in copies made with using the SPF, use the<br />
provided glass cleaner to clean the original scanning glass. (If white or<br />
black lines appear in copies or printed pages when the SPF is not used,<br />
see "CLEANING THE TRANSFER CH<strong>AR</strong>GER" (p.61).<br />
Example of dirty print image<br />
Black lines<br />
White lines<br />
1<br />
Open the SPF and take out the glass<br />
cleaner.<br />
2<br />
Clean the original scanning glass with<br />
the glass cleaner.<br />
3<br />
Return the glass cleaner to its original<br />
position.<br />
60
ROUTINE MAINTENANCE<br />
CLEANING THE BYPASS TRAY PAPER FEED ROLLER<br />
If misfeeds occur frequently when feeding envelopes, thick paper, etc. through the bypass tray, wipe the paper feed<br />
roller at the feed slot of the bypass tray with a soft, clean cloth dampened with alcohol or water.<br />
Paper feed roller<br />
CLEANING THE TRANSFER CH<strong>AR</strong>GER<br />
If copies start becoming streaky or blotchy, the transfer charger may be dirty.<br />
Clean the charger using the following procedure.<br />
1<br />
2<br />
Turn the power switch off.<br />
Open the bypass tray and the side<br />
cover.<br />
5<br />
Set the charger cleaner onto the<br />
transfer charger and gently slide the<br />
cleaner in the direction indicated by<br />
the arrow two or three times.<br />
If the white sheet metal is<br />
smudged with toner,<br />
wipe it with a soft, clean<br />
cloth.<br />
3<br />
Lift and pull out the upper paper tray.<br />
6<br />
Note<br />
Slide the charger cleaner from one end to the<br />
other end along the groove of the transfer<br />
charger. If the cleaner is stopped on the way,<br />
smudges on copies may occur.<br />
Return the charger cleaner to its<br />
original position. Close the upper<br />
paper tray. Close the side cover by<br />
pressing the handle on the cover.<br />
6<br />
4<br />
Take the charger cleaner out by<br />
holding the tab.<br />
7<br />
Turn the power switch on.<br />
Charger<br />
cleaner<br />
61
7<br />
Chapter<br />
7<br />
PERIPHERAL DEVICES AND SUPPLIES<br />
Optional equipment and supplies are explained in this chapter. To purchase optional equipment and supplies,<br />
contact your authorised service representative.<br />
PERIPHERAL DEVICES<br />
Note<br />
As a part of our policy of continuous improvement, SH<strong>AR</strong>P reserves the right to make design and specification<br />
changes for product improvement without prior notice. The performance specification figures indicated are nominal<br />
values of production units. There may be some deviations from these values in individual units.<br />
<strong>AR</strong>-<strong>5520S</strong><br />
<strong>AR</strong>-<strong>5516S</strong><br />
Options that can be installed on both models<br />
250-sheet paper feed unit<br />
(<strong>AR</strong>-D34)<br />
2 x 250-sheet paper feed unit<br />
(<strong>AR</strong>-D35)<br />
Single pass feeder<br />
(<strong>AR</strong>-SP10)<br />
Note<br />
You cannot attach two units of 250-sheet paper feed unit to the machine. When you need to attach two or more<br />
paper trays, be sure to use the 2 x 250-sheet paper feed unit, and then 250-sheet paper feed unit if necessary.<br />
62
PERIPHERAL DEVICES AND SUPPLIES<br />
SINGLE PASS FEEDER<br />
For the names of the parts of the SPF, see "P<strong>AR</strong>T NAMES AND FUNCTIONS" (p.4).<br />
Specifications<br />
Acceptable<br />
original<br />
<strong>AR</strong>-SP10 (Single pass feeder)<br />
Weight 56 g/m 2 to 90 g/m 2<br />
Size<br />
Capacity<br />
Detectable original<br />
sizes*<br />
Weight<br />
Dimensions<br />
A5 to A3<br />
Up to 40 sheets (Thickness 4 mm and below)<br />
For B4 and larger sizes, up to 30 sheets<br />
A5, B5, B5R, A4, A4R, B4, A3<br />
5.0 kg<br />
583 mm (W) x 435 mm (D) x 133 mm (H)<br />
250-SHEET PAPER FEED UNIT/2 X 250-SHEET PAPER<br />
FEED UNIT<br />
These paper feed units provide the convenience of increased paper capacity for the copier and a greater choice of<br />
paper sizes readily available for copying.<br />
The <strong>AR</strong>-D34 contains one 250-sheet paper tray and the <strong>AR</strong>-D35 contains two 250-sheet paper trays.<br />
Part names<br />
250-sheet paper feed unit<br />
<strong>AR</strong>-D34<br />
Side cover<br />
2 x 250-sheet paper feed unit<br />
<strong>AR</strong>-D35<br />
Side cover<br />
Specifications<br />
Tray<br />
Trays<br />
7<br />
Paper size<br />
Paper capacity<br />
<strong>AR</strong>-D34<br />
One tray with capacity for 250 sheets of<br />
90 g/m 2 bond paper<br />
B5 to A3<br />
Paper weight 56 g/m 2 to 90 g/m 2<br />
Power supply<br />
Drawn from the machine<br />
<strong>AR</strong>-D35<br />
Two trays with capacity for 250 sheets of<br />
90 g/m 2 bond paper<br />
Dimensions 590 mm (W) x 476.5 mm (D) x 88 mm (H) 590 mm (W) x 476.5 mm (D) x 174 mm (H)<br />
Weight 5.0 kg 10.0 kg<br />
63
STORAGE OF SUPPLIES<br />
Standard supplies for this product that are to be replaced by the user are paper and toner cartridge.<br />
For best copying results, be sure to use only SH<strong>AR</strong>P products.<br />
Only genuine SH<strong>AR</strong>P consumables carry the Genuine Supplies label.<br />
GENUINE SUPPLIES<br />
PROPER STORAGE<br />
● Store the supplies in a location that is:<br />
clean and dry,<br />
at a stable temperature,<br />
not exposed to direct sunlight.<br />
● Store paper in the wrapper and lying flat.<br />
Paper stored out of the wrapper or in packages<br />
standing on end may curl or get damp, resulting in<br />
paper misfeeds.<br />
Supply of spare parts and consumables<br />
The supply of spare parts for repair of the machine is guaranteed for at least 7 years following the termination of<br />
production. Spare parts are those parts of the machine which may break down within the scope of the ordinary<br />
use of the product, whereas those parts which normally exceed the life of the product are not to be considered as<br />
spare parts. Consumables too, are available for 7 years following the termination of production.<br />
64
OPERATION GUIDE<br />
<strong>AR</strong><strong>5520S</strong>-<strong>GB</strong>1