1061504_Rev. A ENDOBUTTON Tech - EUROCIENCIA
1061504_Rev. A ENDOBUTTON Tech - EUROCIENCIA
1061504_Rev. A ENDOBUTTON Tech - EUROCIENCIA

Create successful ePaper yourself
Turn your PDF publications into a flip-book with our unique Google optimized e-Paper software.
<strong>ENDOBUTTON</strong> CL BTB Fixation System Stuart Fromm, M.D.<br />
2.<br />
3.<br />
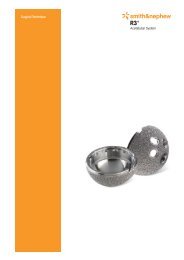
Attaching the <strong>ENDOBUTTON</strong><br />
CL BTB Fixation System to<br />
the Graft<br />
The <strong>ENDOBUTTON</strong> CL BTB<br />
System can be divided into<br />
three distinct “areas” (Figure 13):<br />
1. Long CL loop<br />
1.<br />
2. Short CL loop<br />
3. <strong>ENDOBUTTON</strong> Fixation Device<br />
Figure 13: <strong>ENDOBUTTON</strong> CL BTB components<br />
a.<br />
b.<br />
c. d.<br />
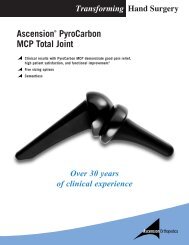
Pass the Continuous Loop (CL)<br />
through the graft and attach it<br />
to the <strong>ENDOBUTTON</strong> device<br />
as shown in Figure 14.<br />
1. Feed the long CL loop through<br />
the prepared hole<br />
of the femoral bone block<br />
(respectively through the<br />
desired position at the<br />
tendon-bone junction). The<br />
short CL loop should face<br />
toward the bone block<br />
(Figure 14-a).<br />
2. Feed the long CL loop through<br />
the short CL loop (Figure 14-b).<br />
3. Slip the long CL loop over<br />
the <strong>ENDOBUTTON</strong> device<br />
(Figures 14-c and d).<br />
e. f.<br />
4. Tighten the construct<br />
(Figures 14-e and f).<br />
Figure 14: Attaching the <strong>ENDOBUTTON</strong> CL BTB System<br />
8