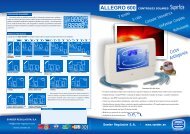
cr radio - Sonder
cr radio - Sonder
cr radio - Sonder

Create successful ePaper yourself
Turn your PDF publications into a flip-book with our unique Google optimized e-Paper software.
5 SEG.<br />
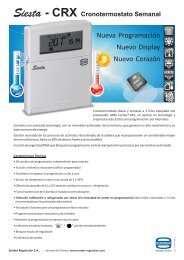
Siesta - CR RADIO<br />
1<br />
Radiofrequency Weekly Chronothermostat<br />
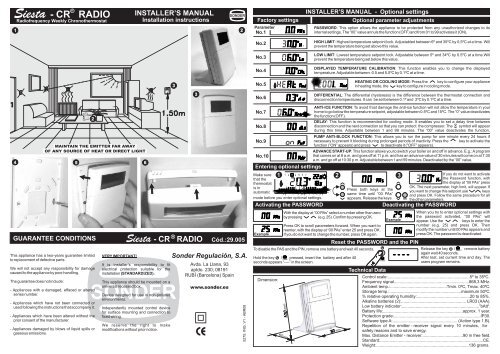
INSTALLER’S MANUAL<br />
Installation instructions<br />
SONDER<br />
2<br />
Factory settings<br />
Parameter<br />
No.1<br />
INSTALLER’S MANUAL - Optional settings<br />
Optional parameter adjustments<br />
PASSWORD: This option allows the appliance to be protected from any unauthorized changes to its<br />
internal settings. The “00” value annuls the function (OFF) and from 01 to 99 activates it (ON).<br />
No.2<br />
HIGH LIMIT: Highest temperature setpoint lock. Adjustabled between 6º and 35ºC by 0.5ºC at a time. Will<br />
prevent the temperature being set above this value.<br />
No.3<br />
LOW LIMIT: Lowest temperature setpoint lock. Adjustable between 5º and 34ºC by 0.5ºC at a time.Will<br />
prevent the temperature being set below this value.<br />
No.4<br />
DISPLAYED TEMPERATURE CALIBRATION: This function enables you to change the displayed<br />
temperature. Adjustable between -0.5 and 5.0ºC by 0.1ºC at a time.<br />
5 6 7<br />
3<br />
8<br />
3<br />
3<br />
No.5<br />
No.6<br />
HEATING OR COOLING MODE: Press the key to configure your appliance<br />
in heating mode, the key to configure in cooling mode.<br />
DIFFERENTIAL: The differential (hysteresis) is the difference between the thermostat connection and<br />
disconnection temperatures. It can be set between 0.1º and 2ºC by 0.1ºC at a time.<br />
4<br />
2<br />
MAINTAIN THE EMITTER FAR AWAY<br />
OF ANY SOURCE OF HEAT OR DIRECT LIGHT<br />
GUARANTEE CONDITIONS<br />
This appliance has a two-years guarantee limited<br />
to replacement of defective parts.<br />
We will not accept any responsibility for damage<br />
caused to the appliance by poor handling.<br />
The guarantee does not include:<br />
- Appliances with a damaged, effaced or altered<br />
series number.<br />
- Appliances which have not been connected or<br />
used following the instructions that accompany it.<br />
- Appliances which have been altered without the<br />
prior consent of the manufacturer.<br />
- Appliances damaged by blows of liquid spills or<br />
gaseous emissions.<br />
5 6<br />
VERY IMPORTANT!<br />
Siesta - CR RADIO<br />
It is installer’s responsibility to fit<br />
electrical protection suitable for the<br />
installation (STANDARDIZED).<br />
This appliance should be mounted on a<br />
universal recessed box.<br />
Device designed for use in non-polluted<br />
SONDER<br />
environments.<br />
Independently mounted control device<br />
for surface mounting and connection to<br />
fixed wiring.<br />
We reserve the right to make<br />
modifications without prior notice.<br />
Cód.:29.005<br />
<strong>Sonder</strong> Regulación, S.A.<br />
Avda. La Llana, 93<br />
aptdo. 230; 08191<br />
RUBÍ (Barcelona) Spain<br />
www.sonder.es<br />
5275. ING. V1 - ABR08<br />
No.7<br />
No.8<br />
No.9<br />
No.10<br />
Entering optional settings<br />
To disable the PAS and the PIN, remove one battery and wait 40 seconds.<br />
Hold the key /<br />
5 SEG.<br />
pressed, insert the battery and after 40<br />
seconds appears “----” in the s<strong>cr</strong>een.<br />
Dimension:<br />
1<br />
Make sure<br />
that the<br />
thermostat<br />
is in<br />
automatic<br />
mode before you enter optional settings.<br />
Activating the PASSWORD<br />
Example<br />
mm<br />
60<br />
mm<br />
ANTI-ICE FUNCTION: To avoid frost damage the anti-ice function will not allow the temperature in your<br />
home to go below the temperature setpoint, adjustable between 0.5ºC and 15ºC. The “0” value deactivates<br />
the function (OFF).<br />
DELAY: This function is recommended for cooling mode. It enables you to set a delay time between<br />
disconnection and the next connection so that you can protect the compressor. The symbol will appear<br />
during this time. Adjustable between 1 and 99 minutes. The “00” value deactivates the function.<br />
PUMP ANTI-BLOCK FUNCTION: This allows you to run the pump for one minute every 24 hours if<br />
necessary to prevent it blocking during prolonged periods of inactivity. Press the key to activate the<br />
function (”ON” appears) and press to deactivate it (”OFF” appears).<br />
ADVANCE START-UP: This function allows you to switch your boiler on and off in advance. E.g.: A program<br />
that comes on at 8 a.m. and goes off at 11 p.m. and has an advance value of 30 minutes will come on at 7:30<br />
a.m. and go off at 10:30 p.m. Adjustable between 1 and 59 minutes. Deactivated by the “00” value.<br />
2<br />
Reset the PASSWORD and the PIN<br />
mm<br />
Press both keys at the<br />
same time until “00 PAs”<br />
appears. Release the keys.<br />
With the display at “00 PAs” select a number other than zero<br />
by pressing (e.g. 25). Confirm by pressing OK.<br />
Press OK to s<strong>cr</strong>oll parameters forward. When you want to<br />
reenter, with the display at “00 PAs” enter 25 and press OK.<br />
If you do not want to change the number, press OK again.<br />
Technical Data<br />
3<br />
OK<br />
If you do not want to activate<br />
the Password function, with<br />
the display at “00 PAs” press<br />
OK. The next parameter, high limit, will appear. If<br />
you want to change this setpoint use keys<br />
and press OK. Follow the same procedure for all<br />
the other parameters.<br />
Deactivating the PASSWORD<br />
Example<br />
When you try to enter optional settings with<br />
the password activated, “00 PAs” will<br />
appear. Use the keys to enter the<br />
number (e.g. 25) and press OK. Then<br />
modify the number until 00 PAs appears and<br />
press OK. The password is deactivated.<br />
Release the key /<br />
5 SEG.<br />
, remove battery<br />
again wait 40 seconds.<br />
After test, set current time and day. The<br />
users program remains.<br />
Control scale:.......................................................................5º to 35ºC.<br />
Frequency signal.................................................................868,3 MHz.<br />
Ambient temp.:.................................................Tmin. 0ºC, Tmax. 40ºC.<br />
Storage temp.:..............................................................maximum 50ºC.<br />
% relative operating humidity:..............................................20 to 85%.<br />
Alkaline batteries (2):........................................................ LR03 (AAA).<br />
Low battery indicator:...................................................................”bAtt“.<br />
Battery life:.....................................................................approx. 1 year.<br />
Protection grade:...........................................................................IP30.<br />
Software type A:........................................................ (Action type 1.B).<br />
Repetition of the emitter - receiver signal every 10 minutes, for<br />
safety reasons and to save energy.<br />
Max. Distance Emitter - receiver:...................................90 m free field.<br />
Standard:.........................................................................................CE.<br />
Weight:................................................................................136 grams.
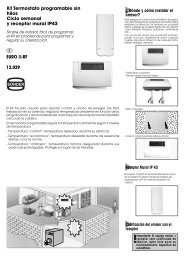
USER’S MANUAL - Basic instructions for use<br />
1.- Start-up or battery change<br />
The Siesta - CR will provide your home with comfort<br />
and economy. You can program your heating for all<br />
seven days of the week. Its features include:<br />
A PIN to lock the keypad, a password (PAS) to protect<br />
the installer’s settings. It saves user programs and<br />
settings indefinitely with its batteries completely dead<br />
and even without them. To get the best out of your<br />
thermostat, please read these instructions carefully.<br />
Insert the LR03 (AAA) 1.5 V alkaline<br />
batteries (Very important: do not use<br />
rechargeable or block batteries)<br />
respecting the polarities marked on the<br />
apparatus as shown in figs. 1 and 2. The<br />
thermostat’s display will flash for 20<br />
seconds (internal check).<br />
1 2<br />
Display<br />
Cooling activated<br />
indicator<br />
Absent mode<br />
indicator<br />
Manual mode<br />
indicator<br />
Keypad<br />
Day of the week<br />
indicator<br />
Hours counter /<br />
Relay connection Period display:<br />
delay<br />
off<br />
Heating activated<br />
comfort<br />
indicator<br />
economy<br />
Temperature or<br />
clock display<br />
Comfort mode<br />
temperature display<br />
3.- Pre-set values, Automatic Mode<br />
Enter 1 the time by pressing the or keys and<br />
The Comfort and Economy temperatures in the<br />
confirm your setting by pressing the OK key. Follow the<br />
Siesta - CR programmable thermostat are factory pre-set<br />
same procedure to enter the minutes and the day of the<br />
to Comfort Temperature 22ºC and Economy 18ºC.<br />
week and go on to point 3.<br />
The pre-set 7-day program is Economy from midnight<br />
12.- Changing time and date / Hours counter to 6 a.m. and from 11 p.m. to midnight, Comfort from<br />
6 a.m. to 11 p.m.<br />
CHANGING TIME, DATA.<br />
If you want to change the time or the day of the week<br />
SET<br />
press the COPY key, enter the time by pressing P1<br />
and confirm your setting with the OK key. Follow the<br />
same procedure to enter the minutes and the day of the<br />
If these temperature and schedule settings for the<br />
week. After changing or confirming the day of the week<br />
heating mode are right for you, then your thermostat is<br />
the operating hours counter will appear on the display:<br />
ready to control and regulate the temperature in your<br />
press OK to exit.<br />
home.<br />
OPERATING HOURS COUNTER<br />
Your thermostat has an automatic system operating<br />
hours counter. This counter will tell you total operating 4.- Changing the Economy and Comfort<br />
hours at any time thus providing you with an energy<br />
temperature setpoints<br />
consumption and maintenance calculation for your<br />
heating or cooling system.<br />
Press the<br />
COPY<br />
key; the time will appear and flash. If it is<br />
correct, press OK. Follow the same procedure for the<br />
minutes and the day of the week. You will then see<br />
on the display showing total hours. If you<br />
want to set it to zero press and keys at the same<br />
time until<br />
to exit.<br />
SET<br />
Changeover to automatic<br />
or manual mode<br />
Up<br />
(Held down)<br />
Fast forward<br />
Down<br />
(Held down)<br />
Fast backwards<br />
Confirm data/<br />
View temperature<br />
or clock<br />
Change comfort<br />
temperature<br />
7-day programming<br />
and view current<br />
programming<br />
Change economy<br />
temperature<br />
Battery polarities<br />
Power<br />
ON-OFF<br />
Enter absent mode<br />
Change day/hour/minute<br />
Hours counter /<br />
Program copy<br />
Press to change the comfort temperature. The current<br />
setpoint will flash on the display followed by the comfort<br />
symbol. Change the temperature using the and<br />
keys. Confirm your setpoint by pressing OK.<br />
Press the key to change the economy temperature.<br />
The current setpoint will flash on the display followed by<br />
appears on the display. Press OK the economy symbol. Change the temperature using the<br />
and keys. Confirm your setpoint by pressing OK.<br />
AUTO<br />
OK<br />
ºC/<br />
PRG<br />
DAYS<br />
SET<br />
COPY<br />
5 SEG.<br />
Comfort mode<br />
activated<br />
indicator<br />
Economy<br />
mode temperature<br />
display<br />
Economy<br />
mode activated<br />
indicator<br />
Anti-ice mode<br />
activated<br />
indicator<br />
Siesta - CR<br />
Your<br />
7-day programmable thermostat<br />
offers you a choice of 4 programs: P1, P2, P3, P4.<br />
P1<br />
SET<br />
P2<br />
SET<br />
P3<br />
SET<br />
P4<br />
FREE<br />
USER’S MANUAL - Basic instructions for use<br />
5.- mode OFF (disabled the temp. Regulation) 8.- Absent mode / Manual Timer<br />
Pressing the key disables the regulation of the Your thermostat has a function which allows manual<br />
temperature but it continues visualizing the temperature mode operation for a specific time, thus enabling the<br />
of the sensors in s<strong>cr</strong>een. when you see the symbol the following applications:<br />
function defrost is activated. (see parameter 7)<br />
6.- Viewing or changing the programming<br />
Adjustable or free, it enables you to set a<br />
different program for each day of the week<br />
based on your schedule requirements. You can<br />
choose from three temperature setpoints:<br />
comfort, economy, or off.<br />
COMFORT = ECONOMY = OFF =<br />
If you want to view or change your 7-day programming<br />
press PRG . Your setpoint for day 1 will appear; press PRG<br />
DAYS<br />
DAYS<br />
again to view the other days. If you want to change the<br />
program press . The factory pre-set programs P1, P2<br />
and P3 and the Adjustable Program P4 will s<strong>cr</strong>oll forward<br />
on the display.<br />
Setting the P4 program:<br />
Press comfort, economy, or off to select the<br />
setpoint you desire for each time. If you want to change<br />
your setting, press to go back.<br />
Use the COPY key to confirm the current program (OK)<br />
and copy it to the following day. If you do not want to copy,<br />
press OK to confirm the setting for the current day. Follow<br />
the same procedure for the rest of the days of the week.<br />
7.- Changeover from Automatic Mode to<br />
Manual Mode<br />
Your programmable thermostat is default programmed to<br />
automatic mode, that is with the programmed time and<br />
temperature setpoint for all the days of the week.<br />
If you want to turn it into a normal thermostat and to be<br />
able to switch on and off your heating immediately without<br />
waiting for the time set in the program, press the key.<br />
The following will appear on the display:<br />
- ABSENCE OR VACATION<br />
When you are away from your home you can deactivate<br />
the heating for a few hours or a few days (Vacation),<br />
setting the temperature to a particular setpoint (for<br />
example anti-ice). After this period your thermostat will<br />
revert to the pre-set program in automatic mode.<br />
- MANUAL TIMER<br />
This enables you to have your heating on for a number of<br />
hours at a spedific temperature that is independent of the<br />
programming (e.g. you have guests to dinner and you<br />
want to leave the heating on). Set the number of hours<br />
and the comfort temperature you require and your<br />
thermostat will maintain that temperature, reverting to the<br />
pre-set program in automatic mode at the end of this<br />
period.<br />
To program a period of time, press the key until the<br />
following appears:<br />
5 SEG.<br />
Use the and keys to<br />
set the number of hours,<br />
01H, 02H, 03H, etc., up to a<br />
maximum of 23 hours (the<br />
thermometer symbol indicates the end of the absence<br />
period), or days, 01d, 02d, 03d, etc., up to a maximum of<br />
50 days.<br />
Press OK and the following will appear:<br />
Use the and keys to<br />
set the temperature required<br />
f o r t h e p e r i o d . Yo u r<br />
thermostat will count down<br />
the hours or days. At the end of the period your thermostat<br />
will revert to the pre-set program in automatic mode. If<br />
you should wish to exit or cancel this operation, just press<br />
the key and it will revert to automatic mode.<br />
9.- Activating and deactivating your PIN<br />
Siesta - CR<br />
In order to avoid unauthorized changes e-<br />
nables you to protect the keypad with a PIN. To activate<br />
SET<br />
the PIN, press and hold down the COPY key until 00 Pin<br />
appears on the display (indicates PIN deactivated). Use<br />
the and keys to enter a number other than zero<br />
and press OK; on Pin will appear on the display. When<br />
the PIN option is activated none of the parameters may be<br />
changed unless the correct number is first entered. To<br />
deactivate it, press any key, enter the correct number, and<br />
press OK: oFF PIN will appear on the display.<br />
Manual mode<br />
Current temperature<br />
activated<br />
or clock<br />
10.- Reverting to FACTORY SETTINGS<br />
Desired<br />
Heating<br />
comfort To consent to revert to the original factory settings, is<br />
activated<br />
temperature necessary that PAS and PIN are disabled (00). once<br />
Use the and keys to set the comfort temperature confirmed this value to come in the following way: press<br />
you require. Press the OK key to view current and hold down for 5 seconds the PRGand SET<br />
DAYS<br />
keys at the<br />
COPY<br />
temperature or time on the display. Press to revert to same time.Your thermostat will revert to its pre-set values<br />
automatic mode.<br />
but will keep time and day of the week.
Siesta R<br />
Siesta R<br />
Siesta R<br />
ZONA<br />
1 2<br />
ON / OFF<br />
Siesta R<br />
MANUAL<br />
ON / OFF<br />
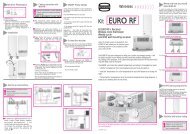
Siesta - CR RADIO<br />
Radiofrequency Weekly Chronothermostat<br />
1<br />
Siesta R<br />
1.- ELECTRICAL CONNECTION<br />
CONNECTION<br />
L<br />
The connection diagrams do not show the<br />
protection fuses or other accesories required by<br />
regulations to protect the installation<br />
The installer is responsible for fitting the<br />
installation with the appropriate (APPROVED)<br />
electrical protection fuses.<br />
IMPORTANT! Disconnect the power when<br />
handling or installing the wall receiver<br />
2 - MOUNTING INSTRUCTIONS<br />
OPEN<br />
POSITION<br />
The receiver<br />
should be<br />
positioned away<br />
from conductive<br />
elements such as<br />
metal surfaces,<br />
electric wires or<br />
sources of<br />
excessive heat.<br />
N<br />
1 2 3 4 5 6<br />
NC NO C<br />
230V~<br />
2<br />
NO<br />
YES<br />
NO<br />
12(5)A<br />
7 8 9<br />
NC NO C<br />
YES<br />
INSTALLATION MANUAL<br />
Siesta - Radio 2 Zones Kit<br />
Emitter thermostat + Wall receiver unit<br />
SUMMARY<br />
1 - Electrical connection.<br />
2 - Mounting instructions.<br />
3 - Forced on/off.<br />
4 - Technical specifications.<br />
5 - Radiofrequency status signal.<br />
6 - Emitters - receiver encoding.<br />
2 VALVES APLICATTION<br />
3<br />
DO NOT USE THE<br />
BASE OF THE BOX<br />
AS A GUIDE FOR<br />
DRILLING HOLES<br />
IN THE WALL<br />
UNDER ANY<br />
CIRCUMSTANCES.<br />
113mm<br />
Zone1<br />
4<br />
Zone2<br />
SONDER<br />
CLOSE<br />
For wall<br />
mounting, use<br />
plugs and<br />
s<strong>cr</strong>ews of the<br />
sizes shown on<br />
the diagram or<br />
Vel<strong>cr</strong>o adhesive<br />
strips.<br />
Siesta - CR RADIO Receiver INSTALLATION MANUAL<br />
Radiofrequency Weekly Chronothermostat<br />
3.- FORCED ON/OFF<br />
MANUAL<br />
ON / OFF<br />
Relay 1 OFF<br />
Relay 2 OFF<br />
Relay 1 ON<br />
Relay 2 OFF<br />
4.- RECEIVER TECHNICAL SPECIFICATIONS<br />
Power supply:.....................................230V~+10%/-15%.<br />
Transmission frequency:................................ 868,3 MHz.<br />
Relay outpout:........................................................12(5)A.<br />
Radio receiver class:..................................................... 2.<br />
Storage temperature :.................................-10ºC a +60ºC.<br />
Working temperature :..................................-5ºC a +45ºC.<br />
% working temperature humidity:.............from 20 to 85%.<br />
2<br />
Maximum section of wire to be connected:.........1.5 mm .<br />
Wirnig type: ........................................ H-05V-K (flexible).<br />
Approved:...................................................................CE.<br />
5.- SIGNAL STATUS (emitter-receiver)<br />
The receiver has a scale to indicate the intensity of the<br />
communication signal from the emitter. This can be affected<br />
by excessive distances, interference or due to a lack of<br />
communication between the emitter and the receiver. The<br />
indication of the communication signal status is updated<br />
each time the emitter sends an order to the receiver (the<br />
order is repeated every 10 minutes for safety reasons) or<br />
when the user uses the emitter (Siesta Chronothermostat).<br />
6.- EMITTER - RECEIVER ENCODING<br />
SONDER<br />
Using the on/off button, you may force the relais on or off,<br />
depending on its current status.<br />
In any event, the emitter is programmed in such a way that the<br />
real status of the relais are updated every 10 minutes.<br />
Kit Siesta RADIO is incompatible with products that they emit<br />
in the same frequency band (868 Mhz) of continuous form.<br />
Protection level<br />
(installed vertically with the wires)..........................IP53.<br />
Action type....................................................(A type 1.B).<br />
Repetition of the emitter-receiver signal every 10<br />
minutes, for safety reasons and to save energy.<br />
Max. Distance Emitter - receiver:..............90 m free field.<br />
Dimensions:.....................................130 X 130 X 35 mm.<br />
Tests ZPressure ball temperatures: 100ºC (voltage conductor<br />
anchor parts) /75ºC (accessible plastic parts)<br />
Z<br />
Assigned pulse voltage: 2500 V<br />
1 to 2 leds Low intensity signal<br />
3 leds medium intensity signal<br />
4 leds high intensity signal<br />
The kit comprising the emitter and the receiver leaves the factory encoded for immediate installation.<br />
If for<br />
any reason you think the device needs to be re-encoded, please phone our technical service on:<br />
Conditions of Warranty for the<br />
This apparatus has a 2-year warranty limited to the<br />
replacement of any defective parts.<br />
For the exchange or repair of the apparatus, dated<br />
proof of purchase must be attached.<br />
We decline all responsibility for apparatus that<br />
have been damaged through misuse.<br />
The warranty does not cover:<br />
- Apparatus whose serial number has been<br />
deteriorated, worn away or modified.<br />
- Apparatus whose connection or use has not been<br />
carried out in accord with the indications given with<br />
the apparatus.<br />
- Apparatus that have been modified without the<br />
prior agreement of the manufacturer.<br />
- Apparatus that have deteriorated as a result of<br />
contact with liquids or gases or as a result of being<br />
dropped or knocked about.<br />
USER<br />
Name:<br />
Town/City:<br />
Postcode:<br />
Telephone number:<br />
SONDER<br />
Date of purchase:<br />
e-mail: info@sonder-regulacion.com; www.sonder.es<br />
Siesta - CR Receptor Code.:29.034<br />
Surname(s):<br />
Address:<br />
Return this sheet to:<br />
SONDER REGULACIÓN S.A.<br />
Avda. La Llana 93.<br />
P.I. “La Llana” 230.<br />
RUBI (Barcelona) SPAIN<br />
FAX 93 588 49 94<br />
INSTALLER<br />
Name:<br />
Surname:<br />
Address:<br />
Town City:<br />
Postcode:<br />
Telephone number:<br />
Date of purchase:<br />
Stamp of the installer or shop:<br />
5742 ING .VØ ABR08