Assembly instructions Bubble System (white airjets ... - SpaDealers.fi
Assembly instructions Bubble System (white airjets ... - SpaDealers.fi
Assembly instructions Bubble System (white airjets ... - SpaDealers.fi

You also want an ePaper? Increase the reach of your titles
YUMPU automatically turns print PDFs into web optimized ePapers that Google loves.
<strong>Assembly</strong><br />
<strong>Bubble</strong><br />
<strong>instructions</strong><br />
<strong>System</strong> (<strong>white</strong> <strong>airjets</strong>)<br />
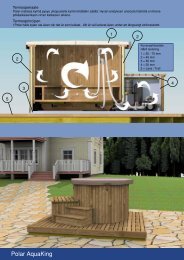
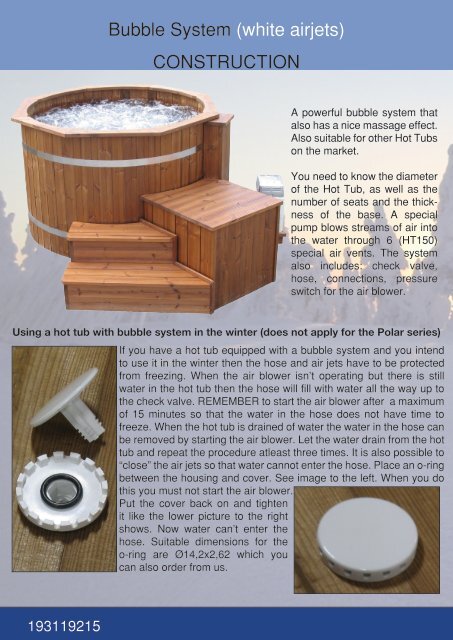
CONSTRUCTION<br />
A powerful bubble system that<br />
also has a nice massage effect.<br />
Also suitable for other Hot Tubs<br />
on the market.<br />
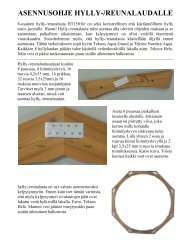
You need to know the diameter<br />
of the Hot Tub, as well as the<br />
number of seats and the thickness<br />
of the base. A special<br />
pump blows streams of air into<br />
the water through 6 (HT150)<br />
special air vents. The system<br />
also includes: check valve,<br />
hose, connections, pressure<br />
switch for the air blower.<br />
Using a hot tub with bubble system in the winter (does not apply for the Polar series)<br />
If you have a hot tub equipped with a bubble system and you intend<br />
to use it in the winter then the hose and air jets have to be protected<br />
from freezing. When the air blower isn’t operating but there is still<br />
water in the hot tub then the hose will <strong>fi</strong>ll with water all the way up to<br />
the check valve. REMEMBER to start the air blower after a maximum<br />
of 15 minutes so that the water in the hose does not have time to<br />
freeze. When the hot tub is drained of water the water in the hose can<br />
be removed by starting the air blower. Let the water drain from the hot<br />
tub and repeat the procedure atleast three times. It is also possible to<br />
“close” the air jets so that water cannot enter the hose. Place an o-ring<br />
between the housing and cover. See image to the left. When you do<br />
this you must not start the air blower.<br />
Put the cover back on and tighten<br />
it like the lower picture to the right<br />
shows. Now water can’t enter the<br />
hose. Suitable dimensions for the<br />
o-ring are Ø14,2x2,62 which you<br />
can also order from us.<br />
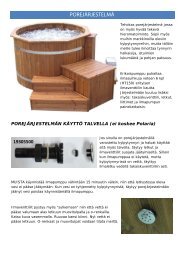
Accessories: 193119215 Sned Trappa
<strong>Bubble</strong> <strong>System</strong><br />
<strong>Assembly</strong> <strong>instructions</strong><br />
CONSTRUCTION<br />
WARNING!<br />
The blower must be placed at least 10<br />
cm above the ground in order for the<br />
suction to work.<br />
It should be placed hoizontally or the<br />
valve connection on the air hose should<br />
face downwards preventing water getting<br />
into the pump.<br />
The blower is controlled by a pressure<br />
valve and a pressure switch via an air<br />
hose. The power cord from the pump<br />
connects to the cord from the coupling<br />
box.<br />
<strong>Bubble</strong> system parts<br />
Silicone<br />
The base of the bubble system for the HT150 has 6 holes for air vents, which are<br />
screwed into a lower part (see picture). This is suitable for T-connections that are<br />
connected to an air hose. Note! Use Silicone or an equivalent material to seal the<br />
base of the jet from above as well as the threads. The black rubber seal is placed<br />
between the base and connector. Tighten by hand. The picture below illustrates the<br />
connected hose system (Basic).<br />
The hose is placed on<br />
the side of the Hot Tub to<br />
prevent water from<br />
coming into contact with<br />
the blower.<br />
The T-connections are easily<br />
pressed onto the connector.<br />
A cover shelf (extra for the DTHS) covers and protects the hose for the blower.<br />
FROST WARNING!<br />
If the Hot Tub is emptied and there is a risk for freezing, it is very important that there is no water<br />
remaining in the system. Start the blower in case there is a bubble system installed and let it run<br />
approx. for 5 seconds. Repeat this procedure three times.<br />
Accessories: 193119215 Sned Trappa
<strong>Bubble</strong> <strong>System</strong><br />
<strong>Assembly</strong> <strong>instructions</strong><br />
CONSTRUCTION<br />
Accessories: 193119215 Sned Trappa