Contents Important Tools Required - National Cycle, Inc.
Contents Important Tools Required - National Cycle, Inc.
Contents Important Tools Required - National Cycle, Inc.

Create successful ePaper yourself
Turn your PDF publications into a flip-book with our unique Google optimized e-Paper software.
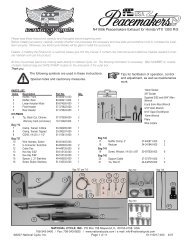
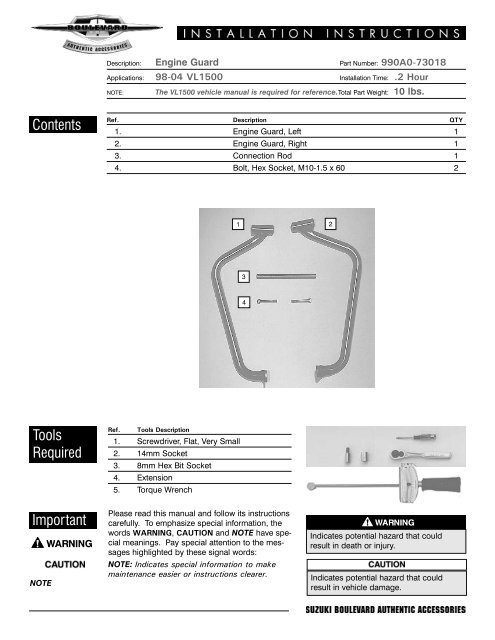
Description: Engine Guard Part Number: 990A0-73018<br />
Applications: 98-04 VL1500 Installation Time: .2 Hour<br />
NOTE:<br />
The VL1500 vehicle manual is required for reference.Total Part Weight: 10 lbs.<br />
<strong>Contents</strong><br />
Ref. Description QTY<br />
1. Engine Guard, Left 1<br />
2. Engine Guard, Right 1<br />
3. Connection Rod 1<br />
4. Bolt, Hex Socket, M10-1.5 x 60 2<br />
1<br />
2<br />
3<br />
4<br />
<strong>Tools</strong><br />
<strong>Required</strong><br />
<strong>Important</strong><br />
NOTE<br />
Ref. <strong>Tools</strong> Description<br />
1. Screwdriver, Flat, Very Small<br />
2. 14mm Socket<br />
3. 8mm Hex Bit Socket<br />
4. Extension<br />
5. Torque Wrench<br />
Please read this manual and follow its instructions<br />
carefully. To emphasize special information, the<br />
words WARNING, CAUTION and NOTE have special<br />
meanings. Pay special attention to the messages<br />
highlighted by these signal words:<br />
NOTE: Indicates special information to make<br />
maintenance easier or instructions clearer.<br />
Indicates potential hazard that could<br />
result in death or injury.<br />
Indicates potential hazard that could<br />
result in vehicle damage.
Preparation<br />
Prior to<br />
Installation<br />
1.<br />
2.<br />
Place the motorcycle securely on its side stand.<br />
Remove the plastic caps, item a, from the<br />
frame (small screwdriver), they will not be<br />
reused. Figure 1.<br />
a<br />
Figure 1<br />
3.<br />
Remove the front floor board bolt, item b,<br />
one from each side of the motorcycle (14mm<br />
wrench). Set these bolts aside for reuse. Figure 2.<br />
b<br />
Figure 2<br />
4.<br />
Thread one M10 x 60 bolt, item A, through the<br />
tubular mount section on the right engine<br />
guard, item B, and into one end of the connection<br />
rod, item C. Leave very loose. Figure 3.<br />
C<br />
A<br />
B<br />
Figure 3<br />
Installation<br />
1.<br />
Insert the connection rod, item C, into the tube<br />
in the motorcycle frame. Figure 4.<br />
C<br />
B<br />
Figure 4
2.<br />
Thread a bolt, item b, from the floor board<br />
mount, through the engine guard flat mount,<br />
item B, and into its original location on the frame,<br />
leave loose (14mm wrench). Figure 5.<br />
B<br />
b<br />
Figure 5<br />
3.<br />
Position the left engine guard, item D, so the<br />
connection rod, item C, enters the tubular<br />
mount. Push on the right side M10 x 60 bolt to make<br />
sure the rod goes into the tubular mount. Figure 6.<br />
D<br />
c<br />
Figure 6<br />
4. Thread the remaining M10 x 60 bolt, item A,<br />
through the tubular mount and into the connection<br />
rod (8mm hex wrench). Figure 7.<br />
A<br />
Figure 7<br />
5. Thread the remaining floor board bolt, item b,<br />
through the right engine guard flat mount and<br />
into its original location on the frame (14 mm<br />
wrench). Figure 8<br />
6.<br />
Tighten the floor board bolts (lower engine<br />
guard mounts), to 45 Nm (32 ft lbs.) (14 mm<br />
wrench and torque wrench). Tighten the upper<br />
engine guard mounting bolts to 45 Nm (32 ft lbs.)<br />
(8mm hex wrench and torque wrench).<br />
Figure 8<br />
b
Figure 9<br />
Inspection /<br />
Adjustments<br />
Maintenance/<br />
Care<br />
1.Periodically check bolts for tightness and re-torque.<br />
1. Clean the chrome with a quality chrome cleaner.<br />
This accessory engine guard is intended for use on Suzuki VL1500 Intruder LC. Use<br />
of this engine guard on another motorcycle may affect its handling and stability, resulting<br />
in unsafe riding conditions. Check your vehicle owner’s manual before installing<br />
any new accessory.