Natura + Line Application Guide - ConvaTec UK
Natura + Line Application Guide - ConvaTec UK
Natura + Line Application Guide - ConvaTec UK

You also want an ePaper? Increase the reach of your titles
YUMPU automatically turns print PDFs into web optimized ePapers that Google loves.
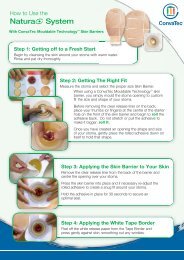
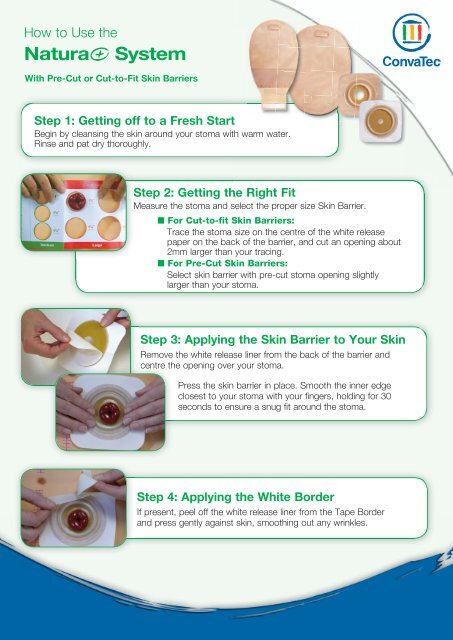
How to Use the<br />
<strong>Natura</strong>+ System<br />
With Pre-Cut or Cut-to-Fit Skin Barriers<br />
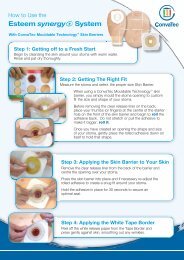
Step 1: Getting off to a Fresh Start<br />
Begin by cleansing the skin around your stoma with warm water.<br />
Rinse and pat dry thoroughly.<br />
Step 2: Getting the Right Fit<br />
Measure the stoma and select the proper size Skin Barrier.<br />
■ For Cut-to-fit Skin Barriers:<br />
Trace the stoma size on the centre of the white release<br />
paper on the back of the barrier, and cut an opening about<br />
2mm larger than your tracing.<br />
■ For Pre-Cut Skin Barriers:<br />
Select skin barrier with pre-cut stoma opening slightly<br />
larger than your stoma.<br />
Step 3: Applying the Skin Barrier to Your Skin<br />
Remove the white release liner from the back of the barrier and<br />
centre the opening over your stoma.<br />
Press the skin barrier in place. Smooth the inner edge<br />
closest to your stoma with your fingers, holding for 30<br />
seconds to ensure a snug fit around the stoma.<br />
Step 4: Applying the White Border<br />
If present, peel off the white release liner from the Tape Border<br />
and press gently against skin, smoothing out any wrinkles.
Step 5: Attaching the Pouch<br />
Make sure the inner surfaces of the pouch are separated and that the<br />
pouch contains a small amount of air. Position the pouch ring over<br />
the skin barrier ring. Gently press your fingers around the entire ring area<br />
starting at the bottom or 6 o’clock position. You will hear and feel<br />
a series of audible “clicks” as the system locks securely into place.<br />
Important: Always recheck the coupling to ensure that the system<br />
is completely closed by repeating the above steps.<br />
Step 6: Removing the Pouch<br />
To easily disconnect the skin barrier from the pouch, firmly pull<br />
downward on the pouch tab and lift the pouch off. Support the skin<br />
barrier with one hand.<br />
Step 7: Removing the Skin Barrier/Wafer<br />
Gently pull the skin barrier down, away from the skin, while<br />
supporting the adjacent skin with your other hand. ConvaCare ®<br />
Adhesive Remover Wipes can be used to aid in skin barrier<br />
removal and remove any adhesive residue left behind.<br />
Pouch Options<br />
■ Pouches are available in Drainable with InvisiClose ® tail closure and Closed-end.<br />
Filter Tips & Techniques<br />
■ The charcoal filter, located at the top of the pouch, lets gasses through while preventing<br />
liquid from leaking out. The filter substantially reduces odour while helping to keep your<br />
pouch flat.<br />
■ Important: cover the filter opening with the provided stick-on filter covers during all<br />
water activities (bathing, showering, or swimming). After water activities are completed<br />
and the pouch is dry, remove the filter cover.<br />
Note: For flush or retracted stomas, convex products are recommended to increase wearing time. Please refer to your healthcare professional or <strong>ConvaTec</strong>’s Customer Care<br />
Center on the number below. Remember to empty your pouch when it is one-third full. The use of soap or cleansers in the pouch is not recommended.<br />
For more information or if you have questions, call 0800 282 254<br />
ROI 1800 721 721 or email us on stoma.webcare@convatec.com<br />
Visit our website at www.convatecstomacare.co.uk<br />
See package insert for complete Instructions for Use.<br />
®/ indicates trademarks of <strong>ConvaTec</strong> Inc. <strong>Natura</strong> is a registered trademark in the U.S.<br />
© 2011 <strong>ConvaTec</strong> Inc. April 2011 AP-009501-MM Stock No. PLUS03N