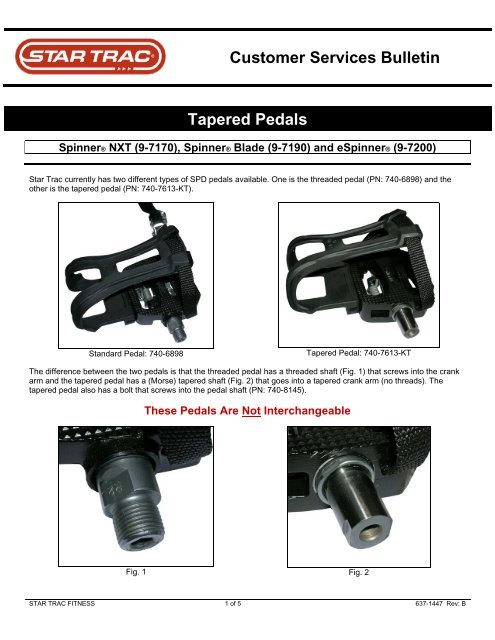
Customer Services Bulletin Tapered Pedals - Star Trac Support
Customer Services Bulletin Tapered Pedals - Star Trac Support
Customer Services Bulletin Tapered Pedals - Star Trac Support

You also want an ePaper? Increase the reach of your titles
YUMPU automatically turns print PDFs into web optimized ePapers that Google loves.
<strong>Customer</strong> <strong>Services</strong> <strong>Bulletin</strong><br />
<strong>Tapered</strong> <strong>Pedals</strong><br />
Spinner® NXT (9-7170), Spinner® Blade (9-7190) and eSpinner® (9-7200)<br />
<strong>Star</strong> <strong>Trac</strong> currently has two different types of SPD pedals available. One is the threaded pedal (PN: 740-6898) and the<br />
other is the tapered pedal (PN: 740-7613-KT).<br />
Standard Pedal: 740-6898<br />
<strong>Tapered</strong> Pedal: 740-7613-KT<br />
The difference between the two pedals is that the threaded pedal has a threaded shaft (Fig. 1) that screws into the crank<br />
arm and the tapered pedal has a (Morse) tapered shaft (Fig. 2) that goes into a tapered crank arm (no threads). The<br />
tapered pedal also has a bolt that screws into the pedal shaft (PN: 740-8145).<br />
These <strong>Pedals</strong> Are Not Interchangeable<br />
Fig. 1 Fig. 2<br />
STAR TRAC FITNESS 1 of 5 637-1447 Rev: B
<strong>Customer</strong> <strong>Services</strong> <strong>Bulletin</strong><br />
<strong>Tapered</strong> Pedal<br />
Model SKU SN Prefix<br />
Spinner® NXT 9-7170-MINTP0 SBENxxxx-xxxxxx<br />
Spinner® NXT - SR 9-7180-MINTP0 SBECxxxx-xxxxxx<br />
Spinner® Blade 9-7190-MINTP0 SBEXxxxx-Lxxxxx*<br />
eSpinner® 9-7200-MUNBP0 SBEBxxxx-Lxxxxx<br />
*The previous Spinner® NXT (9-7090-MINTP0) used the serial number prefix of SBEX.<br />
Do not confuse those serial numbers with the current Spinner® Blade.<br />
Threaded <strong>Pedals</strong><br />
All other Spinner® Bikes** (except than the ones listed above) will use the threaded pedals.<br />
**The Velo and Spinner® V bikes shipped with threaded non-SPD pedals.<br />
Before Installing the <strong>Pedals</strong><br />
Before installing the pedals, make sure you know which is for the right side and which is for the left side.<br />
When installed properly, the rider’s foot should be able to slide into the cage (Fig. 3). If the pedal is installed wrong, the<br />
rider will not be able to get their foot into the cage (Fig. 4).<br />
Fig. 3 Fig. 4<br />
If the pedals have been installed incorrectly, you must follow the proper pedal removal steps or the pedal will become<br />
damaged.<br />
STAR TRAC FITNESS 2 of 5 637-1447 Rev: B
<strong>Customer</strong> <strong>Services</strong> <strong>Bulletin</strong><br />
Proper Pedal Removal<br />
This procedure is the ONLY correct way to remove the pedals. Experimenting with other methods will damage the pedals<br />
and cranks.<br />
Tools required<br />
• Park Tool Crank Remover (CWP-7 model)<br />
• 8mm Hex Key<br />
A CRANK PULLER MUST BE USED TO REMOVE PEDALS<br />
OR THE PEDALS WILL BE DAMAGED<br />
Removing the <strong>Pedals</strong><br />
1. Put pedal in correct position for accessibility (Fig.5). This is the position it should be to have access to the bolt that<br />
holds the pedal.<br />
Fig 5<br />
2. Remove bolt (Fig.6) behind pedal using 8mm hex key (Fig.7).<br />
Fig.6 Fig. 7<br />
STAR TRAC FITNESS 3 of 5 637-1447 Rev: B
<strong>Customer</strong> <strong>Services</strong> <strong>Bulletin</strong><br />
3. Insert Crank Puller (Fig. 8) into the bolt using fingers only (Fig. 9). No tools are needed to tighten the crank puller<br />
into the crank.<br />
Fig. 8 Fig. 9<br />
4. Once the crank puller has been inserted into the crank, use a socket wrench to turn the shaft (Fig. 10). It will not<br />
take a large amount of force to loosen the pedal. As you are turning, the amount of force needed will lessen. This<br />
means the pedal is loose and can be pulled out (Fig. 11).<br />
Fig. 10 Fig. 11<br />
STAR TRAC FITNESS 4 of 5 637-1447 Rev: B
<strong>Customer</strong> <strong>Services</strong> <strong>Bulletin</strong><br />
Proper Pedal Installation<br />
1. Put pedal in correct position for accessibility.<br />
2. Insert the correct pedal into the crank.<br />
3. Using a rubber mallet, tap the pedal (Fig. 12).<br />
Note: The pedal does not need to be hit hard and does not need to be inserted all the way in the crank.<br />
4. Re-insert the bolt into the pedal and tighten.<br />
Fig. 12<br />
The Inner Seal<br />
Do not unscrew the inner seal (Fig. 13) on the pedal. It is not meant to be removed. Should the inner seal come loose,<br />
apply red Loctite to the threads (Fig. 14) before tightening.<br />
Fig. 13 Fig. 14<br />
Broken Bolt in the Pedal<br />
Should a bolt be broken off in the pedal shaft, use an “Easy Out” bolt extractor. The pedal does not need to be replaced.<br />
STAR TRAC FITNESS 5 of 5 637-1447 Rev: B