Featuring fabrics from Manor House by Jinny Beyer - RJR Fabrics
Featuring fabrics from Manor House by Jinny Beyer - RJR Fabrics
Featuring fabrics from Manor House by Jinny Beyer - RJR Fabrics

Create successful ePaper yourself
Turn your PDF publications into a flip-book with our unique Google optimized e-Paper software.
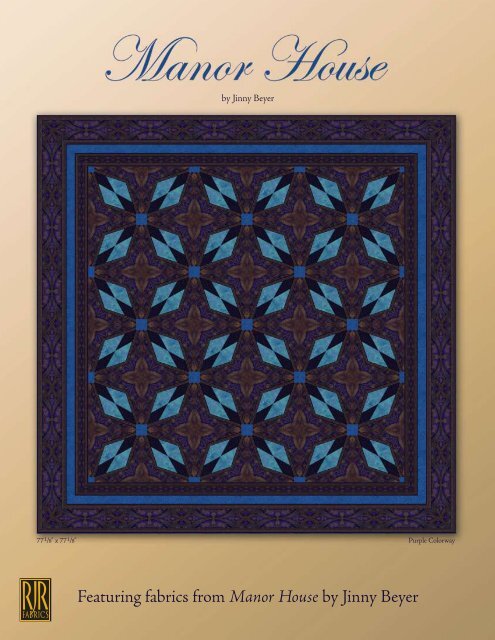
y <strong>Jinny</strong> <strong>Beyer</strong><br />
77 1 /8" x 77 1 /8" Purple Colorway<br />
<strong>Featuring</strong> <strong>fabrics</strong> <strong>from</strong> <strong>Manor</strong> <strong>House</strong> <strong>by</strong> <strong>Jinny</strong> <strong>Beyer</strong>
Cutting Instructions<br />
Cutting amounts are given for both quilt sizes. The amounts<br />
in parentheses are for the 77 1 /8" x 77 1 /8" quilt.<br />
Cutting the Focus Fabric<br />
Study the focus fabric, notice how the pattern on the focus<br />
fabric repeats both across and down the fabric. Choose the<br />
symmetrical design you prefer. Cut 24 (60) identical pieces<br />
<strong>from</strong> the fabric, using template A.<br />
Using template A, draw a portion of the design of the fabric<br />
directly onto the template. This will be a guide for cutting all<br />
the pieces exactly the same. Align the template over the<br />
design and make sure that the center line of the template is<br />
directly over the center line of the symmetrical pattern. Cut<br />
around the template. Label this piece A.<br />
Place template E over template A matching the mirror lines<br />
and outside edges. Transfer the fabric design markings and<br />
onto template E. This will ensure that the pieces cut <strong>from</strong><br />
Template E will match the pieces of designs cut <strong>from</strong><br />
Template A. Cut 8 (12) identical pieces using Template E.<br />
Repeat for Template E (r).<br />
centered motif is at the halfway mark for an accurate<br />
mitered border.<br />
Repeat with the wide border. Cut four LENGTHWISE strips<br />
each 5 ¾” x 70” (5 ¾” x 90”). Make sure a centered motif<br />
is at the halfway mark for an accurate mitered border.<br />
Cutting the Middle Border<br />
From fabric F cut 4 strips 2” x 54” (2” x 72”.)<br />
Making Unit D<br />
Use Fabric E, the border fabric to make Unit D pieces. Cut<br />
32 (72) pieces <strong>from</strong> the narrow border strip using<br />
Templates D as illustrated. Repeat using Template D(r).<br />
Label unit as Unit D and Unit D(r).<br />
D<br />
Paper Piecing Unit B<br />
Figure 2<br />
From fabric B cut 32 (72) rectangles 2 1 /2" x 6 1 /2".<br />
From fabric C cut 72 (144) rectangles<br />
4 7 /8" x 3 3 /4".<br />
Foundation piece according to the<br />
numbers shown on Template B. Use Figure 3<br />
fabric B for #1. Use fabric C for #2 and Unit B<br />
#3. Make 32 (72). Label the completed paper pieced block<br />
Unit B.<br />
Sewing the Blocks<br />
One basic block is used to make the quilt but three different<br />
styles are used to complete the quilt: (as shown in figure 3) a<br />
full block as shown in figure 3, a side block, and a corner<br />
block.<br />
Figure 1<br />
Cutting the Center Square<br />
Use template C to cut 5 (13) pieces <strong>from</strong> fabric D. Label this<br />
piece as Unit C. Use template F and cut 8 (12) pieces <strong>from</strong><br />
fabric D. Label as Unit F.<br />
Cutting the borders<br />
From the narrow border of fabric E, cut four LENGTHWISE<br />
strips each 2 5/8” x 55” (2 5/8” x 75”), making sure a<br />
Figure 4
Piecing the Full Blocks<br />
1) See figure 5 (Take one each of<br />
piece A, piece D, and piece<br />
D(r). Sew D and D(r) to either<br />
side of piece A). Make 20 (52).<br />
D<br />
A<br />
D(r)<br />
4) Sew block together, sew center block and stop. Sew each<br />
side <strong>from</strong> the center to the outside edge. Sew a Unit 2 to<br />
both sides of Unit 3. Make 5 (13). Refer to figure 8.<br />
Unit 1<br />
Figure 5<br />
2) Sew on Unit B to both sides of Unit 1 as shown in figure<br />
6. Label as Unit 2. Make 10 (26).<br />
Unit B<br />
Figure 8<br />
Unit 1<br />
Piecing the Side Blocks<br />
1) Follow the steps 1-2 in piecing the full blocks and make<br />
4 (8) Unit 1's, make 4 (8) Unit 2's. Refer to Figure 9.<br />
Figure 6<br />
(Unit 2)<br />
2) Sew D to an E piece and sew a D (r) to an E (r) piece.<br />
Make 4 (8). Label as Unit 4.<br />
3) Sew Unit 4 and Unit 2 pieces to piece F. Make 4 (8).<br />
3) Refer to figure 7. Sew a Unit 1 to both sides of Unit C.<br />
label as Unit 3. Make 5 (13).<br />
E<br />
D<br />
Unit 2<br />
Figure 9<br />
F<br />
D(r)<br />
E(r)<br />
Unit 4<br />
Figure 7<br />
Unit 3
Piecing the Corner Blocks (See figure 6):<br />
F<br />
Figure 10<br />
1) Sew piece D to an E piece. Label as Unit 5. Make 4. sew<br />
piece D(r) to an E(r) piece Label as Unit 6. Make 4.<br />
2) Sew a Unit B to Unit 5. Label as Unit 7. Make 4.<br />
3) Sew a Unit 6 piece to Unit F. Make 4. Label as<br />
Unit 8.<br />
4) Sew a Unit 7 to a Unit 8. Make 4.<br />
Sewing the Center of the Quilt<br />
Lay out the blocks as shown in figure 10. Once the blocks<br />
are laid out sew the blocks together in rows and then sew<br />
the rows together.<br />
Side Block<br />
Corner<br />
Block<br />
Center Block<br />
Figure 11<br />
Borders<br />
First border: Narrow strip cut <strong>from</strong> border fabric.<br />
Second border: Fabric F.<br />
Third border: Wide strip cut <strong>from</strong> the border fabric.
<strong>Jinny</strong>’s Method for Framing a Square Quilt with a Border Print<br />
1. Place one narrow (inner) border strip across the middle<br />
of the quilt, centering a mirror-imaged motif <strong>from</strong> the<br />
narrow border at the exact center of the quilt. Use a<br />
right-angle, 45˚ triangle to mark the miter along one end<br />
of the strip, positioning triangle at the edge of the quilt<br />
as indicated in Figure #11 (see arrow). Cutting where the<br />
arrow indicates, at the exact edge of the quilt top, allows<br />
for the seam allowance. Mark, then cut the miter.<br />
2. Carefully pick up the mitered edge of the border strip and<br />
bring it over to the other end of the border strip at the<br />
opposite side of the quilt, making sure that the design<br />
matches. Upon centering a motif <strong>from</strong> the border print in<br />
the middle of the quilt, the design should match at the<br />
edges.<br />
3. Using the first mitered strip as a pattern, place it on the<br />
remaining three narrow border strips, matching the<br />
design exactly. Cut three more identical strips.<br />
4. Sew the inner borders to the edges of the quilt. Begin <strong>by</strong><br />
pinning the midpoint (precisely at a mirror image) of one<br />
of the border pieces to the middle of one of the edges<br />
of the quilt. Next, pin the corners. Then find the midpoint<br />
of each half and pin. Continue finding midpoints and<br />
pinning. Finally, ease in any fullness, pinning<br />
carefully all along the edges. Sew all four inner border<br />
strips to the quilt, stopping short of the 1/4" seam<br />
allowance where the miters will meet. Sew the miters into<br />
a Y-seam last.<br />
5. Repeat steps 1 through 4 for the middle and outer<br />
borders.<br />
6. Finish the quilt <strong>by</strong> layering the backing, batting and quilt<br />
top; baste.<br />
7. Quilt, bind and finish as desired.<br />
Figure 12
Red Colorway<br />
57 3 /4" x 57 3 /4"<br />
Brown Colorway<br />
57 3 /4" x 57 3 /4"
Templates<br />
(Shown at 100%, DO NOT scale when printing)<br />
A<br />
C<br />
0 1" 2" 3"<br />
Use this 3" scale to ensure the accuracy of your printout.
Templates<br />
(Shown at 100%, DO NOT scale when printing)<br />
D<br />
Dr<br />
1<br />
Unit B<br />
2<br />
3<br />
0 1" 2" 3"<br />
Use this 3" scale to ensure the accuracy of your printout.
Templates<br />
(Shown at 100%, DO NOT<br />
scale when printing)<br />
E<br />
E(r)<br />
F<br />
0 1" 2" 3"<br />
Use this 3" scale to ensure the<br />
accuracy of your printout.