Faberge - RJR Fabrics
Faberge - RJR Fabrics
Faberge - RJR Fabrics

Create successful ePaper yourself
Turn your PDF publications into a flip-book with our unique Google optimized e-Paper software.
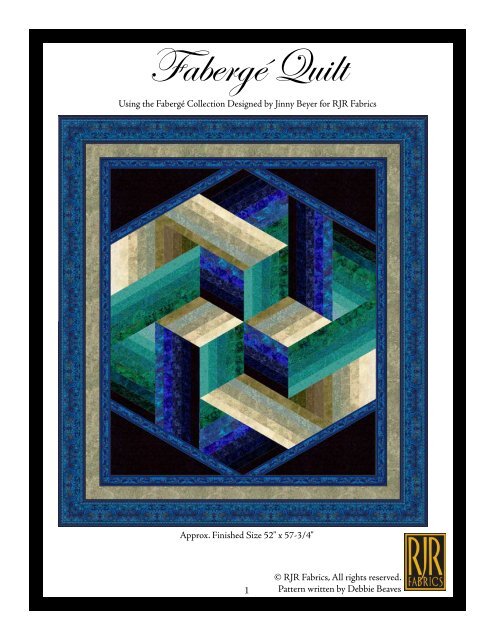
Fabergé Quilt<br />
Using the Fabergé Collection Designed by Jinny Beyer for <strong>RJR</strong> <strong>Fabrics</strong><br />
Approx. Finished Size 52" x 57-3/4"<br />
© <strong>RJR</strong> <strong>Fabrics</strong>, All rights reserved.<br />
1 Pattern written by Debbie Beaves
INSTRUCTIONS~ Read entire pattern before beginning. NOTE: B2 = Fabric 2 cut B (1-3/4" x 14"). It is<br />
essential to maintain a 1/4" seam allowance no wider!<br />
1. Sew the strips into sets as shown below. The A-E strip sets are centered one on top of each other. The F and G strip<br />
sets are staggered approximately 1-1/4" with each addition. Press the seam allowance in the direction indicated by<br />
the arrows (toward the darker fabrics). Stagger the strip sets in the direction shown below, with fabric right side up!<br />
Beige to Khaki Strip Sets<br />
G5<br />
G6<br />
G7<br />
G8<br />
G9<br />
F5<br />
F6<br />
F7<br />
F8F9<br />
G15<br />
G16<br />
G17<br />
G18<br />
G19<br />
F6<br />
F7F8F9<br />
F10<br />
Blue Strip Sets<br />
A1<br />
B2<br />
C3<br />
D4<br />
E5<br />
F15<br />
F16<br />
F17<br />
F18<br />
F19<br />
G23<br />
G24<br />
G11<br />
G12<br />
G13<br />
F16<br />
F17 F18<br />
Teal Strip Sets<br />
A11<br />
B12<br />
C13<br />
D14<br />
E15<br />
F23<br />
F24<br />
F11<br />
F12<br />
F13<br />
F19<br />
F20<br />
30° 60°<br />
F12<br />
F13<br />
F25<br />
F26<br />
F20<br />
A21<br />
B22<br />
C23<br />
D24<br />
E11<br />
2. Cut the strip sets apart using the 30° and 60° angle on your ruler. The triangle units are cut with a base<br />
measurement of 8" (A-E). The short strip sets (F) are cut with a base measurement of 7-3/4". The long strip sets<br />
(G) are cut with a base measurement of 15".<br />
Triangle Unit (A-E strips) Short Strip Set (F strips) Long Strip Set (G strips)<br />
8" base measurement<br />
7-3/4" base measurement<br />
15" base measurement<br />
2<br />
See Cutting Tips on the next page!<br />
Template suggestions on page 8.
5.<br />
Sew the remaining units into kite shapes following<br />
the diagram shown right. Press after each addition.<br />
the end of the star point (indicated by ). Press away<br />
from star.<br />
6.<br />
HINT: First sew the short strip set (F strips) and<br />
the corresponding triangle section together. Turn<br />
unit over and press the connecting seam in the same<br />
direction as the others.<br />
Next sew on the corresponding<br />
long strip set (G strips). Press<br />
toward the longest strip.<br />
Repeat the process for each<br />
kite shape shown in the<br />
Large Hexagon Diagram<br />
below. Make 2 of each kite<br />
combination (the letter/<br />
number in the diagram below<br />
indicates the top strip of each<br />
unit).<br />
Sew the units together into the large hexagon.<br />
Large Hexagon<br />
Diagram<br />
G23<br />
F6<br />
A21<br />
A1<br />
7.<br />
8.<br />
9.<br />
Sew the next kite shape<br />
to the star. Re-direct<br />
seams on the long units<br />
as needed to dove tail<br />
seam allowances (before sewing to<br />
the star). This time sew all<br />
the way to the end of<br />
the star point.<br />
Repeat for the<br />
remaining 4<br />
kite shapes.<br />
Go back to<br />
the first kite<br />
shape sewn to the star and<br />
finish the seam. You should<br />
now have a complete large<br />
hexagon.<br />
Pivot<br />
Check<br />
where<br />
seams<br />
meet<br />
for dove<br />
tailing.<br />
10. Sew I & H strips into corner units. Press. Trim H.<br />
I<br />
F12<br />
G5<br />
H<br />
A11<br />
G15<br />
Inset Seams<br />
TIPS~<br />
F16<br />
Start with one kite unit. Sew down the first side,<br />
stop 1/4" way from the end (where the seams cross)<br />
backstitch, lift presser foot and needle. Pull quilt top<br />
away from machine. Line up the next side at the pivot<br />
point (indicated by small ). Put the quilt top back<br />
under the presser foot, lower presser foot and sew the<br />
seam down the side. Stop this seam a few inches from<br />
11. Sew the corner units to the quilt. Press toward H.<br />
4
12.<br />
13.<br />
Sew border 1 to the quilt using Jinny's special<br />
technique for adding a border print to a rectangular<br />
quilt.<br />
Sew the short border 2 strips to the top and bottom<br />
of the quilt. Sew the long border 2 strips to the sides.<br />
Press.<br />
14. Sew the border 3 strips to the quilt using Jinny's<br />
special technique described.<br />
Jinny Beyer's Framing a Rectangle<br />
with a Border Print Technique -<br />
Sew borders 1 and 3 to the quilt using the following<br />
technique. The border 3 is shown in the example.<br />
Step 1. Place a strip of the border print across the middle<br />
of the quilt, centering a motif from the border at the exact<br />
center of the piece as shown in the diagram below.<br />
Step 3. Place one of the cut strips on top of a length of the<br />
border print stripe, matching the design. Cut one miter to<br />
match the miter on the cut strip. Place the newly cut strip<br />
along the length of the quilt through the center of the<br />
quilt with the mitered edge at the edge of the quilt. Bring<br />
the strip to the exact center of the quilt and cut it off 1/4<br />
inch beyond the center. Using this cut strip as a guide, cut<br />
one more piece identical to it and two strips that are the<br />
exact mirror images of the first piece.<br />
Step 4. Sew the seams at the middle of two mirror imaged<br />
strips and attach these borders to the quilt. Sewing the<br />
borders to a rectangular quilt in this manner assures that<br />
the corners will match. There will be a seam at the center<br />
of the long strips, but the design at that center will mirror<br />
image as well, as shown in below diagram. For more<br />
information and color diagrams go to www.jinnybeyer.<br />
com. Look under tips then border links.<br />
Step 2. Use a right angle triangle to mark the miter along<br />
one of the edges, making sure to leave enough for seam<br />
allowance. Carefully pick up the mitered edge of the<br />
border strip and bring it over to the other end of the<br />
border strip at the opposite edge of the quilt, making sure<br />
that the design matches. Cut the second miter. Using this<br />
first mitered piece as a guide, cut one more identical piece,<br />
making sure that the design on the border print is exactly<br />
the same on the top and bottom strip.<br />
FINISHING<br />
Layer the backing, wrong side up, batting and pieced<br />
top (right side up) together. Baste the layers. Quilt as<br />
desired.<br />
Trim the backing and batting flush with the outer raw<br />
edges of the pieced top.<br />
5
Fabric Cutting Suggestions<br />
For clarity in piecing it is very helpful to mark each fabric with a small paper square showing the number and “cut”<br />
letter. See page 9 for labels. Mark the strip sets as well, by leaving the top<br />
strip marked after cutting apart for proper placement in the blocks. There B22<br />
are multiple labels for the strip sets where it applies.<br />
<strong>Fabrics</strong> 6. 8, 9, 16,<br />
<strong>Fabrics</strong> 1 & 21 <strong>Fabrics</strong> 2 & 22 Fabric 3 Fabric 4 & 14 <strong>Fabrics</strong> 5 & 15 17, 18 & 19<br />
F<br />
G<br />
F<br />
F<br />
Note use the<br />
remaining<br />
piece of<br />
fabric 18 for<br />
binding.<br />
G<br />
A<br />
B<br />
C<br />
D<br />
E<br />
Selvage<br />
Selvage<br />
Selvage<br />
Selvage<br />
Selvage<br />
Selvage<br />
F<br />
<strong>Fabrics</strong> 7<br />
G<br />
<strong>Fabrics</strong> 10 & 25 & 26<br />
F<br />
Fabric 11<br />
G<br />
F<br />
Fabric 12<br />
G<br />
F<br />
Fabric 13<br />
G<br />
<strong>Fabrics</strong> 20<br />
F<br />
Border 2<br />
F<br />
A<br />
F<br />
B<br />
F<br />
C<br />
F<br />
I<br />
E<br />
Selvage<br />
Selvage<br />
Selvage<br />
Selvage<br />
Selvage<br />
Selvage<br />
Fabric 23<br />
Fabric 24<br />
Fabric 27<br />
H & Border 1 cut.<br />
F<br />
G<br />
F<br />
G<br />
Please refer to<br />
pages 5 and 7 for<br />
specifics on cutting<br />
the stripe.<br />
Border 3 cut.<br />
C<br />
D<br />
Selvage<br />
Selvage<br />
6
Fabergé quilt Fabric Cutting Directions<br />
Fabric 1 1/8 yard 6740-02 (P9)<br />
A (1) 1-3/4" x 13"<br />
Fabric 2 1/8 yard 8543-01<br />
B (1) 1-3/4" x 14"<br />
Fabric 3 1/8 yard 6740-01 (P4)<br />
C (1) 1-3/4" x 15"<br />
Fabric 4 1/8 yard 5746-01 (P3)<br />
D (1) 1-3/4" x 17"<br />
Fabric 5 1/8 yard 8542-11<br />
E (1) 1-3/4" x 19"<br />
F (1) 1-3/4" x 21"<br />
G (1) 1-3/4" x 36"<br />
Fabric 6 1/4 yard 6740-04<br />
F (2) 1-3/4" x 21"<br />
G (1) 1-3/4" x 36"<br />
Fabric 7 1/2 yard 8541-01<br />
F (2) 1-3/4" x 21"<br />
G (1) 1-3/4" x 36"<br />
Border 2 (5) 2-1/4" x WOF,<br />
Sew end to end and trim to two<br />
45" & two 51" or adjust to fit.<br />
Fabric 8 1/4 yard 8623-01<br />
F (2) 1-3/4" x 21"<br />
G (1) 1-3/4" x 36"<br />
Fabric 9 1/4 yard 8542-31<br />
F (2) 1-3/4" x 21"<br />
G (1) 1-3/4" x 36"<br />
Fabric 10 1/8 yard 9812-01<br />
F (1) 1-3/4" x 21"<br />
Fabric 11 1/4 yard 8543-03<br />
A (1) 1-3/4" x 13"<br />
E (1) 1-3/4" x 19"<br />
F (1) 1-3/4" x 21"<br />
G (1) 1-3/4" x 36"<br />
Fabric 12 1/4 yard 8541-04<br />
B (1) 1-3/4" x 14"<br />
F (2) 1-3/4" x 21"<br />
G (1) 1-3/4" x 36"<br />
Fabric 13 1/4 yard 8544-04<br />
C (1) 1-3/4" x 15"<br />
F (2) 1-3/4" x 21"<br />
G (1) 1-3/4" x 36"<br />
Fabric 14 1/8 yard 8542-01<br />
D (1) 1-3/4" x 17"<br />
7<br />
Fabric 15 1/8 yard 8539-01<br />
E (1) 1-3/4" x 19"<br />
F (1) 1-3/4" x 21"<br />
G (1) 1-3/4" x 36"<br />
Fabric 16 1/4 yard 8544-01<br />
F (2) 1-3/4" x 21"<br />
G (1) 1-3/4" x 36"<br />
Fabric 17 1/4 yard 3302-01 (P121)<br />
F (2) 1-3/4" x 21"<br />
G (1) 1-3/4" x 36"<br />
Fabric 18 3/4 yard 8545-01<br />
F (2) 1-3/4" x 21"<br />
G (1) 1-3/4" x 36"<br />
Binding At least 242" of 2" wide<br />
Fabric 19 1/4 yard 9812-08 (P87)<br />
F (2) 1-3/4" x 21"<br />
G (1) 1-3/4" x 36"<br />
Fabric 20 1/2 yard 9410-14 (P48)<br />
F (2) 1-3/4" x 21"<br />
I (2) 10" x 17" cut mirror image<br />
Fabric 21 1/8 yard 9414-25 (P130)<br />
A (1) 1-3/4" x 13"<br />
Fabric 22 1/8 yard 4730-10 (P129)<br />
B (1) 1-3/4" x 14"<br />
Fabric 23 1/8 yard 9812-09 (P128)<br />
C (1) 1-3/4" x 15"<br />
F (1) 1-3/4" x 21"<br />
G (1) 1-3/4" x 36"<br />
Fabric 24 1/8 yard 2767-03 (P127)<br />
D (1) 1-3/4" x 17"<br />
F (1) 1-3/4" x 21"<br />
G (1) 1-3/4" x 36"<br />
Fabric 25 1/8 yard 8542-03<br />
F (1) 1-3/4" x 21"<br />
Fabric 26 1/8 yard 8545-04<br />
F (1) 1-3/4" x 21"<br />
Fabric 27 2-1/2 yards 8540-01<br />
H (4) 2" x 24"<br />
Border 1 (2) 2" x 42"<br />
(2) 2" x 47"<br />
Border 3 (2) 4-1/8" x 52"<br />
(2) 4-1/8' x 58"<br />
Backing Suggestion 4 yards of 8539-01
Trim excess corners.<br />
Trim<br />
Short Strip Sets<br />
Long Strip Sets<br />
Trim<br />
If you wish to make templates for the units make 7 copies of this page at 100% scale. This is<br />
especially nice printed out on vellum so you can clearly see the overlap. Carefully cut<br />
out the triangle templates. Use a single template for the triangle units. Tape the<br />
remaining triangle templates into rows as shown above. Be sure to overlap<br />
the edges that touch so the seam allowances are not included inside the<br />
shape. Trim the excess corners that do not apply to the shape.<br />
<strong>Faberge</strong><br />
TEMPLATE<br />
Bottom Edge of Triangle Unit<br />
8" wide base measurement<br />
8
FABRIC CUT STRIP MARKERS<br />
Print a copy of this page and cut the labels apart. Pin each<br />
label to the left end of the fabric strips as you cut them.<br />
B22<br />
Fabric 1 F6 G9 C13 Fabric 17 F20 G24<br />
A1 G6 Fabric 10 F13 F17 F20 Fabric 25<br />
Fabric 2 Fabric 7 F10 F13 F17 I20 F25<br />
B2 F7 Fabric 11 G13 G17 Fabric 21 Fabric 26<br />
Fabric 3 F7 A11 Fabric 14 Fabric 18 A21 F26<br />
C3 G7 E11 D14 F18 Fabric 22 Fabric 27<br />
Fabric 4 Border 2 F11 Fabric 15 F18 B22 H27<br />
D4 Fabric 8 G11 E15 G18 Fabric 23 Border 1<br />
Fabric 5 F8 Fabric 12 F15 Binding C23 Border 3<br />
E5 F8 B12 G15 Fabric 19 F23<br />
F5 G8 F12 Fabric 16 F19 G23<br />
G5 Fabric 9 F12 F16 F19 Fabric 24<br />
Fabric 6 F9 G12 F16 G19 D24<br />
F6 F9 Fabric 13 G16 Fabric 20 F24<br />
9