
You also want an ePaper? Increase the reach of your titles
YUMPU automatically turns print PDFs into web optimized ePapers that Google loves.
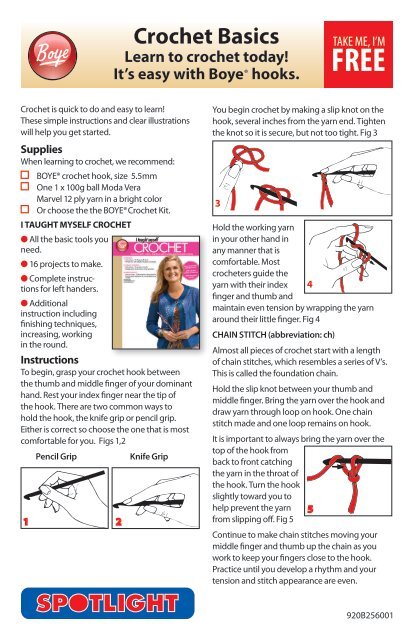
Crochet Basics<br />
Learn to crochet today!<br />
It’s easy with Boye ® hooks.<br />
TAKE ME, I’M<br />
FREE<br />
Crochet is quick to do and easy to learn!<br />
These simple instructions and clear illustrations<br />
will help you get started.<br />
Supplies<br />
When learning to crochet, we recommend:<br />
BOYE® crochet hook, size 5.5 mm<br />
One 1 x 100g ball Moda Vera<br />
Marvel 12 ply yarn in a bright color<br />
Or choose the the BOYE® Crochet Kit.<br />
I TAUGHT MYSELF CROCHET<br />
● All the basic tools you<br />
need.<br />
● 16 projects to make.<br />
● Complete instructions<br />
for left handers.<br />
● Additional<br />
instruction including<br />
finishing techniques,<br />
increasing, working<br />
in the round.<br />
Instructions<br />
To begin, grasp your crochet hook between<br />
the thumb and middle finger of your dominant<br />
hand. Rest your index finger near the tip of<br />
the hook. There are two common ways to<br />
hold the hook, the knife grip or pencil grip.<br />
Either is correct so choose the one that is most<br />
comfortable for you. Figs 1,2<br />
Pencil Grip<br />
Knife Grip<br />
You begin crochet by making a slip knot on the<br />
hook, several inches from the yarn end. Tighten<br />
the knot so it is secure, but not too tight. Fig 3<br />
Hold the working yarn<br />
in your other hand in<br />
any manner that is<br />
comfortable. Most<br />
crocheters guide the<br />
yarn with their index<br />
finger and thumb and<br />
maintain even tension by wrapping the yarn<br />
around their little finger. Fig 4<br />
CHAIN STITCH (abbreviation: ch)<br />
Almost all pieces of crochet start with a length<br />
of chain stitches, which resembles a series of V’s.<br />
This is called the foundation chain.<br />
Hold the slip knot between your thumb and<br />
middle finger. Bring the yarn over the hook and<br />
draw yarn through loop on hook. One chain<br />
stitch made and one loop remains on hook.<br />
It is important to always bring the yarn over the<br />
top of the hook from<br />
back to front catching<br />
the yarn in the throat of<br />
the hook. Turn the hook<br />
slightly toward you to<br />
help prevent the yarn<br />
from slipping off. Fig 5<br />
Continue to make chain stitches moving your<br />
middle finger and thumb up the chain as you<br />
work to keep your fingers close to the hook.<br />
Practice until you develop a rhythm and your<br />
tension and stitch appearance are even.<br />
920B256001
Product H<br />
Note: When counting<br />
the number of stitches<br />
in the foundation chain,<br />
do NOT include the loop<br />
on the hook. Fig 6<br />
Now you are ready to<br />
learn three basic crochet<br />
stitches: double crochet,<br />
half-treble crochet, and treble crochet. Each will be<br />
taller than the last. This variation in height is the<br />
result of the number of times you wrap the yarn<br />
around the hook as you work. As you learn each<br />
stitch make sure you practice until your stitches are<br />
even and not too tight.<br />
DOUBLE CROCHET (abbreviation: dc)<br />
Double crochet is the shortest of the basic<br />
stitches. It is dense and makes a good firm fabric<br />
when little open work is desired.<br />
To begin, make a foundation chain of 13 stitches<br />
(do not work too tightly). Insert the hook in the<br />
second chain from hook (under the back loop).<br />
Fig 7<br />
Yarn over hook and<br />
draw a loop through.<br />
There are now two<br />
loops on your hook.<br />
Yarn over hook again<br />
and draw the loop<br />
through both loops<br />
on the hook. Fig 8<br />
One double crochet<br />
made and one loop<br />
remains on hook. Work<br />
a double crochet<br />
in each following chain<br />
across the row. Make<br />
sure your foundation<br />
chain is kept flat with V’s<br />
facing you. Since you<br />
skipped the first chain,<br />
you will have 12 double<br />
crochet stitches in the<br />
row. Fig 9<br />
At the end of the row, chain one. This is called<br />
the turning chain and is made in order to<br />
give the necessary<br />
height to begin<br />
next row. Turn your<br />
work around until<br />
the opposite side is<br />
facing you. Fig 10<br />
Work one double<br />
crochet in the first<br />
stitch of the previous<br />
row under the top 2<br />
loops. Fig 11<br />
Work a double<br />
crochet in each stitch<br />
across row. Be sure to<br />
work the last double<br />
crochet under top<br />
two loops of last<br />
stitch. Fig 12<br />
Repeat rows of<br />
double crochet until<br />
you have mastered<br />
the technique and<br />
can work with ease. To fasten off at end of<br />
work: Make a chain stitch, then cut the yarn,<br />
leaving 10cm end. Pull end up tightly through<br />
the loop on hook.
eading<br />
HALF-TREBLE CROCHET<br />
(abbreviation: htr)<br />
Half-treble crochet is taller than double<br />
crochet, but shorter than a treble crochet. It<br />
is a simple stitch to master. To begin, make a<br />
foundation chain of 13 stitches.<br />
Yarn over hook, insert hook in 3rd chain from<br />
hook (under back loop). Yarn over hook and<br />
draw loop through. There are now 3 loops on<br />
hook. Fig 13<br />
Yarn over hook<br />
again and draw<br />
loop through all 3<br />
loops on hook. One<br />
half-treble crochet<br />
made and one loop<br />
remains on hook.<br />
Fig 14<br />
Work a half-treble<br />
crochet in each chain<br />
across. The two<br />
chains you skipped<br />
at the beginning of<br />
the row count as one<br />
half-treble crochet,<br />
so you will have a<br />
total of 12 stitches in<br />
the row (11 stitches<br />
plus the chains at<br />
the beginning of the<br />
row). Fig 15<br />
After working the last<br />
half-treble crochet<br />
of the row, chain<br />
2 for the turning<br />
chain. This counts as<br />
the first half-treble<br />
crochet of the next<br />
row and gives proper<br />
height to continue<br />
the row. Fig 16<br />
Turn the work until the opposite side is facing<br />
you. Work a half-treble crochet in the second<br />
stitch of the previous<br />
row (under top 2 loops).<br />
Fig 17<br />
Work a half-treble<br />
crochet in each<br />
remaining stitch across<br />
the row. End by working<br />
a half-treble crochet in<br />
the top of turning chain.<br />
(remember that the<br />
turning chain counts as<br />
one stitch). Fig 18<br />
Repeat the previous<br />
row as many times as<br />
desired. Count your<br />
stitches frequently<br />
to make sure you maintain 12 stitches per row.<br />
Fasten off and cut the work when you feel<br />
comfortable making rows of half-treble crochet.<br />
TREBLE CROCHET<br />
(abbreviation: tr)<br />
Treble crochet is one of the most popular stitches<br />
because the stitches are tall so it works up quickly<br />
and the resulting piece is firm enough to form a<br />
sturdy fabric.<br />
To begin, make a<br />
foundation chain of 14<br />
stitches. Yarn over hook,<br />
insert hook in 4th chain<br />
from hook (under back<br />
loop). Yarn over hook<br />
and draw loop through<br />
stitch. There are now 3<br />
loops on hook. Fig 19
Learn more with the Boye®<br />
I Taught Myself to Crochet Kit<br />
Yarn over hook and<br />
draw loop through first<br />
2 loops on hook. There<br />
are now 2 loops on<br />
hook. Fig 20<br />
Yarn over again and<br />
draw loop through both<br />
loops on hook. Fig 21<br />
One treble crochet<br />
made and one loop<br />
remains on hook.<br />
Work one treble crochet<br />
in each remaining<br />
chain across. The three<br />
chains you skipped at<br />
the beginning of the<br />
row count as one treble<br />
crochet, so you will<br />
have a total of 12<br />
stitches in the row<br />
(11 stitches plus the<br />
chains at the beginning<br />
of the row). Fig 22<br />
After the last treble<br />
crochet of the row, chain<br />
3 for the turning chain.<br />
This counts as the first<br />
treble crochet of next<br />
row and gives proper<br />
row height.<br />
Fig 23<br />
Turn your work until the opposite side is facing<br />
you. Work one treble crochet in 2nd stitch of<br />
previous row (under top 2 loops). Fig 24<br />
Work treble crochet in<br />
each remaining stitch<br />
across row, ending by<br />
working last treble<br />
crochet in top chain<br />
of the turning chain<br />
(remember that the<br />
turning chain counts<br />
as one stitch). Fig 25<br />
Repeat the previous<br />
row as many times as<br />
desired. Fasten off and<br />
cut yarn as before.<br />
Congratulations<br />
you can crochet!<br />
Difficulty: Beginner Completion Time: 30 min. Designed by: Boye®