Installation Guide for SAS 9.3 on Windows 7 (64-bit) (TS1M0 : Rev ...
Installation Guide for SAS 9.3 on Windows 7 (64-bit) (TS1M0 : Rev ...
Installation Guide for SAS 9.3 on Windows 7 (64-bit) (TS1M0 : Rev ...

Create successful ePaper yourself
Turn your PDF publications into a flip-book with our unique Google optimized e-Paper software.
<str<strong>on</strong>g>Installati<strong>on</strong></str<strong>on</strong>g> <str<strong>on</strong>g>Guide</str<strong>on</strong>g> <str<strong>on</strong>g>for</str<strong>on</strong>g> <str<strong>on</strong>g>SAS</str<strong>on</strong>g> <str<strong>on</strong>g>9.3</str<strong>on</strong>g> <strong>on</strong> <strong>Windows</strong> 7 (<strong>64</strong>‐<strong>bit</strong>) (<strong>TS1M0</strong> : <strong>Rev</strong><br />
930_11w45)<br />
(<str<strong>on</strong>g>Installati<strong>on</strong></str<strong>on</strong>g> <strong>on</strong> 32‐<strong>bit</strong> <strong>Windows</strong> would be similar)<br />
(Check the remark at the end of the document.)<br />
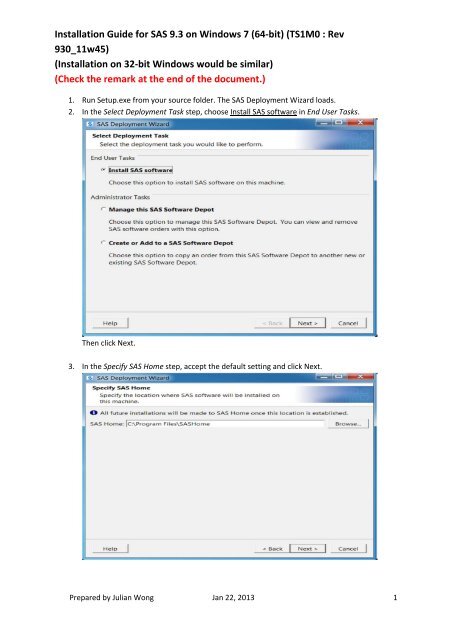
1. Run Setup.exe from your source folder. The <str<strong>on</strong>g>SAS</str<strong>on</strong>g> Deployment Wizard loads.<br />
2. In the Select Deployment Task step, choose Install <str<strong>on</strong>g>SAS</str<strong>on</strong>g> software in End User Tasks.<br />
Then click Next.<br />
3. In the Specify <str<strong>on</strong>g>SAS</str<strong>on</strong>g> Home step, accept the default setting and click Next.<br />
Prepared by Julian W<strong>on</strong>g Jan 22, 2013 1
4. In the Select Deployment Type step, choose Install <str<strong>on</strong>g>SAS</str<strong>on</strong>g> Foundati<strong>on</strong> and Related Software.<br />
Then click Next.<br />
5. In the Select Products to Install step, accept the default setting and click Next.<br />
Prepared by Julian W<strong>on</strong>g Jan 22, 2013 2
(By default, these items are checked:<br />
<str<strong>on</strong>g>SAS</str<strong>on</strong>g> Add‐in <str<strong>on</strong>g>for</str<strong>on</strong>g> Microsoft Office<br />
<str<strong>on</strong>g>SAS</str<strong>on</strong>g> Deployment Tester – Client<br />
<str<strong>on</strong>g>SAS</str<strong>on</strong>g> Enterprise <str<strong>on</strong>g>Guide</str<strong>on</strong>g><br />
<str<strong>on</strong>g>SAS</str<strong>on</strong>g> Enterprise Miner Workstati<strong>on</strong> C<strong>on</strong>figurati<strong>on</strong><br />
<str<strong>on</strong>g>SAS</str<strong>on</strong>g> Foundati<strong>on</strong><br />
<str<strong>on</strong>g>SAS</str<strong>on</strong>g> Integrati<strong>on</strong> Technologies Client<br />
<str<strong>on</strong>g>SAS</str<strong>on</strong>g> Providers <str<strong>on</strong>g>for</str<strong>on</strong>g> OLE DB<br />
<str<strong>on</strong>g>SAS</str<strong>on</strong>g> Rapid Predictive Modeler<br />
<str<strong>on</strong>g>SAS</str<strong>on</strong>g>/GRAPH ActiveX C<strong>on</strong>trol<br />
<str<strong>on</strong>g>SAS</str<strong>on</strong>g>/IML Studio)<br />
6. In the Select <str<strong>on</strong>g>SAS</str<strong>on</strong>g> Foundati<strong>on</strong> Products step, accept the default setting and click Next.<br />
Prepared by Julian W<strong>on</strong>g Jan 22, 2013 3
7. In the Specify <str<strong>on</strong>g>SAS</str<strong>on</strong>g> <str<strong>on</strong>g>Installati<strong>on</strong></str<strong>on</strong>g> Data File step, accept the default file suggesti<strong>on</strong> and click Next.<br />
8. In the Select Language Support step, you may select those you want and click Next.<br />
Prepared by Julian W<strong>on</strong>g Jan 22, 2013 4
9. In the Select Regi<strong>on</strong>al Settings step, accept the default setting (if you see the opti<strong>on</strong> :<br />
C<strong>on</strong>figure as a Unicode server, check it) and click Next.<br />
<br />
10. In the Select Java Runtime Envir<strong>on</strong>ment step, the wizard will install a JRE versi<strong>on</strong> of 1.6.0_24<br />
/ 32‐<strong>bit</strong>. (The 32‐<strong>bit</strong> JRE is required <strong>on</strong> 32‐<strong>bit</strong> and <strong>64</strong>‐<strong>bit</strong> <strong>Windows</strong> systems. Be sure to select<br />
a download whose name includes "windows‐i586". The <strong>64</strong>‐<strong>bit</strong> JREs are not supported. Any<br />
JRE versi<strong>on</strong> newer than that may not work. The JRE can be located at<br />
drive:\<str<strong>on</strong>g>SAS</str<strong>on</strong>g>93x<strong>64</strong>\products\javaruntime__99170__wx6__xx__sp0__1.)<br />
If the Use the recommended Java Runtime Envir<strong>on</strong>ment opti<strong>on</strong> is selected, click Next.<br />
Otherwise, please choose Select an existing Java Runtime Envir<strong>on</strong>ment opti<strong>on</strong> and browse to<br />
your JRE (bin) folder (You may install run the JRE setup to install the right versi<strong>on</strong> at this<br />
point).<br />
Prepared by Julian W<strong>on</strong>g Jan 22, 2013 5
11. In the Checking System step, the wizard is loading the necessary files and check if disk space<br />
is sufficient <str<strong>on</strong>g>for</str<strong>on</strong>g> installati<strong>on</strong>.<br />
If everything is fine (enough disk space and files are ready / unwritable files:0), then click<br />
Next. Otherwise, please fix the problems as suggested.<br />
Prepared by Julian W<strong>on</strong>g Jan 22, 2013 6
12. In the Deployment Summary step, the wizard shows a list of items that will be installed to<br />
your system. You may click Start to start the installati<strong>on</strong> process, or click Back to modify your<br />
choices.<br />
13. The installati<strong>on</strong> starts.<br />
The system may need Reboot <strong>on</strong>ce or twice. If the setup does not c<strong>on</strong>tinue after reboot,<br />
please run the setup.exe again. Follow the previous setting. When the installati<strong>on</strong> process<br />
starts, it starts from where it ends.<br />
Prepared by Julian W<strong>on</strong>g Jan 22, 2013 7
14. In case pop‐up box shows error, please click Retry butt<strong>on</strong>. If the problem doesn’t be solved.<br />
Please capture the screen and send to me <str<strong>on</strong>g>for</str<strong>on</strong>g> an investigati<strong>on</strong>. Please cancel the installati<strong>on</strong><br />
process. All comp<strong>on</strong>ents must be installed <str<strong>on</strong>g>for</str<strong>on</strong>g> <str<strong>on</strong>g>SAS</str<strong>on</strong>g> to work smoothly.<br />
15. The installati<strong>on</strong> process takes about 15‐30 minutes. Click Next.<br />
Prepared by Julian W<strong>on</strong>g Jan 22, 2013 8
16. In the Select Support Opti<strong>on</strong> step, (choose Do Not Send and) click Next.<br />
17. Click Finish to close the <str<strong>on</strong>g>SAS</str<strong>on</strong>g> Deployment Wizard. The <str<strong>on</strong>g>SAS</str<strong>on</strong>g> software installati<strong>on</strong> completes.<br />
Prepared by Julian W<strong>on</strong>g Jan 22, 2013 9
18. You may find a similar list of <str<strong>on</strong>g>SAS</str<strong>on</strong>g> applicati<strong>on</strong>s that are installed.<br />
19. Please note that to use Enterprise Miner 4.3, you need to run <str<strong>on</strong>g>SAS</str<strong>on</strong>g> <str<strong>on</strong>g>9.3</str<strong>on</strong>g> (English). Then select<br />
Soluti<strong>on</strong>s > Analysis > Enterprise Miner.<br />
If you have problems <strong>on</strong> installati<strong>on</strong> of <str<strong>on</strong>g>SAS</str<strong>on</strong>g> <str<strong>on</strong>g>9.3</str<strong>on</strong>g> (<strong>64</strong>‐<strong>bit</strong>) software, please send me an email describing<br />
the problem with screen captures (email: julianw<strong>on</strong>g@cuhk.edu.hk).<br />
Remark: If you install <str<strong>on</strong>g>SAS</str<strong>on</strong>g> after January, 2013, please set our<br />
computer clock back to November 2012, be<str<strong>on</strong>g>for</str<strong>on</strong>g>e starting the <str<strong>on</strong>g>SAS</str<strong>on</strong>g> installati<strong>on</strong>.<br />
After the installati<strong>on</strong> succeeded, set the computer clock to current date and<br />
apply the update licence (check email from Julian W<strong>on</strong>g <strong>on</strong> Dec / Jan).<br />
For installati<strong>on</strong> <strong>on</strong> <strong>Windows</strong> 8, please try installing <str<strong>on</strong>g>SAS</str<strong>on</strong>g> <strong>on</strong> Win7 compatibility<br />
mode.<br />
Prepared by Julian W<strong>on</strong>g Jan 22, 2013 10