Balloon Expandable Biliary Stent Instructions for Use - eV3
Balloon Expandable Biliary Stent Instructions for Use - eV3
Balloon Expandable Biliary Stent Instructions for Use - eV3

Create successful ePaper yourself
Turn your PDF publications into a flip-book with our unique Google optimized e-Paper software.
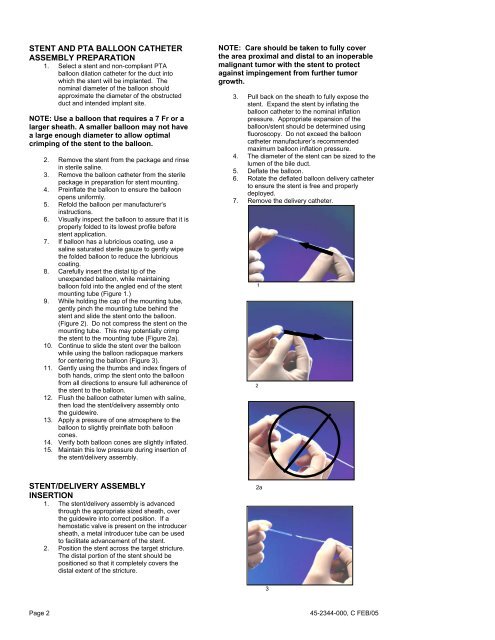
STENT AND PTA BALLOON CATHETER<br />
ASSEMBLY PREPARATION<br />
1. Select a stent and non-compliant PTA<br />
balloon dilation catheter <strong>for</strong> the duct into<br />
which the stent will be implanted. The<br />
nominal diameter of the balloon should<br />
approximate the diameter of the obstructed<br />
duct and intended implant site.<br />
NOTE: <strong>Use</strong> a balloon that requires a 7 Fr or a<br />
larger sheath. A smaller balloon may not have<br />
a large enough diameter to allow optimal<br />
crimping of the stent to the balloon.<br />
2. Remove the stent from the package and rinse<br />
in sterile saline.<br />
3. Remove the balloon catheter from the sterile<br />
package in preparation <strong>for</strong> stent mounting.<br />
4. Preinflate the balloon to ensure the balloon<br />
opens uni<strong>for</strong>mly.<br />
5. Refold the balloon per manufacturer’s<br />
instructions.<br />
6. Visually inspect the balloon to assure that it is<br />
properly folded to its lowest profile be<strong>for</strong>e<br />
stent application.<br />
7. If balloon has a lubricious coating, use a<br />
saline saturated sterile gauze to gently wipe<br />
the folded balloon to reduce the lubricious<br />
coating.<br />
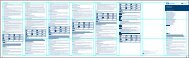
8. Carefully insert the distal tip of the<br />
unexpanded balloon, while maintaining<br />
balloon fold into the angled end of the stent<br />
mounting tube (Figure 1.)<br />
9. While holding the cap of the mounting tube,<br />
gently pinch the mounting tube behind the<br />
stent and slide the stent onto the balloon.<br />
(Figure 2). Do not compress the stent on the<br />
mounting tube. This may potentially crimp<br />
the stent to the mounting tube (Figure 2a).<br />
10. Continue to slide the stent over the balloon<br />
while using the balloon radiopaque markers<br />
<strong>for</strong> centering the balloon (Figure 3).<br />
11. Gently using the thumbs and index fingers of<br />
both hands, crimp the stent onto the balloon<br />
from all directions to ensure full adherence of<br />
the stent to the balloon.<br />
12. Flush the balloon catheter lumen with saline,<br />
then load the stent/delivery assembly onto<br />
the guidewire.<br />
13. Apply a pressure of one atmosphere to the<br />
balloon to slightly preinflate both balloon<br />
cones.<br />
14. Verify both balloon cones are slightly inflated.<br />
15. Maintain this low pressure during insertion of<br />
the stent/delivery assembly.<br />
STENT/DELIVERY ASSEMBLY<br />
INSERTION<br />
1. The stent/delivery assembly is advanced<br />
through the appropriate sized sheath, over<br />
the guidewire into correct position. If a<br />
hemostatic valve is present on the introducer<br />
sheath, a metal introducer tube can be used<br />
to facilitate advancement of the stent.<br />
2. Position the stent across the target stricture.<br />
The distal portion of the stent should be<br />
positioned so that it completely covers the<br />
distal extent of the stricture.<br />
NOTE: Care should be taken to fully cover<br />
the area proximal and distal to an inoperable<br />
malignant tumor with the stent to protect<br />
against impingement from further tumor<br />
growth.<br />
3. Pull back on the sheath to fully expose the<br />
stent. Expand the stent by inflating the<br />
balloon catheter to the nominal inflation<br />
pressure. Appropriate expansion of the<br />
balloon/stent should be determined using<br />
fluoroscopy. Do not exceed the balloon<br />
catheter manufacturer’s recommended<br />
maximum balloon inflation pressure.<br />
4. The diameter of the stent can be sized to the<br />
lumen of the bile duct.<br />
5. Deflate the balloon.<br />
6. Rotate the deflated balloon delivery catheter<br />
to ensure the stent is free and properly<br />
deployed.<br />
7. Remove the delivery catheter.<br />
Page 2 45-2344-000, C FEB/05<br />
2<br />
1<br />
2a<br />
3