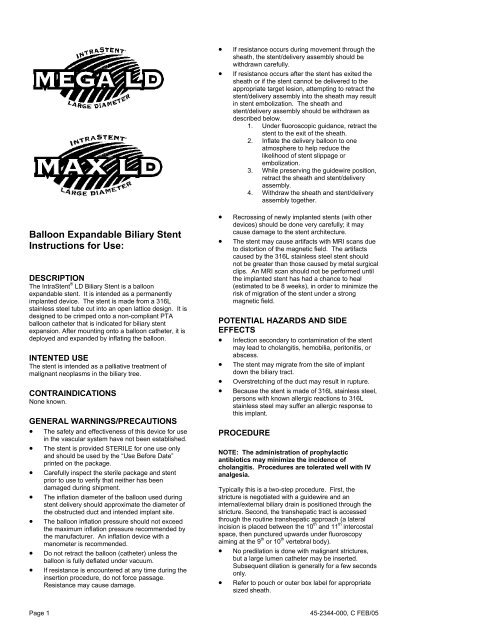
Balloon Expandable Biliary Stent Instructions for Use - eV3
Balloon Expandable Biliary Stent Instructions for Use - eV3
Balloon Expandable Biliary Stent Instructions for Use - eV3

You also want an ePaper? Increase the reach of your titles
YUMPU automatically turns print PDFs into web optimized ePapers that Google loves.
<strong>Balloon</strong> <strong>Expandable</strong> <strong>Biliary</strong> <strong>Stent</strong><br />
<strong>Instructions</strong> <strong>for</strong> <strong>Use</strong>:<br />
DESCRIPTION<br />
The Intra<strong>Stent</strong> ® LD <strong>Biliary</strong> <strong>Stent</strong> is a balloon<br />
expandable stent. It is intended as a permanently<br />
implanted device. The stent is made from a 316L<br />
stainless steel tube cut into an open lattice design. It is<br />
designed to be crimped onto a non-compliant PTA<br />
balloon catheter that is indicated <strong>for</strong> biliary stent<br />
expansion. After mounting onto a balloon catheter, it is<br />
deployed and expanded by inflating the balloon.<br />
INTENTED USE<br />
The stent is intended as a palliative treatment of<br />
malignant neoplasms in the biliary tree.<br />
CONTRAINDICATIONS<br />
None known.<br />
GENERAL WARNINGS/PRECAUTIONS<br />
• The safety and effectiveness of this device <strong>for</strong> use<br />
in the vascular system have not been established.<br />
• The stent is provided STERILE <strong>for</strong> one use only<br />
and should be used by the “<strong>Use</strong> Be<strong>for</strong>e Date”<br />
printed on the package.<br />
• Carefully inspect the sterile package and stent<br />
prior to use to verify that neither has been<br />
damaged during shipment.<br />
• The inflation diameter of the balloon used during<br />
stent delivery should approximate the diameter of<br />
the obstructed duct and intended implant site.<br />
• The balloon inflation pressure should not exceed<br />
the maximum inflation pressure recommended by<br />
the manufacturer. An inflation device with a<br />
manometer is recommended.<br />
• Do not retract the balloon (catheter) unless the<br />
balloon is fully deflated under vacuum.<br />
• If resistance is encountered at any time during the<br />
insertion procedure, do not <strong>for</strong>ce passage.<br />
• If resistance occurs during movement through the<br />
sheath, the stent/delivery assembly should be<br />
withdrawn carefully.<br />
• If resistance occurs after the stent has exited the<br />
sheath or if the stent cannot be delivered to the<br />
appropriate target lesion, attempting to retract the<br />
stent/delivery assembly into the sheath may result<br />
in stent embolization. The sheath and<br />
stent/delivery assembly should be withdrawn as<br />
described below.<br />
1. Under fluoroscopic guidance, retract the<br />
stent to the exit of the sheath.<br />
2. Inflate the delivery balloon to one<br />
atmosphere to help reduce the<br />
likelihood of stent slippage or<br />
embolization.<br />
3. While preserving the guidewire position,<br />
retract the sheath and stent/delivery<br />
assembly.<br />
4. Withdraw the sheath and stent/delivery<br />
assembly together.<br />
• Recrossing of newly implanted stents (with other<br />
devices) should be done very carefully; it may<br />
cause damage to the stent architecture.<br />
• The stent may cause artifacts with MRI scans due<br />
to distortion of the magnetic field. The artifacts<br />
caused by the 316L stainless steel stent should<br />
not be greater than those caused by metal surgical<br />
clips. An MRI scan should not be per<strong>for</strong>med until<br />
the implanted stent has had a chance to heal<br />
(estimated to be 8 weeks), in order to minimize the<br />
risk of migration of the stent under a strong<br />
magnetic field.<br />
POTENTIAL HAZARDS AND SIDE<br />
EFFECTS<br />
• Infection secondary to contamination of the stent<br />
may lead to cholangitis, hemobilia, peritonitis, or<br />
abscess.<br />
• The stent may migrate from the site of implant<br />
down the biliary tract.<br />
• Overstretching of the duct may result in rupture.<br />
• Because the stent is made of 316L stainless steel,<br />
persons with known allergic reactions to 316L<br />
stainless steel may suffer an allergic response to<br />
this implant.<br />
PROCEDURE<br />
NOTE: The administration of prophylactic<br />
antibiotics may minimize the incidence of<br />
cholangitis. Procedures are tolerated well with IV<br />
analgesia.<br />
Typically this is a two-step procedure. First, the<br />
stricture is negotiated with a guidewire and an<br />
internal/external biliary drain is positioned through the<br />
stricture. Second, the transhepatic tract is accessed<br />
through the routine transhepatic approach (a lateral<br />
incision is placed between the 10 th and 11 th intercostal<br />
space, then punctured upwards under fluoroscopy<br />
aiming at the 9 th or 10 th vertebral body).<br />
• No predilation is done with malignant strictures,<br />
but a large lumen catheter may be inserted.<br />
Subsequent dilation is generally <strong>for</strong> a few seconds<br />
only.<br />
Resistance may cause damage. • Refer to pouch or outer box label <strong>for</strong> appropriate<br />
sized sheath.<br />
Page 1 45-2344-000, C FEB/05
STENT AND PTA BALLOON CATHETER<br />
ASSEMBLY PREPARATION<br />
1. Select a stent and non-compliant PTA<br />
balloon dilation catheter <strong>for</strong> the duct into<br />
which the stent will be implanted. The<br />
nominal diameter of the balloon should<br />
approximate the diameter of the obstructed<br />
duct and intended implant site.<br />
NOTE: <strong>Use</strong> a balloon that requires a 7 Fr or a<br />
larger sheath. A smaller balloon may not have<br />
a large enough diameter to allow optimal<br />
crimping of the stent to the balloon.<br />
2. Remove the stent from the package and rinse<br />
in sterile saline.<br />
3. Remove the balloon catheter from the sterile<br />
package in preparation <strong>for</strong> stent mounting.<br />
4. Preinflate the balloon to ensure the balloon<br />
opens uni<strong>for</strong>mly.<br />
5. Refold the balloon per manufacturer’s<br />
instructions.<br />
6. Visually inspect the balloon to assure that it is<br />
properly folded to its lowest profile be<strong>for</strong>e<br />
stent application.<br />
7. If balloon has a lubricious coating, use a<br />
saline saturated sterile gauze to gently wipe<br />
the folded balloon to reduce the lubricious<br />
coating.<br />
8. Carefully insert the distal tip of the<br />
unexpanded balloon, while maintaining<br />
balloon fold into the angled end of the stent<br />
mounting tube (Figure 1.)<br />
9. While holding the cap of the mounting tube,<br />
gently pinch the mounting tube behind the<br />
stent and slide the stent onto the balloon.<br />
(Figure 2). Do not compress the stent on the<br />
mounting tube. This may potentially crimp<br />
the stent to the mounting tube (Figure 2a).<br />
10. Continue to slide the stent over the balloon<br />
while using the balloon radiopaque markers<br />
<strong>for</strong> centering the balloon (Figure 3).<br />
11. Gently using the thumbs and index fingers of<br />
both hands, crimp the stent onto the balloon<br />
from all directions to ensure full adherence of<br />
the stent to the balloon.<br />
12. Flush the balloon catheter lumen with saline,<br />
then load the stent/delivery assembly onto<br />
the guidewire.<br />
13. Apply a pressure of one atmosphere to the<br />
balloon to slightly preinflate both balloon<br />
cones.<br />
14. Verify both balloon cones are slightly inflated.<br />
15. Maintain this low pressure during insertion of<br />
the stent/delivery assembly.<br />
STENT/DELIVERY ASSEMBLY<br />
INSERTION<br />
1. The stent/delivery assembly is advanced<br />
through the appropriate sized sheath, over<br />
the guidewire into correct position. If a<br />
hemostatic valve is present on the introducer<br />
sheath, a metal introducer tube can be used<br />
to facilitate advancement of the stent.<br />
2. Position the stent across the target stricture.<br />
The distal portion of the stent should be<br />
positioned so that it completely covers the<br />
distal extent of the stricture.<br />
NOTE: Care should be taken to fully cover<br />
the area proximal and distal to an inoperable<br />
malignant tumor with the stent to protect<br />
against impingement from further tumor<br />
growth.<br />
3. Pull back on the sheath to fully expose the<br />
stent. Expand the stent by inflating the<br />
balloon catheter to the nominal inflation<br />
pressure. Appropriate expansion of the<br />
balloon/stent should be determined using<br />
fluoroscopy. Do not exceed the balloon<br />
catheter manufacturer’s recommended<br />
maximum balloon inflation pressure.<br />
4. The diameter of the stent can be sized to the<br />
lumen of the bile duct.<br />
5. Deflate the balloon.<br />
6. Rotate the deflated balloon delivery catheter<br />
to ensure the stent is free and properly<br />
deployed.<br />
7. Remove the delivery catheter.<br />
Page 2 45-2344-000, C FEB/05<br />
2<br />
1<br />
2a<br />
3
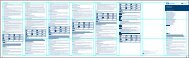
PRODUCT<br />
STENT SIZE<br />
EXPANDED STENT RECOMMENDED<br />
CODE<br />
UNMOUNTED<br />
DIMENSIONS<br />
BALLOON CATHETER<br />
DIAMETER LENGTH DIAMETER LENGTH DIAMETER/LENGTH<br />
(mm) (mm) (mm) (mm)<br />
(mm)/(cm)<br />
S17-16 3.8 16.0 9.0 16.0 9.0/2.0<br />
10.0<br />
10.0/2.0<br />
12.0<br />
12.0/2.0<br />
S17-26 3.8 26.0 9.0 26.0 9.0/3.0<br />
10.0<br />
10.0/3.0<br />
12.0<br />
12.0/3.0<br />
S17-36 3.8 36.0 9.0 36.0 9.0/4.0<br />
10.0<br />
10.0/4.0<br />
12.0<br />
12.0/4.0<br />
S18-16 4.5 16.0 12.0 16.0 12.0/2.0<br />
S18-26 4.5 26.0 12.0 26.0 12.0/3.0<br />
S18-36 4.5 36.0 12.0 36.0 12.0/4.0<br />
CAUTION: Federal (U.S.A.) law restricts this device to sale by or on the order of a physician.<br />
WARRANTY DISCLAIMER<br />
Although this product has been manufactured under carefully controlled conditions, ev3 Inc. has no control over the<br />
conditions under which this product is used. ev3 Inc. there<strong>for</strong>e disclaims all warranties, both express and implied, with<br />
respect to the product including, but not limited to, any implied warranty of merchantability or fitness <strong>for</strong> a particular<br />
purpose. ev3 Inc. shall not be liable to any person or entity <strong>for</strong> any medical expenses or any direct, incidental or<br />
consequential damages caused by any use, defect, failure or malfunction of the product, whether a claim <strong>for</strong> such<br />
damages is based upon warranty, contract, tort or otherwise. No person has any authority to bind ev3 Inc. to any<br />
representation or warranty with respect to the product.<br />
The exclusions and limitations set out above are not intended to, and should not be construed so as to contravene<br />
mandatory provisions of applicable law. If any part or term of this Disclaimer of Warranty is held to be illegal,<br />
unen<strong>for</strong>ceable or in conflict with applicable law by a court of competent jurisdiction, the validity of the remaining<br />
portions of this Disclaimer of Warranty shall not be affected, and all rights and obligations shall be construed and<br />
en<strong>for</strong>ced as if this Disclaimer of Warranty did not contain the particular part or term held to be invalid.<br />
<br />
4600 Nathan Lane North<br />
Plymouth, MN 55442-2920 USA<br />
PH: 763.398.7000<br />
800.716.6700<br />
FX: 763.398.7200<br />
©2005 ev3 Inc. All rights reserved.<br />
Printed in the U.S.A.<br />
T H E E N D O V A S C U L A R C O M P A N Y<br />
Intra<strong>Stent</strong>, Mega and Max are trademarks of ev3<br />
Inc.<br />
Protected under one or more of the following: US<br />
Patent 6,827,732; 6,558,415; 6,358,274;<br />
6,254,631; 6,132,460. Non-US patents pending.<br />
Page 3 45-2344-000, C FEB/05