Mounting the Basic 540 protective cell - Step four
Mounting the Basic 540 protective cell - Step four
Mounting the Basic 540 protective cell - Step four

You also want an ePaper? Increase the reach of your titles
YUMPU automatically turns print PDFs into web optimized ePapers that Google loves.
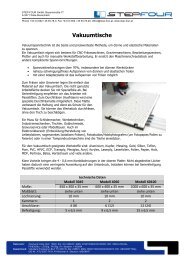
Polycarbone plate:<br />
L-profiles<br />
polycarbonate plate<br />
IMPORTANT: Follow <strong>the</strong> instructions very carefully when glueing<br />
<strong>the</strong> L-profiles to <strong>the</strong> polycarbontae plate (see drawing).<br />
20mm<br />
20 mm<br />
20mm<br />
862x680mm<br />
20mm<br />
862x520mm<br />
1. Clean <strong>the</strong> <strong>four</strong> L-profiles.<br />
2. Glue <strong>the</strong> 3M tape on <strong>the</strong> inner dies of <strong>the</strong> L-profiles.<br />
3. Put <strong>the</strong> L-profiles carefully on <strong>the</strong> polycarbonate plate.<br />
Seite 2 Datum: 02.08.2005 Pfad:G:\Neue Datenstruktur\Produkte\Fräsen\<strong>Basic</strong> <strong>540</strong>\Schutzzelle\Protective<br />
<strong>cell</strong> <strong>Basic</strong> <strong>540</strong>.doc