ENJOY YOUR FLOORS WITH OUR NATURE
cork floors general catalog, DIVINA cork floor. Kork Bodenbeläge Katalog, Printkork, Stein, Parkett, Fliesen - Optik. Klebekork und Klick - System. Verlegeanleitung Korkverlegung, Produktbeschreibung mit vielen schönen Bildern der einzelnen Muster.
cork floors general catalog, DIVINA cork floor.
Kork Bodenbeläge Katalog, Printkork, Stein, Parkett, Fliesen - Optik.
Klebekork und Klick - System. Verlegeanleitung Korkverlegung, Produktbeschreibung mit vielen schönen Bildern der einzelnen Muster.

Create successful ePaper yourself
Turn your PDF publications into a flip-book with our unique Google optimized e-Paper software.
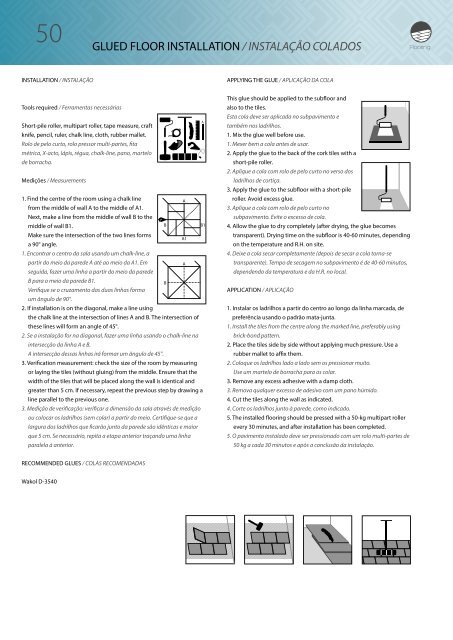
50 51<br />
GLUED FLOOR INSTALLATION / INSTALAÇÃO COLADOS<br />
FLOATING INSTALLATION / INSTALAÇÃO FLUTUANTES<br />
INSTALLATION / INSTALAÇÃO<br />
Tools required / Ferramentas necessárias<br />
Short-pile roller, multipart roller, tape measure, craft<br />
knife, pencil, ruler, chalk line, cloth, rubber mallet.<br />
Rolo de pelo curto, rolo pressor multi-partes, fita<br />
métrica, X-acto, lápis, régua, chalk-line, pano, martelo<br />
de borracha.<br />
Medições / Measurements<br />
1. Find the centre of the room using a chalk line<br />
A<br />
from the middle of wall A to the middle of A1.<br />
Next, make a line from the middle of wall B to the<br />
middle of wall B1.<br />
B<br />
B1<br />
Make sure the intersection of the two lines forms<br />
A1<br />
a 90° angle.<br />
1. Encontrar o centro da sala usando um chalk-line, a<br />
partir do meio da parede A até ao meio da A1. Em<br />
A<br />
seguida, fazer uma linha a partir do meio da parede<br />
B para o meio da parede B1.<br />
B<br />
Verifique se o cruzamento das duas linhas forma<br />
um ângulo de 90°.<br />
2. If installation is on the diagonal, make a line using<br />
the chalk line at the intersection of lines A and B. The intersection of<br />
these lines will form an angle of 45°.<br />
2. Se a instalação for na diagonal, fazer uma linha usando o chalk-line na<br />
intersecção da linha A e B.<br />
A intersecção dessas linhas irá formar um ângulo de 45°.<br />
3. Verification measurement: check the size of the room by measuring<br />
or laying the tiles (without gluing) from the middle. Ensure that the<br />
width of the tiles that will be placed along the wall is identical and<br />
greater than 5 cm. If necessary, repeat the previous step by drawing a<br />
line parallel to the previous one.<br />
3. Medição de verificação: verificar a dimensão da sala através de medição<br />
ou colocar os ladrilhos (sem colar) a partir do meio. Certifique-se que a<br />
largura dos ladrilhos que ficarão junto da parede são idênticas e maior<br />
que 5 cm. Se necessário, repita a etapa anterior traçando uma linha<br />
paralela à anterior.<br />
APPLYING THE GLUE / APLICAÇÃO DA COLA<br />
This glue should be applied to the subfloor and<br />
also to the tiles.<br />
Esta cola deve ser aplicada no subpavimento e<br />
também nos ladrilhos.<br />
1. Mix the glue well before use.<br />
1. Mexer bem a cola antes de usar.<br />
2. Apply the glue to the back of the cork tiles with a<br />
short-pile roller.<br />
2. Aplique a cola com rolo de pelo curto no verso dos<br />
ladrilhos de cortiça.<br />
3. Apply the glue to the subfloor with a short-pile<br />
roller. Avoid excess glue.<br />
3. Aplique a cola com rolo de pelo curto no<br />
subpavimento. Evite o excesso de cola.<br />
4. Allow the glue to dry completely (after drying, the glue becomes<br />
transparent). Drying time on the subfloor is 40-60 minutes, depending<br />
on the temperature and R.H. on site.<br />
4. Deixe a cola secar completamente (depois de secar a cola torna-se<br />
transparente). Tempo de secagem no subpavimento é de 40-60 minutos,<br />
dependendo da temperatura e da H.R. no local.<br />
APPLICATION / APLICAÇÃO<br />
1. Instalar os ladrilhos a partir do centro ao longo da linha marcada, de<br />
preferência usando o padrão mata-junta.<br />
1. Install the tiles from the centre along the marked line, preferably using<br />
brick-bond pattern.<br />
2. Place the tiles side by side without applying much pressure. Use a<br />
rubber mallet to affix them.<br />
2. Coloque os ladrilhos lado a lado sem os pressionar muito.<br />
Use um martelo de borracha para os colar.<br />
3. Remove any excess adhesive with a damp cloth.<br />
3. Remova qualquer excesso de adesivo com um pano húmido.<br />
4. Cut the tiles along the wall as indicated.<br />
4. Corte os ladrilhos junto à parede, como indicado.<br />
5. The installed flooring should be pressed with a 50-kg multipart roller<br />
every 30 minutes, and after installation has been completed.<br />
5. O pavimento instalado deve ser pressionado com um rolo multi-partes de<br />
50 kg a cada 30 minutos e após a conclusão da instalação.<br />
INSTALLATION / INSTALAÇÃO<br />
Uniclic® is unique because panels can be installed in two different ways:<br />
Uniclic® é único porque pode instalar as placas de duas formas diferentes:<br />
Method A - Angled installation method (see diagrams 1A-1B-1C).<br />
Método A - Método de instalação em ângulo (veja os diagramas 1A-1B-1C).<br />
Method B - Horizontal installation method (see diagrams 2A-2B).<br />
Método B - Método de instalação horizontal (veja os diagramas 2A-2B).<br />
TOOLS FOR INSTALLATION OF FLOOR<br />
FERRAMENTAS PARA A INSTALAÇÃO DO PAVIMENTO<br />
Standard tools for installing floating floors (i.e. mallet, saw, pencil, tape<br />
measure).<br />
Installation kit (crowbar, spacers (1-8 mm/0.039”-0318”) and Uniclic®/Divina<br />
batten), table saw or cross-cut saw.<br />
Ferramentas normais para instalar pavimentos flutuantes (i.e. martelo, serra,<br />
lápis, fita métrica).<br />
Kit de instalação (pé-de-cabra, espaçadores (1-8 mm/0.039”-0.318”) e batente<br />
Uniclic®/nome próprio), serra de mesa ou serra de corte transversal.<br />
INSTALLATION OF THE FLOOR / INSTALAÇÃO DO PAVIMENTO<br />
First install a protective barrier against moisture (PE film) and join the rows<br />
with tape (see diagram 3A).<br />
Primeiro instale a barreira de protecção contra a humidade (filme PE) e una as<br />
fiadas com fita-cola (veja diagrama 3A).<br />
Start the first row with an entire panel.<br />
First cut the tongue to the length and width of the panel (see diagram 3B).<br />
Inicie a primeira fiada com uma placa inteira.<br />
Primeiro corte o macho ao comprimento e largura da placa (veja diagrama 3B).<br />
Place the panel with the side on which the tongue was cut against the wall.<br />
Put spacers from the installation kit between the panels and the wall (see<br />
diagram 3C).<br />
Coloque a placa com o lado em que o macho foi cortado contra a parede.<br />
Coloque espaçadores do kit de instalação entre as placas e a parede (veja<br />
diagrama 3C).<br />
The diagram indicates where the Uniclic® panels are joined using the angle<br />
technique or by blows applied to the panels (see diagrams 4A-4F).<br />
O diagrama indica onde as placas Uniclic® são unidas pela técnica em ângulo<br />
ou pelas pancadas aplicadas nas placas (veja diagramas 4A-4F).<br />
In places where it is difficult to install the Uniclic® panels with the batten<br />
(e.g. against the wall), you may join them using a crowbar and mallet (see<br />
diagrams 5A-5B).<br />
Em locais onde é difícil instalar as placas Uniclic® com o batente (e.g. contra<br />
a parede), pode uni-las usando o pé-de-cabra e um martelo (veja diagramas<br />
5A-5B).<br />
FINISH / ACABAMENTO<br />
Remove the spacers.<br />
Install the skirting on the PE film making a round shape with the wall (see<br />
diagram 8A.)<br />
Retire os espaçadores.<br />
Instale o rodapé sobre o filme PE que faz meia cana com a parede (veja<br />
diagrama 8A.)<br />
RECOMMENDED GLUES / COLAS RECOMENDADAS<br />
Wakol D-3540