QuickStart - Strand Lighting
QuickStart - Strand Lighting
QuickStart - Strand Lighting

You also want an ePaper? Increase the reach of your titles
YUMPU automatically turns print PDFs into web optimized ePapers that Google loves.
Philips <strong>Strand</strong> <strong>Lighting</strong> Offices<br />
Philips <strong>Strand</strong> <strong>Lighting</strong> - Dallas<br />
10911 Petal Street<br />
Dallas, TX 75238<br />
Tel: +1 214-647-7880<br />
Fax: +1 214-647-8030<br />
Philips <strong>Strand</strong> <strong>Lighting</strong> - Auckland<br />
19-21 Kawana Street<br />
Northcote, Auckland 0627<br />
New Zealand<br />
Tel: +64 9 481 0100<br />
Fax: +64 9 481 0101<br />
Philips <strong>Strand</strong> <strong>Lighting</strong> - New York<br />
267 5th Ave, 4th Floor<br />
New York, NY 10016<br />
Tel: +1 212-213-8219<br />
Fax: +1 212-532-2593<br />
Philips <strong>Strand</strong> <strong>Lighting</strong> - Europe<br />
Rondweg zuid 85<br />
Winterswijk 7102 JD<br />
The Netherlands<br />
Tel: +31 (0) 543-542516<br />
Philips <strong>Strand</strong> <strong>Lighting</strong> - Asia<br />
Unit C, 14/F, Roxy Industrial Centre<br />
No. 41-49 Kwai Cheong Road<br />
Kwai Chung, N.T., Hong Kong<br />
Tel: +852 2796 9786<br />
Fax: +852 2798 6545<br />
Website:<br />
www.strandlighting.com<br />
The material in this manual is for information purposes only and is subject to change without notice. Philips <strong>Strand</strong><br />
<strong>Lighting</strong> assumes no responsibility for any errors or omissions which may appear in this manual. For comments and<br />
suggestions regarding corrections and/or updates to this manual, please contact your nearest Philips <strong>Strand</strong> <strong>Lighting</strong><br />
office.<br />
El contenido de este manual es solamente para información y está sujeto a cambios sin previo aviso. Philips <strong>Strand</strong><br />
<strong>Lighting</strong> no asume responsabilidad por errores o omisiones que puedan aparecer. Cualquier comentario, sugerencia<br />
o corrección con respecto a este manual, favor de dirijirlo a la oficina de Philips <strong>Strand</strong> <strong>Lighting</strong> más cercana.<br />
Der Inhalt dieses Handbuches ist nur für Informationszwecke gedacht, Aenderungen sind vorbehalten. Philips<br />
<strong>Strand</strong> <strong>Lighting</strong> uebernimmt keine Verantwortung für Fehler oder Irrtuemer, die in diesem Handbuch auftreten. Für<br />
Bemerkungen und Verbesserungsvorschlaege oder Vorschlaege in Bezug auf Korrekturen und/oder<br />
Aktualisierungen in diesem Handbuch, moechten wir Sie bitten, Kontakt mit der naechsten Philips <strong>Strand</strong> <strong>Lighting</strong>-<br />
Niederlassung aufzunehmen.<br />
Le matériel décrit dans ce manuel est pour information seulement et est sujet à changements sans préavis. La<br />
compagnie Philips <strong>Strand</strong> <strong>Lighting</strong> n'assume aucune responsibilité sur toute erreur ou ommission inscrite dans ce<br />
manuel. Pour tous commentaires ou suggestions concernant des corrections et/ou les mises à jour de ce manuel,<br />
veuillez s'il vous plait contacter le bureau de Philips <strong>Strand</strong> <strong>Lighting</strong> le plus proche.<br />
Note: Information contained in this document may not be duplicated in full or in part by any person without prior written<br />
approval of Philips <strong>Strand</strong> <strong>Lighting</strong>. Its sole purpose is to provide the user with conceptual information on the equipment<br />
mentioned. The use of this document for all other purposes is specifically prohibited.<br />
Document Number: 85-6388<br />
Version as of: 15 April 2013<br />
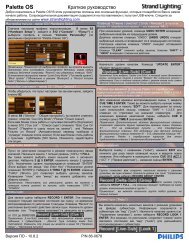
250ML <strong>Lighting</strong> Control Console <strong>QuickStart</strong> Guide<br />
©2013 Philips Group. All rights reserved.
250ML <strong>Lighting</strong> Control Consoles<br />
<strong>QuickStart</strong> Guide<br />
IMPORTANT INFORMATION<br />
Warnings and Notices<br />
When using electrical equipment, basic safety precautions should always be followed including the following:<br />
a. READ AND FOLLOW ALL SAFETY INSTRUCTIONS.<br />
b. Do not use outdoors.<br />
c. Do not mount near gas or electric heaters.<br />
d. Equipment should be mounted in locations and at heights where it will not readily be subjected to<br />
tampering by unauthorized personnel.<br />
e. The use of accessory equipment not recommended by the manufacturer may cause an unsafe<br />
condition.<br />
f. Do not use this equipment for other than intended use.<br />
g. Refer service to qualified personnel.<br />
SAVE THESE INSTRUCTIONS.<br />
WARNING: You must have access to a main circuit breaker or other power disconnect device<br />
before installing any wiring. Be sure that power is disconnected by removing fuses or turning the<br />
main circuit breaker off before installation. Installing the device with power on may expose you to<br />
dangerous voltages and damage the device. A qualified electrician must perform this installation.<br />
WARNING: Refer to National Electrical Code® and local codes for cable specifications. Failure to<br />
use proper cable can result in damage to equipment or danger to personnel.<br />
WARNING: This equipment is intended for installation in accordance with the National Electric<br />
Code® and local regulations. It is also intended for installation in indoor applications only. Before<br />
any electrical work is performed, disconnect power at the circuit breaker or remove the fuse to avoid<br />
shock or damage to the control. It is recommended that a qualified electrician perform this<br />
installation.<br />
Additional Resources for DMX512<br />
For more information on installing DMX512 control systems, the following publication is available for purchase<br />
from the United States Institute for Theatre Technology (USITT), "Recommended Practice for DMX512: A Guide<br />
for Users and Installers, 2nd edition" (ISBN: 9780955703522). USITT Contact Information:<br />
USITT<br />
315 South Crouse Avenue, Suite 200<br />
Syracuse, NY 13210-1844<br />
Phone: 1.800.938.7488 or 1.315.463.6463<br />
www.usitt.org<br />
Philips <strong>Strand</strong> <strong>Lighting</strong> Limited Two-Year Warranty<br />
Philips <strong>Strand</strong> <strong>Lighting</strong> offers a two-year limited warranty of its luminaires against defects in materials or<br />
workmanship from the date of delivery. A copy of Philips <strong>Strand</strong> <strong>Lighting</strong> two-year limited warranty containing<br />
specific terms and conditions can be obtained by contacting your local Philips <strong>Strand</strong> <strong>Lighting</strong> office.<br />
1
<strong>QuickStart</strong> Guide<br />
250ML <strong>Lighting</strong> Control Consoles<br />
TABLE OF CONTENTS<br />
Philips <strong>Strand</strong> <strong>Lighting</strong> Offices .............................................................................................................. Inside Front Cover<br />
IMPORTANT INFORMATION<br />
Warnings and Notices......................................................................................................................................................... 1<br />
Additional Resources for DMX512.................................................................................................................................... 1<br />
Philips <strong>Strand</strong> <strong>Lighting</strong> Limited Two-Year Warranty........................................................................................................ 1<br />
TABLE OF CONTENTS<br />
PREFACE<br />
About this Guide......................................................................................................................................................................... 3<br />
Included Items............................................................................................................................................................................. 3<br />
OVERVIEW<br />
Connections ................................................................................................................................................................................ 4<br />
Main Menu Structure .................................................................................................................................................................. 5<br />
SETUP<br />
Patching Fixtures ........................................................................................................................................................................ 6<br />
Dimmers...................................................................................................................................................................................... 7<br />
Moving Lights............................................................................................................................................................................. 7<br />
OPERATION<br />
Record a Cue............................................................................................................................................................................... 8<br />
Record a Submaster .................................................................................................................................................................... 8<br />
Record a Position........................................................................................................................................................................ 8<br />
Record a Color............................................................................................................................................................................ 8<br />
Record a Beam Position.............................................................................................................................................................. 8<br />
Record a Group........................................................................................................................................................................... 8<br />
List View..................................................................................................................................................................................... 9<br />
Exit Submaster List View ........................................................................................................................................................... 9<br />
Playback Submasters .................................................................................................................................................................. 9<br />
Playback Effects........................................................................................................................................................................ 10<br />
Running Effect View................................................................................................................................................................. 10<br />
Exit Running Effect View......................................................................................................................................................... 11<br />
Upgrading Software.................................................................................................................................................................. 11<br />
Console Password..................................................................................................................................................................... 12<br />
2 TABLE OF CONTENTS
250ML <strong>Lighting</strong> Control Consoles<br />
<strong>QuickStart</strong> Guide<br />
PREFACE<br />
1. About this Guide<br />
The document provides experienced users with the necessary information to get up and<br />
running very quickly.<br />
Refer to the on-line user manual for complete information regarding all console<br />
operations. The manual can be downloaded at www.strandlighting.com. You can use the<br />
QR code (to the right) on any QR code enabled smartphone to connect directly to the<br />
250ML Control Console product page and download the product manual or other product<br />
information.<br />
2. Included Items<br />
Each 250ML <strong>Lighting</strong> Control Console includes the following items:<br />
• <strong>Lighting</strong> control console<br />
• Console dust cover<br />
• Integrated video (VGA) card<br />
• Universal voltage power supply<br />
• USB key drive<br />
• LED desk lamp<br />
• 250ML <strong>Lighting</strong> Control Console <strong>QuickStart</strong> Guide (this document)<br />
250ML Control Console<br />
Product Page<br />
Note: Monitors, cables and other accessories are not included and are sold separately. For available accessories,<br />
please contact you local Authorized <strong>Strand</strong> <strong>Lighting</strong> Dealer. A list of Authorized Dealers is located on the <strong>Strand</strong><br />
<strong>Lighting</strong> web site at www.strandlighting.com.<br />
About this Guide 3
<strong>QuickStart</strong> Guide<br />
250ML <strong>Lighting</strong> Control Consoles<br />
OVERVIEW<br />
1. Connections<br />
1<br />
2<br />
3<br />
4<br />
4 OVERVIEW
250ML <strong>Lighting</strong> Control Consoles<br />
<strong>QuickStart</strong> Guide<br />
2. Main Menu Structure<br />
Shift<br />
+<br />
Untag<br />
Main Menu<br />
Setup Patch Archive Maintenance<br />
Record<br />
Options<br />
DMX<br />
Patch<br />
Save<br />
Show<br />
Reset<br />
Desk<br />
Lock /<br />
Unlock<br />
Assign<br />
Fixture<br />
Clear<br />
Mems/Subs<br />
Update<br />
Software<br />
Midi<br />
Setup<br />
Pan/Tilt<br />
Options<br />
Clear<br />
Palettes<br />
Update VGA<br />
Screen<br />
Playback<br />
Setup<br />
Default<br />
Setup<br />
Test<br />
Mode<br />
DMX Input<br />
Setup<br />
Load<br />
Show<br />
Display<br />
Setup<br />
Main Menu Structure 5
<strong>QuickStart</strong> Guide<br />
250ML <strong>Lighting</strong> Control Consoles<br />
SETUP<br />
1. Patching Fixtures<br />
Insert USB Key into console to load fixture library and then perform the following:<br />
SHIFT +SETUP<br />
Fixture Libraries:<br />
\250ML\<br />
\250ML\VGA\<br />
\250ML\SHOWS\<br />
\250ML\FIX\<br />
\250ML\SHOWLINE\<br />
\250ML\VARILITE\<br />
\250ML\SELECON\<br />
Untag<br />
Fixture Position<br />
Color<br />
Beam<br />
Effect Group<br />
Blackout<br />
Home<br />
S2<br />
Main Menu<br />
Patch<br />
ADD NEW FIXTURE<br />
PATCH MENU<br />
Main Menu<br />
DMX<br />
Patch<br />
Patch<br />
DMX<br />
Patch<br />
Assign<br />
Fixture<br />
Assign<br />
Fixture<br />
Pan/Tilt<br />
Options<br />
Pan/Tilt<br />
Options<br />
ASSIGN FIXTURE<br />
ADD NEW FIXTURE<br />
ASSIGN DMX ADDRESS<br />
Patch Menu<br />
1: Please select Fixture<br />
2 : Use Commane Line to patch Channel DMX<br />
Example: 1 + 2 > 100-30+1024 @ 250<br />
513 @ FX01 @ 10*<br />
100 2 FX 03*<br />
Sn<br />
Sn<br />
Sn<br />
ADD NEW FIXTURE<br />
ADD NEW FIXTURE<br />
ASSIGN DMX ADDRESS<br />
Patch Fixture <br />
Add<br />
Del<br />
Exit<br />
S8<br />
S8<br />
S6<br />
ADD NEW FIXTURE<br />
ADD NEW FIXTURE<br />
ASSIGN DMX ADDRESS<br />
Line A<br />
Patch Fixture <br />
Line B<br />
Cmd: Patch Line-A Dim XXX<br />
EXIT<br />
DEVICE ADDRESS<br />
Sn<br />
Sn<br />
OR<br />
OR<br />
S2<br />
OR<br />
DEVICE ADDRESS<br />
S2<br />
THEN<br />
ENCODER A (Exit)<br />
ENCODER A (Exit)<br />
S10<br />
6 SETUP
250ML <strong>Lighting</strong> Control Consoles<br />
<strong>QuickStart</strong> Guide<br />
2. Dimmers<br />
GRAND<br />
MASTER<br />
GRAND<br />
MASTER<br />
Blackout<br />
Blackout<br />
3. Moving Lights<br />
FIXTURE - DIMMER<br />
Sn<br />
FIXTURE - POSITION<br />
FIXTURE - COLOR<br />
Dimmers 7
<strong>QuickStart</strong> Guide<br />
250ML <strong>Lighting</strong> Control Consoles<br />
OPERATION<br />
1. Record a Cue<br />
Record CUE 1 Enter OR Record CUE 1 Record<br />
2. Record a Submaster<br />
Record<br />
24<br />
Enter<br />
OR Record<br />
24<br />
Record OR Record<br />
24<br />
3. Record a Position<br />
Record<br />
Position<br />
Sn Enter OR<br />
Record<br />
Position<br />
Sn Record<br />
OR<br />
Record<br />
Position<br />
Sn<br />
4. Record a Color<br />
Record<br />
Color<br />
Sn Enter OR<br />
Record<br />
Color<br />
Sn Record<br />
OR<br />
Record<br />
Color<br />
Sn<br />
5. Record a Beam Position<br />
Record<br />
Beam<br />
Sn Enter OR<br />
Record<br />
Beam<br />
Sn Record<br />
OR<br />
Record<br />
Beam<br />
Sn<br />
6. Record a Group<br />
Record<br />
Group<br />
Sn Enter OR<br />
Record<br />
Group<br />
Sn Record<br />
OR<br />
Record<br />
Group<br />
Sn<br />
8 OPERATION
250ML <strong>Lighting</strong> Control Consoles<br />
<strong>QuickStart</strong> Guide<br />
7. List View<br />
F2<br />
S6<br />
001 S<br />
012 03<br />
024 S<br />
S1<br />
S1<br />
S9<br />
Name:<br />
S2<br />
01 0.03.0<br />
02 0.03.0<br />
03 0.03.0<br />
C B<br />
S S<br />
S S<br />
S S<br />
F<br />
S<br />
S<br />
S<br />
S9<br />
S1<br />
01 0.03.0<br />
02 0.03.0<br />
03 0.03.0<br />
C B<br />
S S<br />
S S<br />
S S<br />
F<br />
S<br />
S<br />
S<br />
S9<br />
8. Exit Submaster List View<br />
001 S<br />
012 03<br />
024 S<br />
9. Playback Submasters<br />
SUBMASTERS<br />
PLAYBACK<br />
MASTER<br />
GRAND<br />
MASTER<br />
PLAYBACK<br />
MASTER<br />
GRAND<br />
MASTER<br />
Blackout<br />
Blackout<br />
1 2<br />
List View 9
<strong>QuickStart</strong> Guide<br />
250ML <strong>Lighting</strong> Control Consoles<br />
10. Playback Effects<br />
SUBMASTERS<br />
PLAYBACK<br />
MASTER<br />
GRAND<br />
MASTER<br />
PLAYBACK<br />
MASTER<br />
GRAND<br />
MASTER<br />
Blackout<br />
Blackout<br />
11 12<br />
11. Running Effect View<br />
12 02<br />
SPEED<br />
DIRECTION<br />
12 02<br />
S1<br />
12 02<br />
S2<br />
S3<br />
S4<br />
10 OPERATION
Untag<br />
Home<br />
Fixture Position<br />
Color<br />
Beam<br />
Effect Group<br />
Blackout<br />
250ML <strong>Lighting</strong> Control Consoles<br />
<strong>QuickStart</strong> Guide<br />
12. Exit Running Effect View<br />
12 02<br />
13. Upgrading Software<br />
Main Menu<br />
Maintenance<br />
Reset<br />
Desk<br />
Shift<br />
+<br />
Untag<br />
Update<br />
Software<br />
Update VGA<br />
Screen<br />
Test<br />
Mode<br />
Insert USB Key into console to load software:<br />
/250ML/Software.bin<br />
SHIFT+SETUP<br />
S4<br />
Rest Desk<br />
Update Software<br />
Update VGA Screen<br />
Test Mode<br />
Up/Down<br />
ENTER<br />
Setup menu<br />
Update Software<br />
Please Enter Password<br />
<br />
EXIT<br />
ENTER<br />
Exit Running Effect View 11
<strong>QuickStart</strong> Guide<br />
250ML <strong>Lighting</strong> Control Consoles<br />
14. Console Password<br />
S10<br />
Setup menu<br />
Update Software<br />
Please Wait<br />
<br />
EXIT<br />
ENTER<br />
PHILIPS STRAND LIGHTING<br />
250ML<br />
SOFTWARE VERSION<br />
X.X.XX.XX<br />
Up/Down<br />
ENTER<br />
12 OPERATION
250ML <strong>Lighting</strong> Control Consoles<br />
<strong>QuickStart</strong> Guide<br />
Notes<br />
Console Password 13