Palette Programming Tips and Tricks #9 - Strand Lighting
Palette Programming Tips and Tricks #9 - Strand Lighting
Palette Programming Tips and Tricks #9 - Strand Lighting

You also want an ePaper? Increase the reach of your titles
YUMPU automatically turns print PDFs into web optimized ePapers that Google loves.
Welcome to <strong>Palette</strong> <strong>Programming</strong> <strong>Tips</strong> <strong>and</strong> <strong>Tricks</strong><br />
<strong>#9</strong> – January 2012<br />
The goal of these bulletins is to share information about powerful features within the <strong>Palette</strong><br />
<strong>and</strong> Light<strong>Palette</strong> console lines. <strong>Palette</strong>OS, the software that runs on all <strong>Palette</strong> consoles, is<br />
very powerful <strong>and</strong> has a long rich development history that has taken customer’s comments to<br />
heart to address programmer’s issues <strong>and</strong> requested features.<br />
This ninth bulletin will discuss Independent Timing. This will build off of the information in the<br />
previous two bulletins that discussed cue timing <strong>and</strong> cue parts so I recommend going over<br />
those first. All previous bulletins can be downloaded from www.str<strong>and</strong>lighting.com. Just go to<br />
the Support section.<br />
If there is power <strong>and</strong> flexibility in cue timing options <strong>and</strong> part cues can exp<strong>and</strong> a st<strong>and</strong>ard fade<br />
to a much more dynamic transition, independent timing can exp<strong>and</strong> the dynamic transition<br />
exponentially.<br />
We’ll discuss how it works <strong>and</strong> I’ll give you real world examples of using this powerful <strong>Palette</strong><br />
feature.<br />
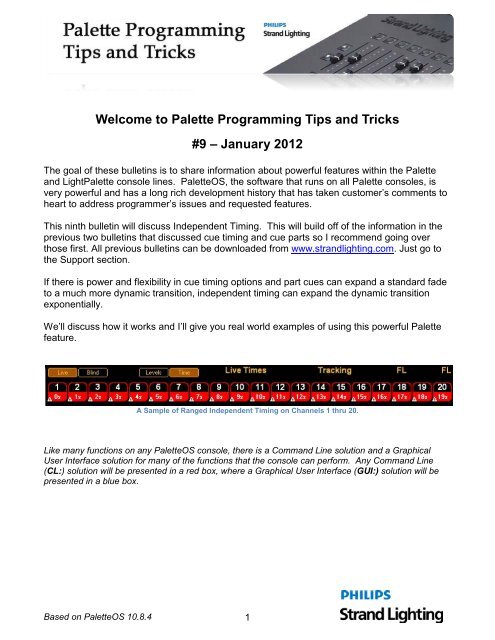
A Sample of Ranged Independent Timing on Channels 1 thru 20.<br />
Like many functions on any <strong>Palette</strong>OS console, there is a Comm<strong>and</strong> Line solution <strong>and</strong> a Graphical<br />
User Interface solution for many of the functions that the console can perform. Any Comm<strong>and</strong> Line<br />
(CL:) solution will be presented in a red box, where a Graphical User Interface (GUI:) solution will be<br />
presented in a blue box.<br />
Based on <strong>Palette</strong>OS 10.8.4 1
Independent Timing<br />
Independent timing, pure <strong>and</strong> simple, allows every channel <strong>and</strong> every parameter to have its<br />
own time in every cue. Now that’s flexibility!<br />
Before we get into the details <strong>and</strong> syntax, we’ll start with a little review of timing option with the<br />
<strong>Palette</strong>OS.<br />
• Cue Time – rate at which every instruction in the cue is executed. This includes levels<br />
going up, down <strong>and</strong> attribute movement.<br />
• Split Time – allows the ability to give a different time for levels going up in value than<br />
levels going down in value. This is separated by a Cue Time column <strong>and</strong> a Down Time<br />
column.<br />
• Delay Time – allows the ability for levels to wait before moving. This can be applied<br />
globally to the cue, levels going up, levels going down or each attribute family (Position,<br />
Color, Gobo, Lens <strong>and</strong> Special) individually.<br />
• Attribute Family Time – allows the ability for unique timing values for each attribute<br />
family. In essence, all position movement can move in one time, while color, gobo <strong>and</strong><br />
lens move each in their own time.<br />
Let’s look at scenarios where you would likely use a feature like this.<br />
• Maybe you have a DC special that wants to reveal a dancer before the stage wash<br />
fades up.<br />
• Maybe you have multiple moving lights focused on a performer CS <strong>and</strong> you want the<br />
backlight to highlight the figure first, then the more saturated lights to brighten next <strong>and</strong><br />
finally the front lights to reveal the performer as they begin to come to life.<br />
• Maybe you have a cyc color change that you want to ripple from SL to SR, one unit at a<br />
time.<br />
• Maybe you have multiple moving lights that you want to perform a live move from<br />
straight down to blind the audience <strong>and</strong> you want the center light to move first <strong>and</strong> ripple<br />
out so the fixtures on the end of the pipe move last.<br />
There are lots of dynamic transitions that can be accomplished with independent timing. As<br />
with part cues, I like to start with the Broadway model of creating the static visual image or cue<br />
<strong>and</strong> then break it up from there. We’ll start by discussing the interface <strong>and</strong> then layer in the<br />
uses of independent timing.<br />
Based on <strong>Palette</strong>OS 10.8.4 2
The Interface<br />
I’ll create a simple cue where 1 thru 10 are going to 50%.<br />
CL: [1] [THRU] [10] [@] [5] [ENTER]<br />
[RECORD] [ENTER]<br />
Or<br />
GUI: With the mouse, click <strong>and</strong> drag to select fixtures 1<br />
thru 10. Roll the mouse’s intelliwheel to achieve 50%.<br />
Press the Record icon, then ENTER.<br />
Basic Cue without Independent Timing<br />
From here, we want 2 thru 4 to go to the recorded level in a 5 count. The first step is to go into<br />
the Independent Timing screen.<br />
If you have a <strong>Palette</strong>, you will have a separate TIMES button that you can press. If you have a<br />
Light<strong>Palette</strong> you have a LEVELS/TIMES button that will toggle you back <strong>and</strong> forth from the<br />
st<strong>and</strong>ard levels screen to the independent timing screen. Or you can always use the<br />
icon on the user interface.<br />
Based on <strong>Palette</strong>OS 10.8.4 3
Independent Timing on Intensities<br />
I always make sure that I set the default time of the cue for the time values that works with the<br />
majority of the levels in the cue. In this case, we’ll keep the default time of 3.<br />
Now we’ll assign a time of 5 for fixtures 2 thru 4.<br />
CL: [2] [THRU] [4] [@] [5] [ENTER]<br />
Or<br />
GUI: With the mouse, click <strong>and</strong> drag to select fixtures 2<br />
thru 4. Roll the mouse’s intelliwheel to achieve 5<br />
seconds.<br />
The comm<strong>and</strong> line solution will look like this…<br />
Note: Remember that prior to ENTER being pressed all text will be white <strong>and</strong> after, the asterisk appears<br />
<strong>and</strong> the text changes to grey. This indicates the comm<strong>and</strong> has been completed.<br />
Since you are viewing the Timing screen, it will show you the Times of each fixture rather than<br />
the level. Notice that all times will be represented in seconds.<br />
The next step is to update the cue.<br />
Based on <strong>Palette</strong>OS 10.8.4 4
Once the cue is updated, notice that all default channels stay in grey while the channels with<br />
independent timing are in white indicating that those channels have an instruction. This is a<br />
similar approach to a hard value on the level of a channel. Also there is a clock face icon next<br />
to the default time of the cue. This is the indicator that there are independent timing values<br />
assigned to this cue. If you want to view them, just press the TIME(S) icon or key. Pressing<br />
the LEVEL(S) icon or key will restore the channel grid to the levels display.<br />
Based on <strong>Palette</strong>OS 10.8.4 5
Independent Timing on Attributes<br />
Not only can independent timing be assigned to intensity levels but to attributes as well.<br />
The image above shows <strong>and</strong> example of fixtures 1 thru 10 being Vari*Lites, independent timing<br />
has been assigned to pan <strong>and</strong> tilt with the following comm<strong>and</strong>s…<br />
CL: [1] [THRU] [10] [S2-Pan] [6] [ENTER]<br />
CL: [S3-TIlt] [12] [ENTER]<br />
Once that has been set, Updating the cue will store this information.<br />
Note: I had not only patched the 10 Vari*Lites, I also move them <strong>and</strong> updated the cue so that the cue<br />
had instructions on the pan <strong>and</strong> tilt values for the selected fixtures. Without a level instruction, there is<br />
no need for timing info.<br />
Based on <strong>Palette</strong>OS 10.8.4 6
Ranging Values<br />
A very nice shortcut is to be able to range values across the selected channels.<br />
The above image shows 20 fixtures all starting at the same time but taking a little longer on<br />
each fixture.<br />
CL: [1] [THRU] [20] [@] [0] [-] [3] [ENTER]<br />
Note: Remember that 1 thru 20 need to have a change of level or independent timing won’t apply. Also,<br />
use the minus “-“ key for the “to” comm<strong>and</strong> after you enter the starting value.<br />
Based on <strong>Palette</strong>OS 10.8.4 7
Ranging Values with Delay<br />
Let’s say you have a cyc light <strong>and</strong> not only do you want the fixtures to change from blue to<br />
green but you want it to happen in a ripple where it starts stage left <strong>and</strong> changes across the<br />
cyc to finish stage right.<br />
Range with delay is the perfect solution here.<br />
Here’s how you accomplish this.<br />
CL: [1] [THRU] [10] [@] [0] [-] [9] [/] [3] [ENTER]<br />
This assigns a 0 count delay to fixture 1 with a 9 count delay on fixture 10. All units fade in a 3<br />
count. The software does the math to determine an equal amount of delay for each channel.<br />
Note: Remember that time works as delay / fade so putting in a range value before the slash “/” key<br />
ranges delay.<br />
Based on <strong>Palette</strong>OS 10.8.4 8
Ranging Values with Relative Data<br />
In the example below, I increased the fade time by 1.<br />
CL: [1] [THRU] [10] [@] [+] [1] [ENTER]<br />
Now I’ll increase the delay data.<br />
CL: [1] [THRU] [10] [@] [+] [1] [/] [ENTER]<br />
By not putting anything after the slash “/”, the fade time remains unchanged.<br />
Based on <strong>Palette</strong>OS 10.8.4 9
Additional <strong>Tips</strong> <strong>and</strong> <strong>Tricks</strong><br />
Independent Timing allows the ultimate in flexibility for timing information on cues <strong>and</strong> the<br />
“range” functionality allows access to all of that flexibility <strong>and</strong> more.<br />
A few additional tips…<br />
• Independent Timing does not have to be assigned from the Times display. You can<br />
assign a level <strong>and</strong> a time in the same comm<strong>and</strong>. This will not only “sneak” the channel<br />
to the assigned level in the assigned time, but it will also remember <strong>and</strong> store that data<br />
if you update afterwards.<br />
CL: [1] [THRU] [10] [@] [5] [@] [8] [ENTER]<br />
• Ranges do not have to be assigned so that the lowest channel number has the lowest<br />
value, you could range values from 5 to 0 rather than from 0 to 5. This goes for both<br />
delay <strong>and</strong> fade so you<br />
CL: [1] [THRU] [10] [@] [0] [to] [5] [/] [5] [to] [0] [ENTER]<br />
could delay 5 to 0 <strong>and</strong><br />
fade 0 to 5 if you wish.<br />
• Ranges will apply based on the fixture selection order so if you select 10 thru 1 rather<br />
than 1 to 10, the range data will apply to the fixtures in the reverse order.<br />
• This also means that you can assign ranges based on a less systemic order. If you<br />
select 1 then 3 then 5 then 2 then 4, any range data will apply in that selected order.<br />
• Fixtures that are already selected do not have to be reselected so your timing changes<br />
can start with the @ comm<strong>and</strong> rather than reentering the fixture numbers.<br />
Based on <strong>Palette</strong>OS 10.8.4 10
<strong>Palette</strong> iRFU<br />
I want to replace the normal Real World Stories section with the exciting news of the <strong>Palette</strong><br />
iRFU launch for your <strong>Palette</strong>OS based console. From the developer of the most advanced<br />
open<strong>Palette</strong> web based remote mRFU, comes the iPhone/iPad/iPod Touch app that not only<br />
gives you remote control of fixtures, cues <strong>and</strong> looks (including all parameter control) but also<br />
the all important channel grid for both fixture <strong>and</strong> output data.<br />
More information about features, screenshots, support <strong>and</strong> introductory pricing can be found<br />
at… http://itunes.apple.com/us/app/palette-irfu/id489735816?ls=1&mt=8<br />
The <strong>Palette</strong>OS iRFU iPhone App<br />
Based on <strong>Palette</strong>OS 10.8.4 11