Denon DX-1000 Manual - Audio Products Australia
Denon DX-1000 Manual - Audio Products Australia
Denon DX-1000 Manual - Audio Products Australia

You also want an ePaper? Increase the reach of your titles
YUMPU automatically turns print PDFs into web optimized ePapers that Google loves.
ENGLISH<br />
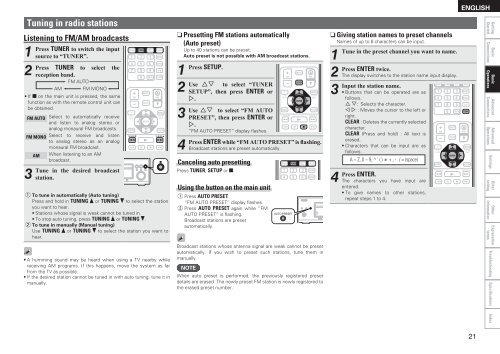
Tuning in radio stations<br />
Listening to FM/AM broadcasts<br />
1<br />
Press<br />
2<br />
Press<br />
TUNER to switch the input<br />
source to “TUNER”.<br />
TUNER to select the<br />
reception band.<br />
FM AUTO<br />
AM FM MONO<br />
• If 2 on the main unit is pressed, the same<br />
function as with the remote control unit can<br />
be obtained.<br />
FM AUTO<br />
FM MONO<br />
3<br />
Tune<br />
AM<br />
Select to automatically receive<br />
and listen to analog stereo or<br />
analog monaural FM broadcasts.<br />
Select to receive and listen<br />
to analog stereo as an analog<br />
monaural FM broadcast.<br />
When listening to an AM<br />
broadcast.<br />
in the desired broadcast<br />
station.<br />
q To tune in automatically (Auto tuning)<br />
Press and hold in TUNING d or TUNING f to select the station<br />
you want to hear.<br />
• Stations whose signal is weak cannot be tuned in.<br />
• To stop auto tuning, press TUNING d or TUNING f.<br />
w To tune in manually (<strong>Manual</strong> tuning)<br />
Use TUNING d or TUNING f to select the station you want to<br />
hear.<br />
• A humming sound may be heard when using a TV nearby while<br />
receiving AM programs. If this happens, move the system as far<br />
from the TV as possible.<br />
• If the desired station cannot be tuned in with auto tuning, tune it in<br />
manually.<br />
nnPresetting FM stations automatically<br />
(Auto preset)<br />
Up to 40 stations can be preset.<br />
Auto preset is not possible with AM broadcast stations.<br />
1<br />
Press SETUP.<br />
2<br />
Use ui to select “TUNER<br />
SETUP”, then press ENTER or<br />
p.<br />
3<br />
Use<br />
4<br />
Press<br />
ui to select “FM AUTO<br />
PRESET”, then press ENTER or<br />
p.<br />
“FM AUTO PRESET” display flashes.<br />
ENTER while “FM AUTO PRESET” is flashing.<br />
Broadcast stations are preset automatically.<br />
Canceling auto presetting<br />
Press TUNER, SETUP or 2.<br />
Using the button on the main unit<br />
q Press AUTO PRESET.<br />
“FM AUTO PRESET” display flashes.<br />
w Press AUTO PRESET again while “FM<br />
AUTO PRESET” is flashing.<br />
Broadcast stations are preset<br />
automatically.<br />
Broadcast stations whose antenna signal are weak cannot be preset<br />
automatically. If you wish to preset such stations, tune them in<br />
manually.<br />
NOTE<br />
When auto preset is performed, the previously registered preset<br />
details are erased. The newly preset FM station is newly registered to<br />
the erased preset number.<br />
nnGiving station names to preset channels<br />
Names of up to 8 characters can be input.<br />
1<br />
Tune in the preset channel you want to name.<br />
2<br />
Press ENTER twice.<br />
The display switches to the station name input display.<br />
3<br />
Input the station name.<br />
• Buttons that can be operated are as<br />
follows.<br />
u i: Selects the character.<br />
o p : Moves the cursor to the left or<br />
right.<br />
CLEAR : Deletes the currently selected<br />
character.<br />
CLEAR (Press and hold) : All text is<br />
erased.<br />
• Characters that can be input are as<br />
follows.<br />
4<br />
Press<br />
A ~ Z, 0 ~ 9, ^ ’ ( ) z + , - . / = (space)<br />
ENTER.<br />
The characters you have input are<br />
entered.<br />
• To give names to other stations,<br />
repeat steps 1 to 4.<br />
Getting<br />
Started<br />
Basic<br />
Connections<br />
Basic<br />
Operations<br />
Advanced<br />
Connections<br />
Advanced<br />
Operations<br />
Settings<br />
Other<br />
setting<br />
Other<br />
information<br />
Explanation<br />
terms<br />
Troubleshooting Specifications Index<br />
21