Denon AVR-X2000 Manual.pdf - Audio Products Australia
Denon AVR-X2000 Manual.pdf - Audio Products Australia
Denon AVR-X2000 Manual.pdf - Audio Products Australia

Create successful ePaper yourself
Turn your PDF publications into a flip-book with our unique Google optimized e-Paper software.
Contents<br />
Connections<br />
Playback<br />
Settings<br />
Tips<br />
Appendix<br />
<strong>AVR</strong>-<strong>X2000</strong><br />
INTEGRATED NETWORK AV RECEIVER<br />
Owner’s <strong>Manual</strong><br />
You can print more than one page of a PDF onto a single sheet of paper.<br />
Front panel Display Rear panel Remote<br />
Index
Contents<br />
Connections<br />
Playback<br />
Settings<br />
Tips<br />
Appendix<br />
Contents<br />
Accessories························································································· 6<br />
Inserting the batteries······································································· 7<br />
Operating range of the remote control unit······································ 7<br />
Features······························································································· 8<br />
High quality sound············································································· 8<br />
High performance············································································· 8<br />
Easy operation··················································································· 9<br />
Part names and functions<br />
Front panel······················································································· 10<br />
Display······························································································· 13<br />
Rear panel························································································· 15<br />
Remote control unit······································································· 17<br />
Connections<br />
Speaker connection······································································· 20<br />
Speaker installation········································································· 20<br />
Speaker connection········································································· 23<br />
Connecting a TV············································································· 29<br />
Connection 1 : TV equipped with an HDMI connector and<br />
compatible with the ARC (<strong>Audio</strong> Return Channel)·························· 30<br />
Connection 2 : TV equipped with an HDMI connector···················· 31<br />
Connecting a playback device···················································· 32<br />
Connecting a set-top box (Satellite tuner/cable TV)························ 33<br />
Connecting a DVD player································································ 34<br />
Connecting a video camcorder or other device······························· 35<br />
Connecting an iPod or USB memory device to the<br />
USB port··························································································· 36<br />
Connecting an FM antenna························································· 38<br />
Connecting to a home network (LAN)····································· 39<br />
Connecting the power cord························································· 40<br />
Playback<br />
Basic operation··············································································· 42<br />
Turning the power on······································································ 42<br />
Selecting the input source······························································ 42<br />
Adjusting the master volume·························································· 43<br />
Turning off the sound temporarily··················································· 43<br />
Playing a DVD player/Blu-ray Disc player········································ 43<br />
Playing an iPod················································································ 44<br />
Listening to music on an iPod························································· 45<br />
Setting operation mode (iPod Browse Mode)································· 46<br />
Performing repeat playback (Repeat)·············································· 47<br />
Performing random playback (Random)·········································· 47<br />
Playing a USB memory device··················································· 48<br />
Playing files stored on USB memory devices································· 49<br />
Front panel Display Rear panel 2<br />
Remote<br />
Index
Contents<br />
Connections<br />
Playback<br />
Settings<br />
Tips<br />
Appendix<br />
Listening to FM broadcasts························································· 51<br />
Listening to FM broadcasts····························································· 52<br />
Tuning in by entering the radio frequency (Direct Tune)················· 53<br />
RDS search····················································································· 54<br />
PTY search······················································································ 54<br />
TP search························································································ 55<br />
Radio Text······················································································· 56<br />
Changing the tuning mode (Tune Mode)········································ 56<br />
Listening to preset stations····························································· 56<br />
Presetting the current broadcast station (Preset Memory)············· 57<br />
Tuning in to radio stations and presetting them automatically<br />
(Auto Preset Memory)····································································· 58<br />
Specify a name for the preset broadcast station (Preset Name)···· 58<br />
Skipping preset broadcast stations (Preset Skip)···························· 59<br />
Cancelling preset skip····································································· 59<br />
Listening to Internet Radio·························································· 60<br />
Listening to Internet Radio······························································ 61<br />
Playing the last played Internet Radio station································· 62<br />
Using vTuner to add Internet Radio stations to favorites················ 63<br />
Playing back files stored on a PC and NAS···························· 64<br />
Applying media sharing settings····················································· 65<br />
Playing back files stored on a PC and NAS····································· 66<br />
Listening to Last.fm······································································· 68<br />
Listening to Last.fm········································································ 69<br />
Log Out··························································································· 72<br />
Viewing photographs on the Flickr site·································· 73<br />
Viewing photographs shared by particular users···························· 74<br />
Viewing all photographs on Flickr···················································· 75<br />
Listening to Spotify······································································· 77<br />
Listening to Spotify········································································· 77<br />
Adding to the FAVORITE STATION button···························· 81<br />
Playing back content added to the FAVORITE STATION button····· 82<br />
AirPlay function·············································································· 83<br />
Streaming music stored in iPhone, iPod touch, or iPad directly<br />
to the unit························································································ 83<br />
Playing iTunes music with this unit················································· 84<br />
Selecting multiple speakers (devices)············································· 84<br />
Perform iTunes playback operations with the remote control unit<br />
of this unit······················································································· 85<br />
Convenience functions································································· 86<br />
Performing repeat playback (Repeat)·············································· 87<br />
Performing random playback (Random)·········································· 87<br />
Add to favorites from the Option menu (Save to Favorites)··········· 88<br />
Playing back content added in “Save to Favorites”························ 88<br />
Deleting content added to favorites (Remove from Favorites)······· 89<br />
Searching content with keywords (Text Search)····························· 89<br />
Playing back music and a favorite picture at the same time<br />
(Slideshow)······················································································ 90<br />
Playing back still pictures in sequential order<br />
(Slideshow Interval)········································································· 91<br />
Displaying your desired video during audio playback<br />
(Video Select)·················································································· 91<br />
Adjusting the picture quality for your viewing environment<br />
(Picture Mode)················································································· 92<br />
Playing music in All Zone Stereo····················································· 93<br />
Selecting a sound mode······························································· 94<br />
Selecting a sound mode·································································· 95<br />
Direct playback················································································ 96<br />
Pure Direct playback······································································· 96<br />
Front panel Display Rear panel 3<br />
Remote<br />
Index
Contents<br />
Connections<br />
Playback<br />
Settings<br />
Tips<br />
Appendix<br />
HDMI control function································································· 105<br />
Setting procedure·········································································· 105<br />
Sleep timer function···································································· 106<br />
Using the sleep timer···································································· 106<br />
Quick select function··································································· 107<br />
Calling up the Quick Select··························································· 107<br />
Changing the settings··································································· 107<br />
Web control function··································································· 108<br />
Controlling the unit from a web control········································ 108<br />
Playback in ZONE2 (Separate room)······································ 110<br />
Connecting ZONE2······································································· 110<br />
Playback in ZONE2········································································ 112<br />
Settings<br />
Menu map······················································································· 114<br />
Menu operation············································································· 120<br />
Inputting characters···································································· 121<br />
Keyboard screen··········································································· 121<br />
<strong>Audio</strong>································································································ 122<br />
Dialog Level··················································································· 122<br />
Subwoofer Level··········································································· 122<br />
Surround Parameter······································································ 123<br />
Tone······························································································ 126<br />
Restorer························································································ 126<br />
<strong>Audio</strong> Delay··················································································· 127<br />
Volume·························································································· 127<br />
Audyssey······················································································· 128<br />
Graphic EQ···················································································· 130<br />
Video································································································ 131<br />
Picture Adjust················································································ 131<br />
HDMI Setup·················································································· 132<br />
Output Settings············································································· 134<br />
On Screen Display········································································· 136<br />
TV Format······················································································ 136<br />
Inputs······························································································· 137<br />
Input Assign·················································································· 137<br />
Source Rename············································································· 139<br />
Hide Sources················································································· 139<br />
Source Level················································································· 139<br />
Input Select··················································································· 140<br />
Speakers························································································· 141<br />
Audyssey® Setup········································································· 141<br />
Procedure for speaker settings (Audyssey ® Setup)····················· 143<br />
Error messages············································································· 148<br />
Retrieving Audyssey ® Setup settings············································ 149<br />
<strong>Manual</strong> Setup················································································ 150<br />
Amp Assign··················································································· 150<br />
Speaker Config.············································································· 151<br />
Distances······················································································ 153<br />
Levels···························································································· 153<br />
Crossovers···················································································· 154<br />
Bass······························································································ 155<br />
Front Speaker Setup····································································· 155<br />
Front panel Display Rear panel 4<br />
Remote<br />
Index
Contents<br />
Connections<br />
Playback<br />
Settings<br />
Tips<br />
Appendix<br />
Network·························································································· 156<br />
Information···················································································· 156<br />
IP Control······················································································ 156<br />
Friendly Name··············································································· 156<br />
Settings························································································· 157<br />
Diagnostics···················································································· 158<br />
Maintenance Mode······································································· 159<br />
General···························································································· 160<br />
Language······················································································· 160<br />
ZONE2 Setup················································································ 160<br />
Zone Rename················································································ 161<br />
Quick Select Names······································································ 161<br />
Auto Standby················································································· 162<br />
Front Display················································································· 162<br />
Information···················································································· 162<br />
Usage Data···················································································· 164<br />
Firmware······················································································· 164<br />
Setup Lock···················································································· 166<br />
Specifying the zone used with the remote control unit················ 167<br />
Tips<br />
Appendix<br />
About HDMI····················································································· 184<br />
Video conversion function····························································· 187<br />
Playing back USB memory devices············································· 189<br />
Playing back files stored on PC or NAS······································ 190<br />
Playing back Internet Radio·························································· 191<br />
Personal memory plus function··················································· 191<br />
Last function memory···································································· 191<br />
Sound modes and channel output··············································· 192<br />
Sound modes and surround parameters···································· 193<br />
Types of input signals, and corresponding sound modes······· 196<br />
Explanation of terms······································································ 199<br />
Trademark information··································································· 205<br />
Specifications·················································································· 207<br />
Index································································································· 209<br />
License····························································································· 212<br />
Contents·························································································· 168<br />
Tips································································································ 169<br />
Troubleshooting············································································ 171<br />
Resetting factory settings·························································· 183<br />
Front panel Display Rear panel 5<br />
Remote<br />
Index
Contents<br />
Connections<br />
Playback<br />
Settings<br />
Tips<br />
Appendix<br />
Thank you for purchasing this <strong>Denon</strong> product. To ensure proper operation, please read this owner’s manual carefully before using the product.<br />
After reading this manual, be sure to keep it for future reference.<br />
Accessories<br />
Check that the following parts are supplied with the product.<br />
q Getting Started w CD-ROM (Owner’s <strong>Manual</strong>) e Safety Instructions r Power cord<br />
t Remote control unit (RC-1183) y R03/AAA batteries u FM indoor antenna i Setup and measurement<br />
microphone (ACM1HB)<br />
o Cable label<br />
Front panel Display Rear panel 6<br />
Remote<br />
Index
Contents<br />
Connections<br />
Playback<br />
Settings<br />
Tips<br />
Appendix<br />
Inserting the batteries<br />
q Remove the rear lid in the direction of the<br />
arrow and remove it.<br />
Operating range of the remote control<br />
unit<br />
Point the remote control unit at the remote sensor when operating it.<br />
w Load the two batteries properly as<br />
indicated by the q and w marks in the<br />
battery compartment.<br />
R03/AAA<br />
Approx. 7 m<br />
30°<br />
30°<br />
e Put the rear cover back on.<br />
NOTE<br />
• When inserting the batteries, be sure to do so in the proper direction, following the<br />
q and w marks in the battery compartment.<br />
• To prevent damage or leakage of battery fluid:<br />
• Do not use a new battery together with an old one.<br />
• Do not use two different types of batteries.<br />
• Remove the batteries from the remote control unit if it will not be in use for long<br />
periods.<br />
• If the battery fluid should leak, carefully wipe the fluid off the inside of the battery<br />
compartment and insert new batteries.<br />
Front panel Display Rear panel 7<br />
Remote<br />
Index
Contents<br />
Connections<br />
Playback<br />
Settings<br />
Tips<br />
Appendix<br />
Features<br />
High quality sound<br />
• With discrete circuit technology, the power amplifier provides<br />
identical quality for all 7-channels (125 Watts x 7-channels)<br />
For optimum realism and stunning dynamic range, the power amplifier<br />
section features discrete power devices (not integrated circuitry).<br />
By using high current, high power discrete power devices, the amplifier<br />
is able to easily drive high quality speakers.<br />
High performance<br />
• Digital video processor upscales analog video signals (SD resolution)<br />
to HD (720p/1080p) and 4K (vpage 184)<br />
This unit features a sophisticated video processor that can upscale<br />
standard definition (SD) analog video content from legacy sources such<br />
as a VCR to HD and is able to output at 4K Ultra HD resolution (3840 x<br />
2160 pixels) for compatibility with newly available high 4K TVs.<br />
• Supports Internet Radio, music, and photograph streaming<br />
Supports AirPlay ® (vpage 83)<br />
You can enjoy a wide variety of content, including listening to Internet<br />
Radio, playing audio files stored on your PC, and displaying photographs<br />
stored on your PC on our television.<br />
This unit also supports Apple AirPlay which lets you stream your music<br />
library from an iPhone®, iPad®, iPod touch® or iTunes®.<br />
• Compatible with “<strong>Denon</strong> Remote App” for performing basic<br />
operations of the unit with an iPad, iPhonez or Android smartphone<br />
“<strong>Denon</strong> Remote App” is application software that allows you to perform<br />
basic operations with an iPad, iPhone, Android smartphone or Android<br />
tablet such as turning the unit ON/OFF, controlling the volume, and<br />
switching the source.<br />
zz<br />
Download the appropriate “<strong>Denon</strong> Remote App” for iOS and Android<br />
devices. This unit needs to be connected to your LAN and the iPhone/<br />
iPod touch or other device needs to be connected to the same<br />
network by Wi-Fi (wireless LAN).<br />
• HDMI connections enable quick connection to various digital AV<br />
devices (7 inputs, 1 output)<br />
The unit is equipped with 7 HDMI input connectors for connecting<br />
devices with HDMI connectors, such as a Blu-ray Disc player, game<br />
console, HD digital camcorder, HDTVs, etc.<br />
• Supports HDMI (3D, ARC, Deep Color, “x.v.Color”, Auto Lip Sync,<br />
4K) and HDMI control function (vpage 184)<br />
Advanced HDMI features are supported, including 3D passthrough,<br />
<strong>Audio</strong> Return Channel, Auto Lip Sync, Deep Color and “x.v.Color”, and<br />
HDMI CEC control functions. If a 4K digital video signal is input, it is<br />
passed through the unit unchanged, and the GUI overlay will adjust the<br />
resolution accordingly.<br />
Front panel Display Rear panel 8<br />
Remote<br />
Index
Contents<br />
Connections<br />
Playback<br />
Settings<br />
Tips<br />
Appendix<br />
• Direct play for iPod and iPhone via USB (vpage 36)<br />
Music data from an iPod or iPhone can be played back if you connect<br />
the USB cable supplied with the iPod via the USB port of this unit, and<br />
also an iPod can be controlled with the remote control that comes with<br />
this unit.<br />
• Multi-Room audio<br />
Enjoy the same music in your home theater and another room at the<br />
same time (vpage 93).<br />
Easy operation<br />
• “Setup Assistant” provides easy-to-follow setup instructions<br />
First select the language when prompted. Then simply follow the<br />
instructions displayed on the TV screen to set up the speakers, network,<br />
etc.<br />
• Easy to use Graphical User Interface<br />
This unit is equipped with an easy to see Graphical User Interface that<br />
uses menu displays and features colorful icons and easy to understand<br />
controls for maximum ease of use.<br />
Front panel Display Rear panel 9<br />
Remote<br />
Index
Contents<br />
Connections<br />
Playback<br />
Settings<br />
Tips<br />
Appendix<br />
Part names and functions<br />
Front panel<br />
Q0<br />
o<br />
i<br />
u<br />
Q1<br />
Q2 Q3 Q4 Q5<br />
Q6<br />
q<br />
w<br />
e<br />
r t y<br />
Front panel Display Rear panel 10<br />
Remote<br />
Index
Contents<br />
Connections<br />
Playback<br />
Settings<br />
Tips<br />
Appendix<br />
Q0<br />
q w<br />
o<br />
Q1<br />
e<br />
i<br />
r t y<br />
q Power operation button (X)<br />
This turns the power of MAIN ZONE on/off (standby) (vpage 42).<br />
w Power indicator<br />
This is lit as follows according to the power status:<br />
• Power on : Green<br />
• Normal standby : Off<br />
• When “HDMI Pass Through” (vpage 133) or “HDMI Control”<br />
(vpage 133) is set to “On” : Red<br />
• When “IP Control” (vpage 156) is set to “Always On” : Red<br />
e Headphones jack (PHONES)<br />
When the headphones are plugged into this jack, audio will no longer<br />
be output from the connected speakers.<br />
NOTE<br />
• To prevent hearing loss, do not raise the volume level excessively when using<br />
headphones.<br />
u<br />
r AUX-HDMI connector<br />
Used to connect devices such as video cameras and game consoles<br />
(vpage 35).<br />
t USB port<br />
Used to connect USB storages (such as USB memory devices) and the<br />
USB cable supplied with iPod (vpage 36).<br />
y SETUP MIC jack<br />
Used to connect the supplied Setup and measurement microphone<br />
(vpage 144).<br />
u MASTER VOLUME knob<br />
This adjusts the volume level (vpage 43).<br />
i Display<br />
This displays various pieces of information (vpage 13).<br />
o Remote control sensor<br />
This receives signals from the remote control unit (vpage 7).<br />
Q0 SOURCE SELECT knob<br />
This selects the input source (vpage 42).<br />
Q1 Tuner preset channel buttons (TUNER PRESET CH +, –)<br />
These select preset FM radio stations (vpage 56).<br />
Front panel Display Rear panel 11<br />
Remote<br />
Index
Contents<br />
Connections<br />
Playback<br />
Settings<br />
Tips<br />
Appendix<br />
Q2Q3Q4Q5<br />
Q6<br />
Q2 ZONE2 ON/OFF button<br />
This turns the power of ZONE2 on/off (vpage 112).<br />
Q3 ZONE2 SOURCE button<br />
This selects the input source for ZONE2 (vpage 112).<br />
Q4 DIMMER button<br />
Each press of this switches the brightness of the display (vpage 162).<br />
Q5 STATUS button<br />
Each press of this switches the status information that is shown on the<br />
display (vpage 46).<br />
Q6QUICK SELECT buttons<br />
With a single press of any of these buttons, you can call up various<br />
settings you’ve registered to each button such as the input source,<br />
volume level and sound mode settings (vpage 107).<br />
Front panel Display Rear panel 12<br />
Remote<br />
Index
Contents<br />
Connections<br />
Playback<br />
Settings<br />
Tips<br />
Appendix<br />
Display<br />
Q2<br />
Q1<br />
Q0<br />
o<br />
i<br />
u<br />
y<br />
t<br />
r<br />
q Information display<br />
The input source name, sound mode, setting values and other<br />
information are displayed here.<br />
w Input signal indicators<br />
e MULTI ZONE indicators<br />
This lights up when ZONE2 (separate room) power is turned on<br />
(vpage 112).<br />
r MUTE indicator<br />
This lights when the audio mute mode is selected (vpage 43).<br />
t Master volume indicator<br />
y Circle indicator<br />
Circle indicator is displayed when the input source is “NETWORK” or<br />
“iPod/USB” when you are playing back music.<br />
q<br />
w e<br />
u Sleep timer indicator<br />
This lights when the sleep mode is selected (vpage 106).<br />
i Tuner reception mode indicators<br />
These light according to the reception conditions when the input<br />
source is set to “TUNER”.<br />
STEREO : In FM mode, this lights up when receiving stereo broadcasts.<br />
TUNED : Lights up when the broadcast is properly tuned in.<br />
RDS : Lights up when receiving RDS broadcasts.<br />
o Audyssey ® indicator<br />
This indicator lights when the “MultEQ® XT” (vpage 128), “Dynamic<br />
EQ” (vpage 128) or “Dynamic Volume” (vpage 129) setting is<br />
set to other than “Off”.<br />
Front panel Display Rear panel 13<br />
Remote<br />
Index
Contents<br />
Connections<br />
Playback<br />
Settings<br />
Tips<br />
Appendix<br />
Q2<br />
Q1<br />
Q0<br />
Q0Decoder indicator<br />
These light when Dolby or DTS signals are input or when the Dolby or<br />
DTS decoder is running.<br />
Q1Surround back indicator<br />
This lights when audio signals are being output from the surround back<br />
speakers (vpage 152).<br />
Q2Input mode indicators<br />
Set the audio input modes for the different input sources (vpage 140).<br />
Front panel Display Rear panel 14<br />
Remote<br />
Index
Contents<br />
Connections<br />
Playback<br />
Settings<br />
Tips<br />
Appendix<br />
Rear panel<br />
Q0<br />
o<br />
i<br />
u<br />
y<br />
t<br />
r<br />
q w e<br />
Front panel Display Rear panel 15<br />
Remote<br />
Index
Contents<br />
Connections<br />
Playback<br />
Settings<br />
Tips<br />
Appendix<br />
Q0<br />
o i u<br />
y<br />
q FM antenna terminals (ANTENNA)<br />
Used to connect FM antennas (vpage 51).<br />
w Speaker terminals (SPEAKERS)<br />
Used to connect speakers (vpage 23).<br />
e Component video connectors (COMPONENT VIDEO)<br />
Used to connect devices equipped with component video connectors<br />
(vpage 33, 34).<br />
r AC inlet (AC IN)<br />
Used to connect the power cord (vpage 40).<br />
t<br />
q w e<br />
r<br />
t HDMI connectors<br />
Used to connect devices equipped with HDMI connectors<br />
(vpage 30, 31, 35).<br />
y Digital audio connectors (DIGITAL AUDIO)<br />
Used to connect devices equipped with digital audio connectors<br />
(vpage 33, 34).<br />
u Video connectors (VIDEO)<br />
Used to connect devices equipped with video connectors<br />
(vpage 33, 34).<br />
i Network connector (NETWORK)<br />
Used to connect this unit to the network (vpage 39).<br />
o PRE OUT connectors<br />
Used to connect a subwoofer with a built-in amplifier or an external<br />
power amplifier (vpage 24, 111).<br />
Q0 Analog audio connectors (AUDIO)<br />
Used to connect devices equipped with analog audio connectors<br />
(vpage 33, 34).<br />
NOTE<br />
• Do not touch the inner pins of the connectors on the rear panel. Electrostatic<br />
discharge may cause permanent damage to the unit.<br />
Front panel Display Rear panel 16<br />
Remote<br />
Index
Contents<br />
Connections<br />
Playback<br />
Settings<br />
Tips<br />
Appendix<br />
Remote control unit<br />
q<br />
w<br />
e<br />
r<br />
t<br />
y<br />
u<br />
i<br />
o<br />
q ZONE SELECT buttons (MAIN, ZONE2)<br />
These switch the zone (MAIN ZONE, ZONE2) that is operated through<br />
the remote control unit (vpage 112, 120).<br />
w Input source select buttons<br />
These select the input source (vpage 42).<br />
e FAVORITE STATION buttons (1 – 3)<br />
With a single press of these, you can call up registered radio stations<br />
and contents (vpage 81).<br />
r Channel/page search buttons (CH/PAGE df)<br />
These select preset radio stations or switch pages (vpage 56).<br />
t MUTE button (:)<br />
This mutes the output audio (vpage 43).<br />
y Information button (INFO)<br />
This displays the status information on the TV screen (vpage 163).<br />
u Cursor buttons (uio p)<br />
These select items (vpage 120).<br />
i BACK button<br />
This returns to the previous screen (vpage 120).<br />
o System buttons<br />
These perform playback related operations (vpage 44).<br />
• Skip buttons (8, 9)<br />
• Play/pause button (1/3)<br />
Tuning up / Tuning down buttons (TUNE +, –)<br />
These operate the tuner (vpage 52).<br />
Front panel Display Rear panel 17<br />
Remote<br />
Index
Contents<br />
Connections<br />
Playback<br />
Settings<br />
Tips<br />
Appendix<br />
Q1<br />
Q2<br />
Q3<br />
Q4<br />
Q5<br />
Q6<br />
Q7<br />
Q0 SOUND MODE buttons<br />
These select the sound mode (vpage 94).<br />
• MOVIE button<br />
• MUSIC button<br />
• GAME button<br />
• PURE button<br />
Q1 Remote control signal transmitter<br />
This transmits signals from the remote control unit (vpage 7).<br />
Q2 SLEEP button<br />
This sets the sleep timer (vpage 106).<br />
Q3 POWER button (X)<br />
This turns the power on/off (vpage 42).<br />
Q4 VOLUME buttons (df)<br />
These adjust the volume level (vpage 43).<br />
Q5 OPTION button<br />
This displays the option menu on the TV screen (vpage 86).<br />
Q6 ENTER button<br />
This determines the selection (vpage 120).<br />
Q7 SETUP button<br />
This displays the menu on the TV screen (vpage 120).<br />
Q000<br />
Front panel Display Rear panel 18<br />
Remote<br />
Index
Contents<br />
Connections<br />
Connections<br />
Speaker connection (vpage 20)<br />
Connecting a TV (vpage 29)<br />
Connecting a playback device (vpage 32)<br />
Playback<br />
Settings<br />
Tips<br />
Appendix<br />
22Cables used for connections<br />
Provide necessary cables according to the devices you want to connect.<br />
Speaker cable<br />
Connecting an iPod or USB memory device to the USB<br />
port (vpage 36)<br />
Connecting an FM antenna (vpage 38)<br />
Subwoofer cable<br />
HDMI cable<br />
Connecting to a home network (LAN) (vpage 39)<br />
Component video cable<br />
Connecting the power cord (vpage 40)<br />
Video cable<br />
NOTE<br />
• Do not plug in the power cord until all connections have been completed.<br />
However, when the “Setup Assistant” is running, follow the instructions in the<br />
“Setup Assistant” (C page 7) screen for making connections. (During “Setup<br />
Assistant” operation, the input/output connectors do not conduct current.)<br />
• Do not bundle power cords together with connection cables. Doing so can result<br />
in noise.<br />
Optical cable<br />
<strong>Audio</strong> cable<br />
LAN cable<br />
L<br />
R<br />
L<br />
R<br />
Front panel Display Rear panel 19<br />
Remote<br />
Index
Contents<br />
Connections<br />
Speaker connection<br />
Playback<br />
Install speakers and connect them to this unit (vpage 20, 23).<br />
Speaker installation<br />
Settings<br />
Tips<br />
Appendix<br />
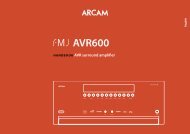
Determine the speaker system depending on the number of speakers you are using and install each speaker and subwoofer in the room. Here, we explain<br />
how to install the speakers using a typical example.<br />
SL<br />
FHL<br />
FL<br />
SW<br />
C<br />
FR<br />
FHR<br />
SBL SB SBR<br />
SR<br />
FL/FR : Place the FRONT left and right speakers an equal distance from<br />
the main listening position. The distance between each speaker<br />
and your TV should also be the same.<br />
C : Place the CENTER speaker in between the front speakers and above<br />
or below your TV.<br />
SL/SR : Place the SURROUND left and right speakers an equal distance<br />
to the left and right sides of the main listening position. If you<br />
don’t have Surround Back speakers, move the surround speakers<br />
slightly behind your listening position.<br />
SBL/SBR (SB) : Place the SURROUND BACK left and right speakers<br />
an equal distance from the main listening position and<br />
directly behind the main listening position. If you only<br />
have one Surround Back speaker, center it.<br />
FHL/FHR : Place the FRONT HEIGHT left and right speakers just outside<br />
of the front left and right speakers. Mount them as close to the<br />
ceiling as possible and aim them towards the main listening<br />
position.<br />
SW : Place the SUBWOOFER at a convenient location near the front<br />
speakers.<br />
Front panel Display Rear panel 20<br />
Remote<br />
Index
Contents<br />
Connections<br />
Playback<br />
Settings<br />
Tips<br />
Appendix<br />
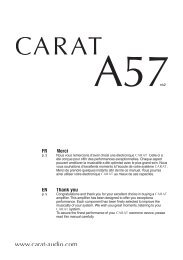
%<br />
• This unit is compatible with Dolby Pro Logic gz (vpage 200) which offers an<br />
even wider and deeper surround sensation.<br />
When using Dolby Pro Logic gz, install front height speakers.<br />
• Use the illustration below as a guide for how high each speaker should be installed.<br />
The height does not need to be exactly the same.<br />
Front height<br />
speaker<br />
• Point slightly<br />
downwards<br />
At least 1 m z<br />
Front<br />
speaker<br />
Surround<br />
speaker<br />
60 – 90 cm<br />
GViewed from the sideH<br />
zzRecommended for Dolby Pro Logic gz<br />
Surround back<br />
speaker<br />
• Point slightly<br />
downwards<br />
NOTE<br />
• You cannot have audio output from the surround back speakers and front height<br />
speakers simultaneously.<br />
22When 7.1/6.1-channel speakers are installed<br />
using surround back speakers<br />
SL<br />
Listening<br />
position<br />
FL<br />
SW<br />
z 2<br />
SBL<br />
z 1<br />
C<br />
z 3<br />
SBR<br />
FR<br />
SR<br />
z1 22˚ – 30˚<br />
z2 90˚ – 110˚<br />
z3 135˚ – 150˚<br />
%<br />
• When using a single surround back speaker, place it directly behind the listening<br />
position.<br />
GSpeaker abbreviationsH<br />
FL Front speaker (L) SBL Surround back speaker (L)<br />
FR Front speaker (R) SBR Surround back speaker (R)<br />
C Center speaker FHL Front height speaker (L)<br />
SW Subwoofer FHR Front height speaker (R)<br />
SL Surround speaker (L)<br />
SR Surround speaker (R)<br />
Front panel Display Rear panel 21<br />
Remote<br />
Index
Contents<br />
Connections<br />
Playback<br />
Settings<br />
Tips<br />
Appendix<br />
22When 7.1-channel speakers are installed using<br />
front height speakers<br />
FHL<br />
FL SW<br />
z2<br />
z1<br />
C<br />
FR<br />
z3<br />
FHR<br />
z1 22˚ – 30˚<br />
z2 22˚ – 45˚<br />
z3 90˚ – 110˚<br />
22When 5.1-channel speakers are installed<br />
SL<br />
FL<br />
z2<br />
SW<br />
C<br />
z1<br />
FR<br />
SR<br />
z1 22˚ – 30˚<br />
z2 120˚<br />
SL<br />
SR<br />
Front panel Display Rear panel 22<br />
Remote<br />
Index
Contents<br />
Connections<br />
Playback<br />
Settings<br />
Tips<br />
Appendix<br />
Speaker connection<br />
Here we connect the speakers in the room to this unit.<br />
This section explains how to connect them using typical examples.<br />
NOTE<br />
• Disconnect this unit’s power plug from the power outlet before connecting the<br />
speakers. Also, turn off the subwoofer.<br />
• Connect so that the speaker cable core wires do not protrude from the speaker<br />
terminal. The protection circuit may be activated if the core wires touch the rear<br />
panel or if the + and – sides touch each other (vpage 203 “Protection circuit”).<br />
• Never touch the speaker terminals while the power cord is connected. Doing so<br />
could result in electric shock. When the “Setup Assistant” is running, follow the<br />
instructions in the “Setup Assistant” screen for making connections. (Power is not<br />
supplied to the speaker terminals while the “Setup Assistant” is running.)<br />
• Use speakers with an impedance of 6 – 16 Ω/ohms.<br />
22Connecting the speaker cables<br />
Carefully check the left (L) and right (R) channels and + (red) and –<br />
(black) polarities on the speakers being connected to this unit, and be<br />
sure to connect the channels and polarities correctly.<br />
1<br />
2<br />
3<br />
Peel off about 10 mm of sheathing from<br />
the tip of the speaker cable, then either<br />
twist the core wire tightly or terminate it.<br />
Turn the speaker terminal counterclockwise<br />
to loosen it.<br />
Insert the speaker cable’s core wire to the<br />
hilt into the speaker terminal.<br />
4<br />
Turn the speaker terminal clockwise to<br />
tighten it.<br />
Front panel Display Rear panel 23<br />
Remote<br />
Index
Contents<br />
Connections<br />
Playback<br />
Settings<br />
Tips<br />
Appendix<br />
22Connecting the subwoofer<br />
Use a subwoofer cable to connect the subwoofer.<br />
SW<br />
Front panel Display Rear panel 24<br />
Remote<br />
Index
Contents<br />
Connections<br />
Playback<br />
Settings<br />
Tips<br />
Appendix<br />
22About the speaker cable label (supplied) for<br />
channel identification<br />
The channel display section for speaker terminals on the rear panel is<br />
color-coded for each channel to be identifiable.<br />
Speaker<br />
GHow to attach the speaker cable labelH<br />
This unit<br />
Speaker terminals<br />
FRONT L<br />
FRONT R<br />
CENTER<br />
SURROUND L<br />
SURROUND R<br />
SURROUND BACK L<br />
SURROUND BACK R<br />
Color<br />
White<br />
Red<br />
Green<br />
Light blue<br />
Blue<br />
Beige<br />
Brown<br />
Attach the speaker cable label for each channel to its speaker cable as<br />
shown in the diagram.<br />
Then, make connection so that the color of the speaker terminal<br />
matches that of the speaker cable label.<br />
Front panel Display Rear panel 25<br />
Remote<br />
Index
Contents<br />
Connections<br />
Playback<br />
Settings<br />
22Connecting 7.1-channel speakers using surround back speakers<br />
The illustrations shows a connection example for performing 7.1-channel playback using surround back speakers.<br />
Tips<br />
Appendix<br />
SW<br />
FR FL C SR SL SBR SBL<br />
%<br />
• When using this connection, also set “Assign Mode” in the menu to<br />
“Surround Back” (vpage 150).<br />
• When using a single surround back speaker, connect it to the<br />
SURROUND BACK L terminal.<br />
Front panel Display Rear panel 26<br />
Remote<br />
Index
Contents<br />
Connections<br />
Playback<br />
Settings<br />
Tips<br />
Appendix<br />
22About the front height or front B speaker connections<br />
The speaker connected to the SURROUND BACK terminal differs depending on the mode selected for “Assign Mode” (vpage 150) in the menu.<br />
• For how to connect the front, center, and surround speaker and the subwoofer to this unit, see “Connecting 7.1-channel speakers using surround<br />
back speakers” (vpage 26).<br />
[Connecting the front height speaker]<br />
[Connecting the front B speaker]<br />
FHR FHL FR (B) FL (B)<br />
%<br />
• When using this connection, also set “Assign Mode” in the menu to “Front<br />
Height” (vpage 150).<br />
%<br />
• When using this connection, also set “Assign Mode” in the menu to “Front B”<br />
(vpage 150).<br />
Front panel Display Rear panel 27<br />
Remote<br />
Index
Contents<br />
Connections<br />
Playback<br />
Settings<br />
Tips<br />
Appendix<br />
22About the Bi-amp connection<br />
Some audiophile loudspeakers can be connected to an amplifier with two separate amp-to-speaker connections per each speaker. One amplifier<br />
channel’s output is hooked up to the speaker’s bass driver (woofer), while the other amplifier drives the upper range transducers (tweeter, or in<br />
some cases midrange and tweeter). This connection method has one amplifier channel driving one half of the bi-amp speaker, and avoids electrical<br />
interference between the speaker’s bass and treble drivers and the driving amplifier channels. You can assign 4 amp channels to connect to one pair<br />
of bi-amp capable speakers. Bi-amp capable speakers always have two sets of speaker input connector pairs, one for the bass range and one for<br />
the treble range. If you’re unsure about whether or not your speakers are bi-amp capable, consult the owner’s manual that came with the speakers.<br />
• For how to connect the front, center, and surround speaker and the subwoofer to this unit, see “Connecting 7.1-channel speakers using surround<br />
back speakers” (vpage 26).<br />
(R) (L)<br />
SW %<br />
• When using this connection, also set “Assign Mode” in the menu to<br />
q w<br />
q w<br />
“Bi-AMP” (vpage 150).<br />
FR<br />
FL<br />
NOTE<br />
• When making bi-amp connections, be sure to remove the short-circuiting<br />
plate or wire between the speaker’s woofer and tweeter terminals.<br />
Front panel Display Rear panel 28<br />
Remote<br />
Index
Contents<br />
Connecting a TV<br />
Connections<br />
Playback<br />
Settings<br />
Connect a TV to this unit so that the input video is output to the TV. You can also enjoy audio from the TV on this unit.<br />
How to connect a TV depends on the connectors and functions equipped on the TV.<br />
ARC function plays TV audio on this unit by sending the TV audio signal to this unit via HDMI cable.<br />
Tips<br />
Appendix<br />
Yes<br />
Is the TV equipped with an HDMI connector?<br />
No<br />
Is the TV compatible with the ARC (<strong>Audio</strong><br />
Return Channel) ?<br />
Yes<br />
No<br />
Connection 1<br />
(vpage 30)<br />
Connection 2<br />
(vpage 31)<br />
You cannot connect the TV to<br />
this unit.<br />
Front panel Display Rear panel 29<br />
Remote<br />
Index
Contents<br />
Connections<br />
Playback<br />
Settings<br />
Tips<br />
Appendix<br />
Connection 1 : TV equipped with an HDMI connector and compatible with the ARC<br />
(<strong>Audio</strong> Return Channel)<br />
Use an HDMI cable to connect a TV that is compatible with the ARC function to this unit.<br />
Set “HDMI Control” (vpage 133) to “On” when using a TV that supports the ARC function.<br />
TV<br />
HDMI<br />
IN<br />
(ARC)<br />
Front panel Display Rear panel 30<br />
Remote<br />
Index
Contents<br />
Connections<br />
Playback<br />
Settings<br />
Tips<br />
Appendix<br />
Connection 2 : TV equipped with an HDMI connector<br />
Use an HDMI cable to connect the TV to this unit.<br />
To listen to audio from TV on this unit, use an optical cable to connect the TV to this unit.<br />
OUT<br />
OPTICAL<br />
OUT<br />
TV<br />
IN<br />
HDMI<br />
IN<br />
%<br />
• To output audio signals that are input from the HDMI input<br />
connector to a TV connected via HDMI, set “HDMI <strong>Audio</strong> Out”<br />
(vpage 132) to “TV”.<br />
Front panel Display Rear panel 31<br />
Remote<br />
Index
Contents<br />
Connections<br />
Connecting a playback device<br />
Playback<br />
Settings<br />
Tips<br />
Appendix<br />
This unit is equipped with three types of video input connectors (HDMI, component video and composite video) and one type of video output connector<br />
(HDMI).<br />
Select input connectors on this unit according to the connectors equipped on the device you want to connect.<br />
If the device connected to this unit is equipped with an HDMI connector, it is recommended to use HDMI connections.<br />
In the HDMI connection, audio and video signals can be transmitted through a single HDMI cable.<br />
• Connecting a set-top box (Satellite tuner/cable TV) (vpage 33)<br />
• Connecting a DVD player (vpage 34)<br />
• Connecting a video camcorder or other device (vpage 35)<br />
%<br />
• Connect devices to this unit as indicated by the input sources printed on the audio/video input connectors of this unit.<br />
• This unit can change the source that is assigned to the HDMI IN, DIGITAL AUDIO IN, COMPONENT VIDEO IN, VIDEO IN and AUDIO IN connectors.<br />
How to change the source assigned to connectors (vpage 137 “Input Assign”).<br />
Front panel Display Rear panel 32<br />
Remote<br />
Index
Contents<br />
Connections<br />
Playback<br />
Settings<br />
Tips<br />
Appendix<br />
Connecting a set-top box (Satellite tuner/cable TV)<br />
This explanation uses the connection with a satellite tuner/cable TV STB as an example.<br />
Select input connectors on this unit according to the connectors equipped on the device you want to connect.<br />
(HDMI incompatible device)<br />
Satellite tuner/Cable TV<br />
AUDIO<br />
AUDIO OPTICAL<br />
OUT<br />
OUT<br />
L R<br />
VIDEO<br />
OUT<br />
VIDEO<br />
COMPONENT VIDEO<br />
OUT<br />
Y PB PR<br />
Satellite tuner/<br />
Cable TV<br />
HDMI<br />
OUT<br />
L<br />
R<br />
or<br />
or<br />
L<br />
R<br />
Front panel Display Rear panel 33<br />
Remote<br />
Index
Contents<br />
Connections<br />
Playback<br />
Settings<br />
Tips<br />
Appendix<br />
Connecting a DVD player<br />
This explanation uses the connection with a DVD players as an example.<br />
Select input connectors on this unit according to the connectors equipped on the device you want to connect.<br />
(HDMI incompatible<br />
device)<br />
DVD player<br />
AUDIO<br />
AUDIO<br />
OUT<br />
L R<br />
VIDEO<br />
OUT<br />
DVD player<br />
VIDEO AUDIO/<br />
VIDEO<br />
HDMI<br />
OUT<br />
L<br />
R<br />
L<br />
R<br />
Front panel Display Rear panel 34<br />
Remote<br />
Index
Contents<br />
Connections<br />
Playback<br />
Settings<br />
Tips<br />
Appendix<br />
Connecting a video camcorder or other device<br />
Connect a playback device to this unit, such as a video camcorder or game console.<br />
This explanation uses the connection with a video camcorders as an example.<br />
Video<br />
camcorder<br />
HDMI<br />
OUT<br />
Front panel Display Rear panel 35<br />
Remote<br />
Index
Contents<br />
Connections<br />
Playback<br />
Settings<br />
Connecting an iPod or USB memory device to the USB port<br />
To connect an iPod to this unit, use the USB adapter cable that was supplied with the iPod.<br />
For operating instructions see “Playing an iPod” (vpage 44) or “Playing a USB memory device” (vpage 48).<br />
Tips<br />
Appendix<br />
USB<br />
memory<br />
device<br />
iPod<br />
or<br />
%<br />
• <strong>Denon</strong> does not guarantee that all USB memory devices will operate or receive power. When using a portable USB hard disk drive (HDD) which came with an AC adapter,<br />
use that device’s supplied AC adapter.<br />
NOTE<br />
• USB memory devices will not work via a USB hub.<br />
• It is not possible to use this unit by connecting the unit’s USB port to a PC via a USB cable.<br />
• Do not use an extension cable when connecting a USB memory device. This may cause radio interference with other devices.<br />
Front panel Display Rear panel 36<br />
Remote<br />
Index
Contents<br />
Connections<br />
Playback<br />
Settings<br />
Tips<br />
Appendix<br />
22Supported iPod models<br />
• iPod classic<br />
• iPod nano<br />
• iPod touch<br />
• iPhone<br />
Front panel Display Rear panel 37<br />
Remote<br />
Index
Contents<br />
Connections<br />
Connecting an FM antenna<br />
Playback<br />
After connecting the antenna and receiving a broadcast signal<br />
(vpage 52 “Listening to FM broadcasts”), fix the antenna with tape in<br />
a position where the noise level becomes minimal.<br />
Settings<br />
Tips<br />
Appendix<br />
Direction of broadcasting station<br />
FM outdoor<br />
antenna<br />
75 Ω/ohms<br />
coaxial cable<br />
FM indoor antenna<br />
(supplied)<br />
NOTE<br />
• Do not connect two FM antennas simultaneously.<br />
• If you are unable to receive a good broadcast signal, we recommend installing an<br />
outdoor antenna. For details, inquire at the retail store where you purchased the<br />
unit.<br />
Front panel Display Rear panel 38<br />
Remote<br />
Index
Contents<br />
Connections<br />
Playback<br />
Settings<br />
Tips<br />
Connecting to a home network (LAN)<br />
You can connect this unit to your home network (LAN) to perform various types of playbacks and operations as follows.<br />
Appendix<br />
• Playback of network audio such as Internet<br />
Radio and from your media server(s)<br />
• Playback of music content from online<br />
streaming services<br />
• Using the Apple AirPlay function<br />
• Operation on this unit via the network<br />
• Firmware Update<br />
Internet<br />
Modem<br />
PC<br />
NAS<br />
(Network Attached<br />
Storage)<br />
%<br />
• With this unit, it is possible to use the DHCP and<br />
Auto IP functions to make the network settings<br />
automatically.<br />
• When using this unit with the broadband router’s<br />
DHCP function enabled, this unit automatically<br />
performs the IP address setting and other settings.<br />
• When using this unit connected to a network with no<br />
DHCP function, make the settings for the IP address,<br />
etc., at “Network” (vpage 156).<br />
Router<br />
To WAN side<br />
To LAN port<br />
To LAN port<br />
LAN port/<br />
Ethernet<br />
connector<br />
LAN port/<br />
Ethernet<br />
connector<br />
For connections to the Internet, contact an ISP (Internet Service Provider) or a computer<br />
shop.<br />
Front panel Display Rear panel 39<br />
Remote<br />
Index
Contents<br />
Connections<br />
Playback<br />
%<br />
• When using this unit, we recommend you use a router equipped with the following<br />
functions:<br />
• Built-in DHCP server<br />
This function automatically assigns IP addresses on the LAN.<br />
• Built-in 100BASE-TX switch<br />
When connecting multiple devices, we recommend a switching hub with a speed<br />
of 100 Mbps or greater.<br />
• Use only a shielded STP or ScTP LAN cable which is easily available at electronics<br />
stores (CAT-5 or greater recommended).<br />
• The normal shielded-type LAN cable is recommended. If a flat-type cable or<br />
unshielded-type cable is used, other devices could be affected by noise.<br />
Settings<br />
Tips<br />
Connecting the power cord<br />
Appendix<br />
After completing all the connections, insert the power plug into the power<br />
outlet.<br />
NOTE<br />
• The types of routers that can be used depend on the ISP. Contact your ISP or a<br />
computer shop for details.<br />
• This unit is not compatible with PPPoE. A PPPoE-compatible router is required if<br />
you have a contract for a type of line set by PPPoE.<br />
• Do not connect an NETWORK connector directly to the LAN port/ Ethernet<br />
connector on your computer.<br />
To household power outlet<br />
(AC 230 V, 50/60 Hz)<br />
Power cord (supplied)<br />
Front panel Display Rear panel 40<br />
Remote<br />
Index
Contents<br />
Connections<br />
Playback<br />
Settings<br />
Tips<br />
Appendix<br />
Playback<br />
Turning the power on (vpage 42)<br />
Selecting the input source (vpage 42)<br />
Adjusting the master volume (vpage 43)<br />
Turning off the sound temporarily (vpage 43)<br />
Playing a DVD player/Blu-ray Disc player (vpage 43)<br />
Playing an iPod (vpage 44)<br />
Playing a USB memory device (vpage 48)<br />
Listening to FM broadcasts (vpage 51)<br />
Listening to Internet Radio (vpage 60)<br />
Playing back files stored on a PC and NAS (vpage 64)<br />
Listening to Last.fm (vpage 68)<br />
Viewing photographs on the Flickr site (vpage 73)<br />
Listening to Spotify (vpage 77)<br />
Adding to the FAVORITE STATION button (vpage 81)<br />
AirPlay function (vpage 83)<br />
Convenience functions (vpage 86)<br />
Selecting a sound mode (vpage 94)<br />
HDMI control function (vpage 105)<br />
Sleep timer function (vpage 106)<br />
Quick select function (vpage 107)<br />
Web control function (vpage 108)<br />
Playback in ZONE2 (Separate room) (vpage 110)<br />
Front panel Display Rear panel 41<br />
Remote<br />
Index
Contents<br />
Connections<br />
Playback<br />
Settings<br />
Tips<br />
Appendix<br />
Basic operation<br />
POWER X<br />
Turning the power on<br />
1<br />
Press POWER X to turn on power to the unit.<br />
Input source<br />
select buttons<br />
%<br />
• You can also switch the power to standby by pressing X on the main unit.<br />
MUTE :<br />
VOLUME df<br />
Selecting the input source<br />
1<br />
Press the input source select button to be played back.<br />
The desired input source can be selected directly.<br />
%<br />
• You can also select the input source by turning SOURCE SELECT knob on the<br />
main unit.<br />
Front panel Display Rear panel 42<br />
Remote<br />
Index
Contents<br />
Connections<br />
Playback<br />
Settings<br />
Tips<br />
Appendix<br />
Adjusting the master volume<br />
1<br />
Use VOLUME df to adjust the volume.<br />
• The variable range differs according to the input signal and channel<br />
level setting.<br />
%<br />
• You can also adjust the master volume by turning MASTER VOLUME on the main<br />
unit.<br />
Turning off the sound temporarily<br />
1<br />
Press MUTE :.<br />
• “MUTE” indicator on the display flashes.<br />
• : appears on the TV screen.<br />
Playing a DVD player/Blu-ray Disc player<br />
The following describes the procedure for playing DVD player/Blu-ray Disc<br />
player.<br />
1<br />
2<br />
3<br />
4<br />
Prepare for playback.<br />
q Turn on the power of the TV, subwoofer and player.<br />
w Change the TV input to the input of this unit.<br />
Press POWER X to turn on power to the unit.<br />
Press DVD or Blu-ray to switch an input source for a<br />
player used for playback.<br />
Play the DVD player or Blu-ray Disc player.<br />
%<br />
• The sound is reduced to the level set at “Mute Level” (vpage 127).<br />
• To cancel, press MUTE : again. Muting can also be cancelled by adjusting the<br />
master volume.<br />
Front panel Display Rear panel 43<br />
Remote<br />
Index
Contents<br />
Connections<br />
Playback<br />
Settings<br />
Tips<br />
Appendix<br />
Playing an iPod<br />
iPod/USB<br />
• You can use the USB cable provided with the iPod to connect the iPod<br />
with the unit’s USB port and enjoy music stored on the iPod.<br />
• For information on the iPod models that can be played back with this<br />
unit, see “Connecting an iPod or USB memory device to the USB port”<br />
(vpage 36).<br />
CH/PAGE df<br />
uio p<br />
ENTER<br />
BACK<br />
OPTION<br />
1/3<br />
8 9<br />
Front panel Display Rear panel 44<br />
Remote<br />
Index
Contents<br />
Connections<br />
Playback<br />
Settings<br />
Tips<br />
Appendix<br />
Listening to music on an iPod<br />
1<br />
2<br />
3<br />
Connect the iPod to the USB port (vpage 36).<br />
Press iPod/USB to switch the input source to “iPod/<br />
USB”.<br />
“Browse From iPod” is displayed on the display of this unit.<br />
• Nothing is displayed on the TV screen.<br />
Operate iPod itself directly while seeing the iPod screen<br />
to play back music.<br />
22Playing the AirPlay (vpage 83)<br />
2 2 Operations available through the OPTION<br />
button<br />
• Setting operation mode (iPod Browse Mode) (vpage 46)<br />
%<br />
• The iPod display modes include “From iPod” and “On-Screen”.<br />
By default, “From iPod”, where you directly operate the iPod itself while looking<br />
at the iPod screen, is set.<br />
• To change to “On-Screen”, where you perform operations while having the iPod<br />
information displayed on the TV screen, see “Setting operation mode (iPod Browse<br />
Mode)” (vpage 46).<br />
NOTE<br />
• Depending on the type of iPod and the software version, some functions may not<br />
operate.<br />
• Note that <strong>Denon</strong> will accept no responsibility whatsoever for any problems arising<br />
with the data on an iPod when using this unit in conjunction with the iPod.<br />
Front panel Display Rear panel 45<br />
Remote<br />
Index
Contents<br />
Connections<br />
Playback<br />
Settings<br />
Tips<br />
Appendix<br />
Setting operation mode (iPod Browse<br />
Mode)<br />
4<br />
Use ui to select the file to be played, then press ENTER.<br />
Playback starts.<br />
In this mode, various lists and screens during playback on the iPod are<br />
displayed on the TV screen.<br />
This section describes the steps up to playing back tracks on the iPod in<br />
“On-Screen”.<br />
1<br />
2<br />
3<br />
Press OPTION.<br />
The option menu screen is displayed.<br />
Select “iPod Browse Mode”, then press ENTER.<br />
The “iPod Browse Mode” screen is displayed.<br />
Use o p to select “On-Screen”, then press ENTER.<br />
• English letters, numbers and certain symbols are displayed.<br />
Incompatible characters are displayed as “.” (period).<br />
• Operations available for “On-Screen” and “From iPod” are listed<br />
below.<br />
Display mode From iPod On-Screen<br />
Playable Music file P P<br />
files Video file<br />
z<br />
Active<br />
buttons<br />
Remote<br />
control unit<br />
(This unit)<br />
iPod<br />
P<br />
P<br />
zzOnly the sound is played.<br />
P<br />
Operation buttons Function<br />
1/3 Playback / Pause<br />
Previous / Next<br />
8 9<br />
(Press and hold)<br />
Fast-reverse / Fast-forward<br />
Playback / Pause<br />
ENTER<br />
(Press and hold)<br />
Stop<br />
Previous / Next<br />
ui<br />
(Press and hold)<br />
Fast-reverse / Fast-forward<br />
CH/PAGE df<br />
Page previous / Page next<br />
%<br />
• The display switches between track title, artist name, and album title etc. each<br />
time the STATUS button is pressed during playback with “iPod Browse Mode”<br />
set to “On-Screen”.<br />
2 2 Operations available through the OPTION<br />
button<br />
• Performing repeat playback (Repeat) (vpage 87)<br />
• Performing random playback (Random) (vpage 87)<br />
Front panel Display Rear panel 46<br />
Remote<br />
Index
Contents<br />
Connections<br />
Playback<br />
Settings<br />
Tips<br />
Appendix<br />
Performing repeat playback (Repeat)<br />
1<br />
2<br />
3<br />
4<br />
Press OPTION with “iPod Browse Mode” set to<br />
“On-Screen”.<br />
The option menu screen is displayed.<br />
Use ui to select “Repeat”, then press ENTER.<br />
Use o p to select repeat playback mode.<br />
Off (Default) : Repeat playback mode is canceled.<br />
One : A file being played is played repeatedly.<br />
All : All files in the folder currently being played are played<br />
repeatedly.<br />
Press ENTER.<br />
The display returns to the playback screen.<br />
Performing random playback (Random)<br />
1<br />
2<br />
3<br />
4<br />
Press OPTION with “iPod Browse Mode” set to<br />
“On-Screen”.<br />
The option menu screen is displayed.<br />
Use ui to select “Random”, then press ENTER.<br />
Use o p to select random playback mode.<br />
Off (Default) : Disable random playback.<br />
On : Randomly play back all tracks in the current playback folder.<br />
Press ENTER.<br />
The display returns to the playback screen.<br />
%<br />
• During random playback, each time playback of a track is completed, another track<br />
is randomly selected for playback from tracks in the folder. Therefore, it’s possible<br />
that you may hear a track played back more than once during random playback.<br />
Front panel Display Rear panel 47<br />
Remote<br />
Index
Contents<br />
Connections<br />
Playback<br />
Settings<br />
Tips<br />
Appendix<br />
Playing a USB memory device<br />
iPod/USB<br />
CH/PAGE df<br />
uio p<br />
ENTER<br />
BACK<br />
OPTION<br />
1/3<br />
8 9<br />
• Playing back music or viewing still picture (JPEG) files stored on a USB<br />
memory device.<br />
• Only USB memory devices conforming to mass storage class and MTP<br />
(Media Transfer Protocol) standards can be played on this unit.<br />
• This unit is compatible with USB memory devices in “FAT16” or<br />
“FAT32” format.<br />
• This unit can play back the following files.<br />
• WMA (Windows Media <strong>Audio</strong>)<br />
• MP3 (MPEG-1 <strong>Audio</strong> Layer-3)<br />
• WAV<br />
• MPEG-4 AAC<br />
• FLAC (Free Lossless <strong>Audio</strong> Codec)<br />
• JPEG<br />
• ALAC (Apple Lossless <strong>Audio</strong> Codec)<br />
Front panel Display Rear panel 48<br />
Remote<br />
Index
Contents<br />
Connections<br />
Playback<br />
Settings<br />
Tips<br />
Appendix<br />
Playing files stored on USB memory<br />
devices<br />
1<br />
2<br />
Connect the USB memory device to the USB port<br />
(vpage 36).<br />
Press iPod/USB to switch the input source to “iPod/<br />
USB”.<br />
USB [1/9]<br />
Folder1<br />
Folder2<br />
Folder3<br />
Music1<br />
Music2<br />
Music3<br />
Music4<br />
OPTION Option<br />
Operation buttons Function<br />
1/3 Playback / Pause<br />
Previous / Next<br />
8 9<br />
(Press and hold)<br />
Fast-reverse / Fast-forward z<br />
Playback / Pause<br />
ENTER<br />
(Press and hold)<br />
Stop<br />
Previous / Next<br />
ui<br />
(Press and hold)<br />
Fast-reverse / Fast-forward z<br />
CH/PAGE df<br />
Page previous / Page next<br />
zzThis function is available while an MP3 / WAV / AAC / FLAC file is being played<br />
back.<br />
%<br />
• When an MP3 music file includes album art data, the album art can be displayed<br />
while playing the file.<br />
3<br />
Use ui to select the file to be played, then press ENTER.<br />
Playback starts.<br />
NOTE<br />
• Note that <strong>Denon</strong> will accept no responsibility whatsoever for any problems arising<br />
with the data on a USB memory device when using this unit in conjunction with<br />
the USB memory device.<br />
Front panel Display Rear panel 49<br />
Remote<br />
Index
Contents<br />
Connections<br />
Playback<br />
Settings<br />
Tips<br />
Appendix<br />
2 2 Operations available through the OPTION<br />
button<br />
• Searching content with keywords (Text Search) (vpage 89)<br />
• Performing repeat playback (Repeat) (vpage 87)<br />
• Performing random playback (Random) (vpage 87)<br />
• Playing back still images in sequential order (Slideshow Interval)<br />
(vpage 91)<br />
Front panel Display Rear panel 50<br />
Remote<br />
Index
Contents<br />
Connections<br />
Playback<br />
Settings<br />
Tips<br />
Appendix<br />
Listening to FM broadcasts<br />
For antenna connections, see “Connecting an FM antenna”<br />
(vpage 38).<br />
TUNER<br />
CH/PAGE df<br />
uio p<br />
ENTER<br />
BACK<br />
FAVORITE<br />
STATION<br />
1 – 3<br />
OPTION<br />
TUNE +, –<br />
Front panel Display Rear panel 51<br />
Remote<br />
Index
Contents<br />
Connections<br />
Playback<br />
Settings<br />
Tips<br />
Appendix<br />
Listening to FM broadcasts<br />
1<br />
Press TUNER to switch the input source to “TUNER”.<br />
GTV ScreenH<br />
TUNER<br />
%<br />
• The modes for receiving FM broadcasts consists of “Auto” mode that automatically<br />
searches available broadcast stations and “<strong>Manual</strong>” mode that lets you tune in<br />
using buttons to change the frequency. The default setting is “Auto”. You can also<br />
use “Direct Tune” to tune in by entering the frequency directly.<br />
In “Auto” mode, you cannot tune in to radio stations if the reception is not good. If<br />
this is the case, then use the “<strong>Manual</strong>” mode or “Direct Tune” to tune in.<br />
STEREO AUTO<br />
Now Playing<br />
CH 1<br />
FM 87.50MHz<br />
TUNE+/- Tune CH / Preset OPTION Option<br />
Operation buttons<br />
TUNE +, –<br />
CH/PAGE df<br />
FAVORITE STATION<br />
1 – 3<br />
Function<br />
Tuning (up/down)<br />
Preset channel selection<br />
Call up favorite stations<br />
(Press and hold)<br />
Add to the favorite stations<br />
GDisplay of this unitH<br />
01 FM 87.50MHz<br />
2<br />
Press TUNE + or TUNE – to select the station you want<br />
to hear.<br />
Scanning is performed until it finds an available radio station. When<br />
it finds a radio station, it stops the scan automatically and tunes in.<br />
Front panel Display Rear panel 52<br />
Remote<br />
Index
Contents<br />
Connections<br />
Playback<br />
Settings<br />
Tips<br />
Appendix<br />
22Adding to the FAVORITE STATION button<br />
(vpage 81)<br />
22Operations available through the OPTION<br />
button<br />
• Tuning in by entering the radio frequency (Direct Tune) (vpage 53)<br />
• RDS search (vpage 54)<br />
• PTY search (vpage 54)<br />
• TP search (vpage 55)<br />
• Radio Text (vpage 56)<br />
• Presetting the current broadcast station (Preset Memory)<br />
(vpage 57)<br />
• Changing the tuning mode (Tune Mode) (vpage 56)<br />
• Tuning in to radio stations and presetting them automatically (Auto<br />
Preset Memory) (vpage 58)<br />
• Specify a name for the preset broadcast station (Preset Name)<br />
(vpage 58)<br />
• Skipping preset broadcast stations (Preset Skip) (vpage 59)<br />
Tuning in by entering the radio<br />
frequency (Direct Tune)<br />
You can enter the receiving frequency directly to tune in.<br />
1<br />
2<br />
3<br />
4<br />
5<br />
Press OPTION.<br />
The option menu screen is displayed.<br />
Use ui to select “Direct Tune”, then press ENTER.<br />
The direct tuner screen is displayed.<br />
Use ui to select a number and press p.<br />
The screen that lets you enter the frequency is displayed.<br />
• If o is pressed, the immediately preceding input is cancelled.<br />
Repeat step 3 and enter the frequency of the radio<br />
station you want to hear.<br />
When setting is completed, press ENTER.<br />
The preset frequency is tuned in.<br />
Front panel Display Rear panel 53<br />
Remote<br />
Index
Contents<br />
Connections<br />
Playback<br />
Settings<br />
Tips<br />
Appendix<br />
RDS search<br />
RDS is a broadcasting service which allows a station to send additional<br />
information along with the regular radio program signal.<br />
Use this function to automatically tune to FM stations that provide the<br />
RDS service.<br />
Note that the RDS function only works when receiving RDS compatible<br />
stations.<br />
1<br />
2<br />
3<br />
Press OPTION.<br />
The option menu screen is displayed.<br />
Use ui to select “RDS Search”, then press ENTER.<br />
Press ENTER.<br />
The search for RDS stations begins automatically.<br />
%<br />
• If you use o p within 5 seconds after the broadcast station name is shown on the<br />
display, you can search for a different station.<br />
PTY search<br />
Use this function to find RDS stations broadcasting a designated program<br />
type (PTY).<br />
PTY identifies the type of RDS program.<br />
The program types and their displays are as follows:<br />
NEWS News WEATHER Weather<br />
AFFAIRS Current Affairs FINANCE Finance<br />
INFO Information CHILDREN Children’s program<br />
SPORT Sports SOCIAL Social Affairs<br />
EDUCATE Education RELIGION Religion<br />
DRAMA Drama PHONE IN Phone In<br />
CULTURE Culture TRAVEL Travel<br />
SCIENCE Science LEISURE Leisure<br />
VARIED Varied JAZZ Jazz Music<br />
POP M Pop Music COUNTRY Country Music<br />
ROCK M Rock Music NATION M National Music<br />
EASY M<br />
Easy Listening OLDIES Oldies Music<br />
Music<br />
FOLK M Folk Music<br />
LIGHT M Light Classical DOCUMENT Documentary<br />
CLASSICS Serious Classical<br />
OTHER M Other Music<br />
Front panel Display Rear panel 54<br />
Remote<br />
Index
Contents<br />
Connections<br />
Playback<br />
Settings<br />
Tips<br />
Appendix<br />
1<br />
2<br />
3<br />
4<br />
%<br />
Press OPTION.<br />
The option menu screen is displayed.<br />
Use ui to select “PTY Search”, then press ENTER.<br />
Use ui to call out the desired program type.<br />
Press ENTER.<br />
PTY search begins automatically.<br />
• If you use o p within 5 seconds after the broadcast station name is shown on the<br />
display, you can search for a different station.<br />
TP search<br />
TP identifies programs that carry traffic announcements.<br />
This allows you to easily find out the latest traffic conditions in your area<br />
before leaving home.<br />
Use this function to find RDS stations broadcasting traffic programs (TP<br />
stations).<br />
1<br />
2<br />
3<br />
Press OPTION.<br />
The option menu screen is displayed.<br />
Use ui to select “TP Search”, then press ENTER.<br />
Press ENTER.<br />
TP search begins automatically.<br />
%<br />
• If you use o p within 5 seconds after the broadcast station name is shown on the<br />
display, you can search for a different station.<br />
Front panel Display Rear panel 55<br />
Remote<br />
Index
Contents<br />
Connections<br />
Playback<br />
Settings<br />
Tips<br />
Appendix<br />
Radio Text<br />
RT allows RDS stations to send text messages that appear on the display.<br />
“Radio Text” appears on the display when radio text data is received.<br />
1<br />
2<br />
3<br />
Press OPTION.<br />
The option menu screen is displayed.<br />
Use ui to select “Radio Text”, then press ENTER.<br />
Use o p to select “On”, then press ENTER.<br />
• While receiving an RDS broadcast station, the text data broadcast<br />
from the station is displayed.<br />
• If no text data is being broadcast, “NO TEXT DATA” is displayed.<br />
Changing the tuning mode (Tune Mode)<br />
You can change the mode for tuning into FM broadcasts. If you cannot<br />
tune in automatically with “Auto” mode, then change the mode to<br />
“<strong>Manual</strong>” and tune in manually.<br />
1<br />
2<br />
3<br />
Press OPTION.<br />
The option menu screen is displayed.<br />
Use ui to select “Tune Mode”, then press ENTER.<br />
Use o p to select tuning mode, then press ENTER.<br />
Auto : Automatically tune to the station.<br />
<strong>Manual</strong> : <strong>Manual</strong>ly tune to the station.<br />
Listening to preset stations<br />
1<br />
Use CH/PAGE df to select the desired preset channel.<br />
%<br />
• You can also select preset broadcast stations by pressing TUNER PRESET CH + or<br />
TUNER PRESET CH – on the main unit.<br />
Front panel Display Rear panel 56<br />
Remote<br />
Index
Contents<br />
Connections<br />
Playback<br />
Settings<br />
Tips<br />
Appendix<br />
Presetting the current broadcast station<br />
(Preset Memory)<br />
Your favorite broadcast stations can be preset so that you can tune them<br />
in easily. Up to 56 stations can be preset.<br />
1<br />
2<br />
3<br />
4<br />
Tune in the broadcast station you want to preset<br />
(vpage 52 “Listening to FM broadcasts”).<br />
Press OPTION.<br />
The option menu screen is displayed.<br />
Use ui to select “Preset Memory”, then press ENTER.<br />
The list of already preset channels is displayed.<br />
Use uito select the channel you want to preset, then<br />
press ENTER.<br />
The current broadcast station that is preset.<br />
• To preset other stations, repeat steps 1 to 4.<br />
Channel<br />
1 – 8<br />
9 – 16<br />
17 – 24<br />
25 – 32<br />
33 – 40<br />
41 – 48<br />
49 – 56<br />
Default settings<br />
87.50 / 89.10 / 98.10 / 108.00 / 90.10 / 90.10 / 90.10 /<br />
90.10 MHz<br />
90.10 / 90.10 / 90.10 / 90.10 / 90.10 / 90.10 / 90.10 /<br />
90.10 MHz<br />
90.10 / 90.10 / 90.10 / 90.10 / 90.10 / 90.10 / 90.10 /<br />
90.10 MHz<br />
90.10 / 90.10 / 90.10 / 90.10 / 90.10 / 90.10 / 90.10 /<br />
90.10 MHz<br />
90.10 / 90.10 / 90.10 / 90.10 / 90.10 / 90.10 / 90.10 /<br />
90.10 MHz<br />
90.10 / 90.10 / 90.10 / 90.10 / 90.10 / 90.10 / 90.10 /<br />
90.10 MHz<br />
90.10 / 90.10 / 90.10 / 90.10 / 90.10 / 90.10 / 90.10 /<br />
90.10 MHz<br />
Front panel Display Rear panel 57<br />
Remote<br />
Index
Contents<br />
Connections<br />
Playback<br />
Settings<br />
Tips<br />
Appendix<br />
Tuning in to radio stations and<br />
presetting them automatically<br />
(Auto Preset Memory)<br />
Up to 56 stations can be preset.<br />
If “Auto Preset Memory” is performed after performing “Preset Memory”,<br />
the “Preset Memory” settings will be overwritten.<br />
1<br />
2<br />
3<br />
Press OPTION.<br />
The option menu screen is displayed.<br />
Use ui to select “Auto Preset Memory”, then press<br />
ENTER.<br />
Press ENTER.<br />
The unit starts to tune in to radio stations automatically and preset<br />
them.<br />
• When presetting is completed, “Completed” is displayed for<br />
about 5 seconds and the option menu screen turns off.<br />
Specify a name for the preset broadcast<br />
station (Preset Name)<br />
You can set the name to the preset broadcast station or change it.<br />
Up to eight characters can be input.<br />
1<br />
2<br />
3<br />
4<br />
5<br />
6<br />
Press OPTION.<br />
The option menu screen is displayed.<br />
Use ui to select “Preset Name”, then press ENTER.<br />
The Preset Name screen is displayed.<br />
Use o p to select the group of the broadcast station you<br />
want to name.<br />
Use ui to select the broadcast station you want to<br />
name, then press ENTER.<br />
Use ui to select a name label, then press ENTER.<br />
The screen that lets you edit the preset name is displayed.<br />
• If you select “Set Defaults”, then the unit returns to displaying<br />
the frequency.<br />
Enter the characters, then press “OK”.<br />
• For character input, see page 121.<br />
Front panel Display Rear panel 58<br />
Remote<br />
Index
Contents<br />
Connections<br />
Playback<br />
Settings<br />
Tips<br />
Appendix<br />
Skipping preset broadcast stations<br />
(Preset Skip)<br />
You can set in advance, the stations you do not want to be displayed when<br />
tuning in, by groups or by stations.<br />
The preset skip setting is useful when tuning in, because only your favorite<br />
stations are displayed.<br />
1<br />
2<br />
Press OPTION.<br />
The option menu screen is displayed.<br />
Use ui to select “Preset Skip”, then press ENTER.<br />
The Preset Skip screen is displayed.<br />
n<br />
3 n To set the stations you want to skip by groups<br />
q Use o p to select the group of broadcast stations<br />
you want to skip.<br />
w Press u to select “Set No.z – z to Skip”, then press<br />
ENTER.<br />
All broadcast stations in the group “z – z” you selected are not<br />
displayed.<br />
(z are the selected group numbers)<br />
e Press BACK.<br />
nnTo set the stations you want to skip by<br />
stations<br />
q Use o p to select the group of broadcast stations<br />
you want to skip.<br />
w Use ui to select the broadcast station you want to<br />
skip.<br />
e Use o p to select “Skip”.<br />
The station you selected is not displayed.<br />
r Press BACK.<br />
Cancelling preset skip<br />
1<br />
2<br />
3<br />
While the Preset Skip screen is displayed, use o p to<br />
select a group containing a broadcast station to cancel<br />
the skip for.<br />
Use ui to select a broadcast station to cancel the skip<br />
for.<br />
Use o p to select “On”.<br />
The skip is cancelled.<br />
NOTE<br />
• You cannot cancel the skip for each group.<br />
Front panel Display Rear panel 59<br />
Remote<br />
Index
Contents<br />
Connections<br />
Playback<br />
Settings<br />
Tips<br />
Appendix<br />
Listening to Internet Radio<br />
NETWORK<br />
CH/PAGE df<br />
uio p<br />
ENTER<br />
BACK<br />
1/3<br />
INTERNET<br />
RADIO<br />
FAVORITE<br />
STATION<br />
1 – 3<br />
OPTION<br />
• Internet Radio refers to radio broadcasts distributed over the Internet.<br />
Internet Radio stations from around the world can be received.<br />
• The broad cast station types and specifications supported by this unit for<br />
playback are as follows.<br />
• WMA (Windows Media <strong>Audio</strong>)<br />
• MP3 (MPEG-1 <strong>Audio</strong> Layer-3)<br />
• MPEG-4 AAC<br />
Front panel Display Rear panel 60<br />
Remote<br />
Index
Contents<br />
Connections<br />
Playback<br />
Settings<br />
Tips<br />
Appendix<br />
Listening to Internet Radio<br />
1<br />
2<br />
3<br />
Prepare for playback.<br />
• Check the network environment, then turn on this unit’s power<br />
(vpage 39 “Connecting to a home network (LAN)”).<br />
Press NETWORK.<br />
• You can also press INTERNET RADIO to select the input source<br />
“Internet Radio” directly.<br />
Use uio p to select “Internet Radio”, then press<br />
ENTER.<br />
4<br />
Use ui to select the item you want to play, then press<br />
ENTER.<br />
Internet Radio [1/7]<br />
zzzzz<br />
Search Stations<br />
Search Podcasts<br />
Recommended Stations<br />
radiodenon.com<br />
Recently Played<br />
Search by Keyword<br />
OPTION Option<br />
Network<br />
Favorites<br />
Spotify<br />
Internet Radio<br />
Media Server<br />
zzzzz (Country name) :<br />
• Displays typical Internet Radio stations your country.<br />
Search Stations :<br />
• Displays all Internet Radio stations that this unit can tune in to.<br />
Search Podcasts :<br />
• Displays Internet Radio stations in the podcasts that this unit can<br />
tune in to.<br />
Recommended Stations :<br />
• Displays recommended Internet Radio stations.<br />
Front panel Display Rear panel 61<br />
Remote<br />
Index
Contents<br />
Connections<br />
Playback<br />
Settings<br />
Tips<br />
Appendix<br />
5<br />
radiodenon.com :<br />
• Displays Internet Radio stations added to favorites in vTuner. For<br />
instructions on how to add to favorites in vTuner, see “Using<br />
vTuner to add Internet Radio stations to favorites” (vpage 63).<br />
Recently Played :<br />
• Displays recently played Internet Radio stations. Up to 20 stations<br />
can be stored in “Recently Played”.<br />
Search by Keyword :<br />
• Displays Internet Radio stations searched by keyword. For<br />
character input, see page 121.<br />
Use ui to select the station, then press ENTER.<br />
Playback starts once buffering reaches “100%”.<br />
Operation buttons Function<br />
1/3 Playback / Stop<br />
ENTER<br />
(Press and hold)<br />
Stop<br />
CH/PAGE df<br />
Page previous / Page next<br />
FAVORITE STATION<br />
1 – 3<br />
INTERNET RADIO<br />
Call up favorite stations<br />
(Press and hold)<br />
Add to the favorite stations<br />
Last played Internet Radio station<br />
%<br />
• The display switches between track title and radio station name etc. each time the<br />
STATUS button is pressed.<br />
• Any characters that cannot be displayed are replaced with “.” (period).<br />
NOTE<br />
• The radio station database service may be suspended or be otherwise unavailable<br />
without notice.<br />
Playing the last played Internet Radio<br />
station<br />
This unit memorizes the last played Internet Radio station. If you press<br />
INTERNET RADIO to switch to the Internet Radio function from another<br />
input source, the last Internet Radio station you listened to is played.<br />
1<br />
Press INTERNET RADIO.<br />
The source switches to “Internet Radio” and the last played radio<br />
station plays.<br />
Front panel Display Rear panel 62<br />
Remote<br />
Index
Contents<br />
Connections<br />
Playback<br />
Settings<br />
Tips<br />
Appendix<br />
Using vTuner to add Internet Radio<br />
stations to favorites<br />
There are many Internet Radio stations in the world, and this unit can tune<br />
into these stations. But finding the radio station you want to hear may<br />
be difficult, because there are too many stations. If this is the case, then<br />
please use vTuner, an Internet Radio station search website specifically<br />
designed for this unit. You can use your PC to search Internet Radio<br />
stations and add them as your favorites. This unit can play radio stations<br />
added to vTuner.<br />
1<br />
2<br />
3<br />
4<br />
Check the MAC address of this unit (vpage 156<br />
“Information”).<br />
• The MAC address is necessary when you create an account for<br />
vTuner.<br />
Use your PC to access the vTuner website (http://www.<br />
radiodenon.com).<br />
Enter the MAC address of this unit, then click “Go”.<br />
Enter your E-mail address and a password of your<br />
choice.<br />
5<br />
6<br />
7<br />
Select the search criteria (genre, region, language, etc.)<br />
of your choice.<br />
• You can also enter a keyword to search for a station you want to<br />
hear.<br />
Select the radio station of your choice from the list, and<br />
then click the Add to Favorites icon.<br />
Enter the name of the favorite group, then click “Go”.<br />
A new favorite group that includes the selected radio station is<br />
created.<br />
• Internet Radio stations added to favorites in vTuner can be played<br />
from “radiodenon.com” (vpage 61) with this unit.<br />
2 2 Operations available through the OPTION<br />
button<br />
• Searching content with keywords (Text Search) (vpage 89)<br />
• Add to favorites from the Option menu (Save to Favorites)<br />
(vpage 88)<br />
• Playing back music and a favorite picture at the same time<br />
(vpage 90)<br />
Front panel Display Rear panel 63<br />
Remote<br />
Index
Contents<br />
Connections<br />
Playback<br />
Settings<br />
Playing back files stored on a PC and NAS<br />
Tips<br />
Appendix<br />
NETWORK<br />
CH/PAGE df<br />
uio p<br />
ENTER<br />
BACK<br />
FAVORITE<br />
STATION<br />
1 – 3<br />
OPTION<br />
1/3<br />
8 9<br />
• This unit can play back music files and playlists (m3u, wpl) stored on a PC<br />
and on Network Attached Storage (NAS) that supports DLNA.<br />
• The network audio playback function of this unit connects to the server<br />
using technologies shown below.<br />
• Windows Media Player Network Sharing Service<br />
• Windows Media DRM10<br />
• This unit can play back the following files.<br />
• WMA (Windows Media <strong>Audio</strong>)<br />
• MP3 (MPEG-1 <strong>Audio</strong> Layer-3)<br />
• WAV<br />
• MPEG-4 AAC<br />
• FLAC (Free Lossless <strong>Audio</strong> Codec)<br />
• JPEG<br />
• ALAC (Apple Lossless <strong>Audio</strong> Codec)<br />
Front panel Display Rear panel 64<br />
Remote<br />
Index
Contents<br />
Connections<br />
Playback<br />
Settings<br />
Tips<br />
Appendix<br />
Applying media sharing settings<br />
Here, we apply the settings to share music files stored on a PC and NAS on the network.<br />
If you are using a Media Server, be sure to apply this setting first.<br />
22When using Windows Media Player 12<br />
(Windows 7 / Windows 8)<br />
2<br />
Start up Windows Media Player 12 on the PC.<br />
1<br />
Select “More streaming options...” in the “Stream”.<br />
2<br />
2<br />
Select “Allowed” in the drop-down list for “<strong>AVR</strong>-<br />
3<br />
3<br />
<strong>X2000</strong>”.<br />
Select “Allowed” in the drop-down list for “Media<br />
4<br />
4<br />
programs on this PC and remote connections...”.<br />
5 Click “OK” to finish.<br />
2 When using Windows Media Player 11<br />
Start up Windows Media Player 11 on the PC.<br />
1<br />
5<br />
Select “Media Sharing” in the “Library”.<br />
Click the “Share my media” check box, select “<strong>AVR</strong>-<br />
<strong>X2000</strong>”, and then click “Allow”.<br />
As you did in step 3, select the icon of the device (other<br />
PCs and mobile devices) you want to use as a media<br />
controller, and then click “Allow”.<br />
Click “OK” to finish.<br />
2 2 Sharing media stored in NAS<br />
Change settings on the NAS to allow this unit and other devices (PCs<br />
and mobile devices) used as media controllers to access the NAS. For<br />
details, see the owner’s manual that came with the NAS.<br />
Front panel Display Rear panel 65<br />
Remote<br />
Index
Contents<br />
Connections<br />
Playback<br />
Settings<br />
Tips<br />
Appendix<br />
Playing back files stored on a PC and<br />
NAS<br />
Use this procedure to play music files, image files or playlists.<br />
1<br />
2<br />
3<br />
Prepare for playback.<br />
q Check the network environment, then turn on this unit’s power<br />
(vpage 39 “Connecting to a home network (LAN)”).<br />
w Prepare the computer (vComputer’s operating instructions).<br />
Press NETWORK.<br />
Use uio p to select “Media Server”, then press ENTER.<br />
Network<br />
Favorites<br />
Spotify<br />
Internet Radio<br />
Media Server<br />
4<br />
5<br />
Use ui to select the server including the file to be<br />
played, then press ENTER.<br />
Use ui to select the file, then press ENTER.<br />
Playback starts once buffering reaches “100%”.<br />
Operation buttons Function<br />
1/3 Playback / Pause<br />
Previous / Next<br />
8 9<br />
(Press and hold)<br />
Fast-reverse / Fast-forward z<br />
Playback / Pause<br />
ENTER<br />
(Press and hold)<br />
Stop<br />
Previous / Next<br />
ui<br />
(Press and hold)<br />
Fast-reverse / Fast-forward z<br />
CH/PAGE df<br />
Page previous / Page next<br />
Call up favorite stations<br />
FAVORITE STATION 1 – 3 (Press and hold)<br />
Add to the favorite stations<br />
z z This function is available while an MP3 / WAV / AAC / FLAC file is being played<br />
back.<br />
Front panel Display Rear panel 66<br />
Remote<br />
Index
Contents<br />
Connections<br />
Playback<br />
Settings<br />
Tips<br />
Appendix<br />
%<br />
• The display switches between track title, artist name, and album title each time the<br />
STATUS button is pressed.<br />
• When a WMA (Windows Media <strong>Audio</strong>), MP3 or MPEG-4 AAC file includes album<br />
art data, the album art can be displayed while the music files are playing.<br />
• If you use Ver.11 or later of Windows Media Player, the album art for WMA files<br />
can be displayed.<br />
• WMA Lossless files can be played when using a server supporting transcoding,<br />
such as Windows Media Player Ver. 11 or later.<br />
NOTE<br />
• When playing back music files with your PC or NAS connected through wireless<br />
LAN, audio may be interrupted depending on your wireless LAN environment. In<br />
this case, play back music files with your PC or NAS connected through wired LAN.<br />
• Depending on the size of the still picture (JPEG) file, some time may be required<br />
for the file to be displayed.<br />
• The order in which the tracks/files are displayed depends on the server<br />
specifications. If the tracks/files are not displayed in alphabetical order due to the<br />
server specifications, searching by the first letter may not work properly.<br />
2 2 Operations available through the OPTION<br />
button<br />
• Searching content with keywords (Text Search) (vpage 89)<br />
• Performing repeat playback (Repeat) (vpage 87)<br />
• Performing random playback (Random) (vpage 87)<br />
• Add to favorites from the Option menu (Save to Favorites)<br />
(vpage 88)<br />
• Playing back music and a favorite picture at the same time (Slideshow)<br />
(vpage 90)<br />
• Playing back still images in sequential order (Slideshow Interval)<br />
(vpage 91)<br />
• Displaying your desired video on the monitor during audio playback<br />
(Video Select) (vpage 91)<br />
• Adjusting the picture quality for your viewing environment (Picture<br />
Mode) (vpage 92)<br />
• Playing music in All Zone Stereo (vpage 93)<br />
Front panel Display Rear panel 67<br />
Remote<br />
Index
Contents<br />
Connections<br />
Playback<br />
Settings<br />
Tips<br />
Appendix<br />
Listening to Last.fm<br />
NETWORK<br />
CH/PAGE df<br />
uio p<br />
ENTER<br />
BACK<br />
OPTION<br />
1/3<br />
9<br />
• Last.fm learns what you love... and it’s a great way to discover new<br />
music.<br />
Your new <strong>Denon</strong> AV receiver is very clever. You can create a free Last.<br />
fm profile when you start using your <strong>Denon</strong> AV receiver and magically<br />
keep track of all the songs you hear.<br />
When you sign in at http://www.last.fm, you can see your top music<br />
charts, view thousands of reviews, biographies and artwork, and get<br />
recommendations for local performances you won’t want to miss.<br />
With an affordable subscription you can enjoy an endless choice of<br />
personalized ad-free radio stations. Check out http://www.last.fm/<br />
subscribe today for more details.<br />
Your subscription also gives you access to Last.fm radio on a great range<br />
of music products, including your <strong>Denon</strong> AV Receiver. This feature is not<br />
available in all countries.<br />
Visit http://www.last.fm/hardware to find out more.<br />
• Last.fm radio is not available in all countries. Please check<br />
http://www.last.fm/hardware for more information. You’ll also need a<br />
subscription. Get one today at http://www.last.fm/subscribe.<br />
Front panel Display Rear panel 68<br />
Remote<br />
Index
Contents<br />
Connections<br />
Playback<br />
Settings<br />
Tips<br />
Appendix<br />
Listening to Last.fm<br />
1<br />
2<br />
3<br />
Prepare for playback.<br />
• Check the network environment, then turn on this unit’s power<br />
(vpage 39 “Connecting to a home network (LAN)”).<br />
Press NETWORK.<br />
Use uio p to select “Last.fm”, then press ENTER.<br />
4<br />
If you have a Last.fm account, use ui to select “I have<br />
a Last.fm account”. Then press ENTER.<br />
Last.fm Account<br />
I have a Last.fm account<br />
I am new to Last.fm<br />
Network<br />
BACK<br />
Cancel<br />
Enter<br />
Favorites<br />
Spotify<br />
Internet Radio<br />
Media Server<br />
• If you do not have a Last.fm account, press i to select “I am new<br />
to Last.fm”. Then press ENTER.<br />
Create an account in accordance with the instructions on the<br />
screen.<br />
Front panel Display Rear panel 69<br />
Remote<br />
Index
Contents<br />
Connections<br />
Playback<br />
Settings<br />
Tips<br />
Appendix<br />
5<br />
Use ui p to enter your username and password.<br />
Username<br />
Password<br />
Last.fm Account<br />
OK<br />
BACK Exit<br />
Enter Username<br />
This service is currently<br />
available in limited countries.<br />
7<br />
Use ui to select menu and then press ENTER.<br />
Popular Stations :<br />
• Play popular artists and tags in your area.<br />
Your Recent Stations :<br />
• Play your recent stations.<br />
Your stations :<br />
• You can play tracks from the following personalized stations<br />
(“Your Recommended Radio”, “Your Library”, “Your Friends’<br />
Radio”, “Your Top Artists”.)<br />
Search Stations :<br />
• You can search station by Artist or Tag.<br />
• For character input, see page 121.<br />
• The password should be no longer than 99 characters.<br />
• Press BACK to cancel the input. When “Cancel input?” is<br />
displayed, select “Yes”, then press ENTER.<br />
8<br />
Use ui to select a station, and press ENTER to start<br />
playback.<br />
Playback starts and the following screen appears.<br />
6<br />
After inputting the username and password, select<br />
“OK”, then press ENTER.<br />
If the username and password match, the top menu for Last.fm is<br />
displayed.<br />
rock Radio<br />
Now Playing<br />
Title<br />
Artist<br />
Album<br />
MP3 128kbps<br />
00:06 100%<br />
Select<br />
Next<br />
Menu<br />
Front panel Display Rear panel 70<br />
Remote<br />
Index
Contents<br />
Connections<br />
Playback<br />
Settings<br />
Tips<br />
Appendix<br />
9<br />
Press p while a track is playing.<br />
The Last.fm menu screen is displayed.<br />
Menu [1/3]<br />
Love this track<br />
Ban this track<br />
Scrobbling (On)<br />
Love this track :<br />
• Loving tracks improves your Last.fm recommendations, and you<br />
can optionally share them on popular social networks.<br />
Ban this track :<br />
• If you ban a track, we won’t play it again. You can undo this on the<br />
Last.fm website.<br />
Scrobbling :<br />
• Scrobbling sends the tracks you played to your Last.fm account.<br />
You can see charts of the music you’ve been listening to, get<br />
recommendations for new music and events in your area and<br />
share your listening tastes with your friends. You can turn this<br />
service on or off using this option. The more you scrobble, the<br />
better your recommendations will become.<br />
Operation buttons Function<br />
1/3 Playback<br />
9 Next<br />
ENTER<br />
(Press and hold)<br />
Stop<br />
i<br />
Next<br />
CH/PAGE df<br />
Page previous / Page next<br />
%<br />
• The display switches between track title and radio station name each time the<br />
STATUS button is pressed.<br />
2 2 Operations available through the OPTION<br />
button<br />
• Performing repeat playback (Repeat) (vpage 87)<br />
• Performing random playback (Random) (vpage 87)<br />
• Displaying your desired video on the monitor during audio playback<br />
(Video Select) (vpage 91)<br />
• Adjusting the picture quality for your viewing environment (Picture<br />
Mode) (vpage 92)<br />
• Playing music in All Zone Stereo (vpage 93)<br />
Front panel Display Rear panel 71<br />
Remote<br />
Index
Contents<br />
Connections<br />
Playback<br />
Settings<br />
Tips<br />
Appendix<br />
Log Out<br />
Disassociate this unit from your Last.fm account.<br />
1<br />
Use ui to select “Log Out”, then press ENTER.<br />
Last.fm [10/10]<br />
Popular tag<br />
Are<br />
Popular<br />
you sure<br />
Artists<br />
you want to log out<br />
xxxxxxx?<br />
Your Recent Stations<br />
Your Recommended Radio<br />
Your Library<br />
Yes<br />
No<br />
Your Friends’ Radio<br />
BACK<br />
Option<br />
2<br />
When the popup menu appears, use o p to select “Yes”,<br />
then press ENTER.<br />
Front panel Display Rear panel 72<br />
Remote<br />
Index
Contents<br />
Connections<br />
Playback<br />
Settings<br />
Tips<br />
Appendix<br />
Viewing photographs on the Flickr site<br />
NETWORK<br />
• Flickr is an online photograph sharing service that started in 2004. You<br />
can use the this unit to view photographs that have been made public<br />
by Flickr users. You do not need an account to use Flickr. To view<br />
photographs that you recorded yourself, you need an account in order to<br />
upload these photographs to the Flickr server. For details, see the Flickr<br />
homepage.<br />
http://www.flickr.com/<br />
• You can view photographs shared by particular users, or all of the<br />
photographs shared on Flickr.<br />
CH/PAGE df<br />
uio p<br />
ENTER<br />
BACK<br />
OPTION<br />
Front panel Display Rear panel 73<br />
Remote<br />
Index
Contents<br />
Connections<br />
Playback<br />
Settings<br />
Tips<br />
Appendix<br />
Viewing photographs shared by<br />
particular users<br />
1<br />
2<br />
3<br />
Prepare for playback.<br />
• Check the network environment, then turn on this unit’s power<br />
(vpage 39 “Connecting to a home network (LAN)”).<br />
Press NETWORK.<br />
Use uio p to select “Flickr”, then press ENTER.<br />
4<br />
Use ui to select “Add Flickr Contact”, then press<br />
ENTER.<br />
Flickr [1/2]<br />
Add Flickr Contact<br />
All Content<br />
OPTION Option<br />
Network<br />
Favorites<br />
Spotify<br />
Internet Radio<br />
Media Server<br />
5<br />
6<br />
In “Contact”, add the screen name (user name you want<br />
to view) you want to add.<br />
• For character input, see page 121.<br />
After inputting the “Contact”, press “OK”.<br />
The screen name is added to “Contact”, and the screen name you<br />
entered in Step 5 is displayed on the top screen of Flickr.<br />
• If you enter a screen name that does not exist, “The Flickr Contact<br />
you entered could not be found” is displayed. Check and enter the<br />
correct screen name.<br />
Front panel Display Rear panel 74<br />
Remote<br />
Index
Contents<br />
Connections<br />
Playback<br />
Settings<br />
Tips<br />
Appendix<br />
7<br />
Use ui to select the folder, and then press ENTER.<br />
Favorites :<br />
• Displays the favorite photographs of the specified user.<br />
Photostream :<br />
• Displays a list of shared photographs.<br />
PhotoSets :<br />
• Displays the folder (photograph album) list.<br />
Contacts :<br />
• Displays the screen name used by the specified user in Contacts.<br />
Remove this Contact :<br />
• Deletes a user from Flickr Contact.<br />
Add this Contact :<br />
• Adds a user from Flickr Contact.<br />
Viewing all photographs on Flickr<br />
1<br />
Use ui to select “All Content”, then press ENTER.<br />
Flickr [1/2]<br />
Add Flickr Contact<br />
All Content<br />
OPTION Option<br />
8<br />
Use ui to select the file, and then press ENTER.<br />
The selected file is displayed.<br />
Operation buttons<br />
ENTER<br />
ui<br />
CH/PAGE df<br />
Function<br />
Playback<br />
(Press and hold)<br />
Stop<br />
Previous / Next<br />
Page previous / Page next<br />
2<br />
3<br />
Use ui to select the folder, and then press ENTER.<br />
Interestingness :<br />
• Displays photographs that are popular from the number of user<br />
comments or number of times they are added as favorites.<br />
Recent :<br />
• Displays the most recently added photographs.<br />
Search by text :<br />
• Search for photographs by keyword.<br />
Use ui to select the file, and then press ENTER.<br />
The selected file is displayed.<br />
Front panel Display Rear panel 75<br />
Remote<br />
Index
Contents<br />
Connections<br />
Playback<br />
Settings<br />
Tips<br />
Appendix<br />
NOTE<br />
• Depending on the file format, some photographs may not be viewable.<br />
2 2 Operations available through the OPTION<br />
button<br />
• Playing back still images in sequential order (Slideshow Interval)<br />
(vpage 91)<br />
• Displaying your desired video on the monitor during audio playback<br />
(Video Select) (vpage 91)<br />
• Adjusting the picture quality for your viewing environment (Picture<br />
Mode) (vpage 92)<br />
• Playing music in All Zone Stereo (vpage 93)<br />
Front panel Display Rear panel 76<br />
Remote<br />
Index
Contents<br />
Connections<br />
Playback<br />
Settings<br />
Tips<br />
Appendix<br />
Listening to Spotify<br />
NETWORK<br />
CH/PAGE df<br />
uio p<br />
ENTER<br />
BACK<br />
OPTION<br />
1/3<br />
8 9<br />
Introduce your <strong>Denon</strong> to a whole new world of music. With Spotify, you<br />
can enjoy instant access to millions of songs.<br />
A Spotify Premium subscription is required.<br />
For details, see the Spotify homepage.<br />
http://www.spotify.com<br />
Listening to Spotify<br />
1<br />
2<br />
3<br />
Prepare for playback.<br />
q Check the network environment, then turn on this unit’s power<br />
(vpage 39 “Connecting to a home network (LAN)”).<br />
w Complete step 5 and obtain a Spotify account.<br />
• If you already have a Spotify account, you do not need to obtain<br />
a new account. Use your existing Spotify account.<br />
Press NETWORK.<br />
Use uio p to select “Spotify”, then press ENTER.<br />
Network<br />
Favorites<br />
Internet Radio<br />
Spotify<br />
Media Server<br />
Front panel Display Rear panel 77<br />
Remote<br />
Index
Contents<br />
Connections<br />
Playback<br />
Settings<br />
Tips<br />
Appendix<br />
4<br />
If you have a Spotify account, then press ENTER.<br />
• For character input, see page 121.<br />
The types of characters that can be input are as shown below.<br />
5<br />
BACK<br />
Spotify<br />
Introduce your <strong>Denon</strong> to a whole new world<br />
of music. With Spotify, you can enjoy instant<br />
access to millions of songs.<br />
A Spotify Premium subscription is required.<br />
Just subscribe at spotify.com<br />
Exit<br />
Get Started<br />
Use ui p to enter your username and password.<br />
Username<br />
Password<br />
Spotify Log In<br />
zzzzz<br />
zzzzz<br />
6<br />
GUpper case characters/Numbers/SymbolsH<br />
ABCDEFGHIJKLMNOPQRSTUVWXYZ<br />
ÄÀÁÂÃÅÆÇÐÈÉÊËÌÍÎÏÑÖÒÓÔÕØÜÙÚÛÝÞ<br />
0123456789<br />
! “ # $ % & ’ ( ) z + , ; < = ><br />
GLower case characters/Numbers/SymbolsH<br />
abcdefghijklmnopqrstuvwxyz<br />
äàáâãåæçðèéêëìíîïñöòóôõøüùúûýþÿß<br />
0123456789<br />
. @ - _ / : ˜ ? [ \ ] ^ ’ { | }<br />
• The password should be no longer than 99 characters.<br />
• Press BACK to cancel the input. When “Cancel Input?” is<br />
displayed, select “Yes”, then press ENTER.<br />
After inputting the username and password, select “Log<br />
In”, then press ENTER.<br />
If the username and password match, the top menu for Spotify is<br />
displayed.<br />
Log In<br />
BACK<br />
Exit<br />
Enter<br />
Front panel Display Rear panel 78<br />
Remote<br />
Index
Contents<br />
Connections<br />
Playback<br />
Settings<br />
Tips<br />
Appendix<br />
7<br />
Use ui to select menu and then press ENTER.<br />
Spotify<br />
[1/5]<br />
8<br />
Use ui to select a station, and press ENTER to start<br />
playback.<br />
Playback starts and the following screen appears.<br />
Search<br />
What’s New<br />
Starred<br />
Playlists<br />
Accounts<br />
Spotify<br />
Now Playing<br />
Title<br />
Artist<br />
Album<br />
OPTION<br />
Option<br />
00:06<br />
Search :<br />
• Searches for tracks, artists and albums by entering keywords.<br />
What’s New :<br />
• Displays the list of the latest albums.<br />
Starred :<br />
• Displays the list of the starred tracks.<br />
Playlists :<br />
• Displays the playlists for Spotify.<br />
Accounts :<br />
• Manages accounts (Log out, Add new user, Switch to user).<br />
Pause<br />
Back<br />
Previous<br />
Next<br />
OPTION Option<br />
Menu<br />
Operation buttons Function<br />
1/3 Playback / Pause<br />
Previous / Next<br />
8 9<br />
(Press and hold)<br />
Fast-reverse / Fast-forward<br />
Playback / Pause<br />
ENTER<br />
(Press and hold)<br />
Stop<br />
Previous / Next<br />
ui<br />
(Press and hold)<br />
Fast-reverse / Fast-forward<br />
CH/PAGE df<br />
Page previous / Page next<br />
Front panel Display Rear panel 79<br />
Remote<br />
Index
Contents<br />
Connections<br />
Playback<br />
Settings<br />
Tips<br />
Appendix<br />
9<br />
Press p while a track is playing.<br />
The Spotify menu screen is displayed.<br />
%<br />
• The display switches between track title, artist name, and album title each time the<br />
STATUS button is pressed.<br />
Track-Artist<br />
Star this track<br />
Browse “Artist name”<br />
Browse “Album name”<br />
Back<br />
[1/3]<br />
2 2 Operations available through the OPTION<br />
button<br />
• Performing repeat playback (Repeat) (vpage 87)<br />
• Performing random playback (Random) (vpage 87)<br />
• Displaying your desired video on the monitor during audio playback<br />
(Video Select) (vpage 91)<br />
• Adjusting the picture quality for your viewing environment (Picture<br />
Mode) (vpage 92)<br />
• Playing music in All Zone Stereo (vpage 93)<br />
Star this track :<br />
• Adds a star to the selected track.<br />
Browse “Artist name” :<br />
• Displays the list of albums by the artist of the track that is being<br />
played back.<br />
Browse “Album name” :<br />
• Displays the list of tracks on the album that is being played back.<br />
Front panel Display Rear panel 80<br />
Remote<br />
Index
Contents<br />
Connections<br />
Playback<br />
Settings<br />
Adding to the FAVORITE STATION button<br />
Tips<br />
Appendix<br />
FAVORITE<br />
STATION<br />
1 – 3<br />
With a single press of these, you can call up registered radio stations and<br />
contents<br />
You can add up to three types of content.<br />
1<br />
Press and hold one of the FAVORITE STATION 1 – 3<br />
buttons for 3 seconds or longer while playing back a<br />
content or listening to a radio station.<br />
The content you are playing back or the radio station you are<br />
listening to is registered to the pressed button.<br />
• Contents that can be added to the FAVORITE STATION button<br />
differ depending on the input source.<br />
Input source<br />
TUNER<br />
Internet Radio<br />
Media Server<br />
Last.fm<br />
Flickr<br />
Spotify<br />
Favorites<br />
Contents that can be added<br />
Radio station<br />
Top list of content / Internet Radio station<br />
Top list of content / Track of Media Server<br />
Top list of content<br />
Top list of content<br />
Top list of content<br />
Top list of content / Internet Radio station /<br />
Track of Media Server<br />
Front panel Display Rear panel 81<br />
Remote<br />
Index
Contents<br />
Connections<br />
Playback<br />
Settings<br />
Tips<br />
Appendix<br />
Playing back content added to the<br />
FAVORITE STATION button<br />
You can easily call up content by pressing the FAVORITE STATION button.<br />
1<br />
Press one of the FAVORITE STATION 1 – 3 buttons that<br />
you added content to.<br />
Playback starts.<br />
%<br />
• Internet Radio stations are already registered to the FAVORITE STATION 1 – 3<br />
buttons. However, you may not be able to play the stations due to restrictions<br />
imposed by the radio stations.<br />
NOTE<br />
• The following operations update the database on the Media Server, which may<br />
make the added music files unplayable.<br />
• When you quit the Media Server and then restart it.<br />
• When music files are deleted or added on the Media Server.<br />
Front panel Display Rear panel 82<br />
Remote<br />
Index
Contents<br />
Connections<br />
Playback<br />
Settings<br />
Tips<br />
Appendix<br />
AirPlay function<br />
Enjoy music from your iTunes library with high quality sound anywhere in<br />
your home.<br />
PC<br />
Router<br />
This unit<br />
Streaming music stored in iPhone, iPod<br />
touch, or iPad directly to the unit<br />
If you update your “iPhone/iPod touch/iPad” to iOS 4.2.1 or later, you can<br />
stream music stored in your “iPhone/iPod touch/iPad” directly to this unit.<br />
1<br />
2<br />
3<br />
Make the Wi-Fi settings for iPhone, iPod touch, or iPad.<br />
• For details, see your device’s manual.<br />
Startup iPhone, iPod touch, or iPad music or iPod app.<br />
' is displayed on the iPhone, iPod touch or iPad screen.<br />
Tap the AirPlay icon '.<br />
4 Select the speaker you want to use. Cancel<br />
<strong>Denon</strong> <strong>AVR</strong>-<strong>X2000</strong><br />
Front panel Display Rear panel 83<br />
Remote<br />
Index
Contents<br />
Connections<br />
Playback<br />
Settings<br />
Tips<br />
Appendix<br />
Playing iTunes music with this unit<br />
1<br />
2<br />
3<br />
Install iTunes 10, or later, on a Mac or Windows PC that<br />
is connected to the same network as this unit.<br />
Turn this unit ON.<br />
Set “IP Control” (vpage 156) to “Always On” for this unit.<br />
NOTE<br />
• When “IP Control” is set to “Always On”, the unit consumes more standby<br />
power.<br />
Launch iTunes and click the AirPlay icon ' displayed<br />
the window and select this unit from the list.<br />
Selecting multiple speakers (devices)<br />
It is possible to play iTunes songs on your home’s AirPlay compatible<br />
speakers (devices) other than those of this unit.<br />
1<br />
2<br />
Click the AirPlay icon ' and select “Multiple”.<br />
Check the speakers you want to use.<br />
AirPlay Single Multiple<br />
Master Volume<br />
My Computer<br />
<strong>Denon</strong> <strong>AVR</strong>-<strong>X2000</strong><br />
4<br />
Choose a song and click play in iTunes.<br />
The music will stream to this unit.<br />
NOTE<br />
• In playback using the AirPlay function, the sound is output at the iPhone, iPod<br />
touch, iPad or iTunes volume setting level.<br />
You should turn down the iPhone, iPod touch, iPad or iTunes volume prior to<br />
playback and then adjust it to a suitable level.<br />
Front panel Display Rear panel 84<br />
Remote<br />
Index
Contents<br />
Connections<br />
Playback<br />
Settings<br />
Tips<br />
Appendix<br />
Perform iTunes playback operations<br />
with the remote control unit of this unit<br />
With this unit’s remote control unit, you can perform iTunes song play,<br />
pause, and auto search (cue) operations.<br />
1<br />
2<br />
3<br />
Select “Edit” – “Preferences...” on the menu.<br />
Select “Devices” in the iTunes setting window.<br />
Check “Allow iTunes audio control from remote<br />
speakers”, and then click “OK”.<br />
Devices Preferences<br />
General Playback Sharing Store Parental Devices Advanced<br />
Device backups:<br />
Delete Backup ...<br />
Prevent iPods, iPhones, and iPads from syncing automatically<br />
Warn when more than 5% of the data on this computer will be changed<br />
Allow iTunes audio control from remote speakers<br />
Only allow paired or Home Sharing Remotes to control iTunes<br />
%<br />
• + is displayed on the menu screen while AirPlay is being operated.<br />
• Source input will be switched to “NETWORK” when AirPlay playback is started.<br />
• You can stop AirPlay playback by pressing the o or choosing other input source.<br />
• To see song and artist names together, press STATUS on the main unit.<br />
• For information about how to use iTunes, also see the Help for iTunes.<br />
• The screen may differ depending on the OS and software versions.<br />
?<br />
iTunes is not paired with any Remotes<br />
Reset Sync History<br />
Forget All Remotes<br />
OK<br />
Cancel<br />
Front panel Display Rear panel 85<br />
Remote<br />
Index
Contents<br />
Connections<br />
Playback<br />
Settings<br />
Tips<br />
Appendix<br />
Convenience functions<br />
Here, we explain how to use the convenience functions. The source<br />
names under the titles of each function’s description are sources that<br />
allow use of these functions.<br />
NETWORK<br />
uio p<br />
ENTER<br />
OPTION<br />
Front panel Display Rear panel 86<br />
Remote<br />
Index
Contents<br />
Connections<br />
Playback<br />
Settings<br />
Tips<br />
Appendix<br />
Performing repeat playback (Repeat)<br />
nn<br />
Supported input sources : USB / Media Server / Spotify<br />
1<br />
2<br />
3<br />
4<br />
While content is playing, press OPTION.<br />
The option menu screen is displayed.<br />
Use ui to select “Repeat”, then press ENTER.<br />
Use o p to select repeat playback mode.<br />
Off (Default) : Repeat playback mode is canceled.<br />
One : A file being played is played repeatedly.<br />
All : All files in the folder currently being played are played<br />
repeatedly.<br />
Press ENTER.<br />
The display returns to the playback screen.<br />
Performing random playback (Random)<br />
nn<br />
Supported input sources : USB / Media Server / Spotify<br />
1<br />
2<br />
3<br />
4<br />
While content is playing, press OPTION.<br />
The option menu screen is displayed.<br />
Use ui to select “Random”, then press ENTER.<br />
Use o p to select random playback mode.<br />
Off (Default) : Disable random playback.<br />
On : Randomly play back all tracks in the current playback folder.<br />
Press ENTER.<br />
The display returns to the playback screen.<br />
%<br />
• During random playback, each time playback of a track is completed, another track<br />
is randomly selected for playback from tracks in the folder. Therefore, it’s possible<br />
that you may hear a track played back more than once during random playback.<br />
Front panel Display Rear panel 87<br />
Remote<br />
Index
Contents<br />
Connections<br />
Playback<br />
Settings<br />
Tips<br />
Appendix<br />
Add to favorites from the Option menu<br />
(Save to Favorites)<br />
You can add up to 100 items as favorites for Internet Radio and Media<br />
Server.<br />
nn<br />
Supported input sources : Internet Radio / Media Server<br />
1<br />
2<br />
While content is playing, press OPTION.<br />
The option menu screen is displayed.<br />
Use ui to select “Save to Favorites”, then press ENTER.<br />
“Favorite added” is displayed, and the current content is added to<br />
favorites.<br />
• The display returns to the playback screen when the procedure<br />
is completed.<br />
Playing back content added in “Save to<br />
Favorites”<br />
1<br />
2<br />
Press NETWORK.<br />
Use uio p to select “Favorites”, then press ENTER.<br />
Network<br />
Favorites<br />
Spotify<br />
Internet Radio<br />
Media Server<br />
3<br />
Use ui to select the content you want to play, and<br />
then press ENTER.<br />
Playback starts.<br />
Front panel Display Rear panel 88<br />
Remote<br />
Index
Contents<br />
Connections<br />
Playback<br />
Settings<br />
Tips<br />
Appendix<br />
Deleting content added to favorites<br />
(Remove from Favorites)<br />
1<br />
2<br />
3<br />
4<br />
Press NETWORK.<br />
Use uio p to select “Favorites”, then press ENTER.<br />
Use ui to select the content you want to delete from<br />
favorites, then press OPTION.<br />
The option menu screen is displayed.<br />
Use ui to select “Remove from Favorites”, then press<br />
ENTER.<br />
“Favorite removed” is displayed, and the selected content is<br />
deleted from favorites.<br />
• The display returns to the original screen when the procedure is<br />
completed.<br />
Searching content with keywords<br />
(Text Search)<br />
nn<br />
Supported input sources : USB / Internet Radio / Media Server<br />
1<br />
2<br />
3<br />
4<br />
While content is playing, press OPTION.<br />
The option menu screen is displayed.<br />
Use ui to select “Text Search”, then press ENTER.<br />
The keyboard input screen is displayed.<br />
Enter the first character of the Internet Radio station or<br />
file you want to search for, and then press “OK”.<br />
• For character input, see page 121.<br />
Use ui to select the content you want to play, and<br />
then press ENTER.<br />
Playback starts.<br />
%<br />
• “Text Search” searches for Internet Radio stations or files that start with the<br />
entered first character from the displayed list.<br />
NOTE<br />
• “Text Search” may not work for some lists.<br />
Front panel Display Rear panel 89<br />
Remote<br />
Index
Contents<br />
Connections<br />
Playback<br />
Settings<br />
Tips<br />
Appendix<br />
Playing back music and a favorite picture at the same time (Slideshow)<br />
nn<br />
Supported input sources : USB<br />
1<br />
2<br />
3<br />
4<br />
Play back a still picture.<br />
• Playing back still pictures stored on USB memory devices<br />
(vpage 49).<br />
Play back a music file (vpage 49).<br />
Press OPTION.<br />
The option menu screen is displayed.<br />
Use ui to select “Slideshow”, then press ENTER.<br />
The option menu disappears, and the picture you were viewing is<br />
shown on the screen.<br />
nn<br />
Supported input sources : Internet Radio / Media Server<br />
1<br />
2<br />
3<br />
4<br />
Play back a still picture.<br />
• Playing back still pictures stored on Flickr (vpage 73).<br />
• Playing back still pictures stored on Media Server (vpage 64).<br />
Play back a music file of Media Server or Internet Radio<br />
station (vpage 61, 66).<br />
Press OPTION.<br />
The option menu screen is displayed.<br />
Use ui to select “Slideshow”, then press ENTER.<br />
The option menu disappears, and the picture you were viewing is<br />
shown on the screen.<br />
Front panel Display Rear panel 90<br />
Remote<br />
Index
Contents<br />
Connections<br />
Playback<br />
Settings<br />
Tips<br />
Appendix<br />
Playing back still pictures in sequential<br />
order (Slideshow Interval)<br />
You can play back still picture (JPEG) files stored on a USB memory device<br />
or Media Server and pictures on Flickr website as a slide show. The display<br />
time can also be set.<br />
nn<br />
Supported input sources : USB / Media Server / Flickr<br />
1<br />
2<br />
3<br />
While the list is displayed, press OPTION.<br />
The option menu screen is displayed.<br />
Use ui to select “Slideshow Interval”, then press<br />
ENTER.<br />
Use o p to set the display time.<br />
Off : The slide show is not played back.<br />
5s – 60s : Set the time for displaying a single picture when playing<br />
back images in the slide show.<br />
Displaying your desired video during<br />
audio playback (Video Select)<br />
This unit can display video from a different source on TV during audio<br />
playback.<br />
You can set this for each input source.<br />
nn<br />
Supported input sources : USB / CDz / TUNER / NETWORK<br />
zzAvailable when none of HDMI, component video or video connector is<br />
assigned.<br />
1<br />
2<br />
3<br />
Press OPTION during audio playback.<br />
The option menu screen is displayed.<br />
Use ui to select “Video Select”, then press ENTER.<br />
Use o p to select the Video Select mode.<br />
Off (Default) : Disable Video Select mode.<br />
On : Enable Video Select mode.<br />
4<br />
Press ENTER.<br />
The slide show is displayed on the screen.<br />
%<br />
• This unit plays back picture (JPEG) files in the order in which they are stored in<br />
the folder.<br />
4<br />
5<br />
If you selected “On” in step 3, press i and select<br />
“Source”.<br />
Press o p to select the input source for video you want<br />
to play back, and press ENTER.<br />
Front panel Display Rear panel 91<br />
Remote<br />
Index
Contents<br />
Connections<br />
Playback<br />
Settings<br />
Tips<br />
Appendix<br />
Adjusting the picture quality for your<br />
3<br />
viewing environment (Picture Mode)<br />
/ MEDIA PLAYER / USB / NETWORK / CDz / TV AUDIOz<br />
zzYou can set the picture mode when an HDMI, component video or video<br />
connector is assigned.<br />
While content is playing, press OPTION.<br />
1<br />
The option menu screen is displayed.<br />
2 Use ui to select “Picture Mode”, then press ENTER.<br />
nn<br />
Supported input sources : CBL/SAT / DVD / Blu-ray / GAME/ AUX<br />
4<br />
Use o p to select picture mode.<br />
Off : No picture quality adjustment is done with this unit.<br />
Standard : The standard mode suited for most living room viewing<br />
environments.<br />
Movie : A mode suited for watching movies in a dark room such as<br />
a theater room.<br />
Vivid : A mode that makes graphic images for games, etc. brighter<br />
and more vivid.<br />
Streaming : A mode suited for low bit rate video sources.<br />
Custom : Adjusts the picture quality manually.<br />
Press ENTER.<br />
The display returns to the playback screen.<br />
Front panel Display Rear panel 92<br />
Remote<br />
Index
Contents<br />
Connections<br />
Playback<br />
Settings<br />
Tips<br />
Appendix<br />
Playing music in All Zone Stereo<br />
You can play back music in another room (ZONE2) simultaneously that is<br />
played back in MAIN ZONE.<br />
It is useful when you want to enjoy the same music at the same time<br />
in multiple rooms during home party or when you want to play back the<br />
same BGM in the entire house.<br />
The All Zone Stereo function can be set for any source.<br />
%<br />
• Before setting this function, you need to turn on the another room (ZONE2) for<br />
which you want to use the All Zone Stereo function.<br />
1<br />
2<br />
3<br />
4<br />
Press MAIN to switch the zone mode.<br />
MAIN lights.<br />
Press OPTION.<br />
The option menu screen is displayed.<br />
Use ui to select “All Zone Stereo”, then press ENTER.<br />
Use o p to select “On”, then press ENTER.<br />
The input source for the multi-zones (ZONE2) is switched to the<br />
same as the one for MAIN ZONE, and playback in the All Zone<br />
Stereo mode starts.<br />
22Stopping the All Zone Stereo function<br />
1<br />
2<br />
3<br />
During playback in All Zone Stereo, press OPTION.<br />
The option menu screen is displayed.<br />
Use ui to select “All Zone Stereo”, then press ENTER.<br />
Use o p to select “Off”, then press ENTER.<br />
%<br />
• The All Zone Stereo function is also stopped when you:<br />
• Turn MAIN ZONE off.<br />
• Change the input source for MAIN ZONE.<br />
• Change the sound mode.<br />
• When “HDMI <strong>Audio</strong> Out” (vpage 132) is set to “TV”, the All Zone Stereo<br />
function is not available.<br />
Front panel Display Rear panel 93<br />
Remote<br />
Index
Contents<br />
Connections<br />
Playback<br />
Settings<br />
Tips<br />
Appendix<br />
Selecting a sound mode<br />
This unit allows you to enjoy various kinds of surround and stereo playback<br />
modes.<br />
Multi-channel audio formats are provided on popular movie and music disc<br />
formats such as Blu-ray and DVD, as well as being supported by digital<br />
broadcasting, and even by streaming movies and music from internetbased<br />
subscription services.<br />
This unit supports playback of almost all of these multi-channel audio<br />
formats. It also supports surround playback of audio formats other than<br />
multi-channel audio such as 2-channel stereo audio.<br />
%<br />
• For audio formats recorded on a disc, see the disc jacket or label.<br />
MOVIE<br />
MUSIC<br />
PURE<br />
GAME<br />
Front panel Display Rear panel 94<br />
Remote<br />
Index
Contents<br />
Connections<br />
Playback<br />
Settings<br />
Tips<br />
Appendix<br />
Selecting a sound mode<br />
Press MOVIE, MUSIC or GAME to select a sound mode.<br />
1<br />
MOVIE : Switches to the sound mode suitable for enjoying movies<br />
and TV programs.<br />
MUSIC : Switches to the sound mode suitable for enjoying music.<br />
GAME : Switches to the sound mode suitable for enjoying games.<br />
%<br />
• The MOVIE, MUSIC, or GAME button memorizes the last sound mode selected for<br />
its button. Pressing MOVIE, MUSIC, or GAME recalls the same sound mode as the<br />
one selected at the previous playback.<br />
• If the content played back does not support the previously selected sound mode,<br />
the most appropriate sound mode for the content is automatically selected.<br />
22Switching the sound mode<br />
• Press and hold MOVIE, MUSIC or GAME displays a list of the sound<br />
modes that can be selected. Each time you press MOVIE, MUSIC or<br />
GAME, the sound mode changes.<br />
• While the list is displayed, you can also use ui to select a sound<br />
mode.<br />
• Try out various surround playback modes and enjoy surround playback<br />
in your favorite mode.<br />
GExampleH When MOVIE is pressed and held<br />
MOVIE SOUND<br />
STEREO<br />
DOLBY PLIIx CINEMA<br />
DTS NEO:6 CINEMA<br />
MULTI CH STEREO<br />
MONO MOVIE<br />
VIRTUAL<br />
This unit provides not only sound modes that conform to the formats<br />
recorded on discs such as Dolby and DTS but also extended types<br />
of modes that match your speaker configuration including front height<br />
speakers and surround back speakers and “original sound modes” that<br />
create atmosphere of ROCK ARENA and JAZZ CLUB, etc.<br />
Front panel Display Rear panel 95<br />
Remote<br />
Index
Contents<br />
Connections<br />
Playback<br />
Settings<br />
Tips<br />
Appendix<br />
Direct playback<br />
Sound recorded in source is played as is.<br />
1<br />
Press PURE to select “DIRECT”.<br />
Direct playback begins.<br />
Pure Direct playback<br />
This mode is for playback with higher sound quality than in “DIRECT”<br />
mode, by turning off the front panel display panel, which can eliminate<br />
faint low level noise from creeping into sensitive analog circuitry.<br />
1<br />
Press PURE to select “PURE DIRECT”.<br />
The display goes dark, and Pure Direct playback begins.<br />
%<br />
• In DIRECT and PURE DIRECT sound modes, the following items cannot be<br />
adjusted.<br />
• Tone (vpage 126)<br />
• Restorer (vpage 126)<br />
• MultEQ® XT (vpage 128)<br />
• Dynamic EQ (vpage 128)<br />
• Dynamic Volume (vpage 129)<br />
NOTE<br />
• Video signals are only output when HDMI signals are played in the PURE DIRECT<br />
mode.<br />
• When the PURE DIRECT mode has been selected, the display turns off after about<br />
5 seconds. The power indicator will remain lit (green). To restore the display press<br />
PURE again, which will set the unit in DIRECT mode.<br />
Front panel Display Rear panel 96<br />
Remote<br />
Index
Contents<br />
Connections<br />
Playback<br />
Settings<br />
Tips<br />
Appendix<br />
22Description of sound mode types<br />
Dolby sound mode<br />
Sound mode type<br />
DOLBY PLgx z1<br />
DOLBY PLg<br />
DOLBY PLgz z2<br />
DOLBY DIGITAL<br />
DOLBY DIGITAL EX z1<br />
DOLBY TrueHD<br />
DOLBY DIGITAL Plus<br />
Description<br />
This mode can be selected when the Dolby Pro Logic gx decoder is used to play back 2-channel sources in 6.1/7.1-channel<br />
surround sound including the surround back channel(s).<br />
By adding the surround back channel(s), a more enveloping surround environment is produced, compared to Dolby Pro<br />
Logic g.<br />
There are three playback modes: “Cinema” mode that is optimized for movie playback, “Music” mode that is optimized<br />
for music playback, and “Game” mode that is optimized for game play.<br />
This mode can be selected when the Dolby Pro Logic g decoder is used to play back 2-channel sources in 5.1-channel<br />
surround sound with an enveloping surround sound experience.<br />
This mode can be selected when the Dolby Pro Logic gz decoder is used to play back 2-channel sources in 7.1-channel<br />
surround sound with added front height channels.<br />
By adding front height channels, the front soundstage becomes dramatically taller, simulating the effect of listening in<br />
a large movie theater or concert hall.<br />
This mode can be selected when playing sources recorded with Dolby Digital.<br />
Using the Dolby Digital EX decoder, this mode plays Dolby Digital sources in 6.1/7.1-channel surround sound with added<br />
surround back channel(s).<br />
By adding surround back speaker(s), sounds can be heard coming at you from behind and not just from the sides.<br />
This mode can be selected when playing sources recorded in Dolby TrueHD.<br />
This mode can be selected when playing sources recorded with Dolby Digital Plus.<br />
z1 This can be selected when “Speaker Config.” – “Surr. Back” (vpage 152) is not set to “None”.<br />
z2 This can be selected when “Speaker Config.” – “Front Height” (vpage 152) is not set to “None”.<br />
Front panel Display Rear panel 97<br />
Remote<br />
Index
Contents<br />
Connections<br />
Playback<br />
Settings<br />
Tips<br />
Appendix<br />
DTS sound mode<br />
Sound mode type<br />
Description<br />
DTS NEO:6<br />
This mode can be selected when a DTS NEO:6 decoder is used to play back 2-channel source in 6.1/7.1-channel<br />
surround sound including the surround back channel.<br />
There is a “Cinema” mode optimized for movie playback, and a “Music” mode optimized for music playback.<br />
DTS SURROUND<br />
This mode can be selected when playing sources recorded in DTS.<br />
DTS ES DSCRT6.1 z1 This mode is suitable for playing discs recorded in DTS-ES. The surround back channel added using the discrete method<br />
is played as an independent channel.<br />
Since all channels are independent, the 360-degree spacial expressiveness and sound localization are enhanced.<br />
DTS ES MTRX6.1 z2<br />
This mode is suitable for playing discs recorded in DTS-ES.<br />
The surround back channel added to the surround-left and surround-right channels by a matrix encoder at software<br />
recording time is decoded by this unit’s matrix decoder and played from each channel (surround left, surround right,<br />
surround back).<br />
DTS 96/24 This mode can be selected when playing sources recorded in DTS 96/24.<br />
DTS-HD<br />
This mode can be selected when playing sources recorded in DTS-HD.<br />
DTS Express<br />
This mode can be selected when playing sources recorded in DTS Express.<br />
z1 This mode can be selected when only one surround back speaker is used and no front height speaker is used.<br />
z2 This can be selected when “Speaker Config.” – “Surr. Back” (vpage 152) is set to “1spkr”.<br />
PCM multi-channel sound mode<br />
Sound mode type<br />
MULTI CH IN<br />
Description<br />
This mode can be selected when playing multi-channel PCM sources from a disc player or external decoder that<br />
features analog multi-channel outputs.<br />
Front panel Display Rear panel 98<br />
Remote<br />
Index
Contents<br />
Connections<br />
Playback<br />
Settings<br />
Tips<br />
Appendix<br />
Original sound mode<br />
Sound mode type<br />
MULTI CH STEREO<br />
ROCK ARENA<br />
JAZZ CLUB<br />
MONO MOVIE<br />
VIDEO GAME<br />
MATRIX<br />
VIRTUAL<br />
Description<br />
This mode is for enjoying stereo sound from all speakers.<br />
Stereo audio (2-channel) sources are played back via the front (L/R) speakers, the surround speakers and if connected<br />
the surround back speakers.<br />
This mode simulates the expansive sound of a live concert in an arena.<br />
This mode puts you right in the middle of an intimate jazz club.<br />
This mode works with monaural audio sources and delivers a surround sound effect. For optimum channel balance and<br />
surround sound effects, connect the monaural source to both of the front (L/R) audio inputs.<br />
This mode provides an exciting, dynamic surround sound effect with your favorite action video games.<br />
This mode adds a spacious surround sound effect with stereo music sources.<br />
This mode lets you experience an expansive surround sound effect when playing back through just the front (L/R)<br />
speakers only, and when listening with stereo headphones.<br />
Front panel Display Rear panel 99<br />
Remote<br />
Index
Contents<br />
Connections<br />
Playback<br />
Settings<br />
Tips<br />
Appendix<br />
Stereo sound mode<br />
STEREO<br />
Sound mode type<br />
Description<br />
This mode plays 2-channel stereo audio with no additional surround sound processing.<br />
• Sound is output from the front left and right speakers, and subwoofer if connected.<br />
• When multi-ichannel signals are inputted, they are mixed down to 2-channel audio and are played back with no<br />
additional surround sound processing.<br />
Direct sound mode<br />
Sound mode type<br />
DIRECT<br />
PURE DIRECT<br />
Description<br />
This mode provides a direct input-to-output path with minimal audio processing, bypassing any unnecessary stages for<br />
purest sound.<br />
This mode provides the direct audio signal path benefit of the Direct mode along with disabling additional stages that<br />
might possibly have an affect on sound quality.<br />
In Pure Direct mode, the following elements are turned off:<br />
• The front panel display and its driver circuitry are shut down. The display will temporarily come on when adjusting the<br />
volume, etc., but will turn off again once the adjustment has been made.<br />
• The analog video input/output switcher and processor is disabled.<br />
Front panel Display Rear panel 100 Remote<br />
Index
Contents<br />
Connections<br />
Playback<br />
Settings<br />
22Sound mode<br />
• The following sound modes can be selected using the MOVIE, MUSIC, GAME, and PURE buttons.<br />
• Adjust the sound field effect with the menu “Surround Parameter” (vpage 123) to enjoy surround sound the way you like it.<br />
2-channel z1<br />
Input signal Sound mode NOTE<br />
Tips<br />
Appendix<br />
Sound mode<br />
MOVIE MUSIC GAME<br />
STEREO S S S<br />
DOLBY PLg/gx Cinema z2 S<br />
DOLBY PLg/gx Music z2 S<br />
DOLBY PLg/gx Game z2 S<br />
DOLBY PLgz z2 S S<br />
DTS NEO:6 Cinema z2 S<br />
DTS NEO:6 Music z2 S<br />
MULTI CH STEREO S S S<br />
MONO MOVIE<br />
S<br />
ROCK ARENA<br />
S<br />
JAZZ CLUB<br />
S<br />
MATRIX<br />
S<br />
VIDEO GAME<br />
S<br />
VIRTUAL S S S<br />
z1 2-channel also includes analog input.<br />
z2 This mode plays back 2-channel sources in 5.1 or 7.1-channel playback. It cannot be selected when headphones are used, or when only front speakers are used.<br />
Front panel Display Rear panel 101 Remote<br />
Index
Contents<br />
Connections<br />
Playback<br />
Settings<br />
Tips<br />
Appendix<br />
Input signal Sound mode NOTE<br />
Sound mode<br />
MOVIE MUSIC GAME<br />
Multi-channel z3 STEREO S S S<br />
DOLBY DIGITAL S S S<br />
DOLBY DIGITAL EX S S S<br />
Dolby Digital<br />
DOLBY DIGITAL + PLgx Cinema<br />
S<br />
DOLBY DIGITAL + PLgx Music<br />
S<br />
DOLBY DIGITAL + PLgz S S S<br />
DOLBY TrueHD S S S<br />
Dolby TrueHD<br />
DOLBY TrueHD + EX S S S<br />
DOLBY TrueHD + PLgx Cinema<br />
DOLBY TrueHD + PLgx Music<br />
DOLBY TrueHD + PLgz S S S<br />
DOLBY DIGITAL Plus S S S<br />
DOLBY DIGITAL Plus + EX S S S<br />
Dolby Digital Plus<br />
DOLBY DIGITAL Plus + PLgx Cinema<br />
S<br />
DOLBY DIGITAL Plus + PLgx Music<br />
S<br />
DOLBY DIGITAL Plus + PLgz S S S<br />
DTS SURROUND S S S<br />
DTS ES DSCRT 6.1 S S S<br />
DTS ES MTRX 6.1 S S S<br />
DTS<br />
DTS 96/24 S S S<br />
DTS + PLgx Cinema<br />
S<br />
DTS + PLgx Music<br />
S<br />
DTS + PLgz S S S<br />
DTS + NEO:6 S S S<br />
z3 Some sound modes cannot be selected, depending on the audio format or number of channels of the input signal. For details, see “Types of input signals, and<br />
corresponding sound modes” (vpage 196).<br />
S<br />
S<br />
Front panel Display Rear panel 102 Remote<br />
Index
Contents<br />
Connections<br />
Playback<br />
Settings<br />
Tips<br />
Appendix<br />
Input signal Sound mode NOTE<br />
Sound mode<br />
MOVIE MUSIC GAME<br />
DTS-HD HI RES S S S<br />
DTS-HD MSTR S S S<br />
DTS Express S S S<br />
DTS-HD /<br />
DTS Express<br />
DTS-HD + PLgx Cinema<br />
S<br />
DTS-HD + PLgx Music<br />
S<br />
DTS-HD + PLgz S S S<br />
DTS-HD + NEO:6 S S S<br />
MULTI CH IN S S S<br />
MULTI CH IN 7.1 S S S<br />
PCM multi-channel<br />
MULTI IN + PLgx Cinema<br />
S<br />
MULTI IN + PLgx Music<br />
S<br />
MULTI IN + PLgz S S S<br />
MULTI IN + NEO:6 S S S<br />
Multi-channel z3 JAZZ CLUB<br />
S<br />
MULTI CH STEREO S S S<br />
MONO MOVIE<br />
S<br />
ROCK ARENA<br />
S<br />
MATRIX<br />
S<br />
VIDEO GAME<br />
S<br />
VIRTUAL S S S<br />
z3 Some sound modes cannot be selected, depending on the audio format or number of channels of the input signal. For details, see “Types of input signals, and<br />
corresponding sound modes” (vpage 196).<br />
Front panel Display Rear panel 103 Remote<br />
Index
Contents<br />
Connections<br />
Playback<br />
Settings<br />
Tips<br />
Appendix<br />
22Views on the display<br />
q<br />
+ PL z DVD<br />
w<br />
q Shows a decoder to be used.<br />
• A DOLBY DIGITAL Plus decoder is displayed as “ ”.<br />
w Shows a decoder that creates sound output from the surround back<br />
speakers.<br />
• “+ PLgz” indicates the front height sound from front height speakers.<br />
Front panel Display Rear panel 104 Remote<br />
Index
Contents<br />
Connections<br />
HDMI control function<br />
Playback<br />
Settings<br />
Tips<br />
Appendix<br />
A recent addition to the HDMI standard is CEC (Consumer Electronics Control), which allows control signals from one device to communicate with<br />
another device via the HDMI cable connection. Not all HDMI-equipped devices have this capability.<br />
Setting procedure<br />
1<br />
2<br />
3<br />
4<br />
Set the HDMI output connector corresponding with the<br />
HDMI control function.<br />
Set “HDMI Control” (vpage 133) to “On”.<br />
Turn the power on for all the devices connected by<br />
HDMI cable.<br />
Set the HDMI control function for all devices connected<br />
by HDMI cable.<br />
• Please consult the operating instructions for the connected<br />
devices to check the settings.<br />
• Carry out steps 2 and 3 should any of the devices be unplugged.<br />
Switch the television input to the HDMI input connected<br />
to this unit.<br />
5<br />
6<br />
Switch this unit input to the HDMI input source and<br />
check if the picture from the player is ok.<br />
When you turn the TV’s power to standby, check that<br />
the power of this unit also goes to standby.<br />
NOTE<br />
• Some functions may not operate depending on the connected TV or player. Check<br />
the owner’s manual of each device for details beforehand.<br />
Front panel Display Rear panel 105 Remote<br />
Index
Contents<br />
Connections<br />
Playback<br />
Settings<br />
Tips<br />
Appendix<br />
Sleep timer function<br />
MAIN<br />
ZONE2<br />
SLEEP<br />
You can have the power automatically switched to standby once a set<br />
time has elapsed. This is convenient for viewing and listening while going<br />
to sleep.<br />
The sleep timer function can be set for each zone.<br />
Using the sleep timer<br />
1<br />
2<br />
Press MAIN or ZONE2 to switch the zone mode.<br />
The button for the selected zone is lit.<br />
Press SLEEP and display the time you want to set.<br />
• The SLEEP indicator on the display lights.<br />
• You can set the sleep timer in the range from 10 to 120 minutes<br />
in steps of 10 minutes.<br />
22To cancel the sleep timer<br />
Press SLEEP to set “Off”.<br />
The SLEEP indicator on the display turns off.<br />
%<br />
• The sleep timer is also cancelled when this unit is set to the standby mode or the<br />
MAIN ZONE or ZONE2 power is turned off.<br />
NOTE<br />
• The sleep timer function cannot turn off the power of devices connected to this<br />
unit. To turn off the power of those connected devices, set up sleep timers on the<br />
connected devices themselves.<br />
Front panel Display Rear panel 106 Remote<br />
Index
Contents<br />
Connections<br />
Quick select function<br />
Playback<br />
Settings<br />
Tips<br />
Appendix<br />
You can save settings such as the input source selection, volume level, and sound mode at the QUICK SELECT 1 – 4 buttons.<br />
You can simply press one of the set QUICK SELECT buttons for subsequent playback to switch to various saved settings all at once.<br />
By saving frequently used settings at the QUICK SELECT 1 – 4 buttons, you will always be able to easily call up the same playback environment.<br />
Calling up the Quick Select<br />
1<br />
Press QUICK SELECT.<br />
The Quick Select settings for the button you pressed are called up.<br />
• The default settings of each Quick Select function are as shown below.<br />
Button Input source Volume Sound mode<br />
QUICK SELECT 1 CBL/SAT 40 STEREO<br />
QUICK SELECT 2 Blu-ray 40 STEREO<br />
QUICK SELECT 3 GAME 40 STEREO<br />
QUICK SELECT 4 NETWORK 40 STEREO<br />
Changing the settings<br />
1<br />
2<br />
Set the items below to the settings you want to save.<br />
q Input source z (vpage 42)<br />
w Volume (vpage 43)<br />
e Sound mode (vpage 94)<br />
r Audyssey (Audyssey MultEQ® XT, Audyssey Dynamic EQ®,<br />
Audyssey Dynamic Volume®) (vpage 128)<br />
Press and hold the desired QUICK SELECT until “Quickz<br />
Memory” appears on the display.<br />
The current settings will be memorized.<br />
zzThe number for the QUICK SELECT button you pressed is displayed.<br />
2 2 Changing the Quick Select Name<br />
On this unit, you can change the Quick Select Name displayed on the<br />
menu to the name that you prefer.<br />
For the name change method, see “Quick Select Names”<br />
(vpage 161).<br />
Front panel Display Rear panel 107 Remote<br />
Index
Contents<br />
Connections<br />
Web control function<br />
Playback<br />
You can control this unit from a web control screen on a web browser.<br />
PC<br />
Router<br />
This unit<br />
%<br />
• This unit and the PC need to be connected to the network properly (vpage 39<br />
“Connecting to a home network (LAN)”) in order to use the web control function.<br />
• Depending on the settings of your security-related software, you may not be able<br />
to access this unit from your PC. If this is the case, then change the settings of the<br />
security-related software.<br />
Settings<br />
Tips<br />
Appendix<br />
Controlling the unit from a web control<br />
1<br />
2<br />
Switch the “IP Control” (vpage 156) setting to<br />
“Always On”.<br />
Check the IP address of this unit with “Information”<br />
(vpage 156).<br />
Network/Information<br />
Friendly name<br />
DHCP<br />
IP Address<br />
MAC Address<br />
<strong>Denon</strong> <strong>AVR</strong>-<strong>X2000</strong><br />
On<br />
192.168.100.19<br />
0005cd000000<br />
Checking the IP address.<br />
Displays the current network settings of the <strong>AVR</strong><br />
3<br />
Start up the web browser.<br />
Front panel Display Rear panel 108 Remote<br />
Index
Contents<br />
Connections<br />
Playback<br />
Settings<br />
Tips<br />
Appendix<br />
4<br />
5<br />
Enter the IP address of this unit in browser’s address<br />
box.<br />
For example, if the IP address of this unit is “192.168.100.19”,<br />
enter “http://192.168.100.19/”.<br />
http://192.168.100.19<br />
File Edit View Favorites Tools Help<br />
INDEX<br />
When the http://192.168.100.19<br />
top menu is displayed, click on the menu item<br />
File Edit View Favorites Tools Help<br />
you want to operate.<br />
<strong>Denon</strong> <strong>AVR</strong>-<strong>X2000</strong><br />
Web INDEX Controller<br />
%<br />
• You can use the Web control function with Internet Explorer 8 or later to memorize<br />
and call up various settings on this unit.<br />
To memorize settings, click “SAVE” on the Setup Menu screen.<br />
To call up settings, click “LOAD” on the Setup Menu screen.<br />
Web Controller<br />
MAIN ZONE<br />
<strong>Denon</strong> <strong>AVR</strong>-<strong>X2000</strong><br />
CBL/SAT 0.0<br />
MAIN ZONE<br />
CBL/SAT<br />
0.0 ZONE2<br />
Blu-ray<br />
Blu-ray<br />
ZONE2<br />
Setup Menu<br />
Setup Menu<br />
Front panel Display Rear panel 109 Remote<br />
Index
Contents<br />
Connections<br />
Playback<br />
Playback in ZONE2 (Separate room)<br />
Settings<br />
Tips<br />
Appendix<br />
You can operate this unit to enjoy video and audio in a room (ZONE2) that is different from the room where this unit is placed (MAIN ZONE).<br />
You can simultaneously play back the same source in both the MAIN ZONE and ZONE2. You can also play back separate sources in the MAIN ZONE and<br />
ZONE2.<br />
Connecting ZONE2<br />
You can use the following two methods to play back audio in ZONE2.<br />
• Connection through the speaker output terminals (vpage 110)<br />
• Connection using an external amplifier (vpage 111)<br />
22Connection 1 : Connection through the speaker<br />
output terminals<br />
• Set the “Assign Mode” (vpage 150) setting to “ZONE2”, and<br />
outputs ZONE2 audio from SURROUND BACK speaker terminals<br />
(The default setting is “Surround Back”).<br />
• If you set the “Assign Mode” (vpage 150) setting to “ZONE2”,<br />
the main zone home theater system can play back up to 5.1-channels.<br />
Even if you play back audio recorded in 6.1 or 7.1-channels, this unit<br />
automatically downmixes the audio to 5.1-channels.<br />
MAIN ZONE<br />
ZONE2<br />
This unit<br />
(L)<br />
(R)<br />
w q w q<br />
Front panel Display Rear panel 110 Remote<br />
Index
Contents<br />
Connections<br />
Playback<br />
Settings<br />
Tips<br />
Appendix<br />
22Connection 2 : Connection using an external<br />
amplifier<br />
The audio signals of this unit’s ZONE2 audio output connectors are<br />
output to the ZONE2 amplifiers and played on these amplifiers.<br />
MAIN ZONE<br />
This unit<br />
L<br />
R<br />
ZONE2<br />
Power<br />
amplifiers<br />
AUX IN<br />
%<br />
• We recommend using high quality pin-plug (RCA type) cables for audio connections<br />
in order to prevent noise.<br />
• If you select a same input source for MAIN ZONE and ZONE2, audio playback may<br />
be restricted.<br />
Front panel Display Rear panel 111 Remote<br />
Index
Contents<br />
Connections<br />
Playback<br />
Settings<br />
Tips<br />
Appendix<br />
Playback in ZONE2<br />
ZONE2<br />
Input source<br />
select buttons<br />
MUTE :<br />
POWER X<br />
VOLUME df<br />
1<br />
2<br />
3<br />
Press ZONE2 to switch the zone mode to the ZONE2.<br />
Press POWER X to turn on the ZONE2 power.<br />
The ( indicator on the display lights.<br />
%<br />
• Also press input source select button when in standby mode, the<br />
power turns on.<br />
• When POWER X is pressed, ZONE2 turns off.<br />
• Power in ZONE2 can be turned on or off by pressing ZONE2 ON/<br />
OFF on the main unit.<br />
Press the input source select button to select the input<br />
source to be played.<br />
The audio signal of the selected source is output to ZONE2.<br />
%<br />
• In ZONE2, you can select iPod/USB, TUNER, NETWORK or an<br />
input source with an analog audio input connector.<br />
• To perform an operation with the main unit, press ZONE2<br />
SOURCE.<br />
Each time you press ZONE2 SOURCE, the input source changes.<br />
22Adjusting the volume<br />
Use VOLUME df to adjust the volume.<br />
• At time of purchase, “Volume Limit” (vpage 161) is set to “70<br />
(–10dB)”.<br />
%<br />
• Turn MASTER VOLUME after pressing ZONE2 SOURCE on the main unit to<br />
adjust the sound volume.<br />
Front panel Display Rear panel 112 Remote<br />
Index
Contents<br />
Connections<br />
Playback<br />
Settings<br />
Tips<br />
Appendix<br />
2 2 Turning off the sound temporarily<br />
Press MUTE :.<br />
The sound is reduced to the level set at “Mute Level” (vpage 161)<br />
in the menu.<br />
• To cancel, either adjust the volume or press MUTE : again.<br />
• You can also adjust the volume level to cancel the muting.<br />
Front panel Display Rear panel 113 Remote<br />
Index
Contents<br />
Settings<br />
Menu map<br />
Connections<br />
Playback<br />
Settings<br />
For menu operation, connect a TV to this unit and display the menu on the TV screen. For menu operations, see the following page.<br />
By default, this unit has recommended settings defined. You can customize this unit based on your existing system and your preferences.<br />
22<strong>Audio</strong><br />
Tips<br />
Appendix<br />
Setting items Description Page<br />
Dialog Level Sets the output level to clarify the dialogue output from the center channel. 122<br />
Subwoofer Level This setting adjusts the volume level for the subwoofer. 122<br />
Subwoofer Turn subwoofer output on and off. 122<br />
Subwoofer Level This setting adjusts the volume level for the subwoofer. 122<br />
Surround Parameter Adjusts surround sound parameters. 123<br />
Cinema EQ Gently softens the upper treble range of movie soundtracks to reduce possible harshness and improve clarity. 123<br />
Loudness Management<br />
This sets whether to output as specified in “Dynamic Compression” or output directly without compressing the 123<br />
dynamic range of audio recorded in the disc.<br />
Dynamic Compression Compress dynamic range (difference between loud and soft sounds). 123<br />
Low Frequency Effects<br />
Adjust the low frequency effects level (LFE).<br />
Center Image<br />
Distributes the dialogue output from the center channel to the front left and right channels and widens the sound 124<br />
image in the front.<br />
Panorama Assign front L/R signals to also go to the surround channels for wider sound. 124<br />
Dimension Shift sound image center to front or rear to adjust playback balance. 124<br />
Center Width<br />
Distributes the dialogue output from the center channel to left and right channels and widens the sound image 125<br />
in the front.<br />
Delay Time Adjust the audio delay time against video to extend the sound field image. 125<br />
Effect Level Adjust the sound effect level of the current sound mode. 125<br />
Room Size Determine size of acoustic environment. 125<br />
Height Gain Control the front height channel volume. 125<br />
Front panel Display Rear panel 114 Remote<br />
Index
Contents<br />
Connections<br />
Playback<br />
Settings<br />
Tips<br />
Appendix<br />
Setting items Description Page<br />
Tone Adjusts the tonal quality of the sound. 126<br />
Tone Control Set the tone control function to “On” and “Off”. 126<br />
Bass Adjust bass. 126<br />
Treble Adjust treble. 126<br />
Restorer<br />
Expands the low and high frequency components of compressed audio content such as MP3 files to enable<br />
126<br />
richer audio playback.<br />
<strong>Audio</strong> Delay Compensates for incorrect timing between video and audio. 127<br />
Volume Set the MAIN ZONE (room where the unit is located) volume setting. 127<br />
Scale Set how volume is displayed. 127<br />
Limit Make a setting for maximum volume. 127<br />
Power On Level Define the volume setting that is active when the power is turned on. 127<br />
Mute Level Set the amount of attenuation when muting is on. 127<br />
Audyssey Makes Audyssey MultEQ® XT, Audyssey Dynamic EQ® and Audyssey Dynamic Volume® settings. 128<br />
MultEQ ® XT<br />
MultEQ® XT compensates for both time and frequency characteristics of the listening area based on Audyssey® 128<br />
Setup measurement results.<br />
Dynamic EQ<br />
Solves the problem of deteriorating sound quality as volume is decreased by taking into account human<br />
128<br />
perception and room acoustics. Works with MultEQ® XT.<br />
Reference Level Offset Audyssey Dynamic EQ® is referenced to the standard film mix level. 129<br />
Dynamic Volume<br />
Solves the problem of large variations in volume level between TV, movies and other content (between quiet<br />
129<br />
passages and loud passages, etc.) by automatically adjusting to the user’s preferred volume setting.<br />
Graphic EQ Uses the graphic equalizer to adjust the tone of each speaker. 130<br />
Speaker Selection Select whether to adjust tones for individual speakers or for all speakers. 130<br />
Adjust EQ Adjust tonal balance for each frequency band. Adjust the speaker selected in “Speaker Selection”. 130<br />
Curve Copy Copy “Audyssey Flat”curve from MultEQ® XT. 130<br />
Front panel Display Rear panel 115 Remote<br />
Index
Contents<br />
Connections<br />
Playback<br />
Settings<br />
Tips<br />
Appendix<br />
22Video<br />
Setting items Description Page<br />
Picture Adjust Adjusts the video quality. 131<br />
Picture Mode Select the desired picture mode according to the video content and your viewing environment. 131<br />
Contrast Adjust picture contrast. 131<br />
Brightness Adjust picture brightness. 131<br />
Saturation Adjust picture chroma level (color saturation). 131<br />
Hue Adjust green and red balance. Also called Tint. 131<br />
Noise Reduction Reduce overall video noise. 132<br />
Enhancer Emphasize picture sharpness. 132<br />
HDMI Setup Makes settings for HDMI video/audio output. 132<br />
Auto Lip Sync Make automatic compensation for timing shift in audio and video output. 132<br />
HDMI <strong>Audio</strong> Out Select HDMI audio output device. 133<br />
HDMI Pass Through Selects how the AV receiver will pass HDMI signals to the HDMI output in standby power mode. 133<br />
HDMI Control You can link operations with devices connected to HDMI and compatible with HDMI Control. 133<br />
Pass Through Source The AV receiver will “pass through” the sources HDMI signal when in standby. 133<br />
Power Off Control Links the power standby of this unit to external devices. 133<br />
Output Settings Makes screen-related settings. 134<br />
Video Mode Make settings for video processing. 134<br />
Video Conversion The input video signal is converted automatically in conjunction with the connected TV. 134<br />
i/p Scaler Convert the input source resolution to the resolution set. 134<br />
Resolution Set the output resolution. 135<br />
Progressive Mode Set an appropriate progressive conversion mode for the source video signal. 135<br />
Aspect Ratio Set the aspect ratio for the video signals output to the HDMI. 135<br />
On Screen Display Select the on-screen display user interface preferences. 136<br />
Volume Sets where to display the master volume level. 136<br />
Info Displays status of operation temporarily when the sound mode is changed, or input source is switched. 136<br />
Now Playing Sets how long each menu is displayed when the input source is “NETWORK”, “iPod/USB”, or “TUNER”. 136<br />
TV Format Set the video output signal format for the TV you are using. 136<br />
Front panel Display Rear panel 116 Remote<br />
Index
Contents<br />
Connections<br />
Playback<br />
Settings<br />
Tips<br />
Appendix<br />
22Inputs<br />
Setting items Description Page<br />
Input Assign Changes input connector assignment. 137<br />
Source Rename Changes the display name for this source. 139<br />
Hide Sources Remove from the display input sources that are not used. 139<br />
Source Level Adjusts the playback level of the audio input. 139<br />
Input Select Sets the audio input mode and decode mode. 140<br />
Input Mode Set the audio input modes for the different input sources. 140<br />
Decode Mode Set the audio decode mode for input source. 140<br />
22Speakers<br />
Setting items Description Page<br />
Audyssey ® Setup<br />
The acoustic characteristics of the connected speakers and listening room are measured and the optimum<br />
141<br />
settings are made automatically.<br />
<strong>Manual</strong> Setup Perform when setting the speakers manually or when changing settings made in Audyssey® Setup. 150<br />
Amp Assign Select power amplifier usage method to match your speaker system. 150<br />
Speaker Config. Indicate speaker presence and select speaker size categories based on bass reproduction capability. 151<br />
Distances Set distance from listening position to speakers. 153<br />
Levels Set the volume of the test tone to be the same when it is output from each speaker. 153<br />
Crossovers Set the maximum frequency of the bass signal output from each channel to the subwoofer. 154<br />
Bass Set subwoofer and LFE signal range playback. 155<br />
Front Speaker Setup Set the front speakers to use for every sound mode. 155<br />
Front panel Display Rear panel 117 Remote<br />
Index
Contents<br />
Connections<br />
Playback<br />
Settings<br />
Tips<br />
Appendix<br />
22Network<br />
Setting items Description Page<br />
Information Display network information. 156<br />
IP Control Enables network communication in standby power mode. 156<br />
Friendly Name<br />
The Friendly Name is the name of this unit displayed on the network. You can change the Friendly Name<br />
156<br />
according to your preferences.<br />
Settings Make settings for wired LAN. 157<br />
Diagnostics Used to check the network connection. 158<br />
Maintenance Mode Use when receiving maintenance from a <strong>Denon</strong> service engineer or custom installer. 159<br />
22General<br />
Setting items Description Page<br />
Language Sets the language for display the menu on the TV screen. 160<br />
ZONE2 Setup Makes settings for audio playback in a ZONE2 system. 160<br />
Lch Level Adjust the left channel output level. 160<br />
Rch Level Adjust the right channel output level. 160<br />
Volume Level Set the volume output level. 160<br />
Volume Limit Make a setting for maximum volume. 161<br />
Power On Volume Define the volume setting that is active when the power is turned on. 161<br />
Mute Level Set the amount of attenuation when muting is on. 161<br />
Zone Rename Change the display title of each zone to one you prefer. 161<br />
Quick Select Names Change the “Quick Select” display title to one you prefer. 161<br />
Auto Standby<br />
When you do not perform any operation on this unit with no audio or video input for a specified time, this unit<br />
162<br />
automatically enters the standby mode. Before it enters the standby mode, “Auto Standby” is displayed on the<br />
display of this unit and the menu screen.<br />
Front Display Makes settings related to the display on this unit. 162<br />
Front panel Display Rear panel 118 Remote<br />
Index
Contents<br />
Connections<br />
Playback<br />
Settings<br />
Tips<br />
Appendix<br />
Setting items Description Page<br />
Information Show information about receiver settings, input signals, etc. 162<br />
<strong>Audio</strong> Shows information about audio input signals. 162<br />
Video Shows information about video input signal and HDMI Monitor. 163<br />
ZONE Shows information about each zone. 163<br />
Firmware Displays system information. 163<br />
Notifications Selects notification message preferences. 163<br />
Usage Data Selects whether or not to send anonymous usage data to <strong>Denon</strong>. 164<br />
Firmware<br />
Set whether or not to check for firmware update, update the firmware, and display update and upgrade<br />
164<br />
notifications.<br />
Update Update the firmware of the receiver. 164<br />
Notifications Displays a notification message on this unit’s menu screen when the latest firmware is released with “Update”. 165<br />
Add New Feature Display new features that can be downloaded to this unit and perform an upgrade. 165<br />
Setup Lock Protect settings from inadvertent changes. 166<br />
22Setup Assistant<br />
Setting items Description Page<br />
Begin Setup<br />
Language Select<br />
Speaker Setup<br />
Speaker Calibration<br />
Network Setup<br />
Input Setup<br />
Perform basic installation/connections/settings from the beginning according to the guidance indicated on the TV<br />
screen.<br />
Perform settings item by item according to the guidance indicated on the TV screen.<br />
C 7<br />
Front panel Display Rear panel 119 Remote<br />
Index
Contents<br />
Connections<br />
Playback<br />
Settings<br />
Tips<br />
Appendix<br />
MAIN<br />
uio p<br />
ENTER<br />
BACK<br />
SETUP<br />
Menu operation<br />
1<br />
2<br />
3<br />
4<br />
5<br />
Press MAIN to switch the zone mode.<br />
MAIN lights.<br />
Press SETUP.<br />
The menu is displayed on the TV screen.<br />
Use uio p to select the menu to be set or operated,<br />
then press ENTER.<br />
Use o p to change to desired setting.<br />
Press ENTER to enter the setting.<br />
• To return to the previous item, press BACK.<br />
• Exiting the Menu, press SETUP while the menu is displayed.<br />
The menu display disappears.<br />
Front panel Display Rear panel 120 Remote<br />
Index
Contents<br />
Connections<br />
Inputting characters<br />
Playback<br />
Settings<br />
On this unit, you can change the name displayed on the following screens to the names that you prefer.<br />
• Text Search (vpage 89) • Preset Name (vpage 58) • Source Rename (vpage 139)<br />
• Friendly Name (vpage 156) • Zone Rename (vpage 161) • Quick Select Names (vpage 161)<br />
• Character input for the network functions (vpage 61, 68, 73, 77, 157)<br />
Keyboard screen<br />
1<br />
Display the screen for inputting characters.<br />
GExampleH Source Rename screen<br />
Inputs/Source Rename<br />
CBL/SAT CBL/SAT<br />
Clear Insert Delete<br />
A<br />
N<br />
0<br />
B<br />
O<br />
1<br />
C<br />
P<br />
2<br />
D<br />
Q<br />
3<br />
E<br />
R<br />
4<br />
F<br />
S<br />
5<br />
G<br />
T<br />
6<br />
H<br />
U<br />
7<br />
I<br />
V<br />
8<br />
J<br />
W<br />
9<br />
K<br />
X<br />
!<br />
L<br />
Y<br />
“<br />
M<br />
Z<br />
#<br />
$ % & ‘ ( ) * + , ; < = ><br />
a/A Space Cancel O K<br />
3<br />
4<br />
5<br />
Tips<br />
Appendix<br />
Select a character to be input with uio p then press<br />
ENTER.<br />
Repeat steps 2 and 3 to change the name.<br />
Use uio p to select “OK”, then press ENTER.<br />
Change the display name for this source<br />
2<br />
Select a character to be changed.<br />
q Use uio p to select “,” or “.”.<br />
w Press ENTER to place the cursor at the character to<br />
be changed.<br />
Each time ENTER is pressed, the cursor moves by one character.<br />
Front panel Display Rear panel 121 Remote<br />
Index
<strong>Audio</strong><br />
Contents<br />
Make audio-related settings.<br />
Dialog Level<br />
Connections<br />
Playback<br />
Sets the output level to clarify the dialogue output from the center channel.<br />
22Level<br />
–12.0dB – +12.0dB (Default : 0.0dB)<br />
Settings<br />
Subwoofer Level<br />
Tips<br />
This setting adjusts the volume level for the subwoofer.<br />
22Subwoofer<br />
Turn subwoofer output on and off.<br />
On (Default) : The subwoofer is used.<br />
Off : The subwoofer is not used.<br />
Appendix<br />
%<br />
• This can be set when the sound mode is “DIRECT” and “PURE DIRECT” and<br />
the “Subwoofer Mode” (vpage 155) is “LFE+Main”.<br />
2 2 Subwoofer Level<br />
This setting adjusts the volume level for the subwoofer.<br />
–12.0dB – +12.0dB (Default : 0.0dB)<br />
Front panel Display Rear panel 122 Remote<br />
Index
Contents<br />
Surround Parameter<br />
Connections<br />
Playback<br />
You can adjust the surround audio sound field effects to match your<br />
preferences.<br />
The items (parameters) that can be adjusted depend on the signal<br />
being input and the currently set sound mode. For details on the<br />
adjustable parameters, see “Sound modes and surround parameters”<br />
(vpage 193).<br />
%<br />
• Some setting items cannot be set while playback is stopped. Make the settings<br />
during playback.<br />
22Cinema EQ<br />
Gently softens the upper treble range of movie soundtracks to reduce<br />
possible harshness and improve clarity.<br />
On : “Cinema EQ” is used.<br />
Off (Default) : “Cinema EQ” is not used.<br />
Settings<br />
Tips<br />
Appendix<br />
22Loudness Management<br />
This sets whether to output as specified in “Dynamic Compression”<br />
or output directly without compressing the dynamic range of audio<br />
recorded in the disc.<br />
On (Default) : Outputs using the settings made in “Dynamic<br />
Compression” and “Dialogue normalization function”<br />
(vpage 162) are enabled.<br />
Off : “Dynamic Compression” settings and “Dialogue Normalization”<br />
are disabled, and the signals on the disk are output as is.<br />
%<br />
• This can be set in the Dolby TrueHD mode.<br />
22Dynamic Compression<br />
Compress dynamic range (difference between loud and soft sounds).<br />
Auto (Default) : Automatic dynamic range compression on/off control<br />
according to source.<br />
Low / Medium / High : These set the compression level.<br />
Off : Dynamic range compression is always off.<br />
%<br />
• You can set “Auto” only for the Dolby TrueHD source.<br />
Front panel Display Rear panel 123 Remote<br />
Index
Contents<br />
Connections<br />
22Low Frequency Effects<br />
Adjust the low-frequency effects level (LFE).<br />
–10dB – 0dB (Default)<br />
Playback<br />
%<br />
• For proper playback of the different sources, we recommend setting to the<br />
values below.<br />
• Dolby Digital sources : 0dB<br />
• DTS movie sources : 0dB<br />
• DTS music sources : –10dB<br />
22Center Image<br />
Distributes the dialogue output from the center channel to the front left<br />
and right channels and widens the sound image in the front.<br />
0.0 – 1.0 (Default : 0.3)<br />
%<br />
• You can set this when the sound mode is set to DTS NEO:6 Music.<br />
• The smaller the value, the more dialogue is concentrated on the center<br />
channel. The larger the value, the more dialogue is distributed to front left and<br />
right channels, and the more the sound image widens in the front.<br />
Settings<br />
Tips<br />
Appendix<br />
22Panorama<br />
Assign front L/R signals to also go to the surround channels for wider<br />
sound.<br />
On : Set.<br />
Off (Default) : Do not set.<br />
%<br />
• You can set this when the sound mode is Dolby PLg/gx in the “Music” mode.<br />
22Dimension<br />
Shift sound image center to front or rear to adjust playback balance.<br />
0 – 6 (Default : 3)<br />
%<br />
• You can set this when the sound mode is Dolby PLg/gx in the “Music” mode.<br />
• As you set a smaller number, the surround sound field shifts backward; as you<br />
set a larger number, the surround sound field shifts forward.<br />
Front panel Display Rear panel 124 Remote<br />
Index
Contents<br />
Connections<br />
Playback<br />
22Center Width<br />
Distributes the dialogue output from the center channel to left and right<br />
channels and widens the sound image in the front.<br />
0 – 7 (Default : 3)<br />
%<br />
• You can set this when the sound mode is Dolby PLg/gx in the “Music” mode.<br />
• The smaller the value, the more dialogue is concentrated on the center<br />
channel. The larger the value, the more dialogue is distributed to front left and<br />
right channels, and the more the sound image widens in the front.<br />
22Delay Time<br />
Adjust the audio delay time against video to extend the sound field<br />
image.<br />
0ms – 300ms (Default : 30ms)<br />
%<br />
• You can set this when the sound mode is “MATRIX”.<br />
22Effect Level<br />
Adjust the sound effect level of the current sound mode.<br />
1 – 15 (Default : 10)<br />
%<br />
• Set to a lower level if the positioning and sense of phase of the surround<br />
signals seems unnatural.<br />
Settings<br />
Tips<br />
Appendix<br />
22Room Size<br />
Determine size of acoustic environment. You can set this when the<br />
sound mode is one of the original sound modes.<br />
Small : Simulate acoustics of a small room.<br />
Medium small : Simulate acoustics of a medium-small room.<br />
Medium (Default) : Simulate acoustics of a medium room.<br />
Medium large : Simulate acoustics of a medium-large room.<br />
Large : Simulate acoustics of a large room.<br />
%<br />
• “Room Size” does not indicate the size of the room in which sources are<br />
played.<br />
22Height Gain<br />
Control the front height channel volume.<br />
Low : Reduce the front height channel volume.<br />
Normal (Default) : Front height channel sound is output with standard<br />
sound volume.<br />
High : Increase the front height channel volume.<br />
%<br />
• You can set this in the “PLgz” sound mode or when using the PLgz decoder.<br />
2 2 Set Defaults<br />
The “Surround Parameter” settings are returned to the default settings.<br />
Front panel Display Rear panel 125 Remote<br />
Index
Contents<br />
Connections<br />
Playback<br />
Settings<br />
Tips<br />
Appendix<br />
Tone<br />
Adjust the tonal quality of the sound.<br />
22Tone Control<br />
Set the tone control function to “On” and “Off”.<br />
On : Allow tone adjustment (bass, treble).<br />
Off : Playback without tone adjustment.<br />
22Bass<br />
Adjust bass.<br />
–6dB – +6dB<br />
22Treble<br />
Adjust treble.<br />
–6dB – +6dB<br />
%<br />
• This cannot be set when the sound mode is set to “DIRECT” or “PURE<br />
DIRECT”.<br />
Restorer<br />
Compressed audio formats such as MP3, WMA (Windows Media <strong>Audio</strong>)<br />
and MPEG-4 AAC reduce the amount of data by eliminating signal<br />
components that are hard for the human ear to hear. The “Restorer”<br />
function generates the signals eliminated upon compression, restoring the<br />
sound to conditions near those of the original sound before compression.<br />
It also restores the original bass characteristics for a rich and expanded<br />
tonal range.<br />
22Mode<br />
High : Optimized mode for compressed sources with very weak highs<br />
(64 kbps and under).<br />
Medium : Apply suitable bass and treble boost for all compressed<br />
sources (96 kbps and under).<br />
Low : Optimized mode for compressed sources with normal highs (96<br />
kbps and over).<br />
Off : Do not use “Restorer”.<br />
%<br />
• This item can be set with analog signals or PCM signal (Sample Rate =<br />
44.1/48 kHz) is input.<br />
• “Restorer” settings are stored for each input source.<br />
• This item default setting for “NETWORK” and “iPod/USB” is “Low”. All<br />
others are set to “Off”.<br />
• This cannot be set when the sound mode is set to “DIRECT” or “PURE<br />
DIRECT”.<br />
Front panel Display Rear panel 126 Remote<br />
Index
Contents<br />
Connections<br />
Playback<br />
Settings<br />
Tips<br />
Appendix<br />
<strong>Audio</strong> Delay<br />
While viewing video, manually adjust the time to delay audio output so<br />
that the video and audio are synchronized.<br />
0ms (Default) – 200ms<br />
%<br />
• This item can be set within the range of 0 to 100 ms when “Auto Lip Sync”<br />
(vpage 132) is set to “On” and when a TV compatible with Auto Lip Sync is<br />
connected.<br />
• Store “<strong>Audio</strong> Delay” for each input source.<br />
• <strong>Audio</strong> Delay for game mode can be set when “Video Mode” (vpage 134) is set<br />
to “Auto” or “Game”.<br />
Volume<br />
Set the MAIN ZONE (room where the unit is located) volume setting.<br />
22Scale<br />
Set how volume is displayed.<br />
0 – 98 (Default) : Display in the range 0 (Min) to 98.<br />
–79.5dB – 18.0dB : Display ---dB (Min), in the range –79.5 dB to 18.0<br />
dB.<br />
22Limit<br />
Make a setting for maximum volume.<br />
60 (–20dB) / 70 (–10dB) / 80 (0dB)<br />
Off (Default)<br />
22Power On Level<br />
Define the volume setting that is active when the power is turned on.<br />
Last (Default) : Use the memorized setting from the last session.<br />
Mute : Always use the muting on condition when power is turned on.<br />
1 – 98 (–79dB – 18dB) : The volume is adjusted to the set level.<br />
2 2 Mute Level<br />
Set the amount of attenuation when muting is on.<br />
Full (Default) : The sound is muted entirely.<br />
–40dB : The sound is attenuated by 40 dB down.<br />
–20dB : The sound is attenuated by 20 dB down.<br />
%<br />
• The “Scale” setting applies to all zones.<br />
Front panel Display Rear panel 127 Remote<br />
Index
Contents<br />
Connections<br />
Playback<br />
Settings<br />
Tips<br />
Appendix<br />
Audyssey<br />
Set Audyssey MultEQ® XT, Audyssey Dynamic EQ® and Audyssey<br />
Dynamic Volume®. These can be selected after Audyssey® Setup has been<br />
performed. For additional information on Audyssey technology, please see<br />
page 199.<br />
%<br />
• “MultEQ® XT”, “Dynamic EQ” and “Dynamic Volume” settings are stored for each<br />
input source.<br />
• “MultEQ® XT”, “Dynamic EQ” and “Dynamic Volume” cannot be set when the<br />
sound mode is set to “DIRECT” or “PURE DIRECT”.<br />
22MultEQ® XT<br />
MultEQ® XT compensates for both time and frequency characteristics<br />
of the listening area based on Audyssey® Setup measurement results.<br />
Selection is done from three types of compensation curves. We<br />
recommend the “Audyssey” setting.<br />
Audyssey (Default) : Optimize the frequency response of all speakers.<br />
Audyssey Byp. L/R : Optimize frequency response of speakers except<br />
front L and R speakers.<br />
Audyssey Flat : Optimize frequency response of all speakers to flat<br />
response.<br />
Graphic EQ : Apply frequency response set with “Graphic EQ”<br />
(vpage 130).<br />
Off : Turn “MultEQ® XT” equalizer off.<br />
22Dynamic EQ<br />
Solves the problem of deteriorating sound quality as volume is<br />
decreased by taking into account human perception and room<br />
acoustics. Works with MultEQ® XT.<br />
On (Default) : Use Dynamic EQ.<br />
Off : Do not use Dynamic EQ.<br />
%<br />
• When the menu “Dynamic EQ” setting is “On”, it is not possible to do “Tone<br />
Control” (vpage 126) adjustment.<br />
%<br />
• When using headphones, “MultEQ® XT” is automatically set to “Off”.<br />
Front panel Display Rear panel 128 Remote<br />
Index
Contents<br />
Connections<br />
Playback<br />
Settings<br />
Tips<br />
Appendix<br />
22Reference Level Offset<br />
Audyssey Dynamic EQ® is referenced to the standard film mix level. It<br />
makes adjustments to maintain the reference response and surround<br />
envelopment when the volume is turned down from 0 dB. However,<br />
film reference level is not always used in music or other non-film<br />
content. Dynamic EQ Reference Level Offset provides three offsets<br />
from the film level reference (5 dB, 10 dB, and 15 dB) that can be<br />
selected when the mix level of the content is not within the standard.<br />
Recommended setting levels are shown at below.<br />
0dB (Film Ref) (Default) : This is the default setting and should be used<br />
when listening to movies.<br />
5dB : Select this setting for content that has a very wide dynamic<br />
range, such as classical music.<br />
10dB : Select this setting for jazz or other music that has a wider<br />
dynamic range. This setting should also be selected for TV<br />
content as that is usually mixed at 10 dB below film reference.<br />
15dB : Select this setting for pop/rock music or other program material<br />
that is mixed at very high listening levels and has a compressed<br />
dynamic range.<br />
22Dynamic Volume<br />
Solves the problem of large variations in volume level between TV,<br />
movies and other content (between quiet passages and loud passages,<br />
etc.) by automatically adjusting to the user’s preferred volume setting.<br />
Heavy : Most adjustment to softest and loudest sounds.<br />
Medium : Medium adjustment to loudest and softest sound.<br />
Light : Least adjustment to loudest and softest sounds.<br />
Off (Default) : Do not use “Dynamic Volume”.<br />
%<br />
• If “Dynamic Volume” is set to “Yes” in “Audyssey® Setup” (vpage 141),<br />
the setting is automatically changed to “Medium”.<br />
%<br />
• Setting is enabled when “Dynamic EQ” (vpage 128) is “On”.<br />
Front panel Display Rear panel 129 Remote<br />
Index
Contents<br />
Connections<br />
Playback<br />
Settings<br />
Tips<br />
Appendix<br />
Graphic EQ<br />
Use the 9 band graphic equalizer to adjust the tone of each speaker.<br />
%<br />
• “Graphic EQ” can be set when “MultEQ® XT” (vpage 128) setting is “Graphic<br />
EQ”.<br />
• Speakers for which “Graphic EQ” can be set differ according to the sound mode.<br />
22Speaker Selection<br />
Select whether to adjust tones for individual speakers or for all<br />
speakers.<br />
All<br />
Left/Right (Default)<br />
Each<br />
22Curve Copy<br />
Copy “Audyssey Flat” curve from “MultEQ® XT” (vpage 128).<br />
%<br />
• “Curve Copy” is displayed after Audyssey® Setup has been performed.<br />
2 2 Set Defaults<br />
The “Graphic EQ” settings are returned to the default settings.<br />
22Adjust EQ<br />
Adjust tonal balance for each frequency band. Adjust the speaker<br />
selected in “Speaker Selection”.<br />
q Select the speaker.<br />
w Select the adjustment frequency band.<br />
63Hz / 125Hz / 250Hz / 500Hz / 1kHz / 2kHz / 4kHz / 8kHz / 16kHz<br />
e Adjust the level.<br />
–20.0dB – +6.0dB (Default : 0.0dB)<br />
Front panel Display Rear panel 130 Remote<br />
Index
Video<br />
Contents<br />
Make video-related settings.<br />
Picture Adjust<br />
Picture quality can be adjusted.<br />
Connections<br />
Playback<br />
%<br />
• Can be set when the “Video Conversion” (vpage 134) setting is “On”.<br />
• Can be set when “HDMI”, “COMP” or “VIDEO” (vpage 138) is assigned for<br />
each input source.<br />
22Picture Mode<br />
Select the desired picture mode according to the video content and<br />
your viewing environment.<br />
Standard : The standard mode suited for most living room viewing<br />
environments.<br />
Movie : A mode suited for watching movies in a dark room such as a<br />
theater room.<br />
Vivid : A mode that makes graphic images for games, etc. brighter<br />
and more vivid.<br />
Streaming : A mode suited for low bit rate video sources.<br />
Custom : Adjusts the picture quality manually.<br />
Off : No picture quality adjustment is done with this unit.<br />
Settings<br />
Tips<br />
Appendix<br />
%<br />
• You can also press OPTION to make these settings from “Picture Mode”<br />
(vpage 92) in the option menu.<br />
• The default settings are as follows.<br />
• For “NETWORK” and “iPod/USB” input sources : Streaming<br />
• For input sources other than “Network” and “iPod/USB” : Off<br />
22Contrast<br />
Adjust picture contrast.<br />
–6 – +6 (Default : 0)<br />
22Brightness<br />
Adjust picture brightness.<br />
0 (Default) – +12<br />
22Saturation<br />
Adjust picture chroma level (color saturation).<br />
–6 – +6 (Default : 0)<br />
2 2 Hue<br />
Adjust green and red balance. Also called Tint.<br />
–6 – +6 (Default : 0)<br />
Front panel Display Rear panel 131 Remote<br />
Index
Contents<br />
Connections<br />
Playback<br />
Settings<br />
Tips<br />
Appendix<br />
22Noise Reduction<br />
Reduce overall video noise.<br />
Low / Medium / High / Off (Default)<br />
22Enhancer<br />
Emphasize picture sharpness.<br />
0 (Default) – +12<br />
%<br />
• “Contrast”, “Brightness”, “Saturation”, “Hue”, “Noise Reduction” and<br />
“Enhancer” can be set when “Picture Mode” is set to “Custom”.<br />
• “Picture Adjust” can not be set when 4K signals are input.<br />
HDMI Setup<br />
Make settings for HDMI video/audio output.<br />
NOTE<br />
• When “HDMI Pass Through” and “HDMI Control” is set to “On”, it consumes<br />
more standby power. If you are not using this unit for an extended period, it is<br />
recommended that you unplug the power cord from the power outlet.<br />
22Auto Lip Sync<br />
Make automatic compensation for timing shift in audio and video<br />
output.<br />
On (Default) : Compensated.<br />
Off : Not compensated.<br />
22HDMI <strong>Audio</strong> Out<br />
Select HDMI audio output device.<br />
<strong>AVR</strong> (Default) : Play back through speakers connected to the unit.<br />
TV : Play back through TV connected to the unit.<br />
%<br />
• When the HDMI control function is activated, priority is given to the TV audio<br />
setting (vpage 105 “HDMI control function”).<br />
• When the power of this unit is on and “HDMI <strong>Audio</strong> Out” is set to “TV”,<br />
audio is output as 2-channel from the HDMI OUT connector.<br />
Front panel Display Rear panel 132 Remote<br />
Index
Contents<br />
Connections<br />
Playback<br />
22HDMI Pass Through<br />
Selects how the AV receiver will pass HDMI signals to the HDMI<br />
output in standby power mode.<br />
On : Passes the selected HDMI input through the AV receiver’s HDMI<br />
output when the AV receiver is in standby power mode.<br />
Off (Default) : No HDMI signals are passed through the AV receiver’s<br />
HDMI output in standby power mode.<br />
22HDMI Control<br />
You can link operations with devices connected to HDMI and<br />
compatible with HDMI Control.<br />
On : Use HDMI control function.<br />
Off (Default) : Do not use HDMI control function.<br />
%<br />
• Please consult the operating instructions for each connected device to check<br />
the settings.<br />
• Refer to “HDMI control function” (vpage 105) for more information about<br />
the HDMI control function.<br />
NOTE<br />
• If the “HDMI Control” settings have been changed, always reset the power<br />
to connected devices after the change.<br />
Settings<br />
Tips<br />
Appendix<br />
22Pass Through Source<br />
The AV receiver will “pass through” the sources HDMI signal when<br />
in standby.<br />
Last (Default) : Choose this option to “pass through” the last used<br />
HDMI input video source.<br />
CBL/SAT / DVD / Blu-ray / GAME / AUX / MEDIA PLAYER / CD z :<br />
Choose one of these HDMI sources to be passed through when the AV<br />
receiver is in standby.<br />
z z“Pass Through Source” can be set when any of the HDMI connectors is<br />
assigned to “CD” for the input source in the “Input Assign” (vpage 137)<br />
setting.<br />
%<br />
• “Pass Through Source” can be set when “HDMI Control” is set to “On” or<br />
“HDMI Pass Through” is set to “On”.<br />
2 2 Power Off Control<br />
Links the power standby of this unit to external devices.<br />
All (Default) : If power to a connected TV is turned off independently<br />
of the input source, power to this unit is automatically<br />
set to standby.<br />
Video : With an input source being selected that is assigned either<br />
“HDMI”, “COMP” or “VIDEO” (vpage 138), when you<br />
turn the power of the TV off, power to this unit is automatically<br />
set to standby.<br />
Off : This unit does not link with power to a TV.<br />
Front panel Display Rear panel 133 Remote<br />
Index
Contents<br />
Output Settings<br />
Makes screen-related settings.<br />
Connections<br />
Playback<br />
%<br />
• Can be set when each input source is assigned “HDMI”, “COMP” or “VIDEO”<br />
(vpage 138).<br />
• “Resolution”, “Progressive Mode” and “Aspect Ratio” can be set when “i/p<br />
Scaler” is set to anything other than “Off”.<br />
• “Output Settings” can not be set when 4K signals are input.<br />
22Video Mode<br />
Make settings for video processing.<br />
Auto (Default) : Process video automatically based on the HDMI<br />
content information.<br />
Game : Always process video for game content.<br />
Movie : Always process video for movie content.<br />
%<br />
• If “Video Mode” is set to “Auto”, the mode is switched according to the<br />
input contents.<br />
22Video Conversion<br />
The input video signal is converted automatically in conjunction with<br />
the connected TV (vpage 187 “Video conversion function”).<br />
On (Default) : The input video signal is converted.<br />
Off : The input video signal is not converted.<br />
Settings<br />
Tips<br />
Appendix<br />
22i/p Scaler<br />
Convert the input source resolution to the resolution set.<br />
nn<br />
When the input source is set other than to “iPod/USB” and<br />
“NETWORK”<br />
Analog (Default) : Use i/p (interlace-to-progressive) scaler function for<br />
analog video signals.<br />
HDMI : Use i/p scaler function for HDMI video signals.<br />
Off : Do not use i/p scaler function.<br />
nn<br />
When the input source is set to “iPod/USB” and “NETWORK”<br />
On (Default) : Use i/p scaler function.<br />
Off : Do not use i/p scaler function.<br />
%<br />
• “Analog & HDMI” can be set for input sources for which an HDMI input<br />
connector is assigned.<br />
• Which items can be set depend on the input source assigned to each input<br />
connector.<br />
• This function is not effective when the input signal is “x.v.Color”, 3D, sYCC<br />
601 color, Adobe RGB color, Adobe YCC 601 color or computer resolutions.<br />
Front panel Display Rear panel 134 Remote<br />
Index
Contents<br />
Connections<br />
Playback<br />
22Resolution<br />
Set the output resolution.<br />
You can set “Resolution” separately for HDMI output of the analog<br />
video input and HDMI input.<br />
Auto (Default) : The number of pixels the TV connected to the HDMI<br />
MONITOR OUT connector supports is detected<br />
automatically and the appropriate output resolution is<br />
set.<br />
480p/576p / 1080i / 720p / 1080p / 1080p:24Hz / 4K :<br />
Set the output resolution.<br />
%<br />
• When “i/p Scaler” is set to “Analog & HDMI”, the resolution of both the<br />
analog video input signal and HDMI input signal can be set.<br />
• When set to “1080p:24Hz”, you can enjoy film-like pictures for film sources<br />
(in 24 Hz). For video sources and mixed sources, we recommend setting the<br />
resolution to “1080p”.<br />
• It is not possible to convert a 50 Hz signal into 1080p/24Hz. It is output at a<br />
resolution of 1080p/50Hz.<br />
Settings<br />
Tips<br />
Appendix<br />
22Progressive Mode<br />
Set an appropriate progressive conversion mode for the source video<br />
signal.<br />
Auto (Default) : The video signal is automatically detected and the<br />
appropriate mode is set.<br />
Video : Select mode suitable for video playback.<br />
Video and Film : Select mode suitable for video and 30-frame film<br />
material playback.<br />
%<br />
• This item can be set when “i/p Scaler” is set to anything other than “Off”.<br />
22Aspect Ratio<br />
Set the aspect ratio for the video signals output to the HDMI.<br />
16:9 (Default) : Output at 16:9 aspect ratio.<br />
4:3 : Output at 4:3 aspect ratio with black bars on the sides of a 16:9 TV<br />
screen (except for 480p/576p output).<br />
%<br />
• “Aspect Ratio” can be set when “i/p Scaler” is set to anything other than<br />
“Off”.<br />
Front panel Display Rear panel 135 Remote<br />
Index
Contents<br />
Connections<br />
Playback<br />
Settings<br />
Tips<br />
Appendix<br />
On Screen Display<br />
Select the on-screen display user interface preferences.<br />
22Volume<br />
Sets where to display the master volume level.<br />
Bottom (Default) : Display at the bottom.<br />
Top : Display at the top.<br />
Off : Turn display off.<br />
%<br />
• When the master volume display is hard to see when superimposed text<br />
(closed captioning) or movie subtitles are present, set to “Top”.<br />
22Info<br />
Displays status of operation temporarily when the sound mode is<br />
changed, or input source is switched. You can set whether or not to<br />
show each of these status displays.<br />
On (Default) : Turn display on.<br />
Off : Turn display off.<br />
TV Format<br />
Set the video signal format to be output for the TV you are using.<br />
22Format<br />
PAL (Default) : Select PAL output.<br />
NTSC : Select NTSC output.<br />
%<br />
• “Format” can also be set by the following procedure. However, the menu<br />
screen is not displayed.<br />
1. Press and hold the main unit’s ZONE2 SOURCE and STATUS for at least 3<br />
seconds.<br />
“V.Format:” appears on the display.<br />
2. Use the main unit’s TUNER PRESET CH +, – and set the video signal format.<br />
3. Press the main unit’s STATUS to complete the setting.<br />
NOTE<br />
• When a format other than the video format of the connected TV is set, the<br />
picture will not be displayed properly.<br />
22Now Playing<br />
Sets how long each menu is displayed when the input source is<br />
“NETWORK”, “iPod/USB”, or “TUNER”.<br />
Always On (Default) : Show display continuously.<br />
Auto Off : Show display for 30 seconds after operation.<br />
Front panel Display Rear panel 136 Remote<br />
Index
Inputs<br />
Contents<br />
Connections<br />
Playback<br />
Perform settings related to input source playback.<br />
You do not have to change the settings to use the unit. Make settings when needed.<br />
Input Assign<br />
By making connections as indicated by the input sources printed on the<br />
audio/video input connectors of this unit, you can just press one of the<br />
input source select buttons to easily play back audio or video from a<br />
connected device.<br />
When making connections other than the default settings, you must<br />
change settings in this section.<br />
22Examples of “Input Assign” menu screen<br />
displays<br />
Use the “Input Assign” menu to change the HDMI input connectors,<br />
Digital input connectors, Analog input connectors, Component input<br />
connectors, and Video input connectors that are assigned to the input<br />
sources in default settings.<br />
Inputs/Input Assign<br />
Set Defaults<br />
CBL/SAT<br />
DVD<br />
Blu-ray<br />
GAME<br />
MEDIA PLAYER<br />
TV AUDIO<br />
AUX<br />
CD<br />
HDMI DIGITAL ANALOG COMP VIDEO<br />
1<br />
2<br />
3<br />
4<br />
5<br />
-<br />
FRONT<br />
-<br />
OPT2<br />
-<br />
-<br />
-<br />
-<br />
OPT1<br />
-<br />
-<br />
1<br />
2<br />
3<br />
-<br />
-<br />
-<br />
-<br />
4<br />
COMP<br />
-<br />
-<br />
-<br />
-<br />
-<br />
-<br />
-<br />
1<br />
2<br />
-<br />
-<br />
-<br />
-<br />
-<br />
-<br />
Settings<br />
Tips<br />
%<br />
• By default, each item is set as follows.<br />
Appendix<br />
Input source HDMI DIGITAL ANALOG COMP VIDEO<br />
CBL/SAT 1 OPT2 1 COMP 1<br />
DVD 2 – 2 – 2<br />
Blu-ray 3 – 3 – –<br />
GAME 4 – – – –<br />
MEDIA PLAYER 5 – – – –<br />
TV AUDIO – OPT1 – – –<br />
AUX FRONT – – – –<br />
CD – – 4 – –<br />
n n TV set top box/satellite users please note<br />
When using the optical digital audio output on a TV/satellite box<br />
To play the video signal assigned to “HDMI” combined with the audio<br />
signal assigned at “Input Assign” – “DIGITAL”, you will also need to<br />
select “Digital” in the “Input Mode” (vpage 140).<br />
Changes HDMI input assignments<br />
Front panel Display Rear panel 137 Remote<br />
Index
Contents<br />
Connections<br />
Playback<br />
22HDMI<br />
Set this to change the HDMI input connectors assigned to the input<br />
sources.<br />
1 / 2 / 3 / 4 / 5 / 6 / FRONT : Assign an HDMI input connector to the<br />
selected input source.<br />
– : Do not assign an HDMI input connector to the selected input source.<br />
%<br />
• When “HDMI Control” (vpage 133) is set to “On”, HDMI input connector<br />
cannot be assigned to “TV AUDIO”.<br />
22DIGITAL<br />
Set this to change the digital audio input connectors assigned to the<br />
input sources.<br />
OPT1 (Optical) / OPT2 :<br />
Assign a digital input connector to the selected input source.<br />
– : Do not assign a digital input connector to the selected input source.<br />
Settings<br />
Tips<br />
Appendix<br />
22COMP (Component video)<br />
Set this to change the component video input connectors assigned to<br />
the input sources.<br />
COMP : Assign the component video input connector to the selected<br />
input source.<br />
– : Do not assign a component video input connector to the selected<br />
input source.<br />
22VIDEO<br />
Set this to change the composite video input connectors assigned to<br />
the input sources.<br />
1 / 2 : Assign the video input connector to the selected input source.<br />
– : Do not assign a video input connector to the selected input source.<br />
2 2 Set Defaults<br />
The “Input Assign” settings are returned to the default settings.<br />
22ANALOG<br />
Set this to change the analog audio input connectors assigned to the<br />
input sources.<br />
1 / 2 / 3 / 4 : Assign a analog input connector to the selected input<br />
source.<br />
– : Do not assign a analog input connector to the selected input source.<br />
Front panel Display Rear panel 138 Remote<br />
Index
Contents<br />
Connections<br />
Playback<br />
Settings<br />
Tips<br />
Appendix<br />
Source Rename<br />
Change the display name of the selected input source.<br />
This is convenient when the input source name of your device and the<br />
input source name of this unit are different. You can change the name to<br />
suit your needs. When the renaming is completed, the name is displayed<br />
on this unit’s display and on the menu screen.<br />
CBL/SAT / DVD / Blu-ray / GAME / AUX / MEDIA PLAYER / CD /<br />
TV AUDIO : Change the display name of the selected input source.<br />
Set Defaults : The “Source Rename” settings are returned to the default<br />
settings.<br />
%<br />
• Up to 12 characters can be input. For character input, see page 121.<br />
Hide Sources<br />
Remove from the display input sources that are not used.<br />
Show (Default) : Use this source.<br />
Hide : Do not use this source.<br />
Source Level<br />
• This function corrects the playback level of the selected input source’s<br />
audio input.<br />
• Make this setting if there are differences in the input volume levels<br />
between the different sources.<br />
–12dB – +12dB (Default : 0dB)<br />
Front panel Display Rear panel 139 Remote<br />
Index
Contents<br />
Connections<br />
Playback<br />
Settings<br />
Tips<br />
Appendix<br />
Input Select<br />
Set the audio input mode and decode mode of each input source.<br />
The input modes available for selection may vary depending on the input<br />
source.<br />
22Input Mode<br />
Set the audio input modes for the different input sources.<br />
It is normally recommended to set the audio input mode to “Auto”.<br />
Auto (Default) : Automatically detect input signal and perform playback.<br />
HDMI : Play only signals from HDMI input.<br />
Digital : Play only signals from digital input.<br />
Analog : Play only signals from analog input.<br />
22Decode Mode<br />
Set the audio decode mode for input source.<br />
Auto (Default) : Detect type of digital input signal and decode and play<br />
automatically.<br />
PCM : Decode and play only PCM input signals.<br />
DTS : Decode and play only DTS input signals.<br />
%<br />
• This item can be set for input sources for which “DIGITAL” is assigned at<br />
“Input Assign” (vpage 137).<br />
• Normally set this mode to “Auto”. It is recommended to set “PCM” or “DTS”<br />
when audio is missing at the beginning or a noise occurs. Set “PCM” and<br />
“DTS” when inputting the corresponding input signal.<br />
%<br />
• When digital signals are properly input, the ~ indicator lights on the display.<br />
If the ~ indicator does not light, check “Input Assign” (vpage 137) and<br />
the connections.<br />
• If “HDMI Control” is set to “On” and a TV compatible with the ARC is<br />
connected via the HDMI MONITOR connectors, the input mode whose input<br />
source is “TV AUDIO” is fixed to ARC.<br />
Front panel Display Rear panel 140 Remote<br />
Index
Contents<br />
Speakers<br />
Connections<br />
Playback<br />
Settings<br />
Tips<br />
Appendix<br />
The acoustic characteristics of the connected speakers and listening room are measured and the optimum settings are made automatically. This is called<br />
“Audyssey® Setup”.<br />
You do not have to perform Audyssey® Setup when you have already performed Speaker Calibration in Setup Assistant.<br />
To set up the speakers manually, use “<strong>Manual</strong> Setup” (vpage 150) on the menu.<br />
Audyssey® Setup<br />
To perform measurement, place the Setup and measurement microphone<br />
in multiple locations all around the listening area. For best results, we<br />
recommend you measure in six or more positions, as shown in the<br />
illustration (up to eight positions).<br />
%<br />
• When performing Audyssey® Setup, Audyssey MultEQ® XT/Audyssey Dynamic<br />
EQ®/Audyssey Dynamic Volume® functions become active (vpage 128, 129).<br />
NOTE<br />
• Make the room as quiet as possible. Background noise can disrupt the room<br />
measurements. Close windows and turn off the power on electronic devices<br />
(TVs, radios, air conditioners, fluorescent lights, etc.). The measurements could be<br />
affected by the sounds emitted by such devices.<br />
• During the measurement process, place cell phones outside the listening room.<br />
Cell phone signals could disrupt the measurements.<br />
• Do not stand between the speakers and Setup and measurement microphone or<br />
allow obstacles in the path while the measurements are being made. Do not hold<br />
the Setup and measurement microphone in your hand during measurements. This<br />
will cause inaccurate readings.<br />
• During the measurement process, audible test tones will come from the speakers<br />
and subwoofer(s), but this is part of normal operation. If there is background noise<br />
in the room, these test signals will increase in volume.<br />
• Operating VOLUME df on the remote control unit or MASTER VOLUME on the<br />
main unit during the measurements will cancel the measurements.<br />
• Measurement cannot be performed when headphones are connected. Unplug the<br />
headphones before performing Audyssey® Setup.<br />
Front panel Display Rear panel 141 Remote<br />
Index
Contents<br />
Connections<br />
Playback<br />
Settings<br />
Tips<br />
Appendix<br />
22About Setup and measurement microphone<br />
placement<br />
• Measurements are performed by placing the Setup and measurement<br />
microphone successively at multiple positions throughout the entire<br />
listening area, as shown in GExample qH.<br />
• Even if the listening environment is small as shown in GExample wH,<br />
measuring at multiple points throughout the listening environment<br />
results in more effective correction.<br />
2 2 About the main listening position (*M)<br />
The main listening position is the position where listeners would<br />
normally sit or where one would normally sit alone within the listening<br />
environment. Before starting Audyssey® Setup, place the Setup and<br />
measurement microphone in the main listening position. Audyssey<br />
MultEQ® XT uses the measurements from this position to calculate<br />
speaker distance, level, polarity, and the optimum crossover value for<br />
the subwoofer.<br />
GExample qH<br />
GExample wH<br />
FL SW C FR<br />
FL SW C FR<br />
(<br />
: Measuring positions)<br />
(<br />
: Measuring positions)<br />
SL<br />
*M<br />
SR<br />
SL<br />
*M<br />
SR<br />
FL Front speaker (L) SW Subwoofer<br />
FR Front speaker (R) SL Surround speaker (L)<br />
C Center speaker SR Surround speaker (R)<br />
Front panel Display Rear panel 142 Remote<br />
Index
Contents<br />
Connections<br />
Playback<br />
Settings<br />
Tips<br />
Appendix<br />
Procedure for speaker settings<br />
(Audyssey® Setup)<br />
Preparation<br />
Measurement<br />
Calculation<br />
Check<br />
Store<br />
1<br />
2<br />
Mount the Setup and measurement microphone on a<br />
tripod or stand and place it in the main listening position.<br />
When you set the setup microphone, point the tip of it toward the<br />
ceiling, at the height of your ears in your listening position.<br />
If using a subwoofer capable of the following<br />
adjustments, set up the subwoofer as shown below.<br />
nn<br />
When using a subwoofer with a direct mode<br />
Set the direct mode to “On” and disable the volume adjustment<br />
and crossover frequency setting.<br />
n n When using a subwoofer without a direct mode<br />
Make the following settings:<br />
• Volume : “12 o’clock position”<br />
• Crossover frequency : “Maximum/Highest Frequency”<br />
• Low pass filter : “Off”<br />
• Standby mode : “Off”<br />
Finish<br />
Front panel Display Rear panel 143 Remote<br />
Index
Contents<br />
Connections<br />
Playback<br />
Settings<br />
Tips<br />
Appendix<br />
3<br />
Connect the Setup and measurement microphone to<br />
the SETUP MIC jack of this unit.<br />
When the Setup and measurement<br />
microphone is connected, the<br />
following screen is displayed.<br />
Audyssey Setup<br />
Your AV receiver can automatically measure the acoustics of<br />
your room then optimize your speakers using the included<br />
microphone.<br />
Set the following items<br />
if necessary.<br />
Amp Assign<br />
Channel Select<br />
Check Results<br />
Restore...<br />
Start<br />
4<br />
5<br />
6<br />
Select “Start” and then press ENTER.<br />
Audyssey® Setup can also make the following settings.<br />
• Amp Assign<br />
The signal output from the SURROUND BACK speaker terminals<br />
of this unit can be switched to match your speaker environment.<br />
Refer to “Amp Assign” (vpage 150).<br />
• Channel Select<br />
If channels that are not to be used are set in advance,<br />
measurement for the set channels is skipped, and measuring<br />
time can be reduced. You can also change the number of surround<br />
back speakers.<br />
Select “Next” and then press ENTER.<br />
Select “Begin Test” and then press ENTER.<br />
• Measurement requires several minutes.<br />
NOTE<br />
• If “Caution!” is displayed on TV screen:<br />
Go to “Error messages” (vpage 148). Check any related items, and<br />
perform the necessary procedures.<br />
When measuring has stopped<br />
q Press BACK to display the popup screen.<br />
w Press o to select “Yes”, and then press ENTER.<br />
Front panel Display Rear panel 144 Remote<br />
Index
Contents<br />
Connections<br />
Playback<br />
Settings<br />
Tips<br />
Appendix<br />
The detected speakers are displayed.<br />
7 9<br />
Audyssey Setup<br />
Speaker Detection<br />
Front :Yes<br />
Center :Yes<br />
Subwoofer :Yes<br />
Surround :Yes<br />
Surr. Back :2spkrs<br />
Repeat Last Test<br />
Next<br />
8 Select “Next” and then press ENTER.<br />
Move the Setup and measurement microphone to<br />
position 2, select “Continue”, and then press ENTER.<br />
The measurement of the second position starts. Measurements<br />
can be made in up to eight positions.<br />
Audyssey Setup<br />
Place the microphone at ear level at the 2nd listening position,<br />
then select “Continue”...<br />
Continue<br />
Calculation<br />
Back<br />
%<br />
• To skip measuring the second and subsequent listening position, use i to<br />
select “Calculation” and press ENTER to proceed to step 12.<br />
Front panel Display Rear panel 145 Remote<br />
Index
Contents<br />
Connections<br />
Playback<br />
Settings<br />
Tips<br />
Appendix<br />
10<br />
11<br />
Repeat step 9, measuring positions 3 to 8.<br />
Select “Calculation” and then press ENTER.<br />
Audyssey Setup<br />
Calibration completed! Now calculating...Please wait.<br />
12<br />
Use ui to select the item you want to check, and then<br />
press ENTER.<br />
Audyssey Setup<br />
Check processing results. To proceed, press “Store”.<br />
50%<br />
Speaker Config.<br />
Distances<br />
Levels<br />
Crossovers<br />
Store<br />
• Analysis takes several minutes to complete. The more speakers<br />
and measurement positions that there are, the more time it takes<br />
to perform the analysis.<br />
• Subwoofers may measure a greater reported distance than<br />
the actual distance due to added electrical delay common in<br />
subwoofers.<br />
Front panel Display Rear panel 146 Remote<br />
Index
Contents<br />
Connections<br />
Playback<br />
Settings<br />
Tips<br />
Appendix<br />
13<br />
Select “Store” and then press ENTER.<br />
Save the measurement results.<br />
15 Set Audyssey Dynamic Volume ®.<br />
Audyssey Setup<br />
Check processing results. To proceed, press “Store”.<br />
Audyssey Setup<br />
You can set Dynamic Volume function, which automatically<br />
adjust volume level for all content.<br />
Do you want to enable?<br />
Speaker Config.<br />
Distances<br />
Levels<br />
Crossovers<br />
Yes<br />
No<br />
Store<br />
14<br />
• Saving the results requires about 20 seconds.<br />
NOTE<br />
• During saving of measurement results, be sure not to turn off the power.<br />
Unplug the Setup and measurement microphone from<br />
the unit’s SETUP MIC jack.<br />
• This feature adjusts the output volume to the optimal level while<br />
constantly monitoring the level of the audio input to the unit.<br />
Optimal volume control is performed automatically without any<br />
loss in the dynamism and clarity of the sound when, for example,<br />
the volume suddenly increases for commercials shown during<br />
television programs.<br />
NOTE<br />
• After performing Audyssey® Setup, do not change the speaker connections or<br />
subwoofer volume. In event of a change, perform Audyssey® Setup again.<br />
Front panel Display Rear panel 147 Remote<br />
Index
Contents<br />
Connections<br />
Playback<br />
Settings<br />
Tips<br />
Appendix<br />
Error messages<br />
An error message is displayed if Audyssey® Setup could not be completed due to speaker placement, the measurement environment, etc. If an error<br />
message is displayed, check the relevant items and perform the necessary measures. Be sure to turn off the power before checking speaker connections.<br />
Examples Error details Measures<br />
Microphone or Speaker is<br />
None<br />
Ambient noise is too high or<br />
level is too low<br />
Front R : None<br />
Front R : Phase<br />
• Setup and measurement microphone is not<br />
detected.<br />
• Not all speakers could be detected.<br />
• There is too much noise in the room.<br />
• Speaker or subwoofer sound is too low.<br />
• The displayed speaker could not be<br />
detected.<br />
• The displayed speaker is connected with<br />
the polarity reversed.<br />
• Connect the included Setup and measurement microphone to the<br />
SETUP MIC jack of this unit.<br />
• Check the speaker connections.<br />
• Either turn off any device generating noise or move it away.<br />
• Perform again when the surroundings are quieter.<br />
• Check the speaker installation and the direction in which the<br />
speakers are facing.<br />
• Adjust the subwoofer’s volume.<br />
• Check the connections of the displayed speaker.<br />
• Check the polarity of the displayed speaker.<br />
• For some speakers, this error message may be displayed even if<br />
the speaker is properly connected. If you are sure the connection is<br />
correct, use p to select “Skip Error”, then press ENTER.<br />
Front panel Display Rear panel 148 Remote<br />
Index
Contents<br />
Connections<br />
Playback<br />
Settings<br />
Tips<br />
Appendix<br />
Retrieving Audyssey® Setup settings<br />
If you set “Restore...” to “Restore”, you can return to Audyssey® Setup<br />
measurement result (value calculated at the start by MultEQ® XT) even<br />
when you have changed each setting manually.<br />
Audyssey Setup<br />
Your AV receiver can automatically measure the acoustics of<br />
your room then optimize your speakers using the included<br />
microphone.<br />
Set the following items<br />
if necessary.<br />
Amp Assign<br />
Channel Select<br />
Check Results<br />
Restore...<br />
Start<br />
Front panel Display Rear panel 149 Remote<br />
Index
Contents<br />
<strong>Manual</strong> Setup<br />
Connections<br />
Playback<br />
Perform when setting the speakers manually or when changing settings<br />
made in Audyssey® Setup.<br />
• If you change the speaker settings after performing Audyssey® Setup, it<br />
will not be possible to select Audyssey MultEQ® XT, Audyssey Dynamic<br />
EQ® and Audyssey Dynamic Volume® (vpage 128, 129).<br />
• “<strong>Manual</strong> Setup” can be used without changing the settings. Please set<br />
if necessary.<br />
Settings<br />
Amp Assign<br />
Tips<br />
Appendix<br />
Select power amplifier usage method to match your speaker system.<br />
2 2 Assign Mode<br />
Set the assignment mode.<br />
Surround Back (Default) : Setting for 7.1-channel playback using<br />
surround back speakers.<br />
ZONE2 : Setting to assign the unit’s built-in power amplifier for ZONE2<br />
and output the audio in stereo.<br />
Bi-AMP : Setting to use the front speakers via the bi-amp connection.<br />
Front B : Setting to use the second set of front speakers for playback.<br />
You can switch the front speakers A and B to be used for<br />
playback in accordance with the 2-channel playback or multichannel<br />
playback mode. When you select this Front B setting,<br />
also perform the “Front Speaker Setup” (vpage 155)<br />
procedure.<br />
Front Height : Setting for 7.1-channel playback using front height<br />
speakers.<br />
Front panel Display Rear panel 150 Remote<br />
Index
Contents<br />
Speaker Config.<br />
Connections<br />
Playback<br />
Indicate speaker presence and select speaker size categories based on<br />
bass reproduction capability.<br />
22Front<br />
Set the front speaker size.<br />
Large (Default) : Use a large speaker that can adequately play back very<br />
low bass frequencies.<br />
Small : Use a small speaker that has inadequate playback capacity for<br />
very low bass frequencies. Note that for most multi-channel<br />
speakers, this is the best choice.<br />
%<br />
• When “Subwoofer” is set to “No”, “Front” is automatically set to “Large”.<br />
• When “Front” is set to “Small”, “Center”, “Surround“, “Surr. Back” and<br />
“Front Height” can not be set to “Large”.<br />
22Center<br />
Set the presence and size of the center speaker.<br />
Large : Use a large speaker that can adequately play back very low<br />
bass frequencies.<br />
Small (Default) : Use a small speaker that has inadequate playback<br />
capacity for very low bass frequencies. Note that this<br />
is almost always the best choice.<br />
None : Select when a center speaker is not connected.<br />
Settings<br />
Tips<br />
22Subwoofer<br />
Set the presence of a subwoofer.<br />
Yes (Default) : Use a subwoofer.<br />
No : Select when a subwoofer is not connected.<br />
Appendix<br />
22Surround<br />
Set the presence and size of the surround speakers.<br />
Large : Use a large speaker that can adequately play back very low<br />
bass frequencies.<br />
Small (Default) : Use a small speaker that has inadequate playback<br />
capacity for very low bass frequencies. Note that this<br />
is almost always the best choice.<br />
None : Select when the surround speakers are not connected.<br />
%<br />
• When “Surround” is set to “None”, “Surr. Back” and “Front Height” are<br />
automatically set to “None”.<br />
Front panel Display Rear panel 151 Remote<br />
Index
Contents<br />
Connections<br />
Playback<br />
22Surr. Back<br />
Set the presence, size and number of surround back speakers.<br />
Large : Use a large speaker that can adequately play back very low<br />
bass frequencies.<br />
Small (Default) : Use a small speaker that has inadequate playback<br />
capacity for very low bass frequencies. Note that this<br />
is almost always the best choice.<br />
None : Select when the surround back speakers are not connected.<br />
2spkrs (Default) : Use two surround back speakers.<br />
1spkr : Use only one surround back speaker. When you select this<br />
setting, connect the surround back speaker to the left (L)<br />
channel.<br />
Settings<br />
Tips<br />
Appendix<br />
22Front Height<br />
Set the presence and size of the front height speakers.<br />
Large : Use a large speaker that can adequately play back very low<br />
bass frequencies.<br />
Small (Default) : Use a small speaker that has inadequate playback<br />
capacity for very low bass frequencies. Note that this<br />
is almost always the best choice.<br />
None : Select when the front height speakers are not connected.<br />
%<br />
• When “Assign Mode” (vpage 150) setting is “Front Height”, you can<br />
make the “Front Height” setting.<br />
%<br />
• When “Assign Mode” (vpage 150) setting is “Surround Back”, you can<br />
make the “Surr. Back” setting.<br />
Front panel Display Rear panel 152 Remote<br />
Index
Contents<br />
Connections<br />
Playback<br />
Settings<br />
Tips<br />
Appendix<br />
Distances<br />
Set distance from listening position to speakers.<br />
Measure beforehand the distance from the listening position to each<br />
speaker.<br />
22Unit<br />
Set the unit of distance.<br />
Meters (Default)<br />
Feet<br />
22Step<br />
Set the minimum variable width of the distance.<br />
0.1m (Default) / 0.01m<br />
1ft / 0.1ft<br />
22Set Defaults<br />
The “Distances” settings are returned to the default settings.<br />
22Set the distance<br />
0.00m – 18.00m / 0.0ft – 60.0ft<br />
Levels<br />
Set the volume of the test tone to be the same when it is output from<br />
each speaker.<br />
22Test Tone Start<br />
Output test tone. A test tone is output from the selected speaker.<br />
While listening to the test tone, adjust the volume output from the<br />
selected speaker.<br />
–12.0dB – +12.0dB (Default : 0.0dB)<br />
%<br />
• When “Levels” is adjusted, the adjusted values are set for all the sound<br />
modes.<br />
• When headphones are connected to the PHONES connector on this unit, you<br />
cannot set “Levels”.<br />
2 2 Set Defaults<br />
The “Levels” settings are returned to the default settings.<br />
%<br />
• The speakers that can be selected differ depending on the “Amp Assign”<br />
(vpage 150) and “Speaker Config.” (vpage 151) settings.<br />
• Default settings :<br />
Front L / Front R / F. Height L / F. Height R / Center / Subwoofer : 3.60 m (12.0<br />
ft)<br />
Surround L / Surround R / Surr. Back L / Surr. Back R : 3.00 m (10.0 ft)<br />
• Set the difference in the distance between the speakers to less than 6.00 m<br />
(20.0 ft).<br />
Front panel Display Rear panel 153 Remote<br />
Index
Contents<br />
Connections<br />
Playback<br />
Settings<br />
Tips<br />
Appendix<br />
Crossovers<br />
Set the maximum frequency of the bass signal output from each channel to<br />
the subwoofer. Set the Crossover Frequency to suit the bass reproduction<br />
capability of the speaker being used.<br />
22Speaker Selection<br />
Selects how to set the crossover frequency. See the speaker manual<br />
for information concerning speaker crossover frequency.<br />
All (Default) : Selects the crossover point of all speakers at the same<br />
time.<br />
Individual : Selects the crossover points for each speaker individually.<br />
22Set the crossover frequency<br />
40Hz / 60Hz / 80Hz (Default) / 90Hz / 100Hz / 110Hz / 120Hz / 150Hz<br />
/ 200Hz / 250Hz<br />
%<br />
• “Crossovers” can be set when the “Subwoofer Mode” (vpage 155)<br />
setting is “LFE+Main”, or when you have a speaker that is set to “Small”.<br />
• The default crossover frequency is “80Hz”, which will work best with the<br />
widest variety of speakers. When using very small speakers, however, you<br />
can choose a higher setting based on the specified frequency response of the<br />
speakers. If the speaker has a specified frequency response of 120 Hz – 20<br />
kHz (as an example), then choose the 120 Hz crossover frequency.<br />
• For speakers set to “Small”, low frequency content below the crossover<br />
frequency is attenuated to the speakers and the low bass content is then<br />
re-delivered to the subwoofer, or the front (L/R) speakers if they have been<br />
set to Large.<br />
• The speakers that can be set when “Individual” is selected differ depending<br />
on to the “Subwoofer Mode” (vpage 155) setting.<br />
• When “LFE” is selected, speakers set to “Small” at “Speaker Config.”<br />
(vpage 151) can be set. If the speakers are set to “Large”, “Full Band” is<br />
displayed and the setting cannot be made.<br />
• When “LFE+Main” is selected, speakers can be set regardless of the<br />
“Speaker Config.” (vpage 151) setting.<br />
Front panel Display Rear panel 154 Remote<br />
Index
Contents<br />
Connections<br />
Playback<br />
Settings<br />
Tips<br />
Appendix<br />
Bass<br />
Set subwoofer and LFE signal range playback.<br />
22Subwoofer Mode<br />
Select low range signals to be reproduced by subwoofer.<br />
LFE (Default) : The low range signal of the channel set to “Small”<br />
speaker size is added to the LFE signal output from the<br />
subwoofer.<br />
LFE+Main : The low range signal of all channels is added to the LFE<br />
signal output from the subwoofer. This is usually the best<br />
setting for most systems.<br />
%<br />
• “Subwoofer Mode” can be set when “Speaker Config.” – “Subwoofer”<br />
(vpage 151) is set to other than “No”.<br />
• Play music or a movie source and select the mode offering the strongest<br />
bass.<br />
• If “Front” and “Center” for “Speaker Config.” (vpage 151) are set to<br />
“Large”, and “Subwoofer Mode” is set to “LFE”, no sound may be output<br />
from the subwoofers, depending on the input signal or selected sound mode.<br />
Select “LFE+Main” if you want the bass signals to always be produced from<br />
the subwoofer.<br />
22LPF for LFE<br />
Set LFE signal playback range. Set this when you want to change the<br />
playback frequency (low pass filter point) of the subwoofer.<br />
80Hz / 90Hz / 100Hz / 110Hz / 120Hz (Default) / 150Hz / 200Hz / 250Hz<br />
Front Speaker Setup<br />
Set the front speakers to use for every sound mode.<br />
%<br />
• This can be set when “Assign Mode” (vpage 150) is set to “Front B”.<br />
222ch Playback<br />
The front speakers used in direct play (2-channel), stereo play and pure<br />
direct play (2-channel) are set in advance.<br />
A (Default) : Front speaker A is used.<br />
B : Front speaker B is used.<br />
A+B : Both front speakers A and B are used.<br />
2 2 Multi ch Playback<br />
The front speakers used in play modes other than direct play (2-channel),<br />
stereo play and pure direct play (2-channel) are set in advance.<br />
A (Default) : Front speaker A is used.<br />
B : Front speaker B is used.<br />
A+B : Both front speakers A and B are used.<br />
Front panel Display Rear panel 155 Remote<br />
Index
Contents<br />
Network<br />
Connections<br />
Playback<br />
Settings<br />
Tips<br />
Appendix<br />
To use this unit by connecting it to a home network (LAN), you must configure network settings.<br />
If you set up your home network (LAN) via DHCP, set “DHCP” to “On” (use the default setting). This allows this unit to use your home network (LAN).<br />
If you assign an IP address for each device, you must use the “IP Address” setting to assign an IP address to this unit and enter the information about<br />
your home network (LAN) such as the gateway address and subnet mask.<br />
Information<br />
Display network information.<br />
Friendly Name / DHCP On or Off / IP Address / MAC Address<br />
%<br />
• MAC Address is required to make a vTuner account.<br />
IP Control<br />
Enables network communication in standby power mode.<br />
Off In Standby (Default) : Suspend network function during standby.<br />
Always On : Network is on during standby. Main unit operable with a<br />
network compatible controller.<br />
%<br />
• Set to “Always On” when using the web control function.<br />
NOTE<br />
• When “IP Control” is set to “Always On”, it consumes more standby power.<br />
Friendly Name<br />
The Friendly Name is the name of this unit displayed on the network. You<br />
can change the Friendly Name according to your preferences.<br />
22Edit Name<br />
Edits Friendly Name.<br />
%<br />
• The default Friendly Name on first use is “<strong>Denon</strong> <strong>AVR</strong>-<strong>X2000</strong>”.<br />
• Up to 63 characters can be input.<br />
• For character input, see page 121.<br />
2 2 Set Defaults<br />
Restores Friendly Name, which you had changed, to the default setting.<br />
Front panel Display Rear panel 156 Remote<br />
Index
Contents<br />
Connections<br />
Playback<br />
Settings<br />
Tips<br />
Appendix<br />
Settings<br />
Make settings for wired LAN.<br />
• If you are using a broadband router (DHCP function), there is no need<br />
to make the settings at “IP Address” and “Proxy”, since the DHCP<br />
function is set to “On” in this unit’s default settings.<br />
• Only set “Settings” when connecting to a network without a DHCP<br />
function.<br />
Network/Settings<br />
DHCP<br />
-IP Address<br />
-Subnet Mask<br />
-Default Gateway<br />
-Primary DNS<br />
-Secondary DNS<br />
Proxy<br />
-Address<br />
-Port<br />
Save<br />
Cancel<br />
Off<br />
192.168.000.001<br />
255.255.255.000<br />
255.255.255.000<br />
000.000.000.000<br />
000.000.000.000<br />
Off<br />
000.000.000.000<br />
00000<br />
Configure the network settings manually<br />
22DHCP<br />
Selects how to connect to the network.<br />
On : Configure the network settings automatically from your router.<br />
Off : Configure the network settings manually.<br />
22IP Address<br />
Set the IP address within the ranges shown below.<br />
• The Network <strong>Audio</strong> function cannot be used if other IP addresses<br />
are set.<br />
CLASS A: 10.0.0.1 – 10.255.255.254<br />
CLASS B: 172.16.0.1 – 172.31.255.254<br />
CLASS C: 192.168.0.1 – 192.168.255.254<br />
22Subnet Mask<br />
When connecting an xDSL modem or connector adapter directly to this<br />
unit, input the subnet mask indicated in the documentation supplied by<br />
your provider. Normally input 255.255.255.0.<br />
22Default Gateway<br />
When connected to a gateway (router), input its IP address.<br />
2 2 Primary DNS, Secondary DNS<br />
If there is only one DNS address indicated in the documentation<br />
supplied by your provider, input it at “Primary DNS”. If two or more<br />
DNS are provided by your provider, enter both “Primary DNS” and<br />
“Secondary DNS”.<br />
Front panel Display Rear panel 157 Remote<br />
Index
Contents<br />
Connections<br />
Playback<br />
Settings<br />
Tips<br />
Appendix<br />
22Proxy<br />
Make this setting when connecting to the Internet via a proxy server.<br />
Make the proxy settings only when you connect to the Internet via<br />
a proxy server that is on your internal network or provided by your<br />
provider, etc.<br />
On(Address) : Select when inputting by address.<br />
On(Name) : Select when inputting by domain name. Up to 38<br />
characters can be input.<br />
Off : Disables the proxy server.<br />
22Port<br />
Enter port number.<br />
%<br />
• If you cannot connect to the Internet, recheck the connections and settings<br />
(vpage 39).<br />
• If you do not understand about Internet connection, contact your ISP (Internet<br />
Service Provider) or the store from which you purchased your computer.<br />
Diagnostics<br />
Used to check the network connection.<br />
22Physical Connection<br />
Checks the physical LAN port connection.<br />
OK<br />
Error : The LAN cable is not connected. Check the connection.<br />
22Router Access<br />
Checks the connection from this unit to the router.<br />
OK<br />
Error : Failed to communicate with the router. Check the router<br />
settings.<br />
2 2 Internet Access<br />
Checks whether this unit has access to the Internet (WAN).<br />
OK<br />
Error : Failed to connect to the Internet. Check the Internet connection<br />
environment or router settings.<br />
Front panel Display Rear panel 158 Remote<br />
Index
Contents<br />
Connections<br />
Playback<br />
Settings<br />
Tips<br />
Appendix<br />
Maintenance Mode<br />
Use when receiving maintenance from a <strong>Denon</strong> service engineer or custom<br />
installer. Ordinarily, this mode isn’t suitable for use by the end user, only<br />
by a trained service technician or custom installation professional.<br />
NOTE<br />
• Only use this function if so instructed by a <strong>Denon</strong> serviceperson or installer.<br />
Front panel Display Rear panel 159 Remote<br />
Index
Contents<br />
General<br />
Make various other settings.<br />
Language<br />
Connections<br />
Playback<br />
Set the language for display on the menu screen.<br />
English (Default) / Deutsch / Français / Italiano / Español / Nederlands<br />
/ Svenska / / Polski<br />
%<br />
• “Language” can also be set by the following procedure. However, the menu<br />
screen is not displayed.<br />
Following the display content to make the setting.<br />
1. Press and hold the main unit’s ZONE2 SOURCE and STATUS for at least 3<br />
seconds.<br />
“V.Format:” appears on the display.<br />
2. Press the main unit’s DIMMER.<br />
“Lang.:” appears on the display.<br />
3. Use the main unit’s TUNER PRESET CH +, – and set the language.<br />
4. Press the main unit’s STATUS to complete the setting.<br />
Settings<br />
ZONE2 Setup<br />
Tips<br />
Appendix<br />
Set the audio to play back with multi-zone (ZONE2).<br />
%<br />
• The setting values (dB) for “Volume Limit” and “Power On Volume” are what is<br />
displayed when “Scale” (vpage 127) in the menu is set to “–79.5dB – 18.0dB”.<br />
22Lch Level<br />
Adjust the left channel output level.<br />
–12dB – +12dB (Default : 0dB)<br />
22Rch Level<br />
Adjust the right channel output level.<br />
–12dB – +12dB (Default : 0dB)<br />
2 2 Volume Level<br />
Set the volume output level.<br />
Variable (Default) : Volume adjustment is enabled by main unit and<br />
remote control unit.<br />
1 – 98 (–79dB – 18dB) : The volume is adjusted to the set level.<br />
Front panel Display Rear panel 160 Remote<br />
Index
Contents<br />
Connections<br />
22Volume Limit<br />
Make a setting for maximum volume.<br />
60 (–20dB) / 70 (–10dB) / 80 (0dB) (Default : 70 (–10dB))<br />
Off : Do not set a maximum volume.<br />
Playback<br />
22Power On Volume<br />
Define the volume setting that is active when the power is turned on.<br />
Last (Default) : Use the memorized setting from the last session.<br />
Mute : Always mute when power is turned on.<br />
1 – 98 (–79dB – 18dB) : The volume is adjusted to the set level.<br />
22Mute Level<br />
Set the amount of attenuation when muting is on.<br />
Full (Default) : The sound is muted entirely.<br />
–40dB : The sound is attenuated by 40 dB down.<br />
–20dB : The sound is attenuated by 20 dB down.<br />
%<br />
• This can be set when “Volume Level” (vpage 160) is set to “Variable”.<br />
Settings<br />
Zone Rename<br />
Tips<br />
Appendix<br />
Change the display title of each zone to one you prefer.<br />
MAIN ZONE / ZONE2<br />
Set Defaults : The input source name is returned to the default setting.<br />
%<br />
• Up to 10 characters can be input.<br />
• For character input, see page 121.<br />
Quick Select Names<br />
Change the “Quick Select” display title to one you prefer.<br />
Quick Select 1 / Quick Select 2 / Quick Select 3 / Quick Select 4<br />
Set Defaults : The input source name is returned to the default setting.<br />
%<br />
• Up to 16 characters can be input.<br />
• For character input, see page 121.<br />
Front panel Display Rear panel 161 Remote<br />
Index
Contents<br />
Connections<br />
Playback<br />
Settings<br />
Tips<br />
Appendix<br />
Auto Standby<br />
When you do not perform any operation on this unit with no audio or video<br />
input for a specified time, this unit automatically enters the standby mode.<br />
Before it enters the standby mode, “Auto Standby” is displayed on the<br />
display of this unit and the menu screen.<br />
60 min : The unit goes into standby after 60 minutes.<br />
30 min (Default) : The unit goes into standby after 30 minutes.<br />
Off : The unit does not go into standby automatically.<br />
Front Display<br />
Makes settings related to the display on this unit.<br />
22Dimmer<br />
Adjust the display brightness of this unit.<br />
Bright (Default) : Normal display brightness.<br />
Dim : Reduced display brightness.<br />
Dark : Very low display brightness.<br />
Off : Turns the display off.<br />
%<br />
• You can also adjust the display by turning DIMMER on the main unit.<br />
Information<br />
Show information about receiver settings, input signals, etc.<br />
22<strong>Audio</strong><br />
Show the audio information for MAIN ZONE.<br />
Sound Mode : The currently set sound mode.<br />
Input Signal : The input signal type.<br />
Format : The number of input signal channels (presence of front,<br />
surround, LFE).<br />
Sample Rate : The input signal’s sampling frequency.<br />
Offset : The dialogue normalization correction value.<br />
Flag : This is displayed when inputting signals including a surround<br />
back channel. “MATRIX” is displayed with Dolby Digital EX<br />
and DTS-ES Matrix signals, “DISCRETE” with DTS-ES Discrete<br />
signals.<br />
Dialogue normalization function<br />
This function is automatically activated when playing Dolby Digital,<br />
Dolby Digital Plus, Dolby TrueHD, DTS and DTS-HD sources.<br />
It automatically corrects the standard signal level for individual<br />
program sources.<br />
The correction value can be checked using the STATUS on the main<br />
unit.<br />
Offset: - 4dB<br />
The figure is the corrected value. This cannot be changed.<br />
Front panel Display Rear panel 162 Remote<br />
Index
Contents<br />
Connections<br />
Playback<br />
Settings<br />
Tips<br />
Appendix<br />
22Video<br />
Show the HDMI input/output signals and HDMI monitor information<br />
for MAIN ZONE.<br />
HDMI Signal Info.<br />
Resolution / Color Space / Pixel Depth<br />
HDMI Monitor<br />
Interface / Resolutions<br />
22ZONE<br />
Show information about current settings.<br />
MAIN ZONE : This item shows information about settings for MAIN<br />
ZONE. The information displayed differs according to<br />
the input source.<br />
ZONE2 : This item shows information about settings for ZONE2.<br />
22Firmware<br />
Version : Displays information for the current firmware.<br />
22Notifications<br />
Selects notification message preferences.<br />
Notification Alerts<br />
On (Default) : Displays notification messages from <strong>Denon</strong> in the popup<br />
menu.<br />
Off : Does not display notification messages from <strong>Denon</strong> in the popup<br />
menu.<br />
%<br />
• Press INFO to display current source name, volume, sound mode name, and other<br />
information at the bottom of the screen.<br />
SOURCE Blu-ray<br />
SOUND DOLBY TrueHD<br />
SIGNAL Dolby TrueHD<br />
INPUT SIGNAL<br />
FHL EXT FHR<br />
FWL FL C FR FWR<br />
SL<br />
LFE<br />
SR<br />
SBL SB SBR<br />
SL<br />
ACTIVE SPEAKERS<br />
FL<br />
SBL<br />
C<br />
SW<br />
FR<br />
SBR<br />
40.0<br />
SR<br />
NOTE<br />
• The status display screen cannot be displayed at a computer’s resolution (e.g. VGA)<br />
is being played.<br />
Front panel Display Rear panel 163 Remote<br />
Index
Contents<br />
Connections<br />
Playback<br />
Settings<br />
Tips<br />
Appendix<br />
Usage Data<br />
To help us improve our products and customer service, <strong>Denon</strong> collects<br />
anonymous information about how you use your AV receiver (such as<br />
frequently used input sources and sound modes and speaker settings).<br />
<strong>Denon</strong> will never provide any information we collect to third parties.<br />
Yes (Default) : Provide <strong>Denon</strong> with information about how you use this<br />
unit via the network.<br />
No : Do not provide <strong>Denon</strong> with information about how you use this unit<br />
via the network.<br />
Firmware<br />
Set whether or not to check for firmware update, update the firmware,<br />
and display update and upgrade notifications.<br />
22Update<br />
Update the firmware of the receiver.<br />
Check for Update : Check for firmware updates. You can also check<br />
approximately how long it will take to complete<br />
an update.<br />
Update Start : Execute the update process. When the update starts,<br />
the menu screen is shut down. During the update, the<br />
progress is shown on the display.<br />
%<br />
• If updating fails, the set automatically retries, but if updating is still not<br />
possible, one of the messages shown below is displayed. If the display reads<br />
as shown below, check the settings and network environment, then update<br />
again.<br />
Display<br />
Updating fail<br />
Login failed<br />
Server is busy<br />
Connection fail<br />
Download fail<br />
Description<br />
Updating failed.<br />
Failure to log into server.<br />
Server is busy. Wait a while then try again.<br />
Failure in connecting to server.<br />
Downloading of the firmware has failed.<br />
Front panel Display Rear panel 164 Remote<br />
Index
Contents<br />
Connections<br />
Playback<br />
Settings<br />
Tips<br />
Appendix<br />
22Notifications<br />
When the latest firmware is available, a notification message is<br />
displayed on the TV screen at power on.<br />
Update<br />
On (Default) : Display update message.<br />
Off : Do not display update message.<br />
Upgrade<br />
The notification message is displayed for about 20 seconds when the<br />
power is turned on. Connect to broadband Internet (vpage 39)<br />
when using this function.<br />
On (Default) : Display upgrade message.<br />
Off : Do not display upgrade message.<br />
22Add New Feature<br />
Display new features that can be downloaded to this unit and perform<br />
an upgrade.<br />
Upgrade Package : Display the items to be upgraded.<br />
Upgrade Status : Display a list of the additional functions provided by<br />
the upgrade.<br />
Upgrade Start : Execute the upgrade process. When the upgrade<br />
starts, the menu screen is shut down. During the<br />
upgrade, the amount of upgrade time which has<br />
elapsed is displayed.<br />
%<br />
• See the <strong>Denon</strong> website for details about upgrades.<br />
• When the procedure is complete, “Registered” is displayed in this menu and<br />
upgrades can be carried out. If the procedure has not been carried out, “Not<br />
Registered” is displayed.<br />
The ID number shown on this screen is needed when carrying out the<br />
procedure.<br />
The ID number can also be displayed by pressing and holding the main unit’s<br />
TUNER PRESET CH – and STATUS for at least 3 seconds.<br />
• If the upgrade is not successful, an error message identical to those in<br />
“Update” will appear on the display. Check the settings and network<br />
environment and then perform the upgrade again.<br />
Front panel Display Rear panel 165 Remote<br />
Index
Contents<br />
Connections<br />
Playback<br />
Settings<br />
Tips<br />
Appendix<br />
Notes concerning use of “Update” and “Add New Feature”<br />
• In order to use these functions, you must have the correct system<br />
requirements and settings for a broadband Internet connection<br />
(vpage 39).<br />
• Do not turn off the power until updating or upgrading is completed.<br />
• Even with a broadband connection to the Internet, approximately 1<br />
hour is required for the updating/upgrading procedure to be completed.<br />
• Once updating/upgrade starts, normal operations on this unit cannot<br />
be performed until updating/upgrading is completed. Furthermore,<br />
there may be cases where backup data is reset for the parameters,<br />
etc., set on this unit.<br />
• If the update or upgrade fails, press and hold the X on the main unit<br />
for more than 5 seconds, or remove and re-insert the power cord.<br />
“Update retry” appears on the display and update restarts from the<br />
point at which update failed. If the error continues despite this, check<br />
the network environment.<br />
Setup Lock<br />
Protect settings from inadvertent changes.<br />
22Lock<br />
On : Turn protection on.<br />
Off (Default) : Turn protection off.<br />
%<br />
• When cancelling the setting, set “Lock” to “Off”.<br />
NOTE<br />
• When “Lock” is set to “On”, no setting items are displayed except for “Setup<br />
Lock”.<br />
%<br />
• Information regarding the “Update” function and “Add New Feature” will be<br />
announced on the <strong>Denon</strong> web site each time related plans are defined.<br />
Front panel Display Rear panel 166 Remote<br />
Index
Contents<br />
Connections<br />
Playback<br />
Settings<br />
Tips<br />
Appendix<br />
Specifying the zone used with the<br />
remote control unit<br />
When the ZONE2 button is pressed, only the MAIN ZONE can be operated<br />
with the remote control unit.<br />
1<br />
Press and hold ZONE2 and SETUP.<br />
MAIN and ZONE2 button blink.<br />
22To cancel<br />
1<br />
Press and hold ZONE2 and SETUP.<br />
MAIN and ZONE2 button blink.<br />
Front panel Display Rear panel 167 Remote<br />
Index
Tips<br />
Contents<br />
Contents<br />
Connections<br />
Playback<br />
22Tips...................................................................(169)<br />
I want the volume not to become too loud by mistake...................(169)<br />
I want to keep the volume at the same level when I turn the<br />
power on.........................................................................................(169)<br />
I want to have the subwoofer always output audio........................(169)<br />
I want to make human voices in the movies clearer.......................(169)<br />
I want to keep bass and clarity during playback at a lower<br />
volume level....................................................................................(169)<br />
I want to automatically adjust the volume level difference in<br />
content such as TV and movies......................................................(169)<br />
I want to set the optimized listening environment after changing<br />
the configuration/position of the speakers or changing a speaker<br />
to a new one...................................................................................(169)<br />
I want to combine a desired video with the current music.............(170)<br />
I want to play back photos from Flickr at the same time while<br />
listening to the Internet radio..........................................................(170)<br />
I want to delete unused input sources............................................(170)<br />
I want to enjoy the same music in all zones at the home<br />
party, etc.........................................................................................(170)<br />
I want to minimize the delay in video signals when I’m playing a<br />
game on my game console.............................................................(170)<br />
How to add Wi-Fi to the AV receiver?.............................................(170)<br />
Settings<br />
Tips<br />
Appendix<br />
22Troubleshooting.............................................(171)<br />
Power does not turn on/Power is turned off...................................(171)<br />
Operations cannot be performed through the<br />
remote control unit..........................................................................(172)<br />
Display on this unit shows nothing.................................................(172)<br />
No sound comes out.......................................................................(173)<br />
Desired sound does not come out..................................................(174)<br />
Sound is interrupted or noise occurs...............................................(176)<br />
No video is shown on the TV..........................................................(176)<br />
The menu screen is not displayed on the TV..................................(177)<br />
iPod cannot be played back.............................................................(178)<br />
USB memory devices cannot be played back.................................(179)<br />
File names on the iPod/USB memory device are not<br />
displayed properly...........................................................................(180)<br />
The Internet radio cannot be played back.......................................(180)<br />
Music files on PC or NAS cannot be played back...........................(181)<br />
The HDMI control function does not work......................................(182)<br />
When using ZONE2, no sound comes out......................................(182)<br />
Front panel Display Rear panel 168 Remote<br />
Index
Contents<br />
Connections<br />
Playback<br />
Settings<br />
Tips<br />
Appendix<br />
Tips<br />
I want the volume not to become too loud by mistake.<br />
• Set the volume upper limit for “Volume Limit” in the menu beforehand. This prevents children or others from increasing the volume too much by<br />
mistake. You can set this for each zone (vpage 127, 161).<br />
I want to keep the volume at the same level when I turn the power on.<br />
• By default, the volume setting when power was previously set to standby is applied at next power on. To use a fixed volume level, set the volume level<br />
at power on for “Volume Limit” in the menu. You can set this for each zone (vpage 127, 161).<br />
I want to have the subwoofer always output audio.<br />
• Depending on the input signals and sound mode, the subwoofer may not output audio.<br />
When “Subwoofer Mode” in the menu is set to “LFE+Main”, you can have the subwoofer always output audio (vpage 155).<br />
I want to make human voices in the movies clearer.<br />
• Use “Dialog Level” in the menu to adjust the level (vpage 122).<br />
I want to keep bass and clarity during playback at a lower volume level.<br />
• Set “Dynamic EQ” in the menu to “On”. This setting corrects the frequency characteristics to allow you to enjoy clear sound without the bass being<br />
lost even during playback at a lower volume level (vpage 128).<br />
I want to automatically adjust the volume level difference in content such as TV and movies.<br />
• Set “Dynamic Volume” in the menu. Volume level changes (between quiet scenes and loud scenes) in TV shows or movies are automatically adjusted<br />
to your desired level (vpage 129).<br />
I want to set the optimized listening environment after changing the configuration/position of the speakers or<br />
changing a speaker to a new one.<br />
• Perform Audyssey® Setup. This automatically makes the optimized speaker settings for the new listening environment (vpage 141).<br />
Front panel Display Rear panel 169 Remote<br />
Index
Contents<br />
Connections<br />
Playback<br />
Settings<br />
Tips<br />
Appendix<br />
I want to combine a desired video with the current music.<br />
• Set “Video Select” in the option menu to “On”. You can combine the current music with your desired video source from Set-top Box or DVD, etc. while<br />
listening to music from Tuner, CD or the Internet radio (vpage 91).<br />
I want to play back photos from Flickr at the same time while listening to the Internet radio.<br />
• After playing back photos from Flickr, start the slide show on the Internet radio playback screen (vpage 90).<br />
I want to delete unused input sources.<br />
• Set unused input sources for “Hide Sources” in the menu. This allows you to skip unused input sources when rotating the SOURCE SELECT knob on<br />
this unit (vpage 139).<br />
I want to enjoy the same music in all zones at the home party, etc.<br />
• Set “All Zone Stereo” in the option menu to “On”. This allows you to simultaneously play back in ZONE2 the music that is played back in MAIN ZONE<br />
(vpage 93).<br />
I want to minimize the delay in video signals when I’m playing a game on my game console.<br />
• When the video is delayed against button operations with the controller on the game console, set “Video Mode” in the menu to “Game” (vpage 134).<br />
How to add Wi-Fi to the AV receiver?<br />
• Connect a wireless LAN converter (sold separately) to the NETWORK connector on this unit.<br />
Front panel Display Rear panel 170 Remote<br />
Index
Contents<br />
Connections<br />
Playback<br />
Settings<br />
Tips<br />
Appendix<br />
Troubleshooting<br />
If a problem should arise, first check the following:<br />
1. Are the connections correct?<br />
2. Is the set being operated as described in the owner’s manual?<br />
3. Are the other devices operating properly?<br />
If this unit does not operate properly, check the items listed in the table below. Should the problem persist, there may be a malfunction.<br />
In this case, disconnect the power immediately and contact your store of purchase.<br />
22Power does not turn on / Power is turned off<br />
Symptom Cause / Solution Page<br />
Power does not turn on. • Check whether the power plug is correctly inserted into the power outlet. 40<br />
Power automatically turns off.<br />
Power turns off and the power<br />
indicator flashes in red approx. every<br />
2 seconds.<br />
Power turns off and the power<br />
indicator flashes in red approx. every<br />
0.5 seconds.<br />
• The sleep timer is set. Turn on the power again.<br />
• “Auto Standby” is set. “Auto Standby” is triggered when there is no operation for a set<br />
amount of time. To disable “Auto Standby”, set “Auto Standby” on the menu to “Off”.<br />
• Due to the temperature rise within this unit, the protection circuit is working. Turn off the<br />
power and wait about an hour until this unit sufficiently cools down. Then, turn on the power<br />
again.<br />
• Please re-install this unit in a place having good ventilation.<br />
• Check the speaker connection. The protection circuit may have been activated because<br />
speaker cable core wires came in contact with each other or a core wire was disconnected<br />
from the connector and came in contact with the rear panel of this unit. After unplugging the<br />
power cord, take corrective action such as firmly re-twisting the core wire or taking care of the<br />
connector, and then reconnect the wire.<br />
• Turn down the volume and turn on the power again.<br />
• This unit’s amplifier circuit has failed. Turn off the power and please contact the <strong>Denon</strong><br />
service adviser.<br />
106<br />
162<br />
203<br />
–<br />
23<br />
42, 43<br />
–<br />
Front panel Display Rear panel 171 Remote<br />
Index
Contents<br />
Connections<br />
Playback<br />
Settings<br />
Tips<br />
Appendix<br />
22Operations cannot be performed through the remote control unit<br />
Symptom Cause/Solution Page<br />
Operations cannot be performed<br />
through the remote control unit.<br />
22Display on this unit shows nothing<br />
• Batteries are worn out. Replace with new batteries.<br />
• Operate the remote control unit within a distance of about 7 m from this unit and at an angle<br />
of within 30°.<br />
• Remove any obstacle between this unit and the remote control unit.<br />
• Insert the batteries in the proper direction, checking the q and w marks.<br />
• The set’s remote control sensor is exposed to strong light (direct sunlight, inverter type<br />
fluorescent bulb light, etc.). Move the set to a place in which the remote control sensor will<br />
not be exposed to strong light.<br />
• The operation target zone does not correspond to the zone setting specified on the remote<br />
control unit. Press MAIN or ZONE2 to select the zone to operate.<br />
• When using a 3D video device, the remote control unit of this unit may not function due to<br />
effects of infrared communications between units (such as TV and glasses for 3D viewing). In<br />
this case, adjust the direction of units with the 3D communications function and their distance<br />
to ensure they do not affect operations from the remote control unit of this unit.<br />
7<br />
7<br />
–<br />
7<br />
–<br />
112, 120<br />
Symptom Cause/Solution Page<br />
Display is off.<br />
• Set “Dimmer” on the menu to something other than “Off”.<br />
• When the sound mode is set to PURE DIRECT, the display is off.<br />
162<br />
96<br />
–<br />
Front panel Display Rear panel 172 Remote<br />
Index
Contents<br />
Connections<br />
Playback<br />
Settings<br />
Tips<br />
Appendix<br />
22No sound comes out<br />
Symptom Cause/Solution Page<br />
No sound comes out of speakers.<br />
No sound comes out when using the<br />
DVI-D connection.<br />
• Check the connections for all devices.<br />
• Insert connection cables all the way in.<br />
• Check that input connectors and output connectors are not reversely connected.<br />
• Check cables for damage.<br />
• Check that speaker cables are properly connected. Check that cable core wires come in<br />
contact with the metal part on speaker terminals. Also, securely tighten speaker terminals.<br />
Check speaker terminals for looseness.<br />
• Check that a proper input source is selected.<br />
• Adjust the master volume.<br />
• Cancel the mute mode.<br />
• Check the digital input connector setting.<br />
• Check the digital audio output setting on the connected device. On some devices, the digital<br />
audio output is set to off by default.<br />
• No sound is output from the speakers when headphones are connected.<br />
• When this unit is connected to a device equipped with a DVI-D connector, no sound is output.<br />
Make a separate audio connection.<br />
23, 30, 31, 33,<br />
34, 35, 36, 38,<br />
39<br />
–<br />
–<br />
–<br />
23<br />
42, 112<br />
43, 112<br />
43, 113<br />
31, 33, 34<br />
–<br />
11<br />
–<br />
Front panel Display Rear panel 173 Remote<br />
Index
Contents<br />
Connections<br />
Playback<br />
Settings<br />
Tips<br />
Appendix<br />
22Desired sound does not come out<br />
Symptom Cause/Solution Page<br />
The volume does not increase.<br />
No sound comes out with the HDMI<br />
connection.<br />
No sound comes out of a specific<br />
speaker.<br />
No sound is produced from<br />
subwoofer.<br />
• The maximum volume is set too low. Set the maximum volume using “Limit”on the menu.<br />
• Appropriate volume correction processing is performed according to the input audio format<br />
and settings, so the volume may not reach the upper limit.<br />
• Check the connection of the HDMI connectors.<br />
• When outputting HDMI audio from the speakers, set “HDMI <strong>Audio</strong> Out” on the menu to<br />
“<strong>AVR</strong>”. To output from the TV, set “TV”.<br />
• When using the HDMI control function, check that the audio output is set to the AV amplifier<br />
on the TV.<br />
• Check that the speaker cable is properly connected.<br />
• Check that a selection other than “None” is set for the “Speaker Config.” setting in menu.<br />
• Check the “Assign Mode” setting in the menu.<br />
• When the sound mode is “STEREO” and “VIRTUAL”, audio is only output from the front<br />
speakers and subwoofer.<br />
• Check the subwoofer connections.<br />
• Turn on the subwoofer’s power.<br />
• Set “Speaker Config.” – “Subwoofer” on the menu to “Yes”.<br />
• When “Speaker Config.” – “Front” in the menu is set to “Large”, depending on the input<br />
signal and the sound mode, no sound may be output from the subwoofer.<br />
• When no subwoofer audio signal (LFE) is included in the input signals, no sound may be<br />
output from the subwoofer.<br />
• You can make the subwoofer always output sound by setting the subwoofer mode to<br />
“LFE+Main”.<br />
127, 161<br />
–<br />
30, 31<br />
132<br />
105<br />
23<br />
151, 152<br />
150<br />
–<br />
24<br />
–<br />
151<br />
151<br />
155<br />
155<br />
Front panel Display Rear panel 174 Remote<br />
Index
Contents<br />
Connections<br />
Playback<br />
Settings<br />
Tips<br />
Appendix<br />
DTS sound is not output.<br />
Symptom Cause/Solution Page<br />
Dolby TrueHD, DTS-HD, Dolby Digital<br />
Plus audio is not output.<br />
Dolby PLg mode or DTS NEO:6 mode<br />
cannot be selected.<br />
Audyssey MultEQ® XT, Audyssey<br />
Dynamic EQ® and Audyssey Dynamic<br />
Volume® cannot be selected.<br />
“Restorer” cannot be selected.<br />
No audio is output in ZONE2.<br />
• Check that the digital audio output setting on the connected device is set to “DTS”.<br />
• Set “Decode Mode” on the menu to “Auto” or “DTS”.<br />
• Make HDMI connections.<br />
• Check the digital audio output setting on the connected device. On some devices, “PCM” is<br />
set by default.<br />
• It cannot be selected when “None” is set for “Speaker Config.” – “Center” and “Surround”.<br />
• These cannot be selected when using the headphones.<br />
• These cannot be selected when you have not performed Audyssey® Setup.<br />
• Switch the sound mode to other than “DIRECT” or “PURE DIRECT”.<br />
• These cannot be selected when using the headphones.<br />
• These cannot be selected when an HD audio format with a sampling frequency of over 96 kHz<br />
is input (such as may be found on select Dolby TrueHD and DTS-HD discs).<br />
• Check that an analog signal or PCM signal (Sample Rate=44.1/48 kHz) is input. For playback<br />
of multichannel signals such as Dolby Digital or DTS surround, “Restorer” cannot be used.<br />
• Switch the sound mode to other than “DIRECT” or “PURE DIRECT”.<br />
• You cannot play back the audio for digital signals that are input from the HDMI connector or<br />
digital connectors (OPTICAL/COAXIAL). Make an analog connection instead.<br />
–<br />
140<br />
33, 34<br />
–<br />
151<br />
–<br />
141<br />
96<br />
–<br />
–<br />
126<br />
96<br />
–<br />
Front panel Display Rear panel 175 Remote<br />
Index
Contents<br />
Connections<br />
Playback<br />
Settings<br />
Tips<br />
Appendix<br />
22Sound is interrupted or noise occurs<br />
Symptom Cause/Solution Page<br />
During playback from the Internet<br />
radio or USB memory device, sound<br />
is occasionally interrupted.<br />
• When the transfer speed of the USB memory device is slow, sound may occasionally be<br />
interrupted.<br />
• The network communication speed is slow or the radio station is busy.<br />
–<br />
–<br />
When making a call on iPhone, noise<br />
occurs in audio output on this unit.<br />
• When making a call, keep a distance of 20 cm or longer between iPhone and this unit. –<br />
Noise often occurs in FM<br />
broadcasting.<br />
22No video is shown on the TV<br />
• Change the antenna orientation or position.<br />
• Use an FM outdoor antenna.<br />
• Separate the antenna from other connection cables.<br />
Symptom Cause/Solution Page<br />
No picture appears.<br />
• Check the connections for all devices.<br />
• Insert connection cables all the way in.<br />
• Check that input connectors and output connectors are not reversely connected.<br />
• Check cables for damage.<br />
• Match the input settings to the input connector of the TV connected to this unit.<br />
• Check that the proper input source is selected.<br />
• Check the video input connector setting.<br />
• Check that the resolution of the player corresponds to that of the TV.<br />
• Check whether the TV is compatible with copyright protection (HDCP). If connected to a<br />
device not compatible with HDCP, video will not be output correctly.<br />
38<br />
38<br />
38<br />
30, 31, 33, 34,<br />
35, 36, 38, 39<br />
–<br />
–<br />
–<br />
137<br />
42, 112<br />
137<br />
163<br />
186<br />
Front panel Display Rear panel 176 Remote<br />
Index
Contents<br />
Connections<br />
Playback<br />
Settings<br />
Tips<br />
Appendix<br />
Symptom Cause/Solution Page<br />
No video is shown on the TV with the • With the DVI-D connection, on some device combinations, devices may not function properly 186<br />
DVI-D connection.<br />
due to the copy guard copyright protection (HDCP).<br />
No video from an input source such<br />
as a game console is shown on the<br />
TV.<br />
While the menu is being displayed, no<br />
video is shown on the TV.<br />
22The menu screen is not displayed on the TV<br />
• When special video signals are input from a game console, etc., the video conversion function<br />
may not function. Connect the input connector to the monitor output connector of the same<br />
type.<br />
• When the menu is operated during playback of some 3D video contents or of video at some<br />
computer resolutions (such as VGA), no playback video is shown in the background of the<br />
menu.<br />
Symptom Cause/Solution Page<br />
The menu screen is not displayed on<br />
the TV.<br />
• No operation detail is displayed for some 3D videos or videos with a computer resolution<br />
such as VGA.<br />
• When a 2D video is converted to a 3D video on the TV, the menu screen or status indication<br />
screen is not properly displayed.<br />
• In the pure direct playback mode, the menu screen or operation detail is not displayed. Switch<br />
to a sound mode other than the pure direct mode.<br />
• Set the “TV Format” setting in the menu to a selection that is appropriate for the TV.<br />
163<br />
–<br />
95, 96<br />
136<br />
–<br />
–<br />
Front panel Display Rear panel 177 Remote<br />
Index
Contents<br />
Connections<br />
Playback<br />
Settings<br />
Tips<br />
Appendix<br />
22iPod cannot be played back<br />
iPod cannot be connected.<br />
Symptom Cause/Solution Page<br />
The AirPlay icon ' is not displayed<br />
on iTunes / iPhone / iPod touch / iPad.<br />
<strong>Audio</strong> is not output.<br />
<strong>Audio</strong> is interrupted during the AirPlay<br />
playback on iPhone / iPod touch /<br />
iPad.<br />
iTunes cannot be played back through<br />
the remote control unit.<br />
• When using iPod by connecting it to the USB port, some iPod variations are not supported.<br />
• When iPod is connected by using a USB cable other than the genuine cable, iPod may not be<br />
recognized. Use a genuine USB cable.<br />
• This unit and PC / iPhone / iPod touch / iPad are not connected to the same network (LAN).<br />
Connect it to the same LAN as this unit.<br />
• The firmware on iTunes / iPhone / iPod touch / iPad is not compatible with AirPlay. Update the<br />
firmware to the latest version.<br />
• The volume on iTunes / iPhone / iPod touch / iPad is set to the minimum level. The volume on<br />
iTunes / iPhone / iPod touch / iPad is linked with the volume on this unit. Set a proper volume<br />
level.<br />
• The AirPlay playback is not performed, or this unit is not selected. Click the AirPlay icon ' on<br />
the iTunes / iPhone / iPod touch / iPad screen and select this unit.<br />
• Quit the application running in the background of the iPhone/iPod touch/iPad, and then play<br />
using AirPlay.<br />
• Some external factors may be affecting the wireless connection. Modify the network<br />
environment by taking measures such as shortening the distance from the wireless LAN<br />
access point.<br />
• Enable the “Allow iTunes control from remote speakers” setting on iTunes. Then, you can<br />
perform playback, pause, and skip operations through the remote control unit.<br />
37<br />
–<br />
39<br />
–<br />
–<br />
83<br />
–<br />
–<br />
–<br />
Front panel Display Rear panel 178 Remote<br />
Index
Contents<br />
Connections<br />
Playback<br />
Settings<br />
Tips<br />
Appendix<br />
22USB memory devices cannot be played back<br />
Symptom Cause/Solution Page<br />
“No Connection” is displayed. • The set cannot recognize a USB memory device. Disconnect and reconnect the USB memory<br />
device.<br />
• USB memory devices of a mass storage class or those compatible with MTP are supported.<br />
• This unit does not support a connection through a USB hub. Connect the USB memory device<br />
directly to the USB port.<br />
• The USB memory device must be formatted to FAT16 or FAT32.<br />
• Not all USB memory devices are guaranteed to work. Some USB memory devices are not<br />
recognized. When using a type of portable hard disc drive compatible with the USB connection<br />
that requires power from an AC adapter, use the AC adapter that came with the drive.<br />
36<br />
–<br />
–<br />
–<br />
–<br />
Files on the USB memory device are<br />
not displayed.<br />
Files on a USB memory device cannot<br />
be played.<br />
• Files of a type not supported by this unit are not displayed.<br />
• This unit can display a file structure with up to 8 levels and up to 5000 subfolders and files in<br />
total. Modify the folder structure of the USB memory device.<br />
• When multiple partitions exist on the USB memory device, only files on the first partition are<br />
displayed.<br />
• Files are created in a format that is not supported by this unit. Check the formats supported<br />
by this unit.<br />
• You are attempting to play a file that is copyright protected. Files that are copyright protected<br />
cannot be played on this unit.<br />
48<br />
–<br />
–<br />
189<br />
–<br />
Front panel Display Rear panel 179 Remote<br />
Index
Contents<br />
Connections<br />
Playback<br />
Settings<br />
Tips<br />
Appendix<br />
22File names on the iPod/USB memory device are not displayed properly<br />
Symptom Cause/Solution Page<br />
The file names are not displayed • Characters that cannot be displayed are used. This is not a malfunction. On this unit, characters –<br />
properly (“...”, etc.).<br />
that cannot be displayed are replaced with a “.” (period).<br />
22The Internet radio cannot be played back<br />
Symptom Cause/Solution Page<br />
A list of broadcasting stations is not<br />
displayed.<br />
• The LAN cable is not properly connected, or the network is disconnected. Check the<br />
connection status.<br />
• Perform the network diagnostic mode.<br />
39<br />
–<br />
Internet Radio cannot be played. • The selected radio station is broadcasting in a format that is not supported by this unit.<br />
Formats that can be played back in this unit are MP3, WMA and AAC.<br />
• The firewall function is enabled on the router. Check the firewall setting.<br />
• The IP address is not properly set.<br />
• Check the power of the router is on.<br />
• To obtain the IP address automatically, enable the DHCP server function on the router. Also,<br />
set the DHCP setting to “On” on this unit.<br />
• To obtain the IP address manually, set the IP address and proxy on this unit.<br />
• Some radio stations broadcast silently during some time period. In this case, no audio is<br />
191<br />
–<br />
157<br />
–<br />
157<br />
157, 158<br />
61<br />
output. Wait for a while and select the same radio station, or select another radio station.<br />
Cannot connect to favorite radio • Radio station is not currently in service. Register radio stations in service. –<br />
stations.<br />
For some radio stations, “Connection<br />
down” is displayed and station cannot<br />
be connected to.<br />
• The selected radio station is not in service. Select a radio station in service. –<br />
Front panel Display Rear panel 180 Remote<br />
Index
Contents<br />
Connections<br />
Playback<br />
Settings<br />
Tips<br />
Appendix<br />
22Music files on PC or NAS cannot be played back<br />
Symptom Cause/Solution Page<br />
Files stored on a computer cannot be<br />
played.<br />
Server is not found, or it is not<br />
possible to connect to the server.<br />
Music files on PC cannot be played<br />
back.<br />
• Files are stored in a non-compatible format. Record in a compatible format.<br />
• You are attempting to play a file that is copyright protected. Files that are copyright protected<br />
cannot be played on this unit.<br />
• Set and computer are connected by USB cable. The set’s USB port cannot be used for<br />
connection to a computer.<br />
• Media sharing settings are not correct. Change media sharing settings so that the unit can<br />
access the folders on your computer.<br />
• The computer’s or router’s firewall is activated. Check the computer’s or router’s firewall<br />
settings.<br />
• Computer’s power is not turned on. Turn on the power.<br />
• Server is not running. Launch the server.<br />
• Set’s IP address is wrong. Check the set’s IP address.<br />
• Even if PC is connected to the USB connector on this unit, music files on it cannot be played<br />
back. Connect PC or NAS to this unit through the network.<br />
Files on PC or NAS are not displayed. • Files of a type not supported by this unit are not displayed. 190<br />
190<br />
–<br />
–<br />
65<br />
–<br />
–<br />
–<br />
156<br />
39<br />
Music stored on a NAS cannot be<br />
played.<br />
• If you use a NAS in conformity with the DLNA standard, enable the DLNA server function in<br />
the NAS setting.<br />
• If you use a NAS that does not conform with the DLNA standard, play the music via a PC.<br />
Set Windows Media Player’s media sharing function and add NAS to the selected play folder.<br />
• If connection is restricted, set audio equipment as the connection target.<br />
–<br />
65<br />
–<br />
Front panel Display Rear panel 181 Remote<br />
Index
Contents<br />
Connections<br />
Playback<br />
Settings<br />
Tips<br />
Appendix<br />
22The HDMI control function does not work<br />
Symptom Cause/Solution Page<br />
The HDMI control function does not<br />
work.<br />
22When using ZONE2, no sound comes out<br />
• Check that “HDMI Control” in the menu is set to “On”.<br />
• You cannot operate devices that are not compatible with the HDMI control function. In<br />
addition, depending on the connected device or the settings, the HDMI control function may<br />
not work. In this case, operate the external device directly.<br />
• Check that the HDMI control function setting is enabled on all devices connected to this unit.<br />
• When you make connection related changes such as connecting an additional HDMI device,<br />
the link operation settings may be initialized. Turn off this unit and devices connected via<br />
HDMI, and turn them on again.<br />
Symptom Cause/Solution Page<br />
When using ZONE2, no sound comes • In ZONE2, you can select iPod/USB, TUNER, NETWORK or an input source with an analog 112<br />
out.<br />
audio input connector.<br />
133<br />
105<br />
105<br />
105<br />
Front panel Display Rear panel 182 Remote<br />
Index
Contents<br />
Connections<br />
Resetting factory settings<br />
Playback<br />
Settings<br />
Perform this procedure if the display is abnormal or if operations cannot be performed.<br />
Note that when the microprocessor is reset, all the settings are reset to their default values and setup will need to be performed again.<br />
X<br />
TUNER PRESET CH –<br />
1<br />
Tips<br />
Turn off the power using X.<br />
Appendix<br />
2<br />
3<br />
Press X while simultaneously pressing TUNER PRESET<br />
CH – and TUNER PRESET CH +.<br />
Once the display starts flashing at intervals of about 1<br />
second, release the two buttons.<br />
TUNER PRESET CH +<br />
%<br />
• If in step 3 the display does not flash at intervals of about 1 second, start over<br />
from step 1.<br />
Front panel Display Rear panel 183 Remote<br />
Index
Contents<br />
Appendix<br />
About HDMI<br />
Connections<br />
Playback<br />
HDMI is an abbreviation of High-Definition Multimedia Interface, which is<br />
an AV digital interface that can be connected to a TV or amplifier.<br />
With the HDMI connection, high definition video and high quality audio<br />
formats adopted by Blu-ray disc players (Dolby Digital Plus, Dolby TrueHD,<br />
DTS-HD, DTS-HD Master <strong>Audio</strong>) can be transmitted, which is not possible<br />
with the analog video transmission.<br />
Furthermore, in the HDMI connection, audio and video signals can<br />
be transmitted through a single HDMI cable, while in conventional<br />
connections it is necessary to provide audio and video cables separately<br />
for connection between devices.<br />
This allows you to simplify the wiring configuration that tends to be quite<br />
complex in a home theater system.<br />
This unit supports the following HDMI functions.<br />
• Deep Color<br />
An imaging technology supported by HDMI. Unlike RGB or YCbCr, which<br />
uses 8 bits (256 shades) per color, it can use 10 bits (1024 shades), 12<br />
bits (4096 shades), or 16 bits (65536 shades) to produce colors in higher<br />
definition. Both devices linked via HDMI must support Deep Color.<br />
• “x.v.Color”<br />
This function lets HDTVs display colors more accurately. It enables<br />
display with natural, vivid colors.<br />
“x.v.Color” is trademark of Sony Corporation.<br />
Settings<br />
Tips<br />
Appendix<br />
• 3D<br />
This unit supports input and output of 3D (3 dimensional) video signals<br />
of HDMI.<br />
To play back 3D video, you need a TV and player that provide support for<br />
the HDMI 3D function and a pair of 3D glasses.<br />
• 4K<br />
This unit supports input and output of 4K Ultra HD (3840 x 2160 pixels)<br />
video signals of HDMI.<br />
• Content Type<br />
It automatically makes settings suitable for the video output type<br />
(content information).<br />
• Adobe RGB color, Adobe YCC601 color<br />
The color space defined by Adobe Systems Inc. Because it is a wider<br />
color space than RGB, it can produce more vivid and natural images.<br />
• sYCC601 color<br />
Each of these color spaces defines a palette of available colors that is<br />
larger than the traditional RGB color model.<br />
• Auto Lip Sync<br />
This function can automatically correct delay between the audio and<br />
video.<br />
Use a TV that is compatible with the Auto Lip Sync function.<br />
• HDMI pass through<br />
Even when the power to this unit is set to standby, signals input from<br />
the HDMI input connector are output to a TV or other device that is<br />
connected to the HDMI output connector.<br />
Front panel Display Rear panel 184 Remote<br />
Index
Contents<br />
Connections<br />
Playback<br />
Settings<br />
Tips<br />
Appendix<br />
• HDMI control<br />
If you connect the unit and an HDMI control function compatible TV or<br />
player with an HDMI cable and then enable the HDMI control function<br />
setting on each device, the devices will be able to control each other.<br />
• Power off link<br />
This unit power off can be linked to the TV power off step.<br />
• <strong>Audio</strong> output destination switching<br />
From the TV, you can switch whether to output audio from the TV or<br />
the AV amplifier.<br />
• Volume adjustment<br />
You can adjust this unit’s volume in the TV volume adjustment<br />
operation.<br />
• Input source switching<br />
You can switch this unit input sources through linkage to TV input<br />
switching.<br />
When playing the player, this unit input source switches to the source<br />
for that player.<br />
• ARC (<strong>Audio</strong> Return Channel)<br />
This function transmits audio signals from the TV to this unit through the<br />
HDMI cable and plays back the audio from the TV on this unit based on<br />
the HDMI control function.<br />
If a TV without the ARC function is connected via HDMI connections,<br />
video signals of the playback device connected to this unit are<br />
transmitted to the TV, but this unit can not play back the audio from the<br />
TV. If you want to enjoy surround audio for TV program, a separate audio<br />
cable connection is required. In contrast, if a TV with the ARC function is<br />
connected via HDMI connections, no audio cable connection is required.<br />
<strong>Audio</strong> signals from the TV can be input to this unit through the HDMI<br />
cable between this unit and the TV. This function allows you to enjoy<br />
surround playback on this unit for the TV.<br />
Front panel Display Rear panel 185 Remote<br />
Index
Contents<br />
Connections<br />
Playback<br />
Settings<br />
Tips<br />
Appendix<br />
22Supported audio formats<br />
2-channel Linear PCM<br />
Multi-channel Linear PCM<br />
Bitstream<br />
2-channel, 32 kHz – 192 kHz,<br />
16/20/24 bit<br />
7.1-channel, 32 kHz – 192kHz,<br />
16/20/24 bit<br />
Dolby Digital / DTS / Dolby TrueHD /<br />
Dolby Digital Plus /<br />
DTS-HD Master <strong>Audio</strong> /<br />
DTS-HD High Resolution <strong>Audio</strong> /<br />
DTS Express<br />
22Supported video signals<br />
• 480i • 480p • 576i<br />
• 576p • 720p 60/50Hz • 1080i 60/50Hz<br />
• 1080p 60/50/24Hz • 4K 30/25/24Hz<br />
Copyright protection system<br />
In order to play back digital video and audio such as BD-Video (Blu-ray<br />
Disc) or DVD-Video via HDMI connection, both this unit and TV and the<br />
player need to support the copyright protection system known as HDCP<br />
(High-bandwidth Digital Content Protection System). HDCP is copyright<br />
protection technology comprised of data encryption and authentication<br />
of the connected AV devices. This unit supports HDCP.<br />
• If a device that does not support HDCP is connected, video and audio<br />
are not output correctly. Read the owner’s manual of your television or<br />
player for more information.<br />
%<br />
• When connecting this unit to a device that is compatible with the Deep Color, 4K,<br />
ARC function, use a “High Speed HDMI cable” or “High Speed HDMI cable with<br />
Ethernet”.<br />
Front panel Display Rear panel 186 Remote<br />
Index
Contents<br />
Connections<br />
Playback<br />
Settings<br />
Tips<br />
Video conversion function<br />
This unit automatically converts the input video signals as shown in the diagram below before outputting them to the TV.<br />
Appendix<br />
Video device<br />
This unit<br />
HDMI-compatible TV<br />
Output<br />
Input<br />
(IN)<br />
Output<br />
(MONITOR OUT)<br />
Input<br />
HDMI signal<br />
HDMI signal<br />
HDMI connector<br />
HDMI connector<br />
HDMI connector<br />
HDMI connector<br />
Component video<br />
signal<br />
Component video<br />
connectors<br />
Component video<br />
connectors<br />
Video connector<br />
Video signal<br />
Video connector<br />
%<br />
• The main zone video conversion function is<br />
compatible with the following formats: NTSC,<br />
PAL, SECAM, NTSC4.43, PAL-N, PAL-M and PAL-<br />
60.<br />
Front panel Display Rear panel 187 Remote<br />
Index
Contents<br />
Connections<br />
Playback<br />
Settings<br />
Tips<br />
Appendix<br />
This unit can convert the input video signals to the resolution that is set for “Resolution” (vpage 135) in the menu before outputting them to the TV.<br />
Output signal<br />
HDMI<br />
Input signal<br />
480i/576i 480p/576p 720p 1080i 1080p 1080p 24Hz 4K 30/25/24Hz<br />
480i/576i P P P P P P P<br />
480p/576p P P P P P P<br />
720p P P P P P<br />
HDMI<br />
1080i P P P P P<br />
1080p 24Hz P P P<br />
1080p P P P<br />
4K 30/25/24Hz<br />
P<br />
480i/576i P P P P P P P<br />
480p/576p P P P P P P<br />
Component Video 720p P P P P P<br />
1080i P P P P P<br />
1080p P P P<br />
Video 480i/576i P P P P P P P<br />
Front panel Display Rear panel 188 Remote<br />
Index
Contents<br />
Connections<br />
Playback<br />
Settings<br />
Tips<br />
Appendix<br />
Playing back USB memory devices<br />
• This unit is compatible with MP3 ID3-Tag (Ver. 2) standard.<br />
• This unit can show the artwork that was embedded by using MP3 ID3-<br />
Tag Ver. 2.3 or 2.4.<br />
• This unit is compatible with WMA META tags.<br />
• If the image size (pixels) of an album artwork exceeds 500 × 500 (WMA/<br />
MP3/WAV/FLAC) or 349 × 349 (MPEG-4 AAC), then music may not be<br />
played back properly.<br />
22Compatible formats<br />
Sampling frequency Bit rate Extension<br />
WMA<br />
(Windows<br />
32/44.1/48 kHz – 192 kbps .wma<br />
Media <strong>Audio</strong>) z1<br />
MP3<br />
(MPEG-1 <strong>Audio</strong><br />
Layer-3)<br />
WAV<br />
32/44.1/48 kHz 32 – 320 kbps .mp3<br />
32/44.1/48/88.2/96/<br />
176.4/192 kHz<br />
MPEG-4 AAC z2 32/44.1/48 kHz 16 – 320 kbps<br />
FLAC<br />
(Free Lossless<br />
<strong>Audio</strong> Codec)<br />
32/44.1/48/88.2/96/<br />
176.4/192 kHz<br />
– .wav<br />
.aac/<br />
.m4a/<br />
.mp4<br />
– .flac<br />
ALAC<br />
(Apple Lossless 32/44.1/48/88.2/96 kHz – .m4a<br />
<strong>Audio</strong> Codec) z3<br />
z1 Copyright-protected files can be played on certain portable players compatible<br />
with MTP.<br />
z2 Only files that are not protected by copyright can be played on this unit.<br />
Content downloaded from pay sites on the Internet are copyright protected.<br />
Also, files encoded in WMA format when ripped from a CD, etc. on a computer<br />
may be copyright protected, depending on the computer’s settings.<br />
z3 Copyright [2012] [D&M Holdings. Inc.]<br />
Licensed under the Apache License, Version 2.0 (the “License”); you may not<br />
use this file except in compliance with the License. You may obtain a copy of<br />
the License at http://www.apache.org/licenses/LICENSE-2.0.<br />
22Maximum Number of Playable Files and Folder<br />
The limits on the number of folders and files that can be displayed by<br />
this unit are as follows.<br />
Media<br />
Item<br />
USB memory devices<br />
Memory capacity<br />
FAT16 : 2 GB, FAT32 : 2 TB<br />
Number of folder directory levels<br />
z1<br />
8 levels<br />
Number of folders 500<br />
Number of files z2 5000<br />
z1 The limited number includes the root folder.<br />
z2 The allowable number of files may differ according to the USB memory device<br />
capacity and the file size.<br />
Front panel Display Rear panel 189 Remote<br />
Index
Contents<br />
Connections<br />
Playback<br />
Playing back files stored on PC or<br />
NAS<br />
• This unit is compatible with MP3 ID3-Tag (Ver. 2) standard.<br />
• This unit can show the artwork that was embedded by using MP3 ID3-<br />
Tag Ver. 2.3 or 2.4.<br />
• This unit is compatible with WMA META tags.<br />
• If the image size (pixels) of an album artwork exceeds 500 × 500 (WMA/<br />
MP3/WAV/FLAC) or 349 × 349 (MPEG-4 AAC), then music may not be<br />
played back properly.<br />
• A server or server software compatible with distribution in the<br />
corresponding formats is required to play music files via a network.<br />
Settings<br />
Tips<br />
22Specifications of supported files<br />
WMA<br />
(Windows<br />
Media <strong>Audio</strong>)<br />
MP3<br />
(MPEG-1 <strong>Audio</strong><br />
Layer-3)<br />
WAV<br />
Appendix<br />
Sampling frequency Bit rate Extension<br />
32/44.1/48 kHz 48 – 192 kbps .wma<br />
32/44.1/48 kHz 32 – 320 kbps .mp3<br />
32/44.1/48/88.2/96/<br />
176.4/192 kHz<br />
MPEG-4<br />
AAC z1 32/44.1/48 kHz 16 – 320 kbps<br />
FLAC<br />
(Free Lossless<br />
<strong>Audio</strong> Codec)<br />
32/44.1/48/88.2/96/<br />
176.4/192 kHz<br />
– .wav<br />
.aac/<br />
.m4a/<br />
.mp4<br />
– .flac<br />
ALAC<br />
(Apple Lossless 32/44.1/48/88.2/96 kHz – .m4a<br />
<strong>Audio</strong> Codec) z2<br />
z1 Only files that are not protected by copyright can be played on this unit.<br />
Content downloaded from pay sites on the Internet are copyright protected.<br />
Also, files encoded in WMA format when ripped from a CD, etc. on a computer<br />
may be copyright protected, depending on the computer’s settings.<br />
z2 Copyright [2012] [D&M Holdings. Inc.]<br />
Licensed under the Apache License, Version 2.0 (the “License”); you may not<br />
use this file except in compliance with the License. You may obtain a copy of<br />
the License at http://www.apache.org/licenses/LICENSE-2.0.<br />
Front panel Display Rear panel 190 Remote<br />
Index
Contents<br />
Connections<br />
Playback<br />
Settings<br />
Tips<br />
Appendix<br />
Playing back Internet Radio<br />
22Playable broadcast station specifications<br />
Sampling frequency Bit rate Extension<br />
WMA<br />
(Windows<br />
Media <strong>Audio</strong>)<br />
MP3<br />
(MPEG-1 <strong>Audio</strong><br />
Layer-3)<br />
32/44.1/48 kHz 48 – 192 kbps .wma<br />
32/44.1/48 kHz 32 – 320 kbps .mp3<br />
MPEG-4 AAC 32/44.1/48 kHz 16 – 320 kbps<br />
.aac/<br />
.m4a/<br />
.mp4<br />
Personal memory plus function<br />
This function sets the settings (input mode, sound mode, HDMI output<br />
mode, MultEQ® XT, Dynamic EQ, audio delay etc.) last selected for the<br />
individual input sources.<br />
%<br />
• The surround parameters, tone control settings are stored for the individual sound<br />
modes.<br />
Last function memory<br />
This function stores the settings which were made before going into the<br />
standby mode.<br />
When the power is turned back on, the settings are restored.<br />
Front panel Display Rear panel 191 Remote<br />
Index
Contents<br />
Connections<br />
Playback<br />
Sound modes and channel output<br />
Settings<br />
S This indicates the audio output channels or surround parameters that can be set.<br />
D This indicates the audio output channels. The output channels depend on the settings of “Speaker Config.” (vpage 151).<br />
Tips<br />
Appendix<br />
Sound mode (vpage 94)<br />
Channel output<br />
Front L/R Center Surround L/R Surround back L/R Front height L/R Subwoofer<br />
DIRECT/PURE DIRECT (2-channel) S Dz3<br />
DIRECT/PURE DIRECT (Multi-channel) S D D Dz1 Dz1 D<br />
STEREO S D<br />
MULTI CH IN S D D Dz1 D<br />
DOLBY PRO LOGIC gz S D D Dz2 D<br />
DOLBY PRO LOGIC gx S D D D D<br />
DOLBY PRO LOGIC g S D D D<br />
DTS NEO:6 S D D D D<br />
DOLBY DIGITAL S D D D Dz2 D<br />
DOLBY DIGITAL Plus S D D Dz1 Dz1 D<br />
DOLBY TrueHD S D D Dz1 Dz1 D<br />
DTS SURROUND S D D D Dz2 D<br />
DTS 96/24 S D D D Dz2 D<br />
DTS-HD S D D Dz1 Dz1 D<br />
DTS Express S D D D Dz2 D<br />
MULTI CH STEREO S D D D D D<br />
ROCK ARENA S D D D D D<br />
JAZZ CLUB S D D D D D<br />
MONO MOVIE S D D D D D<br />
VIDEO GAME S D D D D D<br />
MATRIX S D D D D D<br />
VIRTUAL S D<br />
z1 A signal for each channel contained in an input signal is output as audio.<br />
z2 <strong>Audio</strong> is output when the set sound mode name contains “+PLgz”.<br />
z3 <strong>Audio</strong> is output when “Subwoofer Mode” (vpage 155) in the menu is set to “LFE+Main”.<br />
Front panel Display Rear panel 192 Remote<br />
Index
Contents<br />
Connections<br />
Playback<br />
Settings<br />
Tips<br />
Appendix<br />
Sound modes and surround parameters<br />
Sound mode (vpage 94)<br />
Dialog Level<br />
(vpage 122)<br />
Subwoofer<br />
Level<br />
(vpage 122)<br />
Cinema EQ<br />
(vpage 123)<br />
Loudness<br />
Management<br />
z5<br />
(vpage 123)<br />
Surround Parameter (vpage 123)<br />
Dynamic<br />
Compression<br />
z6<br />
(vpage 123)<br />
DIRECT/PURE DIRECT (2-channel)z1 Sz2 S S<br />
DIRECT/PURE DIRECT (Multi-channel)z1 S S S S<br />
Low<br />
Frequency<br />
Effects<br />
z7<br />
(vpage 124)<br />
STEREO S S S S<br />
MULTI CH IN S S Sz3 S<br />
Delay Time<br />
(vpage 125)<br />
Effect Level<br />
(vpage 125)<br />
Room Size<br />
(vpage 125)<br />
DOLBY PRO LOGIC gz S S S S S S<br />
DOLBY PRO LOGIC gx S S Sz4 S S<br />
DOLBY PRO LOGIC g S S Sz4 S S<br />
DTS NEO:6 S S Sz4 S S<br />
DOLBY DIGITAL S S Sz3 S S S<br />
DOLBY DIGITAL Plus S S Sz3 S S S<br />
DOLBY TrueHD S S Sz3 S S S S<br />
DTS SURROUND S S Sz3 S S S<br />
DTS 96/24 S S Sz3 S S<br />
DTS-HD S S Sz3 S S<br />
DTS Express S S Sz3 S S<br />
MULTI CH STEREO S S S S S<br />
ROCK ARENA S S S S S S S<br />
JAZZ CLUB S S S S S S S<br />
MONO MOVIE S S S S S S S<br />
VIDEO GAME S S S S S S S<br />
MATRIX S S S S S S<br />
VIRTUAL S S S S<br />
z1 – z8 : vpage 195<br />
Height Gain<br />
z8<br />
(vpage 125)<br />
Front panel Display Rear panel 193 Remote<br />
Index
Contents<br />
Connections<br />
Playback<br />
Settings<br />
Tips<br />
Appendix<br />
Sound mode (vpage 94)<br />
Surround Parameter (vpage 123)<br />
PRO LOGIC g/gx Music mode only<br />
Panorama<br />
(vpage 124)<br />
Dimension<br />
(vpage 124)<br />
Center Width<br />
(vpage 125)<br />
NEO:6 Music<br />
mode only<br />
Center Image<br />
(vpage 124)<br />
Tone<br />
z9<br />
(vpage 126)<br />
MultEQ® XT<br />
z10<br />
(vpage 128)<br />
Audyssey (vpage 128)<br />
Dynamic EQ<br />
z11<br />
(vpage 128)<br />
Dynamic<br />
Volume<br />
z11<br />
(vpage 129)<br />
Restorer<br />
z12<br />
(vpage 126)<br />
DIRECT/PURE DIRECT (2-channel)z1<br />
DIRECT/PURE DIRECT (Multi-channel)z1<br />
STEREO S S S S S<br />
MULTI CH IN S S S S<br />
DOLBY PRO LOGIC gz S S S S S<br />
DOLBY PRO LOGIC gx S S S S S S S S<br />
DOLBY PRO LOGIC g S S S S S S S S<br />
DTS NEO:6 S S S S S S<br />
DOLBY DIGITAL S S S S<br />
DOLBY DIGITAL Plus S S S S<br />
DOLBY TrueHD S S S S<br />
DTS SURROUND S S S S<br />
DTS 96/24 S S S S<br />
DTS-HD S S S S<br />
DTS Express S S S S<br />
MULTI CH STEREO S S S S S<br />
ROCK ARENA Sz13 S S S S<br />
JAZZ CLUB S S S S S<br />
MONO MOVIE S S S S S<br />
VIDEO GAME S S S S S<br />
MATRIX S S S S S<br />
VIRTUAL S S S S S<br />
z1, z9 – z13 : vpage 195<br />
Front panel Display Rear panel 194 Remote<br />
Index
Contents<br />
Connections<br />
Playback<br />
Settings<br />
Tips<br />
Appendix<br />
z1 During playback in PURE DIRECT mode, the surround parameters are the same as in DIRECT mode.<br />
z2 <strong>Audio</strong> is output when “Subwoofer Mode” (vpage 155) in the menu is set to “LFE+Main”.<br />
z3 This setting is unavailable when the set sound mode name contains “+PLg Music”.<br />
z4 This setting is possible when the sound mode is “Cinema” mode.<br />
z5 This item can be selected when a Dolby TrueHD signal is played.<br />
z6 This item can be selected when a Dolby Digital or DTS signal is played.<br />
z7 This item can be selected when a Dolby Digital or DTS signal or DVD-<strong>Audio</strong> is played.<br />
z8 This setting is available when the set sound mode name contains “+PLgz”.<br />
z9 This item cannot be set when “Dynamic EQ” (vpage 128) is set to “On”.<br />
z10 This item cannot be set when Audyssey® Setup (Speaker Calibration) has not been performed.<br />
z11 This item cannot be set when “MultEQ® XT” (vpage 128) is set to “Off” or “Graphic EQ”.<br />
z12 This item can be set when the input signal is analog, PCM 48 kHz or 44.1 kHz.<br />
z13 In this sound mode, bass is +6 dB, and treble is +4 dB. (Default)<br />
Front panel Display Rear panel 195 Remote<br />
Index
Contents<br />
Connections<br />
Playback<br />
Settings<br />
Types of input signals, and corresponding sound modes<br />
F This indicates the default sound mode.<br />
S This indicates the selectable sound mode.<br />
Tips<br />
Appendix<br />
Sound mode (vpage 94)<br />
DTS SURROUND<br />
DTS-HD MSTR<br />
DTS-HD HI RES<br />
NOTE<br />
2-channel signal<br />
Analog /<br />
PCM<br />
Dolby<br />
Digital (+/<br />
HD) /<br />
DTS (-HD)<br />
PCM<br />
Multi<br />
DTS-HD<br />
DTS<br />
Express<br />
DTS ES DSCRT6.1 z1 F<br />
DTS ES<br />
DSCRT<br />
6.1<br />
DTS ES MTRX6.1 z1 F<br />
DTS SURROUND<br />
DTS 96/24<br />
Multi-channel signal<br />
DTS ES<br />
MTRIX<br />
6.1<br />
DTS (–HD) + PLgx z1z2 S S S<br />
DTS (–HD) + PLgz z3 S S S S S<br />
DTS Express<br />
DTS NEO:6 z4 S S<br />
DOLBY SURROUND<br />
DOLBY TrueHD<br />
DOLBY DIGITAL+<br />
Fz6<br />
Fz7<br />
F<br />
DTS<br />
F<br />
Fz8<br />
DOLBY<br />
TrueHD<br />
DOLBY<br />
DIGITAL<br />
Plus<br />
DOLBY<br />
DIGITAL<br />
EX<br />
DOLBY DIGITAL EX z1 S S<br />
DOLBY (D+) (HD) +EX z1 S S<br />
DOLBY DIGITAL F F<br />
DOLBY (D) (D+) (HD) + PLgx z1z2 S S S S<br />
DOLBY (D) (D+) (HD) + PLgz z3 S S S S<br />
DOLBY PRO LOGIC g/gx z5 S S<br />
DOLBY PRO LOGIC gz z3 S S<br />
z1 – z8 : vpage 198<br />
F<br />
F<br />
DOLBY<br />
DIGITAL<br />
Front panel Display Rear panel 196 Remote<br />
Index
Contents<br />
Connections<br />
Playback<br />
Settings<br />
Tips<br />
Appendix<br />
Sound mode (vpage 94)<br />
MULTI CH IN<br />
DIRECT<br />
MULTI CH IN<br />
NOTE<br />
2-channel signal<br />
Analog /<br />
PCM<br />
Dolby<br />
Digital (+/<br />
HD) /<br />
DTS (-HD)<br />
PCM<br />
Multi<br />
MULTI CH IN + DOLBY EX z1 S<br />
MULTI CH IN + PLgx z1z2 S<br />
MULTI CH IN + PLgz z3 S<br />
MULTI CH IN 7.1 z1 Fz10<br />
F<br />
DTS-HD<br />
DTS<br />
Express<br />
DTS ES<br />
DSCRT<br />
6.1<br />
Multi-channel signal<br />
DTS ES<br />
MTRIX<br />
6.1<br />
DTS<br />
DOLBY<br />
TrueHD<br />
DOLBY<br />
DIGITAL<br />
Plus<br />
DOLBY<br />
DIGITAL<br />
EX<br />
DIRECT Sz9 S S S S S S S S S S S<br />
PURE DIRECT<br />
PURE DIRECT S S S S S S S S S S S S<br />
DSP SIMULATION<br />
MULTI CH STEREO S S S S S S S S S S S S<br />
ROCK ARENA S S S S S S S S S S S S<br />
JAZZ CLUB S S S S S S S S S S S S<br />
MONO MOVIE S S S S S S S S S S S S<br />
VIDEO GAME S S S S S S S S S S S S<br />
MATRIX S S S S S S S S S S S S<br />
VIRTUAL S S S S S S S S S S S S<br />
STEREO<br />
STEREO S S S S S S S S S S S S<br />
z1 – z3, z9, z10 : vpage 198<br />
DOLBY<br />
DIGITAL<br />
Front panel Display Rear panel 197 Remote<br />
Index
Contents<br />
Connections<br />
Playback<br />
Settings<br />
Tips<br />
Appendix<br />
z1 This item can be selected when surround back speakers are used.<br />
z2 The Cinema mode or Music mode can be selected. When using a single surround back speaker, the Music mode is used.<br />
z3 This item can be selected when front height speakers are used.<br />
z4 The Cinema mode or Music mode can be selected.<br />
z5 The Cinema mode, Music mode or Game mode can be selected.<br />
z6 This item can be selected when the input signal is DTS-HD MASTER AUDIO.<br />
z7 This item can be selected when the input signal is DTS-HD HI RESOLUTION.<br />
z8 This item can be selected when the input signal is DTS 96/24.<br />
z9 The default sound mode for the AirPlay playback is DIRECT. (Default)<br />
z10 This item can be selected when the input signals contain surround back signals.<br />
Front panel Display Rear panel 198 Remote<br />
Index
Contents<br />
Connections<br />
Playback<br />
Settings<br />
Tips<br />
Appendix<br />
Explanation of terms<br />
A<br />
AirPlay<br />
AirPlay sends (plays) contents recorded in iTunes or on an iPhone/iPod<br />
touch/iPad to a compatible device via the network.<br />
ALAC (Apple Lossless <strong>Audio</strong> Codec)<br />
This is a codec for lossless audio compression method developed by<br />
Apple Inc. This codec can be played back on iTunes, iPod or iPhone. Data<br />
compressed to approximately 60 – 70 % can be decompressed to exactly<br />
the same original data.<br />
App Store<br />
App Store is a site that sells application software for such devices as the<br />
iPhone or iPod Touch, and is operated by Apple Inc.<br />
Audyssey Dynamic EQ®<br />
Dynamic EQ solves the problem of deteriorating sound quality as volume<br />
is decreased by taking into account human perception and room acoustics.<br />
Audyssey Dynamic EQ® works in tandem with Audyssey MultEQ® XT to<br />
provide well-balanced sound for every listener at any volume level.<br />
Audyssey Dynamic Volume®<br />
Dynamic Volume solves the problem of large variations in volume level<br />
between television programs, commercials, and between the soft and<br />
loud passages of movies. Audyssey Dynamic EQ® is integrated into<br />
Dynamic Volume so that as the playback volume is adjusted automatically,<br />
the perceived bass response, tonal balance, surround impression, and<br />
dialog clarity remain the same.<br />
Audyssey MultEQ® XT<br />
MultEQ® XT is a room equalization solution that calibrates any audio<br />
system so that it can achieve optimum performance for every listener in<br />
a large listening area. Based on several room measurements, MultEQ®<br />
XT calculates an equalization solution that corrects for both time and<br />
frequency response problems in the listening area and also performs a<br />
fully automated surround system setup.<br />
D<br />
DLNA<br />
DLNA and DLNA CERTIFIED are trademarks and/or service marks of<br />
Digital Living Network Alliance.<br />
Some contents may not be compatible with other DLNA CERTIFIED®<br />
products.<br />
Dolby Digital<br />
Dolby Digital is a multi-channel digital signal format developed by Dolby<br />
Laboratories.<br />
A total of 5.1-channels are played: 3 front channels (“FL”, “FR” and “C”),<br />
2 surround channels (“SL” and “SR”) and the “LFE” channel for low<br />
frequency effects.<br />
Because of this, there is no crosstalk between channels and a realistic<br />
sound field with a “three-dimensional” feeling (sense of distance,<br />
movement and positioning) is achieved. This delivers a thrilling surround<br />
sound experience in the home.<br />
Front panel Display Rear panel 199 Remote<br />
Index
Contents<br />
Connections<br />
Playback<br />
Settings<br />
Tips<br />
Appendix<br />
Dolby Digital EX<br />
Dolby Digital EX is a 6.1-channel surround format from Dolby Laboratories<br />
that allows users to enjoy in their homes the “DOLBY DIGITAL SURROUND<br />
EX” audio format jointly developed by Dolby Laboratories and Lucasfilm.<br />
The 6.1-channels of sound, including surround back channel, provide<br />
improved sound positioning and expansion of the surround sound field.<br />
Dolby Digital Plus<br />
Dolby Digital Plus is an improved Dolby Digital signal format that is<br />
compatible with up to 7.1-channels of discrete digital sound and also<br />
improves sound quality thanks to extra data bit rate performance. It is<br />
upwardly compatible with conventional Dolby Digital, so it offers greater<br />
flexibility in response to the source signal and the conditions of the<br />
playback device.<br />
Dolby Pro Logic g<br />
Dolby Pro Logic g is a matrix decoding technology developed by Dolby<br />
Laboratories.<br />
Regular music such as that on CDs is encoded into 5-channels to achieve<br />
an excellent surround effect.<br />
The surround channel signals are converted into stereo and full band<br />
signals (with a frequency response of 20 Hz to 20 kHz or greater) to create<br />
a “three-dimensional” sound image offering a rich sense of presence for<br />
all stereo sources.<br />
Dolby Pro Logic gx<br />
Dolby Pro Logic gx is a further improved version of the Dolby Pro Logic g<br />
matrix decoding technology.<br />
<strong>Audio</strong> signals recorded in 2-channels are decoded to achieve a natural<br />
sound with up to 7.1-channels.<br />
There are three modes: “Music” suited for playing music, “Cinema”<br />
suited for playing movies, and “Game” which is optimized for playing<br />
games.<br />
Dolby Pro Logic gz<br />
Dolby Pro Logic gz introduces a new dimension to Home Entertainment<br />
through the addition of a pair of front height channels. Compatible with<br />
stereo, 5.1-channel and 7.1-channel content, Dolby Pro Logic gz provides<br />
enhanced spaciousness, depth and dimension to movies, concert video<br />
and video game playback while maintaining the full integrity of the source<br />
mix.<br />
Dolby Pro Logic gz identifies and decodes spatial cues that occur naturally<br />
in all content, directing this information to the front height channels,<br />
complementing the performance of left and right surround sound<br />
speakers. Content that is encoded with Dolby Pro Logic gz height channel<br />
information can be even more revealing, with perceptually discrete<br />
height channel information bringing an exciting new dimension to home<br />
entertainment.<br />
Dolby Pro Logic gz, with front height channels is also an ideal alternative<br />
for households that cannot support the placement of back surround<br />
speakers of a typical 7.1-channel system but may have bookshelf space<br />
available to support the addition of height speakers.<br />
Dolby TrueHD<br />
Dolby TrueHD is a high definition audio technology developed by Dolby<br />
Laboratories, using lossless coding technology to faithfully reproduce the<br />
sound of the studio master.<br />
This format provides the facility to support up to 8 audio channels with a<br />
sampling frequency of 96 kHz/24 bit resolution and up to 6 audio channels<br />
with a sampling frequency of 192 kHz/24 bit resolution. Dolby TrueHD is<br />
adopted for applications that put very high importance on sound quality.<br />
Front panel Display Rear panel 200 Remote<br />
Index
Contents<br />
Connections<br />
Playback<br />
Settings<br />
Tips<br />
Appendix<br />
Downmix<br />
This function converts the number of channels of surround audio to<br />
a lower number of channels and plays back according to the system’s<br />
configuration.<br />
DTS<br />
This is an abbreviation of Digital Theater System, which is a digital audio<br />
system developed by DTS.<br />
DTS delivers a powerful and dynamic surround sound experience, and is<br />
found in the world’s finest movie theaters and screening rooms.<br />
DTS 96/24<br />
DTS 96/24 is a digital audio format enabling high sound quality playback in<br />
5.1-channels with a sampling frequency of 96 kHz and 24 bit quantization<br />
on DVD-Video.<br />
DTS Digital Surround<br />
DTS Digital Surround is the standard digital surround format of DTS,<br />
Inc., compatible with a sampling frequency of 44.1 or 48 kHz and up to<br />
5.1-channels of digital discrete surround sound.<br />
DTS-ES Discrete 6.1<br />
DTS-ES Discrete 6.1 is a 6.1-channel discrete digital audio format adding<br />
a surround back (SB) channel to the DTS digital surround sound.<br />
Decoding of conventional 5.1-channel audio signals is also possible<br />
according to the decoder.<br />
DTS-ES Matrix 6.1<br />
DTS-ES Matrix 6.1 is a 6.1-channel audio format that inserts a surround<br />
back (SB) channel to the DTS digital surround sound through matrix<br />
encoding. Decoding of conventional 5.1-channel audio signals is also<br />
possible according to the decoder.<br />
DTS Express<br />
DTS Express is an audio format supporting low bit rates (max. 5.1-channels,<br />
24 to 256 kbps).<br />
DTS-HD<br />
This audio technology provides higher sound quality and enhanced<br />
functionality than the conventional DTS and is adopted as an optional audio<br />
for Blu-ray Disc. This technology supports multi-channel, high data transfer<br />
speed, high sampling frequency, and lossless audio playback. Maximum<br />
7.1-channels are supported in Blu-ray Disc.<br />
DTS-HD High Resolution <strong>Audio</strong><br />
DTS-HD High Resolution <strong>Audio</strong> is an improved version of the conventional<br />
DTS, DTS-ES and DTS 96/24 signals formats, compatible with sampling<br />
frequencies of 96 or 48 kHz and up to 7.1-channels of discrete digital sound.<br />
High data bit rate performance provides high quality sound. This format is<br />
fully compatible with conventional products, including conventional DTS<br />
digital surround 5.1-channel data.<br />
DTS-HD Master <strong>Audio</strong><br />
DTS-HD Master <strong>Audio</strong> is a lossless audio format created by Digital<br />
Theater System (DTS). This format provides the facility to support<br />
up to 8 audio channels with a sampling frequency of 96 kHz/<br />
24 bit resolution and up to 6 audio channels with a sampling frequency of<br />
192 kHz/24 bit resolution. It is fully compatible with conventional products,<br />
including conventional DTS digital surround 5.1-channel data.<br />
DTS NEO:6 Surround<br />
DTS NEO:6 is a matrix decoding technology for achieving 6.1-channel<br />
surround playback with 2-channel sources. It includes “DTS NEO:6<br />
Cinema” suited for playing movies and “DTS NEO:6 Music” suited for<br />
playing music.<br />
Front panel Display Rear panel 201 Remote<br />
Index
Contents<br />
Connections<br />
Playback<br />
Settings<br />
Tips<br />
Appendix<br />
Dynamic range<br />
The difference between the maximum undistorted sound level and the<br />
minimum discernible level above the noise emitted by the device.<br />
F<br />
FLAC<br />
FLAC stands for Free lossless <strong>Audio</strong> Codec, and is a lossless free audio<br />
file format. Lossless means that the audio is compressed without any loss<br />
in quality.<br />
The FLAC license is as shown below.<br />
Copyright (C) 2000, 2001, 2002, 2003, 2004, 2005, 2006, 2007, 2008,<br />
2009 Josh Coalson<br />
Redistribution and use in source and binary forms, with or without<br />
modification, are permitted provided that the following conditions are met:<br />
• Redistributions of source code must retain the above copyright notice,<br />
this list of conditions and the following disclaimer.<br />
• Redistributions in binary form must reproduce the above copyright notice,<br />
this list of conditions and the following disclaimer in the documentation<br />
and/or other materials provided with the distribution.<br />
• Neither the name of the Xiph.org Foundation nor the names of its<br />
contributors may be used to endorse or promote products derived from<br />
this software without specific prior written permission.<br />
THIS SOFTWARE IS PROVIDED BY THE COPYRIGHT HOLDERS AND<br />
CONTRIBUTORS “AS IS” AND ANY EXPRESS OR IMPLIED WARRANTIES,<br />
INCLUDING, BUT NOT LIMITED TO, THE IMPLIED WARRANTIES OF<br />
MERCHANTABILITY AND FITNESS FOR A PARTICULAR PURPOSE ARE<br />
DISCLAIMED. IN NO EVENT SHALL THE FOUNDATION OR CONTRIBUTORS<br />
BE LIABLE FOR ANY DIRECT, INDIRECT, INCIDENTAL, SPECIAL, EXEMPLARY,<br />
OR CONSEQUENTIAL DAMAGES (INCLUDING, BUT NOT LIMITED TO,<br />
PROCUREMENT OF SUBSTITUTE GOODS OR SERVICES; LOSS OF USE, DATA,<br />
OR PROFITS; OR BUSINESS INTERRUPTION) HOWEVER CAUSED AND ON ANY<br />
THEORY OF LIABILITY, WHETHER IN CONTRACT, STRICT LIABILITY, OR TORT<br />
(INCLUDING NEGLIGENCE OR OTHERWISE) ARISING IN ANY WAY OUT OF THE<br />
USE OF THIS SOFTWARE, EVEN IF ADVISED OF THE POSSIBILITY OF SUCH<br />
DAMAGE.<br />
H<br />
HDCP<br />
When transmitting digital signals between devices, this copyright<br />
protection technology encrypts the signals to prevent content from being<br />
copied without authorization.<br />
I<br />
iTunes<br />
iTunes is the name of the multimedia player provided by Apple Inc. It<br />
enables management and playback of multimedia contents including<br />
music and movies. iTunes supports many main file formats including AAC,<br />
WAV, and MP3.<br />
Front panel Display Rear panel 202 Remote<br />
Index
Contents<br />
Connections<br />
Playback<br />
Settings<br />
Tips<br />
Appendix<br />
L<br />
LFE<br />
This is an abbreviation of Low Frequency Effect, which is an output channel<br />
that emphasizes low frequency effect sound. Surround audio is intensified<br />
by outputting 20 Hz to 120 Hz deep bass to the system subwoofer(s).<br />
M<br />
MAIN ZONE<br />
The room where this unit is placed is called the MAIN ZONE.<br />
Modem<br />
Device that connects to your broadband internet provider, and is very<br />
often supplied with the service.<br />
A type that is integrated with a router is also often available.<br />
MP3 (MPEG <strong>Audio</strong> Layer-3)<br />
This is an internationally standardized audio data compression scheme,<br />
using the “MPEG-1” video compression standard. It compresses the data<br />
volume to about one eleventh its original size while maintaining sound<br />
quality equivalent to a music CD.<br />
MPEG (Moving Picture Experts Group),<br />
MPEG-2, MPEG-4<br />
These are the names for digital compression format standards used for the<br />
encoding of video and audio. Video standards include “MPEG-1 Video”,<br />
“MPEG-2 Video”, “MPEG-4 Visual”, “MPEG-4 AVC”. <strong>Audio</strong> standards<br />
include “MPEG-1 <strong>Audio</strong>”, “MPEG-2 <strong>Audio</strong>”, “MPEG-4 AAC”.<br />
P<br />
Progressive (sequential scanning)<br />
This is a scanning system of the video signal that displays 1 frame of video<br />
as one image. Compared to the interlace system, this system provides<br />
images with less flickering and jagged edges.<br />
Protection circuit<br />
This is a function to prevent damage to devices within the power supply<br />
when an abnormality such as an overload, excess voltage occurs or over<br />
temperature for any reason.<br />
In this unit, the power indicator blinks and the unit enters standby mode<br />
when an abnormality occurs.<br />
S<br />
Sampling frequency<br />
Sampling involves taking a reading of a sound wave (analog signal) at<br />
regular intervals and expressing the height of the wave at each reading in<br />
digitized format (producing a digital signal).<br />
The number of readings taken in one second is called the “sampling<br />
frequency”. The larger the value, the closer the reproduced sound is to<br />
the original.<br />
Speaker impedance<br />
This is an AC resistance value, indicated in Ω (Ohms). Greater power can<br />
be obtained when this value is smaller.<br />
Front panel Display Rear panel 203 Remote<br />
Index
Contents<br />
Connections<br />
Playback<br />
Settings<br />
Tips<br />
Appendix<br />
V<br />
vTuner<br />
This is a free online content server for Internet Radio. Note that usage fees<br />
are included in upgrade costs.<br />
For inquiries about this service, visit the vTuner site below.<br />
vTuner website: http://www.radiodenon.com<br />
This product is protected by certain intellectual property rights of<br />
Nothing Else Matters Software and BridgeCo. Use or distribution of such<br />
technology outside of this product is prohibited without a license from<br />
Nothing Else Matters Software and BridgeCo or an authorized subsidiary.<br />
W<br />
Windows Media DRM<br />
This is a copyright protection technology developed by Microsoft.<br />
Content providers are using the digital rights management technology<br />
for Windows Media contained in this device (WM-DRM) to protect<br />
the integrity of their content (Secure Content) so that their intellectual<br />
property, including copyright, in such content is not misappropriated.<br />
This device uses WM-DRM software to play Secure Content (WM-DRM<br />
Software). If the security of the WM-DRM Software in this device has been<br />
compromised, owners of Secure Content (Secure Content Owners) may<br />
request that Microsoft revoke the WM-DRM Software’s right to acquire<br />
new licenses to copy, display and/or play Secure Content. Revocation does<br />
not alter the WM-DRM Software’s ability to play unprotected content. A<br />
list of revoked WM-DRM Software is sent to your device whenever you<br />
download a license for Secure Content from the Internet or from a PC.<br />
Microsoft may, in conjunction with such license, also download revocation<br />
list onto your device on behalf of Secure Content Owners.<br />
Windows Media Player Ver.11 or later<br />
This is a media player distributed free of charge by Microsoft Corporation.<br />
It can play playlists created with Ver.11 or later of Windows Media Player,<br />
as well as WMA, DRM WMA, WAV, and other files.<br />
WMA (Windows Media <strong>Audio</strong>)<br />
This is audio compression technology developed by Microsoft Corporation.<br />
WMA data can be encoded using Windows Media® Player.<br />
To encode WMA files, only use applications authorized by Microsoft<br />
Corporation. If you use an unauthorized application, the file may not work<br />
properly.<br />
Z<br />
ZONE2<br />
This unit can operate in a room other than the room where this unit is<br />
placed (MAIN ZONE) (ZONE2 playback). The room for ZONE2 playback is<br />
called ZONE2.<br />
Front panel Display Rear panel 204 Remote<br />
Index
Contents<br />
Connections<br />
Playback<br />
Settings<br />
Tips<br />
Appendix<br />
Trademark information<br />
The terms HDMI and HDMI High-Definition Multimedia Interface, and<br />
the HDMI Logo are trademarks or registered trademarks of HDMI<br />
Licensing LLC in the United States and other countries.<br />
Manufactured under license from Audyssey Laboratories. U.S. and<br />
foreign patents pending. Audyssey MultEQ® XT, Audyssey Dynamic EQ®<br />
and Audyssey Dynamic Volume® are registered trademarks of Audyssey<br />
Laboratories.<br />
Manufactured under license from Dolby Laboratories. “Dolby”, “Pro<br />
Logic” and the double-D symbol are trademarks of Dolby Laboratories.<br />
Manufactured under license under U.S. Patent Nos: 5,956,674;<br />
5,974,380; 6,226,616; 6,487,535; 7,212,872; 7,333,929; 7,392,195;<br />
7,272,567 & other U.S. and worldwide patents issued & pending.<br />
DTS-HD, the Symbol, & DTS-HD and the Symbol together are registered<br />
trademarks & DTS-HD Master <strong>Audio</strong> is a trademark of DTS, Inc. Product<br />
includes software. © DTS, Inc. All Rights Reserved.<br />
“Made for iPod” and “Made for iPhone” mean that an electronic<br />
accessory has been designed to connect specifically to iPod, or iPhone,<br />
respectively, and has been certified by the developer to meet Apple<br />
performance standards.<br />
Apple is not responsible for the operation of this device or its compliance<br />
with safety and regulatory standards. Please note that the use of this<br />
accessory with iPod, or iPhone, may affect wireless performance.<br />
AirPlay, the AirPlay logo, iPad, iPhone, iPod, iPod classic, iPod nano, iPod<br />
shuffle and iPod touch are trademarks of Apple Inc., registered in the<br />
U.S. and other countries.<br />
• Individual users are permitted to use iPhone, iPod, iPod classic, iPod<br />
nano, iPod shuffle, and iPod touch for private copy and playback of<br />
non-copyrighted contents and contents whose copy and playback is<br />
permitted by law. Copyright infringement is prohibited by law.<br />
Front panel Display Rear panel 205 Remote<br />
Index
Contents<br />
Connections<br />
Playback<br />
Settings<br />
Tips<br />
Appendix<br />
Windows Media and the Windows logo are trademarks or registered<br />
trademarks of Microsoft Corporation in the United States and/or other<br />
countries.<br />
Adobe, the Adobe logo and Reader are either registered trademarks or<br />
trademarks of Adobe Systems Incorporated in the United States and/or<br />
other countries.<br />
Front panel Display Rear panel 206 Remote<br />
Index
Contents<br />
Connections<br />
Playback<br />
Settings<br />
Tips<br />
Appendix<br />
Specifications<br />
22<strong>Audio</strong> section<br />
• Power amplifier<br />
Rated output:<br />
Output connectors:<br />
• Analog<br />
Input sensitivity/Input impedance:<br />
Frequency response:<br />
S/N:<br />
Front:<br />
95 W + 95 W (8 Ω/ohms, 20 Hz – 20 kHz with 0.08 % T.H.D.)<br />
125 W + 125 W (6 Ω/ohms, 1 kHz with 0.7 % T.H.D.)<br />
Center:<br />
95 W (8 Ω/ohms, 20 Hz – 20 kHz with 0.08 % T.H.D.)<br />
125 W (6 Ω/ohms, 1 kHz with 0.7 % T.H.D.)<br />
Surround:<br />
95 W + 95 W (8 Ω/ohms, 20 Hz – 20 kHz with 0.08 % T.H.D.)<br />
125 W + 125 W (6 Ω/ohms, 1 kHz with 0.7 % T.H.D.)<br />
Surround back:<br />
95 W + 95 W (8 Ω/ohms, 20 Hz – 20 kHz with 0.08 % T.H.D.)<br />
125 W + 125 W (6 Ω/ohms, 1 kHz with 0.7 % T.H.D.)<br />
6 – 16 Ω/ohms<br />
200 mV/47 kΩ/kohms<br />
10 Hz – 100 kHz — +1, –3 dB (DIRECT mode)<br />
100 dB (IHF–A weighted, DIRECT mode)<br />
Front panel Display Rear panel 207 Remote<br />
Index
Contents<br />
Connections<br />
Playback<br />
Settings<br />
Tips<br />
Appendix<br />
22Tuner section [FM]<br />
(Note: μV at 75 Ω/ohms, 0 dBf = 1 x 10 –15 W)<br />
Receiving Range:<br />
87.5 MHz – 108.0 MHz<br />
Usable Sensitivity:<br />
1.2 μV (12.8 dBf)<br />
50 dB Quieting Sensitivity: MONO 2.8 μV (20.2 dBf)<br />
S/N : MONO 70 dB (IHF–A weighted, DIRECT mode)<br />
STEREO 67 dB (IHF–A weighted, DIRECT mode)<br />
Total harmonic Distortion: MONO 0.7 % (1 kHz)<br />
STEREO 1.0 % (1 kHz)<br />
22General<br />
Power supply:<br />
Power consumption:<br />
Power consumption in standby mode:<br />
Power consumption in CEC standby mode:<br />
Power consumption in network standby mode:<br />
AC 230 V, 50/60 Hz<br />
500 W<br />
0.1 W<br />
0.5 W<br />
2.7 W<br />
For purposes of improvement, specifications and design are subject to change without notice.<br />
Front panel Display Rear panel 208 Remote<br />
Index
Index<br />
Contents<br />
vv<br />
Numerics<br />
Connections<br />
3D········································································· 184<br />
4K·········································································· 184<br />
5.1-channel······························································ 22<br />
6.1-channel······························································ 21<br />
7.1-channel············································ 21, 22, 26, 27<br />
vv<br />
A<br />
Accessories······························································· 6<br />
Add New Feature·················································· 165<br />
Adjusting the master volume·································· 43<br />
AirPlay····························································· 83, 199<br />
ALAC····································································· 199<br />
App Store······························································ 199<br />
<strong>Audio</strong> settings······················································· 122<br />
Audyssey Dynamic EQ®········································ 199<br />
Audyssey Dynamic Volume®································· 199<br />
Audyssey MultEQ® XT·········································· 199<br />
Audyssey settings········································· 128, 143<br />
Audyssey® Setup··················································· 141<br />
Auto Standby························································ 162<br />
vv<br />
B<br />
Bi-amp····································································· 28<br />
vv<br />
C<br />
Playback<br />
Settings<br />
Cables····································································· 19<br />
Connection<br />
FM········································································ 38<br />
Home network (LAN)··········································· 39<br />
iPod (USB)···························································· 36<br />
Power cord··························································· 40<br />
Speaker································································ 23<br />
TV··································································· 30, 31<br />
USB memory device············································ 36<br />
Video camcorder·················································· 35<br />
Content Type························································ 184<br />
Convenient function menu<br />
All Zone Stereo····················································· 93<br />
Picture Mode························································ 92<br />
Random································································ 87<br />
Remove from Favorites········································ 89<br />
Repeat·································································· 87<br />
Save to Favorites·················································· 88<br />
Slideshow····························································· 90<br />
Slideshow Interval················································ 91<br />
Text Search·························································· 89<br />
Video Select························································· 91<br />
vv<br />
D<br />
Deep Color···························································· 184<br />
Display···································································· 13<br />
DLNA···································································· 199<br />
Tips<br />
Appendix<br />
Dolby<br />
Dolby Digital················································· 97, 199<br />
Dolby Digital EX············································ 97, 200<br />
Dolby Digital Plus········································· 97, 200<br />
Dolby Pro Logic II········································· 97, 200<br />
Dolby Pro Logic IIx······································· 97, 200<br />
Dolby Pro Logic IIz······································· 97, 200<br />
Dolby TrueHD··············································· 97, 200<br />
Downmix······························································· 201<br />
DTS······································································· 201<br />
DTS 96/24···················································· 98, 201<br />
DTS Digital Surround·········································· 201<br />
DTS-ES Discrete 6.1····································· 98, 201<br />
DTS-ES Matrix 6.1········································ 98, 201<br />
DTS Express················································· 98, 201<br />
DTS-HD························································ 98, 201<br />
DTS-HD High Resolution <strong>Audio</strong>·························· 201<br />
DTS-HD Master <strong>Audio</strong>········································ 201<br />
DTS Neo:6···························································· 98<br />
DTS NEO:6 Surround······································ 201<br />
Dynamic range······················································ 202<br />
vv<br />
E<br />
Error messages (Audyssey® Setup)······················ 148<br />
vv<br />
F<br />
Firmware update··················································· 164<br />
FLAC····································································· 202<br />
Flickr········································································ 73<br />
FM··········································································· 51<br />
FM indoor antenna·················································· 38<br />
Front height speaker········································· 21, 27<br />
Front panel······························································ 10<br />
Front panel Display Rear panel 209 Remote<br />
Index
Contents<br />
Connections<br />
Playback<br />
Settings<br />
Tips<br />
Appendix<br />
vv<br />
H<br />
HDCP···························································· 186, 202<br />
HDMI control················································ 105, 133<br />
Headphones···························································· 11<br />
vv<br />
I<br />
Information···························································· 162<br />
<strong>Audio</strong>·································································· 162<br />
Firmware···························································· 163<br />
Notifications······················································· 163<br />
Video·································································· 163<br />
ZONE·································································· 163<br />
Input signal···························································· 196<br />
Inputting characters·············································· 121<br />
iPod Browse Mode················································· 46<br />
iTunes··································································· 202<br />
vv<br />
L<br />
Last.fm···································································· 68<br />
LFE········································································ 203<br />
Listening position·················································· 142<br />
vv<br />
M<br />
MAIN ZONE·························································· 203<br />
Menu map····························································· 114<br />
<strong>Audio</strong>·························································· 114, 122<br />
General······················································· 118, 160<br />
Inputs························································· 117, 137<br />
Network····················································· 118, 156<br />
Setup Assistant·················································· 119<br />
Speakers···················································· 117, 141<br />
Video·························································· 116, 131<br />
Modem································································· 203<br />
MP3······································································ 203<br />
MPEG···································································· 203<br />
vv<br />
N<br />
Network settings·················································· 156<br />
vv<br />
P<br />
Playback<br />
ALAC······························································ 48, 64<br />
Blu-ray Disc player················································ 43<br />
DVD player··························································· 43<br />
FLAC······························································ 48, 64<br />
Flickr····································································· 73<br />
FM········································································ 52<br />
Internet Radio······················································· 60<br />
iPod (USB)···························································· 44<br />
JPEG······························································ 48, 64<br />
Last.fm································································· 68<br />
MP3·························································· 48, 60, 64<br />
MPEG-4 AAC············································ 48, 60, 64<br />
NAS······································································ 64<br />
PC········································································· 64<br />
PTY······································································· 54<br />
Radio Text···························································· 56<br />
RDS······································································ 54<br />
Spotify·································································· 77<br />
TP········································································· 55<br />
USB memory device············································ 48<br />
WAV······························································· 48, 64<br />
WMA························································ 48, 60, 64<br />
ZONE2································································ 112<br />
Protection circuit··················································· 203<br />
PTY·········································································· 54<br />
vv<br />
Q<br />
Quick select·························································· 107<br />
vv<br />
R<br />
Radio Text······························································· 56<br />
Random····························································· 47, 87<br />
RDS········································································· 54<br />
Rear panel······························································· 15<br />
Remote control unit················································ 17<br />
Inserting the batteries············································ 7<br />
Repeat······························································· 47, 87<br />
Resetting the microprocessor······························· 183<br />
vv<br />
S<br />
Sampling frequency·············································· 203<br />
Selecting the input source······································ 42<br />
Sleep timer···························································· 106<br />
Sound mode············································ 94, 101, 193<br />
Direct···························································· 96, 100<br />
Dolby···································································· 97<br />
DTS······································································ 98<br />
Original································································· 99<br />
PCM multi-channel··············································· 98<br />
Pure Direct··················································· 96, 100<br />
Stereo································································· 100<br />
Speaker<br />
Connect································································ 23<br />
Install···································································· 20<br />
Set up································································· 141<br />
Speaker impedance·············································· 203<br />
Spotify····································································· 77<br />
Surround back speaker····································· 21, 26<br />
Front panel Display Rear panel 210 Remote<br />
Index
Contents<br />
Connections<br />
Playback<br />
Settings<br />
Tips<br />
Appendix<br />
vv<br />
T<br />
Tips······································································· 169<br />
TP············································································ 55<br />
Troubleshooting···················································· 171<br />
Tuner operation menu<br />
Auto Preset Memory············································ 58<br />
Direct Tune··························································· 53<br />
Preset Memory···················································· 57<br />
Preset Name························································ 58<br />
Preset Skip··························································· 59<br />
Tune Mode··························································· 56<br />
Turning off the sound temporarily··························· 43<br />
Turning the power on·············································· 42<br />
vv<br />
V<br />
Video conversion··················································· 187<br />
Video settings······················································· 131<br />
vTuner····························································· 63, 204<br />
vv<br />
W<br />
Web control·························································· 108<br />
Windows Media DRM·········································· 204<br />
Windows Media Player········································· 204<br />
WMA····································································· 204<br />
vv<br />
Z<br />
ZONE2···················································· 13, 110, 204<br />
Front panel Display Rear panel 211 Remote<br />
Index
Contents<br />
License<br />
Connections<br />
This section describes software license used for<br />
this unit. To maintain the correct content, the<br />
original (English) is used.<br />
nnBoost<br />
http://www.boost.org/<br />
Boost Software License - Version 1.0 - August 17th,<br />
2003<br />
Permission is hereby granted, free of charge, to any<br />
person or organization obtaining a copy of the software<br />
and accompanying documentation covered by this<br />
license (the “Software”) to use, reproduce, display,<br />
distribute, execute, and transmit the Software, and to<br />
prepare derivative works of the Software, and to permit<br />
third-parties to whom the Software is furnished to do<br />
so, all subject to the following:<br />
The copyright notices in the Software and this entire<br />
statement, including the above license grant, this<br />
restriction and the following disclaimer, must be<br />
included in all copies of the Software, in whole or in<br />
part, and all derivative works of the Software, unless<br />
such copies or derivative works are solely in the form of<br />
machine-executable object code generated by a source<br />
language processor.<br />
THE SOFTWARE IS PROVIDED “AS IS”, WITHOUT<br />
WARRANTY OF ANY KIND, EXPRESS OR IMPLIED,<br />
INCLUDING BUT NOT LIMITED TO THE WARRANTIES<br />
OF MERCHANTABILITY, FITNESS FOR A PARTICULAR<br />
PURPOSE, TITLE AND NON-INFRINGEMENT. IN<br />
NO EVENT SHALL THE COPYRIGHT HOLDERS<br />
OR ANYONE DISTRIBUTING THE SOFTWARE BE<br />
LIABLE FOR ANY DAMAGES OR OTHER LIABILITY,<br />
WHETHER IN CONTRACT, TORT OR OTHERWISE,<br />
ARISING FROM, OUT OF OR IN CONNECTION WITH<br />
THE SOFTWARE OR THE USE OR OTHER DEALINGS<br />
IN THE SOFTWARE.<br />
Playback<br />
nnExpat<br />
http://www.jclark.com/xml/expat.html<br />
Settings<br />
Expat License. Copyright (c) 1998, 1999, 2000 Thai<br />
Open Source Software Center Ltd<br />
Permission is hereby granted, free of charge, to any<br />
person obtaining a copy of this software and associated<br />
documentation files (the “Software”), to deal in<br />
the Software without restriction, including without<br />
limitation the rights to use, copy, modify, merge,<br />
publish, distribute, sublicense, and/or sell copies of<br />
the Software, and to permit persons to whom the<br />
Software is furnished to do so, subject to the following<br />
conditions:<br />
The above copyright notice and this permission notice<br />
shall be included in all copies or substantial portions of<br />
the Software.<br />
THE SOFTWARE IS PROVIDED “AS IS”, WITHOUT<br />
WARRANTY OF ANY KIND, EXPRESS OR IMPLIED,<br />
INCLUDING BUT NOT LIMITED TO THE WARRANTIES<br />
OF MERCHANTABILITY, FITNESS FOR A PARTICULAR<br />
PURPOSE AND NONINFRINGEMENT. IN NO EVENT<br />
SHALL THE AUTHORS OR COPYRIGHT HOLDERS<br />
BE LIABLE FOR ANY CLAIM, DAMAGES OR OTHER<br />
LIABILITY, WHETHER IN AN ACTION OF CONTRACT,<br />
TORT OR OTHERWISE, ARISING FROM, OUT OF OR<br />
IN CONNECTION WITH THE SOFTWARE OR THE USE<br />
OR OTHER DEALINGS IN THE SOFTWARE.<br />
Tips<br />
Appendix<br />
nnFastDelegate<br />
http://www.codeproject.com/KB/cpp/FastDelegate.<br />
aspx<br />
THE WORK (AS DEFINED BELOW) IS PROVIDED<br />
UNDER THE TERMS OF THIS CODE PROJECT OPEN<br />
LICENSE (“LICENSE”). THE WORK IS PROTECTED BY<br />
COPYRIGHT AND/OR OTHER APPLICABLE LAW. ANY<br />
USE OF THE WORK OTHER THAN AS AUTHORIZED<br />
UNDER THIS LICENSE OR COPYRIGHT LAW IS<br />
PROHIBITED.<br />
BY EXERCISING ANY RIGHTS TO THE WORK<br />
PROVIDED HEREIN, YOU ACCEPT AND AGREE TO<br />
BE BOUND BY THE TERMS OF THIS LICENSE. THE<br />
AUTHOR GRANTS YOU THE RIGHTS CONTAINED<br />
HEREIN IN CONSIDERATION OF YOUR ACCEPTANCE<br />
OF SUCH TERMS AND CONDITIONS. IF YOU DO NOT<br />
AGREE TO ACCEPT AND BE BOUND BY THE TERMS<br />
OF THIS LICENSE, YOU CANNOT MAKE ANY USE OF<br />
THE WORK.<br />
1. Definitions.<br />
a. “Articles” means, collectively, all articles written<br />
by Author which describes how the Source Code<br />
and Executable Files for the Work may be used by a<br />
user.<br />
b. “Author” means the individual or entity that offers<br />
the Work under the terms of this License.<br />
c. “Derivative Work” means a work based upon the<br />
Work or upon the Work and other pre-existing<br />
works.<br />
d. “Executable Files” refer to the executables, binary<br />
files, configuration and any required data files<br />
included in the Work.<br />
e. “Publisher” means the provider of the website,<br />
magazine, CD-ROM, DVD or other medium from or<br />
by which the Work is obtained by You.<br />
f. “Source Code” refers to the collection of source<br />
code and configuration files used to create the<br />
Executable Files.<br />
Front panel Display Rear panel 212 Remote<br />
Index
Contents<br />
Connections<br />
Playback<br />
Settings<br />
Tips<br />
Appendix<br />
g. “Standard Version” refers to such a Work if it has not<br />
been modified, or has been modified in accordance<br />
with the consent of the Author, such consent being<br />
in the full discretion of the Author.<br />
h. “Work” refers to the collection of files distributed<br />
by the Publisher, including the Source Code,<br />
Executable Files, binaries, data files, documentation,<br />
whitepapers and the Articles.<br />
i. “You” is you, an individual or entity wishing to<br />
use the Work and exercise your rights under this<br />
License.<br />
2. Fair Use/Fair Use Rights. Nothing in this License<br />
is intended to reduce, limit, or restrict any rights<br />
arising from fair use, fair dealing, first sale or other<br />
limitations on the exclusive rights of the copyright<br />
owner under copyright law or other applicable laws.<br />
3. License Grant. Subject to the terms and conditions<br />
of this License, the Author hereby grants You a<br />
worldwide, royalty-free, non-exclusive, perpetual<br />
(for the duration of the applicable copyright) license<br />
to exercise the rights in the Work as stated below:<br />
a. You may use the standard version of the Source<br />
Code or Executable Files in Your own applications.<br />
b. You may apply bug fixes, portability fixes and other<br />
modifications obtained from the Public Domain or<br />
from the Author. A Work modified in such a way<br />
shall still be considered the standard version and<br />
will be subject to this License.<br />
c. You may otherwise modify Your copy of this<br />
Work (excluding the Articles) in any way to create<br />
a Derivative Work, provided that You insert a<br />
prominent notice in each changed file stating how,<br />
when and where You changed that file.<br />
d. You may distribute the standard version of the<br />
Executable Files and Source Code or Derivative<br />
Work in aggregate with other (possibly commercial)<br />
programs as part of a larger (possibly commercial)<br />
software distribution.<br />
e. The Articles discussing the Work published in<br />
any form by the author may not be distributed or<br />
republished without the Author’s consent. The<br />
author retains copyright to any such Articles. You<br />
may use the Executable Files and Source Code<br />
pursuant to this License but you may not repost or<br />
republish or otherwise distribute or make available<br />
the Articles, without the prior written consent of<br />
the Author.<br />
Any subroutines or modules supplied by You and linked<br />
into the Source Code or Executable Files this Work<br />
shall not be considered part of this Work and will not<br />
be subject to the terms of this License.<br />
4. Patent License. Subject to the terms and conditions<br />
of this License, each Author hereby grants to You<br />
a perpetual, worldwide, non-exclusive, no-charge,<br />
royalty-free, irrevocable (except as stated in this<br />
section) patent license to make, have made, use,<br />
import, and otherwise transfer the Work.<br />
5. Restrictions. The license granted in Section 3 above<br />
is expressly made subject to and limited by the<br />
following restrictions:<br />
a. You agree not to remove any of the original<br />
copyright, patent, trademark, and attribution notices<br />
and associated disclaimers that may appear in the<br />
Source Code or Executable Files.<br />
b. You agree not to advertise or in any way imply that<br />
this Work is a product of Your own.<br />
c. The name of the Author may not be used to endorse<br />
or promote products derived from the Work without<br />
the prior written consent of the Author.<br />
d. You agree not to sell, lease, or rent any part of the<br />
Work. This does not restrict you from including<br />
the Work or any part of the Work inside a larger<br />
software distribution that itself is being sold. The<br />
Work by itself, though, cannot be sold, leased or<br />
rented.<br />
e. You may distribute the Executable Files and Source<br />
Code only under the terms of this License, and You<br />
must include a copy of, or the Uniform Resource<br />
Identifier for, this License with every copy of the<br />
Executable Files or Source Code You distribute<br />
and ensure that anyone receiving such Executable<br />
Files and Source Code agrees that the terms of<br />
this License apply to such Executable Files and/<br />
or Source Code. You may not offer or impose any<br />
terms on the Work that alter or restrict the terms<br />
of this License or the recipients’ exercise of the<br />
rights granted hereunder. You may not sublicense<br />
the Work. You must keep intact all notices that refer<br />
to this License and to the disclaimer of warranties.<br />
You may not distribute the Executable Files or<br />
Source Code with any technological measures<br />
that control access or use of the Work in a manner<br />
inconsistent with the terms of this License.<br />
f. You agree not to use the Work for illegal, immoral or<br />
improper purposes, or on pages containing illegal,<br />
immoral or improper material. The Work is subject<br />
to applicable export laws. You agree to comply with<br />
all such laws and regulations that may apply to the<br />
Work after Your receipt of the Work.<br />
Front panel Display Rear panel 213 Remote<br />
Index
Contents<br />
Connections<br />
Playback<br />
Settings<br />
Tips<br />
Appendix<br />
6. Representations, Warranties and Disclaimer. THIS<br />
WORK IS PROVIDED “AS IS”, “WHERE IS” AND<br />
“AS AVAILABLE”, WITHOUT ANY EXPRESS<br />
OR IMPLIED WARRANTIES OR CONDITIONS<br />
OR GUARANTEES. YOU, THE USER, ASSUME<br />
ALL RISK IN ITS USE, INCLUDING COPYRIGHT<br />
INFRINGEMENT, PATENT INFRINGEMENT,<br />
SUITABILITY, ETC. AUTHOR EXPRESSLY<br />
DISCLAIMS ALL EXPRESS, IMPLIED OR<br />
STATUTORY WARRANTIES OR CONDITIONS,<br />
INCLUDING WITHOUT LIMITATION, WARRANTIES<br />
OR CONDITIONS OF MERCHANTABILITY,<br />
MERCHANTABLE QUALITY OR FITNESS FOR A<br />
PARTICULAR PURPOSE, OR ANY WARRANTY<br />
OF TITLE OR NON-INFRINGEMENT, OR THAT<br />
THE WORK (OR ANY PORTION THEREOF) IS<br />
CORRECT, USEFUL, BUG-FREE OR FREE OF<br />
VIRUSES. YOU MUST PASS THIS DISCLAIMER<br />
ON WHENEVER YOU DISTRIBUTE THE WORK OR<br />
DERIVATIVE WORKS.<br />
7. Indemnity. You agree to defend, indemnify and<br />
hold harmless the Author and the Publisher from<br />
and against any claims, suits, losses, damages,<br />
liabilities, costs, and expenses (including reasonable<br />
legal or attorneys??? fees) resulting from or relating<br />
to any use of the Work by You.<br />
8. Limitation on Liability. EXCEPT TO THE EXTENT<br />
REQUIRED BY APPLICABLE LAW, IN NO EVENT<br />
WILL THE AUTHOR OR THE PUBLISHER BE<br />
LIABLE TO YOU ON ANY LEGAL THEORY FOR<br />
ANY SPECIAL, INCIDENTAL, CONSEQUENTIAL,<br />
PUNITIVE OR EXEMPLARY DAMAGES ARISING<br />
OUT OF THIS LICENSE OR THE USE OF THE<br />
WORK OR OTHERWISE, EVEN IF THE AUTHOR<br />
OR THE PUBLISHER HAS BEEN ADVISED OF THE<br />
POSSIBILITY OF SUCH DAMAGES.<br />
9. Termination.<br />
a. This License and the rights granted hereunder will<br />
terminate automatically upon any breach by You<br />
of any term of this License. Individuals or entities<br />
who have received Derivative Works from You under<br />
this License, however, will not have their licenses<br />
terminated provided such individuals or entities<br />
remain in full compliance with those licenses.<br />
Sections 1, 2, 6, 7, 8, 9, 10 and 11 will survive any<br />
termination of this License.<br />
b. If You bring a copyright, trademark, patent or any<br />
other infringement claim against any contributor<br />
over infringements You claim are made by the Work,<br />
your License from such contributor to the Work<br />
ends automatically.<br />
c. Subject to the above terms and conditions, this<br />
License is perpetual (for the duration of the<br />
applicable copyright in the Work). Notwithstanding<br />
the above, the Author reserves the right to release<br />
the Work under different license terms or to stop<br />
distributing the Work at any time; provided, however<br />
that any such election will not serve to withdraw<br />
this License (or any other license that has been, or<br />
is required to be, granted under the terms of this<br />
License), and this License will continue in full force<br />
and effect unless terminated as stated above.<br />
10. Publisher. The parties hereby confirm that the<br />
Publisher shall not, under any circumstances,<br />
be responsible for and shall not have any liability<br />
in respect of the subject matter of this License.<br />
The Publisher makes no warranty whatsoever in<br />
connection with the Work and shall not be liable<br />
to You or any party on any legal theory for any<br />
damages whatsoever, including without limitation<br />
any general, special, incidental or consequential<br />
damages arising in connection to this license. The<br />
Publisher reserves the right to cease making the<br />
Work available to You at any time without notice<br />
11. Miscellaneous<br />
a. This License shall be governed by the laws of the<br />
location of the head office of the Author or if the<br />
Author is an individual, the laws of location of the<br />
principal place of residence of the Author.<br />
b. If any provision of this License is invalid or<br />
unenforceable under applicable law, it shall not<br />
affect the validity or enforceability of the remainder<br />
of the terms of this License, and without further<br />
action by the parties to this License, such provision<br />
shall be reformed to the minimum extent necessary<br />
to make such provision valid and enforceable.<br />
c. No term or provision of this License shall be<br />
deemed waived and no breach consented to unless<br />
such waiver or consent shall be in writing and<br />
signed by the party to be charged with such waiver<br />
or consent.<br />
d. This License constitutes the entire agreement<br />
between the parties with respect to the Work<br />
licensed herein. There are no understandings,<br />
agreements or representations with respect to the<br />
Work not specified herein. The Author shall not be<br />
bound by any additional provisions that may appear<br />
in any communication from You. This License<br />
may not be modified without the mutual written<br />
agreement of the Author and You.<br />
nnlibogg<br />
http://www.xiph.org/ogg/<br />
Copyright (c) 2002, Xiph.org Foundation<br />
Redistribution and use in source and binary forms, with<br />
or without modification, are permitted provided that the<br />
following conditions are met:<br />
• Redistributions of source code must retain the<br />
above copyright notice, this list of conditions and the<br />
following disclaimer.<br />
Front panel Display Rear panel 214 Remote<br />
Index
Contents<br />
Connections<br />
Playback<br />
Settings<br />
Tips<br />
Appendix<br />
• Redistributions in binary form must reproduce the<br />
above copyright notice, this list of conditions and<br />
the following disclaimer in the documentation and/or<br />
other materials provided with the distribution.<br />
• Neither the name of the Xiph.org Foundation nor the<br />
names of its contributors may be used to endorse or<br />
promote products derived from this software without<br />
specific prior written permission.<br />
THIS SOFTWARE IS PROVIDED BY THE COPYRIGHT<br />
HOLDERS AND CONTRIBUTORS “AS IS” AND ANY<br />
EXPRESS OR IMPLIED WARRANTIES, INCLUDING,<br />
BUT NOT LIMITED TO, THE IMPLIED WARRANTIES<br />
OF MERCHANTABILITY AND FITNESS FOR A<br />
PARTICULAR PURPOSE ARE DISCLAIMED.<br />
IN NO EVENT SHALL THE FOUNDATION OR<br />
CONTRIBUTORS BE LIABLE FOR ANY DIRECT,<br />
INDIRECT, INCIDENTAL, SPECIAL, EXEMPLARY,<br />
OR CONSEQUENTIAL DAMAGES (INCLUDING, BUT<br />
NOT LIMITED TO, PROCUREMENT OF SUBSTITUTE<br />
GOODS OR SERVICES; LOSS OF USE, DATA, OR<br />
PROFITS; OR BUSINESS INTERRUPTION) HOWEVER<br />
CAUSED AND ON ANY THEORY OF LIABILITY,<br />
WHETHER IN CONTRACT, STRICT LIABILITY, OR<br />
TORT (INCLUDING NEGLIGENCE OR OTHERWISE)<br />
ARISING IN ANY WAY OUT OF THE USE OF THIS<br />
SOFTWARE, EVEN IF ADVISED OF THE POSSIBILITY<br />
OF SUCH DAMAGE.<br />
nnlibvorbis<br />
http://www.xiph.org/vorbis/<br />
Copyright (c) 2002-2004 Xiph.org Foundation<br />
Redistribution and use in source and binary forms, with<br />
or without modification, are permitted provided that the<br />
following conditions are met:<br />
• Redistributions of source code must retain the<br />
above copyright notice, this list of conditions and the<br />
following disclaimer.<br />
• Redistributions in binary form must reproduce the<br />
above copyright notice, this list of conditions and<br />
the following disclaimer in the documentation and/or<br />
other materials provided with the distribution.<br />
• Neither the name of the Xiph.org Foundation nor the<br />
names of its contributors may be used to endorse or<br />
promote products derived from this software without<br />
specific prior written permission.<br />
THIS SOFTWARE IS PROVIDED BY THE COPYRIGHT<br />
HOLDERS AND CONTRIBUTORS “AS IS” AND ANY<br />
EXPRESS OR IMPLIED WARRANTIES, INCLUDING,<br />
BUT NOT LIMITED TO, THE IMPLIED WARRANTIES<br />
OF MERCHANTABILITY AND FITNESS FOR A<br />
PARTICULAR PURPOSE ARE DISCLAIMED.<br />
IN NO EVENT SHALL THE FOUNDATION OR<br />
CONTRIBUTORS BE LIABLE FOR ANY DIRECT,<br />
INDIRECT, INCIDENTAL, SPECIAL, EXEMPLARY,<br />
OR CONSEQUENTIAL DAMAGES (INCLUDING, BUT<br />
NOT LIMITED TO, PROCUREMENT OF SUBSTITUTE<br />
GOODS OR SERVICES; LOSS OF USE, DATA, OR<br />
PROFITS; OR BUSINESS INTERRUPTION) HOWEVER<br />
CAUSED AND ON ANY THEORY OF LIABILITY,<br />
WHETHER IN CONTRACT, STRICT LIABILITY, OR<br />
TORT (INCLUDING NEGLIGENCE OR OTHERWISE)<br />
ARISING IN ANY WAY OUT OF THE USE OF THIS<br />
SOFTWARE, EVEN IF ADVISED OF THE POSSIBILITY<br />
OF SUCH DAMAGE.<br />
nnTremolo<br />
http://wss.co.uk/pinknoise/tremolo<br />
Copyright (C) 2002-2009 Xiph.org Foundation Changes<br />
Copyright (C) 2009-2010 Robin Watts for Pinknoise<br />
Productions Ltd<br />
Redistribution and use in source and binary forms, with<br />
or without modification, are permitted provided that the<br />
following conditions are met:<br />
• Redistributions of source code must retain the<br />
above copyright notice, this list of conditions and the<br />
following disclaimer.<br />
• Redistributions in binary form must reproduce the<br />
above copyright notice, this list of conditions and<br />
the following disclaimer in the documentation and/or<br />
other materials provided with the distribution.<br />
• Neither the name of the Xiph.org Foundation nor the<br />
names of its contributors may be used to endorse or<br />
promote products derived from this software without<br />
specific prior written permission.<br />
THIS SOFTWARE IS PROVIDED BY THE COPYRIGHT<br />
HOLDERS AND CONTRIBUTORS “AS IS” AND ANY<br />
EXPRESS OR IMPLIED WARRANTIES, INCLUDING,<br />
BUT NOT LIMITED TO, THE IMPLIED WARRANTIES<br />
OF MERCHANTABILITY AND FITNESS FOR A<br />
PARTICULAR PURPOSE ARE DISCLAIMED.<br />
IN NO EVENT SHALL THE FOUNDATION OR<br />
CONTRIBUTORS BE LIABLE FOR ANY DIRECT,<br />
INDIRECT, INCIDENTAL, SPECIAL, EXEMPLARY,<br />
OR CONSEQUENTIAL DAMAGES (INCLUDING, BUT<br />
NOT LIMITED TO, PROCUREMENT OF SUBSTITUTE<br />
GOODS OR SERVICES; LOSS OF USE, DATA, OR<br />
PROFITS; OR BUSINESS INTERRUPTION) HOWEVER<br />
CAUSED AND ON ANY THEORY OF LIABILITY,<br />
WHETHER IN CONTRACT, STRICT LIABILITY, OR<br />
TORT (INCLUDING NEGLIGENCE OR OTHERWISE)<br />
ARISING IN ANY WAY OUT OF THE USE OF THIS<br />
SOFTWARE, EVEN IF ADVISED OF THE POSSIBILITY<br />
OF SUCH DAMAGE.<br />
Front panel Display Rear panel 215 Remote<br />
Index
Contents<br />
Connections<br />
Playback<br />
Settings<br />
Tips<br />
Appendix<br />
nnTremor<br />
http://wiki.xiph.org/index.php/Tremor<br />
Copyright (c) 2002, Xiph.org Foundation<br />
Redistribution and use in source and binary forms, with<br />
or without modification, are permitted provided that the<br />
following conditions are met:<br />
• Redistributions of source code must retain the<br />
above copyright notice, this list of conditions and the<br />
following disclaimer.<br />
• Redistributions in binary form must reproduce the<br />
above copyright notice, this list of conditions and<br />
the following disclaimer in the documentation and/or<br />
other materials provided with the distribution.<br />
• Neither the name of the Xiph.org Foundation nor the<br />
names of its contributors may be used to endorse or<br />
promote products derived from this software without<br />
specific prior written permission.<br />
THIS SOFTWARE IS PROVIDED BY THE COPYRIGHT<br />
HOLDERS AND CONTRIBUTORS “AS IS” AND ANY<br />
EXPRESS OR IMPLIED WARRANTIES, INCLUDING,<br />
BUT NOT LIMITED TO, THE IMPLIED WARRANTIES<br />
OF MERCHANTABILITY AND FITNESS FOR A<br />
PARTICULAR PURPOSE ARE DISCLAIMED.<br />
IN NO EVENT SHALL THE FOUNDATION OR<br />
CONTRIBUTORS BE LIABLE FOR ANY DIRECT,<br />
INDIRECT, INCIDENTAL, SPECIAL, EXEMPLARY,<br />
OR CONSEQUENTIAL DAMAGES (INCLUDING, BUT<br />
NOT LIMITED TO, PROCUREMENT OF SUBSTITUTE<br />
GOODS OR SERVICES; LOSS OF USE, DATA, OR<br />
PROFITS; OR BUSINESS INTERRUPTION) HOWEVER<br />
CAUSED AND ON ANY THEORY OF LIABILITY,<br />
WHETHER IN CONTRACT, STRICT LIABILITY, OR<br />
TORT (INCLUDING NEGLIGENCE OR OTHERWISE)<br />
ARISING IN ANY WAY OUT OF THE USE OF THIS<br />
SOFTWARE, EVEN IF ADVISED OF THE POSSIBILITY<br />
OF SUCH DAMAGE.<br />
nnMersenne Twister<br />
http://www.math.sci.hiroshima-u.ac.jp/~m-mat/MT/<br />
MT2002/CODES/mt19937ar.c<br />
Copyright (C) 1997 - 2002, Makoto Matsumoto<br />
and Takuji Nishimura,<br />
All rights reserved.<br />
Redistribution and use in source and binary<br />
forms, with or without modification, are<br />
permitted provided that the following conditions<br />
are met:<br />
1. Redistributions of source code must retain the<br />
above copyright notice, this list of conditions and<br />
the following disclaimer.<br />
2. Redistributions in binary form must reproduce the<br />
above copyright notice, this list of conditions and<br />
the following disclaimer in the documentation and/<br />
or other materials provided with the distribution.<br />
3. The names of its contributors may not be used<br />
to endorse or promote products derived from this<br />
software without specific prior written permission.<br />
THIS SOFTWARE IS PROVIDED BY THE COPYRIGHT<br />
HOLDERS AND CONTRIBUTORS “AS IS” AND ANY<br />
EXPRESS OR IMPLIED WARRANTIES, INCLUDING,<br />
BUT NOT LIMITED TO, THE IMPLIED WARRANTIES<br />
OF MERCHANTABILITY AND FITNESS FOR A<br />
PARTICULAR PURPOSE ARE DISCLAIMED. IN<br />
NO EVENT SHALL THE COPYRIGHT OWNER OR<br />
CONTRIBUTORS BE LIABLE FOR ANY DIRECT,<br />
INDIRECT, INCIDENTAL, SPECIAL, EXEMPLARY,<br />
OR CONSEQUENTIAL DAMAGES (INCLUDING, BUT<br />
NOT LIMITED TO, PROCUREMENT OF SUBSTITUTE<br />
GOODS OR SERVICES; LOSS OF USE, DATA, OR<br />
PROFITS; OR BUSINESS INTERRUPTION) HOWEVER<br />
CAUSED AND ON ANY THEORY OF LIABILITY,<br />
WHETHER IN CONTRACT, STRICT LIABILITY, OR<br />
TORT (INCLUDING NEGLIGENCE OR OTHERWISE)<br />
ARISING IN ANY WAY OUT OF THE USE OF THIS<br />
SOFTWARE, EVEN IF ADVISED OF THE POSSIBILITY<br />
OF SUCH DAMAGE.<br />
Front panel Display Rear panel 216 Remote<br />
Index
Contents<br />
Connections<br />
Playback<br />
Settings<br />
Tips<br />
Appendix<br />
nnzlib<br />
http://www.zlib.net/<br />
zlib.h -- interface of the ‘zlib’ general purpose<br />
compression library version 1.2.3, July 18th, 2005<br />
Copyright (C) 1995-2004 Jean-loup Gailly and Mark<br />
Adler<br />
This software is provided ‘as-is’, without any express<br />
or implied warranty. In no event will the authors be<br />
held liable for any damages arising from the use of this<br />
software.<br />
Permission is granted to anyone to use this software<br />
for any purpose, including commercial applications,<br />
and to alter it and redistribute it freely, subject to the<br />
following restrictions:<br />
1. The origin of this software must not be<br />
misrepresented; you must not claim that you wrote<br />
the original software. If you use this software in<br />
a product, an acknowledgment in the product<br />
documentation would be appreciated but is not<br />
required.<br />
2. Altered source versions must be plainly marked as<br />
such, and must not be misrepresented as being the<br />
original software.<br />
3. This notice may not be removed or altered from any<br />
source distribution.<br />
Jean-loup Gailly jloup@gzip.org, Mark Adler madler@<br />
alumni.caltech.edu<br />
nncURL<br />
http://curl.haxx.se<br />
COPYRIGHT AND PERMISSION NOTICE<br />
Copyright (c) 1996 - 2011, Daniel Stenberg, .<br />
All rights reserved.<br />
Permission to use, copy, modify, and distribute this<br />
software for any purpose with or without fee is hereby<br />
granted, provided that the above copyright notice and<br />
this permission notice appear in all copies.<br />
THE SOFTWARE IS PROVIDED “AS IS”, WITHOUT<br />
WARRANTY OF ANY KIND, EXPRESS OR<br />
IMPLIED, INCLUDING BUT NOT LIMITED TO THE<br />
WARRANTIES OF MERCHANTABILITY, FITNESS FOR<br />
A PARTICULAR PURPOSE AND NONINFRINGEMENT<br />
OF THIRD PARTY RIGHTS. IN NO EVENT SHALL THE<br />
AUTHORS OR COPYRIGHT HOLDERS BE LIABLE<br />
FOR ANY CLAIM, DAMAGES OR OTHER LIABILITY,<br />
WHETHER IN AN ACTION OF CONTRACT, TORT<br />
OR OTHERWISE, ARISING FROM, OUT OF OR IN<br />
CONNECTION WITH THE SOFTWARE OR THE USE<br />
OR OTHER DEALINGS IN THE SOFTWARE.<br />
Except as contained in this notice, the name of a<br />
copyright holder shall not be used in advertising or<br />
otherwise to promote the sale, use or other dealings in<br />
this Software without prior written authorization of the<br />
copyright holder.<br />
nnc-ares<br />
http://c-ares.haxx.se<br />
Copyright 1998 by the Massachusetts Institute of<br />
Technology.<br />
Permission to use, copy, modify, and distribute this<br />
software and its documentation for any purpose and<br />
without fee is hereby granted, provided that the above<br />
copyright notice appear in all copies and that both that<br />
copyright notice and this permission notice appear in<br />
supporting documentation, and that the name of M.I.T.<br />
not be used in advertising or publicity pertaining to<br />
distribution of the software without specific, written<br />
prior permission. M.I.T. makes no representations<br />
about the suitability of this software for any purpose. It<br />
is provided “as is” without express or implied warranty.<br />
Front panel Display Rear panel 217 Remote<br />
Index
Contents<br />
Connections<br />
Playback<br />
Settings<br />
Tips<br />
Appendix<br />
2 2 License Information for the<br />
Software Used in the Unit<br />
About GPL (GNU-General Public License), LGPL<br />
(GNU Lesser General Public License) License<br />
This product uses GPL/LGPL software and software<br />
made by other companies.<br />
After you purchase this product, you may procure,<br />
modify or distribute the source code of the GPL/<br />
LGPL software that is used in the product.<br />
<strong>Denon</strong> provides the source code based on the GPL<br />
and LPGL licenses at the actual cost upon your<br />
request to our customer service center. However,<br />
note that we make no guarantees concerning the<br />
source code. Please also understand that we do not<br />
offer support for the contents of the source code.<br />
Front panel Display Rear panel 218 Remote<br />
Index
Contents<br />
Connections<br />
Playback<br />
Settings<br />
Tips<br />
Appendix<br />
22Dimensions<br />
Unit : mm<br />
18.5 288.0<br />
23.5<br />
330.0<br />
54.0 164.5<br />
69.5<br />
434.0<br />
60.0<br />
14.5 152.5<br />
167.0<br />
22Weight : 9.5 kg<br />
45.0<br />
344.0<br />
45.0<br />
Front panel Display Rear panel 219 Remote<br />
Index
www.denon.com<br />
D&M Holdings Inc.<br />
3520 10215 00AD