The Linux Development Platform Configuring, Using, and ... - Classes
The Linux Development Platform Configuring, Using, and ... - Classes
The Linux Development Platform Configuring, Using, and ... - Classes

You also want an ePaper? Increase the reach of your titles
YUMPU automatically turns print PDFs into web optimized ePapers that Google loves.
FM.fm Page i Friday, October 4, 2002 11:49 AM<br />
<strong>The</strong> <strong>Linux</strong> <strong>Development</strong> <strong>Platform</strong><br />
<strong>Configuring</strong>, <strong>Using</strong>, <strong>and</strong> Maintaining a<br />
Complete Programming Environment<br />
ISBN 013009115-4<br />
94999<br />
9 780130 091154
hp_perens_series.fm Page 1 Monday, September 23, 2002 10:03 AM<br />
BRUCE PERENS’ OPEN SOURCE SERIES<br />
elements from the cover to be added —<br />
info to come from Jill <strong>and</strong>/or Mark<br />
◆ Implementing CIFS: <strong>The</strong> Common Internet File System<br />
Christopher R. Hertel<br />
◆ Embedded Software <strong>Development</strong> with eCos<br />
Anthony J. Massa<br />
◆ <strong>The</strong> <strong>Linux</strong> <strong>Development</strong> <strong>Platform</strong>: <strong>Configuring</strong>, <strong>Using</strong>,<br />
<strong>and</strong> Maintaining a Complete Programming<br />
Environment<br />
Rafeeq Ur Rehman, Christopher Paul
FM.fm Page iii Friday, October 4, 2002 11:49 AM<br />
<strong>The</strong> <strong>Linux</strong> <strong>Development</strong> <strong>Platform</strong><br />
<strong>Configuring</strong>, <strong>Using</strong>, <strong>and</strong> Maintaining a<br />
Complete Programming Environment<br />
Rafeeq Ur Rehman<br />
Christopher Paul<br />
Prentice Hall PTR<br />
Upper Saddle River, New Jersey 07458<br />
www.phptr.com
FM.fm Page iv Friday, October 4, 2002 11:49 AM<br />
Library of Congress Cataloging-in-Publication Data<br />
A CIP catalog record for this book can be obtained from the Library of Congress.<br />
Editorial/production supervision: Mary Sudul<br />
Cover design director: Jerry Votta<br />
Cover design: DesignSource<br />
Manufacturing manager: Alexis Heydt-Long<br />
Acquisitions editor: Jill Harry<br />
Editorial assistant: Kate Wolf<br />
Marketing manager: Dan DePasquale<br />
© 2003 Pearson Education, Inc.<br />
Publishing as Prentice Hall PTR<br />
Upper Saddle River, New Jersey 07458<br />
This material may be distributed only subject to the terms <strong>and</strong> conditions set forth in the Open<br />
Publication License, v1.0 or later (the latest version is presently available at<br />
).<br />
Prentice Hall books are widely used by corporations <strong>and</strong> government agencies for training, marketing,<br />
<strong>and</strong> resale.<br />
<strong>The</strong> publisher offers discounts on this book when ordered in bulk quantities. For more information,<br />
contact Corporate Sales Department, Phone: 800-382-3419; FAX: 201-236-7141;<br />
E-mail: corpsales@prenhall.com<br />
Or write: Prentice Hall PTR, Corporate Sales Dept., One Lake Street, Upper Saddle River, NJ 07458.<br />
Other product or company names mentioned herein are the trademarks or registered trademarks of their<br />
respective owners.<br />
All rights reserved. No part of this book may be<br />
reproduced, in any form or by any means,<br />
without permission in writing from the publisher.<br />
Printed in the United States of America<br />
10 9 8 7 6 5 4 3 2 1<br />
ISBN 0-13-009115-4<br />
Pearson Education LTD.<br />
Pearson Education Australia PTY, Limited<br />
Pearson Education Singapore, Pte. Ltd.<br />
Pearson Education North Asia Ltd.<br />
Pearson Education Canada, Ltd.<br />
Pearson Educación de Mexico, S.A. de C.V.<br />
Pearson Education — Japan<br />
Pearson Education Malaysia, Pte. Ltd.
FM.fm Page v Friday, October 4, 2002 11:49 AM<br />
To Asia, Afnan, <strong>and</strong> Faris for their love <strong>and</strong> support.<br />
—Rafeeq Ur Rehman<br />
To Cheryl, Rachel, <strong>and</strong> Sarah for the moral support <strong>and</strong> unending<br />
encouragement to complete this project. I’d be lost without you.<br />
—Christopher Paul
FM.fm Page vi Friday, October 4, 2002 11:49 AM
RehmanPaulTOC.fm Page vii Friday, October 4, 2002 1:06 PM<br />
C ONTENTS<br />
Acknowledgments<br />
xvii<br />
Chapter 1 Introduction to Software <strong>Development</strong> 1<br />
1.1 Life Cycle of a Software <strong>Development</strong> Project 2<br />
1.1.1 Requirement Gathering 2<br />
1.1.2 Writing Functional Specifications 4<br />
1.1.3 Creating Architecture <strong>and</strong> Design Documents 4<br />
1.1.4 Implementation <strong>and</strong> Coding 5<br />
1.1.5 Testing 6<br />
1.1.6 Software Releases 8<br />
1.1.7 Documentation 8<br />
1.1.8 Support <strong>and</strong> New Features 9<br />
1.2 Components of a <strong>Development</strong> System 10<br />
1.2.1 Hardware <strong>Platform</strong> 10<br />
1.2.2 Operating System 11<br />
1.2.3 Editors 11<br />
1.2.4 Compilers <strong>and</strong> Assemblers 12<br />
1.2.5 Debuggers 12<br />
1.2.6 Version Control Systems 12<br />
1.2.7 E-mail <strong>and</strong> Collaboration 13<br />
vii
RehmanPaulTOC.fm Page viii Friday, October 4, 2002 1:06 PM<br />
viii<br />
Contents<br />
1.2.8 X-Windows 13<br />
1.3 Selection Criteria for Hardware <strong>Platform</strong> 13<br />
1.4 Selection Criteria for Software <strong>Development</strong> Tools 14<br />
1.5 Managing <strong>Development</strong> Process 14<br />
1.5.1 Creating Deadlines 14<br />
1.5.2 Managing the <strong>Development</strong> Team 15<br />
1.5.3 Resolving Dependencies 15<br />
1.6 <strong>Linux</strong> <strong>Development</strong> <strong>Platform</strong> Specifications (LDPS) <strong>and</strong> <strong>Linux</strong><br />
St<strong>and</strong>ard Base (LSB) 15<br />
1.6.1 Libraries 15<br />
1.6.2 Current Contributors to LSB 16<br />
1.7 References 16<br />
Chapter 2 Working With Editors 17<br />
2.1 What to Look for in an Editor 17<br />
2.1.1 Extensibility 17<br />
2.1.2 Underst<strong>and</strong>ing Syntax 18<br />
2.1.3 Tag Support 18<br />
2.1.4 Folding Code 18<br />
2.2 Emacs 18<br />
2.2.1 <strong>Using</strong> Emacs 19<br />
2.2.2 Basic Emacs Concepts 20<br />
2.2.3 <strong>Using</strong> Buffers <strong>and</strong> Windows 24<br />
2.2.4 Language Modes 26<br />
2.2.5 <strong>Using</strong> Tags 27<br />
2.2.6 Compiling 30<br />
2.2.7 Xemacs 32<br />
2.3 Jed 32<br />
2.3.1 <strong>Configuring</strong> Jed 33<br />
2.3.2 <strong>Using</strong> Jed 34<br />
2.3.3 Folding Code 35<br />
2.4 VIM 37<br />
2.4.1 VIM Concepts 38<br />
2.4.2 Basic Editing 38<br />
2.4.3 <strong>Using</strong> Tags with VIM 41<br />
2.4.4 Folding Code 42<br />
2.5 References <strong>and</strong> Resources 42
RehmanPaulTOC.fm Page ix Friday, October 4, 2002 1:06 PM<br />
Contents<br />
ix<br />
Chapter 3 Compilers <strong>and</strong> Assemblers 43<br />
3.1 Introduction to GNU C <strong>and</strong> C++ Compilers 44<br />
3.1.1 Languages Supported by GCC 44<br />
3.1.2 New Features in GCC 3.x 46<br />
3.2 Installing GNU Compiler 48<br />
3.2.1 Downloading 48<br />
3.2.2 Building <strong>and</strong> Installing GCC 48<br />
3.2.3 Environment Variables 54<br />
3.2.4 Post-Installation Tasks 56<br />
3.2.5 What Not to Do when Installing <strong>Development</strong> Tools 58<br />
3.3 Compiling a Program 58<br />
3.3.1 Simple Compilation 59<br />
3.3.2 Default File Types 60<br />
3.3.3 Compiling to Intermediate Levels 61<br />
3.3.4 Compilation with Debug Support 63<br />
3.3.5 Compilation with Optimization 64<br />
3.3.6 Static <strong>and</strong> Dynamic Linking 65<br />
3.3.7 Compiling Source Code for Other Languages 66<br />
3.3.8 Summary of gcc Options 70<br />
3.4 Linking a program 91<br />
3.5 Assembling a Program 91<br />
3.6 H<strong>and</strong>ling Warning <strong>and</strong> Error messages 92<br />
3.7 Include files 92<br />
3.8 Creating Libraries 92<br />
3.9 St<strong>and</strong>ard Libraries 93<br />
3.10 Compiling Pascal Programs 94<br />
3.10.1 <strong>Using</strong> Free Pascal (fpc) 95<br />
3.10.2 <strong>Using</strong> GNU Pascal 96<br />
3.11 Compiling Fortran Programs 96<br />
3.12 Other Compilers 98<br />
3.12.1 Smalltalk 98<br />
3.12.2 Oberon 98<br />
3.12.3 Ruby 98<br />
3.13 References <strong>and</strong> Resources 98<br />
Chapter 4 <strong>Using</strong> GNU make 101<br />
4.1 Introduction to GNU make 102<br />
4.1.1 Basic Terminology 103
RehmanPaulTOC.fm Page x Friday, October 4, 2002 1:06 PM<br />
x<br />
Contents<br />
4.1.2 Input Files 105<br />
4.1.3 Typical Contents of a Makefile 106<br />
4.1.4 Running make 108<br />
4.1.5 Shell to Execute Comm<strong>and</strong>s 109<br />
4.1.6 Include Files 109<br />
4.2 <strong>The</strong> make Rules 110<br />
4.2.1 Anatomy of a Rule 110<br />
4.2.2 A Basic Makefile 111<br />
4.2.3 Another Example of Makefile 113<br />
4.2.4 Explicit Rules 118<br />
4.2.5 Implicit Rules 118<br />
4.3 <strong>Using</strong> Variables 119<br />
4.3.1 Defining Variables 120<br />
4.3.2 Types of Variables 120<br />
4.3.3 Pre-Defined Variables 121<br />
4.3.4 Automatic Variables 121<br />
4.4 Working with Multiple Makefiles <strong>and</strong> Directories 122<br />
4.4.1 Makefile in <strong>The</strong> Top Directory 123<br />
4.4.2 Makefile in common-dir Directory 125<br />
4.4.3 Makefile in the ftp-dir Directory 126<br />
4.4.4 Makefile in the tftp-dir Directory 127<br />
4.4.5 Makefile in the dns-dir Directory 127<br />
4.4.6 Building Everything 128<br />
4.4.7 Cleaning Everything 129<br />
4.4.8 Making Individual Targets 129<br />
4.5 Special Features of make 130<br />
4.5.1 Running Comm<strong>and</strong>s in Parallel 130<br />
4.5.2 Non-Stop Execution 130<br />
4.6 Control Structures <strong>and</strong> Directives 131<br />
4.6.1 <strong>The</strong> ifeq Directive 132<br />
4.6.2 <strong>The</strong> ifneq Directive 132<br />
4.6.3 <strong>The</strong> ifdef Directive 132<br />
4.6.4 <strong>The</strong> ifndef Directive 133<br />
4.6.5 <strong>The</strong> for Control Structure 133<br />
4.7 Getting the Latest Version <strong>and</strong> Installation 133<br />
4.7.1 Compilation 133
RehmanPaulTOC.fm Page xi Friday, October 4, 2002 1:06 PM<br />
Contents<br />
xi<br />
4.7.2 Installation 134<br />
4.8 References <strong>and</strong> Resources 134<br />
Chapter 5 Working with GNU Debugger 135<br />
5.1 Introduction to GDB 136<br />
5.2 Getting Started with GDB 136<br />
5.2.1 Most Commonly Used gdb Comm<strong>and</strong>s 137<br />
5.2.2 A Sample Session with gdb 138<br />
5.2.3 Passing Comm<strong>and</strong> Line Arguments to the Program<br />
Being Debugged 141<br />
5.3 Controlling Execution 144<br />
5.3.1 <strong>The</strong> step <strong>and</strong> finish Comm<strong>and</strong>s 144<br />
5.4 Working with the Stack 146<br />
5.5 Displaying Variables 151<br />
5.5.1 Displaying Program Variables 151<br />
5.5.2 Automatic Displaying Variables with Each Comm<strong>and</strong> 153<br />
5.5.3 Displaying Environment Variables 154<br />
5.5.4 Modifying Variables 155<br />
5.6 Adding Break Points 156<br />
5.6.1 Continuing from Break Point 158<br />
5.6.2 Disabling Break Points 159<br />
5.6.3 Enabling Break Points 159<br />
5.6.4 Deleting Break Points 160<br />
5.7 Debugging Optimized Code 160<br />
5.8 Files <strong>and</strong> Shared Libraries 163<br />
5.9 <strong>Using</strong> gdb With GNU Emacs 164<br />
5.10 Debugging Running Processes 165<br />
5.11 Installing GDB 168<br />
5.11.1 Downloading <strong>and</strong> Building 168<br />
5.11.2 Final Installation 168<br />
5.12 Other Open Source Debuggers 169<br />
5.12.1 <strong>The</strong> kdbg Debugger 169<br />
5.12.2 <strong>The</strong> ddd Debugger 172<br />
5.12.3 <strong>The</strong> xxgdb Debugger 173<br />
5.13 References <strong>and</strong> Resources 174
RehmanPaulTOC.fm Page xii Friday, October 4, 2002 1:06 PM<br />
xii<br />
Contents<br />
Chapter 6 Introduction to CVS 175<br />
6.1 CVS Policies 176<br />
6.2 Project Management <strong>and</strong> Communication 176<br />
6.3 Installing <strong>and</strong> Managing CVS 176<br />
6.3.1 <strong>Configuring</strong> CVS 177<br />
6.3.2 Importing a Project into the Repository 179<br />
6.4 <strong>Using</strong> the CVS Client 180<br />
6.4.1 Local Repositories 181<br />
6.4.2 Remote Repositories 182<br />
6.4.3 Checking out a Project 182<br />
6.4.4 Finding the Status of a Project 183<br />
6.4.5 Finding Differences 184<br />
6.4.6 Resolving Conflicts 185<br />
6.4.7 Checking the Project Back In 186<br />
6.4.8 Adding Files to a Project 186<br />
6.4.9 Removing Files from a Project 187<br />
6.4.10 Renaming Files within a Project 188<br />
6.4.11 Removing your Working Copy 188<br />
6.4.12 Tags <strong>and</strong> Releases 189<br />
6.5 Introduction to jCVS 190<br />
6.5.1 System Requirements 190<br />
6.5.2 Installation Instructions 190<br />
6.5.3 <strong>Using</strong> jCVS 191<br />
6.6 <strong>Using</strong> Emacs with CVS 196<br />
6.6.1 Installing pcl-cvs 197<br />
6.6.2 <strong>Using</strong> pcl-cvs 197<br />
6.7 Secure remote access with CVS 199<br />
6.7.1 Secure Shell Access 199<br />
6.8 References <strong>and</strong> Resources 201<br />
Chapter 7 Miscellaneous Tools 203<br />
7.1 <strong>Using</strong> indent Utility 204<br />
7.1.1 Getting Started with Indent 205<br />
7.1.2 Selecting Coding Styles 206<br />
7.1.3 Blank Lines <strong>and</strong> Comments 209<br />
7.1.4 Formatting Braces 210<br />
7.1.5 Formatting Declarations 211
RehmanPaulTOC.fm Page xiii Friday, October 4, 2002 1:06 PM<br />
Contents<br />
xiii<br />
7.1.6 Breaking Long Lines 212<br />
7.1.7 Summary of Options 213<br />
7.2 <strong>Using</strong> sed Utility 215<br />
7.3 <strong>Using</strong> diff Utility 215<br />
7.3.1 Other Forms of diff Utility 218<br />
7.4 <strong>Using</strong> cscope <strong>and</strong> cbrowser 219<br />
7.5 Generating C Function Prototypes from C Source Code<br />
<strong>Using</strong> cproto 222<br />
7.6 <strong>Using</strong> ltrace <strong>and</strong> strace Utilities 223<br />
7.7 <strong>Using</strong> GNU Binary Utilities 226<br />
7.7.1 <strong>Using</strong> the ar Utility 226<br />
7.7.2 <strong>Using</strong> the ranlib Utility 228<br />
7.7.3 <strong>Using</strong> the nm Utility 228<br />
7.7.4 <strong>Using</strong> the strip Utility 231<br />
7.7.5 <strong>Using</strong> the objcopy Utility 231<br />
7.7.6 <strong>Using</strong> the objdump Utility 232<br />
7.7.7 <strong>Using</strong> the size Utility 236<br />
7.7.8 <strong>Using</strong> the strings Utility 237<br />
7.7.9 <strong>Using</strong> the addr2line Utility 237<br />
7.8 <strong>Using</strong> the ldd Utility 238<br />
7.9 References <strong>and</strong> Resources 238<br />
Chapter 8 Cross-<strong>Platform</strong> <strong>and</strong> Embedded Systems <strong>Development</strong> 239<br />
8.1 Introduction to the Cross-<strong>Platform</strong> <strong>Development</strong> Process 240<br />
8.1.1 Host Machine 240<br />
8.1.2 Target Machine 240<br />
8.1.3 Native <strong>and</strong> Cross Compilers 241<br />
8.1.4 Cross <strong>Platform</strong> <strong>Development</strong> Cycle 241<br />
8.2 What are Embedded Systems? 243<br />
8.2.1 Embedded Systems <strong>and</strong> Moving Parts 244<br />
8.2.2 Embedded Systems <strong>and</strong> Power Consumption 245<br />
8.2.3 Embedded Operating Systems 245<br />
8.2.4 Software Applications for Embedded Systems 246<br />
8.3 How <strong>Development</strong> Systems Differ for Embedded Systems 246<br />
8.3.1 Knowledge of Target System Hardware 246<br />
8.3.2 Is the Target System Real-Time? 247
RehmanPaulTOC.fm Page xiv Friday, October 4, 2002 1:06 PM<br />
xiv<br />
Contents<br />
8.3.3 Testing Methodology 247<br />
8.4 Cross Compilations 247<br />
8.4.1 Software Emulators 248<br />
8.4.2 In-circuit emulators 249<br />
8.4.3 Introduction to JTAG <strong>and</strong> BDM 249<br />
8.5 Connecting to Target 250<br />
8.5.1 <strong>Using</strong> gdbserver with GNU Debugger 250<br />
8.5.2 Attaching to a Running Process <strong>Using</strong> gdbserver 255<br />
8.5.3 <strong>Using</strong> Stubs with GNU Debugger 256<br />
8.5.4 Debugging the Debug Session 256<br />
8.6 Hardware Used for Cross <strong>Platform</strong> <strong>and</strong> Embedded Systems<br />
<strong>Development</strong> 258<br />
8.6.1 Arcom SBC-GX1 Board 258<br />
8.6.2 Artesyn PM/PPC Mezzanine Card 260<br />
8.7 References 261<br />
Chapter 9 <strong>Platform</strong> Independent <strong>Development</strong> with Java 263<br />
9.1 How Java Applications Work 264<br />
9.1.1 Java Compiler 264<br />
9.1.2 Java Virtual Machine 264<br />
9.2 Kaffe 264<br />
9.3 <strong>The</strong> Jboss Java <strong>Development</strong> System 266<br />
9.4 Java 2 SDK 267<br />
9.4.1 Java 2 SDK St<strong>and</strong>ard Edition 267<br />
9.4.2 Getting <strong>and</strong> Installing Java SDK from Sun 269<br />
9.4.3 Creating jar Files 269<br />
9.5 Building Java Applications 270<br />
9.5.1 Creating Source Code File 270<br />
9.5.2 Compiling Java Code 270<br />
9.5.3 Running Java Applications 271<br />
9.5.4 <strong>Using</strong> gcj to Build Java Applications 271<br />
9.6 Building Applets 271<br />
9.7 Testing Applets with Netscape 272<br />
9.8 Jikes for Java 272<br />
9.9 Miscellaneous 274<br />
9.9.1 Embedded Java 274<br />
9.9.2 Real Time Java 274
RehmanPaulTOC.fm Page xv Friday, October 4, 2002 1:06 PM<br />
Contents<br />
xv<br />
9.9.3 Wireless Applications 275<br />
9.10 References 275<br />
Appendix A Typical Hardware Requirements for a <strong>Linux</strong><br />
<strong>Development</strong> Workstation 277<br />
Index 283
RehmanPaulTOC.fm Page xvi Friday, October 4, 2002 1:06 PM
Preface.fm Page xvii Wednesday, October 16, 2002 10:46 AM<br />
P REFACE<br />
Setting up a complete development environment using open source tools has always<br />
been a challenging task. Although all of the development tools are available in the open source,<br />
no comprehensive development environment exists as of today. This book is an effort to enable<br />
the reader to set up <strong>and</strong> use open source to create such an environment. Each chapter of the book<br />
is dedicated to a particular component of the development environment.<br />
Chapter 1 provides an introduction to the practical software development life cycle <strong>and</strong><br />
stages. <strong>The</strong> chapter also provides information about the documentation required for all serious<br />
software development projects. Guidelines are provided about criteria for selecting hardware<br />
<strong>and</strong> software platforms.<br />
Chapter 2 is about using editors. Editors are essential components of any software development<br />
system. Selection of a good editor saves time <strong>and</strong> money in the development life cycle.<br />
This chapter provides information about commonly used editors like Emacs, Jed <strong>and</strong> vim (vi<br />
Improved).<br />
Chapter 3 is about the GNU set of compilers commonly known as GCC. <strong>The</strong> procedure<br />
for installation <strong>and</strong> use of gcc with different languages is presented here.<br />
Larger software projects contain hundreds or thous<strong>and</strong>s of files. Compiling these files in<br />
an orderly fashion <strong>and</strong> then building the final executable product is a challenging task. GNU<br />
make is a tool used to build a project by compiling <strong>and</strong> linking source code files. Chapter 4 provides<br />
information on how to install <strong>and</strong> use this important tool.<br />
Chapter 5 discusses debuggers. An introduction to commonly used debuggers is provided<br />
in this chapter with an emphasis on the GNU debugger gdb.<br />
Chapter 6 introduces CVS, which is the open source revision control system <strong>and</strong> is most<br />
widely used in open source development. Setting up a CVS server is detailed in this chapter. You<br />
will learn how to use remote the CVS server in a secure way.<br />
<strong>The</strong>re are tools other than compilers, debuggers <strong>and</strong> editors. <strong>The</strong>se tools are discussed in<br />
Chapter 7. <strong>The</strong>se tools help in building good products.<br />
xvii
Preface.fm Page xviii Wednesday, October 16, 2002 10:46 AM<br />
xviii<br />
Preface<br />
Open source tools are also widely used in embedded <strong>and</strong> cross-platform development.<br />
Chapter 8 provides information using open source tools in such environments. Remote debugging<br />
is an important concept <strong>and</strong> it is explained in this chapter.<br />
Chapter 9 is the last chapter of the book <strong>and</strong> it provides a basic introduction to open source<br />
Java development.<br />
<strong>The</strong>re is one important thing that you must keep in mind while reading this book. It is not<br />
a tutorial on any language or programming techniques. It is about development tools <strong>and</strong> how to<br />
use these. You need other books to learn programming languages <strong>and</strong> techniques.<br />
<strong>The</strong> book explains the installation procedures of different tools. By the time you read this<br />
book, new versions of these tools may be available. <strong>The</strong> installation procedures will not vary<br />
drastically in these versions <strong>and</strong> you can use the steps explained in this book. In fact, most of the<br />
open source tools employ the same compiling <strong>and</strong> installation procedure that you will note in<br />
this book. This process has been consistent <strong>and</strong> is expected to remain the same in future as well.<br />
After reading this book, we are very much hopeful that the reader will be able to underst<strong>and</strong><br />
different components of a development system. You will also be able to create such a system<br />
from scratch using open source tools.<br />
Rafeeq Ur Rehman<br />
Christopher Paul
Preface.fm Page xix Wednesday, October 16, 2002 10:46 AM<br />
A BOUT THE CD<br />
This book comes with a CD-ROM. <strong>The</strong> CD-ROM contains source code of all software<br />
<strong>and</strong> utilities used in this book. You can compile <strong>and</strong> install these tools as explained in this<br />
book. If you need latest versions of these tools, you can download these from the links provided<br />
in the book.<br />
xix
Preface.fm Page xx Wednesday, October 16, 2002 10:46 AM
CH01.fm Page 1 Friday, October 4, 2002 3:06 PM<br />
C HAPTER 1<br />
Introduction to<br />
Software<br />
<strong>Development</strong><br />
S<br />
oftware development is a complicated process. It requires careful<br />
planning <strong>and</strong> execution to meet the goals. Sometimes a developer<br />
must react quickly <strong>and</strong> aggressively to meet everchanging market<br />
dem<strong>and</strong>s. Maintaining software quality hinders fast-paced software development,<br />
as many testing cycles are necessary to ensure quality products.<br />
This chapter provides an introduction to the software development process.<br />
As you will learn, there are many stages of any software development<br />
project. A commercial software product is usually derived from<br />
market dem<strong>and</strong>s. Sales <strong>and</strong> marketing people have first-h<strong>and</strong> knowledge<br />
of their customers’ requirements. Based upon these market requirements,<br />
senior software developers create an architecture for the products along<br />
with functional <strong>and</strong> design specifications. <strong>The</strong>n the development process<br />
starts. After the initial development phase, software testing begins, <strong>and</strong><br />
many times it is done in parallel with the development process. Documentation<br />
is also part of the development process because a product cannot be<br />
brought to market without manuals. Once development <strong>and</strong> testing are<br />
done, the software is released <strong>and</strong> the support cycle begins. This phase<br />
may include bug fixes <strong>and</strong> new releases.<br />
After reading this chapter, you should underst<strong>and</strong> how software development<br />
is done <strong>and</strong> the components of a software development system. At<br />
1
CH01.fm Page 2 Friday, October 4, 2002 3:06 PM<br />
2 Chapter 1 • Introduction to Software <strong>Development</strong><br />
the end of the chapter, you will find an introduction to <strong>Linux</strong> St<strong>and</strong>ard<br />
Base. This chapter is not specific to a particular hardware platform or<br />
tools. You will start learning about components of an actual software<br />
development platform in the next chapter.<br />
1.1 Life Cycle of a Software <strong>Development</strong> Project<br />
Software development is a complicated process comprising many stages. Each stage requires a<br />
lot of paperwork <strong>and</strong> documentation in addition to the development <strong>and</strong> planning process. This<br />
is in contrast to the common thinking of newcomers to the software industry who believe that<br />
software development is just “writing code.” Each software development project has to go<br />
through at least the following stages:<br />
• Requirement gathering<br />
• Writing functional specifications<br />
• Creating architecture <strong>and</strong> design documents<br />
• Implementation <strong>and</strong> coding<br />
• Testing <strong>and</strong> quality assurance<br />
• Software release<br />
• Documentation<br />
• Support <strong>and</strong> new features<br />
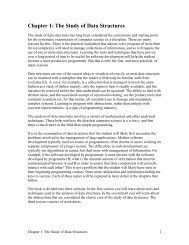
Figure 1-1 shows a typical development process for a new product.<br />
<strong>The</strong>re may be many additional steps <strong>and</strong> stages depending upon the nature of the software<br />
product. You may have to go through multiple cycles during the testing phase as software testers<br />
find problems <strong>and</strong> bugs <strong>and</strong> developers fix them before a software product is officially released.<br />
Let us go into some detail of these stages.<br />
1.1.1 Requirement Gathering<br />
Requirement gathering is usually the first part of any software product. This stage starts<br />
when you are thinking about developing software. In this phase, you meet customers or prospective<br />
customers, analyzing market requirements <strong>and</strong> features that are in dem<strong>and</strong>. You also find out<br />
if there is a real need in the market for the software product you are trying to develop.<br />
In this stage, marketing <strong>and</strong> sales people or people who have direct contact with the customers<br />
do most of the work. <strong>The</strong>se people talk to these customers <strong>and</strong> try to underst<strong>and</strong> what<br />
they need. A comprehensive underst<strong>and</strong>ing of the customers’ needs <strong>and</strong> writing down features of<br />
the proposed software product are the keys to success in this phase. This phase is actually a base<br />
for the whole development effort. If the base is not laid correctly, the product will not find a<br />
place in the market. If you develop a very good software product which is not required in the<br />
market, it does not matter how well you build it. You can find many stories about software products<br />
that failed in the market because the customers did not require them. <strong>The</strong> marketing people
CH01.fm Page 3 Friday, October 4, 2002 3:06 PM<br />
Life Cycle of a Software <strong>Development</strong> Project 3<br />
Market research<br />
Product<br />
requirements<br />
Add new features to existing product<br />
Product architecture <strong>and</strong><br />
functional specifications<br />
Create functional specification<br />
Product Design<br />
Coding <strong>and</strong><br />
implementation<br />
Bug fixes<br />
New features<br />
Testing <strong>and</strong><br />
quality assurance<br />
Support<br />
Software release<br />
Customer<br />
Figure 1-1 Typical processes for software development projects.<br />
usually create a Marketing Requirement Document or MRD that contains formal data representation<br />
of market data gathered.<br />
Spend some time doing market research <strong>and</strong> analysis. Consider your competitors’ products<br />
(if any), a process called competitive analysis. List the features required by the product. You<br />
should also think about the economics of software creation at this point. Is there a market? Can I<br />
make money? Will the revenue justify the cost of development?
CH01.fm Page 4 Friday, October 4, 2002 3:06 PM<br />
4 Chapter 1 • Introduction to Software <strong>Development</strong><br />
1.1.2 Writing Functional Specifications<br />
Functional specifications may consist of one or more documents. Functional specification<br />
documents show the behavior or functionality of a software product on an abstract level. Assuming<br />
the product is a black box, the functional specifications define its input/output behavior.<br />
Functional specifications are based upon the product requirements documentation put forward<br />
by people who have contact with the enduser of the product or the customers.<br />
In larger products, functional specifications may consist of separate documents for each<br />
feature of the product. For example, in a router product, you may have a functional specification<br />
document for RIP (Routing Information Protocol), another for security features, <strong>and</strong> so on.<br />
Functional specifications are important because developers use them to create design documents.<br />
<strong>The</strong> documentation people also use them when they create manuals for end users. If different<br />
groups are working in different physical places, functional specifications <strong>and</strong> architecture<br />
documents (discussed next) are also a means to communicate among them. Keep in mind that<br />
sometimes during the product development phase you may need to amend functional specifications<br />
keeping in view new marketing requirements.<br />
1.1.3 Creating Architecture <strong>and</strong> Design Documents<br />
When you have all of the requirements collected <strong>and</strong> arranged, it is the turn of the technical<br />
architecture team, consisting of highly qualified technical specialists, to create the architecture<br />
of the product. <strong>The</strong> architecture defines different components of the product <strong>and</strong> how they<br />
interact with each other. In many cases the architecture also defines the technologies used to<br />
build the product. While creating the architecture documents of the project, the team also needs<br />
to consider the timelines of the project. This refers to the target date when the product is required<br />
to be on the market. Many excellent products fail because they are either too early or late to market.<br />
<strong>The</strong> marketing <strong>and</strong> sales people usually decide a suitable time frame to bring the product to<br />
market. Based on the timeline, the architecture team may drop some features of the product if it<br />
is not possible to bring the full-featured product to market within the required time limits.<br />
Once components of the product have been decided <strong>and</strong> their functionality defined, interfaces<br />
are designed for these components to work together. In most cases, no component works in<br />
isolation; each one has to coordinate with other components of the product. Interfaces are the<br />
rules <strong>and</strong> regulations that define how these components will interact with each other. <strong>The</strong>re may<br />
be major problems down the road if these interfaces are not designed properly <strong>and</strong> in a detailed<br />
way. Different people will work on different components of any large software development<br />
project <strong>and</strong> if they don’t fully underst<strong>and</strong> how a particular component will communicate with<br />
others, integration becomes a major problem.<br />
For some products, new hardware is also required to make use of technology advancements.<br />
<strong>The</strong> architects of the product also need to consider this aspect of the product.<br />
After defining architecture, software components <strong>and</strong> their interfaces, the next phase of<br />
development is the creation of design documents. At the architecture level, a component is<br />
defined as a black box that provides certain functionality. At the design documents stage, you
CH01.fm Page 5 Friday, October 4, 2002 3:06 PM<br />
Life Cycle of a Software <strong>Development</strong> Project 5<br />
have to define what is in that black box. Senior software developers usually create design documents<br />
<strong>and</strong> these documents define individual software components to the level of functions <strong>and</strong><br />
procedures. <strong>The</strong> design document is the last document completed before development of the<br />
software begins. <strong>The</strong>se design documents are passed on to software developers <strong>and</strong> they start<br />
coding. Architecture documents <strong>and</strong> MRDs typically need to stay in sync, as sales <strong>and</strong> marketing<br />
will work from MRDs while engineering works from engineering documents.<br />
1.1.4 Implementation <strong>and</strong> Coding<br />
<strong>The</strong> software developers take the design documents <strong>and</strong> development tools (editors, compilers,<br />
debuggers etc.) <strong>and</strong> start writing software. This is usually the longest phase in the product<br />
life cycle. Each developer has to write his/her own code <strong>and</strong> collaborate with other developers to<br />
make sure that different components can interoperate with each other. A revision control system<br />
such as CVS (Concurrent Versions System) is needed in this phase. <strong>The</strong>re are a few other open<br />
source revision control systems as well as commercial options. <strong>The</strong> version control system provides<br />
a central repository to store individual files. A typical software project may contain anywhere<br />
from hundreds to thous<strong>and</strong>s of files. In large <strong>and</strong> complex projects, someone also needs to<br />
decide directory hierarchy so that files are stored in appropriate locations. During the development<br />
cycle, multiple persons may modify files. If everyone is not following the rules, this may<br />
easily break the whole compilation <strong>and</strong> building process. For example, duplicate definitions of<br />
the same variables may cause problems. Similarly, if included files are not written properly, you<br />
can easily cause the creation of loops. Other problems pop up when multiple files are included in<br />
a single file with conflicting definitions of variables <strong>and</strong> functions.<br />
Coding guidelines should also be defined by architects or senior software developers. For<br />
example, if software is intended to be ported to some other platform as well, it should be written<br />
on a st<strong>and</strong>ard like ANSI.<br />
During the implementation process, developers must write enough comments inside the<br />
code so that if anybody starts working on the code later on, he/she is able to underst<strong>and</strong> what has<br />
already been written. Writing good comments is very important as all other documents, no matter<br />
how good they are, will be lost eventually. Ten years after the initial work, you may find only<br />
that information which is present inside the code in the form of comments.<br />
<strong>Development</strong> tools also play an important role in this phase of the project. Good development<br />
tools save a lot of time for the developers, as well as saving money in terms of improved<br />
productivity. <strong>The</strong> most important development tools for time saving are editors <strong>and</strong> debuggers. A<br />
good editor helps a developer to write code quickly. A good debugger helps make the written<br />
code operational in a short period of time. Before starting the coding process, you should spend<br />
some time choosing good development tools.<br />
Review meetings during the development phase also prove helpful. Potential problems are<br />
caught earlier in the development. <strong>The</strong>se meeting are also helpful to keep track of whether the<br />
product is on time or if more effort is needed complete it in the required time frame. Sometimes<br />
you may also need to make some changes in the design of some components because of new
CH01.fm Page 6 Friday, October 4, 2002 3:06 PM<br />
6 Chapter 1 • Introduction to Software <strong>Development</strong><br />
requirements from the marketing <strong>and</strong> sales people. Review meetings are a great tool to convey<br />
these new requirements. Again, architecture documents <strong>and</strong> MRDs are kept in sync with any<br />
changes/problems encountered during development.<br />
1.1.5 Testing<br />
Testing is probably the most important phase for long-term support as well as for the reputation<br />
of the company. If you don’t control the quality of the software, it will not be able to compete<br />
with other products on the market. If software crashes at the customer site, your customer<br />
loses productivity as well money <strong>and</strong> you lose credibility. Sometimes these losses are huge.<br />
Unhappy customers will not buy your other products <strong>and</strong> will not refer other customers to you.<br />
You can avoid this situation by doing extensive testing. This testing is referred to as Quality<br />
Assurance, or QA, in most of the software world.<br />
Usually testing starts as soon as the initial parts of the software are available. <strong>The</strong>re are<br />
multiple types of testing <strong>and</strong> these are explained in this section. Each of these has its own<br />
importance.<br />
1.1.5.1 Unit Testing<br />
Unit testing is testing one part or one component of the product. <strong>The</strong> developer usually<br />
does this when he/she has completed writing code for that part of the product. This makes sure<br />
that the component is doing what it is intended to do. This also saves a lot of time for software<br />
testers as well as developers by eliminating many cycles of software being passed back <strong>and</strong> forth<br />
between the developer <strong>and</strong> the tester.<br />
When a developer is confident that a particular part of the software is ready, he/she can<br />
write test cases to test functionality of this part of the software. <strong>The</strong> component is then forwarded<br />
to the software testing people who run test cases to make sure that the unit is working<br />
properly.<br />
1.1.5.2 Sanity Testing<br />
Sanity testing is a very basic check to see if all software components compile with each<br />
other without a problem. This is just to make sure that developers have not defined conflicting or<br />
multiple functions or global variable definitions.<br />
1.1.5.3 Regression or Stress Testing<br />
Regression or stress testing is a process done in some projects to carry out a test for a<br />
longer period of time. This type of testing is used to determine behavior of a product when used<br />
continuously over a period of time. It can reveal some bugs in software related to memory leakage.<br />
In some cases developers allocate memory but forget to release it. This problem is known as<br />
memory leakage. When a test is conducted for many days or weeks, this problem results in allocation<br />
of all of the available memory until no memory is left. This is the point where your software<br />
starts showing abnormal behavior.
CH01.fm Page 7 Friday, October 4, 2002 3:06 PM<br />
Life Cycle of a Software <strong>Development</strong> Project 7<br />
Another potential problem in long-term operation is counter overflow. This occurs when<br />
you increment a counter but forget to decrement, it resulting in an overflow when the product is<br />
used for longer periods.<br />
<strong>The</strong> regression testing may be started as soon as some components are ready. This testing<br />
process requires a very long period of time by its very nature. <strong>The</strong> process should be continued<br />
as more components of the product are integrated. <strong>The</strong> integration process <strong>and</strong> communication<br />
through interfaces may create new bugs in the code.<br />
1.1.5.4 Functional Testing<br />
Functional testing is carried out to make sure that the software is doing exactly what it is<br />
supposed to do. This type of testing is a must before any software is released to customers. Functional<br />
testing is done by people whose primary job is software testing, not the developers themselves.<br />
In small software projects where a company can’t afford dedicated testers, other<br />
developers may do functional testing also. <strong>The</strong> key point to keep in mind is that the person who<br />
wrote a software component should not be the person who tested it. A developer will tend to test<br />
the software the way he/she has written it. He/she may easily miss any problems in the software.<br />
<strong>The</strong> software testers need to prepare a testing plan for each component of the software. A<br />
testing plan consists of test cases that are run on the software. <strong>The</strong> software tester can prepare<br />
these test cases using functional specifications documents. <strong>The</strong> tester may also get help from the<br />
developer to create test cases. Each test case should include methodology used for testing <strong>and</strong><br />
expected results.<br />
In addition to test cases, the tester may also need to create a certain infrastructure or environment<br />
to test the functionality of a piece of code. For example, you may simulate a network to<br />
test routing algorithms that may be part of a routing product.<br />
<strong>The</strong> next important job of the tester is to create a service request if an anomaly is found.<br />
<strong>The</strong> tester should include as much information in the service request as possible. Typical information<br />
included in reporting bugs includes:<br />
• Test case description<br />
• How the test was carried out<br />
• Expected results<br />
• Results obtained<br />
• If a particular environment was created for testing, a description of that environment<br />
<strong>The</strong> service request should be forwarded to the developer so that the developer may correct<br />
the problem. Many software packages are available in the market to track bugs <strong>and</strong> fix problems<br />
in software. <strong>The</strong>re are many web-based tools as well. For a list of freely available open<br />
source projects, go to http://www.osdn.org or http://www.sourceforge.net <strong>and</strong> search for “bug<br />
track”. OSDN (Open Source Developers Network) hosts many open source software development<br />
projects. You can find software packages that work with CVS also. CVS is explained in<br />
Chapter 6 of this book.
CH01.fm Page 8 Friday, October 4, 2002 3:06 PM<br />
8 Chapter 1 • Introduction to Software <strong>Development</strong><br />
1.1.6 Software Releases<br />
Before you start selling any software product, it is officially released. This means that you<br />
create a state of the software in your repository, make sure that it has been tested for functionality<br />
<strong>and</strong> freeze the code. A version number is assigned to released software. After releasing the<br />
software, development may continue but it will not make any change in the released software.<br />
<strong>The</strong> development is usually carried on in a new branch <strong>and</strong> it may contain new features of the<br />
product. <strong>The</strong> released software is updated only if a bug fixed version is released.<br />
Usually companies assign incremental version numbers following some scheme when the<br />
next release of the software is sent to market. <strong>The</strong> change in version number depends on whether<br />
the new software contains a major change to the previous version or it contains bug fixes <strong>and</strong><br />
enhancement to existing functionality. Releases are also important because they are typically<br />
compiled versions of a particular version of the code, <strong>and</strong> thus provide a stable set of binaries for<br />
testing.<br />
1.1.6.1 Branches<br />
In almost all serious software development projects, a revision or version control system is<br />
used. This version control system keeps a record of changes in source code files <strong>and</strong> is usually<br />
built in a tree-like structure. When software is released, the state of each file that is part of the<br />
release should be recorded. Future developments are made by creating branches to this state.<br />
Sometimes special branches may also be created that are solely used for bug fixing. CVS is discussed<br />
in detail in Chapter 6.<br />
1.1.6.2 Release Notes<br />
Every software version contains release notes. <strong>The</strong>se release notes are prepared by people<br />
releasing the software version with the help of developers. Release notes show what happened in<br />
this software version. Typically the information includes:<br />
• Bug fixes<br />
• New functionality<br />
• Detail of new features added to the software<br />
• Any bugs that are not yet fixed<br />
• Future enhancements<br />
• If a user needs a change in the configuration process, it is also mentioned in the release<br />
notes<br />
Typically a user should be given enough information to underst<strong>and</strong> the new release<br />
enhancements <strong>and</strong> decide whether an upgrade is required or not.<br />
1.1.7 Documentation<br />
<strong>The</strong>re are three broad categories of documentation related to software development processes.
CH01.fm Page 9 Friday, October 4, 2002 3:06 PM<br />
Life Cycle of a Software <strong>Development</strong> Project 9<br />
1. Technical documentation developed during the development process. This includes<br />
architecture, functional <strong>and</strong> design documents.<br />
2. Technical documentation prepared for technical support staff. This includes technical<br />
manuals that support staff use to provide customer support.<br />
3. End-user manuals <strong>and</strong> guides. This is the documentation for the end user to assist the<br />
user getting started with the product <strong>and</strong> using it.<br />
All three types of documents are necessary for different aspects of product support. Technical<br />
documents are necessary for future development, bug fixes, <strong>and</strong> adding new features. Technical<br />
documentation for technical support staff contains information that is too complicated for<br />
the end user to underst<strong>and</strong> <strong>and</strong> use. <strong>The</strong> support staff needs this information in addition to user<br />
manuals to better support customers. Finally each product must contain user manuals.<br />
Technical writers usually develop user manuals which are based on functional specifications.<br />
In the timelines of most software development projects, functional specifications are prepared<br />
before code development starts. So the technical writers can start writing user manuals<br />
while developers are writing code. By the time the product is ready, most of the work on user<br />
manuals has already been completed.<br />
1.1.8 Support <strong>and</strong> New Features<br />
Your customers need support when you start selling a product. This is true regardless of<br />
the size of the product, <strong>and</strong> even for products that are not software related. Most common support<br />
requests from customers are related to one of the following:<br />
• <strong>The</strong> customer needs help in installation <strong>and</strong> getting started.<br />
• <strong>The</strong> customer finds a bug <strong>and</strong> you need to release a patch or update to the whole<br />
product.<br />
• <strong>The</strong> product does not fulfill customer requirements <strong>and</strong> a new feature is required by the<br />
customer.<br />
In addition to that, you may also want to add new features to the product for the next<br />
release because competitor products have other features. Better support will increase your customer<br />
loyalty <strong>and</strong> will create referral business for you.<br />
You may adopt two strategies to add new features. You may provide an upgrade to the current<br />
release as a patch, or wait until you have compiled <strong>and</strong> developed a list of new features <strong>and</strong><br />
make a new version. Both of these strategies are useful depending how urgent the requirement<br />
for new features is.
CH01.fm Page 10 Friday, October 4, 2002 3:06 PM<br />
10 Chapter 1 • Introduction to Software <strong>Development</strong><br />
1.2 Components of a <strong>Development</strong> System<br />
Like any other system, a development system is composed of many components that work<br />
together to provide services to the developer for the software development task. Depending upon<br />
the requirements of a project, different types of components can be chosen. Many commercial<br />
companies also sell comprehensive development tools. On <strong>Linux</strong> systems, all of the development<br />
tools are available <strong>and</strong> you can choose some of these depending upon your level of expertise<br />
with these tools <strong>and</strong> your requirements. Typically each development platform consists of the<br />
following components:<br />
• Hardware platform<br />
• Operating system<br />
• Editors<br />
• Compilers <strong>and</strong> assemblers<br />
• Debuggers<br />
• Version control system<br />
• Collaboration <strong>and</strong> bug tracking<br />
Let us take a closer look on these components <strong>and</strong> what role they play in the development<br />
cycle.<br />
1.2.1 Hardware <strong>Platform</strong><br />
This is the tangible part of the development system. A hardware platform is the choice of<br />
your hardware, PC or workstation, for the development system. You can choose a particular<br />
hardware platform depending upon different factors as listed below:<br />
Cost<br />
Performance<br />
Tools<br />
<strong>Development</strong> Type<br />
Depending upon budget, you may chose different types of hardware.<br />
Usually UNIX workstations are costly to buy <strong>and</strong> maintain. On the<br />
other h<strong>and</strong>, PC-based workstations are cheap <strong>and</strong> the maintenance<br />
cost is also low.<br />
Usually UNIX workstations have high performance <strong>and</strong> stability as<br />
compared to PC-based solutions.<br />
You also need to keep in mind availability of development tools on a<br />
particular platform.<br />
If the target system is the same as the host system on which development<br />
is done, the development is relatively easy <strong>and</strong> native tools are<br />
cheap as well, compared to cross-platform development tools.<br />
Depending upon these factors, you may make a choice from the available hardware platforms<br />
for development.
CH01.fm Page 11 Friday, October 4, 2002 3:06 PM<br />
Components of a <strong>Development</strong> System 11<br />
If hardware is part of the final product, selection of hardware platform also depends upon<br />
customer/market requirement.<br />
1.2.2 Operating System<br />
Choice of a particular operating system may be made depending upon:<br />
• Cost<br />
• Availability of development tools<br />
• Hardware platform<br />
• Native or cross compiling<br />
Some operating systems are cheaper than others. <strong>Linux</strong> is an excellent choice, as far as<br />
cost is concerned. <strong>Linux</strong> is also a very good operating system as it has all of the development<br />
tools available. Now you can install <strong>Linux</strong> on high-end workstations from Sun Microsystems,<br />
HP, <strong>and</strong> IBM as well as commodity PC hardware available everywhere. It provides stability <strong>and</strong><br />
most of the people are familiar with development tools. You can also use the operating system<br />
for cross-platform development using GNU tools.<br />
1.2.3 Editors<br />
Editors play an important role in the development work. Easy-to-use <strong>and</strong> feature rich editors,<br />
like Emacs, increase developers’ productivity. You should look at a few things while selecting<br />
editors. <strong>The</strong>se features include:<br />
• Underst<strong>and</strong>ing syntax of language<br />
• Collapsing of context<br />
• Support of tags<br />
• Opening multiple files<br />
• Easy editing for generally used editing functions like cut, copy, paste, search, replace<br />
<strong>and</strong> so on<br />
• Multiple windows<br />
• Support of user defined functions <strong>and</strong> macros<br />
If you look at the open source community, you can find a lot of good editors available to<br />
developers. <strong>The</strong> most commonly used editors are Jed, Emacs <strong>and</strong> Xemacs. However, many other<br />
variants of these editors are also available. You can also use X-Windows-based editors available<br />
on <strong>Linux</strong> platform. A lot of people also edit in vi or vim, both of these have been very popular<br />
historically.
CH01.fm Page 12 Friday, October 4, 2002 3:06 PM<br />
12 Chapter 1 • Introduction to Software <strong>Development</strong><br />
1.2.4 Compilers <strong>and</strong> Assemblers<br />
Compilers <strong>and</strong> assemblers are the core development tools because they convert source<br />
code to executable form. Quality of compilers does affect the output code. For example, some<br />
compilers can do much better code optimization compared to others. If you are doing some<br />
cross-platform development, then your compiler should support code generation for the target<br />
machine as well.<br />
GNU compilers collection, more commonly called GCC, is a comprehensive set of compilers<br />
for commonly used languages including the following:<br />
• C<br />
• C++<br />
• Java<br />
• Fortran<br />
In addition to GCC, you can find a lot of other open source compilers available for <strong>Linux</strong>.<br />
Some of these are introduced in Chapter 3.<br />
GNU utilities set, also known as binutils, includes GNU assembler <strong>and</strong> other utilities that<br />
can be used for many tasks. GNU assembler is used whenever you compile a program using<br />
GNU compiler.<br />
1.2.5 Debuggers<br />
Debuggers are the also an important part of all development systems. You can’t write a<br />
program that is free of bugs. Debugging is a continuous part of software development <strong>and</strong> you<br />
need good tools for this purpose. GNU debugger, more commonly known as GDB, is a common<br />
debugger. Many other debuggers are also built on this debugger. <strong>The</strong> GNU debugger <strong>and</strong> some<br />
other debuggers will be introduced later in this book.<br />
1.2.6 Version Control Systems<br />
<strong>The</strong> revision control system is a must for any serious development effort where multiple<br />
developers work on a software product. <strong>The</strong> most popular version control system on <strong>Linux</strong> is<br />
known as Concurrent Versions System or CVS. CVS allows many people to work on files at the<br />
same time <strong>and</strong> provides a central repository to store files. Developers can check out files from<br />
this repository, make changes <strong>and</strong> check the files back into the repository. CVS also works with<br />
editors like GNU Emacs.<br />
When multiple developers are modifying the same file at the same time, conflict may<br />
occur between different changes made by multiple developers. When a conflict is detected in the<br />
files being checked in, CVS provides a mechanism to merge the files appropriately.<br />
CVS can be used over secure links as well. This is required when developers are not physically<br />
located at the same place. A server on the Internet can be used to provide secure access to<br />
the central software repository.
CH01.fm Page 13 Friday, October 4, 2002 3:06 PM<br />
Selection Criteria for Hardware <strong>Platform</strong> 13<br />
<strong>The</strong>re are other version control systems as well which are popular in the software development<br />
community. Examples are Aegis, PRCS, RCS <strong>and</strong> SCCS.<br />
1.2.7 E-mail <strong>and</strong> Collaboration<br />
In any software development project, collaboration among developers, designers <strong>and</strong><br />
architects as well as marketing people is a must. <strong>The</strong> objective can be achieved in many ways.<br />
Probably e-mail is the most efficient <strong>and</strong> cheapest way. Some collaboration tools provide more<br />
functionality than just e-mailing.<br />
1.2.8 X-Windows<br />
X-Windows is much more than just a GUI interface on <strong>Linux</strong>, but for development purposes,<br />
it provides a very good user interface. This is especially useful for editors like Emacs.<br />
1.2.9 Miscellaneous Tools<br />
Many miscellaneous tools are also important during the development process. Some of<br />
these tools are listed below:<br />
• <strong>The</strong> make utility<br />
• <strong>The</strong> ar program<br />
• <strong>The</strong> ranlib utility<br />
• <strong>The</strong> hexdump utility<br />
Information about these tools is provided later in this book.<br />
1.3 Selection Criteria for Hardware <strong>Platform</strong><br />
<strong>The</strong> development process needs computers, networks, storage, printing <strong>and</strong> other hardware components.<br />
However the important hardware decision is the selection of PCs <strong>and</strong> workstations for<br />
developers. <strong>The</strong>re is no hard <strong>and</strong> fast rule about how to select a particular hardware platform. It<br />
depends upon the requirements of a development project. Some factors that you may keep in<br />
mind are as follows:<br />
• Cost of the hardware.<br />
• Availability of desired operating system on the hardware. For example, you can’t run<br />
HP-UX on PCs.<br />
• Availability of development tools.<br />
• Maintenance cost.
CH01.fm Page 14 Friday, October 4, 2002 3:06 PM<br />
14 Chapter 1 • Introduction to Software <strong>Development</strong><br />
<strong>The</strong>re may be other factors as well <strong>and</strong> you are the best person to judge what you need.<br />
However, keep in mind that reliability of hardware is one major factor that people usually overlook.<br />
If you buy cheap systems that decrease productivity of developers, you lose a lot of money.<br />
1.4 Selection Criteria for Software <strong>Development</strong> Tools<br />
After selecting the hardware, software development tools are the next major initial expense in<br />
terms of money <strong>and</strong> time to set these up. Selection of software development tools depends upon<br />
the choice of hardware <strong>and</strong> operating system. In many cases GNU tools are very well suited.<br />
Selection of development tools also has a major effect on the productivity of the whole development<br />
team.<br />
1.5 Managing <strong>Development</strong> Process<br />
In large software development projects, management of the development process is a big task<br />
<strong>and</strong> a dedicated person may be needed to take care of this aspect of the project. A development<br />
manager usually acts as a binding <strong>and</strong> coordinating force among different parties with conflicting<br />
interests. <strong>The</strong>se parties include:<br />
• Marketing <strong>and</strong> sales people who put forward requirements, change requirements <strong>and</strong><br />
come up with new requirements, usually when much of the work is already done!<br />
• Architecture <strong>and</strong> design people.<br />
• Software developers who always think that they always have less amount of time.<br />
• Release management people.<br />
• Software testers.<br />
• Documentation writers.<br />
• Senior managers who often push to complete the project earlier than the deadline.<br />
Coordinating all of these parties is not an easy task. <strong>The</strong> manager has to convince senior<br />
management that a new feature needs that much time for development. At the same time he has<br />
to push developers to meet the deadlines. Some of the important tasks of software management<br />
in a real-life project are as follows.<br />
1.5.1 Creating Deadlines<br />
<strong>The</strong> manager usually coordinates with the software developers to set reasonable deadlines<br />
for certain features. <strong>The</strong>se deadlines must conform to the product delivery time lines.<br />
<strong>The</strong> manager may have to arrange additional resources to complete feature development in the<br />
allotted time.<br />
Project management software can help a manager to set <strong>and</strong> meet deadlines <strong>and</strong> track<br />
completion of different components.
CH01.fm Page 15 Friday, October 4, 2002 3:06 PM<br />
<strong>Linux</strong> <strong>Development</strong> <strong>Platform</strong> Specifications (LDPS) <strong>and</strong> <strong>Linux</strong> St<strong>and</strong>ard Base (LSB) 15<br />
1.5.2 Managing the <strong>Development</strong> Team<br />
<strong>The</strong> manager has to keep track of how development among different parts of the software<br />
is going on. If part of the product is behind schedule, she has to re-arrange resources to get it<br />
back on track.. She may also need to hire new people to finish the development of a particular<br />
component on schedule.<br />
1.5.3 Resolving Dependencies<br />
Usually software components are dependent on one another. If the development of one<br />
component is lagging behind, it may affect development of other components. <strong>The</strong> development<br />
manager needs to keep an eye on these dependencies <strong>and</strong> how these may affect the overall<br />
progress of the project. Well-known project management methods are usually helpful for<br />
this task.<br />
1.6 <strong>Linux</strong> <strong>Development</strong> <strong>Platform</strong> Specifications (LDPS) <strong>and</strong> <strong>Linux</strong><br />
St<strong>and</strong>ard Base (LSB)<br />
<strong>Linux</strong> <strong>Development</strong> <strong>Platform</strong> Specifications or LDPS was an effort to design a common specification<br />
so that programs developed on one <strong>Linux</strong> distribution could be easily ported to other distributions.<br />
<strong>The</strong> specifications define components <strong>and</strong> packages that must be present on <strong>Linux</strong><br />
development workstations. <strong>The</strong> latest version of the specifications at the time of writing this<br />
book is available at http://www.freest<strong>and</strong>ards.org/ldps/1.1/ldps-1.1.html web site.<br />
<strong>Linux</strong> St<strong>and</strong>ard Base or LSB (http://www.linuxbase.org) is the new forum to st<strong>and</strong>ardize<br />
<strong>Linux</strong> distributions. LSB specifications 1.1.0 is available at the time of writing this book. LSB<br />
compliant applications can run on any LSB compliant distribution without any modification or<br />
recompilation process. Specifications are detailed <strong>and</strong> the latest version can be found at http://<br />
www.linuxbase.org/spec/.<br />
1.6.1 Libraries<br />
<strong>The</strong> following libraries will be available on LSB compliant systems. While developing<br />
applications for <strong>Linux</strong>, the developer can assume presence of these libraries on target machines,<br />
provided the target is LSB compliant.<br />
• libX11<br />
• libXt<br />
• libGL<br />
• libXext<br />
• libICE<br />
• libSM<br />
• libdl<br />
• libcrypt
CH01.fm Page 16 Friday, October 4, 2002 3:06 PM<br />
16 Chapter 1 • Introduction to Software <strong>Development</strong><br />
• libz<br />
• libncurses<br />
1.6.2 Current Contributors to LSB<br />
Major <strong>Linux</strong> vendors include:<br />
• Caldera Inc.<br />
• M<strong>and</strong>rakeSoft<br />
• Red Hat Software<br />
• <strong>The</strong> Debian Project<br />
• Turbo<strong>Linux</strong> Inc.<br />
• SuSE<br />
• VA <strong>Linux</strong><br />
References<br />
1. LDPS web site at http://www.freest<strong>and</strong>ards.org/ldps/<br />
2. CVS web site at http://www.gnu.org/software/cvs/<br />
3. Aegis at web site http://aegis.sourceforge.net/index.html<br />
4. PRCS at its web site http://prcs.sourceforge.net/<br />
5. GNU Software at http://www.gnu.org<br />
6. <strong>Linux</strong> St<strong>and</strong>ard Base at http://www.linuxbase.org<br />
7. Open Source Developers Network at http://www.osdn.org
CH02.fm Page 17 Monday, October 7, 2002 8:09 PM<br />
C HAPTER 2<br />
Working With<br />
Editors<br />
O<br />
ne of the most fundamental tools required for application development<br />
on any platform is a text editor; <strong>and</strong> the <strong>Linux</strong> operating system<br />
offers programmers a wide variety to choose from. <strong>The</strong>se editors<br />
offer a wide variety of functionality from simple editing features to syntax<br />
highlighting <strong>and</strong> reading e-mail.<br />
In this chapter, we will focus on a couple of editors that offer features that<br />
will be of interest to developers, Jed, vim, <strong>and</strong> Emacs. All of these editors<br />
offer extended features beyond simple text editing.<br />
2.1 What to Look for in an Editor<br />
While editors like pico or even ed may be useful for editing system files or writing quick notes,<br />
programming editors have certain functions that permit the programmer to focus on the act of<br />
creating code <strong>and</strong> helps to manage the process <strong>and</strong> keep an eye on syntax.<br />
2.1.1 Extensibility<br />
One useful feature of programming editors is the ability to extend the out-of-the-box functionality<br />
with custom programming.<br />
Emacs utilizes a full-featured Lisp language called Elisp to provide users with the ability<br />
to add just about any functionality they might require to the editor. <strong>The</strong> original Lisp language<br />
was written in the late 1950s as part of MIT’s research into artificial intelligence. Elisp is derived<br />
from the original Lisp <strong>and</strong> provides surprising flexibility in extending Emacs for those who take<br />
the time to learn it.<br />
17
CH02.fm Page 18 Monday, October 7, 2002 8:09 PM<br />
18 Chapter 2 • Working With Editors<br />
Jed extensibility is based on the s-lang libraries (www.s-lang.org) that were developed by<br />
John E. Davis as a generic macro language that would become the basis for a number of different<br />
programs. S-lang programs resemble C in syntax <strong>and</strong> layout.<br />
2.1.2 Underst<strong>and</strong>ing Syntax<br />
By underst<strong>and</strong>ing the syntax of the programming, the editor can perform a number of<br />
functions that make it easier for the programmer to move through the code, locate bugs more<br />
quickly <strong>and</strong> perform other common functions.<br />
Such functions include jumping to the beginning of a stanza in the code, highlighting that<br />
stanza, automatic indenting, highlighting syntax, <strong>and</strong> quickly inserting comments <strong>and</strong> commenting<br />
on entire sections of code.<br />
2.1.3 Tag Support<br />
<strong>The</strong> ctags <strong>and</strong> etags utilities that come with <strong>Linux</strong> are able to build a list of the various<br />
functions, classes, fragments, data blocks <strong>and</strong> other information within the various files that<br />
make up the application. Not all information is available for all languages. For example, while<br />
only subroutines are supported for the Perl language, support for the C/C++ languages includes:<br />
• macros (names defined/undefined by #define / #undef)<br />
• enumerators (enumerated values)<br />
• function definitions, prototypes, <strong>and</strong> declarations<br />
• class, enum, struct, <strong>and</strong> union names<br />
• namespaces<br />
• typedefs<br />
• variables (definitions <strong>and</strong> declarations)<br />
• class, struct, <strong>and</strong> union members<br />
Both Emacs <strong>and</strong> vim provide the ability for the editor to underst<strong>and</strong> st<strong>and</strong>ard tag files <strong>and</strong><br />
help the programmer quickly locate <strong>and</strong> edit the portion of code that he/she is working on.<br />
Emacs uses the output from etags, while vi uses ctags.<br />
2.1.4 Folding Code<br />
Folding code refers to the ability of the editor to hide portions of code while they are not<br />
needed. For example, all of the functions or subroutines in the code can be folded so that only<br />
the names of the functions are seen until the programmer unfolds that routine to work on it.<br />
2.2 Emacs<br />
Emacs is a lisp-based editor that has been around in one form or another since the late 1970s;<br />
despite its long history, it remains one of the most up-to-date <strong>and</strong> widely used editing environ-
CH02.fm Page 19 Monday, October 7, 2002 8:09 PM<br />
Emacs 19<br />
ments today. From within the editor a user can read <strong>and</strong> send mail, perform research on the Internet,<br />
<strong>and</strong> even send out for coffee to RFC2324 compliant coffee makers.<br />
Configuration of Emacs is accomplished via the .emacs file that can be created in each<br />
user’s $HOME directory. If the configuration does not exist, Emacs will use its built-in<br />
defaults. This file consists of a series of elisp expressions that the editor evaluates when the<br />
application runs.<br />
2.2.1 <strong>Using</strong> Emacs<br />
Navigating <strong>and</strong> using Emacs may appear confusing <strong>and</strong> counter-intuitive for those just learning<br />
how to use the editor, however the time taken to master this editor can prove well-spent when<br />
one considers the time savings that such an integrated <strong>and</strong> flexible development environment can<br />
provide.<br />
If Emacs is started from within X-Windows, it will automatically open a new window in<br />
the desktop. To prevent this behavior, you can use the –nw option from the comm<strong>and</strong> line. Alternately,<br />
you can tell Emacs how large to make the window by specifying the size of the window,<br />
in characters, that you wish to create. Examples are:<br />
$ emacs –nw main.c<br />
$ emacs –geometry 80x24 main.c &<br />
Figure 2-1 shows the initial Emacs screen if it is invoked without an initial file name.<br />
Figure 2-1 <strong>The</strong> initial Emacs screen.
CH02.fm Page 20 Monday, October 7, 2002 8:09 PM<br />
20 Chapter 2 • Working With Editors<br />
For a complete tutorial in using Emacs, from within the application itself, type ^H-t 1 .<br />
This tutorial covers many of the functions that are available within Emacs <strong>and</strong> takes you step-bystep<br />
through them.<br />
2.2.2 Basic Emacs Concepts<br />
Emacs uses several keyboard keys to enter comm<strong>and</strong>s into the application. <strong>The</strong> primary<br />
one is the Meta key. <strong>The</strong> Meta key is signified by M-. <strong>The</strong> Meta key is generally the ALT key<br />
on the keyboard, although it may be the ESC key in certain circumstances. If the ALT key does<br />
not work, try the ESC key. What works will depend on if you are logged in locally, accessing the<br />
console directly or using X-Windows. <strong>The</strong> ALT key is used in the same manner as the CTRL key.<br />
When using the ESC key, press <strong>and</strong> release the ESC key <strong>and</strong> then press the next indicated key.<br />
In all cases, typing ^U may be used in place of the Meta key. Just type <strong>and</strong> release ^U <strong>and</strong> then<br />
type the rest of the key sequence as you would for the ESC key.<br />
Entering text into the buffer is accomplished in the default mode simply by typing on the<br />
keyboard. To abort a comm<strong>and</strong> that’s currently running or asking for input, type ^G. This will<br />
return you to the current buffer.<br />
Simple comm<strong>and</strong>s can be repeated by prefacing them with the key sequence ESC #. By<br />
pressing the escape key <strong>and</strong> typing any number, the next comm<strong>and</strong> that is issued will be repeated<br />
that number of times. For example, typing ESC 75= is the same as pressing the equal key 75<br />
times.<br />
To exit Emacs, use the comm<strong>and</strong> sequence ^X^C.<br />
Moving around<br />
In additional to the basic functionality provided by the arrow keys on the keyboard, the<br />
key combinations shown in Table 2-1 may be used to move the pointer one character at a time in<br />
a given direction.<br />
Table 2-1 Simple Movement Comm<strong>and</strong>s.<br />
Arrow Key<br />
Left Arrow<br />
Right Arrow<br />
Up Arrow<br />
Down Arrow<br />
Alternate Combination<br />
^F<br />
^B<br />
^P<br />
^N<br />
1. <strong>The</strong> caret symbol denotes a control character. To enter the key combination ^H-t, press <strong>and</strong> hold the CTRL key,<br />
<strong>and</strong> then press the ‘H’ key. Release both keys <strong>and</strong> then press the ‘t’ key.
CH02.fm Page 21 Monday, October 7, 2002 8:09 PM<br />
Emacs 21<br />
Movement can also be accomplished a word or a page at a time. This is accomplished by<br />
referring to Table 2-2.<br />
Table 2-2 Movement Comm<strong>and</strong>s<br />
Action<br />
Comm<strong>and</strong><br />
M-b<br />
M-f<br />
^A<br />
^E<br />
M-c or Page-Up<br />
^V or Page-Down<br />
M-<<br />
M-><br />
Word Left<br />
Word Right<br />
Beginning of Line<br />
End of Line<br />
Page Up<br />
Page Down<br />
Beginning of Buffer<br />
End of Buffer<br />
Deleting<br />
Just as there are several ways to move around in the buffer, there are several ways to<br />
quickly delete unwanted information. <strong>The</strong> key or ^H can be used to delete the<br />
character before the pointer. By using ^D you can delete the character at the pointer.<br />
In addition, there are ways to delete words, lines <strong>and</strong> portions of lines. <strong>The</strong>re are also<br />
methods for blocking text <strong>and</strong> deleting entire sections of the buffer. For more information on<br />
working with blocks of text, see Cutting <strong>and</strong> Pasting below.<br />
Table 2-3 shows the various comm<strong>and</strong>s used to perform these functions.<br />
Table 2-3 Movement Comm<strong>and</strong>s<br />
Action<br />
or ^H<br />
^D<br />
M-DEL<br />
M-d<br />
^A^K<br />
^K<br />
^X u<br />
Comm<strong>and</strong><br />
Delete character to the left<br />
Delete character to the right<br />
Delete word to the left<br />
Delete from pointer to end of current word<br />
Delete current line excluding the EOL character<br />
Delete from pointer to end of line<br />
Undo previous comm<strong>and</strong> – may be used multiple times
CH02.fm Page 22 Monday, October 7, 2002 8:09 PM<br />
22 Chapter 2 • Working With Editors<br />
File Operations<br />
Editing within Emacs is done through a series of buffers. Each buffer may be edited separately<br />
<strong>and</strong> the changes saved back to the disk. Files may also be opened into new or existing<br />
buffers as shown in Table 2-4.<br />
Table 2-4 File Comm<strong>and</strong>s<br />
Action<br />
^X ^F<br />
^X k<br />
^X i<br />
^X ^S<br />
^X w<br />
^X b<br />
Comm<strong>and</strong><br />
Open File<br />
Close File<br />
Insert File<br />
Save File<br />
Save File As<br />
Change Buffer<br />
Search <strong>and</strong> Replace<br />
<strong>The</strong>re are two search <strong>and</strong> replace functions within Emacs. <strong>The</strong> first one simply does a simple<br />
search (case insensitive by default) for the character string provided by the user. <strong>The</strong> second,<br />
more complex search function does a search <strong>and</strong> replace on regular expressions. See Table 2-5<br />
for a list of these comm<strong>and</strong>s.<br />
Table 2-5 Search <strong>and</strong> Replace Comm<strong>and</strong>s<br />
Action<br />
Comm<strong>and</strong><br />
^S ENTER<br />
^S<br />
^R ENTER<br />
^R<br />
M-%<br />
M-X query-replace-regexp<br />
M-X occur<br />
Search<br />
Continue Forward Search<br />
Search Backwards<br />
Continue Backwards Search<br />
Search & Replace<br />
Regular Expression (regex) Search & Replace<br />
Find occurrences of a string in the current buffer
CH02.fm Page 23 Monday, October 7, 2002 8:09 PM<br />
Emacs 23<br />
By typing ^S you will be prompted to enter the string to search for. With the<br />
search string still active, typing ^S again to search for the next occurrence of that string in the<br />
current buffer.<br />
Typing M-% (usually accomplished by ESC-% rather than ALT-% under <strong>Linux</strong>) will bring<br />
up the same search function, but when you press RETURN after entering the search key, you will<br />
be prompted for a replacement string. Type in the string that you wish to replace the search key<br />
with <strong>and</strong> press RETURN. If the search string is found in the current buffer, you will be presented<br />
with the options shown in Table 2-6.<br />
Table 2-6 Search <strong>and</strong> Replace Options<br />
Action<br />
y or SPACE<br />
n or DEL<br />
Comm<strong>and</strong><br />
Replace the string at the pointer with the replacement string <strong>and</strong> search for the next<br />
occurrence.<br />
Leave the string at the pointer as is <strong>and</strong> search for the next occurrence.<br />
! Replace globally from the pointer forward in the buffer.<br />
. Replace the string at the pointer <strong>and</strong> then exit search <strong>and</strong> replace mode.<br />
^<br />
u<br />
q or ENTER<br />
Move point back to previous match.<br />
Undo the previous replacement.<br />
Exit search <strong>and</strong> replace mode.<br />
? Display help.<br />
<strong>The</strong> more complex search <strong>and</strong> replace feature is available by default, only from the prompt<br />
<strong>and</strong> is not bound to a particular key combination. To access this feature, you need to type in the<br />
name of the mode, which in this case is “query-match-regex”. <strong>The</strong> complete key sequence<br />
for this is:<br />
M-X query-replace-regex <br />
This comm<strong>and</strong> brings up a similar series of prompts that allows you to search for regular<br />
expressions in the current buffer <strong>and</strong>, using the same options shown in Table 2-5, replace them.<br />
Emacs has an auto-completion option that you can use instead of typing the entire comm<strong>and</strong><br />
shown above. By typing:<br />
M-X que<br />
Emacs will search through its listing of modes <strong>and</strong> complete as much of the request as it<br />
can. If there is a conflict <strong>and</strong> there are one or more modes that begin with the phrase that you
CH02.fm Page 24 Monday, October 7, 2002 8:09 PM<br />
24 Chapter 2 • Working With Editors<br />
have typed in, pressing the will cycle through the names. You can press<br />
to select the one currently displayed.<br />
Emacs supports the use of parenthetical statements in regex search <strong>and</strong> replace comm<strong>and</strong>s.<br />
A portion of the search string may be used as part of the replacement string. <strong>The</strong> contents of the<br />
first set of parenthesis in the search string may be referenced as \1 in the replacement string. <strong>The</strong><br />
second set would be referred to by \2.<br />
For example:<br />
Original string:<strong>The</strong> Dodo <strong>and</strong> the Griffin<br />
Search string:\([Tt]h\)e \([a-zA-Z]*\)<br />
Replacement string:\1ose \2s<br />
New string:Those Dodos <strong>and</strong> those Griffins<br />
Cutting <strong>and</strong> Pasting<br />
Sections of the buffer may be marked <strong>and</strong> certain comm<strong>and</strong>s may be applied to those<br />
regions. <strong>The</strong>se comm<strong>and</strong>s include copying, cutting <strong>and</strong> pasting text. To select a region of text,<br />
move the pointer to the beginning of the sections that you wish to select <strong>and</strong> press ^. When the pointer is moved, the text from the marked point to the current pointer position<br />
will be highlighted. Once the region is selected, issue the cut or copy comm<strong>and</strong>. To deselect the<br />
text without issuing the copy or paste comm<strong>and</strong>, simply press ^ again.<br />
Table 2-7 shows a list of the various selection comm<strong>and</strong>s.<br />
Table 2-7 Cut <strong>and</strong> Paste Comm<strong>and</strong>s<br />
Action<br />
^<br />
^W<br />
M-W<br />
^Y<br />
Comm<strong>and</strong><br />
Begin selection<br />
Cut<br />
Copy<br />
Paste<br />
2.2.3 <strong>Using</strong> Buffers <strong>and</strong> Windows<br />
As mentioned, Emacs has multiple buffers that can be opened <strong>and</strong> edited simultaneously.<br />
To navigate between buffers, press ^Xb <strong>and</strong> type the name of the buffer that you wish to switch<br />
to. Buffers may be opened <strong>and</strong> closed by using the File Comm<strong>and</strong>s listed earlier in this chapter.<br />
To see a list of buffers, use ^X^B.<br />
As shown in Figure 2-2, each window may be split into two windows by using the ^X2<br />
comm<strong>and</strong>. This will create a horizontal divide in the middle of the current window. <strong>The</strong> same<br />
file will be present in each pane, but they may be scrolled separately. To move between windows,<br />
press ^Xo. Windows may be split multiple times. To close all other buffer, use ^X1. <strong>The</strong><br />
current buffer may be closed with ^X0.
CH02.fm Page 25 Monday, October 7, 2002 8:09 PM<br />
Emacs 25<br />
See Table 2-8 for a complete list of window comm<strong>and</strong>s <strong>and</strong> Figure 2-2 for an example of<br />
using multiple buffers. <strong>The</strong>se buffers are ‘main.c’ <strong>and</strong> ‘temp.c’.<br />
Table 2-8 Window Comm<strong>and</strong>s<br />
Action<br />
Comm<strong>and</strong><br />
^Xb<br />
^X^B<br />
^X2<br />
^Xo<br />
^X0<br />
^X1<br />
Switch to buffer<br />
List buffers<br />
Split current window<br />
Move to other window<br />
Delete current window<br />
Delete all over windows<br />
Figure 2-2 <strong>Using</strong> multiple buffers in Emacs.
CH02.fm Page 26 Monday, October 7, 2002 8:09 PM<br />
26 Chapter 2 • Working With Editors<br />
2.2.4 Language Modes<br />
Emacs recognizes a number of different programming language files based on their extensions.<br />
When you load a recognized source code file, Emacs will assume certain defaults <strong>and</strong><br />
enter the appropriate mode for editing that file.<br />
For example, when you load a file with a .c extension for editing, Emacs sets the appropriate<br />
mode <strong>and</strong> enables comm<strong>and</strong>s used to automatically <strong>and</strong> manually indent code, quickly move<br />
though functions <strong>and</strong> insert comments.<br />
When a language mode is on, Emacs can automatically indent code as you type. To turn<br />
this mode on, type ^C^A. <strong>The</strong> same comm<strong>and</strong> is used to turn this mode back off.<br />
With this mode active, auto-indenting takes place when certain characters are entered from<br />
the keyboard. <strong>The</strong>se characters are the semi-colon, curly braces, <strong>and</strong> under certain circumstances,<br />
the comma <strong>and</strong> colon.<br />
For example, if auto-indent (or technically c-toggle-auto-state) is on <strong>and</strong> the following<br />
code is typed into the buffer:<br />
void main ( int argc, char **argv) { while (<br />
it will be formatted by Emacs as follows:<br />
void main ( int argc, char **argv)<br />
{<br />
while (<br />
Table 2-9 shows some of the common C-mode comm<strong>and</strong>s.<br />
Table 2-9 C-mode Comm<strong>and</strong>s<br />
Action<br />
ESC ;<br />
ESC ^A<br />
ESC ^E<br />
ESC ^H<br />
Comm<strong>and</strong><br />
Insert comment<br />
Go to top of function<br />
Go to bottom of function<br />
Mark function<br />
{ Insert bracket <strong>and</strong> return<br />
} Return <strong>and</strong> insert bracket<br />
^C^A<br />
Toggle Auto-indent mode<br />
^\ Auto-indent selected region
CH02.fm Page 27 Monday, October 7, 2002 8:09 PM<br />
Emacs 27<br />
2.2.5 <strong>Using</strong> Tags<br />
As an application grows in size, it also grows in complexity. As the number of subroutines,<br />
variables, functions <strong>and</strong> files increases, it becomes much more difficult to keep track of every<br />
piece <strong>and</strong> to quickly find the portion of code that one needs to work on. To address this issue,<br />
Emacs has the ability to read a file that contains a table of tags that reference various parts of an<br />
application.<br />
<strong>The</strong>se tags are stored in a TAGS file that is created by the etags comm<strong>and</strong>. Once this file<br />
is built, Emacs can read this table <strong>and</strong> use it to quickly locate a specific portion of code, regardless<br />
of whether it is in a currently open file or not.<br />
From the comm<strong>and</strong> line the etags comm<strong>and</strong> is issued with a list of file names to be read:<br />
$ etags *.[ch]<br />
This comm<strong>and</strong> will read all files in the current directory that have a .c or .h extension<br />
<strong>and</strong> build a tags table file in the current directory. <strong>The</strong> output file is, by default, called TAGS.<br />
To build a single TAGS table for a project that has source code spread through any number<br />
of subdirectories, the following comm<strong>and</strong> may be used:<br />
$ find . –name \*.[ch] | xargs etags –<br />
Just be aware if there are too many files, then this comm<strong>and</strong> may need to be run several<br />
times with varying arguments in order to build a complete table. To do this, you must use the<br />
–append option to the etags comm<strong>and</strong> as shown:<br />
$ find . –name \*.c | xargs etags –<br />
$ find . –name \*.h | xargs etags –-append –<br />
Any of these comm<strong>and</strong>s may be issued from within Emacs itself by using the M-! comm<strong>and</strong><br />
to issue a shell comm<strong>and</strong>. Simply type ESC ! <strong>and</strong> press return.<br />
Once you have built a TAGS table, it must first be read into Emacs before you can use it to<br />
search. To accomplish this, type M-x visit-tags-table, specify the location of the TAGS<br />
file to be read in, <strong>and</strong> then the name of the TAGS file. <strong>The</strong> default value for the location is the<br />
current working directory, <strong>and</strong> the default tags file name is “TAGS”.<br />
Once the TAGS file has been read in, you may issue search comm<strong>and</strong>s against the table.<br />
<strong>The</strong>re are several comm<strong>and</strong>s that can be used. <strong>The</strong> one most commonly used is ESC . which<br />
searches for a tag that matches the search parameter. <strong>The</strong> default search parameter is the word at<br />
the current pointer position. For example, if the pointer were on the character string<br />
search_function, the default search string that Emacs presents would be<br />
search_function.<br />
If you are not sure of the name of the function that you are looking for, you can type the<br />
first few characters of the function name <strong>and</strong> press the TAB key. This invokes the completion<br />
function of Emacs <strong>and</strong>, if the function is unique, it will display that function name. If the function<br />
name is not unique, Emacs will complete as much of the function name as it can <strong>and</strong> then<br />
prompt you for the rest. Pressing TAB again after Emacs has completed as much of the function
CH02.fm Page 28 Monday, October 7, 2002 8:09 PM<br />
28 Chapter 2 • Working With Editors<br />
name as it can <strong>and</strong> will display the matching functions in a new buffer. If, for example, you<br />
wanted to edit the close_files function, Figure 2-3 shows the results of typing ESC .<br />
c.<br />
If Emacs finds a function that matches your search string, it will replace the current buffer<br />
with the contents of the first file in which it found the search string <strong>and</strong> the pointer will be positioned<br />
at the first line of that function. In the above example, completing the file name <strong>and</strong> pressing<br />
ENTER results in the file exit.c being opened <strong>and</strong> the pointer being positioned on the first<br />
line of the close_files function. This is shown in Figure 2-4.<br />
Alternatively, you can initiate the search with the comm<strong>and</strong> ESC x find-tagother-window<br />
<strong>and</strong> rather than replacing the current buffer with the found function, a new<br />
buffer will be opened instead. Remember that Emacs has a completion function, so after typing<br />
the first few characters of a function, you can press the TAB key <strong>and</strong> Emacs will fill in the rest<br />
of the comm<strong>and</strong> if it is unique. If you are sure that a comm<strong>and</strong> is unique, pressing the ENTER<br />
key will execute that comm<strong>and</strong>.<br />
Rather than searching for functions by name, you can also search all of the files referenced<br />
in the tags file for a regular expression. To accomplish this, type ESC x tags-search <strong>and</strong><br />
Emacs will prompt you for a regular expression to search for. If it finds a match, the first occurrence<br />
of the string found will be displayed in the current buffer. You can search for the next<br />
occurrence of the string by issuing the ESC , comm<strong>and</strong>.<br />
Figure 2-3 Emacs tags-search function.
CH02.fm Page 29 Monday, October 7, 2002 8:09 PM<br />
Emacs 29<br />
Figure 2-4 Finding the function.<br />
Instead of searching for a specific regular expression, the comm<strong>and</strong> ESC tags-apropos<br />
will create a new buffer entitled *Tags List* that contains a listing of all of the tags that<br />
match that regular expression. By moving the pointer around this buffer, you can place it on the<br />
function that you are looking for <strong>and</strong> use the ESC . comm<strong>and</strong> to open that function in the current<br />
buffer. A list of TAGS comm<strong>and</strong>s is shown in Table 2-10.<br />
Table 2-10 Emacs comm<strong>and</strong>s related to TAGS<br />
Action<br />
Comm<strong>and</strong><br />
M-x visit-tags-table<br />
Load a tags file into Emacs<br />
M- . Search for a function<br />
M-x find-tag-other-window<br />
M-x tags-search<br />
M-,<br />
M-x tags-apropos<br />
Search for a function <strong>and</strong> load the file in a new buffer<br />
Search for a regular expression in the files represented by the current<br />
tag list<br />
Repeat regular expression search<br />
Load a list of all tags into a new buffer
CH02.fm Page 30 Monday, October 7, 2002 8:09 PM<br />
30 Chapter 2 • Working With Editors<br />
2.2.6 Compiling<br />
Emacs has the facility to call external compilers, parse their output <strong>and</strong> display the results<br />
in a buffer. As the results are displayed, the programmer can then move forward <strong>and</strong> backward<br />
through any error or warnings. As each error or warning is displayed, the appropriate line in the<br />
code is displayed <strong>and</strong> may be edited.<br />
To invoke the compiler from Emacs, type M-X compile; in response, Emacs will ask<br />
you for the comm<strong>and</strong> to use to compile the program for application. You can either specify<br />
make or the comm<strong>and</strong> line compiler with all the options. <strong>The</strong> default is to invoke make with the<br />
–k option in order to continue as far into the make as it can when encountering errors.<br />
For example, assume that the following (broken) bit of code is in a buffer entitled ‘main.c’.<br />
#include <br />
int main ()<br />
{<br />
printf(‘Hello World\n’);<br />
}<br />
<strong>The</strong> compiler may be invoked by typing:<br />
M-X compile<br />
Compile comm<strong>and</strong>: gcc –o main main.c<br />
If the buffer being compiled has not been saved, the editor will prompt you to save it. <strong>The</strong><br />
results of the compilation will appear in the *compilation* buffer as seen in Figure 2-5.<br />
Figure 2-5 <strong>The</strong> results of M-X compile.
CH02.fm Page 31 Monday, October 7, 2002 8:09 PM<br />
Emacs 31<br />
<strong>The</strong> main.c buffer is still the active buffer, but it is linked to the *compilation* buffer. As<br />
indicated by Figure 2-6, typing ^X-` the first error in the bottom buffer is highlighted <strong>and</strong> the<br />
pointer in the top buffer is positioned in the line of code that caused the error. Repeating that<br />
comm<strong>and</strong> moves the pointer forward in the code to the next error.<br />
Figure 2-6 <strong>Using</strong> the built-in functions to debug code.<br />
While navigating through the *compilation* buffer, typing ^C^C will move the code in<br />
the window to the line referenced by the error message. Table 2-11 lists the comm<strong>and</strong>s used to<br />
aid in debugging compiled code.<br />
Table 2-11 Compiling with Emacs<br />
Action<br />
M-X compile<br />
^X-`<br />
^C^C<br />
Comm<strong>and</strong><br />
Compile a file or an entire project<br />
Find the next error<br />
Examine source code that created the error
CH02.fm Page 32 Monday, October 7, 2002 8:09 PM<br />
32 Chapter 2 • Working With Editors<br />
2.2.7 Xemacs<br />
Xemacs is a project that was spawned from the original source tree of the Emacs project.<br />
In many ways it still resembles its ancestor, but when it is run it includes additional features that<br />
make use of the X-Window interface. <strong>The</strong>se include toolbars, font faces, image embedding <strong>and</strong><br />
editing, <strong>and</strong> similar features.<br />
As you can see in Figure 2-7, the Xemacs interface has taken many commonly used functions<br />
<strong>and</strong> created a tool bar across the top of the display that makes them accessible to the<br />
mouse. In addition, most of the user interface is customizable.<br />
Figure 2-7 <strong>The</strong> Xemacs interface.<br />
2.3 Jed<br />
Jed was designed as a small, lightweight editor. It has many of the functions required by application<br />
programmers <strong>and</strong> can be set up with one of several different key bindings to aid people transitioning<br />
from other editors.<br />
<strong>The</strong> main Jed configuration file is in JEDROOT/lib/jed.rc (/usr/share/jed/lib/jed.rc if the<br />
RedHat RPM was used to install the application). This file contains the default values for all<br />
users, but it is only read if the user does not have a local configuration file present in the home<br />
directory.
CH02.fm Page 33 Monday, October 7, 2002 8:09 PM<br />
Jed 33<br />
2.3.1 <strong>Configuring</strong> Jed<br />
Individual users may change their default setting by copying JEDROOT/lib/jed.rc to .jedrc<br />
in their home directory:<br />
$ cp /usr/share/jed/lib/jed.rc ~/.jedrc<br />
This file may be edited to change the initial values <strong>and</strong> behavior of Jed. Lines beginning<br />
with a percent symbol (%) are comments <strong>and</strong> are ignored when the file is read. Other than conditional<br />
statements, all entries must end in a semi-colon (;).<br />
One of the first options that a user may wish to change is the emulation mode of the editor.<br />
By default Jed uses Emacs-like key bindings for entering comm<strong>and</strong>s. Some other emulation<br />
modes available are IDE, CUA <strong>and</strong> even WordStar. To select a new emulation, edit the .jedrc in<br />
the user’s home directory, comment out the current emulation <strong>and</strong> uncomment the one that you<br />
wish to use.<br />
Below, the user has changed the application to use the IDE mode instead of the default.<br />
<strong>The</strong>se key bindings resemble those used by in Borl<strong>and</strong>’s IDE.<br />
if (BATCH == 0)<br />
{<br />
% () = evalfile("emacs"); % Emacs-like bindings<br />
% () = evalfile("edt"); % EDT emulation<br />
() = evalfile ("ide"); % Borl<strong>and</strong> IDE<br />
% () = evalfile ("brief"); % Brief Keybindings<br />
% () = evalfile("wordstar"); % Wordstar (use ide instead)<br />
% () = evalfile ("cua"); % CUA-like key bindings<br />
…<br />
}<br />
You will also notice that there is a conditional statement in the example above. This is<br />
because Jed may also be run in batch mode for processing files unattended. Statements within<br />
this block will only be processed if the application is run in interactive mode, not when run in<br />
batch mode. While having the statements outside of this block would not effect the application<br />
when run in batch mode, having them separated speeds up the load time of the application when<br />
they are not needed.<br />
<strong>The</strong>re are many other configuration options available in the .jedrc file that control how the<br />
program operates. Some of them are generic to all modes <strong>and</strong> others are used in only one mode.<br />
For example, the variable CASE_SEARCH may be set to force case sensitivity in searches, or<br />
C_BRA_NEWLINE may be set to force a newline character to be inserted prior to a curly-bracket<br />
when in C-mode.<br />
Jed also has the capability of calling a compiler directly <strong>and</strong> examining the output. <strong>The</strong><br />
st<strong>and</strong>ard compiler is assumed to be gcc. If you are using a different compiler, you will need to<br />
set the Compile_Default_Compiler variable in the .jedrc file.
CH02.fm Page 34 Monday, October 7, 2002 8:09 PM<br />
34 Chapter 2 • Working With Editors<br />
2.3.2 <strong>Using</strong> Jed<br />
Jed is called from the comm<strong>and</strong> line with an argument telling it which file you would like<br />
to edit. If Jed is called without an argument, it will prompt you for the name of the file before<br />
you may do any editing. This behavior may be changed by modifying the<br />
Startup_With_File variable in .jedrc to have a value of 0.<br />
Jed may be called with one or more comm<strong>and</strong> line arguments. A –n argument forces Jed<br />
to ignore the users’ local .jedrc file as well as the jedrc file. <strong>The</strong>re is also an X version of Jed<br />
that allows you to use the mouse to select text <strong>and</strong> options from the menu. To start Jed, simply<br />
type:<br />
or<br />
$ jed <br />
$ xjed <br />
Figure 2-8 shows the initial text-based Jed display when no comm<strong>and</strong>-line argument is<br />
given. <strong>The</strong> menu across the top is accessed by pressing the F-10 key. This scratch buffer will disappear<br />
when you begin to type <strong>and</strong> if a filename is given on the comm<strong>and</strong> line you will be taken<br />
immediately to that buffer to begin editing.<br />
<strong>The</strong> basic editing features of Jed will be dependent upon the emulation mode that is<br />
selected. In this section, it is assumed that you will be using the Emacs emulation mode.<br />
Figure 2-8 <strong>The</strong> Jed text interface.
CH02.fm Page 35 Monday, October 7, 2002 8:09 PM<br />
Jed 35<br />
2.3.3 Folding Code<br />
<strong>The</strong> ability to fold buffers in order to view only the parts of a file that are necessary at the<br />
time is quite useful when trying to underst<strong>and</strong> program flow <strong>and</strong> how the application is put<br />
together at a very high level.<br />
In order for folding to be used, special markers must be put in the file at the appropriate<br />
points. <strong>The</strong>re are two markers, one to denote the beginning of a section to be folded <strong>and</strong> one to<br />
denote the end. In plain text files, these markers must be in the leftmost column; but when an<br />
application language that is recognized by Jed is used, they may be inserted in comments.<br />
<strong>The</strong> opening marker is three left curly braces “{{{” <strong>and</strong> the closing is three of the right<br />
“}}}” To insert marker into a C-language program, place the markers directly after the /* that<br />
begins the comment:<br />
/*{{{ Deep magic begins here. */<br />
{<br />
x = n[i];<br />
a = ((a13)) + n[(i+128)&255];<br />
n[i] = y = n[x&255] + a + b;<br />
r[i] = d = n[(y>>8)&255] + x;<br />
}<br />
/*}}} */<br />
When the file is folded up, the above section of code will appear as follows:<br />
/*{{{ Deep magic begins here. */...<br />
<strong>The</strong> ellipsis at the end of the line indicates that this line may be unfolded.<br />
Figure 2-9 shows a section of Perl code with the fold markers in place. <strong>The</strong> comments are<br />
placed before <strong>and</strong> after each section of code <strong>and</strong> a description of the code included in that fold<br />
has been added. Figure 2-10 shows the same file folded.<br />
Figure 2-9 <strong>The</strong> file with the folding markers in place.
CH02.fm Page 36 Monday, October 7, 2002 8:09 PM<br />
36 Chapter 2 • Working With Editors<br />
Figure 2-10 <strong>The</strong> same file folded.<br />
<strong>The</strong> entire program can be folded <strong>and</strong> unfolded at once, or individual sections of the file<br />
may be unfolded. Several sections from different parts of the program may be unfolded at once.<br />
Jed treats each folded section as a subroutine <strong>and</strong> it can be edited as such. By moving the<br />
pointer to a folded section <strong>and</strong> pressing ^C> only that section of the program is displayed for<br />
editing.<br />
In order to use the folding mode, it must be activated from within Jed. In order to do this,<br />
type M-X folding-mode . This will turn the folding mode on <strong>and</strong> immediately<br />
fold up the current buffer.<br />
See Table 2-12 for a list of the available comm<strong>and</strong>s in this mode.<br />
Table 2-12 Folding Mode Comm<strong>and</strong>s<br />
Action<br />
Comm<strong>and</strong><br />
^C^W<br />
^C^O<br />
^C^X<br />
^C^S<br />
^C^F<br />
^C><br />
^C<<br />
Fold current buffer<br />
Unfold current buffer<br />
Fold current marked section<br />
Unfold current marked section<br />
Fold highlighted section<br />
Edit folded section<br />
Exit current section being edited
CH02.fm Page 37 Monday, October 7, 2002 8:09 PM<br />
VIM 37<br />
2.4 VIM<br />
VIM st<strong>and</strong>s for Vi IMproved <strong>and</strong> was developed by Bram Moolenaar. It is based on the functionality<br />
of the original, non-open source vi editor. While most open source software is also freeware,<br />
VIM is distributed as Charityware. In exchange for using the program, the authors request<br />
that users consider donating to the Kibaale Children’s Center (KCC), a charity providing food,<br />
health care <strong>and</strong> education for the children in the area. For further information regarding this<br />
donation program <strong>and</strong> the KCC, within VIM, type :help ifcc or visit http://www.vim.org/<br />
ifcc.<br />
2.4.1 <strong>Using</strong> VIM<br />
VIM is available in both text-based <strong>and</strong> graphical modes. <strong>The</strong> graphical version, shown in Figure<br />
2-11, has the same functionality as the text-based version, but also provides easy access to<br />
many functions through pull-down menus <strong>and</strong> a button bar. To start the text-based version, use<br />
the comm<strong>and</strong> vim. <strong>The</strong> graphical version is started by typing gvim. For example, to start VIM<br />
<strong>and</strong> edit the file main.c, type the following:<br />
$ vim main.c<br />
Or, for the graphical version, type:<br />
$ gvim main.c<br />
Figure 2-11 gvim.
CH02.fm Page 38 Monday, October 7, 2002 8:09 PM<br />
38 Chapter 2 • Working With Editors<br />
2.4.1 VIM Concepts<br />
<strong>The</strong>re are two basic modes within VIM that determine VIM’s behavior. <strong>The</strong>se two modes<br />
are Normal <strong>and</strong> Insert. In Normal mode, the editor expects the user to enter comm<strong>and</strong>s that perform<br />
a number of functions. In Insert mode, the editor inserts typed characters into the current<br />
document.<br />
<strong>The</strong> editor starts in Normal mode. To return to that mode from Insert mode, press the<br />
ESC key.<br />
2.4.2 Basic Editing<br />
As previously noted, VIM is based on the vi editor <strong>and</strong> anyone familiar with vi’s editing<br />
keys will immediately be at home with VIM.<br />
VIM uses two methods of entering comm<strong>and</strong>s into the application. Simple comm<strong>and</strong>s<br />
such as those used for navigation <strong>and</strong> entering Insert mode are one- or two-letter comm<strong>and</strong>s that<br />
are case sensitive <strong>and</strong> are not echoed to the screen as they are typed. More complex comm<strong>and</strong>s<br />
such as those used to perform searches <strong>and</strong> utilize the tags created by the ctags program are<br />
entered <strong>and</strong> echoed into the last line of the application screen. A colon, slash or question mark<br />
character is used to activate the last line mode <strong>and</strong> enter the comm<strong>and</strong>. <strong>The</strong> character used will<br />
depend upon which comm<strong>and</strong> is being issued.<br />
Most simple comm<strong>and</strong>s can be preceded by a number. When this occurs, the comm<strong>and</strong><br />
entered is treated as if it had been entered that many times. For example, the comm<strong>and</strong> to delete<br />
a line in a buffer is dd. If this comm<strong>and</strong> preceded by the number 15, as in 15dd, the next 15<br />
lines in the buffer will be deleted.<br />
To exit VIM, type :q if the text has not been changed, :q! to ab<strong>and</strong>on all changes made<br />
to the file, or :wq! to save all changes <strong>and</strong> exit.<br />
For help on any function, type:help where is the name of the function.<br />
Typing<br />
:help tutor<br />
will bring up information about VIMs built in tutor file. This file will walk you through the<br />
basics of using VIM.<br />
Navigation<br />
If the terminal that is being used is set up correctly, the arrow keys on the keyboard will<br />
often work for simple navigation comm<strong>and</strong>s that move the cursor around the screen. If the terminal<br />
type is not properly configured, alternate keys may be used to navigate through the text.<br />
<strong>The</strong> “h”, “j”, “k”, <strong>and</strong> “l” keys can be used in place of the left, down, up <strong>and</strong> right arrow<br />
keys respectively. Additionally, the cursor may be moved one word, sentence or paragraph at a<br />
time by using the keys listed in Table 2-13.
CH02.fm Page 39 Monday, October 7, 2002 8:09 PM<br />
VIM 39<br />
Table 2-13 Navigating VIM<br />
Action<br />
Hjkl<br />
W<br />
E<br />
Comm<strong>and</strong><br />
Left, down, up, right<br />
Move one word forward<br />
Move one word backward<br />
( ) Move to previous, next sentence<br />
{ } Move to previous, next paragraph<br />
It is also possible to scroll the text on the screen without moving the cursor from its current<br />
position. Table 2-14 lists some of the more common comm<strong>and</strong>s.<br />
Table 2-14 Folding Mode Comm<strong>and</strong>s<br />
Action<br />
^F ^B<br />
^U ^D<br />
^E ^Y<br />
Comm<strong>and</strong><br />
Scroll one screen forward, backward<br />
Scroll one half screen up, down<br />
Scroll one line up, down<br />
Insert Mode<br />
<strong>The</strong>re are numerous ways to enter Insert mode depending on where in the buffer you<br />
wish to insert text <strong>and</strong> how much of the text you wish to change. For example, it is possible to<br />
insert text at the beginning of the current line, at the end of the line, to change only the letter<br />
or word at the cursor, or to change text from the cursor to the end of the line. All of these comm<strong>and</strong>s<br />
are accomplished by simple one- <strong>and</strong> two-letter comm<strong>and</strong>s. When you press the “i”<br />
key, VIM enters Insert mode <strong>and</strong> starts inserting the next typed characters at the current cursor<br />
position. If “a” (append) is used to enter Insert mode, the insertion point is the character following<br />
the cursor.<br />
Pressing “I” will insert characters at the beginning of the line, <strong>and</strong> “A” will append characters<br />
to the end of the current line. <strong>The</strong> “o” character opens the line after the current one for<br />
inserting text, <strong>and</strong> the “O” key creates a new line above the current one <strong>and</strong> positions the cursor<br />
to enter new text.<br />
Table 2-15 lists these comm<strong>and</strong>s.
CH02.fm Page 40 Monday, October 7, 2002 8:09 PM<br />
40 Chapter 2 • Working With Editors<br />
Table 2-15 Entering Insert mode<br />
Action<br />
i a<br />
I A<br />
o O<br />
Comm<strong>and</strong><br />
Begin inserting characters at the cursor, after the cursor<br />
Begin inserting characters at the beginning, end of the line<br />
Open a new line after, before the current line<br />
In addition to simply entering text into the buffer, vim can change text already in the document.<br />
Table 2-16 lists the comm<strong>and</strong>s for changing text <strong>and</strong> their function.<br />
Table 2-16 Comm<strong>and</strong>s to change text<br />
Action<br />
Comm<strong>and</strong><br />
cw<br />
cc<br />
r<br />
R<br />
Change from the current cursor position to the end of the word<br />
Change the current line<br />
Replace the letter at the cursor<br />
Replace from cursor on<br />
Also of note are the deletion comm<strong>and</strong>s. <strong>The</strong>y are entered from Normal mode <strong>and</strong> may be<br />
used to delete a character, a word or a line at a time. <strong>The</strong>se comm<strong>and</strong>s are listed in Table 2-17.<br />
Table 2-17 Deletion comm<strong>and</strong>s<br />
Action<br />
x X<br />
dw<br />
dd<br />
D<br />
Comm<strong>and</strong><br />
Delete the character at, before the cursor<br />
Delete from the cursor to the end of the current word<br />
Delete the current line<br />
Delete from cursor to end of the current line<br />
Automatic Indentation<br />
<strong>The</strong>re are several indenting options available with VIM. <strong>The</strong>y are autoindent,<br />
smartindent <strong>and</strong> cindent. <strong>The</strong> first, autoindent, simply copies the indentention from<br />
the previous line <strong>and</strong> uses that as the default for all new lines entered into the buffer. Smartindent<br />
<strong>and</strong> cindent are similar, but cindent is stricter in the way that it h<strong>and</strong>les the formatting<br />
<strong>and</strong> may not be suitable for programming languages other than C.
CH02.fm Page 41 Monday, October 7, 2002 8:09 PM<br />
VIM 41<br />
To turn any of these indent modes on, with the application in Normal mode, type :set<br />
. To turn off an indent mode, simply preface the mode name with the word<br />
“no”. For example, to turn on cindent, type:<br />
:set cindent<br />
To turn cindent back off, type:<br />
:set nocindent<br />
2.4.3 <strong>Using</strong> Tags with VIM<br />
<strong>The</strong> ctags program can be used to build a tags file that is readable by VIM <strong>and</strong> can be<br />
used to quickly navigate among multiple source code files. Building the tags file is done in the<br />
same way as described earlier in the chapter for Jed, but you must us the ctags program<br />
instead of etags.<br />
$ ctags *.[ch]<br />
This builds the tags file in the current directory.<br />
To build a tags file for an entire project that spans many subdirectories, from the main<br />
project directory, issue the ctags comm<strong>and</strong> with the –R option to recurse the directories.<br />
$ ctags -R<br />
From within VIM, if you need to jump to a particular function that is in the current file,<br />
place the cursor on the appropriate function <strong>and</strong> press ^]. This comm<strong>and</strong> uses the tags file to<br />
locate the function <strong>and</strong> reads that file into the buffer.<br />
To open a file <strong>and</strong> locate a function that is not present in the current buffer, type:<br />
:tag <br />
where is the name of the function that you are looking for. This will load the<br />
file into the buffer <strong>and</strong> position the cursor at that appropriate tag.<br />
To list the tags that you have jumped to in this editing session, type :tags. <strong>The</strong> output<br />
from this comm<strong>and</strong> is shown below.<br />
:tags<br />
# TO tag FROM line in file/text<br />
1 1 main 1 ./arch/alpha/boot/tools/mkbb.c<br />
2 1 perror 116 ./arch/alpha/boot/tools/mkbb.c<br />
><br />
By pressing the number listed in the left column, you can return to previously accessed tags.<br />
In large projects, it would not be uncommon for one function to be referenced in several<br />
places. In the event that multiple tags are created with the same name, you can select from the<br />
list of similar tags by using the :tselect comm<strong>and</strong>. To select from a list functions, type<br />
:tselect . When the tselect comm<strong>and</strong> completes, you will be presented
CH02.fm Page 42 Monday, October 7, 2002 8:09 PM<br />
42 Chapter 2 • Working With Editors<br />
with a list of matching functions from which to choose. When you type in the appropriate number<br />
from the left-h<strong>and</strong> column, that function will be opened in the buffer.<br />
2.4.4 Folding Code<br />
VIM can use several methods for folding code. <strong>The</strong> most useful of these for application<br />
programming is the indent method. <strong>The</strong> variable foldmethod determines how the folding will<br />
take place. To indent set the mode by typing:<br />
:set foldmethod=indent<br />
This comm<strong>and</strong> can also be set as a default by entering it in the ~/.vimrc configuration file.<br />
When this option is set <strong>and</strong> a file is opened, VIM will parse the file looking for initial tab<br />
sequences in order to determine the various indent levels <strong>and</strong> fold the file automatically. In order<br />
to open or unfold a section, use zo <strong>and</strong> to close or refold a section, use zc.<br />
<strong>The</strong> comm<strong>and</strong>s zm <strong>and</strong> zr can also be used to increase <strong>and</strong> decrease the amount of folding<br />
currently being done to a file. By issuing the zr comm<strong>and</strong>, the amount of folding being done is<br />
reduced by one shiftwidth level. That is to say, one level of tabbing is revealed in the code. <strong>The</strong><br />
zm comm<strong>and</strong> reverses this <strong>and</strong> folds up one level of indentation every time that it is used.<br />
2.5 References <strong>and</strong> Resources<br />
1. Learning GNU Emacs, Second Edition, Debra Cameron, Bill Rosenblatt & Eric Raymond,<br />
O’Reilly & Associates, Inc., ISBN:1-56592-152-6.<br />
2. GNU Emacs home page, http://www.gnu.org/software/emacs/emacs.html<br />
3. Jed home page, http://space.mit.edu/~davis/jed/<br />
4. GNU Emacs Lisp Reference Manual, http://www.gnu.org/manual/elisp-manual-21-2.8/<br />
html_chapter/elisp.html<br />
5. Coffee.el, a fanciful elisp program to have Emacs make coffee, http://www.chez.com/<br />
emarsden/downloads/coffee.el<br />
6. Xemacs home page. http://www.xemacs.org/<br />
7. VIM Home page. http://www.vim.org
CH03.fm Page 43 Monday, October 7, 2002 8:33 PM<br />
C HAPTER 3<br />
Compilers <strong>and</strong><br />
Assemblers<br />
A<br />
ll development systems are essentially a combination of many<br />
tools. Compilers, assemblers <strong>and</strong> debuggers are integral parts of<br />
these development tools. Fortunately <strong>Linux</strong> has a large number of tools<br />
available for software developers. <strong>The</strong>se tools have a very rich set of features<br />
that we shall discuss in this <strong>and</strong> coming chapters. <strong>The</strong> basic reason<br />
for including this chapter is to enable a reader to use compilers <strong>and</strong><br />
assembler in a development environment in a productive way. However<br />
this chapter is not a tutorial on any language or programming technique.<br />
Examples of code listings presented in this chapter are very simple <strong>and</strong><br />
are intended to demonstrate the function of development tools.<br />
GNU C compiler, most commonly known as GCC, is the most important<br />
part of this discussion. This compiler can be used to compile programs<br />
written in the following languages:<br />
• ANSI C<br />
• Objective C<br />
•C++<br />
•Java<br />
•Fortran<br />
• Pascal, after converting Pascal code to C<br />
GCC recently added the capability to generate object code from Java<br />
source code. Work has also been done on Ada support.<br />
43
CH03.fm Page 44 Monday, October 7, 2002 8:33 PM<br />
44 Chapter 3 • Compilers <strong>and</strong> Assemblers<br />
GNU assembler is often needed in projects where you want to have tight<br />
control over a particular part of code <strong>and</strong> want to write it in assembly language.<br />
Most of the time people also write boot code for embedded systems<br />
in assembly language. <strong>The</strong> compiler uses assembler during the<br />
compilation process to generate object code.<br />
In addition to the most common compilers, we shall also discuss the use<br />
of some less common languages in the <strong>Linux</strong> environment. <strong>The</strong>se languages<br />
include the following:<br />
•Oberon<br />
• Smalltalk<br />
•Ada<br />
<strong>The</strong> compilation process is completed in different stages. <strong>The</strong>se stages<br />
are:<br />
• Preprocessing<br />
• Compiling to generate assembly language code<br />
• Assembling to generate object code<br />
• Linking to generate executable code<br />
<strong>The</strong> GNU compiler takes help from many programs during this process<br />
<strong>and</strong> can be used to generate intermediate files. For example, the compiler<br />
can generate Assembly language code from a C source code file.<br />
This chapter provides information about the GNU set of compilers <strong>and</strong><br />
how to build a software development environment using GNU tools. During<br />
this process you will also learn the building process for the GNU C<br />
library, most commonly known as glibc.<br />
3.1 Introduction to GNU C <strong>and</strong> C++ Compilers<br />
<strong>The</strong> GNU compiler, most commonly known as GCC, is not a single program. It is a large set of<br />
programs, libraries <strong>and</strong> other utilities that work together to build source code into executable<br />
form. A user, however, mostly interacts with gcc comm<strong>and</strong>. <strong>The</strong> gcc program acts as sort of a<br />
front end for compilers <strong>and</strong> other utilities. This section is an introduction to the compiler <strong>and</strong> its<br />
capabilities.<br />
3.1.1 Languages Supported by GCC<br />
GCC is a family of compilers, also known as the GNU Compiler Collection. GCC supports<br />
multiple languages, including:
CH03.fm Page 45 Monday, October 7, 2002 8:33 PM<br />
Introduction to GNU C <strong>and</strong> C++ Compilers 45<br />
•C<br />
• C++<br />
•Fortran<br />
• Objective C<br />
•Java<br />
Front-end preprocessors for many other languages also exist for GCC. For example, you<br />
can use a Pascal language front end with GCC.<br />
C is the primary language <strong>and</strong> GCC supports ANSI/ISO st<strong>and</strong>ards put forward in 1989-90<br />
<strong>and</strong> 1995-96. <strong>The</strong>se st<strong>and</strong>ards are also sometimes called C90 <strong>and</strong> C95, respectively. Another<br />
revision of the ANSI/ISO C language st<strong>and</strong>ard was made in 1999 (known as C99), <strong>and</strong> GCC<br />
does not yet fully support this revision. You can find out the current status of support for this<br />
revision at http://gcc.gnu.org/gcc-3.0/c99status.html.<br />
Support for these variations in st<strong>and</strong>ards can be selected using comm<strong>and</strong> line switches<br />
when compiling programs. For example, to compile programs according to original 1989-90<br />
st<strong>and</strong>ards, you can use one of the following comm<strong>and</strong> line switches:<br />
-ansi<br />
-std=c89<br />
-std=iso9899:1990<br />
<strong>The</strong> GCC compiler supports Objective C source code. Information on Objective C can be<br />
found in different books <strong>and</strong> online resources. However there is no st<strong>and</strong>ard for Objective C yet.<br />
Later in this chapter you will learn how to compile a simple program written in Objective C.<br />
GCC supports GNU Fortran language <strong>and</strong> we shall discuss later in this chapter how to<br />
compile programs written in Fortran.<br />
Support for Java is a new addition to GCC <strong>and</strong> we shall see how GCC h<strong>and</strong>les Java code<br />
with the GCJ compiler. This compiler, which is a part of the GCC family of compilers, can create<br />
an executable object from Java source code files.<br />
St<strong>and</strong>ard libraries are not part of the GCC compiler. You have to separately install libraries.<br />
<strong>The</strong> most common library used with the compiler is the GNU C library <strong>and</strong> we shall see how<br />
to get <strong>and</strong> install this library on <strong>Linux</strong> systems. <strong>The</strong> GNU C library (also known as glibc) provides<br />
support for:<br />
• ANSI/ISO C<br />
•POSIX<br />
•BSD<br />
• System V<br />
• X/Open<br />
For more information on languages supported by GCC, please see http://gcc.gnu.org/<br />
onlinedocs/gcc-3.0.2/gcc_2.html.
CH03.fm Page 46 Monday, October 7, 2002 8:33 PM<br />
46 Chapter 3 • Compilers <strong>and</strong> Assemblers<br />
3.1.2 New Features in GCC 3.x<br />
<strong>The</strong>re are many new features in GNU compiler starting with version 3.0. Some of these<br />
are discussed below briefly. In addition to that, version 3.0.x also includes many fixes for bugs<br />
present in 2.x versions.<br />
3.1.2.1 Optimization Improvements<br />
A major improvement in this version is new optimization features. Some of these features<br />
greatly improve compile <strong>and</strong> run-time performance. Important features are listed below.<br />
• Basic block reordering pass is now optimized. In some cases, it improves performance<br />
by eliminating a JMP instruction in assembly code. An explanation can be found at<br />
http://www.gnu.org/software/gcc/news/reorder.html.<br />
• A new register-renaming pass is included.<br />
• Static Single Assignment or SSA is introduced in GCC. A dead code elimination pass<br />
is included in new versions of GCC to improve optimization.<br />
• A global Null pointer elimination test elimination pass is included. Information about<br />
this enhancement can be found at http://www.gnu.org/software/gcc/news/null.html.<br />
• New optimizations for stdio.h, string.h <strong>and</strong> old BSD functions are added.<br />
3.1.2.2 Support of new Languages<br />
Support of Java is now added through GCJ compiler. It includes a run-time library having<br />
non-GUI Java classes.<br />
3.1.2.3 Language Improvements<br />
<strong>The</strong>re are some improvements in the support of different languages <strong>and</strong> these are listed<br />
below.<br />
• New C++ support library is added. Details are available at http://www.gnu.org/<br />
software/gcc/libstdc++/.<br />
• A new inliner is added that significantly reduces both memory utilization as well as<br />
compile time. Details are present at http://www.gnu.org/software/gcc/news/<br />
inlining.html.<br />
• <strong>The</strong> C preprocessor is rewritten with many improvements. Details are available at http:/<br />
/www.gnu.org/software/gcc/news/dependencies.html.<br />
• More warning messages <strong>and</strong> a new warning option are added.<br />
• <strong>The</strong>re are many improvements in Fortran language support area <strong>and</strong> these are listed on<br />
http://gcc.gnu.org/onlinedocs/g77_news.html.<br />
• <strong>The</strong>re are other improvements that are not listed here. Go to the GCC home page at<br />
http://gcc.gnu.org/ for a complete list.
CH03.fm Page 47 Monday, October 7, 2002 8:33 PM<br />
Introduction to GNU C <strong>and</strong> C++ Compilers 47<br />
3.1.2.4 Addition of New Targets<br />
Support for the following platforms is added.<br />
•HP-UX 11<br />
•IA-64<br />
•MCore 210<br />
•MCore 340<br />
• Xscale<br />
• Atmel AVR Micro- controller<br />
• D30V from Mitsubishi<br />
• AM33 from Matsushita<br />
• FR30 from Fujitsu<br />
• 68HC11<br />
• 68HC12<br />
• picoJava from Sun Microsystems<br />
3.1.2.5 Target Specific Improvements<br />
Some of the improvements are as follows:<br />
• New back end is added for x86 targets<br />
• New back end for Arm <strong>and</strong> Strongarm<br />
• Improvements in PowerPC code generation<br />
3.1.2.6 Improved Documentation<br />
Significant improvements in this area are:<br />
• Many manuals are re-written.<br />
• <strong>The</strong>re are some improvements to man pages.<br />
3.1.2.7 Additional GCC Version 3.0.1 Improvements<br />
This version includes some bug fixes in version 3.0. It also addresses some bugs for exception<br />
h<strong>and</strong>ling. A port to IBM S/390 is added <strong>and</strong> some improvements in cross-compiling are<br />
made.<br />
3.1.2.8 Additional GCC Version 3.0.2 Improvements<br />
This version mostly contains some bug fixes.<br />
3.1.2.9 GCC Version 3.0.3 Improvements<br />
This version contains some more bug fixes as well as improvement in generation of<br />
debugging information.<br />
At the time of revision of this book, GCC 3.1 is released <strong>and</strong> it has all of these features,<br />
among others.
CH03.fm Page 48 Monday, October 7, 2002 8:33 PM<br />
48 Chapter 3 • Compilers <strong>and</strong> Assemblers<br />
3.2 Installing GNU Compiler<br />
In most cases, GCC comes with all <strong>Linux</strong> distributions. However you can download the latest<br />
version, <strong>and</strong> build <strong>and</strong> install it according to your requirements. You may also need to build your<br />
compiler if you are building a cross-compiling development system. <strong>The</strong> best way to build a new<br />
version of the compiler is to have some pre-installed <strong>and</strong> pre-configured <strong>Linux</strong> distribution on<br />
your system that will be used to build the new compiler. For the purpose of writing this book, we<br />
have used Red Hat 7.1 but the process is the same on any distribution of <strong>Linux</strong>.<br />
<strong>The</strong> installation process is done in multiple steps. After downloading, you have to untar<br />
the source code <strong>and</strong> build it in a directory. This directory should be separate from the source<br />
code directory tree. <strong>The</strong> building process includes configuration <strong>and</strong> compiling stages. Once you<br />
have successfully created the new compiler, you can install it in a directory of your choice. It is<br />
advised to keep this installation directory separate from the location where the original compiler<br />
is installed.<br />
3.2.1 Downloading<br />
You can download the latest version of GCC from ftp://ftp.gnu.org/gnu/gcc/. I downloaded<br />
GCC 3.0.4 <strong>and</strong> it is about 17.5 MB. You can also find a mirror site near you to get GCC.<br />
A list of mirror sites is available on http://www.gnu.org/order/ftp.html.<br />
3.2.2 Building <strong>and</strong> Installing GCC<br />
<strong>The</strong> GCC installation process can be divided into four steps for simplicity <strong>and</strong> underst<strong>and</strong>ing.<br />
1. Download <strong>and</strong> extract<br />
2. Configure<br />
3. Build<br />
4. Install<br />
3.2.2.1 Download <strong>and</strong> Extract<br />
First create a directory where you will unpack the source code. Use the tar comm<strong>and</strong> to<br />
unpack the code. For our purpose, I have created a directory /gcc3 to compile <strong>and</strong> build the<br />
GCC compiler. <strong>The</strong> untar process looks like the following <strong>and</strong> it creates a directory gcc-<br />
3.0.4 under /gcc3 directory.<br />
[root@laptop /gcc3]# tar zxvf gcc-3.0.4.tar.gz<br />
gcc-3.0.4/<br />
gcc-3.0.4/INSTALL/<br />
gcc-3.0.4/INSTALL/index.html<br />
gcc-3.0.4/INSTALL/README<br />
gcc-3.0.4/INSTALL/specific.html<br />
gcc-3.0.4/INSTALL/download.html<br />
gcc-3.0.4/INSTALL/configure.html
CH03.fm Page 49 Monday, October 7, 2002 8:33 PM<br />
Installing GNU Compiler 49<br />
gcc-3.0.4/INSTALL/build.html<br />
gcc-3.0.4/INSTALL/test.html<br />
gcc-3.0.4/INSTALL/finalinstall.html<br />
gcc-3.0.4/INSTALL/binaries.html<br />
gcc-3.0.4/INSTALL/gfdl.html<br />
gcc-3.0.4/.cvsignore<br />
gcc-3.0.4/COPYING<br />
gcc-3.0.4/COPYING.LIB<br />
gcc-3.0.4/ChangeLog<br />
gcc-3.0.4/MAINTAINERS<br />
gcc-3.0.4/Makefile.in<br />
gcc-3.0.4/README<br />
This is a partial output of the comm<strong>and</strong>. Most of the output is truncated to save space.<br />
3.2.2.2 Running configure Script<br />
After uncompressing the source code, the first thing is to run the configure script. This<br />
script is found in /gcc3/gcc-3.0.4 directory. You can specify three major things when you<br />
run the configure script.<br />
1. Build machine. This is the machine where you compile <strong>and</strong> build the compiler.<br />
2. Host machine. This is the machine where compiler will be installed. This is usually the<br />
same as the build machine.<br />
3. Target machine. This is the machine for which the newly built compiler will generate<br />
executable code. If you are building a native compiler, this is the same machine as the<br />
host machine. If you are building a cross-compiler, this machine will be different than<br />
the host machine.<br />
Each of these machines names are used in the following format:<br />
CPUname-CompanyName-SystemName<br />
For example, if you want to build a compiler that will run on a sparc processor made by<br />
Sun Microsystems <strong>and</strong> on SunOS 4.1 operating system, the comm<strong>and</strong> line for configure<br />
script will be as follows:<br />
./configure –host=sparc-sun-sunos4.1<br />
Please see a list of supported systems at http://gcc.gnu.org/onlinedocs/gcc-3.0.4/<br />
gcc_4.html .<br />
For a native compiler (a compiler that runs on the same machine where it is built <strong>and</strong> generates<br />
code for the same machine), you don’t need to specify any options on the comm<strong>and</strong> line<br />
when you run the configure script. However, if you are building a cross-compiler, you must<br />
specify the target machine. Similarly, if you are building a compiler that will be installed on<br />
some other machine, you have to specify the host machine.
CH03.fm Page 50 Monday, October 7, 2002 8:33 PM<br />
50 Chapter 3 • Compilers <strong>and</strong> Assemblers<br />
N O T E <strong>The</strong>re may be some other requirements when you are<br />
building a non-native compiler.<br />
It is recommended to run the configure script in a directory other than the source code<br />
directory so that the source code tree is completely separate from the place where you build the<br />
compiler. For the sake of this example, I have created a directory /gcc3/objdir <strong>and</strong> I ran the<br />
configure script from that directory. As you already know, the source code tree is under the /<br />
gcc3/gcc-3.0.4 directory. You may need to add a prefix for GCC installation files. <strong>The</strong> prefix<br />
shows the directory where GCC files will be finally installed. <strong>The</strong> default prefix is /usr/<br />
local. This means that GCC binary files will be installed in /usr/local/bin directory.<br />
For installation purposes, I have selected /opt/gcc-3.0.4 directory as the prefix. In a typical<br />
development environment, you would do something similar to that. Just create a directory<br />
under /opt <strong>and</strong> install all of your tools <strong>and</strong> applications under /opt. <strong>The</strong> following comm<strong>and</strong><br />
line will configure the GCC compilation process <strong>and</strong> will create many files under /gcc3/<br />
objdir. <strong>The</strong>se files will be used later on to build the compiler. When you start the configure<br />
script, the following messages will start scrolling up.<br />
[root@laptop objdir]# ../gcc-3.0.4/configure --prefix=/opt/<br />
gcc-3.0.4<br />
<strong>Configuring</strong> for a i686-pc-linux-gnu host.<br />
Created "Makefile" in /gcc3/gcc-3.0.4 using "mt-frag"<br />
<strong>Configuring</strong> libiberty...<br />
creating cache ../config.cache<br />
checking host system type... i686-pc-linux-gnu<br />
checking build system type... i686-pc-linux-gnu<br />
checking for ar... ar<br />
checking for ranlib... ranlib<br />
checking for gcc... gcc<br />
checking whether we are using GNU C... yes<br />
checking whether gcc accepts -g... yes<br />
checking for POSIXized ISC... no<br />
checking for working const... yes<br />
checking for inline... inline<br />
checking for a BSD compatible install... /usr/bin/install -c<br />
checking how to run the C preprocessor... gcc -E<br />
checking for sys/file.h... yes<br />
checking for sys/param.h... yes<br />
checking for limits.h... yes<br />
checking for stdlib.h... yes<br />
checking for string.h... yes<br />
Most of the output is truncated from the configure script to save space. When the configure<br />
script is completed, you will get back the comm<strong>and</strong> prompt. Now you may start building the<br />
compiler.
CH03.fm Page 51 Monday, October 7, 2002 8:33 PM<br />
Installing GNU Compiler 51<br />
If you want to enable threads on <strong>Linux</strong> systems, you can use --enablethreads=posix<br />
as a comm<strong>and</strong> line option.<br />
3.2.2.3 Building GCC<br />
It is recommended that you use GNU make for building purpose. Running the make<br />
bootstrap comm<strong>and</strong> will build the compiler, libraries <strong>and</strong> related utilities. Following is part<br />
of the output when you start the building process.<br />
[root@laptop objdir]# make bootstrap<br />
make[1]: Entering directory `/gcc3/objdir/libiberty'<br />
if [ x"" != x ] && [ ! -d pic ]; then \<br />
mkdir pic; \<br />
else true; fi<br />
touch stamp-picdir<br />
if [ x"" != x ]; then \<br />
gcc -c -DHAVE_CONFIG_H -g -O2 -I. -I../../gcc-3.0.4/<br />
libiberty/../include -W -Wall -Wtraditional -pedantic ../../<br />
gcc-3.0.4/libiberty/argv.c -o pic/argv.o; \<br />
else true; fi<br />
gcc -c -DHAVE_CONFIG_H -g -O2 -I. -I../../gcc-3.0.4/libiberty/<br />
../include -W -Wall -Wtraditional -pedantic ../../gcc-3.0.4/<br />
libiberty/argv.c<br />
if [ x"" != x ]; then \<br />
gcc -c -DHAVE_CONFIG_H -g -O2 -I. -I../../gcc-3.0.4/<br />
libiberty/../include -W -Wall -Wtraditional -pedantic ../../<br />
gcc-3.0.4/libiberty/choose-temp.c -o pic/choose-temp.o; \<br />
else true; fi<br />
gcc -c -DHAVE_CONFIG_H -g -O2 -I. -I../../gcc-3.0.4/libiberty/<br />
../include -W -Wall -Wtraditional -pedantic ../../gcc-3.0.4/<br />
libiberty/choose-temp.c<br />
if [ x"" != x ]; then \<br />
gcc -c -DHAVE_CONFIG_H -g -O2 -I. -I../../gcc-3.0.4/<br />
libiberty/../include -W -Wall -Wtraditional -pedantic ../../<br />
gcc-3.0.4/libiberty/concat.c -o pic/concat.o; \<br />
else true; fi<br />
gcc -c -DHAVE_CONFIG_H -g -O2 -I. -I../../gcc-3.0.4/libiberty/<br />
../include -W -Wall -Wtraditional -pedantic ../../gcc-3.0.4/<br />
libiberty/concat.c<br />
if [ x"" != x ]; then \<br />
gcc -c -DHAVE_CONFIG_H -g -O2 -I. -I../../gcc-3.0.4/<br />
libiberty/../include -W -Wall -Wtraditional -pedantic ../../<br />
gcc-3.0.4/libiberty/cplus-dem.c -o pic/cplus-dem.o; \<br />
else true; fi<br />
Again most of the output is truncated. <strong>The</strong> building process may take a long time depending<br />
upon how powerful a computer you are using for building GCC. <strong>The</strong> process is completed in
CH03.fm Page 52 Monday, October 7, 2002 8:33 PM<br />
52 Chapter 3 • Compilers <strong>and</strong> Assemblers<br />
three stages. Stage 1 <strong>and</strong> stage 2 binaries are deleted as soon as they are no longer needed. Typically<br />
this building process will do the following:<br />
• Build some basic tools like bison, gperf <strong>and</strong> so on. <strong>The</strong>se tools are necessary to<br />
continue the compilation process.<br />
• Build target tools like gas, ld, binutils <strong>and</strong> so on.<br />
• Perform a three-stage bootstrap of the compiler.<br />
• Perform comparison of stage 2 <strong>and</strong> stage 3.<br />
• Build run-time libraries.<br />
• Remove unnecessary files.<br />
You should have enough disk space to build GCC. If you are short of disk space, you can<br />
use the bootstrap-lean option on the comm<strong>and</strong> line instead of bootstrap.<br />
3.2.2.4 Final Install<br />
<strong>The</strong> final installation process is necessary to move GCC binaries under the directory used<br />
as a prefix during the configure script execution. We have used /opt/gcc-3.0.4 as the<br />
prefix directory. Executing the following comm<strong>and</strong> in /gcc3/objdir will move GCC binaries<br />
in a tree structure under /opt/gcc-3.0.4.<br />
make install<br />
A typical directory tree after installation is shown below.<br />
[root@conformix gcc-3.0.4]# tree -d |more<br />
.<br />
|-- bin<br />
|-- include<br />
| |-- g++-v3<br />
| | |-- backward<br />
| | |-- bits<br />
| | |-- ext<br />
| | `-- i686-pc-linux-gnu<br />
| | `-- bits<br />
| |-- gcj<br />
| |-- gnu<br />
| | |-- awt<br />
| | | `-- j2d<br />
| | |-- classpath<br />
| | |-- gcj<br />
| | | |-- awt<br />
| | | |-- convert<br />
| | | |-- io<br />
| | | |-- jni<br />
| | | |-- math<br />
| | | |-- protocol
CH03.fm Page 53 Monday, October 7, 2002 8:33 PM<br />
Installing GNU Compiler 53<br />
| | | | |-- file<br />
| | | | |-- http<br />
| | | | `-- jar<br />
| | | |-- runtime<br />
| | | |-- text<br />
| | | `-- util<br />
| | `-- java<br />
| | |-- beans<br />
| | | |-- editors<br />
| | | `-- info<br />
| | |-- io<br />
| | |-- lang<br />
| | | `-- reflect<br />
| | |-- locale<br />
| | `-- security<br />
| | `-- provider<br />
| `-- java<br />
| |-- applet<br />
| |-- awt<br />
| | |-- color<br />
| | |-- datatransfer<br />
| | |-- event<br />
| | |-- geom<br />
| | |-- image<br />
| | `-- peer<br />
| |-- beans<br />
| | `-- beancontext<br />
| |-- io<br />
| |-- lang<br />
| | |-- ref<br />
| | `-- reflect<br />
| |-- math<br />
| |-- net<br />
| |-- security<br />
| | |-- cert<br />
| | |-- interfaces<br />
| | `-- spec<br />
| |-- sql<br />
| |-- text<br />
| `-- util<br />
| |-- jar<br />
| `-- zip<br />
|-- info<br />
|-- lib<br />
| `-- gcc-lib<br />
| `-- i686-pc-linux-gnu<br />
| `-- 3.0.4<br />
| `-- include
CH03.fm Page 54 Monday, October 7, 2002 8:33 PM<br />
54 Chapter 3 • Compilers <strong>and</strong> Assemblers<br />
| |-- SDL<br />
| |-- X11 -> root/usr/X11R6/include/X11<br />
| |-- linux<br />
| |-- mozilla<br />
| |-- ncurses<br />
| |-- objc<br />
| |-- openssl<br />
| |-- pcap<br />
| | `-- net<br />
| |-- pgsql<br />
| | `-- utils<br />
| |-- root<br />
| | `-- usr<br />
| | `-- X11R6<br />
| | `-- include<br />
| | `-- X11<br />
| |-- schily<br />
| | `-- scg<br />
| |-- slang<br />
| |-- ucd-snmp<br />
| |-- w3c-libwww<br />
| |-- wnn<br />
| `-- wnn6<br />
|-- man<br />
| |-- man1<br />
| `-- man7<br />
`-- share<br />
95 directories<br />
[root@conformix gcc-3.0.4]#<br />
N O T E Detailed instructions for compiling <strong>and</strong> installing GCC<br />
are available at http://gcc.gnu.org/onlinedocs/gcc-3.0.4/gcc_4.html<br />
as well as at http://gcc.gnu.org/install/.<br />
3.2.3 Environment Variables<br />
<strong>The</strong> GCC compiler relies on many environment variables for its operation. <strong>The</strong>se variables<br />
are used for different purposes including location of library <strong>and</strong> header files, location of<br />
helping programs <strong>and</strong> so on. Some important variables <strong>and</strong> their respective use are introduced<br />
in this section.<br />
TMPDIR<br />
This variable shows location of temporary file location. GCC uses<br />
this location to store temporary files during the compiling <strong>and</strong><br />
linking processes.
CH03.fm Page 55 Monday, October 7, 2002 8:33 PM<br />
Installing GNU Compiler 55<br />
GCC_EXEC_PREFIX<br />
COMPILER_PATH<br />
LIBRARY_PATH<br />
C_INCLUDE_PATH<br />
OBJC_INCLUDE_PATH<br />
CPLUS_INCLUDE_PAT<br />
H<br />
LD_LIBRARY_PATH<br />
If this variable is set, GCC will look into the directory to find sub<br />
programs.<br />
This is a colon-separated list of directories that GCC uses to find<br />
out sub programs if search fails using GCC_EXEC_PREFIX variable.<br />
This is a colon-separated list of directories that is used to find out<br />
libraries for linking process.<br />
Colon separated list of directories to find out header files for C<br />
programs.<br />
Colon separated list of directories to find out header files for<br />
Objective C programs.<br />
Colon separated list of directories to find out header files for C++<br />
programs.<br />
Path for shared libraries.<br />
<strong>The</strong>re are other environment variables <strong>and</strong> settings that GCC uses while building a target.<br />
You can display these using the –v comm<strong>and</strong> line switch with the gcc comm<strong>and</strong> when you<br />
compile a program. This will show you the path including files, programs used during the compilation<br />
process, <strong>and</strong> comm<strong>and</strong> line arguments <strong>and</strong> switches passed to each of these programs.<br />
<strong>The</strong> following is the output of the comm<strong>and</strong> when you compile the hello.c program.<br />
[rr@conformix 4]$ gcc -v hello.c<br />
Reading specs from /opt/gcc-3.0.4/lib/gcc-lib/i686-pc-linuxgnu/3.0.4/specs<br />
Configured with: ../gcc-3.0.4/configure --prefix=/opt/gcc-<br />
3.0.4 --enable-threads=posix<br />
Thread model: posix<br />
gcc version 3.0.4<br />
/opt/gcc-3.0.4/lib/gcc-lib/i686-pc-linux-gnu/3.0.4/cc1 -langc<br />
-v -D__GNUC__=3 -D__GNUC_MINOR__=0 -D__GNUC_PATCHLEVEL__=4 -<br />
D__ELF__ -Dunix -Dlinux -D__ELF__ -D__unix__ -D__linux__ -<br />
D__unix -D__linux -Asystem=posix -D__NO_INLINE__ -<br />
D__STDC_HOSTED__=1 -Acpu=i386 -Amachine=i386 -Di386 -D__i386 -<br />
D__i386__ -D__tune_i686__ -D__tune_pentiumpro__ hello.c -quiet<br />
-dumpbase hello.c -version -o /tmp/ccJsUmYa.s<br />
GNU CPP version 3.0.4 (cpplib) (i386 <strong>Linux</strong>/ELF)<br />
GNU C version 3.0.4 (i686-pc-linux-gnu)<br />
compiled by GNU C version 3.0.4.<br />
ignoring nonexistent directory "/opt/gcc-3.0.4/i686-pc-linuxgnu/include"<br />
#include "..." search starts here:<br />
#include search starts here:<br />
/usr/local/include
CH03.fm Page 56 Monday, October 7, 2002 8:33 PM<br />
56 Chapter 3 • Compilers <strong>and</strong> Assemblers<br />
/opt/gcc-3.0.4/include<br />
/opt/gcc-3.0.4/lib/gcc-lib/i686-pc-linux-gnu/3.0.4/include<br />
/usr/include<br />
End of search list.<br />
as --traditional-format -V -Qy -o /tmp/ccn7wLgw.o /tmp/<br />
ccJsUmYa.s<br />
GNU assembler version 2.10.91 (i386-redhat-linux) using BFD<br />
version 2.10.91.0.2<br />
/opt/gcc-3.0.4/lib/gcc-lib/i686-pc-linux-gnu/3.0.4/collect2 -<br />
m elf_i386 -dynamic-linker /lib/ld-linux.so.2 /usr/lib/crt1.o<br />
/usr/lib/crti.o /opt/gcc-3.0.4/lib/gcc-lib/i686-pc-linux-gnu/<br />
3.0.4/crtbegin.o -L/opt/gcc-3.0.4/lib/gcc-lib/i686-pc-linuxgnu/3.0.4<br />
-L/opt/gcc-3.0.4/lib/gcc-lib/i686-pc-linux-gnu/<br />
3.0.4/../../.. /tmp/ccn7wLgw.o -lgcc -lc -lgcc /opt/gcc-3.0.4/<br />
lib/gcc-lib/i686-pc-linux-gnu/3.0.4/crtend.o /usr/lib/crtn.o<br />
[rr@conformix 4]$<br />
If you examine the output of this comm<strong>and</strong>, you can find out which helper programs gcc<br />
uses <strong>and</strong> what comm<strong>and</strong> line switches are passed to these programs.<br />
3.2.4 Post-Installation Tasks<br />
<strong>The</strong>re are a few tasks that you need to carry out after the installation process of the compilers.<br />
3.2.4.1 Setting PATH Variable<br />
This is the first important task. Your PATH variable must include the directory where GCC<br />
binaries are installed. We have installed these in /opt/gcc-3.0.4/bin directory because<br />
we used /opt/gcc-3.0.4 as the prefix while running the configure script. This directory<br />
should come before the directories where the old compiler is installed. A typical comm<strong>and</strong> to do<br />
this in bash or other POSIX-compliant shells to include our installation location is as follows:<br />
export PATH=/opt/gcc-3.0.4/bin:$PATH<br />
where /opt/gcc-3.0.4/bin is the path to newly installed compilers.<br />
It is also extremely important that you make sure the GCC in the path is the correct one.<br />
<strong>The</strong> 'which gcc' comm<strong>and</strong> will provide this.<br />
3.2.4.2 Setting the Location of Libraries<br />
<strong>The</strong>re are two steps to set up the location of libraries. First edit /etc/ld/so.config<br />
<strong>and</strong> add the path of any newly created libraries. This directory is /opt/gcc-3.0.4/lib<br />
because we used –prefix=/opt/gcc-3.0.4 while building the compiler. Typical contents<br />
of this file after adding the new directory are as follows:<br />
/opt/gcc-3.0.4/lib<br />
/usr/lib<br />
/usr/kerberos/lib<br />
/usr/X11R6/lib<br />
/usr/lib/sane
CH03.fm Page 57 Monday, October 7, 2002 8:33 PM<br />
Installing GNU Compiler 57<br />
/usr/lib/qt-2.3.0/lib<br />
/usr/lib/mysql<br />
/usr/lib/qt-1.45/lib<br />
After editing this file, execute the ldconfig program, which will configure dynamic<br />
linker binding. You can use the –v comm<strong>and</strong> line option to get more information when you run<br />
this comm<strong>and</strong>. Note that the order of comm<strong>and</strong>s is important.<br />
<strong>The</strong> next step is to setup the LD_LIBRARY_PATH variable. You can do this by adding the<br />
following line at the end of /etc/profile file so that it is set for all users at login time.<br />
export LD_LIBRARY_PATH=/opt/gcc-3.0.4/lib<br />
Again note that this is the path where new library files are installed. Please note that if you<br />
make these changes, some older programs that are compiled for some other set of shared libraries<br />
may not function properly.<br />
3.2.4.3 Setting Location of include Files<br />
<strong>The</strong> default search path for include files can be found by executing the following comm<strong>and</strong>:<br />
[rr@conformix 4]$ gcc -v -E -<br />
Reading specs from /opt/gcc-3.0.4/lib/gcc-lib/i686-pc-linuxgnu/3.0.4/specs<br />
Configured with: ../gcc-3.0.4/configure --prefix=/opt/gcc-<br />
3.0.4 --enable-threads=posix<br />
Thread model: posix<br />
gcc version 3.0.4<br />
/opt/gcc-3.0.4/lib/gcc-lib/i686-pc-linux-gnu/3.0.4/cpp0 -<br />
lang-c -v -D__GNUC__=3 -D__GNUC_MINOR__=0 -<br />
D__GNUC_PATCHLEVEL__=4 -D__ELF__ -Dunix -Dlinux -D__ELF__ -<br />
D__unix__ -D__linux__ -D__unix -D__linux -Asystem=posix -<br />
D__NO_INLINE__ -D__STDC_HOSTED__=1 -Acpu=i386 -Amachine=i386 -<br />
Di386 -D__i386 -D__i386__ -D__tune_i686__ -<br />
D__tune_pentiumpro__ -<br />
GNU CPP version 3.0.4 (cpplib) (i386 <strong>Linux</strong>/ELF)<br />
ignoring nonexistent directory "/opt/gcc-3.0.4/i686-pc-linuxgnu/include"<br />
#include "..." search starts here:<br />
#include search starts here:<br />
/usr/local/include<br />
/opt/gcc-3.0.4/include<br />
/opt/gcc-3.0.4/lib/gcc-lib/i686-pc-linux-gnu/3.0.4/include<br />
/usr/include<br />
End of search list.<br />
<strong>The</strong> last part of the output shows that include files will be searched in the following directories<br />
by default.<br />
/usr/local/include
CH03.fm Page 58 Monday, October 7, 2002 8:33 PM<br />
58 Chapter 3 • Compilers <strong>and</strong> Assemblers<br />
/opt/gcc-3.0.4/include<br />
/opt/gcc-3.0.4/lib/gcc-lib/i686-pc-linux-gnu/3.0.4/<br />
include<br />
/usr/include<br />
You can place include files in other directories if you have set the C_INCLUDE_PATH<br />
environment variable. Setting this variable to /opt using the following comm<strong>and</strong> will include /<br />
opt directory also in the search list. Also note that order is once again extremely important.<br />
export C_INCLUDE_PATH=/opt<br />
If you again execute the gcc –v –E – comm<strong>and</strong>, /opt path will be included in the last<br />
part of the output.<br />
To set additional include paths permanently for all users, it is a good idea to add a line with<br />
the export comm<strong>and</strong> in /etc/profile file.<br />
3.2.4.4 Setting Manual Pages Path<br />
To be able to use manual pages installed with GCC, you have to add a line in the /etc/<br />
man.config file. This will enable the man comm<strong>and</strong> to also look into the /opt/gcc-<br />
3.0.4/man directory when searching for manual pages. <strong>The</strong> line looks like the following:<br />
MANPATH /opt/gcc-3.0.4/man<br />
Location of this line with respect to other MANPATH entries is important. If you put this<br />
line after other entries, you will still get the same old man pages. That is why it is recommended<br />
to put this entry BEFORE any other line that starts with MANPATH keyword in this file.<br />
3.2.5 What Not to Do when Installing <strong>Development</strong> Tools<br />
When building GCC, don’t build it into the source directory. I would also recommend not<br />
installing your development tools in the default location (under /usr/local). Instead use<br />
some place under the /opt directory. This way if something goes wrong, you can just delete<br />
this directory under /opt without making any other change in the system. If you install these<br />
tools in the default location, you may overwrite some existing files <strong>and</strong> may not be able to<br />
reverse the installation process.<br />
3.3 Compiling a Program<br />
<strong>The</strong> GCC compiler is commonly invoked using the gcc comm<strong>and</strong>. <strong>The</strong> comm<strong>and</strong> accepts many<br />
comm<strong>and</strong> line switches that can be used to invoke different options for the compilation process.<br />
You can use the same comm<strong>and</strong> line switch multiple times. For example, if you need to specify<br />
multiple include paths, you can use –I option multiple times. However you can’t combine two<br />
switches into one. For example –c <strong>and</strong> –o can’t be combined as –co. This section provides<br />
information about different methods of compilation <strong>and</strong> things you need to consider in the compilation<br />
process. Please note that in most of software development projects, you don’t invoke<br />
gcc from the comm<strong>and</strong> line. Instead, the GNU make utility that reads one or many Makefiles
CH03.fm Page 59 Monday, October 7, 2002 8:33 PM<br />
Compiling a Program 59<br />
is used. <strong>The</strong>se Makefiles contain information about how the compiler will be invoked <strong>and</strong> what<br />
comm<strong>and</strong> line switches will be used. Information about GNU make <strong>and</strong> Makefiles is presented<br />
in Chapter 5.<br />
3.3.1 Simple Compilation<br />
Consider the following C source code file, which is named hello.c. We shall frequently<br />
refer to this program in this as well as coming chapters.<br />
#include <br />
main ()<br />
{<br />
printf("Hello world\n");<br />
}<br />
To compile this file, you just need to run the following comm<strong>and</strong>.<br />
[rr@conformix 4]$ gcc hello.c<br />
[rr@conformix 4]$<br />
By default, this comm<strong>and</strong> will generate an output file named a.out, which can be executed<br />
on the comm<strong>and</strong> line as follows:<br />
[rr@conformix 4]$ ./a.out<br />
Hello world<br />
[rr@conformix 4]$<br />
Note that regardless of the name of your source code file, the name of the output file is<br />
always a.out. You may actually know what an ordinary a.out file is, but this isn't one of<br />
them. It is an elf file, despite its name. If you want to create an output file with a different<br />
name, you have to use the –o comm<strong>and</strong> line option. <strong>The</strong> following comm<strong>and</strong> creates an output<br />
file with name hello.<br />
gcc hello.c -o hello<br />
As you may have noted, the above comm<strong>and</strong>s do both the compiling <strong>and</strong> linking processes<br />
in a single step. If you don’t want to link the program, then simple compilation of hello.c file<br />
can be done with the following comm<strong>and</strong>. <strong>The</strong> output file will be hello.o <strong>and</strong> will contain<br />
object code.<br />
gcc –c hello.c<br />
Note that both –c <strong>and</strong> –o comm<strong>and</strong> line switches can be used simultaneously. <strong>The</strong> following<br />
comm<strong>and</strong> compiles hello.c <strong>and</strong> produces an output file test.o which is not yet linked.<br />
gcc –c hello.c -o test.o<br />
Usually when you compile many files in a project, you don’t create a.out files. Either<br />
you compile many files into object files <strong>and</strong> then link them together into an application or make<br />
executables with the same name as the source code file.
CH03.fm Page 60 Monday, October 7, 2002 8:33 PM<br />
60 Chapter 3 • Compilers <strong>and</strong> Assemblers<br />
3.3.2 Default File Types<br />
GCC can recognize an input file by the last part of its name, sometimes called an extension.<br />
Table 3-1 shows file types <strong>and</strong> the extensions used with them. Depending upon a particular<br />
extension, gcc takes appropriate action to build the output file.<br />
Table 3-1 File types used with GCC<br />
File<br />
Extension<br />
File Type<br />
.c C source code file.<br />
.cc<br />
.cp<br />
.cxx<br />
.cpp<br />
.c+<br />
C++ source code file.<br />
C++ source code file.<br />
C++ source code file.<br />
C++ source code file.<br />
C++ source code file.<br />
.C C++ source code file.<br />
.m Objective C source code file.<br />
.F Fortran source code file.<br />
.fpp<br />
.FPP<br />
Fortran source code file.<br />
Fortran source code file.<br />
.h C header file.<br />
.i C source code file. GCC does not preprocess it.<br />
.ii<br />
.mi<br />
C++ source code file. GCC does not preprocess it.<br />
Objective C source code file. GCC does not preprocess it.<br />
.f Fortran source code file. GCC does not preprocess it.<br />
.for<br />
.FOR<br />
Fortran source code file. GCC does not preprocess it.<br />
Fortran source code file. GCC does not preprocess it.<br />
.s Assembler code. GCC does not preprocess it.<br />
.S Assembler file.
CH03.fm Page 61 Monday, October 7, 2002 8:33 PM<br />
Compiling a Program 61<br />
This means that if you use comm<strong>and</strong> gcc hello.c, GCC will consider hello.c as a<br />
C program <strong>and</strong> will invoke appropriate helper programs to build the output. However, if you use<br />
gcc hello.cpp comm<strong>and</strong>, GCC will consider hello.cpp as a C++ program <strong>and</strong> will<br />
compile it accordingly. You can also select a language type with a particular file using –x comm<strong>and</strong><br />
line option. Table 3-2 lists languages that can be selected with this option.<br />
Table 3-2 Selecting languages with –x option.<br />
Option<br />
Language<br />
-x c (lowercase c) C language selection<br />
-x c++ C++ file<br />
-x objective-c Objective C<br />
-x assembler Assembler file<br />
-x f77 Fortran file<br />
-x java Java language file<br />
Note that –x option applies to all the files that follow until you turn it off using the –x<br />
none option on the comm<strong>and</strong> line. This is especially important when you use the GNU make<br />
utility discussed in Chapter 5.<br />
By default, the object file created by GCC has .o extension, replacing the original extension<br />
of the file. You can create output file with a particular name using –o comm<strong>and</strong> line option.<br />
<strong>The</strong> following comm<strong>and</strong> creates test.o file from hello.c.<br />
gcc –c hello.c –o test.o<br />
3.3.3 Compiling to Intermediate Levels<br />
<strong>The</strong> compilation process involves many steps like preprocessing, assembling <strong>and</strong> linking.<br />
By default GCC carries out all of these processes <strong>and</strong> generates executable code as you have<br />
seen earlier. However, you can force GCC not to do all of these steps. For example, using the –c<br />
comm<strong>and</strong> line option, the gcc comm<strong>and</strong> will only compile a source code file <strong>and</strong> will not generate<br />
executable object code. As you already know, the following comm<strong>and</strong> compiles file<br />
hello.c <strong>and</strong> creates an object file hello.o.<br />
gcc –c hello.c<br />
If you look at the type of the newly created object file using the file comm<strong>and</strong>, you can<br />
see that this is not a linked file. This is shown in the following comm<strong>and</strong> output.<br />
[root@conformix chap-03]# file hello.o<br />
hello.o: ELF 32-bit LSB relocatable, Intel 80386, version 1,<br />
not stripped<br />
[root@conformix chap-03]#
CH03.fm Page 62 Monday, October 7, 2002 8:33 PM<br />
62 Chapter 3 • Compilers <strong>and</strong> Assemblers<br />
3.3.3.1 Creating Assembler Code<br />
<strong>Using</strong> the –S (uppercase S) comm<strong>and</strong> line option, you can stop the GCC compiler just<br />
before the assembler process. <strong>The</strong> output is an assembler file with a .s extension. <strong>The</strong> following<br />
comm<strong>and</strong> creates an output file hello.s from source code file hello.c.<br />
gcc –S hello.c<br />
If you look at the output file, you can see the assembler code. Contents of the input file are<br />
as follows:<br />
#include <br />
main()<br />
{<br />
printf ("Hello world\n");<br />
}<br />
<strong>The</strong> output assembler code is shown below:<br />
[root@conformix chap-03]# cat hello.s<br />
.file "hello.c"<br />
.version "01.01"<br />
gcc2_compiled.:<br />
.section .rodata<br />
.LC0:<br />
.string "Hello world\n"<br />
.text<br />
.align 4<br />
.globl main<br />
.type main,@function<br />
main:<br />
pushl %ebp<br />
movl %esp, %ebp<br />
subl $8, %esp<br />
subl $12, %esp<br />
pushl $.LC0<br />
call printf<br />
addl $16, %esp<br />
leave<br />
ret<br />
.Lfe1:<br />
.size main,.Lfe1-main<br />
.ident "GCC: (GNU) 2.96 20000731 (Red Hat <strong>Linux</strong> 7.1<br />
2.96-81)"<br />
[root@conformix chap-03]#<br />
This assembler code may be used with some assembler, like GNU as. Here as is not word<br />
“as” but name of the GNU Assembler which is often written as GNU as as, later on. It can also<br />
be assembled <strong>and</strong> linked to create <strong>and</strong> execute. Please note that for the above comm<strong>and</strong>, the<br />
compiler that is included in RedHat distribution was used.
CH03.fm Page 63 Monday, October 7, 2002 8:33 PM<br />
Compiling a Program 63<br />
3.3.4 Compilation with Debug Support<br />
If you want to debug a program after compiling with gcc, you have to include debug<br />
information in the compiled program. <strong>The</strong> debug information is included in object file using the<br />
–g comm<strong>and</strong> line switch with gcc. <strong>The</strong> following comm<strong>and</strong> creates the hello.o file that contains<br />
debug information.<br />
[rr@conformix 4]$ gcc -g -c hello.c<br />
[rr@conformix 4]$<br />
Note that when you compile a program with debug information, the size may be quite<br />
large as compared to a file compiled without debug information. In the example program of<br />
hello.c, the size of hello.o is 908 bytes when compiled without debug information. <strong>The</strong><br />
size of hello.o is 10780 bytes when it is compiled with debug information.<br />
You can use multiple debug levels with –g option. <strong>The</strong> default debug level is 2 which is<br />
equivalent to using –g2 comm<strong>and</strong> line option. If you use –g3 comm<strong>and</strong> line option, information<br />
about macros is also included which makes it easier to debug macros.<br />
N O T E You can use the debug option with optimization<br />
options. Optimization options are discussed later in this chapter.<br />
With the –a option on the comm<strong>and</strong> line, you can also include some profiling information<br />
in the object code.<br />
You can also use some comm<strong>and</strong> line switches to provide extra information. For example,<br />
one useful thing is to print out a list of directories that the gcc comm<strong>and</strong> searches to find files.<br />
<strong>The</strong> following comm<strong>and</strong> will print all directories that gcc uses to search libraries, programs <strong>and</strong><br />
so on.<br />
[rr@conformix 4]$ gcc -print-search-dirs hello.c -o hello<br />
install: /usr/lib/gcc-lib/i386-redhat-linux/2.96/<br />
programs: =/usr/lib/gcc-lib/i386-redhat-linux/2.96/:/usr/lib/<br />
gcc-lib/i386-redhat-linux/2.96/:/usr/lib/gcc-lib/i386-redhat-<br />
linux/:/usr/lib/gcc/i386-redhat-linux/2.96/:/usr/lib/gcc/i386-<br />
redhat-linux/:/usr/lib/gcc-lib/i386-redhat-linux/2.96/../../<br />
../../i386-redhat-linux/bin/i386-redhat-linux/2.96/:/usr/lib/<br />
gcc-lib/i386-redhat-linux/2.96/../../../../i386-redhat-linux/<br />
bin/<br />
libraries: =/usr/lib/gcc-lib/i386-redhat-linux/2.96/:/usr/lib/<br />
gcc/i386-redhat-linux/2.96/:/usr/lib/gcc-lib/i386-redhatlinux/2.96/../../../../i386-redhat-linux/lib/i386-redhatlinux/2.96/:/usr/lib/gcc-lib/i386-redhat-linux/2.96/../../../<br />
../i386-redhat-linux/lib/:/usr/lib/gcc-lib/i386-redhat-linux/<br />
2.96/../../../i386-redhat-linux/2.96/:/usr/lib/gcc-lib/i386-<br />
redhat-linux/2.96/../../../:/lib/i386-redhat-linux/2.96/:/lib/<br />
:/usr/lib/i386-redhat-linux/2.96/:/usr/lib/<br />
[rr@conformix 4]$
CH03.fm Page 64 Monday, October 7, 2002 8:33 PM<br />
64 Chapter 3 • Compilers <strong>and</strong> Assemblers<br />
Here I have used GCC version 2.96 that came with RedHat <strong>Linux</strong> 7.1 <strong>and</strong> you can see<br />
directories <strong>and</strong> references to this version information also.<br />
You can also find the amount of time taken by each process during compilation. <strong>The</strong> following<br />
comm<strong>and</strong> displays time taken during each step of building the output file.<br />
[rr@conformix 4]$ gcc -time hello.c -o hello<br />
# cpp0 0.06 0.00<br />
# cc1 0.08 0.01<br />
# as 0.02 0.00<br />
# collect2 0.12 0.03<br />
[rr@conformix 4]$<br />
It is also evident from the output of the above comm<strong>and</strong> that GCC has used four other programs<br />
(cpp0, cc1, as <strong>and</strong> collect2) during the compilation process.<br />
3.3.5 Compilation with Optimization<br />
<strong>The</strong> first objective of a compiler is to generate output code swiftly. <strong>The</strong> compiler does not<br />
do any code optimization to make the compile time short. However you can instruct gcc to<br />
compile code with code optimization. This is done using –O (uppercase O, not zero) on the comm<strong>and</strong><br />
line. Different optimization levels can be designated by using a number suffix with this<br />
option. For example, -O2 will do code optimization at level 2. If you specifically don’t want to<br />
do any code optimization, you can use zero with option as –O0.<br />
So what does optimization mean? Consider the following C source code file sum.c that<br />
calculates the sum of two numbers <strong>and</strong> prints the result. Of course this is not the best code for<br />
this purpose <strong>and</strong> it is used only to demonstrate a point.<br />
1 #include <br />
2 main ()<br />
3 {<br />
4 int a, b, sum;<br />
5<br />
6 a=4;<br />
7 b=3;<br />
8 sum = a+b;<br />
9<br />
10 printf("<strong>The</strong> sum is: %d\n", sum);<br />
11 }<br />
If you compile this program without any optimization, the compiler will generate code for<br />
all lines starting from line number 6 to line number 10. This can be verified by loading the file in<br />
a debugger <strong>and</strong> tracing through it. However, if you optimize the compilation process, lines 6 to<br />
10 can be replaced by a single line as shown below. This can be done without affecting the output<br />
of the program.<br />
printf("<strong>The</strong> sum is: 7\n", );
CH03.fm Page 65 Monday, October 7, 2002 8:33 PM<br />
Compiling a Program 65<br />
This is because the compiler can easily determine that all of the variables are static <strong>and</strong><br />
there is no need to assign values <strong>and</strong> then calculate the sum at the run time. All of this can be<br />
done at the compile time. You can also verify this fact in a debugger. <strong>The</strong> optimized code will<br />
skip over assignment lines (lines 6 to 8) <strong>and</strong> will directly jump to the printf statement when<br />
you step through.<br />
However in the following code, the compiler can’t make such decisions because the numbers<br />
a <strong>and</strong> b are entered interactively.<br />
1 #include <br />
2 main ()<br />
3 {<br />
4 int a, b, sum;<br />
5<br />
6 printf("Enter first number: ");<br />
7 scanf("%d", &a);<br />
8 printf("Enter second number: ");<br />
9 scanf("%d", &b);<br />
10<br />
11 sum = a+b;<br />
12<br />
13 printf("<strong>The</strong> sum is: %d\n", sum);<br />
14 }<br />
If you compile this code with different levels of optimization (e.g., –O1 <strong>and</strong> –O2), <strong>and</strong><br />
then trace it through a debugger, you will see a difference in execution sequence because of the<br />
way the compiler makes decisions at the compile time.<br />
It may be mentioned that optimization is not always beneficial. For example, code optimization<br />
changes timings or clock cycles when the code is executed. This especially may create<br />
some problems on embedded systems if you have debugged your code by compiling without<br />
optimization. <strong>The</strong> rule of thumb is that you should create optimized code instead of relying on<br />
the compiler to make optimization for you.<br />
For a detailed list of optimization options, please see all options starting with –f comm<strong>and</strong><br />
line option. However options starting with –O are the most commonly used in the optimization<br />
process.<br />
3.3.6 Static <strong>and</strong> Dynamic Linking<br />
A compiler can generate static or dynamic code depending upon how you proceed with the<br />
linking process. If you create static object code, the output files are larger but they can be used as<br />
st<strong>and</strong>-alone binaries. This means that you can copy an executable file to another system <strong>and</strong> it<br />
does not depend on shared libraries when it is executed. On the other h<strong>and</strong>, if you chose dynamic<br />
linking, the final executable code is much smaller but it depends heavily upon shared libraries. If<br />
you copy the final executable program to another system, you have to make sure that the shared<br />
libraries are also present on the system where your application is executed. Please note that version<br />
inconsistencies in dynamic libraries can also cause problems.
CH03.fm Page 66 Monday, October 7, 2002 8:33 PM<br />
66 Chapter 3 • Compilers <strong>and</strong> Assemblers<br />
To create static binaries, you have to use –static comm<strong>and</strong> line option with gcc. To<br />
created dynamically linked output binary files, use –shared on the comm<strong>and</strong> line.<br />
For example, if we compile the hello.c program used earlier in this chapter with shared<br />
libraries, size of the output executable file is 13644 bytes (this can be further reduced using the<br />
strip utility discussed later in Chapter 7 of this book). However, if you compile it statically,<br />
the size of the output binary file is 1625261 bytes, which is very large compared to the shared<br />
binary. Note that this size can also be reduced using the strip utility.<br />
To identify the dependencies of a dynamically linked binary file, you can use the ldd<br />
comm<strong>and</strong>. <strong>The</strong> following comm<strong>and</strong> shows that linked output file hello depends upon two<br />
dynamic libraries.<br />
[rr@conformix 4]$ ldd hello<br />
libc.so.6 => /lib/i686/libc.so.6 (0x4002c000)<br />
/lib/ld-linux.so.2 => /lib/ld-linux.so.2 (0x40000000)<br />
[rr@conformix 4]$<br />
If you copy hello to some other host, you also need to make sure that libc.so.6 <strong>and</strong><br />
ld-linux.so.2 exist on the target system.<br />
On most of the <strong>Linux</strong> systems, dynamic linking is done by default.<br />
3.3.7 Compiling Source Code for Other Languages<br />
As mentioned earlier, the GCC set of compilers supports many languages. It can be used<br />
to compile programs other than C language. Following is an introduction to compiling programs<br />
from other languages.<br />
3.3.7.1 Compiling C++ Code<br />
C++ source code files have suffixes such as .C, .cpp, .cc, .c++, .cxx or .cp. <strong>The</strong> gcc compiler<br />
recognizes these extensions <strong>and</strong> can compile C++ code. However you can also use g++ or<br />
c++ compilers, which are part of the GCC compilers family <strong>and</strong> are installed with it. <strong>The</strong>se programs<br />
invoke gcc with appropriate options to compile C++ code <strong>and</strong> location of class files.<br />
<strong>Using</strong> these programs, you can also compile C++ source code files that don’t have the st<strong>and</strong>ard<br />
suffixes listed earlier.<br />
3.3.7.2 Compiling Objective C Code<br />
Objective files have suffixes such as .m <strong>and</strong> gcc recognizes Objective C files with that<br />
suffix. When you compile Objective C code, you have to pass an option to the linker. This is<br />
done using –lobjc. By this option, the linker uses Objective C libraries during the linking process.<br />
Consider the following sample Objective C code (stored in hello.m file) to print “Hello<br />
World” on the st<strong>and</strong>ard output.<br />
#include "objc/Object.h"<br />
@interface HelloWorld : Object<br />
{
CH03.fm Page 67 Monday, October 7, 2002 8:33 PM<br />
Compiling a Program 67<br />
}<br />
STR msg;<br />
+ new;<br />
- print;<br />
- setMessage: (STR) str;<br />
@end<br />
@implementation HelloWorld<br />
+ new<br />
{<br />
self = [super new];<br />
[self setMessage : ""];<br />
return self;<br />
}<br />
- print<br />
{<br />
printf("%s\n", msg);<br />
return self;<br />
}<br />
- setMessage: (STR) str<br />
{<br />
msg = str;<br />
return self;<br />
}<br />
@end<br />
int main(int argc, char**argv) {<br />
id msg;<br />
}<br />
msg = [HelloWorld new];<br />
[msg setMessage: "Hello World"] ;<br />
[msg print];<br />
return 0;<br />
You can compile <strong>and</strong> link it using the gcc hello.m –lobjc comm<strong>and</strong>. <strong>The</strong> output is<br />
again a.out file that can be executed on the comm<strong>and</strong> line.<br />
This is sort of a long “Hello World” program. <strong>The</strong>re are much shorter Objective C “Hello<br />
World” programs available on the Internet.
CH03.fm Page 68 Monday, October 7, 2002 8:33 PM<br />
68 Chapter 3 • Compilers <strong>and</strong> Assemblers<br />
3.3.7.3 Compiling Java Code<br />
Information about the GCC Java compiler gcj is available at http://gcc.gnu.org/java/.<br />
Before you can build Java programs, you also need to have libgcj installed. With old compilers,<br />
you had to install it separately from source code. When you build <strong>and</strong> install new versions of<br />
GCC, libgcj is installed automatically. If you are still using an old compiler <strong>and</strong> want to have<br />
libgcj installed, information is available at http://gcc.gnu.org/java/libgcj2.html. Briefly the<br />
process is as follows:<br />
Download libgcj from ftp://sourceware.cygnus.com/pub/java/ or another web site on<br />
the Internet. Untar it in /opt directory <strong>and</strong> a new directory will be created under /opt which<br />
will contain source code for libgcj. Create a directory /opt/libgcj-build <strong>and</strong> move<br />
into this directory. After that you have to perform the following sequence of comm<strong>and</strong>s:<br />
• ../libgcj/configure<br />
•make<br />
• make install<br />
Note that your new compiler must be in PATH before you build libgcj.<br />
Now let us see how to compile a Java program. Consider the following simple Java program<br />
that prints the message “Hello World”. <strong>The</strong> source code filename is hello.java.<br />
class HelloWorld {<br />
public static void main (String args[]) {<br />
System.out.print("Hello World ");<br />
}<br />
}<br />
Traditionally you have to invoke the javac program to build a byte code. After that you<br />
have to run the byte code using the java program on <strong>Linux</strong>. However if you use gcj, you can<br />
create a binary output file hello using the following comm<strong>and</strong>:<br />
gcj –main=HelloWorld –o hello hello.java<br />
<strong>The</strong> output file is hello, which is an executable binary. <strong>The</strong> –main switch is used for<br />
the entry point when the program is executed.<br />
<strong>The</strong> compiler uses some information to build Java code. This information includes reading<br />
the gcj specification file <strong>and</strong> libraries. <strong>The</strong> following comm<strong>and</strong> displays this information.<br />
[rr@conformix 4]$ gcj -v<br />
Reading specs from /opt/gcc-3.0.4/lib/gcc-lib/i686-pc-linuxgnu/3.0.4/specs<br />
Reading specs from /opt/gcc-3.0.4/lib/gcc-lib/i686-pc-linuxgnu/3.0.4/../../../libgcj.spec<br />
rename spec lib to liborig<br />
rename spec startfile to startfileorig
CH03.fm Page 69 Monday, October 7, 2002 8:33 PM<br />
Compiling a Program 69<br />
Configured with: ../gcc-3.0.4/configure --prefix=/opt/gcc-<br />
3.0.4 --enable-threads=posix<br />
Thread model: posix<br />
gcc version 3.0.4<br />
[rr@conformix 4]$<br />
<strong>The</strong> compilation of Java programs is completed in many steps. Let us compile the<br />
hello.java program to build a statically linked hello output binary using the following<br />
comm<strong>and</strong>. <strong>The</strong> –v switch shows all of the steps during this process.<br />
[rr@conformix 4]$ gcj hello.java --main=HelloWorld -o hello -<br />
static -v<br />
Reading specs from /opt/gcc-3.0.4/lib/gcc-lib/i686-pc-linuxgnu/3.0.4/specs<br />
Reading specs from /opt/gcc-3.0.4/lib/gcc-lib/i686-pc-linuxgnu/3.0.4/../../../libgcj.spec<br />
rename spec lib to liborig<br />
rename spec startfile to startfileorig<br />
Configured with: ../gcc-3.0.4/configure --prefix=/opt/gcc-<br />
3.0.4 --enable-threads=posix<br />
Thread model: posix<br />
gcc version 3.0.4<br />
/opt/gcc-3.0.4/lib/gcc-lib/i686-pc-linux-gnu/3.0.4/jc1<br />
hello.java -fuse-divide-subroutine -fuse-boehm-gc -fnon-callexceptions<br />
-quiet -dumpbase hello.java -g1 -version -o /tmp/<br />
ccHj5WMY.s<br />
GNU Java version 3.0.4 (i686-pc-linux-gnu)<br />
compiled by GNU C version 3.0.4.<br />
as --traditional-format -V -Qy -o /tmp/cchm92Nc.o /tmp/<br />
ccHj5WMY.s<br />
GNU assembler version 2.10.91 (i386-redhat-linux) using BFD<br />
version 2.10.91.0.2<br />
/opt/gcc-3.0.4/lib/gcc-lib/i686-pc-linux-gnu/3.0.4/jvgenmain<br />
HelloWorldmain /tmp/ccTlFcXz.i<br />
/opt/gcc-3.0.4/lib/gcc-lib/i686-pc-linux-gnu/3.0.4/cc1 /tmp/<br />
ccTlFcXz.i -quiet -dumpbase HelloWorldmain.c -g1 -version -<br />
fdollars-in-identifiers -o /tmp/ccHj5WMY.s<br />
GNU CPP version 3.0.4 (cpplib) (i386 <strong>Linux</strong>/ELF)<br />
GNU C version 3.0.4 (i686-pc-linux-gnu)<br />
compiled by GNU C version 3.0.4.<br />
as --traditional-format -V -Qy -o /tmp/ccBgJjpa.o /tmp/<br />
ccHj5WMY.s<br />
GNU assembler version 2.10.91 (i386-redhat-linux) using BFD<br />
version 2.10.91.0.2<br />
/opt/gcc-3.0.4/lib/gcc-lib/i686-pc-linux-gnu/3.0.4/collect2 -<br />
m elf_i386 -static -o hello /usr/lib/crt1.o /usr/lib/crti.o /<br />
opt/gcc-3.0.4/lib/gcc-lib/i686-pc-linux-gnu/3.0.4/crtbegin.o -<br />
L/opt/gcc-3.0.4/lib/gcc-lib/i686-pc-linux-gnu/3.0.4 -L/opt/
CH03.fm Page 70 Monday, October 7, 2002 8:33 PM<br />
70 Chapter 3 • Compilers <strong>and</strong> Assemblers<br />
gcc-3.0.4/lib/gcc-lib/i686-pc-linux-gnu/3.0.4/../../.. /tmp/<br />
ccBgJjpa.o /tmp/cchm92Nc.o -lgcc -lgcj -lm -lgcjgc -lpthread -<br />
lzgcj -ldl -lgcc -lc -lgcc /opt/gcc-3.0.4/lib/gcc-lib/i686-pclinux-gnu/3.0.4/crtend.o<br />
/usr/lib/crtn.o<br />
[rr@conformix 4]$<br />
As you can see, different programs have been executed to get the output binary file. <strong>The</strong>se<br />
programs include:<br />
• <strong>The</strong> jcl program<br />
• GNU assembler as. Again as is the name of the assembler. as<br />
• <strong>The</strong> jvgenmain program<br />
• <strong>The</strong> cc1 compiler<br />
• <strong>The</strong> collect2 program<br />
You can also see various comm<strong>and</strong> line switches used with these programs.<br />
3.3.8 Summary of gcc Options<br />
Hundreds of options can be used with gcc on comm<strong>and</strong> line. Explanation of all of these<br />
options is beyond the scope of this book. However, following is a summary list of these options<br />
as displayed by gcc man page (using man gcc comm<strong>and</strong>). Options are grouped in different<br />
sections which will be helpful for you if you are looking for options related to a particular task.<br />
3.3.8.1 Overall Options<br />
-c<br />
-S<br />
-E<br />
-o file<br />
-pipe<br />
-pass-exit-codes<br />
-x language<br />
-v<br />
--target-help<br />
--help<br />
3.3.8.2 C Language Options<br />
-ansi<br />
-std=st<strong>and</strong>ard<br />
-aux-info filename<br />
-fno-asm<br />
-fno-builtin<br />
-fhosted<br />
-ffree-st<strong>and</strong>ing<br />
-trigraphs<br />
-traditional
CH03.fm Page 71 Monday, October 7, 2002 8:33 PM<br />
Compiling a Program 71<br />
-traditional-cpp<br />
-fallow-single-precision<br />
-fcond-mismatch<br />
-fsigned-bitfields<br />
-fsigned-char<br />
-funsigned-bitfields<br />
-funsigned-char<br />
-fwritable-strings<br />
-fshort-wchar<br />
3.3.8.3 C++ Language Options<br />
-fno-access-control<br />
-fcheck-new<br />
-fconserve-space<br />
-fno-const-strings<br />
-fdollars-in-identifiers<br />
-fno-elide-constructors<br />
-fno-enforce-eh-specs<br />
-fexternal-templates<br />
-falt-external-templates<br />
-ffor-scope<br />
-fno-for-scope<br />
-fno-gnu-keywords<br />
-fno-implicit-templates<br />
-fno-implicit-inline-templates<br />
-fno-implement-inlines<br />
-fms-extensions<br />
-fno-nonansi-builtins<br />
-fno-operator-names<br />
-fno-optional-diags<br />
-fpermissive<br />
-frepo<br />
-fno-rtti<br />
-fstats<br />
-ftemplate-depth-n<br />
-fuse-cxa-atexit<br />
-fno-weak<br />
-nostdinc++<br />
-fno-default-inline<br />
-Wctor-dtor-privacy<br />
-Wnon-virtual-dtor<br />
-Wreorder<br />
-Weffc++<br />
-Wno-deprecated<br />
-Wno-non-template-friend
CH03.fm Page 72 Monday, October 7, 2002 8:33 PM<br />
72 Chapter 3 • Compilers <strong>and</strong> Assemblers<br />
-Wold-style-cast<br />
-Woverloaded-virtual<br />
-Wno-pmf-conversions<br />
-Wsign-promo<br />
-Wsynth<br />
3.3.8.4 Objective-C Language Options<br />
-fconstant-string-class=class-name<br />
-fgnu-runtime<br />
-fnext-runtime<br />
-gen-decls<br />
-Wno-protocol<br />
-Wselector<br />
3.3.8.5 Language Independent Options<br />
-fmessage-length=n<br />
-fdiagnostics-show-location=[once|every-line]<br />
3.3.8.6 Warning Options<br />
-fsyntax-only<br />
-pedantic<br />
-pedantic-errors<br />
-w<br />
-W<br />
-Wall<br />
-Waggregate-return<br />
-Wcast-align<br />
-Wcast-qual<br />
-Wchar-subscripts<br />
-Wcomment<br />
-Wconversion<br />
-Wdisabled-optimization<br />
-Werror<br />
-Wfloat-equal<br />
-Wformat<br />
-Wformat=2<br />
-Wformat-nonliteral<br />
-Wformat-security<br />
-Wid-clash-len<br />
-Wimplicit<br />
-Wimplicit-int<br />
-Wimplicit-function-declaration<br />
-Werror-implicit-function-declaration<br />
-Wimport<br />
-Winline<br />
-Wlarger-than-len
CH03.fm Page 73 Monday, October 7, 2002 8:33 PM<br />
Compiling a Program 73<br />
-Wlong-long<br />
-Wmain<br />
-Wmissing-braces<br />
-Wmissing-declarations<br />
-Wmissing-format-attribute<br />
-Wmissing-noreturn<br />
-Wmultichar<br />
-Wno-format-extra-args<br />
-Wno-format-y2k<br />
-Wno-import<br />
-Wpacked<br />
-Wpadded<br />
-Wparentheses<br />
-Wpointer-arith<br />
-Wredundant-decls<br />
-Wreturn-type<br />
-Wsequence-point<br />
-Wshadow<br />
-Wsign-compare<br />
-Wswitch<br />
-Wsystem-headers<br />
-Wtrigraphs<br />
-Wundef<br />
-Wuninitialized<br />
-Wunknown-pragmas<br />
-Wunreachable-code<br />
-Wunused<br />
-Wunused-function<br />
-Wunused-label<br />
-Wunused-parameter<br />
-Wunused-value<br />
-Wunused-variable<br />
-Wwrite-strings<br />
3.3.8.7 C-only Warning Options<br />
-Wbad-function-cast<br />
-Wmissing-prototypes<br />
-Wnested-externs<br />
-Wstrict-prototypes<br />
-Wtraditional<br />
3.3.8.8 Debugging Options<br />
-a<br />
-ax<br />
-dletters<br />
-dumpspecs<br />
-dumpmachine
CH03.fm Page 74 Monday, October 7, 2002 8:33 PM<br />
74 Chapter 3 • Compilers <strong>and</strong> Assemblers<br />
-dumpversion<br />
-fdump-unnumbered<br />
-fdump-translation-unit[-n]<br />
-fdump-class-hierarchy[-n]<br />
-fdump-ast-original[-n]<br />
-fdump-ast-optimized[-n]<br />
-fmem-report<br />
-fpretend-float<br />
-fprofile-arcs<br />
-ftest-coverage<br />
-ftime-report -g<br />
-glevel<br />
-gcoff<br />
-gdwarf<br />
-gdwarf-1<br />
-gdwarf-1+<br />
-gdwarf-2<br />
-ggdb<br />
-gstabs<br />
-gstabs+<br />
-gxcoff<br />
-gxcoff+<br />
-p<br />
-pg<br />
-print-file-name=library<br />
-print-libgcc-file-name<br />
-print-multi-directory<br />
-print-multi-lib<br />
-print-prog-name=program<br />
-print-search-dirs<br />
-Q<br />
-save-temps<br />
-time<br />
3.3.8.9 Optimization Options<br />
-falign-functions=n<br />
-falign-jumps=n<br />
-falign-labels=n<br />
-falign-loops=n<br />
-fbranch-probabilities<br />
-fcaller-saves<br />
-fcse-follow-jumps<br />
-fcse-skip-blocks<br />
-fdata-sections<br />
-fdce -fdelayed-branch<br />
-fdelete-null-pointer-checks
CH03.fm Page 75 Monday, October 7, 2002 8:33 PM<br />
Compiling a Program 75<br />
-fexpensive-optimizations<br />
-ffast-math<br />
-ffloat-store<br />
-fforce-addr<br />
-fforce-mem<br />
-ffunction-sections<br />
-fgcse<br />
-finline-functions<br />
-finline-limit=n<br />
-fkeep-inline-functions<br />
-fkeep-static-consts<br />
-fmove-all-movables<br />
-fno-default-inline<br />
-fno-defer-pop<br />
-fno-function-cse<br />
-fno-guess-branch-probability<br />
-fno-inline<br />
-fno-math-errno<br />
-fno-peephole<br />
-fno-peephole2<br />
-fomit-frame-pointer<br />
-foptimize-register-move<br />
-foptimize-sibling-calls<br />
-freduce-all-givs<br />
-fregmove<br />
-frename-registers<br />
-frerun-cse-after-loop<br />
-frerun-loop-opt<br />
-fschedule-insns<br />
-fschedule-insns2<br />
-fsingle-precision-constant<br />
-fssa<br />
-fstrength-reduce<br />
-fstrict-aliasing<br />
-fthread-jumps<br />
-ftrapv<br />
-funroll-all-loops<br />
-funroll-loops --param name=value -O<br />
-O0<br />
-O1<br />
-O2<br />
-O3<br />
-Os
CH03.fm Page 76 Monday, October 7, 2002 8:33 PM<br />
76 Chapter 3 • Compilers <strong>and</strong> Assemblers<br />
3.3.8.10 Preprocessor Options<br />
-$<br />
-Aquestion=answer<br />
-A-question[=answer]<br />
-C<br />
-dD<br />
-dI<br />
-dM<br />
-dN<br />
-Dmacro[=defn]<br />
-E<br />
-H<br />
-idirafter dir<br />
-include file<br />
-imacros file<br />
-iprefix file<br />
-iwithprefix dir<br />
-iwithprefixbefore dir<br />
-isystem dir<br />
-M<br />
-MM<br />
-MF<br />
-MG<br />
-MP<br />
-MQ<br />
-MT<br />
-nostdinc<br />
-P<br />
-remap<br />
-trigraphs<br />
-undef<br />
-Umacro<br />
-Wp,option<br />
3.3.8.11 Assembler Option<br />
-Wa,option<br />
3.3.8.12 Linker Options<br />
object-file-name<br />
-llibrary<br />
-nostartfiles<br />
-nodefaultlibs<br />
-nostdlib<br />
-s<br />
-static<br />
-static-libgcc<br />
-shared
CH03.fm Page 77 Monday, October 7, 2002 8:33 PM<br />
Compiling a Program 77<br />
-shared-libgcc<br />
-symbolic<br />
-Wl,option<br />
-Xlinker option<br />
-u symbol<br />
3.3.8.13 Directory Options<br />
-Bprefix<br />
-Idir<br />
-I-<br />
-Ldir<br />
-specs=file<br />
3.3.8.14 Target Options<br />
-b machine<br />
-V version<br />
3.3.8.15 Machine Dependent Options<br />
M680x0 Options<br />
-m68000<br />
-m68020<br />
-m68020-40<br />
-m68020-60<br />
-m68030<br />
-m68040<br />
-m68060<br />
-mcpu32<br />
-m5200<br />
-m68881<br />
-mbitfield<br />
-mc68000<br />
-mc68020<br />
-mfpa<br />
-mnobitfield<br />
-mrtd<br />
-mshort<br />
-msoft-float<br />
-mpcrel<br />
-malign-int<br />
-mstrict-align<br />
M68hc1x Options<br />
-m6811<br />
-m6812<br />
-m68hc11<br />
-m68hc12<br />
-mauto-incdec
CH03.fm Page 78 Monday, October 7, 2002 8:33 PM<br />
78 Chapter 3 • Compilers <strong>and</strong> Assemblers<br />
-mshort<br />
-msoft-reg-count=count<br />
VAX Options<br />
-mg<br />
-mgnu<br />
-munix<br />
SPARC Options<br />
-mcpu=cpu-type<br />
-mtune=cpu-type<br />
-mcmodel=code-model<br />
-m32<br />
-m64<br />
-mapp-regs<br />
-mbroken-saverestore<br />
-mcypress<br />
-mepilogue<br />
-mfaster-structs<br />
-mflat<br />
-mfpu<br />
-mhard-float<br />
-mhard-quad-float<br />
-mimpure-text<br />
-mlive-g0<br />
-mno-app-regs<br />
-mno-epilogue<br />
-mno-faster-structs<br />
-mno-flat<br />
-mno-fpu<br />
-mno-impure-text<br />
-mno-stack-bias<br />
-mno-unaligned-doubles<br />
-msoft-float<br />
-msoft-quad-float<br />
-msparclite<br />
-mstack-bias<br />
-msupersparc<br />
-munaligned-doubles<br />
-mv8<br />
Convex Options<br />
-mc1<br />
-mc2<br />
-mc32<br />
-mc34
CH03.fm Page 79 Monday, October 7, 2002 8:33 PM<br />
Compiling a Program 79<br />
-mc38<br />
-margcount<br />
-mnoargcount<br />
-mlong32<br />
-mlong64<br />
-mvolatile-cache<br />
-mvolatile-nocache<br />
AMD29K Options<br />
-m29000<br />
-m29050<br />
-mbw<br />
-mnbw<br />
-mdw<br />
-mndw<br />
-mlarge<br />
-mnormal<br />
-msmall<br />
-mkernel-registers<br />
-mno-reuse-arg-regs<br />
-mno-stack-check<br />
-mno-storem-bug<br />
-mreuse-arg-regs<br />
-msoft-float<br />
-mstack-check<br />
-mstorem-bug<br />
-muser-registers<br />
ARM Options<br />
-mapcs-frame<br />
-mno-apcs-frame<br />
-mapcs-26<br />
-mapcs-32<br />
-mapcs-stack-check<br />
-mno-apcs-stack-check<br />
-mapcs-float<br />
-mno-apcs-float<br />
-mapcs-reentrant<br />
-mno-apcs-reentrant<br />
-msched-prolog<br />
-mno-sched-prolog<br />
-mlittle-endian<br />
-mbig-endian<br />
-mwords-little-endian<br />
-malignment-traps<br />
-mno-alignment-traps<br />
-msoft-float
CH03.fm Page 80 Monday, October 7, 2002 8:33 PM<br />
80 Chapter 3 • Compilers <strong>and</strong> Assemblers<br />
-mhard-float<br />
-mfpe<br />
-mthumb-interwork<br />
-mno-thumb-interwork<br />
-mcpu=name<br />
-march=name<br />
-mfpe=name<br />
-mstructure-size-boundary=n<br />
-mbsd<br />
-mxopen<br />
-mno-symrename<br />
-mabort-on-noreturn<br />
-mlong-calls<br />
-mno-long-calls<br />
-msingle-pic-base<br />
-mno-single-pic-base<br />
-mpic-register=reg<br />
-mnop-fun-dllimport<br />
-mpoke-function-name<br />
-mthumb<br />
-marm<br />
-mtpcs-frame<br />
-mtpcs-leaf-frame<br />
-mcaller-super-interworking<br />
-mcallee-super-interworking<br />
MN10200 Options<br />
-mrelax<br />
MN10300 Options<br />
-mmult-bug<br />
-mno-mult-bug<br />
-mam33<br />
-mno-am33<br />
-mno-crt0<br />
-mrelax<br />
M32R/D Options<br />
-mcode-model=model-type<br />
-msdata=sdata-type -G num<br />
M88K Options<br />
-m88000<br />
-m88100<br />
-m88110<br />
-mbig-pic<br />
-mcheck-zero-division
CH03.fm Page 81 Monday, October 7, 2002 8:33 PM<br />
Compiling a Program 81<br />
-mh<strong>and</strong>le-large-shift<br />
-midentify-revision<br />
-mno-check-zero-division<br />
-mno-ocs-debug-info<br />
-mno-ocs-frame-position<br />
-mno-optimize-arg-area<br />
-mno-serialize-volatile<br />
-mno-underscores<br />
-mocs-debug-info<br />
-mocs-frame-position<br />
-moptimize-arg-area<br />
-mserialize-volatile<br />
-mshort-data-num<br />
-msvr3<br />
-msvr4<br />
-mtrap-large-shift<br />
-muse-div-instruction<br />
-mversion-03.00<br />
-mwarn-passed-structs<br />
RS/6000 <strong>and</strong> PowerPC Options<br />
-mcpu=cpu-type<br />
-mtune=cpu-type<br />
-mpower<br />
-mno-power<br />
-mpower2<br />
-mno-power2<br />
-mpowerpc<br />
-mpowerpc64<br />
-mno-powerpc<br />
-mpowerpc-gpopt<br />
-mno-powerpc-gpopt<br />
-mpowerpc-gfxopt<br />
-mno-powerpc-gfxopt<br />
-mnew-mnemonics<br />
-mold-mnemonics<br />
-mfull-toc<br />
-mminimal-toc<br />
-mno-fop-in-toc<br />
-mno-sum-in-toc<br />
-m64<br />
-m32<br />
-mxl-call<br />
-mno-xl-call
CH03.fm Page 82 Monday, October 7, 2002 8:33 PM<br />
82 Chapter 3 • Compilers <strong>and</strong> Assemblers<br />
-mthreads<br />
-mpe<br />
-msoft-float<br />
-mhard-float<br />
-mmultiple<br />
-mno-multiple<br />
-mstring<br />
-mno-string<br />
-mupdate<br />
-mno-update<br />
-mfused-madd<br />
-mno-fused-madd<br />
-mbit-align<br />
-mno-bit-align<br />
-mstrict-align<br />
-mno-strict-align<br />
-mrelocatable<br />
-mno-relocatable<br />
-mrelocatable-lib<br />
-mno-relocatable-lib<br />
-mtoc<br />
-mno-toc<br />
-mlittle<br />
-mlittle-endian<br />
-mbig<br />
-mbig-endian<br />
-mcall-aix<br />
-mcall-sysv<br />
-mcall-netbsd<br />
-mprototype<br />
-mno-prototype-<br />
-msim<br />
-mmvme<br />
-mads<br />
-myellowknife<br />
-memb<br />
-msdata<br />
-msdata=opt<br />
-mvxworks –G num<br />
RT Options<br />
-mcall-lib-mul<br />
-mfp-arg-in-fpregs<br />
-mfp-arg-in-gregs<br />
-mfull-fp-blocks<br />
-mhc-struct-return<br />
-min-line-mul
CH03.fm Page 83 Monday, October 7, 2002 8:33 PM<br />
Compiling a Program 83<br />
-mminimum-fp-blocks<br />
-mnohc-struct-return<br />
MIPS Options<br />
-mabicalls<br />
-mcpu=cpu-type<br />
-membedded-data<br />
-muninit-const-in-rodata<br />
-membedded-pic-<br />
-mfp32<br />
-mfp64<br />
-mgas<br />
-mgp32<br />
-mgp64<br />
-mgpopt<br />
-mhalf-pic<br />
-mhard-float<br />
-mint64<br />
-mips1<br />
-mips2<br />
-mips3<br />
-mips4<br />
-mlong64<br />
-mlong32<br />
-mlong-calls<br />
-mmemcpy<br />
-mmips-as<br />
-mmips-tfile<br />
-mno-abicalls<br />
-mno-embedded-data<br />
-mno-uninit-const-in-rodata<br />
-mno-embedded-pic<br />
-mno-gpopt<br />
-mno-long-calls<br />
-mno-memcpy<br />
-mno-mips-tfile<br />
-mno-rnames<br />
-mno-stats<br />
-mrnames<br />
-msoft-float<br />
-m4650<br />
-msingle-float<br />
-mmad<br />
-mstats<br />
-EL<br />
-EB<br />
-G num
CH03.fm Page 84 Monday, October 7, 2002 8:33 PM<br />
84 Chapter 3 • Compilers <strong>and</strong> Assemblers<br />
-nocpp<br />
-mabi=32<br />
-mabi=n32<br />
-mabi=64<br />
-mabi=eabi -mfix7000<br />
-mno-crt0<br />
i386 Options<br />
-mcpu=cpu-type<br />
-march=cpu-type<br />
-mintel-syntax<br />
-mieee-fp<br />
-mno-fancy-math-387<br />
-mno-fp-ret-in-387<br />
-msoft-float<br />
-msvr3-shlib<br />
-mno-wide-multiply<br />
-mrtd<br />
-malign-double<br />
-mreg-alloc=list<br />
-mregparm=num<br />
-malign-jumps=num<br />
-malign-loops=num<br />
-malign-functions=num<br />
-mpreferred-stack-boundary=num<br />
-mthreads<br />
-mno-align-stringops<br />
-minline-all-stringops<br />
-mpush-args<br />
-maccumulate-outgoing-args<br />
-m128bit-long-double<br />
-m96bit-long-double<br />
-momit-leaf-frame-pointer<br />
HPPA Options<br />
-march=architecture-type<br />
-mbig-switch<br />
-mdisable-fpregs<br />
-mdisable-indexing<br />
-mfast-indirect-calls<br />
-mgas<br />
-mjump-in-delay<br />
-mlong-load-store<br />
-mno-big-switch<br />
-mno-disable-fpregs<br />
-mno-disable-indexing<br />
-mno-fast-indirect-calls
CH03.fm Page 85 Monday, October 7, 2002 8:33 PM<br />
Compiling a Program 85<br />
-mno-gas<br />
-mno-jump-in-delay<br />
-mno-long-load-store<br />
-mno-portable-runtime<br />
-mno-soft-float<br />
-mno-space-regs<br />
-msoft-float<br />
-mpa-risc-1-0<br />
-mpa-risc-1-1<br />
-mpa-risc-2-0<br />
-mportable-runtime<br />
-mschedule=cpu-type<br />
-mspace-regs<br />
Intel 960 Options<br />
-mcpu-type<br />
-masm-compat<br />
-mclean-linkage<br />
-mcode-align<br />
-mcomplex-addr<br />
-mleaf-procedures<br />
-mic-compat<br />
-mic2.0-compat<br />
-mic3.0-compat<br />
-mintel-asm<br />
-mno-clean-linkage<br />
-mno-code-align<br />
-mno-complex-addr<br />
-mno-leaf-procedures<br />
-mno-old-align<br />
-mno-strict-align<br />
-mno-tail-call<br />
-mnumerics<br />
-mold-align<br />
-msoft-float<br />
-mstrict-align<br />
-mtail-call<br />
DEC Alpha Options<br />
-mfp-regs<br />
-mno-fp-regs<br />
-mno-soft-float<br />
-msoft-float<br />
-malpha-as<br />
-mgas<br />
-mieee<br />
-mieee-with-inexact<br />
-mieee-conformant
CH03.fm Page 86 Monday, October 7, 2002 8:33 PM<br />
86 Chapter 3 • Compilers <strong>and</strong> Assemblers<br />
-mfp-trap-mode=mode<br />
-mfp-rounding-mode=mode<br />
-mtrap-precision=mode<br />
-mbuild-constants<br />
-mcpu=cpu-type<br />
-mbwx<br />
-mno-bwx<br />
-mcix<br />
-mno-cix<br />
-mmax<br />
-mno-max<br />
-mmemory-latency=time<br />
Clipper Options<br />
-mc300<br />
-mc400<br />
H8/300 Options<br />
-mrelax<br />
-mh<br />
-ms<br />
-mint32<br />
-malign-300<br />
SH Options<br />
-m1<br />
-m2<br />
-m3<br />
-m3e<br />
-m4-nofpu<br />
-m4-single-only<br />
-m4-single<br />
-m4<br />
-mb<br />
-ml<br />
-mdalign<br />
-mrelax<br />
-mbigtable<br />
-mfmovd<br />
-mhitachi<br />
-mnomacsave<br />
-mieee<br />
-misize<br />
-mpadstruct<br />
-mspace<br />
-mprefergot<br />
-musermode
CH03.fm Page 87 Monday, October 7, 2002 8:33 PM<br />
Compiling a Program 87<br />
System V Options<br />
-Qy<br />
-Qn<br />
-YP,paths<br />
-Ym,dir<br />
ARC Options<br />
-EB<br />
-EL<br />
-mmangle-cpu<br />
-mcpu=cpu<br />
-mtext=text-section<br />
-mdata=data-section<br />
-mrodata=readonly-data-section<br />
TMS320C3x/C4x Options<br />
-mcpu=cpu<br />
-mbig<br />
-msmall<br />
-mregparm<br />
-mmemparm<br />
-mfast-fix<br />
-mmpyi<br />
-mbk<br />
-mti<br />
-mdp-isr-reload -mrpts=count<br />
-mrptb<br />
-mdb<br />
-mloop-unsigned<br />
-mparallel-insns<br />
-mparallel-mpy<br />
-mpreserve-float<br />
V850 Options<br />
-mlong-calls<br />
-mno-long-calls<br />
-mep<br />
-mno-ep<br />
-mprolog-function<br />
-mno-prolog-function<br />
-mspace<br />
-mtda=n<br />
-msda=n<br />
-mzda=n<br />
-mv850<br />
-mbig-switch
CH03.fm Page 88 Monday, October 7, 2002 8:33 PM<br />
88 Chapter 3 • Compilers <strong>and</strong> Assemblers<br />
NS32K Options<br />
-m32032<br />
-m32332<br />
-m32532<br />
-m32081<br />
-m32381<br />
-mmult-add<br />
-mnomult-add<br />
-msoft-float<br />
-mrtd<br />
-mnortd<br />
-mregparam<br />
-mnoregparam<br />
-msb<br />
-mnosb<br />
-mbitfield<br />
-mnobitfield<br />
-mhimem<br />
-mnohimem<br />
AVR Options<br />
-mmcu=mcu<br />
-msize<br />
-minit-stack=n<br />
-mno-interrupts<br />
-mcall-prologues<br />
-mno-table-jump<br />
-mtiny-stack<br />
MCore Options<br />
-mhardlit<br />
-mno-hardlit<br />
-mdiv<br />
-mno-div<br />
-mrelax-immediates<br />
-mno-relax-immediates<br />
-mwide-bitfields<br />
-mno-wide-bitfields<br />
-m4byte-functions<br />
-mno-4byte-functions<br />
-mcallgraph-data<br />
-mno-callgraph-data<br />
-mslow-bytes<br />
-mno-slow-bytes<br />
-mno-lsim<br />
-mlittle-endian
CH03.fm Page 89 Monday, October 7, 2002 8:33 PM<br />
Compiling a Program 89<br />
-mbig-endian<br />
-m210<br />
-m340<br />
-mstack-increment<br />
IA-64 Options<br />
-mbig-endian<br />
-mlittle-endian<br />
-mgnu-as<br />
-mgnu-ld<br />
-mno-pic<br />
-mvolatile-asm-stop<br />
-mb-step<br />
-mregister-names<br />
-mno-sdata<br />
-mconstant-gp<br />
-mauto-pic<br />
-minline-divide-min-latency<br />
-minline-divide-max-throughput<br />
-mno-dwarf2-asm<br />
-mfixed-range=register-range<br />
S/390 <strong>and</strong> zSeries Options<br />
-mhard-float<br />
-msoft-float<br />
-mbackchain<br />
-mno-backchain<br />
-msmall-exec<br />
-mno-small-exec<br />
-mmvcle<br />
-mno-mvcle<br />
-m64<br />
-m31<br />
-mdebug<br />
-mno-debug<br />
Xtensa Options<br />
-mbig-endian<br />
-mlittle-endian<br />
-mdensity<br />
-mno-density<br />
-mmac16<br />
-mno-mac16<br />
-mmul16<br />
-mno-mul16<br />
-mmul32
CH03.fm Page 90 Monday, October 7, 2002 8:33 PM<br />
90 Chapter 3 • Compilers <strong>and</strong> Assemblers<br />
-mno-mul32<br />
-mnsa<br />
-mno-nsa<br />
-mminmax<br />
-mno-minmax<br />
-msext<br />
-mno-sext<br />
-mbooleans<br />
-mno-booleans<br />
-mhard-float<br />
-msoft-float<br />
-mfused-madd<br />
-mno-fused-madd<br />
-mserialize-volatile<br />
-mno-serialize-volatile<br />
-mtext-section-literals<br />
-mno-text-section-literals<br />
-mtarget-align<br />
-mno-target-align<br />
-mlongcalls<br />
-mno-long-calls<br />
3.3.8.16 Code Generation Options<br />
-fcall-saved-reg<br />
-fcall-used-reg<br />
-ffixed-reg<br />
-fexceptions<br />
-fnon-call-exceptions<br />
-funwind-tables<br />
-finhibit-size-directive<br />
-finstrument-functions<br />
-fcheck-memory-usage<br />
-fprefix-function-name<br />
-fno-common<br />
-fno-ident<br />
-fno-gnu-linker<br />
-fpcc-struct-return<br />
-fpic<br />
-fPIC<br />
-freg-struct-return<br />
-fshared-data<br />
-fshort-enums<br />
-fshort-double<br />
-fvolatile<br />
-fvolatile-global<br />
-fvolatile-static
CH03.fm Page 91 Monday, October 7, 2002 8:33 PM<br />
Linking a program 91<br />
-fverbose-asm<br />
-fpack-struct<br />
-fstack-check<br />
-fstack-limit-register=reg<br />
-fstack-limit-symbol=sym<br />
-fargument-alias<br />
-fargument-noalias<br />
-fargument-noalias-global<br />
-fleading-underscore<br />
3.4 Linking a program<br />
As mentioned earlier, building an executable binary file from a source code file is a multi-stage<br />
process.<br />
<strong>The</strong> gcc compiler usually carries all these steps for you by default. However you can stop<br />
gcc at any of these stages for various reasons. You have already seen how to create assembler<br />
code from a C source code file. In most software projects, output binaries are built from many<br />
source code files. For this purpose you have to compile these source code files to object files one<br />
by one before you can generate the output binary file. After creating these object files, you can<br />
link these files using gcc to the final executable.<br />
<strong>The</strong> gcc compiler gets help from different programs during the four steps listed earlier in<br />
this chapter. During the linking part, the ld program is invoked with appropriate arguments to<br />
link one or many object files together with libraries to generate an executable. Comm<strong>and</strong> line<br />
switches used with ld can be found using manual pages.<br />
<strong>The</strong> linker is a part of GNU binary utilities package also known as binutils. You can download<br />
<strong>and</strong> install the latest version of GNU linker if you need to do so.<br />
3.5 Assembling a Program<br />
GNU assembler is part of GNU binary utilities package. To get the latest binutils packages, you<br />
can download it from ftp://ftp.gnu.org/gnu/binutils/. After downloading you have to use the tar<br />
comm<strong>and</strong> to extract source code files. <strong>The</strong> latest version at the time of writing this chapter is<br />
2.12 <strong>and</strong> the tar comm<strong>and</strong> will create a directory binutils-2.12 automatically. I have<br />
extracted it in /opt directory, so the source code directory is /opt/binutils-2.12. I created<br />
another directory /opt/binutils-build to build the package. Running the configure<br />
script is the first step towards building binary utilities package. <strong>The</strong> following sequence of<br />
comm<strong>and</strong>s does all of these steps.<br />
[root@conformix /opt]# cd /opt<br />
[root@conformix /opt]# tar zxvf binutils-2.12.tar.gz<br />
[root@conformix /opt]# mkdir binutils-build<br />
[root@conformix /opt]# cd binutils-build/<br />
[root@conformix binutils-build]# ../binutils-2.12/configure --<br />
prefix=/opt/gcc-3.0.4 --enable-shared
CH03.fm Page 92 Monday, October 7, 2002 8:33 PM<br />
92 Chapter 3 • Compilers <strong>and</strong> Assemblers<br />
[root@conformix /opt]# make LDFLAGS=-all-static tooldir=/opt/<br />
gcc-3.0.4<br />
[root@conformix /opt]# make tooldir=/opt/gcc-3.0.4 install<br />
Note that since we have used /opt/gcc/3.0.4 as a prefix <strong>and</strong> tooldir as the destination<br />
for installation, the binary utilities will be installed in /opt/gcc-3.0.4/bin directory.<br />
As you may have noted, I have installed all software under /opt/gcc-3.0.4 so that I<br />
can use one directory for all of my tools.<br />
3.6 H<strong>and</strong>ling Warning <strong>and</strong> Error messages<br />
<strong>The</strong> GNU compiler generates two types of messages when compiling source code. Warning<br />
messages are non-critical messages <strong>and</strong> the compiler can build the output code even if there are<br />
warning messages. Error messages are fatal messages <strong>and</strong> compiler is not able to generate output<br />
files when an error occurs. By default, the compiler does not display many warning messages.<br />
You may like to see these messages, for example, when you want to get a release of a<br />
software package. Usually the release version of software should be compiled without any warning<br />
message. <strong>Using</strong> options that start with –W, you can control which types of messages should<br />
be displayed. It is a good idea to always use –Wall option in your Makefiles. <strong>The</strong> reason is that<br />
warnings often signify problems in code that you will want to see. Please see gcc man pages to<br />
get a feel of options controlling warning messages.<br />
3.7 Include files<br />
During the compilation process, the compiler should know where include files will be located.<br />
This can be done in different ways. <strong>The</strong> compiler looks into some default locations when searching<br />
for include files <strong>and</strong> you have already seen in this chapter how to display that information.<br />
You can also use the –I comm<strong>and</strong> line switch with the gcc comm<strong>and</strong> to set additional paths to<br />
locate include files. <strong>The</strong> third method is the use of environment variables. Please see the environment<br />
variables section earlier in this chapter for more information.<br />
3.8 Creating Libraries<br />
Libraries are files containing commonly used functions needed for all programs. For example,<br />
printf() is a function used in most of the C programs. When the program is linked, the linker<br />
must know where the code for the printf() function is located. Knowledge of location of<br />
library files is a must at this stage. <strong>The</strong> location can be passed to the linker using comm<strong>and</strong> line<br />
options or environment variables. In large software projects, this is done inside Makefiles. <strong>The</strong><br />
environment variable that shows the location of library files is LD_LIBRARY_PATH. Please see<br />
the list of comm<strong>and</strong> line options in this chapter or use manual pages to find out which options<br />
are appropriate.
CH03.fm Page 93 Monday, October 7, 2002 8:33 PM<br />
St<strong>and</strong>ard Libraries 93<br />
3.9 St<strong>and</strong>ard Libraries<br />
In addition to the compiler, assembler, linker <strong>and</strong> other tools, you also need st<strong>and</strong>ard library<br />
files. All <strong>Linux</strong> distributions come with the GNU C library which is installed as glibc. However,<br />
when you are building your development environment, you may need to get the library in<br />
source code format <strong>and</strong> install the latest version. You may also need the library in source code<br />
format in order to cross compile it when you are building a cross-compilation environment. <strong>The</strong><br />
st<strong>and</strong>ard GNU C library provides functions for the following major areas.<br />
• Memory management<br />
• Error h<strong>and</strong>ling<br />
• Character h<strong>and</strong>ling<br />
• Strings <strong>and</strong> arrays<br />
• Locales <strong>and</strong> international specific things, like character h<strong>and</strong>ling <strong>and</strong> date <strong>and</strong> time<br />
specific functions<br />
• Searching<br />
•Sorting<br />
• Pattern matching<br />
• Input <strong>and</strong> output<br />
• File system support<br />
•Pipes<br />
•Fifos<br />
•Sockets<br />
•Terminal I/O<br />
• Mathematics functions<br />
• Date <strong>and</strong> time functions<br />
• Signal <strong>and</strong> exception h<strong>and</strong>ling<br />
• Process management<br />
• Job control<br />
• User <strong>and</strong> groups<br />
• System related tasks<br />
Information about glibc is available on http://www.gnu.org/software/libc/libc.html.<br />
You can download it from ftp://ftp.gnu.org/gnu/glibc/ where you can find the latest as well as old<br />
versions. <strong>The</strong> current version at the time of writing this book is 2.2.5.<br />
After downloading the library, you have to untar it. For the sake of this book, I untarred the<br />
library file in /opt directory. <strong>The</strong> following tar comm<strong>and</strong> extracts library files in /opt/<br />
glibc-2.2.5 directory.<br />
tar zxvf glibc-2.2.5.tar.gz<br />
Now you have to extract any other components or add-ons of the library. I have added one<br />
component, <strong>Linux</strong> threads. File glibc-linuxthreads-2.2.5.tar.gz can also be
CH03.fm Page 94 Monday, October 7, 2002 8:33 PM<br />
94 Chapter 3 • Compilers <strong>and</strong> Assemblers<br />
downloaded from the same location from which you downloaded the main glibc-<br />
2.2.5.tar.gz file. <strong>The</strong> following comm<strong>and</strong>s are used to extract files from these two<br />
archives:<br />
cd glibc-2.2.5<br />
tar zxvf ../ glibc-linuxthreads-2.2.5.tar.gz<br />
In old versions of glibc, you had to install add-ons like locale data <strong>and</strong> crypt library.<br />
<strong>The</strong>se are included in the latest version of glibc.<br />
Now you have to configure the library after creating a build directory. Basically this is the<br />
same process that you have done while installing GCC <strong>and</strong> binutils. This is done using the following<br />
set of comm<strong>and</strong>s:<br />
[root@conformix glibc-2.2.5]# mkdir build<br />
[root@conformix glibc-2.2.5]# cd build<br />
[root@conformix build]# ../configure --enable-addons=linuxthreads<br />
--prefix=/opt/gcc-3.0.4<br />
<strong>The</strong> actual compilation <strong>and</strong> testing is done using the following two comm<strong>and</strong>s:<br />
make<br />
make check<br />
<strong>The</strong> final install comm<strong>and</strong> is the following:<br />
make install<br />
This comm<strong>and</strong> will install components of GNU C library under /opt/gcc-3.0.4/<br />
lib because we had chosen /opt/gcc/3.0.4 as our prefix when we ran the configure<br />
script. Now you can set the appropriate paths in your Makefiles to use the new library.<br />
3.10 Compiling Pascal Programs<br />
Pascal programs can be converted to C language programs <strong>and</strong> then compiled in the usual way.<br />
<strong>The</strong> p2c comm<strong>and</strong> on <strong>Linux</strong> does this for you. Consider the following Pascal program<br />
hello.pas.<br />
(* Program to demonstrate Pascal compilation *)<br />
program Hello ;<br />
begin<br />
writeln ('Hello world')<br />
end.<br />
<strong>The</strong> following comm<strong>and</strong> will create a file hello.c which is the equivalent C version of<br />
the hello.pas program.<br />
[rr@conformix 4]$ p2c hello.pas<br />
Hello<br />
Translation completed.<br />
[rr@conformix 4]$
CH03.fm Page 95 Monday, October 7, 2002 8:33 PM<br />
Compiling Pascal Programs 95<br />
<strong>The</strong> output hello.c file is shown below:<br />
/* Output from p2c 1.21alpha-07.Dec.93, the Pascal-to-C<br />
translator */<br />
/* From input file "hello.pas" */<br />
/* Program to demonstrate Pascal compilation */<br />
#include <br />
main(argc, argv)<br />
int argc;<br />
Char *argv[];<br />
{<br />
PASCAL_MAIN(argc, argv);<br />
printf("Hello world\n");<br />
exit(EXIT_SUCCESS);<br />
}<br />
/* End. */<br />
You may need some libraries with p2c program <strong>and</strong> C compiler to successfully complete<br />
this process.<br />
Many Pascal compilers are also available in the open source world. <strong>The</strong>se compilers can<br />
be used to generate executable code from Pascal source directly without any help from GCC.<br />
3.10.1 <strong>Using</strong> Free Pascal (fpc)<br />
<strong>The</strong> Free Pascal Project has created a 32-bit Pascal compiler which is available for <strong>Linux</strong>,<br />
among other operating systems. You can download it from http://www.freepascal.org. This software<br />
is licensed under GPL like other open source projects. At the time of writing this book version<br />
1.0.4 is available for download. After download, you can install the compiler as follows on<br />
a RedHat system:<br />
[root@conformix rr]# rpm --install fpc-1.0.4.i386.rpm<br />
Write permission in /etc.<br />
Found libgcc.a in /usr/lib/gcc-lib/i386-redhat-linux/2.96<br />
Writing sample configuration file to /etc/ppc386.cfg<br />
[root@conformix rr]#<br />
<strong>The</strong> best thing about this compiler is that you don’t need to convert source code files to C<br />
language <strong>and</strong> then compile these. <strong>The</strong> fpc compiler creates binary executable files. <strong>The</strong> following<br />
comm<strong>and</strong> creates an executable file hello from hello.pas program listed earlier.
CH03.fm Page 96 Monday, October 7, 2002 8:33 PM<br />
96 Chapter 3 • Compilers <strong>and</strong> Assemblers<br />
[rr@conformix 4]$ fpc hello.pas<br />
Free Pascal Compiler version 1.0.4 [2000/12/18] for i386<br />
Copyright (c) 1993-2000 by Florian Klaempfl<br />
Target OS: <strong>Linux</strong> for i386<br />
Compiling hello.pas<br />
Assembling hello<br />
Linking hello<br />
6 Lines compiled, 0.1 sec<br />
[rr@conformix 4]$<br />
<strong>The</strong> output hello program can be executed like any other program.<br />
3.10.2 <strong>Using</strong> GNU Pascal<br />
A GNU Pascal compiler is available from http://agnes.dida.physik.uni-essen.de/~gnu-pascal/<br />
for download <strong>and</strong> can be installed on many platforms like gcc. <strong>The</strong> web site contains all<br />
manuals <strong>and</strong> downloadable files for this compiler. This compiler also creates executable files<br />
from Pascal source code.<br />
3.11 Compiling Fortran Programs<br />
<strong>The</strong> GCC family of compilers also includes g77 which acts as a front end to invoke gcc. <strong>The</strong><br />
gcc compiler is used to compile Fortran programs. Consider the following simple hello.for<br />
Fortran program that write “Hello world” on st<strong>and</strong>ard output.<br />
c This program is to display a string <strong>and</strong> then end<br />
c Written to demonstrate Fortran program compilation<br />
c<br />
c Rafeeq Rehman, March 18, 2002<br />
program hello<br />
write (*,*) 'Hello world'<br />
stop<br />
end<br />
Note that statements in Fortran start from column 7. All lines starting with c in column 1<br />
are comment lines. You can compile this program using the following comm<strong>and</strong>:<br />
g77 hello.for<br />
<strong>The</strong> g77 compiler, like gcc, creates a.out as a default output executable. You can create<br />
output file with a different name using –o comm<strong>and</strong> line option. <strong>The</strong> following comm<strong>and</strong><br />
creates “kaka” as output binary executable file.<br />
g77 hello.for –o kaka<br />
<strong>The</strong> g77 program uses many programs to generate output binary. You can display version<br />
information by using g77 –v comm<strong>and</strong>. Output of this comm<strong>and</strong> is shown below.
CH03.fm Page 97 Monday, October 7, 2002 8:33 PM<br />
Compiling Fortran Programs 97<br />
[rr@conformix 4]$ g77 -v<br />
g77 version 2.96 20000731 (Red Hat <strong>Linux</strong> 7.1 2.96-81) (from<br />
FSF-g77 version 0.5.26 20000731 (Red Hat <strong>Linux</strong> 7.1 2.96-81))<br />
Driving: g77 -v -c -xf77-version /dev/null -xnone<br />
Reading specs from /usr/lib/gcc-lib/i386-redhat-linux/2.96/<br />
specs<br />
gcc version 2.96 20000731 (Red Hat <strong>Linux</strong> 7.1 2.96-81)<br />
/usr/lib/gcc-lib/i386-redhat-linux/2.96/tradcpp0 -langfortran<br />
-v -D__GNUC__=2 -D__GNUC_MINOR__=96 -<br />
D__GNUC_PATCHLEVEL__=0 -D__ELF__ -Dunix -Dlinux -D__ELF__ -<br />
D__unix__ -D__linux__ -D__unix -D__linux -Asystem(posix) -<br />
Acpu(i386) -Amachine(i386) -Di386 -D__i386 -D__i386__ -<br />
D__tune_i386__ /dev/null /dev/null<br />
GNU traditional CPP version 2.96 20000731 (Red Hat <strong>Linux</strong> 7.1<br />
2.96-81)<br />
/usr/lib/gcc-lib/i386-redhat-linux/2.96/f771 -fnull-version -<br />
quiet -dumpbase g77-version.f -version -fversion -o /tmp/<br />
ccr29cz4.s /dev/null<br />
GNU F77 version 2.96 20000731 (Red Hat <strong>Linux</strong> 7.1 2.96-81)<br />
(i386-redhat-linux) compiled by GNU C version 2.96 20000731<br />
(Red Hat <strong>Linux</strong> 7.1 2.96-81).<br />
GNU Fortran Front End version 0.5.26 20000731 (Red Hat <strong>Linux</strong><br />
7.1 2.96-81)<br />
as -V -Qy -o /tmp/ccqJAAN9.o /tmp/ccr29cz4.s<br />
GNU assembler version 2.10.91 (i386-redhat-linux) using BFD<br />
version 2.10.91.0.2<br />
ld -m elf_i386 -dynamic-linker /lib/ld-linux.so.2 -o /tmp/<br />
ccijxxjb /tmp/ccqJAAN9.o /usr/lib/gcc-lib/i386-redhat-linux/<br />
2.96/../../../crt1.o /usr/lib/gcc-lib/i386-redhat-linux/2.96/<br />
../../../crti.o /usr/lib/gcc-lib/i386-redhat-linux/2.96/<br />
crtbegin.o -L/usr/lib/gcc-lib/i386-redhat-linux/2.96 -L/usr/<br />
lib/gcc-lib/i386-redhat-linux/2.96/../../.. -lg2c -lm -lgcc -<br />
lc -lgcc /usr/lib/gcc-lib/i386-redhat-linux/2.96/crtend.o /<br />
usr/lib/gcc-lib/i386-redhat-linux/2.96/../../../crtn.o<br />
/tmp/ccijxxjb<br />
__G77_LIBF77_VERSION__: 0.5.26 20000731 (prerelease)<br />
@(#)LIBF77 VERSION 19991115<br />
__G77_LIBI77_VERSION__: 0.5.26 20000731 (prerelease)<br />
@(#) LIBI77 VERSION pjw,dmg-mods 19991115<br />
__G77_LIBU77_VERSION__: 0.5.26 20000731 (prerelease)<br />
@(#) LIBU77 VERSION 19980709<br />
[rr@conformix 4]$<br />
As you can see, it takes the help of gcc to compile programs. Note that Fortran programs<br />
have .for or .f at the end of the name of the program file.<br />
As with gcc, you can create intermediate assembled or object code with g77. See manual<br />
pages of g77 for more information.
CH03.fm Page 98 Monday, October 7, 2002 8:33 PM<br />
98 Chapter 3 • Compilers <strong>and</strong> Assemblers<br />
3.12 Other Compilers<br />
A major benefit of using <strong>Linux</strong> as a development platform is that you have so many tools <strong>and</strong><br />
compilers available in the open source community that you can develop in virtually any st<strong>and</strong>ard<br />
language. This section provides short information about a few more languages that can be easily<br />
integrated into the <strong>Linux</strong> development platform.<br />
3.12.1 Smalltalk<br />
Smalltalk is an object oriented language <strong>and</strong> a GNU version of Smalltalk can be downloaded<br />
from ftp://ftp.gnu.org/gnu/smalltalk/. <strong>The</strong> latest version at the time of writing this book is<br />
1.95.9. <strong>The</strong> compilation <strong>and</strong> installation is quite easy <strong>and</strong> is similar to other GNU tools. You can<br />
also go to www.smalltalk.org for more information.<br />
3.12.2 Oberon<br />
Oberon is the successor to the Pascal <strong>and</strong> Modula languages <strong>and</strong> it is an object-oriented<br />
language. It is mostly used in educational environments for teaching programming language<br />
concepts. For detailed information, please refer to http://www.oberon.ethz.ch/.<br />
3.12.3 Ruby<br />
Ruby is an interpreted language. Information about this language can be found at http://<br />
www.ruby-lang.org/en/.<br />
3.13 References <strong>and</strong> Resources<br />
1. GNU web site at http://www.gnu.org/<br />
2. Languages supported by GCC at http://gcc.gnu.org/onlinedocs/gcc-3.0.2/gcc_2.html<br />
3. Status of C99 support on GCC at http://gcc.gnu.org/gcc-3.0/c99status.html<br />
4. Object Oriented Programming <strong>and</strong> Objective C at http://developer.apple.com/techpubs/<br />
macosx/Cocoa/ObjectiveC/<br />
5. Object Programming <strong>and</strong> Objective Language at http://www.toodarkpark.org/computers/objc/<br />
6. <strong>The</strong> GNU C Library at http://www.delorie.com/gnu/docs/glibc/libc_toc.html<br />
7. <strong>Using</strong> as at http://www.objsw.com/docs/as_toc.html<br />
8. <strong>Using</strong> <strong>and</strong> porting GNU cc at http://www.delorie.com/gnu/docs/gcc/gcc_toc.html<br />
9. GNU C++ Library at http://www.delorie.com/gnu/docs/libg++/libg++_toc.html<br />
10. NetBSD Library source code at http://www.ajk.tele.fi/libc/code.html<br />
11. Free Pascal project at http://www.freepascal.org<br />
12. GNU Pascal at http://agnes.dida.physik.uni-essen.de/~gnu-pascal/<br />
13. GNU Smalltalk download site at ftp://ftp.gnu.org/gnu/smalltalk/<br />
14. Smalltalk information at http://www.smalltalk.org
CH03.fm Page 99 Monday, October 7, 2002 8:33 PM<br />
References <strong>and</strong> Resources 99<br />
15. Bob Nevlen, <strong>Linux</strong> Assembly Language Programming ISBN 0-13-0877940-1, Prentice<br />
Hall PTR 2000.<br />
16. Oberon Home page at http://www.oberon.ethz.ch/<br />
17. Ruby Home Page at http://www.ruby-lang.org/en/
CH03.fm Page 100 Monday, October 7, 2002 8:33 PM
CH04.fm Page 101 Monday, October 7, 2002 8:54 PM<br />
C HAPTER 4<br />
<strong>Using</strong> GNU make<br />
A<br />
ll serious software projects are built in pieces by many developers.<br />
<strong>The</strong>se pieces consist of source code <strong>and</strong> header files, libraries <strong>and</strong><br />
different tools. To combine these pieces into a product is a process commonly<br />
known as a build. <strong>The</strong> GNU make utility is one of the many available<br />
utilities used to build these software projects. Large software projects<br />
often have hundreds <strong>and</strong> even thous<strong>and</strong>s of files. Compiling these files<br />
<strong>and</strong> linking them into final executable product files is done by a careful<br />
<strong>and</strong> well-defined automated process. This automated process, also known<br />
as the software build process, is controlled by the make utility through<br />
makefiles. <strong>The</strong> make utility reads one or more of these makefiles containing<br />
information about how to build a project. Makefiles contain different<br />
types of information, including variables, control structures <strong>and</strong> rules to<br />
compile <strong>and</strong> link source files, build libraries <strong>and</strong> so on. In the most common<br />
makefiles, rules are present to remove object <strong>and</strong> executable files<br />
from the source code directory to clean it up, if required. <strong>The</strong>se rules are<br />
enforced based upon time stamps on different files. For example, if an<br />
existing object file is newer than the corresponding source code file, it is<br />
not recompiled. However if the object file is older than the source file, it<br />
shows that someone modified the source file after the object file was last<br />
built. In such a case, make detects it <strong>and</strong> rebuilds the object file. Depending<br />
upon the requirements of a project, someone can create different types<br />
of rules <strong>and</strong> comm<strong>and</strong>s to build software projects.<br />
101
CH04.fm Page 102 Monday, October 7, 2002 8:54 PM<br />
102 Chapter 4 • <strong>Using</strong> GNU make<br />
This chapter contains information on how to write makefiles for software<br />
projects <strong>and</strong> provides sufficient information for a reader to write makefiles<br />
for fairly complex projects. You can also refer to the reference at the<br />
end of this chapter for more comprehensive information about the make<br />
utility.<br />
To demonstrate the use of make, several examples are presented in this<br />
chapter. <strong>The</strong>se examples demonstrate how make can be used for different<br />
objectives. <strong>The</strong>se examples are simple <strong>and</strong> easy to underst<strong>and</strong> <strong>and</strong> are<br />
explained in the text. However you may write makefiles in many different<br />
ways for the same object. Features of make that are discussed in this<br />
chapter are those most commonly used. Make has many additional, less<br />
commonly used, features that are not covered here <strong>and</strong> you may want to<br />
use these as well while designing your makefiles.<br />
4.1 Introduction to GNU make<br />
<strong>The</strong> make utility has been used for a very long time in all types of software development<br />
projects. <strong>The</strong>re are open-source as well as commercial variants available from many vendors.<br />
<strong>The</strong> most common <strong>and</strong> popular distribution of make is the GNU make, which is open source<br />
<strong>and</strong> is available for almost all UNIX <strong>and</strong> Microsoft Windows platforms. All of the <strong>Linux</strong> distributions<br />
have the GNU make as a st<strong>and</strong>ard package with the development system. If you have<br />
installed development software from a distribution, you don’t need to install any additional software<br />
for make to work. <strong>The</strong> version of make currently installed can be displayed using the following<br />
comm<strong>and</strong>.<br />
[root@conformix make]# make -v<br />
GNU Make version 3.79.1, by Richard Stallman <strong>and</strong> Rol<strong>and</strong><br />
McGrath.<br />
Built for i386-redhat-linux-gnu<br />
Copyright (C) 1988, 89, 90, 91, 92, 93, 94, 95, 96, 97, 98,<br />
99, 2000<br />
Free Software Foundation, Inc.<br />
This is free software; see the source for copying conditions.<br />
<strong>The</strong>re is NO warranty; not even for MERCHANTABILITY or FITNESS<br />
FOR A PARTICULAR PURPOSE.<br />
Report bugs to .<br />
[root@conformix make]#
CH04.fm Page 103 Monday, October 7, 2002 8:54 PM<br />
Introduction to GNU make 103<br />
Since this is one of the most widely used software packages in the development community,<br />
there is a wealth of information available about it on the Internet. This chapter is intended<br />
to provide sufficient information to use make in all types of software projects.<br />
Simply put, make reads a text input file that contains information about how to compile,<br />
link <strong>and</strong> build target files. Make uses comm<strong>and</strong>s <strong>and</strong> rules specified in this file to carry out its<br />
operation. We shall discuss in detail the contents of these files, commonly known as makefiles.<br />
4.1.1 Basic Terminology<br />
Before we move ahead with more information about make <strong>and</strong> how to use it, let us get<br />
familiar with some basic terminology about the software build process <strong>and</strong> the make utility. <strong>The</strong><br />
terms defined below will be used throughout this chapter as well as in the chapters that follow.<br />
Input Files<br />
<strong>The</strong> make utility uses input files to build software projects. <strong>The</strong>se input files, also known<br />
as makefiles, contain information about when <strong>and</strong> how to compile, assemble or link files. <strong>The</strong>se<br />
input files also contain comm<strong>and</strong>s <strong>and</strong> rules to carry out these tasks.<br />
Rules<br />
A rule in an input file provides information about how to build an individual target<br />
(defined next). A rule has three parts:<br />
1. <strong>The</strong> target<br />
2. Dependencies<br />
3. Comm<strong>and</strong>s<br />
A target is rebuilt whenever a dependency file has a timestamp that is newer than the target.<br />
A target may have no dependency, in which case it is always rebuilt. <strong>The</strong> comm<strong>and</strong>s in the rule are<br />
executed to build the target from dependencies. <strong>The</strong> general format of a rule is as follows:<br />
Target: Dependencies<br />
Comm<strong>and</strong>s<br />
<strong>The</strong> comm<strong>and</strong>s part always starts with a TAB character. <strong>The</strong>re are two types of rules that<br />
will be explained later in this chapter. <strong>The</strong>se are types are:<br />
1. <strong>The</strong> explicit rules<br />
2. <strong>The</strong> implicit rules<br />
<strong>The</strong> rules defined above fall into explicit rules category. Implicit rules are predefined rules<br />
that make uses when it does not find an implicit rule to build a target.
CH04.fm Page 104 Monday, October 7, 2002 8:54 PM<br />
104 Chapter 4 • <strong>Using</strong> GNU make<br />
Target<br />
A target is usually a file or set of files that is the result of some operation on one or more<br />
other files. A target may be an object file, a final executable file or some intermediate file. Targets<br />
may be fake or phony, in which case no files are actually rebuilt. One such example is the<br />
phony target to remove all object <strong>and</strong> executable files from the source files directory. This process<br />
is often called a cleaning process. As a convention, all makefiles have a rule to clean the<br />
source code so that everything can be rebuilt freshly.<br />
Dependency<br />
<strong>The</strong> dependencies are files that determine when to build a target. <strong>The</strong> decision to rebuild a<br />
target is made if the timestamp on any dependency is newer than the target. This usually shows<br />
that a dependency file has been modified after the target was built the last time. Consider the<br />
example of an object file that was built from a C source file. After building the object file, if<br />
someone modifies the source code file, we need to rebuild the object file because it is no longer<br />
current. When the make utility scans the input files, it verifies this rule <strong>and</strong> rebuilds the object<br />
file automatically if it finds a change in the source file. If multiple machines are used, they need<br />
to be in time sync.<br />
A target may have multiple dependencies separated by space characters. In case of multiple<br />
dependencies, the target is rebuilt if any of the dependencies has changed. If the list of<br />
dependencies is very long, you can write multiple lines for dependencies by using a backslash<br />
character at the end of a line to continue to the next line. For example, the following lines show<br />
that tftp.o has dependencies spanning three lines.<br />
tftp.o: tftp.c tftp.h file1.c file2.c file3.c file4.c\<br />
file5.c file6.c file7.c file1.h file2.h file3.h\<br />
file4.h file5.h<br />
Note that the starting character in the second <strong>and</strong> third line should not be a TAB character;<br />
otherwise make will consider these lines as comm<strong>and</strong> lines <strong>and</strong> will try to execute these.<br />
Default Goal<br />
An input file (makefile) usually contains many rules. Each of these rules has a target.<br />
However the make utility does not build all of these targets. It only tries to build the first target<br />
specified in the input makefile. This target is called the default goal of the makefile. However,<br />
note that if dependencies to this default goal are targets of some other rules, the make utility can<br />
also build those targets in an effort to build the default goal. This happens when dependencies of<br />
the default goal are out of date.<br />
If you want to build a target that is not the default goal, you have to specify the target at the<br />
comm<strong>and</strong> line when starting make. This will be explained later in this chapter.<br />
Phony Target<br />
Some targets may have no dependencies. A common example is the clean target that<br />
removes some files from the source directory tree. A typical clean target is shown below:
CH04.fm Page 105 Monday, October 7, 2002 8:54 PM<br />
Introduction to GNU make 105<br />
clean:<br />
rm *.o<br />
Whenever you invoke make to build this target, the rm comm<strong>and</strong> is always executed. This<br />
is because the target has no dependency. <strong>The</strong>se types of targets are called phony targets.<br />
However there is a problem with such targets. Sometimes if there is a file with the same<br />
name as the phony target, the make utility may get confused while building it <strong>and</strong> execute the<br />
comm<strong>and</strong> in the phony target when it is not required to do so. To avoid this problem, you can<br />
specify which targets are phony targets in the makefile. <strong>The</strong> following line in the makefile<br />
defines clean as a phony target.<br />
.PHONY: clean<br />
clean:<br />
rm *.o<br />
4.1.2 Input Files<br />
<strong>The</strong> make comm<strong>and</strong>, when invoked without a comm<strong>and</strong> line argument, expects certain<br />
file names as input. <strong>The</strong>se files names are searched in the current directory in the following<br />
order.<br />
1. GNUmakefile<br />
2. makefile<br />
3. Makefile<br />
If none of these files is present, make will not take any action <strong>and</strong> displays the following<br />
error message:<br />
[root@conformix make]# make<br />
make: *** No targets specified <strong>and</strong> no makefile found. Stop.<br />
[root@conformix make]#<br />
However there is a way to specify files with non-st<strong>and</strong>ard names as explained later. <strong>The</strong><br />
common practice is to use “Makefile” as the name of the input file because it easy to distinguish<br />
from other files due to upper case M.<br />
N O T E If you have multiple input files in the same directory<br />
with names GNUmakefile, makefile <strong>and</strong> Makefile,<br />
only the GNUmakefile will be used. As a rule of thumb, make<br />
will use only the first available file in its priority list to build a<br />
project. This means that if we have two files with names makefile<br />
<strong>and</strong> Makefile, only the file named makefile will be<br />
used.
CH04.fm Page 106 Monday, October 7, 2002 8:54 PM<br />
106 Chapter 4 • <strong>Using</strong> GNU make<br />
You can specify any other filename using comm<strong>and</strong> line switch –f with the make comm<strong>and</strong>.<br />
For example, if you have a file named myrules.make, you can use it as input file to the<br />
make utility as follows:<br />
make –f myrules.make<br />
From now on in this book, we shall use only “Makefile” as the name of the input file for<br />
the make comm<strong>and</strong>. This is a usual convention in most of the software development projects.<br />
Input files with any other name will be used as include files in the Makefile. <strong>The</strong> common conventional<br />
name for include file is Makefile.in.<br />
4.1.3 Typical Contents of a Makefile<br />
<strong>The</strong> makefiles that are used as input to the make comm<strong>and</strong> have similar types of contents.<br />
Some of the typical contents of a makefile are as follows.<br />
Variables<br />
Variables are usually the first part of any makefile. Variables are used to associate a name<br />
to a text string in the makefiles. <strong>The</strong>se variables are then substituted into other targets, dependencies<br />
or comm<strong>and</strong>s later in the makefile. A simple equal sign can associate a text string to a name.<br />
<strong>The</strong> following line defines a variable targets in the makefile. This variable is equal to two target<br />
files tftp.o <strong>and</strong> fto.o.<br />
targets = tftp.o ftp.o<br />
To use this variable later on, you enclose the variable name in parentheses <strong>and</strong> use a dollar<br />
sign with it. <strong>The</strong> targets variable will be used as $(targets) in the makefile to refer to these<br />
two object files. A typical use of this variable is shown in the following three lines.<br />
$(targets): tftp.c tftp.h ftp.c ftp.h<br />
gcc –c tftp.c<br />
gcc –c ftp.c<br />
This rule tells make comm<strong>and</strong> that if any of the four dependency files (tftp.c,<br />
tftp.h, ftp.c, ftp.h) has a timestamp newer than the object files, the object files<br />
should be rebuilt.<br />
Now you may have noticed that this is not a wise rule. If only tftp.c is changed, then<br />
we need to build only tftp.o but with this rule we are also building ftp.o which may not be<br />
required. However this type of rule may be useful when a single dependency may affect many<br />
targets. For example, both ftp.o <strong>and</strong> tftp.o may be dependent on common.h file <strong>and</strong> the<br />
following rule will make sense.<br />
$(targets): common.h<br />
gcc –c tftp.c<br />
gcc –c ftp.c<br />
We shall discuss more about these things <strong>and</strong> how to write wiser <strong>and</strong> more comprehensive<br />
rules in makefiles later in this chapter.
CH04.fm Page 107 Monday, October 7, 2002 8:54 PM<br />
Introduction to GNU make 107<br />
Rule to Build the Default Goal<br />
After defining the variables, the first rule defines the default goal. This is usually used to<br />
build one or more final executable from all of the source, object <strong>and</strong> library files.<br />
Rules to Build Other Goals<br />
After defining the default goal, you can define as many other rules as you like. <strong>The</strong>se other<br />
rules are used to build individual parts of a big project. For example, if a project consists of three<br />
main parts, the FTP server, the TFTP server <strong>and</strong> the DNS resolver, you can have three individual<br />
rules for all of these individual parts. <strong>The</strong> default goal may be used to build all of these three targets<br />
in a single step.<br />
Rules to Build Individual Objects<br />
In addition to defining rules to build goals, you may have to define rules to build individual<br />
objects or intermediate files. One example of these rules is to build object files from the<br />
source files. <strong>The</strong>se object files may then be used to build executable or library files.<br />
Rules to Install<br />
Some rules may be required to install the files into appropriate directories created by other<br />
rules. For example, after building library files, you may want to install them into /lib or /<br />
usr/lib directory. Similarly, after building executable files, you may want to install them into<br />
/bin, /usr/bin or /sbin directory or any other directory of your choice. For this reason,<br />
one or more rules may be defined in the makefiles so that make copies the appropriate files into<br />
their target location.<br />
Rules to Clean Previous Builds<br />
As mentioned earlier, the rule to clean previous builds is usually a phony rule to clean up<br />
the source code tree from the previously built intermediate <strong>and</strong> target files. This rule is useful<br />
when you want to h<strong>and</strong> over a clean directory to someone or to force everything to be rebuilt,<br />
perhaps with new options.<br />
Comments <strong>and</strong> Blank Lines<br />
As a good convention, you can insert some comment lines in makefiles so that you <strong>and</strong><br />
others can make sense of what is there. All comments start with a hash (#) symbol. You can also<br />
put a comment after a comm<strong>and</strong>. <strong>The</strong> rule of thumb is that anything after the hash character will<br />
be considered a comment. If this character is the first character in a line, all of the line is a comment<br />
line.<br />
C A U T I O N Any empty line that begins with a TAB is not really<br />
an empty line. It is considered an empty comm<strong>and</strong>. Empty comm<strong>and</strong>s<br />
are sometimes useful when you don’t want to take any<br />
action for a particular dependency.
CH04.fm Page 108 Monday, October 7, 2002 8:54 PM<br />
108 Chapter 4 • <strong>Using</strong> GNU make<br />
4.1.4 Running make<br />
In its basic <strong>and</strong> most widely used form, simply entering “make” on the comm<strong>and</strong> line<br />
invokes the make program. Upon invocation, it reads its input file, in a priority order as<br />
explained earlier, <strong>and</strong> executes different comm<strong>and</strong>s in it to build the default goal. In this chapter,<br />
we are using a hypothetical project that builds three applications: ftp, tftp <strong>and</strong> dnsresolver.<br />
Reference to this project will be used in many parts of the remaining chapter. See section<br />
4.4 for a complete listing of the makefiles used.<br />
Building a Default Goal<br />
If we have a Makefile in the current directory <strong>and</strong> the default goal is to build all of the<br />
ftp, tftp, <strong>and</strong> dnsresolver, specified by “all” rule, a typical session will be as follows:<br />
[root@rr2 test]# make<br />
gcc -g -O2 -c ftp.c<br />
gcc -g -O2 -c common.c<br />
gcc -static ftp.o common.o -o ftp<br />
gcc -g -O2 -c tftp.c<br />
gcc -static tftp.o common.o -o tftp<br />
gcc -g -O2 -c dnsresolver.c<br />
gcc -static dnsresolver.o common.o -o dnsresolver<br />
[root@rr2 test]#<br />
Building a Non-Default Goal<br />
If you have multiple goals in a Makefile <strong>and</strong> you don’t want to build a default goal, you<br />
have to specify the goal you want to build on the comm<strong>and</strong> line. <strong>The</strong> following line builds only<br />
the ftp server.<br />
[root@rr2 test]# make ftp<br />
gcc -g -O2 -c ftp.c<br />
gcc -g -O2 -c common.c<br />
gcc -static ftp.o common.o -o ftp<br />
[root@rr2 test]#<br />
When a Target is Updated<br />
<strong>The</strong>re are certain rules about when a target will be built or rebuilt. <strong>The</strong>se are as listed below.<br />
• Target is not present. If a target is not present <strong>and</strong> a rule is executed, the target will<br />
always be rebuilt.<br />
• Target is outdated. This means that one or more dependencies of a target are newer than<br />
the target. This happens when someone changed a dependency after the target was built<br />
last time.<br />
• Target is forced to be rebuilt. You can define rules to force a target to be rebuilt<br />
whether a dependency has changed or not. This is also true for phony targets.
CH04.fm Page 109 Monday, October 7, 2002 8:54 PM<br />
Introduction to GNU make 109<br />
4.1.5 Shell to Execute Comm<strong>and</strong>s<br />
All comm<strong>and</strong>s in a makefile are executed in a subshell invoked by the make comm<strong>and</strong>. It<br />
is important to know which shell will be used to execute comm<strong>and</strong>s in the makefile. By default<br />
the shell name is /bin/sh. However this can be changed using the SHELL variable in the<br />
makefile. Please note that this is not the environment variable SHELL, but is set within the<br />
makefile. This is to avoid conflict with someone’s personal preference of using a particular shell.<br />
Each line that starts with TAB character represents a comm<strong>and</strong> <strong>and</strong> is executed by a single<br />
instance of shell. So, for example, the following line will cause a directory change to tftp <strong>and</strong><br />
the comm<strong>and</strong> rm *.o to be executed from that directory. After executing this comm<strong>and</strong>, the<br />
next comm<strong>and</strong> is executed in the original directory because a new subshell is invoked <strong>and</strong> the<br />
effect of the cd tftp comm<strong>and</strong> is gone.<br />
tftp: tftp/Makefile<br />
cd tftp; rm *.o<br />
@echo “Rebuilding . . .”<br />
As mentioned earlier, one line can be split into multiple lines by placing a backslash at the<br />
end of the line. <strong>The</strong> above three lines can be written as follows without any change in their<br />
result:<br />
tftp: tftp/Makefile<br />
(cd tftp;\<br />
rm *.o)<br />
@echo “Makefile changed. Rebuilding …”<br />
4.1.6 Include Files<br />
In case of large projects, makefile rules can be split into many files. <strong>The</strong>se smaller files can<br />
then be included into a makefile. When the make utility is scanning through the makefile <strong>and</strong> it<br />
finds an include file, it will go through the include file before going to the next line in the<br />
makefile. Logically, you can think of contents of the include file being inserted into the<br />
makefile at the place where the file is included.<br />
Files can be included using the include directive inside a makefile. <strong>The</strong> following line<br />
includes a file myrules.in in a makefile.<br />
include myrules.in<br />
Multiple files can be included into a makefile on the same line. <strong>The</strong> following line<br />
includes two files myrules.in <strong>and</strong> bootarules.in into a makefile.<br />
include myrules.in bootarules.in<br />
When multiple files are included, these are read in the order they are present in the makefile.<br />
In the above example, first myrules.in will be read by the make utility <strong>and</strong> then bootarules.in<br />
will be read.
CH04.fm Page 110 Monday, October 7, 2002 8:54 PM<br />
110 Chapter 4 • <strong>Using</strong> GNU make<br />
You can also use wildcards <strong>and</strong> variables to specify file names with the include directives.<br />
<strong>The</strong> following include directive includes all files with last part as “.in” <strong>and</strong> files specified by the<br />
variable MKINCS.<br />
include *.in $(MKINCS)<br />
4.2 <strong>The</strong> make Rules<br />
Rules are the most important part of a makefile. Rules control how a project should be built.<br />
Each rule has a common structure which is discussed in this section. A typical makefile is introduced<br />
as an example to show you how rules are written in makefiles.<br />
4.2.1 Anatomy of a Rule<br />
As mentioned earlier, a typical rule looks like the following:<br />
Target: Dependencies<br />
Comm<strong>and</strong>s<br />
A target is the objective of the rule that depends upon a list of dependencies. Comm<strong>and</strong>s<br />
are used to build the target. <strong>The</strong> target name is followed by a colon. Comm<strong>and</strong>s start with a TAB<br />
character.<br />
C A U T I O N Each line containing comm<strong>and</strong>s starts with a TAB<br />
character. <strong>The</strong> TAB character distinguishes comm<strong>and</strong> lines from<br />
other lines. A common error is to replace the TAB character with<br />
a multiple space character. <strong>The</strong> result is that comm<strong>and</strong>s on this<br />
line are not executed.<br />
Multiple Comm<strong>and</strong>s in the Same Line<br />
A rule can have multiple comm<strong>and</strong>s to build target. <strong>The</strong>se comm<strong>and</strong>s can be listed in multiple<br />
lines or in a single line. If comm<strong>and</strong>s are listed in a single line, they are separated by a<br />
semicolon. It should be noted that the difference is whether or not they are executed in the same<br />
subshell. Comm<strong>and</strong>s listed in one line are executed in the same subshell. If each comm<strong>and</strong> is<br />
listed in a separate line, each line starts with a TAB character in the start of the line. <strong>The</strong> following<br />
rule, used to remove some files from the current directory, has two comm<strong>and</strong>s. <strong>The</strong> first is<br />
echo <strong>and</strong> the second is the rm comm<strong>and</strong>.<br />
clean:<br />
@echo "Deleting files ..."<br />
rm -f $(OBJS) *~<br />
<strong>The</strong>se two comm<strong>and</strong>s can also be listed as follows:<br />
clean:<br />
@echo "Deleting files ..." ; rm -f $(OBJS) *~
CH04.fm Page 111 Monday, October 7, 2002 8:54 PM<br />
<strong>The</strong> make Rules 111<br />
Comm<strong>and</strong> Echoing<br />
By default all comm<strong>and</strong>s in the makefile are echoed to st<strong>and</strong>ard output as these are executed.<br />
This provides information about the activity of make as it is going through the makefile.<br />
However you can suppress the comm<strong>and</strong> echo by starting comm<strong>and</strong>s with the character @.<br />
This is especially useful in printing information from within the makefile using the echo<br />
comm<strong>and</strong>. For example, you can create a makefile that prints information before it starts executing.<br />
A typical rule in the makefile that displays information about the object before executing<br />
any other comm<strong>and</strong> follows. It displays a line showing that make is going to build FTP:<br />
ftp: $(SRCS) $(HDRS)<br />
@echo "Building FTP"<br />
@$(CC) $(CFLAGS) $(INCLUDES) ftp.c<br />
@$(CC) $(LDFLAGS) $(COMMON) $(OBJS) -lcommon -o ftp<br />
When make reads this file, it displays the following output:<br />
[root@conformix ftp-dir]# make ftp<br />
Building FTP<br />
[root@conformix ftp-dir]#<br />
If you don’t insert the @ characters in this file, the result will be as follows. You can easily<br />
find the difference between this <strong>and</strong> the earlier output of the make comm<strong>and</strong>.<br />
[root@conformix ftp-dir]# make ftp<br />
echo "Building FTP"<br />
Building FTP<br />
gcc -g -O2 -c -I../common-dir ftp.c<br />
gcc -static -L../common-dir ftp.o -lcommon -o ftp<br />
[root@conformix ftp-dir]#<br />
N O T E <strong>The</strong>re are other ways to suppress the comm<strong>and</strong><br />
echo. One of these is the use of –s or –silent flag on the<br />
comm<strong>and</strong> line. However the most common method is the use of<br />
the @ character.<br />
Rules with no Dependencies<br />
Many rules are used with no dependencies. <strong>The</strong>se rules are used to execute comm<strong>and</strong>s<br />
without looking into any dependencies. Comm<strong>and</strong>s in these rules are guaranteed to be executed.<br />
4.2.2 A Basic Makefile<br />
Let us start with a simple makefile shown below. This makefile is used to build ftp,<br />
which is the default target.
CH04.fm Page 112 Monday, October 7, 2002 8:54 PM<br />
112 Chapter 4 • <strong>Using</strong> GNU make<br />
###################################################<br />
# Makefile created to demonstrate use of the make<br />
# utility in the "<strong>Linux</strong> <strong>Development</strong> <strong>Platform</strong>" book.<br />
#<br />
# Author: Rafeeq Ur Rehman<br />
# rr@conformix.net<br />
###################################################<br />
# Variable definition<br />
OBJS = ftp.o common.o<br />
HDRS = ftp.h common.h<br />
CFLAGS = -g -O2<br />
TARGETS = ftp<br />
CC = gcc<br />
# Default Target<br />
ftp: $(OBJS) $(HDRS)<br />
$(CC) $(OBJS) -o ftp<br />
ftp.o: ftp.c $(HDRS)<br />
$(CC) $(CFLAGS) -c ftp.c<br />
common.o: common.c common.h<br />
$(CC) $(CFLAGS) -c common.c<br />
clean:<br />
rm -f $(TARGETS) $(OBJS)<br />
This makefile has initial comments that show information about the file. After that, variables<br />
are defined. <strong>The</strong> rule to build default target is listed next. This rule has two dependencies<br />
which are defined by variables $(OBJS) <strong>and</strong> $(HDRS). Rules to build the object files are<br />
listed after the default rule. <strong>The</strong> last rule, clean, is used to remove files created during the<br />
make process so that the directory contains only the initial source code files when you invoked<br />
this rule for the first time. This rule has no dependency, so the rm comm<strong>and</strong> is guaranteed to be<br />
executed.<br />
When building the default target ftp, make checks the dependencies. For this it exp<strong>and</strong>s<br />
two variables $(OBJS) <strong>and</strong> $(HDRS). After expansion, make finds out that the target is<br />
dependent upon the following four files.<br />
1. ftp.o<br />
2. ftp.h<br />
3. common.o<br />
4. common.h
CH04.fm Page 113 Monday, October 7, 2002 8:54 PM<br />
<strong>The</strong> make Rules 113<br />
Now make also finds out that there are other rules to build ftp.o <strong>and</strong> common.o files.<br />
If these two files are not up-to-date, make rebuilds these object files using corresponding rules.<br />
For example, if common.c file has been changed since make built common.o last time, make<br />
will rebuild it. After checking dependencies, make will build ftp if any of the dependency is<br />
newer than the ftp file or ftp file does not exist.<br />
If you want to remove the target file <strong>and</strong> the object files, you can use the make clean<br />
comm<strong>and</strong> that invokes the clean rule. This rule has no dependency so the rm comm<strong>and</strong> will<br />
always execute, removing the ftp <strong>and</strong> any object files.<br />
4.2.3 Another Example of Makefile<br />
<strong>The</strong> following Makefile is a little bit bigger <strong>and</strong> is used to build three targets. <strong>The</strong>se are as<br />
follows:<br />
1. <strong>The</strong> ftp server<br />
2. <strong>The</strong> tftp server<br />
3. <strong>The</strong> dnsresolver<br />
Before going into detail of how it is done, let us look at the Makefile itself. It is listed<br />
below.<br />
###################################################<br />
# Makefile created to demonstrate use of the make<br />
# utility in the "<strong>Linux</strong> <strong>Development</strong> <strong>Platform</strong>" book.<br />
#<br />
# Author: Rafeeq Ur Rehman<br />
# rr@conformix.com<br />
###################################################<br />
# Variable definition<br />
SRCS = ftp.c tftp.c dnsresolver.c common.c<br />
OBJS = ftp.o tftp.o dnsresolver.o common.o<br />
FTPOBJS = ftp.o common.o<br />
FTPHDRS = ftp.h common.h<br />
TFTPOBJS = tftp.o common.o<br />
TFTPHDRS = tftp.h common.h<br />
DNSRESOLVEROBJS = dnsresolver.o common.o<br />
DNSRESOLVERHDRS = dnsresolver.h common.h<br />
CC = gcc<br />
CFLAGS = -g -O2<br />
LDFLAGS = -static<br />
TARGETS = ftp tftp dnsresolver<br />
INSTALLDIR = /root<br />
# Default Target
CH04.fm Page 114 Monday, October 7, 2002 8:54 PM<br />
114 Chapter 4 • <strong>Using</strong> GNU make<br />
all: $(TARGETS)<br />
# Rule to build object files<br />
$(OBJS): $(SRCS)<br />
$(CC) $(CFLAGS) -c $(@:.o=.c)<br />
# Rules to build individual targets<br />
ftp: $(FTPOBJS) $(FTPHDRS)<br />
$(CC) $(LDFLAGS) $(FTPOBJS) -o ftp<br />
tftp: $(TFTPOBJS) $(TFTPHDRS)<br />
$(CC) $(LDFLAGS) $(TFTPOBJS) -o tftp<br />
dnsresolver: $(DNSRESOLVEROBJS) $(DNSRESOLVERHDRS)<br />
$(CC) $(LDFLAGS) $(DNSRESOLVEROBJS) -o dnsresolver<br />
clean:<br />
rm -f $(TARGETS) $(OBJS)<br />
install:<br />
cp $(TARGETS) $(INSTALLDIR)<br />
# Additional Dependencies<br />
ftp.o: $(FTPHDRS) tftp.o: $(TFTPHDRS)<br />
dnsresolver.o: $(DNSRESOLVERHDRS)<br />
After comments in the start of the makefile, the first part of the file defines variables used<br />
in this file. As you shall see, defining variables is very helpful if you need any modification in<br />
the Makefile or want to add or remove more files later on. After defining variables, the default<br />
target is defined with the name "all" as follows:<br />
all: $(TARGETS)<br />
This in turn has dependencies on the three targets that we want to make. Please note that<br />
we don't have any comm<strong>and</strong> to build this default target. When make reaches the default target, it<br />
tries to meet dependencies to make sure that these are up-to-date. If any of these dependencies is<br />
not up-to-date, make will try to recreate it.<br />
<strong>The</strong> three dependencies to the default target (ftp, tftp <strong>and</strong> dnsresolver) have their<br />
own rules to build. For example, the following ftp rule shows that it depends upon two variables<br />
$(FTPOBJS) <strong>and</strong> $(FTPHDRS).<br />
ftp: $(FTPOBJS) $(FTPHDRS)<br />
$(CC) $(LDFLAGS) $(FTPOBJS) -o ftp<br />
This means that if any of the files listed in these two variables has changed, the ftp target<br />
will be rebuilt. <strong>The</strong>se files defined in the two variables are as follows:
CH04.fm Page 115 Monday, October 7, 2002 8:54 PM<br />
<strong>The</strong> make Rules 115<br />
• ftp.o<br />
• common.o<br />
• ftp.h<br />
• common.h<br />
We have another rule to build object files from source files. This rule is as follows:<br />
$(OBJS): $(SRCS)<br />
$(CC) $(CFLAGS) -c $(@:.o=.c)<br />
It will build any of the .o object file, which is not up-to-date from its corresponding .c<br />
source code file. <strong>The</strong> @ sign is used to substitute the name of the target by replacing .o with .c<br />
so that if we want to build the target common.o, the @ symbol will replace .o with .c in the<br />
target, making it common.c. This way the compiler gets the correct argument after the -c<br />
switch in the comm<strong>and</strong> line. This technique is especially useful if you are dealing with files with<br />
different extensions. For example, if the source code files are C++ files ending with .cpp, the<br />
above rule may be written as follows:<br />
$(OBJS): $(SRCS)<br />
$(CC) $(CFLAGS) -c $(@:.o=.cpp)<br />
Now the @ will replace .o with .cpp for each file in the target.<br />
<strong>The</strong> clean rule will delete all of the object <strong>and</strong> executable files. <strong>The</strong> install rule will copy<br />
files into the /root directory. Both of these rules have no dependency. This means that the comm<strong>and</strong>s<br />
in these rules don't depend on anything <strong>and</strong> will always be executed whenever this rule is<br />
invoked.<br />
<strong>The</strong> last part of the makefile lists some additional dependencies not covered by earlier rules.<br />
Note that these three rules in the end have no comm<strong>and</strong> to execute. You can have as many rules to<br />
build a target as you like, but only one of these rules should contain comm<strong>and</strong>s to build it.<br />
Now you can see how the use of variables is useful in this Makefile. If you add or remove<br />
some files or dependencies, you need to modify only the upper part of the makefile where variables<br />
are defined, without worrying about the rest of the makefile. For example, if you add a<br />
new header file to the dependency list of ftp, you just need to modify the variable FTPHDRS.<br />
Similarly to add a new source code file common.c that is being used by ftp, you need to add it<br />
to the following two variables:<br />
1. FTPOBJS<br />
2. OBJS<br />
By modifying these two variables, this will automatically be used by ftp, $(OBJS) <strong>and</strong><br />
clean rules.<br />
Now is the time to use this makefile <strong>and</strong> see how the make program executes different<br />
comm<strong>and</strong>s. <strong>The</strong> output of the make comm<strong>and</strong> is shown below that needs some attention to<br />
underst<strong>and</strong> how the make program checks dependencies <strong>and</strong> builds different targets.
CH04.fm Page 116 Monday, October 7, 2002 8:54 PM<br />
116 Chapter 4 • <strong>Using</strong> GNU make<br />
[root@rr2 test]# make<br />
gcc -g -O2 -c ftp.c<br />
gcc -g -O2 -c common.c<br />
gcc -static ftp.o common.o -o ftp<br />
gcc -g -O2 -c tftp.c<br />
gcc -static tftp.o common.o -o tftp<br />
gcc -g -O2 -c dnsresolver.c<br />
gcc -static dnsresolver.o common.o -o dnsresolver<br />
[root@rr2 test]#<br />
<strong>The</strong> default target is "all" which has dependency upon the variable $(TARGETS). This<br />
variable has three words: ftp, tftp <strong>and</strong> dnsresolver. First make tries to verify that ftp<br />
is up-to-date. For this it finds that ftp file does not exist so it tries to build it using some other<br />
rule. It finds the following rule to build ftp:<br />
ftp: $(FTPOBJS) $(FTPHDRS)<br />
$(CC) $(LDFLAGS) $(FTPOBJS) -o ftp<br />
Now it tries to find if dependencies of this rule are up-to-date. <strong>The</strong> object files are not<br />
present, so first it tries to build the object file. To build the object files, it looks for another rule<br />
<strong>and</strong> finds the following rule to build two object files (ftp.o <strong>and</strong> common.o) in the dependency<br />
list.<br />
$(OBJS): $(SRCS)<br />
$(CC) $(CFLAGS) -c $(@:.o=.c)<br />
When make executes the comm<strong>and</strong> in this rule, you see the following two lines in the output<br />
of the make comm<strong>and</strong>.<br />
gcc -g -O2 -c ftp.c<br />
gcc -g -O2 -c common.c<br />
Now it has all of the dependencies for the ftp target up-to-date <strong>and</strong> it builds ftp using<br />
the corresponding rule. At this point you see the following line in the output of the make comm<strong>and</strong>:<br />
gcc -static ftp.o common.o -o ftp<br />
By building ftp, make has satisfied one dependency in the default goal. Now it will try to<br />
meet the second dependency, which is tftp. Since the tftp file is not present, it will locate a<br />
rule that can be used to build tftp. In the tftp rule dependencies, the common.o file is<br />
already up-to-date, so it will not recompile it. However since it does not find tftp.o, it will<br />
rebuild tftp.o. At this point you see the following line in the output:<br />
gcc -g -O2 -c tftp.c<br />
Now it has successfully built dependencies for tftp <strong>and</strong> it will build the tftp target <strong>and</strong><br />
display the following line in the output:<br />
gcc -static tftp.o common.o -o tftp
CH04.fm Page 117 Monday, October 7, 2002 8:54 PM<br />
<strong>The</strong> make Rules 117<br />
<strong>The</strong> same process is repeated for the dnsresolver <strong>and</strong> the following two lines are displayed:<br />
gcc -g -O2 -c dnsresolver.c<br />
gcc -static dnsresolver.o common.o -o dnsresolver<br />
After building dnsresolver, nothing is left in the default target rule “all,” so make will<br />
stop at this point.<br />
Now let us see what happens if you modify the ftp.h file <strong>and</strong> run make again. <strong>The</strong> output<br />
will be as follows:<br />
[root@rr2 test]# make<br />
gcc -g -O2 -c ftp.c<br />
gcc -static ftp.o common.o -o ftp<br />
[root@rr2 test]#<br />
This time make only rebuilt ftp because ftp.h is a dependency only for the target ftp.<br />
However if you modify common.h, it will rebuild ftp, tftp <strong>and</strong> dnsresolver as follows:<br />
[root@rr2 test]# make<br />
gcc -g -O2 -c ftp.c<br />
gcc -static ftp.o common.o -o ftp<br />
gcc -g -O2 -c tftp.c<br />
gcc -static tftp.o common.o -o tftp<br />
gcc -g -O2 -c dnsresolver.c<br />
gcc -static dnsresolver.o common.o -o dnsresolver<br />
[root@rr2 test]#<br />
Modifying common.c will cause rebuilding of all object files as well. This result of<br />
make after modification in common.c is as follows:<br />
[root@rr2 test]# make<br />
gcc -g -O2 -c ftp.c<br />
gcc -g -O2 -c common.c<br />
gcc -static ftp.o common.o -o ftp<br />
gcc -g -O2 -c tftp.c<br />
gcc -static tftp.o common.o -o tftp<br />
gcc -g -O2 -c dnsresolver.c<br />
gcc -static dnsresolver.o common.o -o dnsresolver<br />
[root@rr2 test]#<br />
You can also use rules to build individual targets. For example, if you want to build only<br />
ftp, you use the following comm<strong>and</strong> line instead:<br />
[root@rr2 test]# make ftp<br />
gcc -g -O2 -c ftp.c<br />
gcc -g -O2 -c common.c<br />
gcc -static ftp.o common.o -o ftp<br />
[root@rr2 test]#
CH04.fm Page 118 Monday, October 7, 2002 8:54 PM<br />
118 Chapter 4 • <strong>Using</strong> GNU make<br />
Now let us clean the files we have created using the following rule.<br />
clean:<br />
rm -f $(TARGETS) $(OBJS)<br />
<strong>The</strong> result of running the comm<strong>and</strong> make clean will be as follows:<br />
[root@rr2 test]# make clean<br />
rm -f ftp tftp dnsresolver ftp.o tftp.o dnsresolver.o common.o<br />
[root@rr2 test]#<br />
As you can see from the above output, make has replaced variables with values present in<br />
the variables before running the rm comm<strong>and</strong>. This is what is done every time make invokes a<br />
comm<strong>and</strong>.<br />
4.2.4 Explicit Rules<br />
<strong>The</strong>re are two types of rules: explicit rules <strong>and</strong> implicit rules. All of the rules that we have<br />
been using in this chapter until now are explicit rules. An explicit rule has three parts: target,<br />
dependencies <strong>and</strong> comm<strong>and</strong>s. Explicit rules are defined in detail <strong>and</strong> they perform exactly as<br />
they are written. In general, all rules present in a makefile are explicit rules.<br />
4.2.5 Implicit Rules<br />
Implicit rules are used by make to build certain targets by itself. <strong>The</strong>se rules are usually<br />
language-specific <strong>and</strong> operate depending upon file extension. For example, make can build .o<br />
files from .c files using an implicit rule for C language compilation. Consider the basic makefile<br />
we used earlier in this chapter as shown below:<br />
# Variable definition<br />
OBJS = ftp.o common.o<br />
HDRS = ftp.h common.h<br />
CFLAGS = -g -O2<br />
TARGETS = ftp<br />
CC = gcc<br />
# Default Target<br />
ftp: $(OBJS) $(HDRS)<br />
$(CC) $(OBJS) -o ftp<br />
ftp.o: ftp.c $(HDRS)<br />
$(CC) $(CFLAGS) -c ftp.c<br />
common.o: common.c common.h<br />
$(CC) $(CFLAGS) -c common.c<br />
clean:<br />
rm -f $(TARGETS) $(OBJS)
CH04.fm Page 119 Monday, October 7, 2002 8:54 PM<br />
<strong>Using</strong> Variables 119<br />
You can modify this file so that it uses implicit rules to build object files. <strong>The</strong> modified file<br />
is shown below:<br />
# Variable definition<br />
OBJS = ftp.o common.o<br />
HDRS = ftp.h common.h<br />
CFLAGS = -g -O2<br />
TARGETS = ftp<br />
CC = gcc<br />
# Default Target<br />
ftp: $(OBJS) $(HDRS)<br />
$(CC) $(OBJS) -o ftp<br />
clean:<br />
rm -f $(TARGETS) $(OBJS)<br />
Note that we have completely taken out two rules that are used to build the object files.<br />
Now when make needs to build these object files, it uses its implicit rule for this purpose. Running<br />
make on this makefile produces the following result.<br />
[root@conformix make]# make<br />
gcc -g -O2 -c -o ftp.o ftp.c<br />
gcc -g -O2 -c -o common.o common.c<br />
gcc ftp.o common.o -o ftp<br />
[root@conformix make]#<br />
Note that the first two lines of the output create object files using implicit rules. You may<br />
also have noted that the CFLAGS variable is also used in this process. Like CFLAGS, implicit<br />
rules use other variables while building targets. For a more detailed discussion, please see the<br />
reference at the end of this chapter.<br />
While using implicit rules, you should be careful about the process, because make can<br />
build a target using explicit rule depending upon which source files are available. For example,<br />
make can produce an object file from a C source code file as well as Pascal source code file. In<br />
the above example, if common.c file is not present but common.p (Pascal source code file) is<br />
present in the current directory, make will invoke Pascal compiler to create common.o file,<br />
which may be wrong. You also have less control over options on implicit rules.<br />
4.3 <strong>Using</strong> Variables<br />
Variables are an important part of all makefiles used in a project. Variables are used for many<br />
purposes; the most important of which is to have structured <strong>and</strong> easily underst<strong>and</strong>able makefiles.<br />
This section contains more information about variables used in makefiles.
CH04.fm Page 120 Monday, October 7, 2002 8:54 PM<br />
120 Chapter 4 • <strong>Using</strong> GNU make<br />
4.3.1 Defining Variables<br />
Variables can be defined in a usual way by typing in the variable name, followed by an<br />
equal sign. <strong>The</strong> equal sign is followed by the value that is assigned to the variable. Note that<br />
there may be space characters on one or both sides of the equal sign. A typical variable assignment<br />
may be as follows:<br />
CFLAGS = -g –O2<br />
Another example of defining the C compiler name is as follows:<br />
CC = gcc<br />
This variable than can be used in other parts of the makefile by placing a $ sign <strong>and</strong> a pair<br />
of parenthesis or braces. <strong>The</strong> following line in a makefile is used to compile a file tftp.c <strong>and</strong><br />
create an object file tftp.o with the help of above two variables;<br />
$(CC) $(CFLAGS) –o tftp.o tftp.c<br />
This line can also be written as follows:<br />
${CC} ${CFLAGS} –o tftp.o tftp.c<br />
N O T E Variables are case sensitive in makefiles. A variable<br />
$(OUTFILES) is different from a variable $(OutFiles).<br />
4.3.2 Types of Variables<br />
<strong>The</strong>re are two types of variables. Variables defined using the = sign are recursively<br />
exp<strong>and</strong>ed variables. This means that a variable may be exp<strong>and</strong>ed depending upon value of a<br />
variable at a later stage in the makefile. Consider the following lines in a makefile.<br />
OBJ1 = ftp.o<br />
OBJ2 = common.o<br />
OBJS = $(OBJ1) $(OBJ2)<br />
printobjs:<br />
@echo $(OBJS)<br />
OBJ1 = ftp.o tftp.o<br />
Variable OBJS will contain a list of three files, ftp.o, tftp.o <strong>and</strong> common.o,<br />
although tftp.o was added after the echo comm<strong>and</strong>. Output of this makefile is as follows.<br />
[root@conformix make]# make<br />
ftp.o tftp.o common.o<br />
[root@conformix make]#<br />
This is because make used the default target rule <strong>and</strong> executed the echo comm<strong>and</strong>.<br />
Before printing out the value of the OBJS variable, it scanned the makefile to the end to re-evaluate<br />
the value of the OBJ1 variable <strong>and</strong> hence the OBJS variable.<br />
<strong>The</strong> other types of variables are simply exp<strong>and</strong>ed variables <strong>and</strong> the value of these variables<br />
is determined at the time of their definition. <strong>The</strong>se variables are defined using the := symbol
CH04.fm Page 121 Monday, October 7, 2002 8:54 PM<br />
<strong>Using</strong> Variables 121<br />
instead of just the = symbol. If we change the OBJS line in the above makefile to this type of<br />
variable, the value printed by the makefile will be as follows:<br />
[root@conformix make]# make<br />
ftp.o common.o<br />
[root@conformix make]#<br />
Now make did not take into consideration the changed value of the OBJ1 variable later in<br />
the makefile.<br />
<strong>The</strong>re are advantages <strong>and</strong> disadvantages to both types of variables. You can decide which<br />
type of variable to use in a particular situation.<br />
4.3.3 Pre-Defined Variables<br />
<strong>The</strong> make utility can also take variables from the shell environment. For example, the<br />
CFLAGS variable can be set through shell startup file (e.g. /etc/profile). If this variable is<br />
not redefined inside the makefile, its value will be taken from the environment.<br />
4.3.4 Automatic Variables<br />
Some variables are pre-defined <strong>and</strong> are called automatic variables. <strong>The</strong>y are usually very<br />
short in length but play a very important role in the decision-making process. <strong>The</strong> most commonly<br />
used automatic variables are listed below.<br />
• <strong>The</strong> $@ variable contains the value of the target of a rule.<br />
• <strong>The</strong> $< variable always contains the first dependency of a rule.<br />
• <strong>The</strong> $? variable contains a list of modified files in the dependency list. If the target is<br />
being built for the first time, it contains a list of all dependencies. Consider the<br />
following makefile.<br />
# Variable definition<br />
OBJS = ftp.o common.o<br />
HDRS = ftp.h common.h<br />
CFLAGS = -g -O2<br />
TARGETS = ftp<br />
CC = gcc<br />
# Default Target<br />
ftp: $(OBJS) $(HDRS)<br />
@echo $?<br />
@echo $@<br />
@echo $<<br />
$(CC) $(OBJS) -o ftp
CH04.fm Page 122 Monday, October 7, 2002 8:54 PM<br />
122 Chapter 4 • <strong>Using</strong> GNU make<br />
Let’s try to build the default target for the first time <strong>and</strong> see the output of these echo<br />
comm<strong>and</strong>s.<br />
[root@conformix make]# make<br />
gcc -g -O2 -c -o ftp.o ftp.c<br />
gcc -g -O2 -c -o common.o common.c<br />
ftp.o common.o ftp.h common.h<br />
ftp<br />
ftp.o<br />
gcc ftp.o common.o -o ftp<br />
[root@conformix make]#<br />
<strong>The</strong> first two lines in the output use implicit rules to build object files. <strong>The</strong> third line in the<br />
output is generated by the first echo comm<strong>and</strong> <strong>and</strong> it has a list of all the dependencies. <strong>The</strong> second<br />
echo comm<strong>and</strong> displays the fourth line in the output, which is just the name of the target, i.e.<br />
ftp. <strong>The</strong> last echo comm<strong>and</strong> prints the first dependency in the fifth line of the output.<br />
Now let us modify the common.c file <strong>and</strong> run make once again. <strong>The</strong> output will be as<br />
follows:<br />
[root@conformix make]# make<br />
gcc -g -O2 -c -o common.o common.c<br />
common.o<br />
ftp<br />
ftp.o<br />
gcc ftp.o common.o -o ftp<br />
[root@conformix make]#<br />
This time make used an implicit rule to build common.o. <strong>The</strong> important thing to note is<br />
the second line in the output, which is displayed by the first echo comm<strong>and</strong> in the makefile.<br />
This time it displayed only one file in the dependency list because common.o is the only file<br />
that is changed in the dependencies.<br />
Automatic variables are very useful in control structures <strong>and</strong> in the decision-making process<br />
when you carry out an operation based upon the result of some comparison.<br />
4.4 Working with Multiple Makefiles <strong>and</strong> Directories<br />
Until now we have used simple makefiles to build projects or targets. We used only one makefile<br />
in the project <strong>and</strong> all of the source files were present in the same directory. In real-life software<br />
development projects, we have multiple directories containing different parts of a software product.<br />
For example, one directory may contain all library files, another header files <strong>and</strong> a third one<br />
common files used by different parts. Similarly every part of the software project may have its<br />
own subdirectory.<br />
This section deals with the same source files <strong>and</strong> targets that we used earlier in this chapter.<br />
<strong>The</strong> project contains three targets to be built. <strong>The</strong>se targets are ftp, tftp <strong>and</strong> dnsresolver.<br />
We are using the same set of source files. However to demonstrate the use of multiple<br />
directories <strong>and</strong> multiple makefiles, we have created each component in a separate directory. This
CH04.fm Page 123 Monday, October 7, 2002 8:54 PM<br />
Working with Multiple Makefiles <strong>and</strong> Directories 123<br />
may not be the best example for a real-life situation, but it is well suited to demonstrate one of<br />
many possible ways to h<strong>and</strong>le such a situation. <strong>The</strong> following directory tree shows the arrangement<br />
of these files in different directories.<br />
[root@conformix make]# tree<br />
.<br />
|-- Makefile<br />
|-- common-dir<br />
| |-- Makefile<br />
| |-- common.c<br />
| `-- common.h<br />
|-- dns-dir<br />
| |-- Makefile<br />
| |-- dnsresolver.c<br />
| `-- dnsresolver.h<br />
|-- ftp-dir<br />
| |-- Makefile<br />
| |-- ftp.c<br />
| `-- ftp.h<br />
`-- tftp-dir<br />
|-- Makefile<br />
|-- tftp.c<br />
`-- tftp.h<br />
4 directories, 13 files<br />
[root@conformix make]#<br />
As you can see, you have four directories, each having its own makefile as well as source<br />
files. <strong>The</strong>re is a makefile in the top directory that is used with the make comm<strong>and</strong>. This toplevel<br />
makefile used makefiles in sub-directories. We can carry out the common tasks of building,<br />
installing <strong>and</strong> cleaning different targets while sitting in the top directory. Let’s have a look at<br />
makefile in each directory.<br />
4.4.1 Makefile in <strong>The</strong> Top Directory<br />
Makefile in the top directory is used to build all of the targets using different rules. To<br />
build a particular target, we move to the directory where source files for that target are present<br />
<strong>and</strong> run make in that directory. This makefile is shown below.<br />
###################################################<br />
# Makefile created to demonstrate use of the make<br />
# utility in the "<strong>Linux</strong> <strong>Development</strong> <strong>Platform</strong>" book.<br />
#<br />
# Author: Rafeeq Ur Rehman<br />
# rr@conformix.com<br />
###################################################<br />
# Variable definition
CH04.fm Page 124 Monday, October 7, 2002 8:54 PM<br />
124 Chapter 4 • <strong>Using</strong> GNU make<br />
FTPDIR = ftp-dir<br />
TFTPDIR = tftp-dir<br />
DNSDIR = dns-dir<br />
COMDIR = common-dir<br />
SUBDIRS = $(COMDIR) $(FTPDIR) $(TFTPDIR) $(DNSDIR)<br />
# Default Target<br />
all:<br />
@echo<br />
@echo "#######################################"<br />
@echo "### BUILDING ALL TARGETS ###"<br />
@echo "#######################################"<br />
@echo<br />
for i in $(SUBDIRS) ; do \<br />
( cd $$i ; make ) ; \<br />
done<br />
# Rules to build individual targets<br />
libs:<br />
@cd $(COMDIR) ; make<br />
ftp:<br />
@cd $(FTPDIR) ; make<br />
tftp:<br />
@cd $(TFTPDIR) ; make<br />
dnsresolver:<br />
@cd $(DNSDIR) ; make<br />
clean:<br />
rm -f *~<br />
for i in $(SUBDIRS) ; do \<br />
( cd $$i ; make clean) ; \<br />
done<br />
install:<br />
for i in $(SUBDIRS) ; do \<br />
( cd $$i ; make install); \<br />
done
CH04.fm Page 125 Monday, October 7, 2002 8:54 PM<br />
Working with Multiple Makefiles <strong>and</strong> Directories 125<br />
N O T E<br />
After defining variables, we have a rule for each target. This rule basically has two comm<strong>and</strong>s<br />
on the same line. <strong>The</strong> first comm<strong>and</strong>, cd, is used to change the directory where source<br />
files for that target are located. In the second comm<strong>and</strong>, make uses makefile in that directory to<br />
build that target. Please note that we can also use the $(MAKE) variable for this purpose.<br />
In the clean <strong>and</strong> install rules, we use the for loop to go into each directory <strong>and</strong> execute<br />
some comm<strong>and</strong>s. <strong>The</strong> for loop is explained later in this chapter.<br />
4.4.2 Makefile in common-dir Directory<br />
<strong>The</strong> files in the common-dir directory are used to build a simple library that is used by<br />
other targets at link time. <strong>The</strong> makefile in this directory is listed below:<br />
# Variable definition<br />
SRCS = common.c<br />
OBJS = common.o<br />
HDRS = common.h<br />
LIBCOMMON = libcommon.a<br />
INSTALLDIR = /root<br />
CC = gcc<br />
CFLAGS = -g -O2 -c<br />
# Default Target<br />
Please note that the following lines:<br />
ftp:<br />
@cd $(FTPDIR) ; make<br />
are not equal to the following three lines:<br />
ftp:<br />
@cd $(FTPDIR)<br />
make<br />
In the first case, make changes the directory to $(FTPDIR)<br />
<strong>and</strong> then executes the make comm<strong>and</strong> in that directory, which is<br />
the right thing to do. However in the second case, the cd comm<strong>and</strong><br />
is executed <strong>and</strong> after that the next make comm<strong>and</strong> is again<br />
executed in the current directory. <strong>The</strong> effect of the cd comm<strong>and</strong> is<br />
lost when make goes to the next line to execute the next comm<strong>and</strong>.<br />
This is because of a new instance of sub-shell. that executes<br />
comm<strong>and</strong>s in each line as discussed earlier in this chapter.<br />
$(LIBCOMMON): $(SRCS) $(HDRS)<br />
$(CC) $(CFLAGS) common.c<br />
ar -cr $(LIBCOMMON) $(OBJS)<br />
ranlib $(LIBCOMMON)
CH04.fm Page 126 Monday, October 7, 2002 8:54 PM<br />
126 Chapter 4 • <strong>Using</strong> GNU make<br />
install:<br />
cp $(LIBCOMMON) $(INSTALLDIR)<br />
clean:<br />
rm -f $(OBJS) $(LIBCOMMON) *~<br />
This makefile builds an archive library file libcommon.a, which is the default target.<br />
Note that this makefile can also be used as a st<strong>and</strong>alone in this directory so that if someone is<br />
working only on the library part of the project, he/she can use this makefile to test only the compilation<br />
<strong>and</strong> library building process. This is useful because each developer can stay in his/her<br />
own directory without building all parts of the project from the main makefile in the top directory.<br />
4.4.3 Makefile in the ftp-dir Directory<br />
<strong>The</strong> makefile in the ftp-dir directory builds the ftp target. It compiles <strong>and</strong> then statically<br />
links the object files using the library we built in common-dir directory. This makefile is<br />
shown below.<br />
# Variable definition<br />
SRCS = ftp.c<br />
OBJS = ftp.o<br />
HDRS = ftp.h<br />
CC = gcc<br />
CFLAGS = -g -O2 -c<br />
INCLUDES = -I../common-dir<br />
LDFLAGS = -static -L$(LIBSDIR)<br />
LIBSDIR = ../common-dir<br />
INSTALLDIR = /root<br />
# Default Target<br />
ftp: $(SRCS) $(HDRS)<br />
$(CC) $(CFLAGS) $(INCLUDES) ftp.c<br />
$(CC) $(LDFLAGS) $(COMMON) $(OBJS) -lcommon -o ftp<br />
install:<br />
cp ftp $(INSTALLDIR)<br />
clean:<br />
@echo "Deleting files ..."<br />
rm -f ftp $(OBJS) *~
CH04.fm Page 127 Monday, October 7, 2002 8:54 PM<br />
Working with Multiple Makefiles <strong>and</strong> Directories 127<br />
4.4.4 Makefile in the tftp-dir Directory<br />
<strong>The</strong> makefile in the tftp-dir directory builds the tftp target. It compiles <strong>and</strong> then<br />
statically links the object files using the library we built in the common-dir directory. This<br />
makefile is shown below. It also has rules to install the target <strong>and</strong> clean the directory.<br />
# Variable definition<br />
SRCS = tftp.c<br />
OBJS = tftp.o<br />
HDRS = tftp.h<br />
CC = gcc<br />
CFLAGS = -g -O2 -c<br />
INCLUDES = -I../common-dir<br />
LIBSDIR = ../common-dir<br />
LDFLAGS = -static -L$(LIBSDIR)<br />
INSTALLDIR = /root<br />
# Default Target<br />
tftp: $(SRCS) $(HDRS)<br />
$(CC) $(CFLAGS) $(INCLUDES) tftp.c<br />
$(CC) $(LDFLAGS) $(COMMON) $(OBJS) -lcommon -o tftp<br />
install:<br />
cp tftp $(INSTALLDIR)<br />
clean:<br />
@echo "Deleting files ..."<br />
rm -f tftp $(OBJS) *~<br />
4.4.5 Makefile in the dns-dir Directory<br />
<strong>The</strong> makefile in the dns-dir directory builds the dnsresolver target. It compiles <strong>and</strong><br />
then statically links the object files using the library we built in the common-dir directory.<br />
This makefile is shown below.<br />
# Variable definition<br />
SRCS = dnsresolver.c<br />
OBJS = dnsresolver.o<br />
HDRS = dnsresolver.h<br />
CC = gcc<br />
CFLAGS = -g -O2 -c<br />
INCLUDES = -I../common-dir<br />
LIBSDIR = ../common-dir<br />
LDFLAGS = -static -L$(LIBSDIR)<br />
INSTALLDIR = /root
CH04.fm Page 128 Monday, October 7, 2002 8:54 PM<br />
128 Chapter 4 • <strong>Using</strong> GNU make<br />
# Default Target<br />
dnsresolver: $(SRCS) $(HDRS)<br />
$(CC) $(CFLAGS) $(INCLUDES) dnsresolver.c<br />
$(CC) $(LDFLAGS) $(COMMON) $(OBJS) -lcommon -o dnsresolver<br />
install:<br />
cp dnsresolver $(INSTALLDIR)<br />
clean:<br />
@echo "Deleting files ..."<br />
rm -f dnsresolver $(OBJS) *~<br />
4.4.6 Building Everything<br />
After going through these makefiles, you are ready to build the targets. Go to the top<br />
directory <strong>and</strong> run the make comm<strong>and</strong> from there. It will read the makefile in the top directory<br />
<strong>and</strong> will try to build all targets. A typical output of this action is as follows:<br />
[root@conformix make]# make<br />
#######################################<br />
### BUILDING ALL TARGETS ###<br />
#######################################<br />
for i in common-dir ftp-dir tftp-dir dns-dir ; do \<br />
( cd $i ; make ) ; \<br />
done<br />
make[1]: Entering directory `/root/make/common-dir'<br />
gcc -g -O2 -c common.c<br />
ar -cr libcommon.a common.o<br />
ranlib libcommon.a<br />
make[1]: Leaving directory `/root/make/common-dir'<br />
make[1]: Entering directory `/root/make/ftp-dir'<br />
gcc -g -O2 -c -I../common-dir ftp.c<br />
gcc -static -L../common-dir ftp.o -lcommon -o ftp<br />
make[1]: Leaving directory `/root/make/ftp-dir'<br />
make[1]: Entering directory `/root/make/tftp-dir'<br />
gcc -g -O2 -c -I../common-dir tftp.c<br />
gcc -static -L../common-dir tftp.o -lcommon -o tftp<br />
make[1]: Leaving directory `/root/make/tftp-dir'<br />
make[1]: Entering directory `/root/make/dns-dir'<br />
gcc -g -O2 -c -I../common-dir dnsresolver.c<br />
gcc -static -L../common-dir dnsresolver.o -lcommon -o<br />
dnsresolver<br />
make[1]: Leaving directory `/root/make/dns-dir'<br />
[root@conformix make]#
CH04.fm Page 129 Monday, October 7, 2002 8:54 PM<br />
Working with Multiple Makefiles <strong>and</strong> Directories 129<br />
During the process of building all targets, you can see how make enters <strong>and</strong> leaves each<br />
directory <strong>and</strong> builds targets in each directory.<br />
4.4.7 Cleaning Everything<br />
<strong>The</strong> cleaning process is done the same way as we built all targets. Output of this process is<br />
shown below. Again you can see that make enters each directory, runs the make clean comm<strong>and</strong><br />
<strong>and</strong> then leaves the directory. <strong>The</strong> clean rule in makefiles present in each subdirectory is<br />
used to remove files.<br />
[root@conformix make]# make clean<br />
rm -f *~<br />
for i in common-dir ftp-dir tftp-dir dns-dir ; do \<br />
( cd $i ; make clean) ; \<br />
done<br />
make[1]: Entering directory `/root/make/common-dir'<br />
rm -f common.o libcommon.a *~<br />
make[1]: Leaving directory `/root/make/common-dir'<br />
make[1]: Entering directory `/root/make/ftp-dir'<br />
Deleting files ...<br />
rm -f ftp ftp.o *~<br />
make[1]: Leaving directory `/root/make/ftp-dir'<br />
make[1]: Entering directory `/root/make/tftp-dir'<br />
Deleting files ...<br />
rm -f tftp tftp.o *~<br />
make[1]: Leaving directory `/root/make/tftp-dir'<br />
make[1]: Entering directory `/root/make/dns-dir'<br />
Deleting files ...<br />
rm -f dnsresolver dnsresolver.o *~<br />
make[1]: Leaving directory `/root/make/dns-dir'<br />
[root@conformix make]#<br />
<strong>The</strong> make clean comm<strong>and</strong> finishes its operation after going through all subdirectories.<br />
4.4.8 Making Individual Targets<br />
Instead of using a single big makefile, you can also build individual targets using smaller<br />
makefiles. While building only one target, make will go into only that directory <strong>and</strong> build that<br />
target. <strong>The</strong> following output shows the output of the make comm<strong>and</strong> when you build only the<br />
ftp target.<br />
[root@conformix make]# make ftp<br />
make[1]: Entering directory `/root/make/ftp-dir'<br />
gcc -g -O2 -c -I../common-dir ftp.c<br />
gcc -static -L../common-dir ftp.o -lcommon -o ftp<br />
make[1]: Leaving directory `/root/make/ftp-dir'<br />
[root@conformix make]#
CH04.fm Page 130 Monday, October 7, 2002 8:54 PM<br />
130 Chapter 4 • <strong>Using</strong> GNU make<br />
4.5 Special Features of make<br />
In addition to the normal use of the make utility, it has some special features. Two of these features<br />
are discussed here that may be of interest for a common user of make. <strong>The</strong>se features are<br />
running make comm<strong>and</strong>s in parallel <strong>and</strong> running make in non-stop mode.<br />
Running multiple comm<strong>and</strong>s in parallel enhances the efficiency of make. Running make<br />
in non-stop mode is useful for very large projects where you want make to go through everything<br />
while running a comm<strong>and</strong> without stopping, even in case of errors. You can redirect the<br />
output of make to a log file which can be viewed later to find out what error occurred during the<br />
make processes of the whole project.<br />
4.5.1 Running Comm<strong>and</strong>s in Parallel<br />
Usually make runs comm<strong>and</strong>s in serial fashion. This means that one comm<strong>and</strong> is executed<br />
<strong>and</strong> when that comm<strong>and</strong> is finished, the next comm<strong>and</strong> is executed. You can ask make to<br />
run many comm<strong>and</strong>s in parallel. This is especially useful in multi-processor systems to make<br />
execution fast. <strong>The</strong> only problem with this is that when multiple comm<strong>and</strong>s are running in parallel,<br />
output from different comm<strong>and</strong>s is displayed simultaneously <strong>and</strong> can get mixed up. To run<br />
multiple comm<strong>and</strong>s in parallel, use the –j (jobs) comm<strong>and</strong> line switch with make.<br />
If you want to specify a maximum number of concurrent comm<strong>and</strong>s, a number with the<br />
–j switch may be specified. For example, -j5 on the comm<strong>and</strong> line will force make to<br />
invoke at the maximum five comm<strong>and</strong>s simultaneously. It is useful to note that in general the<br />
most efficient builds can be done with -j equal to one or two times the total number of processors<br />
on the system. Also note that make rules are followed such that all dependencies are satisfied<br />
before a target is built. This means you won't always have the maximum number of jobs<br />
running simultaneously, depending upon the way makefile is written.<br />
4.5.2 Non-Stop Execution<br />
<strong>The</strong> make utility executes each comm<strong>and</strong> while building a target. After executing the<br />
comm<strong>and</strong>, it checks the result of that comm<strong>and</strong>. If the comm<strong>and</strong> was executed successfully, it<br />
goes to the next comm<strong>and</strong> <strong>and</strong> executes it. However if the comm<strong>and</strong> does not execute successfully,<br />
make exits without executing any further comm<strong>and</strong>s. It displays an error message to show<br />
that the target can’t be built.<br />
Sometime, however, it is not important that each comm<strong>and</strong> should succeed. As an example,<br />
look at the following lines in the clean rule.<br />
clean:<br />
rm ftp<br />
rm ftp.o common.o<br />
If the ftp file is not there, the rm comm<strong>and</strong> will return a failure code. However we still<br />
want to remove other files using the rm comm<strong>and</strong> in the next line. If the rule is listed in this way<br />
<strong>and</strong> the ftp file is not present, the output of the make clean will be as follows:
CH04.fm Page 131 Monday, October 7, 2002 8:54 PM<br />
Control Structures <strong>and</strong> Directives 131<br />
[root@conformix make]# make clean<br />
rm ftp<br />
rm: cannot remove `ftp': No such file or directory<br />
make: *** [clean] Error 1<br />
[root@conformix make]#<br />
Now you can see that make did not attempt to execute the second rm comm<strong>and</strong>. To overcome<br />
this situation, you can use a hyphen at the start of the comm<strong>and</strong> whose result code should<br />
not be checked. This way make displays an error message but continues to the next comm<strong>and</strong>.<br />
<strong>The</strong> same rule with hyphen added to the first rm comm<strong>and</strong> will be as follows:<br />
clean:<br />
-rm ftp<br />
rm ftp.o common.o<br />
Now when you invoke this rule <strong>and</strong> ftp file is not present, make will do something like<br />
the following:<br />
[root@conformix make]# make clean<br />
rm ftp<br />
rm: cannot remove `ftp': No such file or directory<br />
make: [clean] Error 1 (ignored)<br />
rm ftp.o common.o<br />
[root@conformix make]#<br />
As you can see from the above output, make ignored the error <strong>and</strong> continued to the next<br />
line to remove object files.<br />
<strong>The</strong>re are other ways to ignore errors during the make process. You can also use the –i<br />
comm<strong>and</strong> line switch to ignore errors during the make process. Another method is to use<br />
.IGNORE special built-in rule to ignore errors.<br />
4.6 Control Structures <strong>and</strong> Directives<br />
Control structures inside makefiles enable you to make some logical decisions depending upon<br />
certain conditions. Make supports four types of decision-making directives as listed below:<br />
1. <strong>The</strong> ifeq directive<br />
2. <strong>The</strong> ifneq directive<br />
3. <strong>The</strong> ifdef directive<br />
4. <strong>The</strong> ifndef directive<br />
<strong>The</strong>se directives are explained next. In addition to these directives, you can also use the<br />
for control structure to execute a loop a specified number of times. Let us have a look at each<br />
of these.
CH04.fm Page 132 Monday, October 7, 2002 8:54 PM<br />
132 Chapter 4 • <strong>Using</strong> GNU make<br />
4.6.1 <strong>The</strong> ifeq Directive<br />
<strong>The</strong> ifeq directive is used to compare two values <strong>and</strong> make a decision based upon the<br />
result. <strong>The</strong> general format of this directive is as follows:<br />
ifeq (value1, value2)<br />
block if value 1 is equal to value2<br />
else<br />
block if value 1 is not equal to value2<br />
endif<br />
<strong>The</strong> else part is optional <strong>and</strong> may not be present. This structure is useful if you want to<br />
make a decision on the basis of some criteria. For example, based upon the value of type of build<br />
(temporary or final) you want to use different levels of optimization. <strong>The</strong> following code in a<br />
makefile does that.<br />
ifeq ($(BUILD), final)<br />
$(CC) -c -O2 ftp.c<br />
else<br />
$(CC) -c -O1 ftp.c<br />
endif<br />
Please note that there is no TAB character before ifeq, else <strong>and</strong> endif words.<br />
4.6.2 <strong>The</strong> ifneq Directive<br />
<strong>The</strong> ifneq directive is similar to ifeq directive. <strong>The</strong> only difference is that sense of<br />
equality is reversed. <strong>The</strong> general syntax is as follows:<br />
ifneq (value1, value2)<br />
block if value 1 is not equal to value2<br />
else<br />
block if value 1 is equal to value2<br />
endif<br />
4.6.3 <strong>The</strong> ifdef Directive<br />
<strong>The</strong> ifdef directive checks if the value of the variable is empty or not. If the variable is<br />
not empty, the ifdef block is executed, otherwise the else part is executed. <strong>The</strong> general structure<br />
of the directive is as follows:<br />
ifdef variable<br />
block if variable is non-empty<br />
else<br />
block if variable is empty<br />
endif<br />
This directive is useful to verify if a variable is defined or not. <strong>The</strong> else part is optional.
CH04.fm Page 133 Monday, October 7, 2002 8:54 PM<br />
Getting the Latest Version <strong>and</strong> Installation 133<br />
4.6.4 <strong>The</strong> ifndef Directive<br />
<strong>The</strong> ifndef directive is similar to the ifdef directive. However selection of a block of<br />
comm<strong>and</strong>s is reversed as compared to ifdef directive. Its format is as follows:<br />
ifndef variable<br />
block if variable is empty<br />
else<br />
block if variable is not empty<br />
endif<br />
4.6.5 <strong>The</strong> for Control Structure<br />
You have already used the for directive in the example of using make with multiple<br />
directories. This directive is used to perform repeated operation on multiple items. <strong>The</strong> following<br />
rule in the makefile is used to go into multiple directories <strong>and</strong> remove object files in each of<br />
these directories:<br />
SUBDIRS = ftp-dir tftp-dir common-dir<br />
clean:<br />
for dir in $(SUBDIRS) ; do \<br />
( cd $$dir ; rm *.o) ; \<br />
done<br />
Each time a new value is assigned to variable dir from the values listed by the SUBDIRS<br />
variable until all of the values are used.<br />
4.7 Getting the Latest Version <strong>and</strong> Installation<br />
Almost all of the <strong>Linux</strong> distributions come with make. <strong>The</strong> Red Hat 7.1 distribution that we<br />
have used for this book already has the latest version of make. However if you want to get the<br />
latest version of GNU make, it is available at the following FTP site.<br />
ftp://ftp.gnu.org/pub/gnu/make/<br />
This FTP site has multiple versions of the make utility. Download the latest version,<br />
which will be a zipped tar file. <strong>The</strong> latest version at the time of writing this book is 3.79.1 <strong>and</strong><br />
the filename is make-3.79.1.tar.gz.<br />
4.7.1 Compilation<br />
After downloading this file, just un-tar it into a directory using the following comm<strong>and</strong>:<br />
tar zxvf make-3.79.1.tar.gz<br />
<strong>The</strong> source files will be extracted into directory make-3.79.1. Change to this directory<br />
<strong>and</strong> run the configure script. It will create the makefiles appropriate for you. You should<br />
have some previous version of make in order to build the latest version. Use the make comm<strong>and</strong>;<br />
the default rule contains information about how to build make. Use the following com-
CH04.fm Page 134 Monday, October 7, 2002 8:54 PM<br />
134 Chapter 4 • <strong>Using</strong> GNU make<br />
m<strong>and</strong> to verify that the build process for make was successful. This comm<strong>and</strong> will show a long<br />
list of tests <strong>and</strong> the output is truncated to save space.<br />
[root@conformix make-3.79.1]# ./make check<br />
Making check in i18n<br />
make[1]: Entering directory `/opt/make-3.79.1/i18n'<br />
make[1]: Nothing to be done for `check'.<br />
make[1]: Leaving directory `/opt/make-3.79.1/i18n'<br />
make[1]: Entering directory `/opt/make-3.79.1'<br />
/opt/make-3.79.1/./make check-local<br />
make[2]: Entering directory `/opt/make-3.79.1'<br />
cd tests && perl ./run_make_tests.pl -make ../make<br />
--------------------------------------------------------<br />
Running tests for GNU make on <strong>Linux</strong> conformix.net 2.4.2-2<br />
i686<br />
GNU Make version 3.79.1<br />
--------------------------------------------------------<br />
Clearing work...<br />
Finding tests...<br />
features/comments ............................. ok<br />
features/conditionals ......................... ok<br />
features/default_names ........................ ok<br />
features/double_colon.......................... ok<br />
features/echoing .............................. ok<br />
features/errors ............................... ok<br />
features/escape ............................... ok<br />
features/include .............................. ok<br />
If these tests are successful, you have created the latest <strong>and</strong> greatest make utility. If some<br />
of the tests fail, it is an indication that some of the features are missing from this build of make.<br />
4.7.2 Installation<br />
You can install the newly created make utility using the following comm<strong>and</strong>.<br />
make install<br />
<strong>The</strong> comm<strong>and</strong> should be executed in the same directory in which you did the build process.<br />
4.8 References <strong>and</strong> Resources<br />
1. GNU Make, Richard M. Stallman <strong>and</strong> Ronald McGrath, Free Software Foundation,<br />
ISBN:1-8822114-80-9. It is also available on many websites in Postscript form.<br />
2. GNU make web site at http://www.gnu.org/software/make/make.html<br />
3. GNU make manual at http://www.gnu.org/manual/make/index.html
CH05.fm Page 135 Monday, October 7, 2002 9:00 PM<br />
C HAPTER 5<br />
Working with GNU<br />
Debugger<br />
T<br />
he debugger is one of the most important components of any development<br />
system. No programmer writes a code that works on the first<br />
attempt or that does not have any bugs in it. Most of the time you have to<br />
go through debugging processes of your programs time <strong>and</strong> again. <strong>The</strong>refore<br />
no development system is complete without a debugger. <strong>The</strong> GNU<br />
compiler, Emacs editor <strong>and</strong> other utilities work very closely with GNU<br />
debugger, also known as gdb, which is the debugger of choice of all open<br />
source developers community as well as for many commercial products.<br />
Many commercial debuggers are also built on top of GNU debugger.<br />
In addition to comm<strong>and</strong> line debugging features, you can find many GUI<br />
front ends to the GNU debugger. <strong>The</strong>se front ends include the famous<br />
xxgdb.<br />
<strong>The</strong>re are many other debuggers available in the open source community.<br />
Some of these debuggers are also introduced at the end of this chapter.<br />
This chapter provides a comprehensive working knowledge of gdb <strong>and</strong><br />
how to use it. <strong>The</strong> text is accompanied by many examples to elaborate<br />
concepts presented here. After going through this chapter you should be<br />
able to debug many types of programs.<br />
135
CH05.fm Page 136 Monday, October 7, 2002 9:00 PM<br />
136 Chapter 5 • Working with GNU Debugger<br />
5.1 Introduction to GDB<br />
GNU debugger or more commonly known as GDB is the most commonly used debugger in open<br />
source as well as commercial development on UNIX type platforms. It can be used as a native as<br />
well as cross debugger. GNU debugger supports many object file formats. <strong>The</strong> most commonly<br />
used formats are as follows:<br />
• ELF<br />
• a.out<br />
• S-record<br />
It is part of almost all of the <strong>Linux</strong> distributions available these days. In its comm<strong>and</strong> line<br />
form, it is started using the gdb comm<strong>and</strong>. <strong>The</strong> comm<strong>and</strong> provides an interactive text based<br />
prompt for the user. <strong>The</strong> default prompt for the debugger is (gdb). You can use comm<strong>and</strong>s available<br />
on this comm<strong>and</strong> prompt. Most of the comm<strong>and</strong>s can be abbreviated as long as they are not<br />
confused with any other comm<strong>and</strong>. For example, the next comm<strong>and</strong> can be used as single character<br />
n. This abbreviation will be more clear when you go through examples in this book.<br />
All examples in this book use the GNU debugger that came with RedHat 7.1. <strong>The</strong> chapter<br />
also includes information about how to get the latest version of the debugger <strong>and</strong> install it on<br />
your system.<br />
5.2 Getting Started with GDB<br />
<strong>The</strong> GNU debugger is started using the gdb comm<strong>and</strong>. Upon startup, it displays initial information<br />
about the platform. It stops at the (gdb) comm<strong>and</strong> prompt where GDB comm<strong>and</strong>s can be<br />
used. A typical GDB screen is as shown below:<br />
[rrehman@laptop gdb]$ gdb<br />
GNU gdb 5.0rh-5 Red Hat <strong>Linux</strong> 7.1<br />
Copyright 2001 Free Software Foundation, Inc.<br />
GDB is free software, covered by the GNU General Public<br />
License, <strong>and</strong> you are<br />
welcome to change it <strong>and</strong>/or distribute copies of it under<br />
certain conditions.<br />
Type "show copying" to see the conditions.<br />
<strong>The</strong>re is absolutely no warranty for GDB. Type "show warranty"<br />
for details.<br />
This GDB was configured as "i386-redhat-linux".<br />
(gdb)<br />
General help about GDB comm<strong>and</strong>s can be displayed using the help comm<strong>and</strong> on<br />
(gdb) prompt as shown below:<br />
(gdb) help<br />
List of classes of comm<strong>and</strong>s:
CH05.fm Page 137 Monday, October 7, 2002 9:00 PM<br />
Getting Started with GDB 137<br />
aliases -- Aliases of other comm<strong>and</strong>s<br />
breakpoints -- Making program stop at certain points<br />
data -- Examining data<br />
files -- Specifying <strong>and</strong> examining files<br />
internals -- Maintenance comm<strong>and</strong>s<br />
obscure -- Obscure features<br />
running -- Running the program<br />
stack -- Examining the stack<br />
status -- Status inquiries<br />
support -- Support facilities<br />
tracepoints -- Tracing of program execution without stopping<br />
the program<br />
user-defined -- User-defined comm<strong>and</strong>s<br />
Type "help" followed by a class name for a list of comm<strong>and</strong>s in<br />
that class.<br />
Type "help" followed by comm<strong>and</strong> name for full documentation.<br />
Comm<strong>and</strong> name abbreviations are allowed if unambiguous.<br />
(gdb)<br />
You can stop gdb using quit comm<strong>and</strong> on (gdb) prompt. You can also stop gdb or the<br />
current running comm<strong>and</strong> by pressing the Ctrl <strong>and</strong> C keys simultaneously.<br />
You need to open a file for debugging after starting gdb using file comm<strong>and</strong>. You can<br />
also start gdb by providing a file name on the comm<strong>and</strong> line. <strong>The</strong> following comm<strong>and</strong> starts<br />
gdb <strong>and</strong> uses a.out file for debugging purpose.<br />
gdb a.out<br />
Please note that a.out must be compiled using the –g comm<strong>and</strong> line switch with gcc<br />
compiler. If you don’t use the comm<strong>and</strong> line switch –g, no debug information will be stored in<br />
the a.out file. <strong>The</strong> typical comm<strong>and</strong> line to compile a file with debug support is as follows:<br />
gcc –g hello.c –o hello<br />
<strong>The</strong> above comm<strong>and</strong> creates an output file hello that can be used to debug hello.c<br />
program using the following comm<strong>and</strong>:<br />
gdb hello<br />
If you have started gdb without any comm<strong>and</strong> line argument, you can load a file into gdb<br />
at any time using file comm<strong>and</strong> at the (gdb) prompt.<br />
5.2.1 Most Commonly Used gdb Comm<strong>and</strong>s<br />
<strong>The</strong> most commonly used GDB comm<strong>and</strong>s are listed in Table 5-1. <strong>The</strong>se comm<strong>and</strong>s are<br />
used to start <strong>and</strong> stop gdb debugging, executing a program <strong>and</strong> displaying results. Note that you<br />
start gdb using the gdb [filename] comm<strong>and</strong> <strong>and</strong> then you get the (gdb) prompt where<br />
you can use these comm<strong>and</strong>s.<br />
Note that there is a difference between the next <strong>and</strong> the step comm<strong>and</strong>s. <strong>The</strong> next<br />
comm<strong>and</strong> will move you to the next line in the current function. If the current line is a function
CH05.fm Page 138 Monday, October 7, 2002 9:00 PM<br />
138 Chapter 5 • Working with GNU Debugger<br />
Table 5-1 Common gdb comm<strong>and</strong>s<br />
Comm<strong>and</strong><br />
run<br />
quit<br />
print expr<br />
next<br />
step<br />
continue<br />
Description<br />
Start a program execution inside gdb from the beginning<br />
Quit gdb<br />
Print expression, where expression may be a variable name<br />
Go to next line<br />
Step into next line<br />
Continue from the current place until end of program reaches or you find a break<br />
point<br />
call, it will not go into the function code <strong>and</strong> you will not see what happens inside the function<br />
code. This is equivalent to the step over action used in many debuggers. On the other h<strong>and</strong> if you<br />
use the step comm<strong>and</strong>, it will move to the next line but if the current line is a function call, it<br />
will go into the function code <strong>and</strong> will take you to the first line inside the function. This is also<br />
called a step into action in some debuggers.<br />
5.2.2 A Sample Session with gdb<br />
In this section you go through a sample gdb session. You will use the following C code in<br />
this session <strong>and</strong> will step through the code from top to bottom. This code is saved in a file<br />
sum.c <strong>and</strong> the output executable file is sum. <strong>The</strong> sum.c file is listed below.<br />
#include <br />
main ()<br />
{<br />
int num1, num2, total ;<br />
}<br />
printf("Enter first number : ");<br />
scanf("%d", &num1);<br />
printf("Enter second number : ");<br />
scanf("%d", &num2);<br />
total = num1 + num2;<br />
printf("\n<strong>The</strong> sum is : %d\n", total);<br />
As you can see, the sum.c file takes two numbers as input. It then calculates the sum <strong>and</strong><br />
displays it as st<strong>and</strong>ard output. <strong>The</strong> compilation is done using the following comm<strong>and</strong>.<br />
gcc –g sum.c –o sum
CH05.fm Page 139 Monday, October 7, 2002 9:00 PM<br />
Getting Started with GDB 139<br />
Now let us debug the output file. Note that when starting gdb, you use the output file sum<br />
on the comm<strong>and</strong> line <strong>and</strong> gdb will automatically find out the source code file name (sum.c)<br />
from the information stored inside the executable file. An explanation of different gdb comm<strong>and</strong>s<br />
is provided at the end of this debug session. Note that the next comm<strong>and</strong> is abbreviated<br />
as n in this session.<br />
[rr@conformix 5]$ gdb sum<br />
GNU gdb 5.0rh-5 Red Hat <strong>Linux</strong> 7.1<br />
Copyright 2001 Free Software Foundation, Inc.<br />
GDB is free software, covered by the GNU General Public<br />
License, <strong>and</strong> you are<br />
welcome to change it <strong>and</strong>/or distribute copies of it under<br />
certain conditions.<br />
Type "show copying" to see the conditions.<br />
<strong>The</strong>re is absolutely no warranty for GDB. Type "show warranty"<br />
for details.<br />
This GDB was configured as "i386-redhat-linux"...<br />
(gdb) list<br />
1 #include <br />
2 main ()<br />
3 {<br />
4 int num1, num2, total ;<br />
5<br />
6 printf("Enter first number : ");<br />
7 scanf("%d", &num1);<br />
8 printf("Enter second number : ");<br />
9 scanf("%d", &num2);<br />
10<br />
(gdb) list<br />
11 total = num1 + num2;<br />
12<br />
13 printf("\n<strong>The</strong> sum is : %d\n", total);<br />
14 }<br />
(gdb) list 1,14<br />
1 #include <br />
2 main ()<br />
3 {<br />
4 int num1, num2, total ;<br />
5<br />
6 printf("Enter first number : ");<br />
7 scanf("%d", &num1);<br />
8 printf("Enter second number : ");<br />
9 scanf("%d", &num2);<br />
10<br />
11 total = num1 + num2;<br />
12<br />
13 printf("\n<strong>The</strong> sum is : %d\n", total);
CH05.fm Page 140 Monday, October 7, 2002 9:00 PM<br />
140 Chapter 5 • Working with GNU Debugger<br />
}<br />
(gdb) list 5<br />
1 #include <br />
2 main ()<br />
3 {<br />
4 int num1, num2, total ;<br />
5<br />
6 printf("Enter first number : ");<br />
7 scanf("%d", &num1);<br />
8 printf("Enter second number : ");<br />
9 scanf("%d", &num2);<br />
10<br />
(gdb) list 9<br />
4 int num1, num2, total ;<br />
5<br />
6 printf("Enter first number : ");<br />
7 scanf("%d", &num1);<br />
8 printf("Enter second number : ");<br />
9 scanf("%d", &num2);<br />
10<br />
11 total = num1 + num2;<br />
12<br />
13 printf("\n<strong>The</strong> sum is : %d\n", total);<br />
gdb) break sum.c:6<br />
Breakpoint 1 at 0x8048496: file sum.c, line 6.<br />
(gdb) run<br />
Starting program: /home/rr/5/sum<br />
Breakpoint 1, main () at sum.c:6<br />
6 printf("Enter first number : ");<br />
(gdb) n<br />
7 scanf("%d", &num1);<br />
(gdb) n<br />
Enter first number : 45<br />
8 printf("Enter second number : ");<br />
(gdb) n<br />
9 scanf("%d", &num2);<br />
(gdb) n<br />
Enter second number : 56<br />
11 total = num1 + num2;<br />
(gdb) n<br />
13 printf("\n<strong>The</strong> sum is : %d\n", total);<br />
(gdb) n<br />
<strong>The</strong> sum is : 101<br />
14 }<br />
(gdb) n
CH05.fm Page 141 Monday, October 7, 2002 9:00 PM<br />
Getting Started with GDB 141<br />
Program exited with code 022.<br />
(gdb) quit<br />
[rr@conformix 5]$<br />
Here are some observations about this session.<br />
• <strong>The</strong> list comm<strong>and</strong> lists lines in the source code file <strong>and</strong> moves the pointer for listing.<br />
So the first list comm<strong>and</strong> lists lines from 1 to 10. <strong>The</strong> next list comm<strong>and</strong> lists<br />
lines from 11 to 14 where 14 is the last line.<br />
• You can use a number with the list comm<strong>and</strong>. <strong>The</strong> list comm<strong>and</strong> displays the line<br />
with the number in the middle. So the comm<strong>and</strong> list 9 will list lines from 4 to 13<br />
trying to keep line number 9 in the middle.<br />
• To list a range of lines, you can specify that range as an argument to the list<br />
comm<strong>and</strong> using a comma. For example, list 1,14 will list lines from line number 1<br />
to line number 14.<br />
• You can set a break point using the break comm<strong>and</strong> at a particular line number. When<br />
you use the run comm<strong>and</strong>, the execution will stop at the break point. It is important<br />
that you create at least one break point before using the run comm<strong>and</strong>. If you don’t do<br />
so, the program will continue to run until it reaches the end <strong>and</strong> you may not be able to<br />
debug it. More on break points will be discussed later.<br />
• After setting a break point, you can use the run comm<strong>and</strong> to start execution of the<br />
program. Note that simply loading a file into gdb does not start execution. When gdb<br />
comes across a break point, it will stop execution <strong>and</strong> you will get a(gdb) comm<strong>and</strong><br />
prompt. At this point you can start tracing the program line by line or using some other<br />
method.<br />
• <strong>The</strong> next comm<strong>and</strong> (or simply n) executes the current line <strong>and</strong> moves execution<br />
pointer to the next line. Note that the line number <strong>and</strong> the contents of line are displayed<br />
each time you use the next comm<strong>and</strong>.<br />
• When the running program needs an input, gdb will stop <strong>and</strong> you can enter the<br />
required value. For example, I have entered 45 <strong>and</strong> 56 as values for num1 <strong>and</strong> num2.<br />
• gdb will print any output when a comm<strong>and</strong> is executed that prints something on the<br />
output device. You can see the result of addition printed.<br />
•When gdb reaches the end of execution, it will print the exit code. After that you can<br />
use the quit comm<strong>and</strong> to end gdb session.<br />
This was a simple gdb session. In next sections, you will go through more examples of<br />
how to use gdb.<br />
5.2.3 Passing Comm<strong>and</strong> Line Arguments to the Program Being Debugged<br />
Many program need comm<strong>and</strong> line arguments to be passed to them at the time of execution.<br />
<strong>The</strong>re are multiple ways to pass these comm<strong>and</strong> line arguments when you debug a pro-
CH05.fm Page 142 Monday, October 7, 2002 9:00 PM<br />
142 Chapter 5 • Working with GNU Debugger<br />
gram. Let us look at the following program that prints two comm<strong>and</strong> line arguments. <strong>The</strong><br />
program prints a message if exactly two comm<strong>and</strong> line arguments are not specified. Note that<br />
this may not be the best program for this purpose <strong>and</strong> is used only to demonstrate a debugging<br />
process. <strong>The</strong> program name is arg.c <strong>and</strong> it is listed below.<br />
#include <br />
#include <br />
main (int argc, char **argv)<br />
{<br />
if (argc != 3) {<br />
printf("You have to use two comm<strong>and</strong> line arguments\n");<br />
exit(-1);<br />
}<br />
printf("This program prints two comm<strong>and</strong> line arguments\n");<br />
printf("<strong>The</strong> first argument is : %s\n", argv[1]);<br />
printf("<strong>The</strong> second argument is : %s\n", argv[2]);<br />
}<br />
You have to create an executable file, arg, from arg.c source code file. If you run this<br />
program in gdb using the run comm<strong>and</strong>, it complains about comm<strong>and</strong> line arguments <strong>and</strong> terminates<br />
as expected. This is shown below.<br />
[rr@conformix 5]$ gdb arg<br />
GNU gdb 5.0rh-5 Red Hat <strong>Linux</strong> 7.1<br />
Copyright 2001 Free Software Foundation, Inc.<br />
GDB is free software, covered by the GNU General Public<br />
License, <strong>and</strong> you are<br />
welcome to change it <strong>and</strong>/or distribute copies of it under<br />
certain conditions.<br />
Type "show copying" to see the conditions.<br />
<strong>The</strong>re is absolutely no warranty for GDB. Type "show warranty"<br />
for details.<br />
This GDB was configured as "i386-redhat-linux"...<br />
(gdb) run<br />
Starting program: /home/rr/5/arg<br />
You have to use two comm<strong>and</strong> line arguments<br />
Program exited with code 0377.<br />
(gdb)<br />
Note that no break point is set as we are not interested in stepping through the program<br />
line by line at this point.<br />
<strong>The</strong> following lines of another gdb session output show that you can specify comm<strong>and</strong><br />
line arguments with the run comm<strong>and</strong>. Any arguments for the run comm<strong>and</strong> are considered as<br />
program arguments. <strong>The</strong>se arguments are “test1” <strong>and</strong> “test2” <strong>and</strong> are printed on the screen<br />
when you run the program.
CH05.fm Page 143 Monday, October 7, 2002 9:00 PM<br />
Getting Started with GDB 143<br />
[rr@conformix 5]$ gdb arg<br />
GNU gdb 5.0rh-5 Red Hat <strong>Linux</strong> 7.1<br />
Copyright 2001 Free Software Foundation, Inc.<br />
GDB is free software, covered by the GNU General Public<br />
License, <strong>and</strong> you are<br />
welcome to change it <strong>and</strong>/or distribute copies of it under<br />
certain conditions.<br />
Type "show copying" to see the conditions.<br />
<strong>The</strong>re is absolutely no warranty for GDB. Type "show warranty"<br />
for details.<br />
This GDB was configured as "i386-redhat-linux"...<br />
(gdb) run test1 test2<br />
Starting program: /home/rr/5/arg test1 test2<br />
This program prints two comm<strong>and</strong> line arguments<br />
<strong>The</strong> first argument is : test1<br />
<strong>The</strong> second argument is : test2<br />
Program exited with code 037.<br />
(gdb)<br />
Another method is to set the arguments using the set comm<strong>and</strong> as done in the following<br />
gdb session. You can display current arguments using the show comm<strong>and</strong>, which is also<br />
present in this gdb session. After setting the arguments, you can use the run comm<strong>and</strong> to start<br />
executing the program.<br />
[rr@conformix 5]$ gdb arg<br />
GNU gdb 5.0rh-5 Red Hat <strong>Linux</strong> 7.1<br />
Copyright 2001 Free Software Foundation, Inc.<br />
GDB is free software, covered by the GNU General Public<br />
License, <strong>and</strong> you are<br />
welcome to change it <strong>and</strong>/or distribute copies of it under<br />
certain conditions.<br />
Type "show copying" to see the conditions.<br />
<strong>The</strong>re is absolutely no warranty for GDB. Type "show warranty"<br />
for details.<br />
This GDB was configured as "i386-redhat-linux"...<br />
(gdb) set args test1 test2<br />
(gdb) show args<br />
Argument list to give program being debugged when it is<br />
started is "test1 test2".<br />
(gdb) run<br />
Starting program: /home/rr/5/arg test1 test2<br />
This program prints two comm<strong>and</strong> line arguments<br />
<strong>The</strong> first argument is : test1<br />
<strong>The</strong> second argument is : test2<br />
Program exited with code 037.<br />
(gdb)
CH05.fm Page 144 Monday, October 7, 2002 9:00 PM<br />
144 Chapter 5 • Working with GNU Debugger<br />
5.3 Controlling Execution<br />
Now you are already familiar with some of the gdb comm<strong>and</strong>s used for controlling execution of<br />
a program. <strong>The</strong> comm<strong>and</strong>s you have already used are run, quit <strong>and</strong> next comm<strong>and</strong>s. In this<br />
section you will learn some more comm<strong>and</strong>s that can be used to control execution of the program.<br />
<strong>The</strong> most commonly used comm<strong>and</strong>s to control execution of a program in gdb are as follows:<br />
• <strong>The</strong> run comm<strong>and</strong> is used to start execution of a program. If the program is already<br />
running, you can restart the execution right from the beginning using the run<br />
comm<strong>and</strong>.<br />
• <strong>The</strong> quit comm<strong>and</strong> will quit the debugger.<br />
• <strong>The</strong> kill comm<strong>and</strong> stops debugging but does not quit the debugger.<br />
• <strong>The</strong> continue comm<strong>and</strong> starts executing program from the current position. <strong>The</strong><br />
difference between the continue <strong>and</strong> run comm<strong>and</strong>s is that the run comm<strong>and</strong>s<br />
starts execution from the entry point of the program while the continue comm<strong>and</strong><br />
starts execution from the current location.<br />
• <strong>The</strong> next comm<strong>and</strong> goes to the next line in the code. If the current line is a function<br />
call, it completes the function call without going into the function code.<br />
• <strong>The</strong> step comm<strong>and</strong> goes to the next line in the code. If the current line is a function<br />
call, it goes to the first line inside that function.<br />
• <strong>The</strong> finish comm<strong>and</strong> takes you out of the function call, if you are already inside one.<br />
• <strong>The</strong> return comm<strong>and</strong> returns to the caller of the current frame in the stack. This<br />
means that you can return from a function without actually completing the function<br />
code execution.<br />
<strong>The</strong>re are many ways to control execution of a program. Mastery of these methods is necessary<br />
to debug a program more efficiently.<br />
5.3.1 <strong>The</strong> step <strong>and</strong> finish Comm<strong>and</strong>s<br />
Here we have a short demonstration of how to use finish <strong>and</strong> step comm<strong>and</strong>s when<br />
you are dealing with a function. Consider the following sumf.c program that adds two numbers<br />
<strong>and</strong> prints the result of addition. <strong>The</strong> addition is completed inside a function called sum().<br />
#include <br />
int sum(int num1, int num2);<br />
main ()<br />
{<br />
int num1, num2, total ;<br />
printf("Enter first number : ");<br />
scanf("%d", &num1);
CH05.fm Page 145 Monday, October 7, 2002 9:00 PM<br />
Controlling Execution 145<br />
}<br />
printf("Enter second number : ");<br />
scanf("%d", &num2);<br />
total = sum(num1, num2);<br />
printf("\n<strong>The</strong> sum is : %d\n", total);<br />
int sum(int num1, int num2)<br />
{<br />
int result;<br />
result = num1 + num2 ;<br />
printf("\nCalculation complete. Returning ...\n");<br />
return (result);<br />
}<br />
Let us create an executable sumf from this source code using the gcc compiler. This executable<br />
then can be debugged using GNU debugger as shown in the next session. Note that we<br />
use the step comm<strong>and</strong> (abbreviated as s) to step into the function code. We use the finish<br />
comm<strong>and</strong> to complete execution of code in the function sum() instead of tracing it line by line.<br />
After the finish comm<strong>and</strong> is executed, you go to the next line in the main() function just<br />
after the call to the sum() function.<br />
[rr@conformix 5]$ gdb sumf<br />
GNU gdb 5.0rh-5 Red Hat <strong>Linux</strong> 7.1<br />
Copyright 2001 Free Software Foundation, Inc.<br />
GDB is free software, covered by the GNU General Public<br />
License, <strong>and</strong> you are<br />
welcome to change it <strong>and</strong>/or distribute copies of it under<br />
certain conditions.<br />
Type "show copying" to see the conditions.<br />
<strong>The</strong>re is absolutely no warranty for GDB. Type "show warranty"<br />
for details.<br />
This GDB was configured as "i386-redhat-linux"...<br />
(gdb) bre main<br />
Breakpoint 1 at 0x8048496: file sumf.c, line 9.<br />
(gdb) run<br />
Starting program: /home/rr/5/sumf<br />
Breakpoint 1, main () at sumf.c:9<br />
9 printf("Enter first number : ");<br />
(gdb) n<br />
10 scanf("%d", &num1);<br />
(gdb) n<br />
Enter first number : 4<br />
11 printf("Enter second number : ");<br />
(gdb) n<br />
12 scanf("%d", &num2);<br />
(gdb) n
CH05.fm Page 146 Monday, October 7, 2002 9:00 PM<br />
146 Chapter 5 • Working with GNU Debugger<br />
Enter second number : 5<br />
14 total = sum(num1, num2);<br />
(gdb) s<br />
sum (num1=4, num2=5) at sumf.c:21<br />
21 result = num1 + num2 ;<br />
(gdb) finish<br />
Run till exit from #0 sum (num1=4, num2=5) at sumf.c:21<br />
Calculation complete. Returning ...<br />
0x080484ec in main () at sumf.c:14<br />
14 total = sum(num1, num2);<br />
Value returned is $1 = 9<br />
(gdb) n<br />
15 printf("\n<strong>The</strong> sum is : %d\n", total);<br />
(gdb) n<br />
<strong>The</strong> sum is : 9<br />
16}<br />
(gdb) n<br />
Program exited with code 020.<br />
(gdb)<br />
As you can see from the above example, all gdb comm<strong>and</strong>s can be abbreviated as long as<br />
they can’t be confused with any other comm<strong>and</strong>. You can use n for next, bre for the break<br />
comm<strong>and</strong> <strong>and</strong> s for the step comm<strong>and</strong>. Also note that when you return from the function call,<br />
the return value of the function is displayed.<br />
5.4 Working with the Stack<br />
One of the most important tasks during the debugging process is to deal with the stack. <strong>The</strong><br />
stack provides a lot of information about what happened in the past. You can backtrace to higher<br />
levels in the stack using gdb. <strong>Using</strong> the backtrace feature, you can move step-by-step backward<br />
to find out how you reached the current position. To demonstrate some of the comm<strong>and</strong>s used<br />
with stack, let us take the example of sumf.c program that you used in the last section. <strong>The</strong><br />
program takes two numbers as input <strong>and</strong> then calls a function to sum() to add these two numbers.<br />
<strong>The</strong> function returns the result back to the main function.<br />
When you start debugging this program, first you set up a break point right at the beginning<br />
of the main function <strong>and</strong> then use the next comm<strong>and</strong> repeatedly until you reach the line<br />
where the function is called. At this point you use the step comm<strong>and</strong> instead of the next comm<strong>and</strong><br />
to move into the function code. After entering the function code, some other comm<strong>and</strong>s<br />
related to stack are used in the following gdb session. <strong>The</strong>se comm<strong>and</strong>s are explained at the end<br />
of this session listing.
CH05.fm Page 147 Monday, October 7, 2002 9:00 PM<br />
Working with the Stack 147<br />
[rr@conformix 5]$ gdb sumf<br />
GNU gdb 5.0rh-5 Red Hat <strong>Linux</strong> 7.1<br />
Copyright 2001 Free Software Foundation, Inc.<br />
GDB is free software, covered by the GNU General Public<br />
License, <strong>and</strong> you are<br />
welcome to change it <strong>and</strong>/or distribute copies of it under<br />
certain conditions.<br />
Type "show copying" to see the conditions.<br />
<strong>The</strong>re is absolutely no warranty for GDB. Type "show warranty"<br />
for details.<br />
This GDB was configured as "i386-redhat-linux"...<br />
(gdb) break main<br />
Breakpoint 1 at 0x8048496: file sumf.c, line 9.<br />
(gdb) run<br />
Starting program: /home/rr/5/sumf<br />
Breakpoint 1, main () at sumf.c:9<br />
9 printf("Enter first number : ");<br />
(gdb) next<br />
10 scanf("%d", &num1);<br />
(gdb) next<br />
Enter first number : 30<br />
11 printf("Enter second number : ");<br />
(gdb) next<br />
12 scanf("%d", &num2);<br />
(gdb) next<br />
Enter second number : 40<br />
14 total = sum(num1, num2);<br />
(gdb) step<br />
sum (num1=30, num2=40) at sumf.c:21<br />
21 result = num1 + num2 ;<br />
(gdb) next<br />
22 printf("\nCalculation complete. Returning ...\n");<br />
(gdb) frame<br />
#0 sum (num1=30, num2=40) at sumf.c:22<br />
22 printf("\nCalculation complete. Returning ...\n");<br />
(gdb) info frame<br />
Stack level 0, frame at 0xbffffa08:<br />
eip = 0x804851b in sum (sumf.c:22); saved eip 0x80484ec<br />
called by frame at 0xbffffa38<br />
source language c.<br />
Arglist at 0xbffffa08, args: num1=30, num2=40<br />
Locals at 0xbffffa08, Previous frame's sp is 0x0<br />
Saved registers:<br />
ebp at 0xbffffa08, eip at 0xbffffa0c<br />
(gdb) info args<br />
num1 = 30<br />
num2 = 40
CH05.fm Page 148 Monday, October 7, 2002 9:00 PM<br />
148 Chapter 5 • Working with GNU Debugger<br />
(gdb) info locals<br />
result = 70<br />
(gdb) info reg<br />
eax<br />
0x4670<br />
ecx<br />
0x00<br />
edx<br />
0x401548e01075136736<br />
ebx<br />
0x401569e41075145188<br />
esp<br />
0xbffffa000xbffffa00<br />
ebp<br />
0xbffffa080xbffffa08<br />
esi<br />
0x40016b641073834852<br />
edi<br />
0xbffffaac-1073743188<br />
eip<br />
0x804851b0x804851b<br />
eflags<br />
0x312786<br />
cs<br />
0x2335<br />
ss<br />
0x2b43<br />
ds<br />
0x2b43<br />
es<br />
0x2b43<br />
fs<br />
0x00<br />
gs<br />
0x00<br />
fctrl<br />
0x37f895<br />
fstat<br />
0x00<br />
ftag<br />
0xffff65535<br />
fiseg<br />
0x2335<br />
fioff<br />
0x404b42151078673941<br />
foseg<br />
0x2b43<br />
fooff<br />
0x404c69681078749544<br />
fop<br />
0x2e9745<br />
(gdb) info all-reg<br />
eax<br />
0x4670<br />
ecx<br />
0x00<br />
edx<br />
0x401548e01075136736<br />
ebx<br />
0x401569e41075145188<br />
esp<br />
0xbffffa000xbffffa00<br />
ebp<br />
0xbffffa080xbffffa08<br />
esi<br />
0x40016b641073834852<br />
edi<br />
0xbffffaac-1073743188<br />
eip<br />
0x804851b0x804851b<br />
eflags<br />
0x312786<br />
cs<br />
0x2335<br />
ss<br />
0x2b43<br />
ds<br />
0x2b43<br />
es<br />
0x2b43<br />
fs<br />
0x00<br />
gs<br />
0x00<br />
st0 0(raw 0x00000000000000000000)<br />
st1 0(raw 0x00000000000000000000)<br />
st2 0(raw 0x00000000000000000000)<br />
st3 0(raw 0x00000000000000000000)
CH05.fm Page 149 Monday, October 7, 2002 9:00 PM<br />
Working with the Stack 149<br />
st4 0(raw 0x00000000000000000000)<br />
st5 0(raw 0x00000000000000000000)<br />
st6<br />
1.147239263803680981573807073914395(raw<br />
0x3fff92d8bc775ca99ea0)<br />
st7<br />
3(raw 0x4000c000000000000000)<br />
fctrl<br />
0x37f895<br />
fstat<br />
0x00<br />
ftag<br />
0xffff65535<br />
fiseg<br />
0x2335<br />
fioff<br />
0x404b42151078673941<br />
foseg<br />
0x2b43<br />
fooff<br />
0x404c69681078749544<br />
fop<br />
0x2e9745<br />
(gdb) backtrace<br />
#0 sum (num1=30, num2=40) at sumf.c:22<br />
#1 0x080484ec in main () at sumf.c:14<br />
#2 0x40048177 in __libc_start_main (main=0x8048490 ,<br />
argc=1, ubp_av=0xbffffaac, init=0x8048308 ,<br />
fini=0x8048580 , rtld_fini=0x4000e184 ,<br />
stack_end=0xbffffa9c)<br />
at ../sysdeps/generic/libc-start.c:129<br />
(gdb) info frame<br />
Stack level 0, frame at 0xbffffa08:<br />
eip = 0x804851b in sum (sumf.c:22); saved eip 0x80484ec<br />
called by frame at 0xbffffa38<br />
source language c.<br />
Arglist at 0xbffffa08, args: num1=30, num2=40<br />
Locals at 0xbffffa08, Previous frame's sp is 0x0<br />
Saved registers:<br />
ebp at 0xbffffa08, eip at 0xbffffa0c<br />
(gdb) up<br />
#1 0x080484ec in main () at sumf.c:14
CH05.fm Page 150 Monday, October 7, 2002 9:00 PM<br />
150 Chapter 5 • Working with GNU Debugger<br />
14 total = sum(num1, num2);<br />
(gdb) info frame<br />
Stack level 1, frame at 0xbffffa38:<br />
eip = 0x80484ec in main (sumf.c:14); saved eip 0x40048177<br />
called by frame at 0xbffffa78, caller of frame at 0xbffffa08<br />
source language c.<br />
Arglist at 0xbffffa38, args:<br />
Locals at 0xbffffa38, Previous frame's sp is 0x0<br />
Saved registers:<br />
ebp at 0xbffffa38, eip at 0xbffffa3c<br />
(gdb) down<br />
#0 sum (num1=30, num2=40) at sumf.c:22<br />
22 printf("\nCalculation complete. Returning ...\n");<br />
(gdb) info frame<br />
Stack level 0, frame at 0xbffffa08:<br />
eip = 0x804851b in sum (sumf.c:22); saved eip 0x80484ec<br />
called by frame at 0xbffffa38<br />
source language c.<br />
Arglist at 0xbffffa08, args: num1=30, num2=40<br />
Locals at 0xbffffa08, Previous frame's sp is 0x0<br />
Saved registers:<br />
ebp at 0xbffffa08, eip at 0xbffffa0c<br />
(gdb) down<br />
Bottom (i.e., innermost) frame selected; you cannot go down.<br />
(gdb) n<br />
Calculation complete. Returning ...<br />
23 return (result);<br />
(gdb) n<br />
24}<br />
(gdb) n<br />
main () at sumf.c:15<br />
15 printf("\n<strong>The</strong> sum is : %d\n", total);<br />
(gdb) n<br />
<strong>The</strong> sum is : 70<br />
16}<br />
(gdb) n<br />
Program exited with code 021.<br />
(gdb) quit<br />
[rr@conformix 5]$<br />
• <strong>The</strong> frame comm<strong>and</strong> shows the current frame of execution for the program. In simple<br />
terms, you can consider a frame as a block of comm<strong>and</strong>s. For example, comm<strong>and</strong>s in<br />
one function are a frame. When you use the frame comm<strong>and</strong>, it displays the current<br />
frame starting point, the file name <strong>and</strong> current execution pointer.
CH05.fm Page 151 Monday, October 7, 2002 9:00 PM<br />
Displaying Variables 151<br />
• <strong>The</strong> info frame comm<strong>and</strong> shows more information about the current frame,<br />
including some register values. It also shows the stack pointer for the previous frame.<br />
<strong>The</strong>se values are taken from the stack.<br />
• <strong>The</strong> info args comm<strong>and</strong> displays arguments passed to this frame. This is also taken<br />
from the stack.<br />
• <strong>The</strong> info locals comm<strong>and</strong> displays the values of local variables. <strong>The</strong>se variable<br />
have a scope limited to the current frame.<br />
• <strong>The</strong> info reg comm<strong>and</strong> displays values of register values.<br />
• <strong>The</strong> info all-reg comm<strong>and</strong> displays register values, including math registers.<br />
• <strong>The</strong> up comm<strong>and</strong> takes you one level up in the stack. This means if you are inside a<br />
function call, the up comm<strong>and</strong> will take you to the function that called the current<br />
function. <strong>The</strong> down comm<strong>and</strong> is opposite to the up comm<strong>and</strong>.<br />
• You can use backtrace, up <strong>and</strong> down comm<strong>and</strong>s to move around in different<br />
frames. <strong>The</strong>se comm<strong>and</strong>s are useful for looking into stack data.<br />
A combination of all of these comm<strong>and</strong>s used with other execution control comm<strong>and</strong> can<br />
be used to display a lot of information. If you want to effectively use GNU debugger, knowledge<br />
of comm<strong>and</strong>s related to stack is a must.<br />
5.5 Displaying Variables<br />
<strong>Using</strong> the GNU debugger, you can display environment variables as well as your program variables<br />
during the program execution. You can control display of some variables so that the value<br />
of these variables is displayed with each comm<strong>and</strong>. <strong>Using</strong> this feature you can easily track<br />
changes taking place to these variables when you step through the program. You can also modify<br />
the program as well as environment variables. This section shows examples of how to carry out<br />
these tasks.<br />
5.5.1 Displaying Program Variables<br />
<strong>The</strong> following session uses the sum.c program that you already used earlier in this chapter.<br />
Go through the following gdb session <strong>and</strong> then see the discussion at the end of this session<br />
about actions taking place.<br />
[rr@conformix 5]$ gdb sum<br />
GNU gdb 5.0rh-5 Red Hat <strong>Linux</strong> 7.1<br />
Copyright 2001 Free Software Foundation, Inc.<br />
GDB is free software, covered by the GNU General Public<br />
License, <strong>and</strong> you are<br />
welcome to change it <strong>and</strong>/or distribute copies of it under<br />
certain conditions.<br />
Type "show copying" to see the conditions.<br />
<strong>The</strong>re is absolutely no warranty for GDB. Type "show warranty"<br />
for details.
CH05.fm Page 152 Monday, October 7, 2002 9:00 PM<br />
152 Chapter 5 • Working with GNU Debugger<br />
This GDB was configured as "i386-redhat-linux"...<br />
(gdb) break main<br />
Breakpoint 1 at 0x8048496: file sum.c, line 6.<br />
(gdb) run<br />
Starting program: /home/rr/5/sum<br />
Breakpoint 1, main () at sum.c:6<br />
6 printf("Enter first number : ");<br />
(gdb) print num2<br />
$1 = 134518424<br />
(gdb) print total<br />
$2 = 134513777<br />
(gdb) n<br />
7 scanf("%d", &num1);<br />
(gdb) n<br />
Enter first number : 45<br />
8 printf("Enter second number : ");<br />
(gdb) n<br />
9 scanf("%d", &num2);<br />
(gdb) n<br />
Enter second number : 33<br />
11 total = num1 + num2;<br />
(gdb) print num2<br />
$3 = 33<br />
(gdb) n<br />
13 printf("\n<strong>The</strong> sum is : %d\n", total);<br />
(gdb) n<br />
<strong>The</strong> sum is : 78<br />
14}<br />
(gdb) n<br />
Program exited with code 021.<br />
(gdb)<br />
• First set a break point where function main starts.<br />
• Start the program execution using the run comm<strong>and</strong>.<br />
• Print values of num2 <strong>and</strong> total variables. Since these variables are not yet initialized,<br />
r<strong>and</strong>om numbers are present at these two locations.<br />
• Execute the program line by line <strong>and</strong> enter values of num1 <strong>and</strong> num2 variables <strong>and</strong><br />
then calculate the value of total.<br />
• Print the value of num2 variable which is now exactly what you have entered.<br />
Note that in this session, gdb does not display the values of variables automatically when<br />
a value changes. You have to use the print comm<strong>and</strong> again <strong>and</strong> again to display variable values.<br />
In the next section, you will see how to display these values automatically.
CH05.fm Page 153 Monday, October 7, 2002 9:00 PM<br />
Displaying Variables 153<br />
5.5.2 Automatic Displaying Variables with Each Comm<strong>and</strong><br />
<strong>The</strong> display comm<strong>and</strong> displays the value of a variable <strong>and</strong> keeps a record of the variable<br />
so that its value is displayed after each comm<strong>and</strong>. <strong>The</strong> following session shows how this<br />
feature works. This is an easy way to closely watch the value of variables with the execution of<br />
each line of code. It is especially useful when you are tracing through a loop where you need to<br />
know the values of some variables in each cycle.<br />
[rr@conformix 5]$ gdb sum<br />
GNU gdb 5.0rh-5 Red Hat <strong>Linux</strong> 7.1<br />
Copyright 2001 Free Software Foundation, Inc.<br />
GDB is free software, covered by the GNU General Public<br />
License, <strong>and</strong> you are<br />
welcome to change it <strong>and</strong>/or distribute copies of it under<br />
certain conditions.<br />
Type "show copying" to see the conditions.<br />
<strong>The</strong>re is absolutely no warranty for GDB. Type "show warranty"<br />
for details.<br />
This GDB was configured as "i386-redhat-linux"...<br />
(gdb) break main<br />
Breakpoint 1 at 0x8048496: file sum.c, line 6.<br />
(gdb) run<br />
Starting program: /home/rr/5/sum<br />
Breakpoint 1, main () at sum.c:6<br />
6 printf("Enter first number : ");<br />
(gdb) display num1<br />
1: num1 = 134518424<br />
(gdb) disp total<br />
2: total = 134513777<br />
(gdb) n<br />
7 scanf("%d", &num1);<br />
2: total = 134513777<br />
1: num1 = 134518424<br />
(gdb) n<br />
Enter first number : 3<br />
8 printf("Enter second number : ");<br />
2: total = 134513777<br />
1: num1 = 3<br />
(gdb) n<br />
9 scanf("%d", &num2);<br />
2: total = 134513777<br />
1: num1 = 3<br />
(gdb) n<br />
Enter second number : 67<br />
11 total = num1 + num2;<br />
2: total = 134513777<br />
1: num1 = 3
CH05.fm Page 154 Monday, October 7, 2002 9:00 PM<br />
154 Chapter 5 • Working with GNU Debugger<br />
(gdb) n<br />
13 printf("\n<strong>The</strong> sum is : %d\n", total);<br />
2: total = 70<br />
1: num1 = 3<br />
(gdb) n<br />
<strong>The</strong> sum is : 70<br />
14}<br />
2: total = 70<br />
1: num1 = 3<br />
(gdb) n<br />
Program exited with code 021.<br />
(gdb)<br />
You can use the following comm<strong>and</strong>s to control the display of variables <strong>and</strong> get information<br />
about variables that are being displayed.<br />
• <strong>The</strong> undisplay comm<strong>and</strong> removes a variable from the list of displayed items.<br />
• <strong>The</strong> disable display comm<strong>and</strong> keeps the variable in the display list but disables<br />
its continuous display.<br />
• <strong>The</strong> enable display comm<strong>and</strong> enables display of a variable that was previously<br />
disabled.<br />
• <strong>The</strong> info display comm<strong>and</strong> displays a list of expressions or variables currently in<br />
the display list.<br />
5.5.3 Displaying Environment Variables<br />
Environment variables play a significant role in debugging a program. <strong>The</strong>y are used to<br />
locate files <strong>and</strong> other tasks related to the file system as well as shell comm<strong>and</strong> execution. <strong>The</strong><br />
following comm<strong>and</strong> displays the value of the PATH variable:<br />
(gdb) show path<br />
Executable <strong>and</strong> object file path: /usr/kerberos/bin:/bin:/usr/<br />
bin:/usr/local/bin:/usr/bin/X11:/usr/X11R6/bin<br />
<strong>The</strong> following comm<strong>and</strong> shows the current directory:<br />
(gdb) pwd<br />
Working directory /home/rr/5.<br />
All environment variables can be displayed using the following comm<strong>and</strong>:<br />
(gdb) show environment<br />
PWD=/home/rr/5<br />
HOSTNAME=conformix.conformix.net<br />
PVM_RSH=/usr/bin/rsh<br />
QTDIR=/usr/lib/qt-2.3.0<br />
LESSOPEN=|/usr/bin/lesspipe.sh %s
CH05.fm Page 155 Monday, October 7, 2002 9:00 PM<br />
Displaying Variables 155<br />
XPVM_ROOT=/usr/share/pvm3/xpvm<br />
KDEDIR=/usr<br />
USER=rr<br />
LS_COLORS=no=00:fi=00:di=01;34:ln=01;36:pi=40;33:so=01;35:bd=4<br />
0;33;01:cd=40;33;01:or=01;05;37;41:mi=01;05;37;41:ex=01;32:*.c<br />
md=01;32:*.exe=01;32:*.com=01;32:*.btm=01;32:*.bat=01;32:*.sh=<br />
01;32:*.csh=01;32:*.tar=01;31:*.tgz=01;31:*.arj=01;31:*.taz=01<br />
;31:*.lzh=01;31:*.zip=01;31:*.z=01;31:*.Z=01;31:*.gz=01;31:*.b<br />
z2=01;31:*.bz=01;31:*.tz=01;31:*.rpm=01;31:*.cpio=01;31:*.jpg=<br />
01;35:*.gif=01;35:*.bmp=01;35:*.xbm=01;35:*.xpm=01;35:*.png=01<br />
;35:*.tif=01;35:<br />
MACHTYPE=i386-redhat-linux-gnu<br />
OLDPWD=/home/rr<br />
MAIL=/var/spool/mail/rr<br />
INPUTRC=/etc/inputrc<br />
BASH_ENV=/home/rr/.bashrc<br />
LANG=en_US<br />
DISPLAY=192.168.2.115:1<br />
LOGNAME=rr<br />
SHLVL=1<br />
SHELL=/bin/bash<br />
HOSTTYPE=i386<br />
OSTYPE=linux-gnu<br />
HISTSIZE=1000<br />
LAMHELPFILE=/etc/lam/lam-helpfile<br />
PVM_ROOT=/usr/share/pvm3<br />
TERM=xterm<br />
HOME=/home/rr<br />
SSH_ASKPASS=/usr/libexec/openssh/gnome-ssh-askpass<br />
PATH=/usr/kerberos/bin:/bin:/usr/bin:/usr/local/bin:/usr/bin/<br />
X11:/usr/X11R6/bin<br />
_=/usr/bin/gdb<br />
(gdb)<br />
You can also use the set env comm<strong>and</strong> <strong>and</strong> the unset env comm<strong>and</strong> to modify environment<br />
variables or to create or delete variables.<br />
5.5.4 Modifying Variables<br />
<strong>Using</strong> the set comm<strong>and</strong>, you can modify any program variable during the debugging<br />
process. <strong>The</strong> following session shows an example where you entered a value 34 for program<br />
variable num1 but modified it to 11 using set comm<strong>and</strong> before the sum was calculated. You<br />
can see that the sum calculation process takes into account the new value.<br />
Enter first number : 34<br />
11 printf("Enter second number : ");<br />
(gdb) n<br />
12 scanf("%d", &num2);
CH05.fm Page 156 Monday, October 7, 2002 9:00 PM<br />
156 Chapter 5 • Working with GNU Debugger<br />
(gdb) n<br />
Enter second number : 12<br />
14 total = sum(num1, num2);<br />
(gdb) print num1<br />
$1 = 34<br />
(gdb) set num1=11<br />
(gdb) print num1<br />
$2 = 11<br />
(gdb) print num2<br />
$3 = 12<br />
(gdb) n<br />
Calculation complete. Returning ...<br />
15 printf("\n<strong>The</strong> sum is : %d\n", total);<br />
(gdb) n<br />
<strong>The</strong> sum is : 23<br />
16 }<br />
(gdb)<br />
5.6 Adding Break Points<br />
When you start debugging a program, you use the run comm<strong>and</strong>. This comm<strong>and</strong> executes the<br />
program until the end of the program or a break point is met. A break point is a place in your<br />
source code file where you temporarily want to stop execution of the program being debugged.<br />
Break points in GNU debugger can be placed using the break comm<strong>and</strong>. Look at the following<br />
list of the source code file sum.c which you already have used:<br />
(gdb) list<br />
1 #include <br />
2 main ()<br />
3 {<br />
4 int num1, num2, total ;<br />
5<br />
6 printf("Enter first number : ");<br />
7 scanf("%d", &num1);<br />
8 printf("Enter second number : ");<br />
9 scanf("%d", &num2);<br />
10<br />
(gdb)<br />
To place a break point at line number 6 in file sum.c (displayed above), you can use the<br />
following comm<strong>and</strong>:<br />
(gdb) break sum.c:6<br />
Breakpoint 1 at 0x8048496: file sum.c, line 6.<br />
(gdb)
CH05.fm Page 157 Monday, October 7, 2002 9:00 PM<br />
Adding Break Points 157<br />
As you can see from the above lines, when you set a break point, GNU debugger will display<br />
its information in the next line. This information contains the number of the breakpoint,<br />
memory address, file name <strong>and</strong> line number. You can also see a list of currently set break points<br />
using the following comm<strong>and</strong>:<br />
(gdb) info break<br />
Num Type Disp Enb Address What<br />
1 breakpoint keep y 0x08048496 in main at sum.c:6<br />
(gdb)<br />
Break points can also be set on function names. <strong>The</strong> following comm<strong>and</strong> sets a break point<br />
where function main starts:<br />
(gdb) break main<br />
Breakpoint 1 at 0x8048496: file sum.c, line 6.<br />
(gdb)<br />
Note that although the function main() starts at line number 2, the break point is set at<br />
line number 6. This is because the first executable instruction of the function main is located at<br />
this line number.<br />
You can also set a break point at a particular line number in the currently loaded file. <strong>The</strong><br />
following comm<strong>and</strong> creates a break point at line number 8:<br />
(gdb) break 8<br />
Breakpoint 2 at 0x80484ba: file sum.c, line 8.<br />
(gdb)<br />
In a multi-source file project, you set up a break point by including the file name <strong>and</strong> line<br />
number on the comm<strong>and</strong> line. <strong>The</strong> following comm<strong>and</strong> sets up a break point at line number 9 in<br />
file sum.c.<br />
(gdb) break sum.c:9<br />
Breakpoint 3 at 0x80484ca: file sum.c, line 9.<br />
(gdb)<br />
You can also use an offset value to set up a break point. For example if the execution<br />
pointer is on line number 6, you can set up a break point at line number 9 using the following<br />
comm<strong>and</strong>. Note that you can also use a minus symbol to specify an offset.<br />
6 printf("Enter first number : ");<br />
(gdb) break +3<br />
Note: breakpoint 3 also set at pc 0x80484ca.<br />
Breakpoint 4 at 0x80484ca: file sum.c, line 9.<br />
(gdb)<br />
All break points can be displayed using the info comm<strong>and</strong>. <strong>The</strong> following comm<strong>and</strong> displays<br />
three break points that we have specified:<br />
(gdb) info break<br />
Num Type Disp Enb Address What
CH05.fm Page 158 Monday, October 7, 2002 9:00 PM<br />
158 Chapter 5 • Working with GNU Debugger<br />
1 breakpoint keep y 0x08048496 in main at sum.c:6<br />
2 breakpoint keep y 0x080484ba in main at sum.c:8<br />
3 breakpoint keep y 0x080484ca in main at sum.c:9<br />
(gdb)<br />
If you want to disable all break points, use the disable comm<strong>and</strong> without any argument.<br />
Similarly if you want to enable all disabled break points, use the enable comm<strong>and</strong> without any<br />
argument. Normal arguments allow you to specify which break point to enable <strong>and</strong> disable.<br />
5.6.1 Continuing from Break Point<br />
You can continue execution of your program when you reach a break point in many ways.<br />
You can start tracing the program line by line using next or step comm<strong>and</strong>s. You can also use<br />
the continue comm<strong>and</strong> that will run the program from its current location until the program<br />
reaches its end or you find another break point on the way. You have already seen how to use the<br />
step <strong>and</strong> next comm<strong>and</strong>s. <strong>The</strong> following session creates a break point in the start of the main<br />
function <strong>and</strong> then uses the continue comm<strong>and</strong> to start execution from there.<br />
[rr@conformix 5]$ gdb sum<br />
GNU gdb 5.0rh-5 Red Hat <strong>Linux</strong> 7.1<br />
Copyright 2001 Free Software Foundation, Inc.<br />
GDB is free software, covered by the GNU General Public<br />
License, <strong>and</strong> you are<br />
welcome to change it <strong>and</strong>/or distribute copies of it under<br />
certain conditions.<br />
Type "show copying" to see the conditions.<br />
<strong>The</strong>re is absolutely no warranty for GDB. Type "show warranty"<br />
for details.<br />
This GDB was configured as "i386-redhat-linux"...<br />
(gdb) break main<br />
Breakpoint 1 at 0x8048496: file sum.c, line 6.<br />
(gdb) run<br />
Starting program: /home/rr/5/sum<br />
Breakpoint 1, main () at sum.c:6<br />
6 printf("Enter first number : ");<br />
(gdb) continue<br />
Continuing.<br />
Enter first number : 34<br />
Enter second number : 45<br />
<strong>The</strong> sum is : 79<br />
Program exited with code 021.<br />
(gdb) quit<br />
[rr@conformix 5]$
CH05.fm Page 159 Monday, October 7, 2002 9:00 PM<br />
Adding Break Points 159<br />
5.6.2 Disabling Break Points<br />
Break points can be disabled temporarily. You can disable a break point using the disable<br />
comm<strong>and</strong> with a number as its argument. <strong>The</strong>se numbers can be displayed using the<br />
info break comm<strong>and</strong>. <strong>The</strong> following comm<strong>and</strong> lists currently available break points. As you<br />
can see under the Enb column heading, all lines contain a y which shows that all break points<br />
are currently enabled.<br />
(gdb) info break<br />
Num Type Disp Enb Address What<br />
1 breakpoint keep y 0x08048496 in main at sum.c:6<br />
breakpoint already hit 1 time<br />
2 breakpoint keep y 0x080484ba in main at sum.c:8<br />
3 breakpoint keep y 0x080484ca in main at sum.c:9<br />
6 breakpoint keep y 0x08048496 in main at sum.c:5<br />
To disable break point number 3 at line number 9 in file sum.c <strong>and</strong> then display the status<br />
of break points again, use the following two comm<strong>and</strong>s:<br />
(gdb) dis 3<br />
(gdb) info break<br />
Num Type Disp Enb Address What<br />
1 breakpoint keep y 0x08048496 in main at sum.c:6<br />
breakpoint already hit 1 time<br />
2 breakpoint keep y 0x080484ba in main at sum.c:8<br />
3 breakpoint keep n 0x080484ca in main at sum.c:9<br />
6 breakpoint keep y 0x08048496 in main at sum.c:5<br />
(gdb)<br />
Note that you can disable all break points in a single step if you don’t mention any number<br />
as an argument to the disable comm<strong>and</strong>.<br />
5.6.3 Enabling Break Points<br />
You can enable previously disabled break points using the enable comm<strong>and</strong>. <strong>The</strong> following<br />
comm<strong>and</strong> shows that breakpoint at line number 9 is currently disabled because it shows<br />
an n under the Enb column.<br />
(gdb) info break<br />
Num Type Disp Enb Address What<br />
1 breakpoint keep y 0x08048496 in main at sum.c:6<br />
breakpoint already hit 1 time<br />
2 breakpoint keep y 0x080484ba in main at sum.c:8<br />
3 breakpoint keep n 0x080484ca in main at sum.c:9<br />
6 breakpoint keep y 0x08048496 in main at sum.c:5<br />
<strong>The</strong> following two comm<strong>and</strong>s enable the break point number 3 <strong>and</strong> display the status of all<br />
break points.
CH05.fm Page 160 Monday, October 7, 2002 9:00 PM<br />
160 Chapter 5 • Working with GNU Debugger<br />
(gdb) enab 3<br />
(gdb) info break<br />
Num Type Disp Enb Address What<br />
1 breakpoint keep y 0x08048496 in main at sum.c:6<br />
breakpoint already hit 1 time<br />
2 breakpoint keep y 0x080484ba in main at sum.c:8<br />
3 breakpoint keep y 0x080484ca in main at sum.c:9<br />
6 breakpoint keep y 0x08048496 in main at sum.c:5<br />
(gdb)<br />
Enabling <strong>and</strong> disabling break points is useful when you want to cycle quickly through<br />
loops for a certain number of times <strong>and</strong> then start tracing once again.<br />
5.6.4 Deleting Break Points<br />
You can also delete break points using the delete comm<strong>and</strong>. <strong>The</strong> following session<br />
shows that you have four break points present. You delete two of these <strong>and</strong> then you can again<br />
display break points to make sure that these break points are actually deleted.<br />
(gdb) info break<br />
Num Type Disp Enb Address What<br />
1 breakpoint keep y 0x08048496 in main at sum.c:6<br />
breakpoint already hit 1 time<br />
2 breakpoint keep y 0x080484ba in main at sum.c:8<br />
3 breakpoint keep y 0x080484ca in main at sum.c:9<br />
6 breakpoint keep y 0x08048496 in main at sum.c:5<br />
(gdb) del 1<br />
(gdb) del 2<br />
(gdb) info break<br />
Num Type Disp Enb Address What<br />
3 breakpoint keep y 0x080484ca in main at sum.c:9<br />
6 breakpoint keep y 0x08048496 in main at sum.c:5<br />
(gdb)<br />
Note that there is a difference between deleting <strong>and</strong> disabling a break point. <strong>The</strong> disabled<br />
break point stays there although it has no impact on execution of the program being debugged.<br />
<strong>The</strong> deleted break point is gone forever <strong>and</strong> you have to create it again if needed.<br />
5.7 Debugging Optimized Code<br />
You can use multiple levels of optimization while building the output binaries. <strong>The</strong> generated executable<br />
code may be different for each level of optimization. If you step through the optimized<br />
code in gdb, the gdb may not step as you expected in some cases. Let us compile the sumopt.c<br />
program <strong>and</strong> see how optimization does affect. Listing below is the program source code:<br />
#include <br />
main ()<br />
{
CH05.fm Page 161 Monday, October 7, 2002 9:00 PM<br />
Debugging Optimized Code 161<br />
}<br />
int num1, num2, total ;<br />
num1 = 4;<br />
num2 = 6;<br />
total = num1 + num2;<br />
printf("\n<strong>The</strong> sum is : %d\n", total);<br />
Now let us compile the code without optimization using the following comm<strong>and</strong> <strong>and</strong> then<br />
step through it.<br />
gcc -g sumopt.c -o sumopt<br />
Following is the gdb session to step through the code. As you can see, it is quite straightforward.<br />
gdb executes all lines in order until it reaches end of the program.<br />
[rr@conformix 5]$ gdb sumopt<br />
GNU gdb 5.0rh-5 Red Hat <strong>Linux</strong> 7.1<br />
Copyright 2001 Free Software Foundation, Inc.<br />
GDB is free software, covered by the GNU General Public<br />
License, <strong>and</strong> you are<br />
welcome to change it <strong>and</strong>/or distribute copies of it under<br />
certain conditions.<br />
Type "show copying" to see the conditions.<br />
<strong>The</strong>re is absolutely no warranty for GDB. Type "show warranty"<br />
for details.<br />
This GDB was configured as "i386-redhat-linux"...<br />
(gdb) break main<br />
Breakpoint 1 at 0x8048466: file sumopt.c, line 6.<br />
(gdb) run<br />
Starting program: /home/rr/5/sumopt<br />
Breakpoint 1, main () at sumopt.c:6<br />
6 num1 = 4;<br />
(gdb) n<br />
7 num2 = 6;<br />
(gdb) n<br />
8 total = num1 + num2;<br />
(gdb) n<br />
10 printf("\n<strong>The</strong> sum is : %d\n", total);<br />
(gdb) n<br />
<strong>The</strong> sum is : 10<br />
11}<br />
(gdb) n<br />
Program exited with code 021.<br />
(gdb)
CH05.fm Page 162 Monday, October 7, 2002 9:00 PM<br />
162 Chapter 5 • Working with GNU Debugger<br />
Now let us compile the program using the –O2 option for optimization. <strong>The</strong> comm<strong>and</strong> line<br />
for this is shown below:<br />
gcc –O2 -g sumopt.c -o sumopt<br />
Now let us trace through the optimized program. <strong>The</strong> gdb session for this purpose is listed<br />
below:<br />
[rr@conformix 5]$ gdb sumopt<br />
GNU gdb 5.0rh-5 Red Hat <strong>Linux</strong> 7.1<br />
Copyright 2001 Free Software Foundation, Inc.<br />
GDB is free software, covered by the GNU General Public<br />
License, <strong>and</strong> you are<br />
welcome to change it <strong>and</strong>/or distribute copies of it under<br />
certain conditions.<br />
Type "show copying" to see the conditions.<br />
<strong>The</strong>re is absolutely no warranty for GDB. Type "show warranty"<br />
for details.<br />
This GDB was configured as "i386-redhat-linux"...<br />
(gdb) break main<br />
Breakpoint 1 at 0x8048466: file sumopt.c, line 10.<br />
(gdb) run<br />
Starting program: /home/rr/5/sumopt<br />
Breakpoint 1, main () at sumopt.c:10<br />
10 printf("\n<strong>The</strong> sum is : %d\n", total);<br />
(gdb) n<br />
<strong>The</strong> sum is : 10<br />
11 }<br />
(gdb) n<br />
Program exited with code 021.<br />
(gdb)<br />
This is quite different from what you may have expected. <strong>The</strong> first difference is in setting<br />
up the break point. We used the same comm<strong>and</strong> to set up the break point but now gdb set it up at<br />
line number 10 instead of line number 6 as it had done before. When we started execution of the<br />
program, it jumped to line number 10 <strong>and</strong> did not go to any line before that. This is because<br />
when we optimized code at the compile time, the compiler was smart enough to know that all<br />
values are static so there is no need to assign two static numbers to variables at the run time <strong>and</strong><br />
then calculate their sum. All this can be done at the compile time, which results in shorter code<br />
<strong>and</strong> better execution time.<br />
<strong>The</strong> bottom line is that if you find that gdb is not executing some lines when you debug<br />
a program, it may be due to the optimization level used when compiling a program. A fun<br />
trick might be to look at the variable values during such a debug session as well, but it’s not<br />
necessary!
CH05.fm Page 163 Monday, October 7, 2002 9:00 PM<br />
Files <strong>and</strong> Shared Libraries 163<br />
5.8 Files <strong>and</strong> Shared Libraries<br />
You can find out information about the currently loaded file, its type, ELF segments, memory<br />
addresses <strong>and</strong> other things. <strong>The</strong> following comm<strong>and</strong> displays such information about the sum<br />
program.<br />
(gdb) info files<br />
Symbols from "/home/rr/5/sum".<br />
Unix child process:<br />
<strong>Using</strong> the running image of child process 1860.<br />
While running this, GDB does not access memory from...<br />
Local exec file:<br />
`/home/rr/5/sum', file type elf32-i386.<br />
Entry point: 0x8048390<br />
0x080480f4 - 0x08048107 is .interp<br />
0x08048108 - 0x08048128 is .note.ABI-tag<br />
0x08048128 - 0x08048160 is .hash<br />
0x08048160 - 0x080481f0 is .dynsym<br />
0x080481f0 - 0x0804828b is .dynstr<br />
0x0804828c - 0x0804829e is .gnu.version<br />
0x080482a0 - 0x080482d0 is .gnu.version_r<br />
0x080482d0 - 0x080482d8 is .rel.got<br />
0x080482d8 - 0x08048308 is .rel.plt<br />
0x08048308 - 0x08048320 is .init<br />
0x08048320 - 0x08048390 is .plt<br />
0x08048390 - 0x08048540 is .text<br />
0x08048540 - 0x0804855e is .fini<br />
0x08048560 - 0x080485aa is .rodata<br />
0x080495ac - 0x080495bc is .data<br />
0x080495bc - 0x080495c0 is .eh_frame<br />
0x080495c0 - 0x080495c8 is .ctors<br />
0x080495c8 - 0x080495d0 is .dtors<br />
0x080495d0 - 0x080495f8 is .got<br />
0x080495f8 - 0x08049698 is .dynamic<br />
0x08049698 - 0x080496b0 is .bss<br />
You can also display information about shared libraries used by the sum program using<br />
the following comm<strong>and</strong>:<br />
(gdb) info share<br />
From To Syms Read Shared Object Library<br />
0x40047fa0 0x40140a9b Yes<br />
/lib/i686/libc.so.6<br />
0x40001db0 0x4001321c Yes<br />
/lib/ld-linux.so.2<br />
(gdb)<br />
<strong>The</strong> comm<strong>and</strong> shows that the program is using libc.so.6 <strong>and</strong> ld-linux.so.2 during<br />
the debug session. <strong>The</strong> ld-linux.so is the dynamic loader, <strong>and</strong> will always be present in<br />
dynamically linked files.
CH05.fm Page 164 Monday, October 7, 2002 9:00 PM<br />
164 Chapter 5 • Working with GNU Debugger<br />
5.9 <strong>Using</strong> gdb With GNU Emacs<br />
If you use GNU Emacs to edit your programs, you can also create a debug window within<br />
Emacs using the M-x gdb comm<strong>and</strong>. Let us suppose that you are editing sumf.c program in<br />
GNU Emacs as shown in Figure 5-1.<br />
Now when you use M-x gdb comm<strong>and</strong>, you will see that the Emacs window is split <strong>and</strong><br />
the bottom part is used as the gdb window. <strong>The</strong> screen shot in Figure 5-2 shows this new Emacs<br />
window. You can also see that new menus appear in the menu bar at the top of the screen. You<br />
can use these menus for the usual debugging functions like creating break points, starting <strong>and</strong><br />
stopping the debug process <strong>and</strong> so on. <strong>The</strong> Gud menu is especially of interest for program<br />
debugging.<br />
Figure 5-1 Editing sumf.c program in GNU Emacs.
CH05.fm Page 165 Monday, October 7, 2002 9:00 PM<br />
Debugging Running Processes 165<br />
Figure 5-2 <strong>The</strong> gdb split window inside GNU Emacs.<br />
5.10 Debugging Running Processes<br />
In addition to st<strong>and</strong>-alone programs, running processes can also be debugged using GNU debugger.<br />
<strong>The</strong> procedure is as follows:<br />
1. Start the process that you want to debug.<br />
2. Use the ps comm<strong>and</strong> to find the process ID of the running process.<br />
3. Start gdb.<br />
4. Load the file containing the symbol table into gdb.<br />
5. Use the attach comm<strong>and</strong> to attach to the running process to gdb.<br />
6. Continue debugging as usual.<br />
In this section we shall attach to a process created by executing the sumf program that we<br />
created earlier in this chapter. This program requires input of two numbers. After starting, the<br />
process waits for the user to input these two numbers. You can open a new terminal window at
CH05.fm Page 166 Monday, October 7, 2002 9:00 PM<br />
166 Chapter 5 • Working with GNU Debugger<br />
this point <strong>and</strong> start gdb in the new window to attach the process. <strong>The</strong> following comm<strong>and</strong> starts<br />
the process which is waiting for the user to enter the first number.<br />
[rr@conformix 5]$ ./sumf<br />
Enter first number :<br />
Open a new terminal window <strong>and</strong> find out the process ID of the sumf process. This can<br />
be easily done using the ps comm<strong>and</strong> as follows:<br />
[rr@conformix 5]$ ps –a|grep sumf<br />
4272 pts/4 00:00:00 sumf<br />
[rr@conformix 5]$<br />
<strong>The</strong> process ID for the running process is 4272. After getting this information, you can<br />
start gdb <strong>and</strong> load the sumf file that contains the symbol table. This is done using the file<br />
comm<strong>and</strong>. <strong>The</strong> following sequence of comm<strong>and</strong>s shows this process:<br />
[rr@conformix 5]$ gdb<br />
GNU gdb 5.0rh-5 Red Hat <strong>Linux</strong> 7.1<br />
Copyright 2001 Free Software Foundation, Inc.<br />
GDB is free software, covered by the GNU General Public<br />
License, <strong>and</strong> you are<br />
welcome to change it <strong>and</strong>/or distribute copies of it under<br />
certain conditions.<br />
Type "show copying" to see the conditions.<br />
<strong>The</strong>re is absolutely no warranty for GDB. Type "show warranty"<br />
for details.<br />
This GDB was configured as "i386-redhat-linux".<br />
(gdb) file sumf<br />
Reading symbols from sumf...done.<br />
(gdb)<br />
Now you can attach to the program with ID 4272. Note that the program is waiting for<br />
user input <strong>and</strong> there are many functions calls from loaded shared libraries. To come back to this<br />
point in the main source file, you have to make a number of finish comm<strong>and</strong>s.<br />
(gdb) attach 4272<br />
Attaching to program: /home/rr/5/sumf, process 4272<br />
Reading symbols from /lib/i686/libc.so.6...done.<br />
Loaded symbols for /lib/i686/libc.so.6<br />
Reading symbols from /lib/ld-linux.so.2...done.<br />
Loaded symbols for /lib/ld-linux.so.2<br />
0x40105f44 in __libc_read () from /lib/i686/libc.so.6<br />
(gdb) n<br />
Single stepping until exit from function __libc_read,<br />
which has no line number information.<br />
_IO_file_read (fp=0x401548e0, buf=0x40019000, size=1024) at<br />
fileops.c:764<br />
764 fileops.c: No such file or directory.<br />
in fileops.c
CH05.fm Page 167 Monday, October 7, 2002 9:00 PM<br />
Debugging Running Processes 167<br />
(gdb) finish<br />
Run till exit from #0 _IO_file_read (fp=0x401548e0,<br />
buf=0x40019000, size=1024) at fileops.c:764<br />
0x400a68dd in _IO_new_file_underflow (fp=0x401548e0) at<br />
fileops.c:467<br />
467 in fileops.c<br />
Value returned is $1 = 2<br />
(gdb) finish<br />
Run till exit from #0 0x400a68dd in _IO_new_file_underflow<br />
(fp=0x401548e0) at fileops.c:467<br />
_IO_default_uflow (fp=0x401548e0) at genops.c:389<br />
389 genops.c: No such file or directory.<br />
in genops.c<br />
Value returned is $2 = 52<br />
(gdb) finish<br />
Run till exit from #0 _IO_default_uflow (fp=0x401548e0) at<br />
genops.c:389<br />
0x400a7f52 in __uflow (fp=0x401548e0) at genops.c:345<br />
345 in genops.c<br />
Value returned is $3 = 52<br />
(gdb) finish<br />
Run till exit from #0 0x400a7f52 in __uflow (fp=0x401548e0)<br />
at genops.c:345<br />
0x4008bee5 in _IO_vfscanf (s=0x401548e0, format=0x80485d6<br />
"%d", argptr=0xbffff9f4, errp=0x0)<br />
at vfscanf.c:610<br />
610 vfscanf.c: No such file or directory.<br />
in vfscanf.c<br />
Value returned is $4 = 52<br />
(gdb) finish<br />
Run till exit from #0 0x4008bee5 in _IO_vfscanf<br />
(s=0x401548e0, format=0x80485d6 "%d",<br />
argptr=0xbffff9f4, errp=0x0) at vfscanf.c:610<br />
scanf (format=0x80485d6 "%d") at scanf.c:40<br />
40 scanf.c: No such file or directory.<br />
in scanf.c<br />
Value returned is $5 = 1<br />
(gdb) finish<br />
Run till exit from #0 scanf (format=0x80485d6 "%d") at<br />
scanf.c:40<br />
0x080484b7 in main () at sumf.c:10<br />
10 scanf("%d", &num1);<br />
Value returned is $6 = 1<br />
(gdb) n<br />
11 printf("Enter second number : ");<br />
(gdb) n<br />
12 scanf("%d", &num2);<br />
(gdb)
CH05.fm Page 168 Monday, October 7, 2002 9:00 PM<br />
168 Chapter 5 • Working with GNU Debugger<br />
With every finish comm<strong>and</strong>, you can see the function that you were into <strong>and</strong> the return<br />
value of that function. When you are back in the main function, you can use the next comm<strong>and</strong><br />
to start tracing the execution line by line. Note that when you trace through, the output of<br />
the process will appear in the window where you started the program. You will also enter the<br />
input values in the same window. All those functions we had to finish were just part of the st<strong>and</strong>ard<br />
C libraries, <strong>and</strong> you could actually step into them anytime from this program as well, but<br />
you normally wouldn't.<br />
5.11 Installing GDB<br />
GNU debugger is included in all <strong>Linux</strong> distributions in the development package. In certain<br />
cases, you may want to get a new copy in the source code form <strong>and</strong> build <strong>and</strong> install it manually.<br />
<strong>The</strong> compilation <strong>and</strong> building process is similar to other GNU development tools. By this time<br />
you have already built <strong>and</strong> installed the GNU compiler <strong>and</strong> the C library. With that experience,<br />
you should not find the compilation <strong>and</strong> installation of GNU debugger difficult.<br />
5.11.1 Downloading <strong>and</strong> Building<br />
You can download the latest version from ftp://ftp.gnu.org/gnu/gdb directory. <strong>The</strong> current<br />
version at the time of writing this book is 5.1.1. <strong>The</strong> source code is available in the compressed<br />
tar format. <strong>The</strong> file name is gdb-5.1.1.tar.gz. You have to uncompress it using the following<br />
comm<strong>and</strong>.<br />
tar zxvf gdb-5.1.1.tar.gz<br />
I have untarred this file in /opt directory. <strong>The</strong> tar program will create /opt/gdb-<br />
5.1.1 directory <strong>and</strong> uncompress all source code tree under this directory. Move into this directory<br />
using the cd comm<strong>and</strong>. Run the configure script <strong>and</strong> the make comm<strong>and</strong> to build <strong>and</strong><br />
install the debugger. This is a similar process as with all other GNU tools. <strong>The</strong> following comm<strong>and</strong>s<br />
will build gdb.<br />
cd /opt/gdb-5.1.1<br />
./configure –-prefix=/opt/gcc-3.0.4<br />
make<br />
Note that –-prefix shows the directory where the gdb binary <strong>and</strong> other files will be<br />
installed. Usually this is the same directory where your other development tools are installed.<br />
5.11.2 Final Installation<br />
<strong>The</strong> following comm<strong>and</strong> places the gdb binary <strong>and</strong> other files in the proper location. After<br />
running this comm<strong>and</strong>, you can start using the new debugger.<br />
make install
CH05.fm Page 169 Monday, October 7, 2002 9:00 PM<br />
Other Open Source Debuggers 169<br />
5.12 Other Open Source Debuggers<br />
In addition to gdb, there are many other debuggers available to the open source community.<br />
Many of these debuggers are built on top of the GNU debugger or they use gdb concepts. Some<br />
of these debuggers are introduced in this section. <strong>The</strong> most popular of these is the ddd debugger.<br />
xxgdb is a GUI interface to gdb <strong>and</strong> many people also use it. <strong>The</strong> kdbg comes with KDE on<br />
<strong>Linux</strong>. All of these debuggers use the same concepts as used by the gdb debugger.<br />
5.12.1 <strong>The</strong> kdbg Debugger<br />
KDE debugger comes with KDE desktop development utilities. It is a GUI based upon<br />
GNU debugger. You can start it using the kdbg comm<strong>and</strong> or from a KDE menu. <strong>Using</strong> icons in<br />
the tool bar or menus, you can open files to be debugged. Once a file is loaded in the debugger<br />
window, you can click on a line to set or remove break points. To find out the purpose of an icon,<br />
you can move your cursor over the icon on the toolbar to display a short description.<br />
<strong>The</strong> kdbg is a simple debugger but keep in mind that you may not find it as powerful as a<br />
native GNU debugger is. <strong>The</strong> window that appears when you start the debugger is shown in Figure<br />
5-3. In this window the pointer is on the first printf statement where we have a break point set.<br />
You can add a variable to the watch list using the watch window. This window can be<br />
opened by selecting the “Watched Expressions” option from the View menu. <strong>The</strong> window is<br />
shown in Figure 5-4 where two variables num1 <strong>and</strong> num2 are added to the watch list. You can<br />
click on a variable <strong>and</strong> then press the “Del” button to remove a variable from the watch list.<br />
<strong>The</strong> kdbg also has an output window that is used to display any output from the program.<br />
This output window is actually an input window as well. You can enter input for the program in<br />
this window. <strong>The</strong> output window is started when you start the kdbg debugger. <strong>The</strong> output window<br />
is shown Figure 5-5.
CH05.fm Page 170 Monday, October 7, 2002 9:00 PM<br />
170 Chapter 5 • Working with GNU Debugger<br />
Figure 5-3 <strong>The</strong> kdbg window.
CH05.fm Page 171 Monday, October 7, 2002 9:00 PM<br />
Other Open Source Debuggers 171<br />
Figure 5-4 Watch window of kdbg debugger.<br />
Figure 5-5 Output window for kdbg.
CH05.fm Page 172 Monday, October 7, 2002 9:00 PM<br />
172 Chapter 5 • Working with GNU Debugger<br />
5.12.2 <strong>The</strong> ddd Debugger<br />
<strong>The</strong> Data Display Debugger or ddd is a popular GUI front end to the GNU debugger. It<br />
has many additional features that are not present in native gdb. <strong>The</strong> main window of ddd<br />
debugger is shown in Figure 5-6. A complete discussion of this debugger is beyond the scope of<br />
this book.<br />
Figure 5-6 Main window of ddd debugger.
CH05.fm Page 173 Monday, October 7, 2002 9:00 PM<br />
Other Open Source Debuggers 173<br />
5.12.3 <strong>The</strong> xxgdb Debugger<br />
<strong>The</strong> xxgdb debugger is a GUI interface to the GNU debugger. You can use the comm<strong>and</strong><br />
line window as well as GUI buttons with this debugger. <strong>The</strong> main screen is shown in Figure 5-7.<br />
<strong>The</strong> bottom part of the screen can be used to enter gdb comm<strong>and</strong>s while the top part can be used<br />
to scroll through source code <strong>and</strong> set or remove break points.<br />
Figure 5-7 <strong>The</strong> xxgdb debugger main window.
CH05.fm Page 174 Monday, October 7, 2002 9:00 PM<br />
174 Chapter 5 • Working with GNU Debugger<br />
For example, you can bring the cursor to a particular line <strong>and</strong> then press the break button<br />
to set up a break point at that line. Similarly you can use other buttons in the middle part of the<br />
window to carry out other tasks related to debugging a program.<br />
5.13 References <strong>and</strong> Resources<br />
1. GNU web site at http://www.gnu.org/<br />
2. GNU debugger download web site ftp://ftp.gnu.org/gnu/gdb<br />
3. DDD home page at http://www.gnu.org/software/ddd/<br />
4. <strong>The</strong> gdb manual at http://www.gnu.org/manual/gdb/html_mono/gdb.html. You can find<br />
a detailed list of all comm<strong>and</strong>s <strong>and</strong> their explanation on this web site.
CH06.fm Page 175 Monday, October 7, 2002 9:06 PM<br />
C HAPTER 6<br />
Introduction to CVS<br />
T<br />
he Concurrent Versions System, or CVS, is a source code control<br />
application that permits developers to work in parallel on software<br />
development projects without the fear of overwriting someone else’s<br />
work. In addition, it provides a complete project history that includes the<br />
ability to review previous versions of the code, <strong>and</strong> to compare old code<br />
with new code.<br />
CVS can be used for any development project, including assembly <strong>and</strong><br />
machine language to C <strong>and</strong> C++ <strong>and</strong> even the code <strong>and</strong> images necessary<br />
to maintain a web site.<br />
<strong>The</strong> source code is set up in a software repository by the administrator.<br />
Each repository is identified by a unique location. A repository may be<br />
on a local machine or maintained on the network <strong>and</strong> accessed remotely.<br />
Many Open Source developers utilize anonymous CVS access in order<br />
to distribute development snapshots of the source code instead of (or in<br />
addition to) tarballs, RPM <strong>and</strong> other methods of distribution. Each<br />
repository many contain multiple projects <strong>and</strong> many versions of each<br />
project. <strong>The</strong> current version of a project may be checked out, as may<br />
older versions. Versions may also be compared to one another to determine<br />
specific changes <strong>and</strong> help to identify bugs that may have crept into<br />
a piece of software.<br />
175
CH06.fm Page 176 Monday, October 7, 2002 9:06 PM<br />
176 Chapter 6 • Introduction to CVS<br />
6.1 CVS Policies<br />
In addition to the technical aspects of setting up CVS <strong>and</strong> granting users access to the system,<br />
there are certain operational procedures that need to be set forth prior to opening up a CVS<br />
repository for access.<br />
One of the more important aspects deals with users checking in or committing a change<br />
into the repository.<br />
Every time a source file is checked into the system, the version number of that file is incremented.<br />
This version is separate from the version number of the software project. <strong>The</strong> differences<br />
will be described later.<br />
Each team or project will have to develop guidelines as to when a source file should be<br />
checked in, how long one may be checked out prior to committing it, <strong>and</strong> similar items. Checking<br />
a file out for a long period of time, making modifications <strong>and</strong> then checking it back in may<br />
result in conflicts that will have to be addressed. CVS will let you check the file in if your<br />
changes conflict with someone else's work, but someone will have to be responsible for ensuring<br />
that these conflicts are resolved.<br />
Another policy might state that a file may not be checked back into the repository until it<br />
compiles cleanly with the rest of the project, until it has been reviewed, or until other benchmarks<br />
are met. <strong>The</strong>se policies will vary from project to project, <strong>and</strong> while CVS can maintain the<br />
source code repository, it has no method of enforcing these policies. It is the role of the project<br />
owner <strong>and</strong> manager(s) to ensure that the policies are implemented <strong>and</strong> followed by the team<br />
members.<br />
6.2 Project Management <strong>and</strong> Communication<br />
While CVS has many tools to help you manage a software project, it has no inherent ability to<br />
manage the project on its own. <strong>The</strong>re are e-mail notifications available that let individuals keep<br />
an eye on particular files for changes. <strong>The</strong>re are reports available that can determine who<br />
changed which file when, as well as complete logs that describe what those changes did (or at<br />
least, were supposed to have done).<br />
As mentioned previously, even using a version control system such as CVS will not prevent<br />
conflicts of code from arising. Communication between developers is absolutely necessary<br />
in order to ensure that projects proceed smoothly <strong>and</strong> on time.<br />
6.3 Installing <strong>and</strong> Managing CVS<br />
In order to install CVS, the first step is to obtain either the CVS source code or, if you are using<br />
RedHat, the RPM.<br />
<strong>The</strong> latest source code is available at http://www.cvshome.org. As of this writing, the current<br />
CVS version is 1.11.1p1. RPM may be downloaded via RPMFind at http://rpmfind.net/<br />
linux/rpm2html/search.php?query=cvs. Follow the instructions for your preferred installation<br />
method.
CH06.fm Page 177 Monday, October 7, 2002 9:06 PM<br />
Installing <strong>and</strong> Managing CVS 177<br />
6.3.1 <strong>Configuring</strong> CVS<br />
Once CVS is installed on the server, the next step is to configure the machine properly to<br />
use CVS. <strong>The</strong> first step is to create a user <strong>and</strong> group to be the owners of the repositories. For purposes<br />
of example, assume that the user <strong>and</strong> the group are both named “cvs”. This example<br />
shows how to set up CVS for local <strong>and</strong> remote “pserver” access. This method of setting up CVS<br />
is not the most secure method <strong>and</strong> does not provide a secure method for accessing the CVS<br />
repository remotely; but it is necessary if a project intends to provide remote, anonymous access<br />
to the CVS repository. For details on setting up a secure method of accessing the repository, see<br />
Section 6.7.1.<br />
To accomplish this, as root, issue the useradd comm<strong>and</strong> listed below. Under RedHat<br />
<strong>Linux</strong>, this will create the cvs user <strong>and</strong> the cvs group. All of the following comm<strong>and</strong>s must be<br />
issued as the root user.<br />
# useradd -r -c "CVS user" cvs<br />
As initialized, this account will have no password <strong>and</strong> will not be able to be logged into.<br />
You can either leave it this way <strong>and</strong>, in the event that maintenance is necessary, log in as root <strong>and</strong><br />
resolve issues, or assign a password <strong>and</strong> use that account. Leaving the account with no password<br />
is probably the most secure, but in the event that a password is necessary, simply assign one.<br />
# passwd cvs<br />
Changing password for user cvs<br />
New UNIX password: <br />
Retype new UNIX password: <br />
passwd: all authentication tokens updated successfully<br />
<strong>The</strong> next step is to create a CVS repository. For this example, assume that the CVS root is<br />
/usr/local/cvsroot. Additional repositories may be set up at this time, simply issue the<br />
CVS init comm<strong>and</strong> as many times as necessary; while changing the –d option to reflect the<br />
additional repositories.<br />
# cvs –d /usr/local/cvsroot init<br />
This will create the file structure necessary for CVS to function <strong>and</strong> will initialize all necessary<br />
files.<br />
Once the user <strong>and</strong> repositories have been created, the ownership of the repositories needs<br />
to be changed.<br />
# chmod –R cvs:cvs /usr/local/cvsroot [additional repositories here]<br />
<strong>The</strong> next step is to add users to the repositories. Each repository has a password file in the<br />
$CVSROOT/CVSROOT directory. <strong>The</strong>re are three fields in this file separated by colons. <strong>The</strong> first<br />
field is the user name that may or may not be the same as the user’s login id. <strong>The</strong> second field is<br />
the user’s encrypted password. This password is encrypted with the crypt() function. <strong>The</strong><br />
final field is the name of the user whose request will be performed. This is the owner of the CVS<br />
repository <strong>and</strong> in our example, the owner is ‘cvs’.
CH06.fm Page 178 Monday, October 7, 2002 9:06 PM<br />
178 Chapter 6 • Introduction to CVS<br />
<strong>The</strong> easiest way to generate encrypted passwords for the password file is by using a simple<br />
perl script. An example is presented below. Simply type this script into a file using a text editor<br />
<strong>and</strong> make the file executable. <strong>The</strong>n run the program with two arguments, the username <strong>and</strong> the<br />
password.<br />
#!/usr/bin/perl<br />
#<br />
# Simple script to take a username <strong>and</strong> password <strong>and</strong><br />
# return a line suitable for pasting into the CVS<br />
# password file.<br />
#<br />
($u, $p)=@ARGV;<br />
@d=(A..Z,a..z);<br />
$s=$d[r<strong>and</strong>(52)].$d[r<strong>and</strong>(52)];<br />
print $u.":".crypt($p, $s).":cvs\n";<br />
If you have saved the file under the name ‘cvspassgen’ <strong>and</strong> set the permission properly,<br />
simple run the application as follows:<br />
# ./cvspassgen username password<br />
username:mU7OltQzHySmY:cvs<br />
As you can see, the information is returned in the format that CVS requires. (Note: since a<br />
r<strong>and</strong>om salt is used to generate the password, your output will vary from what is presented here.)<br />
You can simply cut <strong>and</strong> paste the line into the password file. Another option is to redirect<br />
the output of the script directly into the password file.<br />
# ./cvspassgen username password >> $CVSROOT/CVSROOT/passwd<br />
This assumes that the $CVSROOT environmental variable is set to the proper directory.<br />
Next, the services file must be updated in order for the CVS server to respond to network<br />
requests. <strong>The</strong> following line will append to the /etc/services file. Just be sure that there<br />
are two “greater than” symbols or you will erase whatever is already in your services file.<br />
# echo “cvspserver 2401/tcp” >> /etc/services<br />
Next, the inetd server needs to know which service to start when requests come in.<br />
RedHat 7.x uses the xinetd server <strong>and</strong> so a file needs to be created in /etc/xinetd.d<br />
named cvspserver.<br />
<strong>Using</strong> your favorite text editor, edit /etc/xinetd.d/cvspserver to include the following<br />
information:<br />
# Description: cvspserver: version control system<br />
service cvspserver<br />
{<br />
socket_type = stream<br />
wait = no<br />
user = cvs
CH06.fm Page 179 Monday, October 7, 2002 9:06 PM<br />
Installing <strong>and</strong> Managing CVS 179<br />
}<br />
passenv =<br />
server = /usr/bin/cvs<br />
server_args = --allow-root=/usr/local/cvsroot pserver<br />
If you have installed multiple repositories, they need to be specified on the<br />
server_args line. To do this, simply insert additional –allow-root= comm<strong>and</strong>s. Please<br />
note that these additional arguments must appear on the same line.<br />
In order for xinetd to acknowledge this change, it needs to reread its configuration files.<br />
To do this, send the server a HUP signal with the killall comm<strong>and</strong>.<br />
# killall –HUP xinetd<br />
At this point, the repository should be up <strong>and</strong> running.<br />
To quickly review the steps for installing CVS:<br />
1. Install the CVS application (RPM or source code)<br />
2. Create CVS user <strong>and</strong> group<br />
3. Create CVS repositories<br />
4. Change the owner <strong>and</strong> group of the repositories<br />
5. Add users to $CVSROOT/CVSROOT/passwd<br />
6. Change file permissions on the password file(s)<br />
7. Edit /etc/services to ensure that cvspserver is present<br />
8. Configure /etc/xinetd.d to acknowledge CVS requests<br />
9. Restart xinetd<br />
6.3.2 Importing a Project into the Repository<br />
Once you have CVS installed <strong>and</strong> configured, the next step is to import a project into the<br />
repository. This creates a directory for the project, copies the files into the repository <strong>and</strong> sets up<br />
the information that will be used to track the project as it gets modified during the development<br />
process.<br />
Assuming that the directory /home/lcp/fuzion holds the source code <strong>and</strong> the files of<br />
the project, to import the project you need to change to that directory <strong>and</strong> issue the CVS import<br />
comm<strong>and</strong>.<br />
<strong>The</strong> options for the import comm<strong>and</strong> include the name of the project, the vendor tag, <strong>and</strong><br />
the release tag(s). <strong>The</strong> vendor tag is not currently used by CVS, <strong>and</strong> can contain any information<br />
that you care to put in. <strong>The</strong> release tag can be used to designate specific releases, but the source<br />
code can also be checked out by the numeric release designation. Any information that you care<br />
to put in these fields may be used, but they must be included with the import comm<strong>and</strong>.<br />
# cd /home/lcp/fuzion<br />
# cvs import Fuzion OSS_Software release_0_1
CH06.fm Page 180 Monday, October 7, 2002 9:06 PM<br />
180 Chapter 6 • Introduction to CVS<br />
At this stage, you will be presented with your preferred editor (as defined by the environment<br />
variables $CVSEDITOR or $EDITOR). This will allow you to create a log entry that<br />
describes the project, the initial state that it is in, <strong>and</strong> anything else of importance.<br />
When you save that file, the information, along with the imported files, will be saved in the<br />
repository.<br />
To avoid having the editor displayed, you can include a log entry on the comm<strong>and</strong> line<br />
with the –m option. Log entries with spaces or other special characters in them should be<br />
enclosed in quotes.<br />
# cvs import –m “Initialized the project” Fuzion \<br />
OSS_Software release_0_1<br />
To ensure that the files have been imported, issue the following comm<strong>and</strong> from the server<br />
that holds the repository:<br />
# ls –l $CVSROOT/Fuzion<br />
You should see a copy of each file in your project with a ‘,v’ appended to the filename.<br />
At this point, you should remove the original directory (after ensuring that you have a<br />
backup) <strong>and</strong> check out the project with CVS so that any modification can be committed to the<br />
repository.<br />
# cd /home/lcp<br />
# rm –rf fuzion<br />
# cvs co Fuzion<br />
# cd Fuzion<br />
At this point you are ready to continue development on this project with CVS.<br />
N O T E Special care must be taken if you are importing binary<br />
data into a CVS repository. This can be the case if you are<br />
importing files from a Windows platform, or if you use CVS to<br />
manage the files necessary for maintaining a web site. Graphic<br />
files <strong>and</strong> dlls will not import correctly unless special care is taken.<br />
One way to do this is with the wrapper function of CVS. To<br />
import a project <strong>and</strong> treat all files with a .jpg extension as binary<br />
data, issue the following comm<strong>and</strong>:<br />
cvs import -I ! -W "*.jpg -k 'b'" Pname V_tag R_tag<br />
6.4 <strong>Using</strong> the CVS Client<br />
<strong>The</strong>re are several methods of accessing a CVS repository. <strong>The</strong> first is local access. This can be<br />
accomplished by a user logging in at the terminal or logging in remotely over the network.<br />
Either way, the developer must have a local account on the machine, a home directory, <strong>and</strong> the<br />
repository to be accessed via the local session.
CH06.fm Page 181 Monday, October 7, 2002 9:06 PM<br />
<strong>Using</strong> the CVS Client 181<br />
Remote access can take several forms. This can be a remote connection from a user’s<br />
machine to the cvspserver that runs on port 2401. Another method would be to have CVS<br />
connect via a remote shell (rsh) when the repository needs to be accessed.<br />
CVS access takes place in clear text over the network with no inherent facility to prevent<br />
passwords <strong>and</strong> data from being intercepted <strong>and</strong> used by unauthorized persons to access the<br />
server. Several options later in the chapter describe a more secure method of access. One of<br />
those methods is similar to the rsh method, but the CVS_RSH environment variable is set to the<br />
ssh instead of the insecure rsh comm<strong>and</strong>.<br />
6.4.1 Local Repositories<br />
In order to work easily <strong>and</strong> efficiently with CVS, it is necessary to set up a series of environmental<br />
variables that tell CVS where your CVS repository is, which editor you prefer, etc.<br />
<strong>The</strong>se variables can be set in either the system-wide or user specific files that are read when the<br />
user logs in, or each user may set or change them manually.<br />
<strong>The</strong> first variable is CVSROOT <strong>and</strong> it tells CVS which repository that you wish to work<br />
with. Assuming that your CVS repository is located on the local machine, simply set the CVS-<br />
ROOT variable to the location of the repository.<br />
If your repository resides at “'/usr/local/cvsroot”' <strong>and</strong> you are using sh, bash,<br />
ksh or a similar shell, simply insert the following line into your startup file (.profile,<br />
.bash, etc.)<br />
file:<br />
export CVSROOT=/usr/local/cvsroot<br />
If you are using csh or tcsh, insert the following line into your .cshrc or .tcshrc<br />
setenv CVSROOT /usr/local/cvsroot<br />
Should you wish to temporarily work with a different repository, the path to the repository<br />
can be supplied on the comm<strong>and</strong> line with the -d option, as in this example:<br />
$ cvs -d /usr/local/cvsother checkout BigProject<br />
Once a project has been checked out of the repository, this information is also kept in the<br />
CVS/Root file in the project directory, as shown below:<br />
$ cat CVS/Root<br />
/usr/local/cvsroot<br />
<strong>The</strong> information in the CVS/Root file takes precedence over the CVSROOT variable in<br />
order to ensure that the files are checked back into the same repository that they were checked<br />
out from.<br />
<strong>The</strong> CVS/Root file may be overridden by the -d comm<strong>and</strong> line option. This allows you<br />
to specifically place the file into a repository other than the one from which it was checked out.<br />
To sum up, which checking a file back into the repository, the CVS root is determined the<br />
following order:
CH06.fm Page 182 Monday, October 7, 2002 9:06 PM<br />
182 Chapter 6 • Introduction to CVS<br />
1. <strong>The</strong> -d comm<strong>and</strong> line option<br />
2. <strong>The</strong> CVS/Root file<br />
3. <strong>The</strong> CVSROOT environment variable<br />
6.4.2 Remote Repositories<br />
As mentioned earlier, there are several methods of accessing a remote CVS server. <strong>The</strong><br />
first one we will discuss is the built-in functionality. This method utilizes a network connection<br />
from the developer’s desktop to port 2401/tcp on the server. It requires that all of the intermediate<br />
networking equipment (routers, firewalls, etc.) permit this traffic to pass.<br />
Accessing a repository using the pserver method requires additional information when<br />
compared to the local access in order to determine the name of the remote host, the user name to<br />
be used, <strong>and</strong> the remote connection method.<br />
For example, in order to log into a remote CVS repository, you would need to specify the<br />
following:<br />
# export CVSROOT=:pserver:user@hostname:/usr/local/cvsroot<br />
Where user is your CVS username on the machine hostname. This may be used in the<br />
CVSROOT variable or on the comm<strong>and</strong> line with the -d option.<br />
Prior to checking out, committing, importing or performing any other actions against a<br />
CVS server, the user is required to authenticate himself first by issuing a login comm<strong>and</strong>. With<br />
the $CVSROOT variable set as indicated, type the following:<br />
# cvs login<br />
Logging in to :pserver:user@hostname:2401/usr/local/cvsroot<br />
CVS password:<br />
Type in your CVS password, which will then be stored in a file in your home directory<br />
(.cvspass) for future use.<br />
At that point you should be able to check out <strong>and</strong> commit software from the repository.<br />
6.4.3 Checking out a Project<br />
In order to begin work on a project contained in a CVS repository, you must first check the<br />
package out. This brings your working directory up-to-date (creating it if necessary) <strong>and</strong> creates<br />
a CVS directory in your working directory where CVS keeps information about the project<br />
locally.<br />
To check out a project that is in the repository, simply issue the cvs comm<strong>and</strong> with the<br />
checkout option <strong>and</strong> the name of the project. For example, to check out the Fuzion project<br />
that was imported into the repository earlier, type:<br />
# cvs checkout Fuzion<br />
cvs server: Updating fuzion<br />
U Fuzion/1.0.fuzion.pl<br />
U Fuzion/em.dat
CH06.fm Page 183 Monday, October 7, 2002 9:06 PM<br />
<strong>Using</strong> the CVS Client 183<br />
U Fuzion/fuzion.pl<br />
U Fuzion/sk.dat<br />
U Fuzion/tl.dat<br />
U Fuzion/test.dat<br />
CVS checks any existing copies of the project with the ones in the repository <strong>and</strong> updates<br />
all of the files on the user’s machine.<br />
<strong>The</strong> option co is an alias for the checkout option <strong>and</strong> they may be used interchangeably.<br />
6.4.4 Finding the Status of a Project<br />
After working on a project for a time, it may be necessary for you to determine which files<br />
in your working directory <strong>and</strong> which files in the repository have changed.<br />
In order to accomplish this, you may use the status option of the CVS comm<strong>and</strong>. If this<br />
comm<strong>and</strong> is issued from the working directory without a project name, that project will be<br />
examined. If it is issued from another directory, you should include the project name to prevent<br />
CVS from trying to examine all of the subdirectories of the current directory for project information.<br />
# cd fuzion<br />
# cvs status<br />
A partial example of the output is presented here:<br />
============================================================<br />
File: 1.0.fuzion.pl Status: Up-to-date<br />
Working revision: 1.1.1.1<br />
Repository revision: 1.1.1.1 /usr/local/cvsroot/fuzion/<br />
1.0.fuzion.pl,v<br />
Sticky Tag:<br />
(none)<br />
Sticky Date:<br />
(none)<br />
Sticky Options: (none)<br />
============================================================<br />
File: fuzion.pl<br />
Status: Locally Modified<br />
Working revision: 1.1.1.1<br />
Repository revision: 1.1.1.1 /usr/local/cvsroot/fuzion/<br />
fuzion.pl,v<br />
Sticky Tag:<br />
(none)<br />
Sticky Date:<br />
(none)<br />
Sticky Options: (none)<br />
============================================================<br />
File: test.dat<br />
Status: Needs Patch<br />
Working revision: 1.2<br />
Repository revision: 1.3<br />
test.dat,v<br />
/usr/local/cvsroot/fuzion/
CH06.fm Page 184 Monday, October 7, 2002 9:06 PM<br />
184 Chapter 6 • Introduction to CVS<br />
Sticky Tag:<br />
Sticky Date:<br />
Sticky Options:<br />
(none)<br />
(none)<br />
(none)<br />
As you can see, there are two files here that are out of sync with the repository. <strong>The</strong> first<br />
one is fuzion.pl that has been modified, but not checked back in; <strong>and</strong> the other is<br />
test.dat, which someone else has modified <strong>and</strong> returned to the repository.<br />
At this point, you can use diff to determine the extent of the changes <strong>and</strong> determine the<br />
appropriate course of action.<br />
If your local copy of a file has changed, <strong>and</strong> the version in the repository has changed from<br />
the last time that you checked it out, you will receive a message indicating that the files needed<br />
to be merged.<br />
File: test.dat<br />
Working revision: 1.2<br />
Repository revision: 1.3<br />
test.dat,v<br />
Sticky Tag:<br />
(none)<br />
Sticky Date:<br />
(none)<br />
Sticky Options: (none)<br />
Status: Needs Merge<br />
/usr/local/cvsroot/fuzion/<br />
Again, you will want to determine the extent of the changes to the files <strong>and</strong> merge the two<br />
so that no changes will be lost when the file is checked back into the repository. Should you<br />
attempt to commit a change on a file when a newer version of the file exists on the server, CVS<br />
will complain <strong>and</strong> refuse to update the file.<br />
cvs server: Up-to-date check failed for `test.dat'<br />
cvs [server aborted]: correct above errors first!<br />
cvs commit: saving log message in /tmp/cvsa15396<br />
In the event of conflicts, you can use the diff option to examine the differences in the<br />
file <strong>and</strong> the update option to merge them. Both of these options are covered below.<br />
6.4.5 Finding Differences<br />
CVS can be used to determine the difference between a file in the repository <strong>and</strong> a file in<br />
the working directory. This is accomplished by using the diff option.<br />
# cvs diff fuzion.pl<br />
Index: fuzion.pl<br />
============================================================<br />
RCS file: /usr/local/cvsroot/fuzion/fuzion.pl,v<br />
retrieving revision 1.1.1.1<br />
diff -r1.1.1.1 fuzion.pl<br />
134c134<br />
< print "=" x 40 ;<br />
---<br />
> print "=" x 80 ;
CH06.fm Page 185 Monday, October 7, 2002 9:06 PM<br />
<strong>Using</strong> the CVS Client 185<br />
If you are familiar with the UNIX diff comm<strong>and</strong>, you will recognize the output of this<br />
comm<strong>and</strong>. See Section 7.3 for more information on the output of the diff comm<strong>and</strong>.<br />
As you can see, CVS checked the repository for the latest copy of the file <strong>and</strong> compared it<br />
with the one in the working directory. This output indicates that one line has been changed at<br />
line 134 (a formatting change to the print statement).<br />
6.4.6 Resolving Conflicts<br />
<strong>The</strong> update option will merge two conflicting files into one file <strong>and</strong> insert special markers<br />
into the file that help you determine where the differences are <strong>and</strong> resolve them.<br />
# cvs update test.dat<br />
RCS file: /usr/local/cvsroot/fuzion/test.dat,v<br />
retrieving revision 1.4<br />
retrieving revision 1.5<br />
Merging differences between 1.4 <strong>and</strong> 1.5 into test.dat<br />
rcsmerge: warning: conflicts during merge<br />
cvs server: conflicts found in test.dat<br />
C test.dat<br />
<strong>The</strong> resulting test.dat file is shown below, clipped for brevity;<br />
# cat test.dat<br />
aerosol<br />
aerosolize<br />
aerosols<br />
aerospace<br />
aesthetic<br />
aesthetically<br />
aesthetics<br />
> 1.5<br />
<strong>The</strong> > markers indicate which version of the file has had which<br />
edits made to it. <strong>The</strong> text between “> 1.5” exists in version 1.5<br />
of the file (in the repository) but not in the local working copy.
CH06.fm Page 186 Monday, October 7, 2002 9:06 PM<br />
186 Chapter 6 • Introduction to CVS<br />
<strong>The</strong> final merged <strong>and</strong> edited file is shown below <strong>and</strong> is ready to be checked back into the<br />
repository.<br />
# cat test.dat<br />
aerosol<br />
aerosolize<br />
aerosols<br />
aerospace<br />
aesthetic<br />
aesthetically<br />
aesthetics<br />
zebras<br />
zenith<br />
zoological<br />
zoologically<br />
zoom<br />
zooms<br />
zoos<br />
6.4.7 Checking the Project Back In<br />
Once you have made changes to a file, it is ready to be checked back into the repository.<br />
This is done with the commit option. <strong>The</strong> checkin <strong>and</strong> ci options are similar to the commit<br />
option, but instead of simply synchronizing the working file with the one in the repository,<br />
commit also releases the file <strong>and</strong> sets certain flags that can be used if the watch functions of<br />
CVS are being used.<br />
# cvs commit -m "Added information to test.dat" test.dat<br />
If there are any further conflicts, CVS will notify you that the files need to be changed.<br />
6.4.8 Adding Files to a Project<br />
Files may be added to a project after it has been imported. This is done by specifying the<br />
add option name of the file or files to be added to the project.<br />
For example:<br />
# cvs add index.html<br />
cvs server: scheduling file `index.html' for addition<br />
cvs server: use 'cvs commit' to add this file permanently<br />
# cvs commit -m "new file" index.html<br />
RCS file: /usr/local/cvsroot/fuzion/index.html,v<br />
done<br />
Checking in index.html;<br />
/usr/local/cvsroot/fuzion/index.html,v
CH06.fm Page 187 Monday, October 7, 2002 9:06 PM<br />
<strong>Using</strong> the CVS Client 187<br />
If the file is a binary file you must specify the –kb option in order for it to be properly<br />
imported into the project.<br />
# cvs add -kb banner.jpg<br />
6.4.9 Removing Files from a Project<br />
If you no longer wish a file to be a part of a project, you can use CVS’s remove option to<br />
rid yourself of that file. Prior to removing the file, however, it must be deleted from the working<br />
directory.<br />
# cvs remove index.html<br />
cvs server: file `index.html' still in working directory<br />
cvs server: 1 file exists; remove it first<br />
# rm index.html<br />
# cvs remove index.html<br />
cvs server: scheduling `index.html' for removal<br />
cvs server: use 'cvs commit' to remove this file permanently<br />
# cvs ci -m "Removed index.html" index.html<br />
Removing index.html;<br />
/usr/local/cvsroot/fuzion/index.html,v
CH06.fm Page 188 Monday, October 7, 2002 9:06 PM<br />
188 Chapter 6 • Introduction to CVS<br />
Additionally, if you have not yet issued the remove comm<strong>and</strong>, you can retrieve a copy of<br />
the file from the repository by issuing an update comm<strong>and</strong>.<br />
# rm index.html<br />
# cvs update index.html<br />
U index.html<br />
6.4.10 Renaming Files within a Project<br />
<strong>The</strong>re is no direct method of renaming files within the CVS repository. In order to rename<br />
a file, you must remove the old name <strong>and</strong> add in the new one. Here is an example of renaming a<br />
file from oldfile to newfile.<br />
# cvs status oldfile<br />
============================================================<br />
File: oldfile<br />
Status: Up-to-date<br />
Working revision: 1.1<br />
Repository revision: 1.1<br />
oldfile,v<br />
Sticky Tag:<br />
(none)<br />
Sticky Date:<br />
(none)<br />
Sticky Options: (none)<br />
/usr/local/cvsroot/fuzion/<br />
# mv oldfile newfile<br />
# cvs remove oldfile<br />
cvs server: scheduling `oldfile' for removal<br />
cvs server: use 'cvs commit' to remove this file permanently<br />
# cvs add newfile<br />
cvs server: scheduling file `newfile' for addition<br />
cvs server: use 'cvs commit' to add this file permanently<br />
# cvs commit -m "Ren oldfile newfile" oldfile newfile<br />
Removing oldfile;<br />
/usr/local/cvsroot/fuzion/oldfile,v
CH06.fm Page 189 Monday, October 7, 2002 9:06 PM<br />
<strong>Using</strong> the CVS Client 189<br />
that have not been updated with the repository, CVS will inform you <strong>and</strong> give you the option of<br />
releasing the working directory.<br />
# cd /home/lcp<br />
# cvs release fuzion<br />
A banner.jpg<br />
M fuzion.pl<br />
You have [2] altered files in this repository.<br />
Are you sure you want to release directory `fuzion': Y<br />
# rm –r fuzion<br />
6.4.12 Tags <strong>and</strong> Releases<br />
One of the strengths of CVS is its ability to create a release of a particular project. A<br />
release is a snapshot of a project at a specific point in time <strong>and</strong> is generally referred to by a<br />
numeric designation. When we refer to CVS version 1.1.11p1, we are talking about a specific<br />
release of the application that will always remain the same. If changes are made to that version<br />
of the software, the version number will change by indicating either a patch level or an increment<br />
in the major or minor version number.<br />
This designation can be accomplished with CVS by assigning a tag to a project. Tags<br />
may be named in any fashion, symbolically with a numerical system as mentioned, or by code<br />
names, etc. It is important, however, that once a methodology for naming releases is established<br />
that it be abided by in order to prevent confusion in the future.<br />
To apply a tag to a project, issue the following comm<strong>and</strong> from within the project directory:<br />
# cvs tag Release_1_1 .<br />
cvs server: Tagging .<br />
T 1.0.fuzion.pl<br />
T banner.jpg<br />
T em.dat<br />
T fuzion.pl<br />
T index.html<br />
T newfile<br />
T sk.dat<br />
T tal.dat<br />
T test.dat<br />
This does not change any information in the files; it simply places symbolic tags in the<br />
CVS repository so that when Release_1_1 of the Fuzion project is requested, these versions of<br />
the files will be retrieved from the repository.<br />
To check a specific release back out of the repository, issue the checkout comm<strong>and</strong><br />
with the –r option <strong>and</strong> the name of the release.<br />
# cvs checkout –r Release_1_1 fuzion
CH06.fm Page 190 Monday, October 7, 2002 9:06 PM<br />
190 Chapter 6 • Introduction to CVS<br />
6.5 Introduction to jCVS<br />
For those more comfortable working with a GUI rather than a comm<strong>and</strong> line CVS client,<br />
there is a Java client available that uses Java that enables you to access off of the functionality of<br />
the CVS repository with a few clicks.<br />
jCVS was written by Timothy Gerard Endres <strong>and</strong> has been released under the GNU Public<br />
License (GPL) <strong>and</strong> may be found at http://www.jcvs.org.<br />
6.5.1 System Requirements<br />
As previously mentioned, jCVS will run on any platform supported by Java. <strong>The</strong> current<br />
release runs on Java version 1.2 or higher. <strong>The</strong> installed application is a little over 6MB with<br />
source code, so any computer capable of running Java <strong>and</strong> X should have not problems installing<br />
<strong>and</strong> running jCVS.<br />
6.5.2 Installation Instructions<br />
In order to run jCVS, you must first install the Java Runtime Environment. <strong>The</strong> latest <strong>and</strong><br />
most complete runtime libraries available from Sun are http://java.sun.com/j2se/1.4/download.html<br />
<strong>and</strong> can be found for <strong>Linux</strong>, Solaris <strong>and</strong> Windows.<br />
Download the installer for your platform <strong>and</strong> follow the instructions provided. This generally<br />
consists of running an installer. In the example provided below, the jre was installed in /<br />
usr/local/jre.<br />
Next, locate the latest jCVS tarball application archive. <strong>The</strong>se are available at http://<br />
www.jcvs.org/download.html for download. For the purpose of these examples, assume that the<br />
application will be installed in /usr/local/jcvs.<br />
# cd /tmp<br />
# wget http://www.jcvs.org/download/jcvs/jcvs-522.tgz<br />
--14:14:46-- http://www.jcvs.org/download/jcvs/jcvs-522.tgz<br />
=> `jcvs-522.tgz'<br />
Connecting to www.jcvs.org:80... connected!<br />
HTTP request sent, awaiting response... 200 OK<br />
Length: 1,976,228 [application/x-tar]<br />
[snip]<br />
14:14:55 (226.81 KB/s) - `jcvs-522.tgz' saved [1976228/<br />
1976228]<br />
# cd /usr/local<br />
# tar xzf /tmp/jcvs-522.tgz<br />
# ln -s jCVS-5.2.2 jcvs<br />
# /usr/local/jre/bin/java -jar \<br />
/usr/local/jcvs/jars/jcvsii.jar
CH06.fm Page 191 Monday, October 7, 2002 9:06 PM<br />
Introduction to jCVS 191<br />
6.5.3 <strong>Using</strong> jCVS<br />
At this point you should be faced with the main jCVS screen. (See Figure 6-1.) <strong>The</strong> tabs<br />
along the top permit you to perform various CVS comm<strong>and</strong>s against one or more repositories. If<br />
you have problem accessing a repository, the Test tab will allow you to check basic connectivity<br />
<strong>and</strong> access rights.<br />
Once you have checked projects out from a repository, you may transfer them to the Work-<br />
Bench in order to have easy access to them. This is simply an area where all of your current<br />
projects can reside.<br />
Figure 6-1 <strong>The</strong> jCVS WorkBench.<br />
6.5.3.1 <strong>Configuring</strong> the jCVS Client<br />
To begin, you will want to set up a few configuration options before beginning work on a<br />
project. Select File | Edit Preferences … from the main menu. Select Global |<br />
Temp Directory in order to specify a place on the computer to store temporary files.<br />
6.5.3.2 Checking Out a Project<br />
To begin working with jCVS, click on the Checkout tab. <strong>The</strong> screen shown in Figure 6-<br />
2 will appear <strong>and</strong> you will be able to checkout a project from your repository.
CH06.fm Page 192 Monday, October 7, 2002 9:06 PM<br />
192 Chapter 6 • Introduction to CVS<br />
Figure 6-2 Checking out a Project from a CVS Repository.<br />
As you can see, the fields presented map to the comm<strong>and</strong> line arguments that are required<br />
in order to check out a project from a repository. In the example presented, I am checking out a<br />
project entitled jCVSii from the dev server.<br />
<strong>The</strong> Arguments field can be used to enter any comm<strong>and</strong> arguments or options that do not<br />
have a specific entry on the form. <strong>The</strong> entry above would be equivalent to the following comm<strong>and</strong>s:<br />
# cd /home/lcp<br />
# export CVSRROOT=:pserver:lcp@dev:/usr/local/cvsroot/<br />
# cvs login<br />
# cvs checkout jCVSii<br />
When the checkout is complete, a project window will be presented displaying the file<br />
structure of the project. See Figure 6-3.<br />
<strong>The</strong> Project Window allows you full access to the entire range of CVS comm<strong>and</strong>s <strong>and</strong><br />
option. Files may be edited <strong>and</strong> committed back to the repository, the entire project may be<br />
updated, you can view the difference between the project file <strong>and</strong> the same file in the repository,<br />
view the project log, <strong>and</strong> even resurrect files as we did earlier with the remove <strong>and</strong> update comm<strong>and</strong>s.
CH06.fm Page 193 Monday, October 7, 2002 9:06 PM<br />
Introduction to jCVS 193<br />
Figure 6-3 <strong>The</strong> Project Window.<br />
6.5.3.3 Setting up the Server Definitions File<br />
Since, in a development environment, you will be accessing one or more CVS repositories<br />
on a regular basis, you can set them up so that some of the information is retained by the system<br />
<strong>and</strong> saves you some effort if you have to switch between repositories.<br />
To do this, create a file in your home directory entitled .jcvsdef with the following format:
CH06.fm Page 194 Monday, October 7, 2002 9:06 PM<br />
194 Chapter 6 • Introduction to CVS<br />
server.myserver=true<br />
param.myserver.method=pserver<br />
param.myserver.name=My CVS Server<br />
param.myserver.module=fuzion<br />
param.myserver.host=dev.mynetwork.net<br />
param.myserver.user=lcp<br />
param.myserver.repos=/usr/local/cvsroot<br />
param.myserver.desc= \<br />
My Server Name goes here.\<br />
As well as a description of the \<br />
available projects.<br />
In this example, you would substitute the name of your CVS repository for myserver.<br />
Use a short nickname, not a fully qualified domain name (FQDN). Don’t use periods in this<br />
name. <strong>The</strong> entry for param.myserver.host should be the FQDN for the CVS repository,<br />
or the IP Address.<br />
If you are working on multiple projects, you can leave the param.myserver.module<br />
blank <strong>and</strong> it will not be filled in automatically. This works for all of the fields.<br />
6.5.3.4 Actions <strong>and</strong> Verbs<br />
Prior to actually editing the files in the project, you must associate each file type with the<br />
application that will be used to Open or Edit the file.<br />
From the WorkBench screen, re-open the preferences. (File | Edit Preferences<br />
…) <strong>The</strong>n select Actions | Verb Comm<strong>and</strong>s from the menu on the left. This will present<br />
the screen shown in Figure 6-4.<br />
Click on the New … button. This displays a dialog button asking for a key. <strong>The</strong> key is a<br />
combination of the file extension <strong>and</strong> an action that may be used with that type of file. For example,<br />
a C Language source code file is designated by the .c extension <strong>and</strong> may be edited or<br />
opened. <strong>The</strong> key to edit any C source code file would be “.c.edit”.<br />
<strong>The</strong> key to open a .jpeg graphic file would be “.jpeg.open”.<br />
To create a key to edit a file with a .java extension, enter .java.edit into the field in<br />
the dialog box. Click the OK button.<br />
Default actions can be defined by adding a key with the definition of ‘._DEF_.verb’.<br />
For example, to create a default editing action for all files not specifically associated with<br />
another action, use the key ‘._DEF_.edit’.<br />
In the Comm<strong>and</strong> field, type the comm<strong>and</strong> line that you would use to perform the action<br />
associated with the key that you have just entered. <strong>The</strong> name of the file to be edited is substituted<br />
on the comm<strong>and</strong> line for the variable $FILE.<br />
If, for example, you wished to use gedit, a simple Gnome editor, enter<br />
/usr/bin/gedit $FILE<br />
in the Comm<strong>and</strong> field.
CH06.fm Page 195 Monday, October 7, 2002 9:06 PM<br />
Introduction to jCVS 195<br />
Figure 6-4 Adding verbs to jCVS.<br />
6.5.3.5 Editing Projects<br />
Once you have associated various file extensions with specific actions <strong>and</strong> helper applications,<br />
you are ready to begin working with your project.<br />
By highlighting a file <strong>and</strong> right-clicking on it, you will display a menu of options for that<br />
file. If you select Edit from the menu that is displayed, jCVS will launch the application that<br />
you have defined for that action as shown in Figure 6-5.<br />
<strong>The</strong> icons of files that have been modified after being checked out of the repository are<br />
shown in red for easy identification.<br />
Running a diff of a file, or updating it, is as simple as selecting the appropriate option<br />
from the menu.
CH06.fm Page 196 Monday, October 7, 2002 9:06 PM<br />
196 Chapter 6 • Introduction to CVS<br />
Figure 6-5 Editing source code.<br />
6.5.3.6 Working with the WorkBench<br />
In order to save a project to the WorkBench, you must first select a folder to save it in. You<br />
can organize your projects by adding additional folders to the WorkBench as needed. <strong>The</strong>se can<br />
be divided by Vendor, Client or any other method that you choose.<br />
When you have selected a folder for the project, in the Project Window, select File |<br />
Add to WorkBench… <strong>The</strong>n fill in the details of the project <strong>and</strong> press OK.<br />
Opening a project on the WorkBench is accomplished by double-clicking on the name of<br />
the project. This opens the local copy.<br />
To remove a project from the WorkBench, you will want to release the project from the<br />
Project screen (Project | Release) <strong>and</strong> then delete the project from the WorkBench.<br />
6.6 <strong>Using</strong> Emacs with CVS<br />
Until recently, (version 1.10) CVS has shipped with pcl-cvs, an interface that allowed Emacs<br />
users to integrate CVS into the Emacs environment. <strong>The</strong> latest version of pcl-cvs (2.9) is
CH06.fm Page 197 Monday, October 7, 2002 9:06 PM<br />
<strong>Using</strong> Emacs with CVS 197<br />
dated 4/15/2000 <strong>and</strong> is available at ftp://rum.cs.yale.edu/pub/monnier/pcl-cvs/pcl-cvs-<br />
2.9.9.tar.gz You will also need to retrieve the elib library found at ftp://ftp.lysator.liu.se/pub/<br />
emacs/elib-1.0.tar.gz.<br />
6.6.1 Installing pcl-cvs<br />
<strong>The</strong> elib library must be installed first. To do this, unpack the tarball:<br />
# tar xvzf elib-1.0.tar.gz<br />
Change directories into the newly created file <strong>and</strong> edit the Makefile to reflect the RedHat<br />
environment. Changes need to be made to two lines in the Makefile under RedHat 7.2. Other<br />
versions of <strong>Linux</strong> may or may not require any changes. <strong>The</strong> original lines <strong>and</strong> the correction are<br />
given below:<br />
Original:<br />
Edited:<br />
prefix = /usr/local<br />
infodir = $(prefix)/info<br />
prefix = /usr<br />
infodir = $(prefix)/share/info<br />
Once these changes are made, you may compile the elib library by issuing the following<br />
comm<strong>and</strong>s as root:<br />
# make<br />
# make install<br />
Once you have installed the elib library, you may install the pcl-cvs application the<br />
exact same way, by making the above changes to the Makefile <strong>and</strong> then compiling with make.<br />
6.6.2 <strong>Using</strong> pcl-cvs<br />
Complete documentation for pcl-cvs is available with the installed appliations in<br />
.info <strong>and</strong> .tex formats. It is also available on the World Wide Web at http://www.delorie.com/gnu/docs/cvs/pcl-cvs_toc.html.<br />
While you will still have to check out the project from the comm<strong>and</strong> line, pcl-cvs provides<br />
you with the ability to compare files, commit changes <strong>and</strong> perform many other CVS functions<br />
from within Emacs.<br />
If you are unfamiliar with Emacs, please refer to Chapter 2 for more detailed information<br />
about working with this editor.<br />
As an introduction to working the CVS through Emacs, change into a CVS project directory<br />
<strong>and</strong> start Emacs. Make sure that you have the CVSROOT environment variable set up properly.<br />
To begin with, let’s get the status on our current project. Type in M-x cvs-status <strong>and</strong><br />
press enter to accept the directory information that Emacs presents. After checking with CVS,<br />
Emacs should display something similar to Figure 6-6.
CH06.fm Page 198 Monday, October 7, 2002 9:06 PM<br />
198 Chapter 6 • Introduction to CVS<br />
Figure 6-6 CVS Project status in Emacs with pcl-cvs.<br />
Files listed in the status screen may be edited by moving the cursor to the appropriate line<br />
<strong>and</strong> pressing the o key. This will load the file in question into another window for editing. Pressing<br />
f instead of o will result in the file being opened in the current window <strong>and</strong> replacing the<br />
status information.<br />
When the edited file is saved with changes, the status window will be updated to reflect<br />
this <strong>and</strong> the file will be shown as being modified.<br />
To check a file back into the repository from Emacs, you need to move the cursor to the<br />
line with the file name on it, <strong>and</strong> press the c key. This will open a new window in which you can<br />
type the log information that reflects the changes that you have made to the file. Press C-c twice<br />
(C-c C-c) to save the log information <strong>and</strong> continue checking the file in. You will be asked to<br />
confirm the action prior to the file being updated in the repository.
CH06.fm Page 199 Monday, October 7, 2002 9:06 PM<br />
Secure remote access with CVS 199<br />
<strong>The</strong> m key will mark multiple files (indicated by an asterisk) so that they can be committed or<br />
have other actions taken on them at the same time. <strong>The</strong> u key can remove the mark from a file.<br />
<strong>The</strong>re are more options available within pcl-cvs, but this should give you enough information<br />
to begin using the application productively.<br />
6.7 Secure remote access with CVS<br />
<strong>The</strong> main goal of CVS is to provide a central repository for the storage of development projects<br />
<strong>and</strong> to provide access to <strong>and</strong> management tools for those projects. CVS by its nature is not a<br />
secure protocol.<br />
Passwords, source code files <strong>and</strong> project data are transmitted across the network in clear<br />
text <strong>and</strong> available to anyone along the data path that cares to eavesdrop <strong>and</strong> analyze the data<br />
collected.<br />
Various developers, aware of the inherent insecurity of the CVS protocol, have started<br />
using Secure Shell (ssh) to provide an additional layer of security to the development process.<br />
This chapter describes how to set up ssh on the clients <strong>and</strong> the server in order to ensure that<br />
code, data <strong>and</strong> authentication information are h<strong>and</strong>led in a secure manner.<br />
6.7.1 Secure Shell Access<br />
When describing remote access methods to use for CVS earlier, the method for setting up<br />
rsh access to the server was intentionally omitted. <strong>The</strong> protocol used by rsh is inherently insecure<br />
in that it transmits all information across the network in plain text <strong>and</strong> encourages trust relationships<br />
to be set up between computers that can lead to system compromises.<br />
Secure Shell (ssh) is a replacement for rsh that uses client <strong>and</strong> server authentication as well<br />
as strong cryptography. It is a little more difficult to set up ssh access to a CVS repository than to<br />
set up rsh access, but the security advantages outweigh any additional time <strong>and</strong> effort in setting<br />
up the server.<br />
<strong>The</strong> first step is to ensure that the CVS server has ssh installed <strong>and</strong> properly configured.<br />
Ssh may be obtained from several sources. OpenSSH (http://www.openssh.org) is an open<br />
source implementation of the protocol that is widely used. This is also what ships with RedHat<br />
<strong>Linux</strong>.<br />
<strong>Using</strong> ssh with CVS uses RSA Authentication <strong>and</strong> you need to make sure that this is<br />
turned on in the ssh configuration file. This configuration file is /etc/ssh/sshd_config.<br />
Locate the RSA Authentication <strong>and</strong> configuration <strong>and</strong> make sure that it is turned on. It<br />
should read:<br />
RSAAuthentication yes<br />
This should complete the ssh configuration on the server.<br />
Now log into the client machines that are going to be accessing the CVS repository. Each<br />
user that wishes to access the repository must:
CH06.fm Page 200 Monday, October 7, 2002 9:06 PM<br />
200 Chapter 6 • Introduction to CVS<br />
1. Have a shell account on the CVS server.<br />
2. Create a public/private key pair on the client.<br />
3. Transfer the public portion of the key to the CVS server.<br />
4. Set up the CVS client to use this new method.<br />
Depending on how the CVS server is configured, it may be possible to set up ssh to bypass<br />
the requirement of typing in your password every time that you interact with the CVS repository.<br />
N O T E <strong>The</strong> key to logging in without having to type in the<br />
passphrase each time is to specify a blank password during the<br />
key generation process. While this does permit you to log into the<br />
server without supplying a passphrase, anyone who has access<br />
to your account will be able to do the same. Make sure never to<br />
leave your workstation unlocked <strong>and</strong> unattended.<br />
Assuming that the accounts have already been set up on the CVS server, the next step is to<br />
generate the public/private key pair. This is accomplished by using the ssh-keygen program.<br />
To generate the key pair, issue the following comm<strong>and</strong> (this may result in a DSA key with<br />
openssh3.):<br />
# ssh-keygen –N “”<br />
Generating public/private rsa1 key pair.<br />
Enter file in which to save the key (/root/.ssh/identity):<br />
<br />
Your identification has been saved in /root/.ssh/identity.<br />
Your public key has been saved in /root/.ssh/identity.pub.<br />
<strong>The</strong> key fingerprint is:<br />
32:66:ea:74:4a:7d:23:78:57:bc:90:12:a3:da:78:20 lcp@client<br />
<strong>The</strong> –N “” option tells the program to uses a null passphrase to protect the keys.<br />
As indicated by the program messages, this creates two files in the user’s $HOME/.ssh<br />
directory. <strong>The</strong> first one, identity, is your private key. This should be kept secure <strong>and</strong> should<br />
not be shared. <strong>The</strong> second, identity.pub, as you may have guessed, is the public key. <strong>The</strong><br />
contents of this file need to be distributed to every machine that you wish to log into <strong>and</strong> access<br />
via ssh.<br />
To accomplish this, you can use ssh itself to copy the file between machines as follows:<br />
# cd ~/.ssh<br />
# scp identity.pub user@cvsserver:.ssh/`hostname`.pub<br />
Replace user@cvsserver with your username on the CVS server. For example if your<br />
username were jon <strong>and</strong> the CVS server was named dev, you would replace this with<br />
jon@dev. You could also use the FQDN or IP Address in place of cvsserver. Also note that<br />
the punctuation marks surrounding the hostname are backticks.
CH06.fm Page 201 Monday, October 7, 2002 9:06 PM<br />
References <strong>and</strong> Resources 201<br />
Next, you need to log into the CVS server <strong>and</strong> append the newly created .pub files to a<br />
file called authorized_keys. <strong>The</strong> authorized_keys holds the authentication keys for<br />
each user/machine combination that is permitted to use RSA Authentication to log in.<br />
# ssh –l username cvsserver<br />
# cd .ssh<br />
# cat client.pub >> authorized_keys<br />
While username <strong>and</strong> cvsserver are the same as before, client.pub should be<br />
replaced with the name of the machine that you generated the keys on.<br />
At this point ssh should be set up <strong>and</strong> you should be able to move ssh into the CVS repository<br />
without having to enter a password or passphrase.<br />
<strong>The</strong> next step is to set up CVS to use this new method of connecting to the repository. This<br />
is accomplished by set two environment variables. <strong>The</strong> first you should already be familiar with;<br />
that is CVSROOT.<br />
When using ssh instead of accessing the server locally or via pserver, the comm<strong>and</strong> to<br />
set up the CVSROOT variable should look something like this:<br />
# export CVSROOT=:ext:user@hostname:/usr/local/cvsroot<br />
<strong>The</strong> second environment variable that needs to be set up is CVS_RSH. This is used with<br />
the :ext: method to specify which comm<strong>and</strong> should be used to log into the remote server. This<br />
should be set to ssh. You may need to specify the full path to the ssh application if ssh is not in<br />
your $PATH.<br />
# export CVS_RSH=ssh<br />
At this point you should be able to use CVS via ssh.<br />
You should be aware that each project, when it is checked out, keeps track of the method<br />
that it used to check out that project. This is kept in the CVS directory of the project in a file<br />
called Root. If you have any projects checked out when switching access methods, you will<br />
want to check the projects back in <strong>and</strong> release them before switching; or manually edit the files<br />
for each project to inform CVS of the change in access.<br />
Supplying the –d option on the comm<strong>and</strong> line to change the access method would also<br />
work.<br />
6.8 References <strong>and</strong> Resources<br />
1. <strong>The</strong> CVS home page at http://www.cvshome.org<br />
2. Complete CVS documentation at http://www.cvshome.org/docs/manual/<br />
3. <strong>The</strong> jCVS home page at http://www.jcvs.org<br />
4. <strong>The</strong> OpenSSH home at http://www.openssh.org
CH06.fm Page 202 Monday, October 7, 2002 9:06 PM
CH07.fm Page 203 Monday, October 7, 2002 9:12 PM<br />
C HAPTER 7<br />
Miscellaneous Tools<br />
I<br />
n addition to the st<strong>and</strong>ard development tools used in software development<br />
projects, many other utilities are also helpful. Most of the time<br />
these utilities are not directly related to the software development process<br />
but are used as helping aids. This chapter provides an introduction to<br />
some of these utilities that are extremely helpful in the software development<br />
process. Some of the more common uses of these utilities are presented<br />
<strong>and</strong> readers are encouraged to experiment with them. If properly<br />
utilized, they may save time <strong>and</strong> increase productivity.<br />
<strong>The</strong> indent utility is helpful in implementing a common programming<br />
style scheme to all source code files in a project. <strong>The</strong> sed utility is useful<br />
for searching <strong>and</strong> replacing text across multiple files. <strong>The</strong> diff comm<strong>and</strong><br />
is used to display difference between two or more files. <strong>The</strong> cscope <strong>and</strong><br />
cbrowser are used to locate symbols in a software source code tree.<br />
<strong>The</strong> strace <strong>and</strong> ltrace utilities are useful to find out system <strong>and</strong><br />
library calls when a program is executed. GNU binary utilities are a set of<br />
utilities that is often used for different needs. Information about GNU utilities<br />
is presented in this chapter as well.<br />
203
CH07.fm Page 204 Monday, October 7, 2002 9:12 PM<br />
204 Chapter 7 • Miscellaneous Tools<br />
7.1 <strong>Using</strong> indent Utility<br />
One major objective of every software development project is that the code be well organized,<br />
structured <strong>and</strong> easy to underst<strong>and</strong> for other members of the team. Proper indentation plays an<br />
important role in achieving these objectives. Most of the editors used in software development<br />
can do automatic indentation if they are configured to do so. <strong>The</strong> Emacs editor is the best example<br />
as it underst<strong>and</strong>s different programming languages <strong>and</strong> does indentation according to language<br />
rules <strong>and</strong> style. However you can come across code written by others that is poorly<br />
indented <strong>and</strong> you may like to re-indent it according to your own requirements or preferences. In<br />
large software development projects, you may try to enforce a particular coding style, but be<br />
assured that not everyone will follow it. <strong>The</strong> indent program is your tool to h<strong>and</strong>le the situation<br />
<strong>and</strong> reformat all files in the project according to the style adopted for the project. You can do<br />
it by creating a script that goes into each directory of the project <strong>and</strong> reformats all files. In this<br />
section we shall explore some of its features <strong>and</strong> how to utilize it.<br />
By default, the indent program uses the GNU style of coding <strong>and</strong> applies these rules to<br />
input files. It creates a backup file with original contents of the file. <strong>The</strong> reformatted file is created<br />
with the same name. <strong>The</strong> backup file ends with a tilde character ~. Note that the same<br />
scheme of creating backup files is used by the Emacs editor.<br />
Let us see how indent works. We will take a poorly indented file <strong>and</strong> apply the indent<br />
program to it. Following is a listing of the poorly indented file hello.c.<br />
1 /**************************************<br />
2 * hello.c<br />
3 *<br />
4 * This file is used to demonstrate use<br />
5 * of indent utility<br />
6 *************************************/<br />
7 #include <br />
8<br />
9 main () {<br />
10 char string[25] ;<br />
11 printf ("Enter a string of characters : ") ;<br />
12 scanf ("%s", string);<br />
13 printf ("<strong>The</strong> entered string is : %s\n ", string);<br />
14 }<br />
Line numbers are added to the listing using the “cat –n hello.c” comm<strong>and</strong> to<br />
explain changes. <strong>The</strong>y are not part of the hello.c file. To properly indent the file hello.c,<br />
the following comm<strong>and</strong> is executed:<br />
indent hello.c<br />
<strong>The</strong> resulting hello.c file is shown below. Note how the indent program has modified<br />
the file. Lines 10 to 14 are indented to two characters (depending upon default settings).
CH07.fm Page 205 Monday, October 7, 2002 9:12 PM<br />
<strong>Using</strong> indent Utility 205<br />
1 /**************************************<br />
2 * hello.c<br />
3 *<br />
4 * This file is used to demonstrate use<br />
5 * of indent utility<br />
6 *************************************/<br />
7 #include <br />
8<br />
9 main ()<br />
10 {<br />
11 char string[25];<br />
12 printf ("Enter a string of characters : ");<br />
13 scanf ("%s", string);<br />
14 printf ("<strong>The</strong> entered string is : %s\n ", string);<br />
15 }<br />
However line 6 is still not properly indented. By default the indent program does not<br />
modify comment lines.<br />
To find out which version of the indent program you are using, use the following comm<strong>and</strong>.<br />
[root@boota ftp-dir]# indent --version<br />
GNU indent 2.2.6<br />
[root@boota ftp-dir]#<br />
7.1.1 Getting Started with Indent<br />
<strong>The</strong> indent program may be used as a comm<strong>and</strong> or as a pipe. In the comm<strong>and</strong> mode, the<br />
program has a general format as shown below:<br />
indent [options] [input filename] [-o output filename]<br />
<strong>The</strong> following two lines show the simplest use of the indent program. It takes<br />
hello.c as input file <strong>and</strong> creates hello.c as output file <strong>and</strong> hello.c~ as backup file.<br />
[root@boota indent]# indent hello.c<br />
[root@boota indent]#<br />
If you want to create an output file with a different name without modifying the original<br />
file, you can use the –o option with indent. When multiple input files are specified,<br />
indent reformats each file <strong>and</strong> creates a backup file for each input file. Wild card characters<br />
can also be used with indent so that you can indent all C source code files with the<br />
“indent *.c” comm<strong>and</strong>.<br />
<strong>The</strong> output of another comm<strong>and</strong> can also be piped into the indent comm<strong>and</strong>. <strong>The</strong> following<br />
comm<strong>and</strong> does the same thing as indent hello.c but writes the output on STDOUT<br />
instead of writing it to a file.<br />
cat hello.c | indent
CH07.fm Page 206 Monday, October 7, 2002 9:12 PM<br />
206 Chapter 7 • Miscellaneous Tools<br />
This is sometimes useful if you just want to test the behavior of indent without modifying<br />
a file.<br />
<strong>The</strong> most efficient use of indent is through a shell script that goes into each directory of<br />
the source code tree <strong>and</strong> indents each <strong>and</strong> every file in the project. You may also create a rule in<br />
the makefile of a project to indent all files in one or all directories. A typical makefile rule may<br />
look like the following:<br />
indent:<br />
indent *.c<br />
indent *.cpp<br />
indent *.h<br />
In the case of a project with multiple subdirectories, you can have a more sophisticated<br />
rule. Taking an example from Chapter 4, where we have four subdirectories, you can use the following<br />
rule to go into each directory <strong>and</strong> indent all C source code files.<br />
SUBDIRS = $(COMDIR) $(FTPDIR) $(TFTPDIR) $(DNSDIR)<br />
indent:<br />
for i in $(SUBDIRS) ; do \<br />
( cd $$i ; indent *.c) ; \<br />
done<br />
Keep in mind that after indenting all of the files, you may have to build the whole project<br />
because source code files have been modified. In big projects this process may take a while.<br />
Indent uses a configuration file called .indent.pro, which should be present in the<br />
current directory or in your home directory. You can use this file to set options that you always<br />
use. If the file is present in the current directory, it is used instead of the file in the home directory<br />
of the user. By creating a different .indent.pro file in different directories of a project,<br />
you can apply different indentation rules in different directories. This is especially useful when a<br />
project uses multiple languages. For example, indentation rules may be different for C, C++ <strong>and</strong><br />
assembly language files.<br />
7.1.2 Selecting Coding Styles<br />
Different coding styles are in use by programmers. Some common styles are defined in<br />
indent program <strong>and</strong> these may be invoked by a single option at the comm<strong>and</strong> line. <strong>The</strong> most<br />
common style of coding in the open source is the GNU style. This style can be applied using –gnu<br />
option at the comm<strong>and</strong> line. Options, which are used with the GNU style, are listed below:<br />
-nbad<br />
-bap<br />
-nbc<br />
-bbo<br />
-bl<br />
-bli2
CH07.fm Page 207 Monday, October 7, 2002 9:12 PM<br />
<strong>Using</strong> indent Utility 207<br />
-bls<br />
-ncdb<br />
-nce<br />
-cp1<br />
-cs<br />
-di2<br />
-ndj<br />
-nfc1<br />
-nfca<br />
-hnl<br />
-i2<br />
-ip5<br />
-lp<br />
-pcs<br />
-nprs<br />
-psl<br />
-saf<br />
-sai<br />
-saw<br />
-nsc<br />
-nsob<br />
A list of all the options <strong>and</strong> their meanings are presented later in this chapter. You can<br />
override a particular option in a style by explicitly typing it on the comm<strong>and</strong> line.<br />
<strong>The</strong> other commonly used style is Kernighan <strong>and</strong> Ritchie style, also known as K&R style.<br />
This style is applied using the –kr option at the comm<strong>and</strong> line <strong>and</strong> it sets the following options.<br />
-nbad<br />
-bap<br />
-bbo<br />
-nbc<br />
-br<br />
-brs<br />
-c33<br />
-cd33
CH07.fm Page 208 Monday, October 7, 2002 9:12 PM<br />
208 Chapter 7 • Miscellaneous Tools<br />
-ncdb<br />
-ce<br />
-ci4<br />
-cli0<br />
-cp33<br />
-cs<br />
-d0<br />
-di1<br />
-nfc1<br />
-nfca<br />
-hnl<br />
-i4<br />
-ip0<br />
-l75<br />
-lp<br />
-npcs<br />
-nprs<br />
-npsl<br />
-saf<br />
-sai<br />
-saw<br />
-nsc<br />
-nsob<br />
-nss<br />
Again, you can override some of these options by specifying them on the comm<strong>and</strong> line.<br />
<strong>The</strong> Berkley style is used by –orig option at the comm<strong>and</strong> line <strong>and</strong> it sets the following<br />
options.<br />
-nbad<br />
-nbap<br />
-bbo<br />
-bc<br />
-br<br />
-brs
CH07.fm Page 209 Monday, October 7, 2002 9:12 PM<br />
<strong>Using</strong> indent Utility 209<br />
-c33<br />
-cd33<br />
-cdb<br />
-ce<br />
-ci4<br />
-cli0<br />
-cp33<br />
-di16<br />
-fc1<br />
-fca<br />
-hnl<br />
-i4<br />
-ip4<br />
-l75<br />
-lp<br />
-npcs<br />
-nprs<br />
-psl<br />
-saf<br />
-sai<br />
-saw<br />
-sc<br />
-nsob<br />
-nss<br />
-ts8<br />
7.1.3 Blank Lines <strong>and</strong> Comments<br />
Blank lines can be used in the source code files to add clarity. <strong>The</strong> indent program<br />
allows you to add or remove blank lines from the source code files. Most commonly used<br />
options to h<strong>and</strong>le blank lines are as follows:<br />
-bad<br />
-bap<br />
This option adds a blank line after declarations.<br />
This option is used to add a blank line after a procedure body. <strong>Using</strong> this option<br />
will create a blank line after each function.
CH07.fm Page 210 Monday, October 7, 2002 9:12 PM<br />
210 Chapter 7 • Miscellaneous Tools<br />
-bbb<br />
-sob<br />
This option is used to add a blank line before a boxed comment. An example of a<br />
boxed comment is shown below.<br />
/**************************************<br />
* hello.c<br />
*<br />
* This file is used to demonstrate use<br />
* of indent utility<br />
*************************************/<br />
This option is used to remove unnecessary blank lines from the source code.<br />
By adding n in the start of these options, their effect may be reversed. For example, the<br />
-nbad option will not add any blank line after declaration.<br />
7.1.4 Formatting Braces<br />
People have different tastes about how braces should be formatted in C language. <strong>Using</strong><br />
indent you can specify different ways of formatting braces. Let us consider a poorly formatted<br />
piece of C source code <strong>and</strong> see different ways of formatting it. <strong>The</strong> input segment of source code<br />
is shown below:<br />
if (counter > 0)<br />
{<br />
counter-- ;<br />
printf ("Counter value is: %d \n");<br />
}<br />
else<br />
{<br />
printf("Counter reached zero. Resetting counter\n");<br />
counter = 100;<br />
}<br />
<strong>The</strong> default indentation of this segment of code is shown below. This is the default GNU<br />
indentation when you use no comm<strong>and</strong> line switches with indent.<br />
if (counter > 0)<br />
{<br />
counter--;<br />
printf ("Counter value is: %d \n");<br />
}<br />
else<br />
{<br />
printf ("Counter reached zero. Resetting counter\n");<br />
counter = 100;<br />
}
CH07.fm Page 211 Monday, October 7, 2002 9:12 PM<br />
<strong>Using</strong> indent Utility 211<br />
Among other things, note that indent has placed a space after the second printf function<br />
call. This is the default style of putting braces in C code. Since the GNU formatting style is<br />
used with GNU indent by default, <strong>and</strong> it uses the –bl option, the result is as shown above. To<br />
put the starting brace on the same line, you can use the –br comm<strong>and</strong> line switch <strong>and</strong> the result<br />
is as follows:<br />
if (counter > 0) {<br />
counter--;<br />
printf ("Counter value is: %d \n");<br />
}<br />
else {<br />
printf ("Counter reached zero. Resetting counter\n");<br />
counter = 100;<br />
}<br />
Other forms of indent can be used with different statements. See the manual pages of<br />
indent for a detailed list of all options.<br />
7.1.5 Formatting Declarations<br />
You can tell indent to h<strong>and</strong>le the variable declarations in other ways by using different<br />
options to separate the declaration lines from other code. <strong>The</strong> most common method is to<br />
place a blank line after the declaration’s end. As an example, if you use the –bad option<br />
(blank line after declarations), indent will place a blank line wherever it finds end of the<br />
declaration part. In the previous example of hello.c program, the result of using this option<br />
will be as follows:<br />
1 /**************************************<br />
2 * hello.c<br />
3 *<br />
4 * This file is used to demonstrate use<br />
5 * of indent utility<br />
6 *************************************/<br />
7 #include <br />
8<br />
9 main ()<br />
10 {<br />
11 char string[25];<br />
12<br />
13 printf ("Enter a string of characters : ");<br />
14 scanf ("%s", string);<br />
15 printf ("<strong>The</strong> entered string is : %s\n ", string);<br />
16 }<br />
Note that line number 12 is inserted into the file. You can also use the –di option with<br />
indent to align an identifier to a particular column. For example, using –di8 will align all<br />
identifiers to column number 8. Consider the following two lines in a C source code file.
CH07.fm Page 212 Monday, October 7, 2002 9:12 PM<br />
212 Chapter 7 • Miscellaneous Tools<br />
int i;<br />
char c;<br />
long boota ;<br />
After using indent with –di8 option, the output will be as follows:<br />
int i;<br />
char c;<br />
long boota;<br />
You can also force creation of a new line for each identifier, using the –bc option. Consider<br />
the following code segment:<br />
int i, j, k;<br />
char c;<br />
long boota ;<br />
After using the “indent –di8 –bc” comm<strong>and</strong> on these three lines, the result will be<br />
as follows:<br />
int i,<br />
j,<br />
k;<br />
char c;<br />
long boota;<br />
In addition to these common methods, there are other ways to arrange identifiers in declaration<br />
sections.<br />
7.1.6 Breaking Long Lines<br />
Long lines can be broken using indent at a defined length. <strong>The</strong> –l option controls this<br />
behavior. Consider the following line of code:<br />
printf ("This is example of a long line.");<br />
This line is 43 characters long. If we set the line limit to 40 characters using –l40 comm<strong>and</strong><br />
line option, the line will be broken as follows:<br />
printf<br />
("This is example of a long line.");<br />
Lines with conditional operators may be broken more intelligently. Consider the following<br />
if statement:<br />
if(((counter == 100) && (color == RED)) || (string[0] == 'S'))<br />
<strong>Using</strong> options “–l30 –bbo” (break before Boolean operator) will be as follows:<br />
if (((counter == 100)<br />
&& (color == RED))<br />
|| (string[0] == 'S'))
CH07.fm Page 213 Monday, October 7, 2002 9:12 PM<br />
<strong>Using</strong> indent Utility 213<br />
<strong>Using</strong> the –nbbo option results in the following output.<br />
if (((counter == 100) &&<br />
(color == RED)) ||<br />
(string[0] == 'S'))<br />
<strong>The</strong> indent utility may also be used to h<strong>and</strong>le new line characters in a special way using<br />
the –hnl option. You are encouraged to experiment with this option.<br />
7.1.7 Summary of Options<br />
Options with the indent program can be used in two ways: the long way that starts with<br />
two hyphen characters <strong>and</strong> the short way that starts with a single hyphen character. Options used<br />
with the indent comm<strong>and</strong> are listed below. <strong>The</strong>se are taken from the manual page of the<br />
indent comm<strong>and</strong>. <strong>The</strong> long method also describes the meaning of an option.<br />
-bc<br />
-bad<br />
-bap<br />
-bbb<br />
-bl<br />
-bli<br />
-bls<br />
-br<br />
-brs<br />
-nbbo<br />
-bbo<br />
-bfda<br />
-clin<br />
-cbin<br />
-cdb<br />
-cn<br />
-cin<br />
-lp<br />
-cdw<br />
-ce<br />
-cdn<br />
-din<br />
-nbfda<br />
-npsl<br />
-ncdw<br />
-nce<br />
-nfca<br />
-nfc1<br />
-nlp<br />
-nss<br />
-nsc<br />
-cpn<br />
--blank-lines-after-commas<br />
--blank-lines-after-declarations<br />
--blank-lines-after-procedures<br />
--blank-lines-before-block-comments<br />
--braces-after-if-line<br />
--brace-indent<br />
--braces-after-struct-decl-line<br />
--braces-on-if-line<br />
--braces-on-struct-decl-line<br />
--break-after-boolean-operator<br />
--break-before-boolean-operator<br />
--break-function-decl-args<br />
--case-indentation<br />
--case-brace-indentation<br />
--comment-delimiters-on-blank-lines<br />
--comment-indentation<br />
--continuation-indentation<br />
--continue-at-parentheses<br />
--cuddle-do-while<br />
--cuddle-else<br />
--declaration-comment-column<br />
--declaration-indentation<br />
--dont-break-function-decl-args<br />
--dont-break-procedure-type<br />
--dont-cuddle-do-while<br />
--dont-cuddle-else<br />
--dont-format-comments<br />
--dont-format-first-column-comments<br />
--dont-line-up-parentheses<br />
--dont-space-special-semicolon<br />
--dont-star-comments<br />
--else-endif-column
CH07.fm Page 214 Monday, October 7, 2002 9:12 PM<br />
214 Chapter 7 • Miscellaneous Tools<br />
-fca<br />
--format-all-comments<br />
-fc1<br />
--format-first-column-comments<br />
-gnu<br />
--gnu-style<br />
-hnl<br />
--honour-newlines<br />
-nhnl<br />
--ignore-newlines<br />
-npro<br />
--ignore-profile<br />
-in<br />
--indent-level<br />
-kr<br />
--k-<strong>and</strong>-r-style<br />
-nsob<br />
--leave-optional-blank-lines<br />
-lps<br />
--leave-preprocessor-space<br />
-dn<br />
--line-comments-indentation<br />
-ln<br />
--line-length<br />
-nbc<br />
--no-blank-lines-after-commas<br />
-nbad<br />
--no-blank-lines-after-declarations<br />
-nbap<br />
--no-blank-lines-after-procedures<br />
-nbbb<br />
--no-blank-lines-before-block-comments<br />
-ncdb<br />
--no-comment-delimiters-on-blank-lines<br />
-ncs<br />
--no-space-after-casts<br />
-nip<br />
--no-parameter-indentation<br />
-nsaf<br />
--no-space-after-for<br />
-npcs<br />
--no-space-after-function-call-names<br />
-nsai<br />
--no-space-after-if<br />
-nprs<br />
--no-space-after-parentheses<br />
-nsaw<br />
--no-space-after-while<br />
-nut<br />
--no-tabs<br />
-nv<br />
--no-verbosity<br />
-orig<br />
--original<br />
-ipn<br />
--parameter-indentation<br />
-pin<br />
--paren-indentation<br />
-pmt<br />
--preserve-mtime<br />
-psl<br />
--procnames-start-lines<br />
-cs<br />
--space-after-cast<br />
-saf<br />
--space-after-for<br />
-sai<br />
--space-after-if<br />
-prs<br />
--space-after-parentheses<br />
-pcs<br />
--space-after-procedure-calls<br />
-saw<br />
--space-after-while<br />
-ss<br />
--space-special-semicolon<br />
-st<br />
--st<strong>and</strong>ard-output<br />
-sc<br />
--start-left-side-of-comments<br />
-sbin<br />
--struct-brace-indentation<br />
-sob<br />
--swallow-optional-blank-lines<br />
-tsn<br />
--tab-size<br />
-ut<br />
--use-tabs<br />
-v --verbose
CH07.fm Page 215 Monday, October 7, 2002 9:12 PM<br />
<strong>Using</strong> sed Utility 215<br />
7.2 <strong>Using</strong> sed Utility<br />
<strong>The</strong> sed utility is a stream editor that can be used for different file editing purposes when used<br />
as a filter. <strong>The</strong> most common task for software development purposes is the use of sed to search<br />
<strong>and</strong> replace text in source code files. Let us take the example of the following C source code file<br />
hello.c.<br />
#include <br />
main ()<br />
{<br />
char string[25];<br />
}<br />
printf ("Enter a line of characters : ");<br />
scanf ("%s", string);<br />
printf ("<strong>The</strong> entered string is : %s\n ", string);<br />
In order to replace every occurrence of word string with the word STRING, you can use<br />
sed. <strong>The</strong> sed filter comm<strong>and</strong> <strong>and</strong> its result on this file are shown below.<br />
[root@boota]# cat hello.c | sed s/string/STRING/<br />
#include <br />
main ()<br />
{<br />
char STRING[25];<br />
printf ("Enter a line of characters : ");<br />
scanf ("%s", STRING);<br />
printf ("<strong>The</strong> entered STRING is : %s\n ", string);<br />
}<br />
[root@boota indent]#<br />
<strong>The</strong> sed comm<strong>and</strong> underst<strong>and</strong>s UNIX regular expressions. Regular expressions can be<br />
used for a higher level of stream editing. You can also use sed in shell scripts as well as makefiles<br />
to carry out tasks in the entire source code directory tree. You can also use –f options followed<br />
by a filename. <strong>The</strong> filename contains sed comm<strong>and</strong>s. Please refer to the sed man pages<br />
for a complete set of options.<br />
7.3 <strong>Using</strong> diff Utility<br />
<strong>The</strong> diff utility is another useful tool that developers may need. It is used to find out the differences<br />
between two files. If you are using CVS, differences between different versions of a file in<br />
the CVS repository can be found using the cvs (cvs diff) comm<strong>and</strong> as well. However, if<br />
you want to find out the difference between two files that are not in the CVS repository, the<br />
diff utility may be quite h<strong>and</strong>y. One common use may be to find out the difference between<br />
the working copy <strong>and</strong> the backup copy of a source code file. This will enable you to find out
CH07.fm Page 216 Monday, October 7, 2002 9:12 PM<br />
216 Chapter 7 • Miscellaneous Tools<br />
what changes have been made in the working copy of the file. <strong>The</strong> output of the diff utility follows<br />
similar rules to those used in the CVS diff comm<strong>and</strong>. <strong>The</strong> following comm<strong>and</strong> shows<br />
that files hello.c <strong>and</strong> hello.c~ are different at line number 11. <strong>The</strong> line starting with the<br />
less-than symbol is taken from the first file (hello.c) <strong>and</strong> the line starting with the greaterthan<br />
symbol is taken from the file hello.c~.<br />
[root@boota]# diff hello.c hello.c~<br />
11c11<br />
< char string[30];<br />
---<br />
> char string[25];<br />
[root@boota]#<br />
<strong>The</strong> first line of the output contains the character c (changed) that shows that line 11 in the<br />
first file is changed to line 11 in the second file.<br />
You can also use “unified diff” that tells you additional information about the file<br />
<strong>and</strong> displays a few lines before <strong>and</strong> after the lines that are different. See the following output of<br />
the unified diff comm<strong>and</strong>:<br />
[root@boota]# diff hello.c hello.c~ -u<br />
--- hello.cTue Jun 25 14:43:30 2002<br />
+++ hello.c~Tue Jun 25 14:43:38 2002<br />
@@ -8,7 +8,7 @@<br />
main ()<br />
{<br />
- char string[30];<br />
+ char string[25];<br />
printf ("Enter a line of characters : ");<br />
scanf ("%s", string);<br />
[root@boota]#<br />
You can also use the –p option with the comm<strong>and</strong> to display the name of the function in<br />
which the modified line(s) exist.<br />
If you add a line after line 15 in hello.c file <strong>and</strong> run the diff comm<strong>and</strong> once again,<br />
the result will be as follows:<br />
[root@boota]# diff hello.c hello.c~<br />
11c11<br />
< char string[30];<br />
---<br />
> char string[25];<br />
16d15<br />
< printf ("End of program\n");<br />
[root@boota]#
CH07.fm Page 217 Monday, October 7, 2002 9:12 PM<br />
<strong>Using</strong> diff Utility 217<br />
<strong>The</strong> first part of the output is familiar. <strong>The</strong> second part shows that line 16 in the first file,<br />
which is printed next, is not present in the second file. Sometimes it is useful to display two files<br />
being compared in side-by-side format. This can be done by using the –y option. <strong>The</strong> following<br />
comm<strong>and</strong> shows how to use side-by-side output. <strong>The</strong> CVS rules of displaying output are used<br />
here to show modified, added or removed lines.<br />
[root@boota]# diff -y --width 60 hello.c hello.c~<br />
/*************************** /***************************<br />
* hello.c * hello.c<br />
* *<br />
* This file is used to demo * This file is used to demo<br />
* of indent utility * of indent utility<br />
*************************** ***************************<br />
#include <br />
#include <br />
main () main ()<br />
{ {<br />
char string[30]; | char string[25];<br />
printf ("Enter a string of printf ("Enter a string of<br />
scanf ("%s", string);<br />
scanf ("%s", string);<br />
printf ("<strong>The</strong> entered strin printf ("<strong>The</strong> entered strin<br />
printf ("End of program\n" <<br />
} }<br />
[root@boota]#<br />
<strong>The</strong> --width option is used to specify width of columns in the output. As you can see<br />
the | symbol is used to show a modified line <strong>and</strong> < or > symbols are used to show added or<br />
deleted lines.<br />
<strong>The</strong> diff utility can also be used on directories. When comparing directories, diff compares<br />
files of the same name in the two directories. Directories can also be compared recursively.<br />
Many options are used with the diff comm<strong>and</strong>, the most common are listed in Table 7-1.<br />
All these options start with a hyphen character.<br />
Table 7-1 Common options used with the diff comm<strong>and</strong><br />
Option<br />
Description<br />
-b Ignore changes in white spaces<br />
-B Ignore changes that are related to insertion of deletion of blank lines<br />
-i Ignore changes in case<br />
-u Unified output<br />
-p Used with –u option. Shows the function name also.
CH07.fm Page 218 Monday, October 7, 2002 9:12 PM<br />
218 Chapter 7 • Miscellaneous Tools<br />
Table 7-1 Common options used with the diff comm<strong>and</strong> (Continued)<br />
Option<br />
Description<br />
-c Context output<br />
-n RCS style of output<br />
-r Compare directories recursively<br />
-y Use side-by-side format<br />
7.3.1 Other Forms of diff Utility<br />
<strong>The</strong>re are two other important forms of the diff utility. <strong>The</strong>se are diff3 <strong>and</strong> sdiff.<br />
<strong>The</strong> diff3 utility is used to compare three files <strong>and</strong> its general format is shown below.<br />
diff3 [options] mine older yours<br />
Suppose you <strong>and</strong> your colleague start working on a file simultaneously. <strong>The</strong> original file is<br />
the older file. Now you have your copy of the file (the mine file) <strong>and</strong> your colleague has his own<br />
copy of the file (the yours file). If you want to compare both of these modified copies of the file<br />
with the original older file, diff3 is a useful tool. See man pages of the diff3 comm<strong>and</strong> for<br />
more details.<br />
Another important utility is sdiff that finds difference between two files <strong>and</strong> merges<br />
these two files into a third file. <strong>The</strong> general format of sdiff is as follows.<br />
sdiff –o outfile [options] file1 file2<br />
<strong>The</strong> sdiff is useful when you want to interactively merge two files. This is the case<br />
when two people have made changes to a source file <strong>and</strong> at some point you want to merge these<br />
changes into a single file. <strong>The</strong> sdiff utility is interactive <strong>and</strong> it displays two files being compared<br />
in side-by-side fashion. It stops on each difference with a % sign prompt. On this sign you<br />
can press different characters to make a decision. Common responses on the % prompt are<br />
shown in Table 7-2.<br />
Table 7-2 Comm<strong>and</strong>s used on % prompt of sdiff<br />
Comm<strong>and</strong><br />
Description<br />
L<br />
R<br />
e l<br />
e r<br />
Q<br />
Use the left side of the version<br />
Use the right side of the version<br />
Edit <strong>and</strong> then use the left side<br />
Edit <strong>and</strong> use the right side<br />
Quit
CH07.fm Page 219 Monday, October 7, 2002 9:12 PM<br />
<strong>Using</strong> cscope <strong>and</strong> cbrowser 219<br />
7.4 <strong>Using</strong> cscope <strong>and</strong> cbrowser<br />
<strong>The</strong> cscope is a very useful utility to browse through the source code tree of a large project. It<br />
was originally written by Santa Cruz Operations <strong>and</strong> made public later on. You can download it<br />
from http://cscope.sourceforge.net. For <strong>Linux</strong>, it is available in RPM format as well.<br />
It is a text-mode screen-oriented utility. When you start it using the cscope comm<strong>and</strong>,<br />
the initial screen looks like the one shown in Figure 7-1.<br />
When invoked, cscope first creates its symbol file cscope.out in the current directory<br />
that contains a reference to symbols in source code files. This reference is generated from<br />
files with the extensions .c <strong>and</strong> .h. You can also use comm<strong>and</strong> line options to create this symbol<br />
file from a particular type of source code files.<br />
<strong>The</strong> bottom part of the screen shows options that can be used to look up a symbol in the<br />
source code. <strong>The</strong> cursor is blinking at the first option <strong>and</strong> can be moved to other options using<br />
arrow keys. For example, if you want to look up symbol “msg” in all source code files, just type<br />
it in at the first line <strong>and</strong> press the Enter key. You will see a listing of files containing this symbol<br />
as shown in Figure 7-2.<br />
Figure 7-1 <strong>The</strong> cscope initial screen.
CH07.fm Page 220 Monday, October 7, 2002 9:12 PM<br />
220 Chapter 7 • Miscellaneous Tools<br />
Figure 7-2 List of files with symbol msg.<br />
As you can see, there are five files listed in the top part of the screen that contain this symbol.<br />
This listing contains five columns as below:<br />
1. Number of row, starting with zero.<br />
2. File name that contains the symbol.<br />
3. Function name where symbol is used. If the symbol is not inside a function, it is<br />
marked as global.<br />
4. Line number where symbol is present in that file.<br />
5. <strong>The</strong> line showing the definition or use of the symbol.<br />
You can move the cursor to a particular line <strong>and</strong> press the Enter key to edit that file. By<br />
default the file is opened in vi editor. However, you can configure to use an editor of your choice.<br />
To move back to the bottom part of the screen to search for another symbol, you can use the Tab<br />
key. Use the Ctrl+D key combination to quit the program.<br />
<strong>The</strong> utility is also very useful if you want to find non-utilized code in a software project.<br />
For example, if a function is present in the source code but never used anywhere in the project, it<br />
can be detected using cscope. It is also useful when you want to modify a particular symbol<br />
throughout the source code tree. Common options used with cscope are listed in Table 7-3.
CH07.fm Page 221 Monday, October 7, 2002 9:12 PM<br />
<strong>Using</strong> cscope <strong>and</strong> cbrowser 221<br />
Table 7-3 Options used with cscope<br />
Option<br />
Description<br />
-b Build only the cross-reference file<br />
-C Ignore case when searching<br />
-f reffile Use reffile as reference file instead of default cscope.out reference file. This is<br />
useful when you create a global reference file for the entire source code tree.<br />
-R Recursively search source code tree for input files<br />
Use the manual pages of cscope to view a complete list of options. Its web site is also a<br />
good reference for updates <strong>and</strong> new features.<br />
<strong>The</strong> cbrowser is a GUI interface to cscope <strong>and</strong> can be downloaded from its web site,<br />
http://cbrowser.sourceforge.net.<br />
At the time of writing this book, version 0.8 of this utility is available. When you invoke<br />
cbrowser, it displays its initial window where you can select a cscope symbol reference file<br />
<strong>and</strong> use the same type of queries as are available on cscope text window. <strong>The</strong> cbrowser window<br />
is shown in Figure 7-3.<br />
To use a particular cscope symbol file, use the “Selected Database” drop-down menu in<br />
the GUI. Click the “Symbols” button to pull down a menu of different options used with<br />
cscope. <strong>The</strong> box next to this button is used to type in the symbol for which you want to search.<br />
When you press the “Submit” button after typing in the symbol name, cbrowser displays a list<br />
of files where this symbol is used or defined as shown in Figure 7-3. An additional benefit of<br />
using cbrowser is that the bottom part of the window also shows the contents of the selected<br />
file. You can use cursor keys to select a different file. You can also edit these files by using<br />
options in the “File” menu. You can use syntax highlighting <strong>and</strong> other helping tools with<br />
cbrowser using menus.
CH07.fm Page 222 Monday, October 7, 2002 9:12 PM<br />
222 Chapter 7 • Miscellaneous Tools<br />
Figure 7-3 <strong>The</strong> cbrowser window.<br />
7.5 Generating C Function Prototypes from C Source Code <strong>Using</strong> cproto<br />
<strong>The</strong> cproto utility is used to create function prototypes from C source code files. It can also convert<br />
function definition style. <strong>The</strong> latest version can be downloaded from http://sourceforge.net/<br />
projects/cproto/.<br />
At the time of writing this book, version 4.6 is available in source code form. You can<br />
download the file, untar it <strong>and</strong> compile it using the following sequence of comm<strong>and</strong>s.<br />
tar zxvf cproto-4.6.tar.gz<br />
cd cproto-4.6<br />
./configure<br />
make<br />
make install
CH07.fm Page 223 Monday, October 7, 2002 9:12 PM<br />
<strong>Using</strong> ltrace <strong>and</strong> strace Utilities 223<br />
It can read existing C files or take its input from st<strong>and</strong>ard input. This utility is not extensively<br />
used in C software development but may be useful in some cases.<br />
7.6 <strong>Using</strong> ltrace <strong>and</strong> strace Utilities<br />
<strong>The</strong> ltrace program is a tracing utility for library function calls. It runs a program <strong>and</strong> logs all<br />
library function calls by that program. You can also use this utility to log system calls made by a<br />
program. <strong>The</strong> utility can also monitor child processes created by fork() or clone() system calls.<br />
This utility is very useful to quickly trace the failure point of an executable program. <strong>The</strong> utility<br />
may also print the time at which a particular function call or system call is executed with a resolution<br />
of microseconds.<br />
Consider the simple single-line program that prints the string “Hello world” <strong>and</strong> then<br />
exits. <strong>Using</strong> ltrace with the executable of this program produces the following result.<br />
[root@boota ltrace]# ltrace -S -tt ./a.out<br />
22:21:48.325970 SYS_uname(0xbffff3b4) = 0<br />
22:21:48.327037 SYS_brk(NULL) = 0x080495f8<br />
22:21:48.327511 SYS_mmap(0xbffff104, 0xcccccccd, 0x400165f8,<br />
4096, 640) = 0x40017000<br />
22:21:48.328212 SYS_open("/etc/ld.so.preload", 0, 010) = -2<br />
22:21:48.329000 SYS_open("/etc/ld.so.cache", 0, 00) = 3<br />
22:21:48.329657 SYS_197(3, 0xbfffea64, 0, 0xbfffea64, 0) = 0<br />
22:21:48.331719 SYS_mmap(0xbfffea34, 0, 0x400165f8, 1, 3) =<br />
0x40018000<br />
22:21:48.332460 SYS_close(3) = 0<br />
22:21:48.332908 SYS_open("/lib/i686/libc.so.6", 0,<br />
027777765514) = 3<br />
22:21:48.333620 SYS_read(3, "\177ELF\001\001\001", 1024) =<br />
1024<br />
22:21:48.334256 SYS_197(3, 0xbfffeaa4, 3, 0xbfffeaa4, 0) = 0<br />
22:21:48.334917 SYS_mmap(0xbfffe994, 0x0012f728, 0x400165f8,<br />
0xbfffe9c0, 5) = 0x4002c000<br />
22:21:48.335584 SYS_mprotect(0x40152000, 38696, 0, 0x4002c000,<br />
0x00126000) = 0<br />
22:21:48.336209 SYS_mmap(0xbfffe994, 24576, 0x400165f8,<br />
0xbfffe9cc, 3) = 0x40152000<br />
22:21:48.336953 SYS_mmap(0xbfffe994, 0xbfffe9cc, 0x400165f8,<br />
0x40158000, 14120) = 0x40158000<br />
22:21:48.337642 SYS_close(3) = 0<br />
22:21:48.340431 SYS_munmap(0x40018000, 77871) = 0<br />
22:21:48.341060 SYS_getpid() = 32540<br />
22:21:48.341562 __libc_start_main(0x08048460, 1, 0xbffff88c,<br />
0x080482e4, 0x080484c0 <br />
22:21:48.342232 __register_frame_info(0x08049508, 0x080495e0,<br />
0xbffff828, 0x0804838e, 0x080482e4) = 0x401575e0<br />
22:21:48.343064 printf("Hello world\n"
CH07.fm Page 224 Monday, October 7, 2002 9:12 PM<br />
224 Chapter 7 • Miscellaneous Tools<br />
22:21:48.343813 SYS_197(1, 0xbfffeff0, 0x401569e4, 0x40154a60,<br />
0x40154a60) = 0<br />
22:21:48.344450 SYS_192(0, 4096, 3, 34, -1) = 0x40018000<br />
22:21:48.345154 SYS_ioctl(1, 21505, 0xbfffef20, 0xbfffef80,<br />
1024) = 0<br />
22:21:48.345890 SYS_write(1, "Hello world\n", 12Hello world<br />
) = 12<br />
22:21:48.346542 ) = 12<br />
22:21:48.346878 __deregister_frame_info(0x08049508,<br />
0x4000d816, 0x400171ec, 0x40017310, 7) = 0x080495e0<br />
22:21:48.347746 SYS_munmap(0x40018000, 4096) = 0<br />
22:21:48.348235 SYS_exit(12) = <br />
22:21:48.348706 +++ exited (status 12) +++<br />
[root@boota ltrace]#<br />
<strong>The</strong> first column in each row shows the current time followed by a number that shows<br />
microseconds. <strong>The</strong> remaining part of the line shows the system call of the library call used. By<br />
comparing the time in two consecutive lines, you can find out the time taken by a particular system<br />
call. By looking at the output, you can also find out if a program fails during a particular<br />
system call. This may be especially helpful when testing device drivers <strong>and</strong> reading or writing to<br />
these drivers fails for some reason.<br />
<strong>The</strong> most common options used with this utility are shown in Table 7-4.<br />
Table 7-4 Common options used with the ltrace utility<br />
Option<br />
Description<br />
-d Debug. Displays extra information about trace.<br />
-f Trace child processes.<br />
-S Display system calls <strong>and</strong> library calls.<br />
-r Display time difference between successive lines.<br />
-tt<br />
Display time stamp with each line with a resolution to microseconds.<br />
-o filename Record output to a file.<br />
-V Display version.<br />
-h Display help.<br />
<strong>The</strong> comm<strong>and</strong> can also read options either from its configuration file /etc/<br />
ltrace.conf or from .ltrace.conf in the home directory of the user.<br />
<strong>The</strong> strace utility is a more comprehensive tool <strong>and</strong> it can be used to separate different<br />
system calls. For example, it can be used to display information about network related system
CH07.fm Page 225 Monday, October 7, 2002 9:12 PM<br />
<strong>Using</strong> ltrace <strong>and</strong> strace Utilities 225<br />
calls or for IPC related systems calls only. It displays arguments for all functions calls <strong>and</strong> their<br />
return values. A typical output from the execution of the same single line function follows:<br />
[root@boota ltrace]# strace ./a.out<br />
execve("./a.out", ["./a.out"], [/* 44 vars */]) = 0<br />
uname({sys="<strong>Linux</strong>", node="boota.boota.net", ...}) = 0<br />
brk(0)<br />
= 0x80495f8<br />
old_mmap(NULL, 4096, PROT_READ|PROT_WRITE,<br />
MAP_PRIVATE|MAP_ANONYMOUS, -1, 0) = 0x40017000<br />
open("/etc/ld.so.preload", O_RDONLY) = -1 ENOENT (No such<br />
file or directory)<br />
open("/etc/ld.so.cache", O_RDONLY) = 3<br />
fstat64(3, {st_mode=S_IFREG|0644, st_size=77871, ...}) = 0<br />
old_mmap(NULL, 77871, PROT_READ, MAP_PRIVATE, 3, 0) =<br />
0x40018000<br />
close(3) = 0<br />
open("/lib/i686/libc.so.6", O_RDONLY) = 3<br />
read(3,<br />
"\177ELF\1\1\1\0\0\0\0\0\0\0\0\0\3\0\3\0\1\0\0\0\200\302"...,<br />
1024) = 1024<br />
fstat64(3, {st_mode=S_IFREG|0755, st_size=5634864, ...}) = 0<br />
old_mmap(NULL, 1242920, PROT_READ|PROT_EXEC, MAP_PRIVATE, 3,<br />
0) = 0x4002c000<br />
mprotect(0x40152000, 38696, PROT_NONE) = 0<br />
old_mmap(0x40152000, 24576, PROT_READ|PROT_WRITE,<br />
MAP_PRIVATE|MAP_FIXED, 3, 0x125000) = 0x40152000<br />
old_mmap(0x40158000, 14120, PROT_READ|PROT_WRITE,<br />
MAP_PRIVATE|MAP_FIXED|MAP_ANONYMOUS, -1, 0) = 0x40158000<br />
close(3) = 0<br />
munmap(0x40018000, 77871) = 0<br />
getpid() = 32610<br />
fstat64(1, {st_mode=S_IFCHR|0620, st_rdev=makedev(136, 3),<br />
...}) = 0<br />
mmap2(NULL, 4096, PROT_READ|PROT_WRITE,<br />
MAP_PRIVATE|MAP_ANONYMOUS, -1, 0) = 0x40018000<br />
ioctl(1, TCGETS, {B38400 opost isig icanon echo ...}) = 0<br />
write(1, "Hello world\n", 12Hello world<br />
) = 12<br />
munmap(0x40018000, 4096) = 0<br />
_exit(12) = ?<br />
[root@boota ltrace]#<br />
As you can see, it gives you a complete picture of what happens from the execution of a<br />
program to its end. See the manual pages of strace for a complete list of comm<strong>and</strong> line<br />
options. <strong>The</strong> strace utility can also be used for performance-gathering activities, <strong>and</strong> can log<br />
times spent in each function in a program. Refer to the man page for more information.
CH07.fm Page 226 Monday, October 7, 2002 9:12 PM<br />
226 Chapter 7 • Miscellaneous Tools<br />
7.7 <strong>Using</strong> GNU Binary Utilities<br />
GNU binutils is a package of many utilities that are related to manipulating library files or getting<br />
information about different types of binary files. <strong>The</strong>se utilities range from finding strings in<br />
a binary file, creating library files, displaying information about binary files, assembling <strong>and</strong> disassembling<br />
files, <strong>and</strong> so on. This section contains an introduction to most commonly used binary<br />
utilities.<br />
7.7.1 <strong>Using</strong> the ar Utility<br />
Files can be stored into a single file using the ar utility. <strong>The</strong> file into which multiple files<br />
are stored is called an archive. <strong>The</strong> ar program retains file permissions, ownerships <strong>and</strong> other<br />
properties of the original files. <strong>The</strong>se files can be extracted from the archive later on, if required.<br />
<strong>The</strong> program also creates an index within the archive file that is used to speed up locating a component<br />
(or members) of the archive.<br />
From the development point of view, the ar program is used to create libraries of functions.<br />
<strong>The</strong>se libraries are then used with other object files to link an executable file. <strong>The</strong> conventional<br />
name of these library files is lib{name}.a where name is any string used as a library<br />
name. For example, a library named common will be stored in a file called libcommon.a.<br />
<strong>The</strong> ar program performs one of the following tasks depending upon options used on the<br />
comm<strong>and</strong> line.<br />
• Delete a file from the archive (option d)<br />
• Move files in the archive (option m)<br />
• Print a list of files in the archive (option p)<br />
• Append files to the archive (option q)<br />
• Insert new files in the archive by replacing if a file already exists in the archive (option r)<br />
• Displaying contents of an archive (option t)<br />
• Extracting files from an archive (option x)<br />
More options can be used in combination with these options to perform additional tasks.<br />
In this section we shall use some very common options to show you how the ar program is used<br />
in a software development environment.<br />
We have used ar version 2.10.91 in this book. You can display a current version of the<br />
program on your system using –V option as shown below. <strong>The</strong> ar utility is usually used because<br />
of its compatibility with ld, the dynamic loader.<br />
[root@boota ar]# ar -V<br />
GNU ar 2.10.91<br />
Copyright 1997, 98, 99, 2000, 2001 Free Software Foundation,<br />
Inc.<br />
This program is free software; you may redistribute it under<br />
the terms of the GNU General Public License. This program has<br />
absolutely no warranty.<br />
[root@boota ar]#
CH07.fm Page 227 Monday, October 7, 2002 9:12 PM<br />
<strong>Using</strong> GNU Binary Utilities 227<br />
Let us create an archive of simple text files. <strong>The</strong> following comm<strong>and</strong> creates an archive<br />
test.a from files /etc/hosts <strong>and</strong> /etc/resolv.conf.<br />
ar -r test.a /etc/resolv.conf /etc/hosts<br />
This comm<strong>and</strong> creates a file test.a that contains the contents of the other two files. To<br />
display the contents of the file, you can use the –t option on the comm<strong>and</strong> line.<br />
[root@boota ar]# ar -t test.a<br />
resolv.conf<br />
hosts<br />
[root@boota ar]#<br />
<strong>Using</strong> –x option, you can extract one or more files from the archive. <strong>The</strong> following comm<strong>and</strong><br />
extracts the file hosts from the archive.<br />
ar -x test.a hosts<br />
Now let us create a real library file from two object files common.o <strong>and</strong> ftp.o. <strong>The</strong> following<br />
comm<strong>and</strong> creates a file libcommon.a from these two object files.<br />
ar -r libcommon.a common.o ftp.o<br />
Functions or variables in these two files can be linked to any other object file using the –l<br />
comm<strong>and</strong> line option with gcc compiler. <strong>The</strong> following comm<strong>and</strong> line creates an executable file<br />
project from this library <strong>and</strong> project.o file.<br />
gcc project.o –lcommon –o project<br />
Note that libcommon.a is not used with the –l option when linking functions in this<br />
library to an executable file. Instead we used common as the library name by stripping the leading<br />
lib part <strong>and</strong> .a trailing part.<br />
Files can be inserted into the archive in a particular order. Similarly you can also use a policy<br />
when replacing existing files using different comm<strong>and</strong> line options. Other options that can be<br />
used with the ar comm<strong>and</strong> can be listed by executing the comm<strong>and</strong> without an argument as<br />
shown below.<br />
[root@boota /root]# ar<br />
Usage: ar [-X32_64] [-]{dmpqrstx}[abcfilNoPsSuvV] [membername]<br />
[count] archive-file file...<br />
ar -M [
CH07.fm Page 228 Monday, October 7, 2002 9:12 PM<br />
228 Chapter 7 • Miscellaneous Tools<br />
comm<strong>and</strong> specific modifiers:<br />
[a]<br />
- put file(s) after [member-name]<br />
[b]<br />
- put file(s) before [member-name]<br />
(same as [i])<br />
[N]<br />
- use instance [count] of name<br />
[f]<br />
- truncate inserted file names<br />
[P]<br />
- use full path names when matching<br />
[o]<br />
- preserve original dates<br />
[u]<br />
- only replace files that are newer than<br />
current archive contents<br />
generic modifiers:<br />
[c]<br />
- do not warn if the library had to be<br />
created<br />
[s]<br />
- create an archive index (cf. ranlib)<br />
[S]<br />
- do not build a symbol table<br />
[v]<br />
- be verbose<br />
[V]<br />
- display the version number<br />
[-X32_64] - (ignored)<br />
ar: supported targets: elf32-i386 a.out-i386-linux efi-appia32<br />
elf32-little elf32-big srec symbolsrec tekhex binary ihex<br />
trad-core<br />
[root@boota /root]#<br />
7.7.2 <strong>Using</strong> the ranlib Utility<br />
<strong>The</strong> ranlib comm<strong>and</strong> is used to create index entries inside an archive file. This can also<br />
be done using –s comm<strong>and</strong> with the ar comm<strong>and</strong> while creating or updating an archive library<br />
file. <strong>The</strong> following comm<strong>and</strong> creates index inside libcommon.a file. Note that these index<br />
entries are stored inside the archive file <strong>and</strong> no other file is created.<br />
ranlib libcommon.a<br />
Most of the time you don’t need to run ranlib, as the latest version of the ar comm<strong>and</strong><br />
creates an index by itself. Index entries can be displayed using the nm comm<strong>and</strong>.<br />
7.7.3 <strong>Using</strong> the nm Utility<br />
<strong>The</strong> nm utility is used to list symbols used in an object file. If no object file is provided on<br />
the comm<strong>and</strong> line, the utility assumes the a.out file in the current directory as the default<br />
object file <strong>and</strong> lists its symbols. A common use of the utility is listing functions defined in a<br />
library. <strong>The</strong> following comm<strong>and</strong> displays object file names <strong>and</strong> functions defined in the library<br />
file created with ar comm<strong>and</strong> in the previous section.<br />
[root@boota]# nm -s libcommon.a<br />
Archive index:<br />
msg in common.o<br />
main in ftp.o
CH07.fm Page 229 Monday, October 7, 2002 9:12 PM<br />
<strong>Using</strong> GNU Binary Utilities 229<br />
common.o:<br />
00000000 T msg<br />
U printf<br />
ftp.o:<br />
00000000 T main<br />
U msg<br />
U printf<br />
[root@boota make]#<br />
For each symbol, nm displays three properties of the symbol.<br />
1. Value<br />
2. Type<br />
3. Name<br />
<strong>The</strong> value of the symbol is displayed in hexadecimal by default. Type is a character, either<br />
uppercase or lowercase. <strong>The</strong> uppercase character shows that the symbol is global <strong>and</strong> the lowercase<br />
character shows that the symbol is local. <strong>The</strong> following line shows that the symbol value is<br />
00000000, its type is T which shows that the symbol is in code section <strong>and</strong> its name is msg.<br />
00000000 T msg<br />
Type U in the above output of nm comm<strong>and</strong> shows that the symbol is undefined <strong>and</strong> no<br />
value is displayed. Note that function msg is defined in common.o but undefined in the ftp.o<br />
member of the archive. This is because of the fact that the function was defined in common.c<br />
file <strong>and</strong> it is used in ftp.c file.<br />
Usually, the list of symbols is very long in executable files. Consider the following simple<br />
file that displays the string “Hello world”.<br />
#include <br />
main()<br />
{<br />
printf ("Hello world\n");<br />
}<br />
Let us compile this file to create an executable a.out file. A list of symbols in the<br />
a.out executable file is shown below:<br />
[root@boota]# nm -s a.out<br />
08049540 ? _DYNAMIC<br />
0804951c ? _GLOBAL_OFFSET_TABLE_<br />
080484e4 R _IO_stdin_used<br />
08049510 ? __CTOR_END__<br />
0804950c ? __CTOR_LIST__<br />
08049518 ? __DTOR_END__<br />
08049514 ? __DTOR_LIST__
CH07.fm Page 230 Monday, October 7, 2002 9:12 PM<br />
230 Chapter 7 • Miscellaneous Tools<br />
08049508 ? __EH_FRAME_BEGIN__<br />
08049508 ? __FRAME_END__<br />
080495e0 A __bss_start<br />
w __cxa_finalize@@GLIBC_2.1.3<br />
080494f8 D __data_start<br />
w __deregister_frame_info@@GLIBC_2.0<br />
08048480 t __do_global_ctors_aux<br />
080483b0 t __do_global_dtors_aux<br />
w __gmon_start__<br />
U __libc_start_main@@GLIBC_2.0<br />
w __register_frame_info@@GLIBC_2.0<br />
080495e0 A _edata<br />
080495f8 A _end<br />
080484c0 ? _fini<br />
080484e0 R _fp_hw<br />
080482e4 ? _init<br />
08048360 T _start<br />
08048384 t call_gmon_start<br />
08049504 d completed.1<br />
080494f8 W data_start<br />
08048410 t fini_dummy<br />
08049508 d force_to_data<br />
08049508 d force_to_data<br />
08048420 t frame_dummy<br />
08048384 t gcc2_compiled.<br />
080483b0 t gcc2_compiled.<br />
08048480 t gcc2_compiled.<br />
080484c0 t gcc2_compiled.<br />
08048460 t gcc2_compiled.<br />
08048450 t init_dummy<br />
080484b0 t init_dummy<br />
08048460 T main<br />
080495e0 b object.2<br />
08049500 d p.0<br />
U printf@@GLIBC_2.0<br />
[root@boota make]#<br />
7.7.3.1 Listing Line Numbers in Source Files<br />
Use of –l option is very useful with this comm<strong>and</strong>. This option also displays filenames<br />
<strong>and</strong> line numbers where these symbols are used. <strong>The</strong> following comm<strong>and</strong> lists symbols in libcommon.a<br />
file in more detail. Note that it displays the path to the source code file <strong>and</strong> the line<br />
number. This information is used in the debugging process.<br />
[root@boota]# nm -s libcommon.a -l<br />
Archive index:<br />
msg in common.o<br />
main in ftp.o
CH07.fm Page 231 Monday, October 7, 2002 9:12 PM<br />
<strong>Using</strong> GNU Binary Utilities 231<br />
common.o:<br />
00000000 T msg /root/make/common.c:6<br />
U printf /root/make/common.c:7<br />
ftp.o:<br />
00000000 T main /root/make/ftp.c:7<br />
U msg /root/make/ftp.c:12<br />
U printf /root/make/ftp.c:11<br />
[root@boota make]#<br />
7.7.3.2 Listing Debug Symbols<br />
When you compile a program with a debug option, many symbols are inserted in the files<br />
that are used for debugging purposes. <strong>Using</strong> the –a option with the nm comm<strong>and</strong> also shows the<br />
debug symbols.<br />
Please see the manual pages of the nm comm<strong>and</strong> for a detail description of all options.<br />
7.7.4 <strong>Using</strong> the strip Utility<br />
<strong>The</strong> strip comm<strong>and</strong> is used to remove symbols from an object or library file. This is useful<br />
to reduce the size of the shipped product as these symbols are not required in enduser executable<br />
code. <strong>Using</strong> the comm<strong>and</strong>, you can also remove symbols partially. For example, you can<br />
remove only debug symbols, local symbols or all symbols with the help of comm<strong>and</strong> line options.<br />
At least one object file must be provided at the comm<strong>and</strong> line. Note that the strip utility<br />
modifies the object files; it does not create new files. To get an idea of the difference in size of<br />
object file before <strong>and</strong> after using the strip comm<strong>and</strong>, let us take the example of a C file that<br />
prints the “Hello world” string only. <strong>The</strong> size of the executable a.out file with symbols on my<br />
computer is 13640 bytes. After using the following comm<strong>and</strong>, the size is reduced to 3208 bytes.<br />
strip a.out<br />
This is a considerable reduction in size. However, in some time-sensitive <strong>and</strong> embedded systems,<br />
stripping files may cause timing problems <strong>and</strong> code may behave differently in some cases.<br />
7.7.5 <strong>Using</strong> the objcopy Utility<br />
<strong>The</strong> basic function of the objcopy utility is to copy one object file to another. This functionality<br />
can be used to change the format of an object file. A common use is to create S-record<br />
or binary files from ordinary object files. S-record or binary files can be used to burn ROM in<br />
embedded systems. <strong>The</strong> following comm<strong>and</strong> converts the ftp file (which is a statically linked<br />
file) to an S-record file ftp.S, which may be downloaded to a ROM/PROM using the EPROM<br />
programmer.<br />
objcopy -O srec ftp ftp.S<br />
You can see types of both input <strong>and</strong> output files by using the file comm<strong>and</strong> as follows.<br />
<strong>The</strong> output file is of type S-record.
CH07.fm Page 232 Monday, October 7, 2002 9:12 PM<br />
232 Chapter 7 • Miscellaneous Tools<br />
[root@boota]# file ftp<br />
ftp: ELF 32-bit LSB executable, Intel 80386, version 1,<br />
statically linked, not stripped<br />
[root@boota]#<br />
[root@boota make]# file ftp.S<br />
ftp.S: Motorola S-Record; binary data in text format<br />
[root@boota]#<br />
<strong>The</strong> S-record file is in ASCII hex format <strong>and</strong> first few lines can be displayed using head<br />
comm<strong>and</strong> as shown below:<br />
[root@boota]# head ftp.S<br />
S00800006674702E532C<br />
S31508048094040000001000000001000000474E5500CB<br />
S315080480A400000000020000000200000005000000B1<br />
S315080480B45589E583EC08E84500000090E8DB0000F0<br />
S30D080480C400E836610400C9C393<br />
S315080480E031ED5E89E183E4F05054526880E2080871<br />
S315080480F068B4800408515668E0810408E80B010056<br />
S3150804810000F489F65589E55350E8000000005B81C0<br />
S31508048110C3826C05008B830C00000085C07402FFC3<br />
S31508048120D08B5DFCC9C389F69090909090909090FE<br />
[root@boota]#<br />
<strong>The</strong> following comm<strong>and</strong> creates a binary image of the ftp file. <strong>The</strong> binary output is a<br />
memory image of the executable <strong>and</strong> all symbols are removed.<br />
objcopy -O binary ftp ftp.bin<br />
Here is how you display a type of the new binary file.<br />
[root@boota]# file ftp.bin<br />
ftp.bin: X11 SNF font data, LSB first<br />
[root@boota]#<br />
It is a good idea to strip object files before converting them to S-record or binary files.<br />
Start addresses can be set using the comm<strong>and</strong> line options --set-start <strong>and</strong> --adjuststart.<br />
7.7.6 <strong>Using</strong> the objdump Utility<br />
<strong>The</strong> objdump comm<strong>and</strong> displays information about an object file. It can also be used to<br />
disassemble an object file. You can use different comm<strong>and</strong> line options to display particular<br />
information about an object file.<br />
7.7.6.1 Displaying Header Information<br />
<strong>The</strong> following comm<strong>and</strong> displays the header information of the binary file a.out.<br />
[root@boota]# objdump -f a.out
CH07.fm Page 233 Monday, October 7, 2002 9:12 PM<br />
<strong>Using</strong> GNU Binary Utilities 233<br />
a.out: file format elf32-i386<br />
architecture: i386, flags 0x00000112:<br />
EXEC_P, HAS_SYMS, D_PAGED<br />
start address 0x08048360<br />
[root@boota]#<br />
7.7.6.2 Displaying Section Headers<br />
<strong>The</strong> following comm<strong>and</strong> displays information about all section headers in the a.out file.<br />
[root@boota]# objdump -h a.out|more<br />
a.out:<br />
file format elf32-i386<br />
Sections:<br />
Idx Name Size VMA LMA File off Algn<br />
0 .interp 00000013 080480f4 080480f4 000000f4 2**0<br />
CONTENTS, ALLOC, LOAD, READONLY, DATA<br />
1 .note.ABI-tag 00000020 08048108 08048108 00000108 2**2<br />
CONTENTS, ALLOC, LOAD, READONLY, DATA<br />
2 .hash 00000034 08048128 08048128 00000128 2**2<br />
CONTENTS, ALLOC, LOAD, READONLY, DATA<br />
3 .dynsym 00000080 0804815c 0804815c 0000015c 2**2<br />
CONTENTS, ALLOC, LOAD, READONLY, DATA<br />
4 .dynstr 00000095 080481dc 080481dc 000001dc 2**0<br />
CONTENTS, ALLOC, LOAD, READONLY, DATA<br />
5 .gnu.version 00000010 08048272 08048272 00000272 2**1<br />
CONTENTS, ALLOC, LOAD, READONLY, DATA<br />
6 .gnu.version_r 00000030 08048284 08048284 00000284<br />
2**2<br />
CONTENTS, ALLOC, LOAD, READONLY, DATA<br />
7 .rel.got 00000008 080482b4 080482b4 000002b4 2**2<br />
CONTENTS, ALLOC, LOAD, READONLY, DATA<br />
8 .rel.plt 00000028 080482bc 080482bc 000002bc 2**2<br />
CONTENTS, ALLOC, LOAD, READONLY, DATA<br />
9 .init 00000018 080482e4 080482e4 000002e4 2**2<br />
CONTENTS, ALLOC, LOAD, READONLY, CODE<br />
10 .plt 00000060 080482fc 080482fc 000002fc 2**2<br />
CONTENTS, ALLOC, LOAD, READONLY, CODE<br />
11 .text 00000160 08048360 08048360 00000360 2**4<br />
CONTENTS, ALLOC, LOAD, READONLY, CODE<br />
12 .fini 0000001e 080484c0 080484c0 000004c0 2**2<br />
CONTENTS, ALLOC, LOAD, READONLY, CODE<br />
13 .rodata 00000015 080484e0 080484e0 000004e0 2**2<br />
CONTENTS, ALLOC, LOAD, READONLY, DATA<br />
14 .data 00000010 080494f8 080494f8 000004f8 2**2<br />
CONTENTS, ALLOC, LOAD, DATA<br />
15 .eh_frame 00000004 08049508 08049508 00000508 2**2
CH07.fm Page 234 Monday, October 7, 2002 9:12 PM<br />
234 Chapter 7 • Miscellaneous Tools<br />
CONTENTS, ALLOC, LOAD, DATA<br />
16 .ctors 00000008 0804950c 0804950c 0000050c 2**2<br />
CONTENTS, ALLOC, LOAD, DATA<br />
17 .dtors 00000008 08049514 08049514 00000514 2**2<br />
CONTENTS, ALLOC, LOAD, DATA<br />
18 .got 00000024 0804951c 0804951c 0000051c 2**2<br />
CONTENTS, ALLOC, LOAD, DATA<br />
19 .dynamic 000000a0 08049540 08049540 00000540 2**2<br />
CONTENTS, ALLOC, LOAD, DATA<br />
20 .sbss 00000000 080495e0 080495e0 000005e0 2**0<br />
CONTENTS<br />
21 .bss 00000018 080495e0 080495e0 000005e0 2**2<br />
ALLOC<br />
22 .stab 00000f9c 00000000 00000000 000005e0 2**2<br />
CONTENTS, READONLY, DEBUGGING<br />
23 .stabstr 00002ec6 00000000 00000000 0000157c 2**0<br />
CONTENTS, READONLY, DEBUGGING<br />
24 .comment 00000144 00000000 00000000 00004442 2**0<br />
CONTENTS, READONLY<br />
25 .note 00000078 00000000 00000000 00004586 2**0<br />
CONTENTS, READONLY<br />
[root@boota]#<br />
7.7.6.3 Disassembling a File<br />
Perhaps the major advantage of this utility is its ability to disassemble object files. Usually<br />
the disassembly code is quite long but still you can make sense of it. <strong>The</strong> following is a segment<br />
of disassembly code from the a.out file.<br />
[root@boota]# objdump -d a.out|more<br />
a.out:<br />
file format elf32-i386<br />
Disassembly of section .init:<br />
080482e4 :<br />
80482e4:55 push %ebp<br />
80482e5:89 e5 mov %esp,%ebp<br />
80482e7:83 ec 08 sub $0x8,%esp<br />
80482ea:e8 95 00 00 00 call 8048384 <br />
80482ef:90<br />
nop<br />
80482f0:e8 2b 01 00 00 call 8048420 <br />
80482f5:e8 86 01 00 00 call 8048480<br />
<br />
80482fa:c9<br />
leave<br />
80482fb:c3<br />
ret<br />
Disassembly of section .plt:<br />
080482fc :
CH07.fm Page 235 Monday, October 7, 2002 9:12 PM<br />
<strong>Using</strong> GNU Binary Utilities 235<br />
80482fc:ff 35 20 95 04 08 pushl 0x8049520<br />
8048302:ff 25 24 95 04 08 jmp *0x8049524<br />
8048308:00 00 add %al,(%eax)<br />
804830a:00 00 add %al,(%eax)<br />
804830c:ff 25 28 95 04 08 jmp *0x8049528<br />
8048312:68 00 00 00 00 push $0x0<br />
8048317:e9 e0 ff ff ff jmp 80482fc <br />
804831c:ff 25 2c 95 04 08 jmp *0x804952c<br />
8048322:68 08 00 00 00 push $0x8<br />
8048327:e9 d0 ff ff ff jmp 80482fc <br />
804832c:ff 25 30 95 04 08 jmp *0x8049530<br />
8048332:68 10 00 00 00 push $0x10<br />
8048337:e9 c0 ff ff ff jmp 80482fc <br />
804833c:ff 25 34 95 04 08 jmp *0x8049534<br />
8048342:68 18 00 00 00 push $0x18<br />
8048347:e9 b0 ff ff ff jmp 80482fc <br />
804834c:ff 25 38 95 04 08 jmp *0x8049538<br />
8048352:68 20 00 00 00 push $0x20<br />
8048357:e9 a0 ff ff ff jmp 80482fc <br />
Disassembly of section .text:<br />
08048360 :<br />
8048360:31 ed xor %ebp,%ebp<br />
8048362:5e pop %esi<br />
8048363:89 e1 mov %esp,%ecx<br />
8048365:83 e4 f0 <strong>and</strong> $0xfffffff0,%esp<br />
8048368:50 push %eax<br />
8048369:54 push %esp<br />
804836a:52 push %edx<br />
804836b:68 c0 84 04 08 push $0x80484c0<br />
8048370:68 e4 82 04 08 push $0x80482e4<br />
8048375:51 push %ecx<br />
7.7.6.4 Disassembling with Source Code<br />
<strong>The</strong> comm<strong>and</strong> can also be used to disassemble an object file so that the source code is also<br />
displayed along with assembly output. This is done using the –S option. Following is output of<br />
disassembly for code that is used to display string the “Hello world”. You can see the assembly<br />
language instructions used for this purpose.<br />
08048460 :<br />
#include <br />
main()<br />
{<br />
8048460:55 push %ebp<br />
8048461:89 e5 mov %esp,%ebp<br />
8048463:83 ec 08 sub $0x8,%esp<br />
printf ("Hello world\n");<br />
8048466:83 ec 0c sub $0xc,%esp
CH07.fm Page 236 Monday, October 7, 2002 9:12 PM<br />
236 Chapter 7 • Miscellaneous Tools<br />
8048469: 68 e8 84 04 08 push $0x80484e8<br />
804846e: e8 c9 fe ff ff call 804833c <br />
8048473: 83 c4 10 add $0x10,%esp<br />
}<br />
7.7.6.5 Displaying Information about Library Files<br />
<strong>The</strong> comm<strong>and</strong> can also be used to display information about library files. <strong>The</strong> following<br />
comm<strong>and</strong> displays information about the library file libcommon.a <strong>and</strong> shows the object file<br />
names from which this library is built.<br />
[root@boota]# objdump -a libcommon.a<br />
In archive ../../chap-04/make/libcommon.a:<br />
common.o: file format elf32-i386<br />
rw-r--r-- 0/0 11668 Nov 13 19:48 2001 common.o<br />
ftp.o: file format elf32-i386<br />
rw-r--r-- 0/0 11824 Nov 13 19:53 2001 ftp.o<br />
[root@boota ltrace]#<br />
Common options that are used with this comm<strong>and</strong> are listed in Table 7-5.<br />
Table 7-5 Common options used with objdump comm<strong>and</strong><br />
Option<br />
Description<br />
-a Display information about library files<br />
--debugging<br />
Show debugging information<br />
-d Disassemble an object file<br />
-f Show file headers summary<br />
-S Display source code with disassembly information<br />
-t Display symbol table entries<br />
7.7.7 <strong>Using</strong> the size Utility<br />
<strong>The</strong> size utility displays sizes of each section in an object file. <strong>The</strong> following comm<strong>and</strong> displays<br />
sizes for the object file a.out.<br />
[root@boota]# size a.out<br />
text data bss dec hex filename<br />
1015 232 24 1271 4f7 a.out<br />
[root@boota]#
CH07.fm Page 237 Monday, October 7, 2002 9:12 PM<br />
<strong>Using</strong> GNU Binary Utilities 237<br />
7.7.8 <strong>Using</strong> the strings Utility<br />
<strong>The</strong> strings utility displays printable strings in an object file. By default it displays<br />
strings only in initialized <strong>and</strong> loaded sections of the object file. <strong>The</strong> object file may be a library<br />
file as well. <strong>The</strong> following comm<strong>and</strong> displays strings in the a.out file.<br />
[root@boota]# strings a.out<br />
/lib/ld-linux.so.2<br />
__gmon_start__<br />
libc.so.6<br />
printf<br />
__cxa_finalize<br />
__deregister_frame_info<br />
_IO_stdin_used<br />
__libc_start_main<br />
__register_frame_info<br />
GLIBC_2.1.3<br />
GLIBC_2.0<br />
PTRh<br />
QVh`<br />
Hello world<br />
[root@boota]#<br />
A complete list of all strings in a file can be displayed with the –a option on the comm<strong>and</strong><br />
line. Multiple filenames or wild cards can be used on the comm<strong>and</strong> line. <strong>Using</strong> the –f option in<br />
this case will display each filename associated with a symbol.<br />
7.7.9 <strong>Using</strong> the addr2line Utility<br />
<strong>The</strong> addr2line utility maps an address in the object file to a line in the source code file.<br />
Consider the following output section of the “objdump –S a.out” comm<strong>and</strong> that shows<br />
addresses <strong>and</strong> source codes.<br />
08048460 :<br />
#include <br />
main()<br />
{<br />
8048460:55 push %ebp<br />
8048461:89 e5 mov %esp,%ebp<br />
8048463:83 ec 08 sub $0x8,%esp<br />
printf ("Hello world\n");<br />
8048466:83 ec 0c sub $0xc,%esp<br />
8048469:68 e8 84 04 08 push $0x80484e8<br />
804846e:e8 c9 fe ff ff call 804833c <br />
8048473:83 c4 10 add $0x10,%esp<br />
}<br />
<strong>The</strong> a.out file is generated from the following a.c file.<br />
1 #include
CH07.fm Page 238 Monday, October 7, 2002 9:12 PM<br />
238 Chapter 7 • Miscellaneous Tools<br />
2 main()<br />
3 {<br />
4 printf ("Hello world\n");<br />
5 }<br />
Now you can display the line number of the source code file corresponding to address<br />
8048466 in the object file with the following comm<strong>and</strong>:<br />
[root@boota]# addr2line -e a.out 8048466<br />
/root/chap-07/ltrace/a.c:4<br />
[root@boota]#<br />
This is the line where the printf function is called in a.c file. <strong>The</strong> add2line comm<strong>and</strong><br />
is useful in debuggers where you need to map addresses to a line in source code file.<br />
7.8 <strong>Using</strong> the ldd Utility<br />
<strong>The</strong> ldd utility is very useful in finding out the dependencies of an executable on shared libraries.<br />
This is necessary when you are copying executable files from one computer to another to<br />
make sure that required libraries are present on the destination computer also. <strong>The</strong> following<br />
comm<strong>and</strong> shows that libc.so.6 must be present to execute a.out file on a computer.<br />
[root@boota]# ldd a.out<br />
libc.so.6 => /lib/i686/libc.so.6 (0x4002c000)<br />
/lib/ld-linux.so.2 => /lib/ld-linux.so.2 (0x40000000)<br />
[root@boota]#<br />
So if you copy a.out to another computer, make sure that this library is also present on<br />
the destination computer.<br />
7.9 References <strong>and</strong> Resources<br />
1. GNU web site at http://www.gnu.org/<br />
2. <strong>The</strong> cbrowser home page at http://cbrowser.sourceforge.net<br />
3. <strong>The</strong> cscope home page at http://cscope.sourceforge.net
CH08.fm Page 239 Monday, October 7, 2002 9:16 PM<br />
C HAPTER 8<br />
Cross-<strong>Platform</strong> <strong>and</strong><br />
Embedded Systems<br />
<strong>Development</strong><br />
A<br />
s you have already learned in Chapter 3, development systems consist<br />
of many tools. <strong>The</strong> discussion in Chapter 3 was about native<br />
software development, which means that the host system on which the<br />
software is developed <strong>and</strong> the target system on which the software runs<br />
are the same. This chapter provides information about embedded <strong>and</strong><br />
cross-platform software development where the host system <strong>and</strong> the target<br />
system are different. <strong>The</strong> issues in this type of development are slightly<br />
different although basic programming methods <strong>and</strong> techniques remain the<br />
same.<br />
In this chapter I have used a single board computer from Arcom<br />
(www.arcomcontrols.com) <strong>and</strong> a processor mezzanine card from Artesyn<br />
(www.artesyn.com). I am thankful to both of these vendors. <strong>The</strong> Arcom<br />
board is based upon a x86 compatible CPU <strong>and</strong> has four serial ports, an<br />
Ethernet port <strong>and</strong> a number of other ports. <strong>The</strong> Artesyn board is PowerPC<br />
based <strong>and</strong> it can be plugged into a Compact PCI career card. Information<br />
about these boards can be obtained from the respective company web site.<br />
I have listed some features at the end of this chapter.<br />
Before reading this chapter, you should become familiar with a few concepts<br />
related to cross-platform development. <strong>The</strong> most important terms<br />
used in this chapter are cross <strong>and</strong> native. <strong>The</strong> term cross is used for tools<br />
239
CH08.fm Page 240 Monday, October 7, 2002 9:16 PM<br />
240 Chapter 8 • Cross-<strong>Platform</strong> <strong>and</strong> Embedded Systems <strong>Development</strong><br />
that run on one type of machine but are used to carry out some service for<br />
another type of machine. For example, a cross compiler is a compiler that<br />
creates executable code for a machine which is different than the machine<br />
on which the compiler is running. Similar is the case with cross assemblers,<br />
cross debuggers <strong>and</strong> so on. On the other h<strong>and</strong>, a native tool provides<br />
a service to the same machine on which it is running. For example, a<br />
native compiler generates output code that is executable on the same<br />
machine on which the compiler runs.<br />
8.1 Introduction to the Cross-<strong>Platform</strong> <strong>Development</strong> Process<br />
You need a general-purpose computer for software development. This computer hosts development<br />
tools. In most cases, the computer also hosts some debugging tools. <strong>The</strong> executable code<br />
may be generated for the same computer on which you develop software or for some other<br />
machine that is not capable of running development tools (editors, compilers, assemblers,<br />
debuggers etc.). Most of the time host <strong>and</strong> target machines differ so that programs built on the<br />
host machine can’t be run on the target machine. <strong>The</strong>se differences may take many forms. Some<br />
common differences between host <strong>and</strong> target machines are different operating system, different<br />
system boards or a different CPU.<br />
It’s necessary to underst<strong>and</strong> some basic concepts <strong>and</strong> terminology related to cross-platform<br />
development. <strong>The</strong>se basic concepts are explained in the following subsections.<br />
8.1.1 Host Machine<br />
<strong>The</strong> host machine is the machine on which you write <strong>and</strong> compile programs. All of the<br />
development tools are installed on this machine. Most of the time this is your PC or workstation.<br />
Your compiler is built to run on this machine. When you are satisfied with your code, the executables<br />
are built <strong>and</strong> transferred to the target machine. If the host <strong>and</strong> target machines are different,<br />
the final executable can’t be executed on the host machine where you built it.<br />
8.1.2 Target Machine<br />
A target machine may be another general-purpose computer, a special-purpose device<br />
employing a single-board computer or any other intelligent device. Usually the target machine is<br />
not able to host all the development tools. That is why a host computer is used to complete<br />
development work.<br />
Debugging is an important issue in cross-platform development. Since you are usually not<br />
able to execute the binary files on the host machine, they must be run on the target machine. <strong>The</strong><br />
debugger, which is running on the host machine, has to talk to the program running on the target<br />
machine. GNU debugger is capable of connecting to remote processes. Some CPUs have a<br />
JTAG or BDM connector, which can also be used to connect to processes on remote systems.
CH08.fm Page 241 Monday, October 7, 2002 9:16 PM<br />
Introduction to the Cross-<strong>Platform</strong> <strong>Development</strong> Process 241<br />
8.1.3 Native <strong>and</strong> Cross Compilers<br />
A native compiler generates code for the same machine on which it is running. A cross<br />
compiler generates code for a machine different from the one on which it is running.<br />
8.1.4 Cross <strong>Platform</strong> <strong>Development</strong> Cycle<br />
<strong>The</strong> cross-platform development cycle consists of at least four stages. <strong>The</strong>se stages are:<br />
• Writing code<br />
• Cross compilation<br />
• Transferring binaries to the target<br />
• Debugging<br />
<strong>The</strong> steps may be different in some cases depending upon the type of product you are building.<br />
Figure 8-1 shows these processes <strong>and</strong> machines on which a particular process is carried out.<br />
Let us take a closer look on these steps.<br />
8.1.4.1 Writing Code<br />
When you write code for cross compilation, you have to keep few things in mind. <strong>The</strong><br />
CPU architecture of the target machine may be different from that of the host machine. This<br />
means that you have to consider word lengths, byte order <strong>and</strong> so on. For example, length of integer<br />
may be different on the target machine. Similarly, organization of memory may play an<br />
important role. As an example, the organization of bytes inside a 32-bit integer is different in<br />
Intel CPUs as compared to Motorola CPUs. This is a typical network-byte-order problem <strong>and</strong><br />
must be considered when developing network protocols.<br />
Some libraries’ routines may be different for cross compilers than for native compilers.<br />
8.1.4.2 Building on the Host Machine<br />
After writing the code, you need to compile it on the host machine. In addition to a cross<br />
compiler <strong>and</strong> cross assembler that can generate code for the target machine, you need libraries<br />
that are linked to your code. <strong>The</strong>se libraries are usually specific to the target machine <strong>and</strong> are<br />
cross-compiled.<br />
If you are writing code according to some st<strong>and</strong>ard, your porting process is usually very<br />
quick. For example, if you have written libraries strictly using the ANSI st<strong>and</strong>ard, it will be relatively<br />
easy for you to port these libraries from one platform to another. In most large software<br />
development projects, it is important that you stick to some st<strong>and</strong>ard. This is because ultimately<br />
you may wish to port <strong>and</strong> sell the product for many platforms.<br />
You have learned the difference between static <strong>and</strong> dynamic linking earlier in this book.<br />
Usually in cross compiling, you have to build the executable code with static linking because<br />
you may not have shared libraries available on the target system. This is especially true for<br />
embedded systems where you usually don’t have a large secondary storage device.
CH08.fm Page 242 Monday, October 7, 2002 9:16 PM<br />
242 Chapter 8 • Cross-<strong>Platform</strong> <strong>and</strong> Embedded Systems <strong>Development</strong><br />
Write Code<br />
Legends<br />
Processes with<br />
this color need<br />
only host machine<br />
Processes with<br />
this color need<br />
both host <strong>and</strong><br />
target machines<br />
Compile <strong>and</strong> Link<br />
Download to the<br />
Target<br />
Debug on the<br />
Target<br />
Processes with<br />
this color need<br />
target machine<br />
only<br />
Works OK ?<br />
Burn a ROM or copy to<br />
any other permanent<br />
storage medium like<br />
Compact Falsh<br />
Run on the target<br />
Figure 8-1 Flow chart of cross-platform development.<br />
During the development phase, most of the time you compile code with debug information<br />
enabled. <strong>The</strong> size of the output files is usually quite large but this is acceptable. A different<br />
approach is to create multiple files, one built without debug information or stripped <strong>and</strong> at least<br />
one other file containing all symbols information. You can load the latter file into the debugger<br />
before connecting the debugger to the executable.<br />
8.1.4.3 Transfer to the Target Machine<br />
After building executable code for a cross-platform development project, you have to<br />
transfer it to the target machine. <strong>The</strong>re are several ways to do so depending upon the target<br />
machine. If the target machine has a JTAG interface, you can use that interface to transfer the file
CH08.fm Page 243 Monday, October 7, 2002 9:16 PM<br />
What are Embedded Systems? 243<br />
<strong>and</strong> then use the same interface to debug it. If the target does not have a JTAG interface, you can<br />
transfer using a serial or Ethernet link. Sometimes the target machine is already running an operating<br />
system <strong>and</strong> you have to transfer an application to the target machine. In some other circumstances<br />
you may have to build <strong>and</strong> transfer a single packaged file that contains the operating<br />
system as well as applications. If the target system is already running the operating system, you<br />
can transfer you application using a network interface very easily. If you have a single packaged<br />
file, you can have a boot routine on the target machine that may download this file from a TFTP<br />
server as well.<br />
<strong>The</strong> bottom line is that there are many methods used by developers depending upon the<br />
nature of the files to be transferred, availability of special hardware on the target machine, availability<br />
of boot routines on the target machine <strong>and</strong> the operating system used. You can select a<br />
method that best suits your needs.<br />
8.1.4.4 Remote Debugging<br />
In the case of cross-platform development <strong>and</strong> embedded systems, you have to debug your<br />
code remotely. <strong>The</strong>re are multiple reasons for that including:<br />
• <strong>The</strong> target machine is different from the host machine so that you can’t execute the<br />
code on your host machine.<br />
• <strong>The</strong> target system is connected to some special hardware <strong>and</strong> the software interacts<br />
with that special hardware. To debug in a real-world situation, you have to debug it<br />
remotely.<br />
• <strong>The</strong> target system itself has some special hardware that is different from the host<br />
machine. For example, the target system may have the same CPU as the host machine<br />
but has different hardware interrupts.<br />
<strong>The</strong>re may be other reasons in addition to the ones mentioned here. In this chapter you will<br />
learn how to attach to a process running on a target machine using GNU debugger. You will use<br />
a local file that contains all of the symbol table information. Before you connect to the target<br />
machine, you will load this symbol table information into gdb <strong>and</strong> then start a debug session<br />
remotely on the target machine.<br />
8.2 What are Embedded Systems?<br />
<strong>The</strong>re are many definitions of embedded system but all of these can be combined into a single<br />
concept. An embedded system is a special-purpose computer system that is used for a particular<br />
task. <strong>The</strong> special computer system is usually less powerful than general-purpose systems,<br />
although some exceptions do exist where embedded systems are very powerful <strong>and</strong> complicated.<br />
Usually a low power consumption CPU with a limited amount of memory is used in embedded<br />
systems. Many embedded systems use very small operating systems; most of these provide very<br />
limited operating system capabilities. However as memory <strong>and</strong> CPU power is becoming cheap,
CH08.fm Page 244 Monday, October 7, 2002 9:16 PM<br />
244 Chapter 8 • Cross-<strong>Platform</strong> <strong>and</strong> Embedded Systems <strong>Development</strong><br />
many modern operating systems are also being used in embedded systems these days. Embedded<br />
<strong>Linux</strong> products are becoming more <strong>and</strong> more popular.<br />
Since embedded systems are used for special purpose tasks, there is usually no need to add<br />
new applications to the system once it is built. <strong>The</strong>refore programs <strong>and</strong> operating systems are<br />
usually loaded only once into read-only memory. <strong>The</strong> read-only memory is available in many<br />
forms these days <strong>and</strong> includes some type of ROM, flash chips <strong>and</strong> flash cards. In case an<br />
upgrade is required, a new ROM chip replaces the old one.<br />
If you look at your surroundings, you will find tiny computers everywhere. <strong>The</strong>y are<br />
present even in places where you rarely notice them. Some of the most common embedded systems<br />
used in everyday life are:<br />
• Refrigerators<br />
• Microwave ovens<br />
• TV, VCR, DVD players<br />
• Cameras<br />
• Cars (Antilock brakes, engine control, sun roof, climate control, automatic<br />
transmission <strong>and</strong> so on)<br />
• Personal digital assistants<br />
• Printers<br />
Complicated <strong>and</strong> more sophisticated embedded systems include routers <strong>and</strong> switches<br />
where high performance CPUs are used.<br />
8.2.1 Embedded Systems <strong>and</strong> Moving Parts<br />
Most of the embedded systems are supposed to be used for a long period of time <strong>and</strong> without<br />
any maintenance. This is the very nature of embedded systems applications, to manufacture<br />
a system <strong>and</strong> then leave it to run independently for its intended life. For this reason, most<br />
embedded systems usually don’t have moving components because any moving or mechanical<br />
part experiences wear <strong>and</strong> tear <strong>and</strong> needs replacement periodically. Typical examples of moving<br />
components include fans, disk drives <strong>and</strong> so on. Fans are used for cooling in power supplies <strong>and</strong><br />
CPU heat sinks in desktop computers. Disk drives (both floppy <strong>and</strong> hard disk drives) are used as<br />
a storage medium for operating systems, applications <strong>and</strong> data.<br />
In embedded systems, ROM is used for storage of operating system <strong>and</strong> application data<br />
to eliminate the need for disk drives. <strong>The</strong>se days, flash cards are also common <strong>and</strong> you can<br />
update a system just by replacing the flash memory card. In embedded systems you have to use<br />
special types of power supplies that don’t need any fan for cooling. Many different types of<br />
power supplies are available on the market that don’t heat up when used continuously for long<br />
periods of time.
CH08.fm Page 245 Monday, October 7, 2002 9:16 PM<br />
What are Embedded Systems? 245<br />
8.2.2 Embedded Systems <strong>and</strong> Power Consumption<br />
Power consumption is also an important issue in embedded systems. This is also related to<br />
the moving parts issue in a sense. Components that consume more power need cooling, so some<br />
type of fan must be attached to the system. For this reason people always prefer CPUs <strong>and</strong> other<br />
components that use less power <strong>and</strong> generate less heat. It is also beneficial for systems that run<br />
on batteries to use less power. High power-consuming components drain batteries quickly.<br />
8.2.3 Embedded Operating Systems<br />
Since embedded systems are usually not general-purpose systems, they need not be as<br />
sophisticated as commercial general-purpose systems. <strong>The</strong>se operating systems are smaller in<br />
size. Most of these operating systems also offer real-time capabilities, which are missing in general-purpose<br />
systems. Although there are hundreds of operating systems available for the<br />
embedded market, some of the most commonly used ones are:<br />
• VxWorks<br />
• pSOS<br />
• Embedded <strong>Linux</strong><br />
• QNX<br />
• Windows CE<br />
When you use <strong>Linux</strong> as an embedded operating system, you can take out many parts of the<br />
kernel that are required in the general-purpose <strong>Linux</strong> systems. Which parts should be excluded<br />
from the kernel depends upon the requirements of a particular system. For example, you can<br />
take out the entire networking code if the embedded system is not going to be networked. Similarly,<br />
you can take out most of the secondary storage related drivers <strong>and</strong> file systems support.<br />
Kernel parts that are the most likely c<strong>and</strong>idates for removal from the embedded <strong>Linux</strong> are:<br />
• Disk drivers<br />
• CD-ROM drivers<br />
• Most of the networking code. Even if an embedded system is intended to be networked,<br />
you may not need all of the routing code <strong>and</strong> drivers for all types of network adapters.<br />
• Sound <strong>and</strong> multimedia related drivers <strong>and</strong> components. However you may need these<br />
components if the embedded system is used as a computer game.<br />
• Most of the file system support<br />
• Any other thing that is not required. You can go through the kernel configuration<br />
process to determine what is not necessary.<br />
<strong>The</strong> trimmed version of the <strong>Linux</strong> kernel will be much smaller compared to the kernels<br />
you find in most <strong>Linux</strong> distributions.
CH08.fm Page 246 Monday, October 7, 2002 9:16 PM<br />
246 Chapter 8 • Cross-<strong>Platform</strong> <strong>and</strong> Embedded Systems <strong>Development</strong><br />
8.2.4 Software Applications for Embedded Systems<br />
Embedded applications are tightly integrated with each other <strong>and</strong> often with the operating<br />
system as well. In many cases you will find only one big file that is loaded by the system at the<br />
time you power it up that contains all of the operating <strong>and</strong> applications data. Since resources are<br />
sparse on embedded systems, applications are usually highly optimized to take the least amount<br />
of memory <strong>and</strong> storage space. Embedded systems programmers don’t have the luxury of even<br />
one extra line of code. In addition, embedded software needs to be solid because there is nobody<br />
to restart a crashed application. Watchdog timers are used to recover from any system lock.<br />
8.3 How <strong>Development</strong> Systems Differ for Embedded Systems<br />
<strong>Development</strong> for embedded systems is different from common practices in many ways. For new<br />
developers in the embedded systems world, there is a learning curve to underst<strong>and</strong> which conventional<br />
practices are no longer valid in this new environment. To be an embedded systems<br />
developer, you need to know many things about the hardware on which your software will be<br />
executed. Often embedded systems are connected to some sort of control system (wheel rotation<br />
in an automobile anti-lock braking system, for example) <strong>and</strong> the developer also needs knowledge<br />
of that system as well. If the CPU <strong>and</strong>/or the operating system are different on the target<br />
embedded platform, you have to do cross-platform development which has its own issues. <strong>The</strong>re<br />
are different testing techniques as well because in most of the embedded systems you don’t have<br />
a monitor screen where you can display error messages or test results. All of these issues make<br />
embedded systems development much more complicated than writing a program on a UNIX<br />
machine <strong>and</strong> then executing it.<br />
This section provides information on some of these issues but should not be considered<br />
comprehensive. This is just a starting point to give you an idea that you should expect new challenges<br />
when you start embedded systems programming.<br />
8.3.1 Knowledge of Target System Hardware<br />
<strong>The</strong> embedded system is usually different from the system on which you develop software<br />
(the host machine). For example, usually the target computer has many input <strong>and</strong> output lines,<br />
different interrupts <strong>and</strong> probably a different type of CPU. It may also have memory constraints<br />
because these systems usually have a low amount of RAM <strong>and</strong> no virtual memory because of the<br />
absence of secondary storage media. To develop software for the target, you need to know all of<br />
these things.<br />
As mentioned earlier, most of the embedded systems are connected to some other sort of<br />
hardware. <strong>The</strong> main job of these systems is to control the connected hardware or systems using<br />
some policy. As an embedded system programmer, if you don’t have knowledge of these additional<br />
system or hardware, you will not be able to program the embedded system well. Usually<br />
embedded systems have some sort of digital <strong>and</strong> analog I/O connected to this external hardware<br />
where you have to exchange data.
CH08.fm Page 247 Monday, October 7, 2002 9:16 PM<br />
Cross Compilations 247<br />
8.3.2 Is the Target System Real-Time?<br />
If the target system is running a real-time operating system, you have to keep in mind<br />
many other issues as well. Usually these issues don’t come into the picture when you are developing<br />
code for general-purpose machines. System scheduling is important <strong>and</strong> you need to know<br />
what type of scheduling is available on the target system. Almost all real-time systems have priority-based<br />
scheduling. However, if two processes have the same priority, then scheduling may<br />
be different depending upon the operating system. Some systems implement round-robin scheduling<br />
for equal priority tasks. On the other h<strong>and</strong> some systems run a task to completion. You<br />
need to know what happens when a process or task is scheduled on a particular real-time scheduler.<br />
Time slices for running equal priority processes on round-robin schedulers can also be<br />
changed on some real-time schedulers.<br />
To complicate the situation, some systems also allow processes to increase or decrease<br />
their priority levels at run time.<br />
Interrupts <strong>and</strong> their service routine are usually critical in real-time systems. If your embedded<br />
target platform is real-time, you should keep in mind limitations in this area <strong>and</strong> tolerance of<br />
critical tasks in constrained environment. You should not miss a critical event in a real-time system<br />
because that may result in disaster. If a packet is dropped in a router, it may be tolerated, but<br />
if a robot reacts to some event late, it may result in major loss. Even dropped packets aren't particularly<br />
acceptable in modern routers.<br />
8.3.3 Testing Methodology<br />
<strong>The</strong> testing methodology is also different in the case of embedded systems. In typical<br />
cases, an embedded system is connected to some other device or system for control purposes.<br />
<strong>The</strong>se connections are not available on the host system where you are developing the software.<br />
This is true even if the operating system <strong>and</strong> CPU on the host <strong>and</strong> target systems are the same.<br />
For example, a <strong>Linux</strong>-based embedded system running an x86 family of processors may be controlling<br />
some security system. It is difficult to simulate that security system on a PC <strong>and</strong> test<br />
your software. So even if the platform is the same, you have to test <strong>and</strong> debug your programs on<br />
the target system.<br />
In some cases testing of embedded systems may be quite complicated as you need to get<br />
results of the functionality testing sent or stored somewhere. In small embedded systems, not<br />
connected to a network or a user-friendly output device, getting these results is difficult. In such<br />
circumstances you may need to build special testing techniques or special code in your embedded<br />
system to produce test results. I would recommend a thorough knowledge of how to write<br />
testable code.<br />
8.4 Cross Compilations<br />
Cross compilation tools are very important for successful product development. Selection of<br />
these tools should be made based upon the embedded system itself as well as features to test <strong>and</strong><br />
debug software remotely. Since you are developing software on a <strong>Linux</strong> platform, your cross-
CH08.fm Page 248 Monday, October 7, 2002 9:16 PM<br />
248 Chapter 8 • Cross-<strong>Platform</strong> <strong>and</strong> Embedded Systems <strong>Development</strong><br />
platform development tools should be compatible with <strong>Linux</strong> as a host machine. Depending<br />
upon CPU family used for the target system, your toolset must be capable of generating code for<br />
the target machine. In the case of GNU development tools, you need to have a number of things<br />
to work together to generate executable code for the target. For example, you must have at least<br />
the following available on your <strong>Linux</strong> machine.<br />
• Cross compiler<br />
• Cross assembler<br />
• Cross linker<br />
• Cross debugger<br />
• Cross-compiled libraries for the target host.<br />
• Operating system-dependent libraries <strong>and</strong> header files for the target system.<br />
<strong>The</strong>se components will enable you to compile, link <strong>and</strong> debug code for the target environment.<br />
In this section, you will learn how to develop a cross-compilation environment on your<br />
<strong>Linux</strong> machine.<br />
You have already built a native GCC compiler in Chapter 3. Conceptually, building a cross<br />
compiler is not much different from building a native compiler. However there are additional<br />
things that you should keep in mind while building a cross compiler. <strong>The</strong> most significant of<br />
these is the comm<strong>and</strong> line listing of the target when running the configure script. <strong>The</strong> whole process<br />
may be slightly different depending upon targets. <strong>The</strong> best resource to find out detailed<br />
information about how to build a cross compiler is the CrossGCC FAQ <strong>and</strong> mailing list. <strong>The</strong><br />
FAQ is found at http://www.objsw.com/CrossGCC/ <strong>and</strong> using information in this FAQ, you can<br />
subscribe to <strong>and</strong> search the CrossGCC mailing list. I would suggest getting a cross compiler<br />
from a vendor instead of building it yourself. Many companies, including RedHat (http://<br />
www.redhat.com) <strong>and</strong> Monta Vista Inc. (http://www.mvista.com), provide development tools for<br />
embedded <strong>Linux</strong> development of different CPU families.<br />
8.4.0.1 Cross Debugging<br />
<strong>The</strong>re are multiple methods of debugging that you can use in the cross-platform development<br />
environment. Most commonly you can use emulators, JTAG, <strong>and</strong> remote debugging over<br />
serial or network links. Some of these methods are discussed in this section.<br />
8.4.1 Software Emulators<br />
Software emulators are software tools that can emulate a particular CPU. <strong>Using</strong> a software<br />
emulator you can debug through your code <strong>and</strong> find out CPU register values, stack pointers <strong>and</strong><br />
other information without having a real CPU. Software emulators are useful when you don’t<br />
have the real hardware available for testing <strong>and</strong> debugging <strong>and</strong> want to see how the CPU will<br />
behave when a program is run on it. Keep in mind that these are not very useful tools to simulate<br />
real hardware because there are many other hardware components that are built onto the target<br />
machine.
CH08.fm Page 249 Monday, October 7, 2002 9:16 PM<br />
Cross Compilations 249<br />
8.4.2 In-circuit emulators<br />
In-circuit emulators are devices that are used to emulate a CPU. You can plug in this<br />
device in place of a CPU on your circuit board. <strong>The</strong> device has the same number of pins <strong>and</strong> the<br />
same package type as the CPU <strong>and</strong> fits into the CPU socket. <strong>The</strong> other side is connected to a PC<br />
or a workstation where a debugger is running. <strong>Using</strong> an in-circuit emulator, you can start <strong>and</strong><br />
stop execution of a program as you wish. This is in contrast to a software emulator, where the<br />
CPU emulator is a program running on your machine, isolated from the circuit board on which<br />
you want to test your software. An in-circuit emulator provides you access to real hardware for<br />
testing purpose.<br />
Usual arrangement of in-circuit emulator is shown in Figure 8-2. <strong>The</strong> emulator is plugged<br />
into the actual embedded system on one side <strong>and</strong> connected to your PC on the other side.<br />
In-circuit<br />
emulator<br />
hardware<br />
Target Device<br />
Host workstation<br />
Figure 8-2 In-circuit emulator connection diagram.<br />
8.4.3 Introduction to JTAG <strong>and</strong> BDM<br />
JTAG or Joint Test Action Group is a method of accessing memory <strong>and</strong> CPU resources<br />
without having an application running on the target. BDM or background debugging mode also<br />
achieves this objective. Many CPUs provide JTAG or BDM port/connection to connect a serial<br />
or parallel port on your host to the target CPU board using a cable. <strong>The</strong>re are a few open source<br />
projects that give you information, utilities <strong>and</strong> hardware diagrams about the procedure.<br />
<strong>Using</strong> JTAG or BDM, you don’t need an in-circuit emulator <strong>and</strong> a debugger running on<br />
your host machine can connect to a target board. But keep in mind that not all CPUs provide this<br />
facility. Most Motorola controllers <strong>and</strong> PowerPC CPUs have this interface.
CH08.fm Page 250 Monday, October 7, 2002 9:16 PM<br />
250 Chapter 8 • Cross-<strong>Platform</strong> <strong>and</strong> Embedded Systems <strong>Development</strong><br />
8.4.3.1 Building Cross Debugger<br />
Building a cross debugger is similar to the building process of a native debugger. When<br />
you configure gdb, you need to mention the target CPU on the comm<strong>and</strong> line of the configure<br />
script. You also need the required libraries for the target.<br />
8.5 Connecting to Target<br />
<strong>Using</strong> gdb, there are two basic methods of connecting to the target machine when you debug a<br />
program. <strong>The</strong>se are:<br />
• <strong>Using</strong> gdbserver program<br />
• <strong>Using</strong> a stub<br />
In this section we shall discuss the gdbserver method in detail because it is the same<br />
for all platforms. <strong>The</strong> stub method differs from platform to platform <strong>and</strong> you need to create stub<br />
file(s) for your target <strong>and</strong> tailor these into your code.<br />
8.5.1 <strong>Using</strong> gdbserver with GNU Debugger<br />
<strong>The</strong> gdbserver utility comes with GNU debugger. I have used gdb version 5.1.1 <strong>and</strong><br />
you can compile the gdbserver after you compile your debugger. If the host machine is different<br />
from the target machine, you must cross-compile the gdbserver program. This utility<br />
can run a program on a remote target <strong>and</strong> can communicate to gdb running on host.<br />
When you build gdb from the source code, the gdbserver is not compiled during this<br />
process. This is what happened when I compiled gdb version 5.1.1 on my RedHat 7.1 machine.<br />
You have to compile it separately by going into the gdb/gdbserver directory. You can run<br />
the following two comm<strong>and</strong>s to build <strong>and</strong> install it:<br />
make<br />
make install<br />
You may choose to build a static binary of the gdbserver program if you don’t have<br />
dynamic libraries installed on your target board. For the purpose of this book, I used the Arcom<br />
board, which is introduced later in this chapter, <strong>and</strong> which has dynamic libraries installed. After<br />
compiling, you can strip down symbols from the binary to reduce size because embedded systems<br />
usually have small storage areas.<br />
<strong>The</strong> gdbserver program may display some error messages when you connect to the<br />
server as it needed /etc/protocols files on the target Arcom board, which I copied manually.<br />
<strong>The</strong> step-by-step process of using gdbserver is as follows:<br />
• Compile a program on the host machine using the –g option.<br />
• Transfer a stripped version of the output to the target machine. You can use a stripped<br />
version because you don’t need symbols on the target.
CH08.fm Page 251 Monday, October 7, 2002 9:16 PM<br />
Connecting to Target 251<br />
• Run gdbserver on the target machine. It will control your application program. It is<br />
explained later in this section.<br />
• Run gdb on the host machine.<br />
• Connect gdb to the remotely running gdbserver process.<br />
• Start debugging.<br />
You can connect gdb on the host to the gdbserver running on the target over the network<br />
or using the serial port. Both of these methods are described here.<br />
8.5.1.1 Running gdbserver On Target <strong>Using</strong> TCP/IP<br />
When you have transferred the executable binary to the target, you can start the gdbserver<br />
process. <strong>The</strong> example below shows that the program being debugged is /tmp/sum, IP address of<br />
the host machine is 192.168.1.3 <strong>and</strong> we are using TCP port 2000 for connection between the host<br />
<strong>and</strong> the target machine. Note that the debugger will be running on the host machine.<br />
In the following session, the gdbserver waits for connection from the debugger after<br />
starting up. When you step through the program on the debugger side, you can enter values of<br />
two numbers on the target machine. I used a Telnet session to open a window on the target. This<br />
window was used to start gdbserver <strong>and</strong> enter values of two numbers.<br />
root@SBC-GXx /bin# gdbserver 192.168.1.3:2000 /tmp/sum<br />
Process /tmp/sum created; pid = 154<br />
Remote debugging using 192.168.1.3:2000<br />
Enter first number : 5<br />
Enter second number : 7<br />
<strong>The</strong> sum is : 12<br />
Killing inferior<br />
root@SBC-GXx /bin#<br />
Note that the gdbserver terminates when you disconnect the debugger on the host side.<br />
Source code of the program sum.c used in this example is as follows:<br />
#include <br />
main ()<br />
{<br />
int num1, num2, total ;<br />
printf("Enter first number : ");<br />
scanf("%d", &num1);<br />
printf("Enter second number : ");<br />
scanf("%d", &num2);<br />
total = num1 + num2;<br />
}<br />
printf("\n<strong>The</strong> sum is : %d\n", total);
CH08.fm Page 252 Monday, October 7, 2002 9:16 PM<br />
252 Chapter 8 • Cross-<strong>Platform</strong> <strong>and</strong> Embedded Systems <strong>Development</strong><br />
It is the same program that was used in Chapter 5 for different examples.<br />
8.5.1.2 Running gdb on Host <strong>Using</strong> TCP/IP<br />
After starting gdbserver on the target, now you can start the GNU debugger on host.<br />
<strong>The</strong> host <strong>and</strong> target must be connected over a TCP/IP network for this example. In the following<br />
session on the host machine, file sum is a non-stripped version of the program that you uploaded<br />
to the target machine as it provides the symbol table to the debugger. After starting the debugger,<br />
you use the “target remote 192.168.1.10:2000” comm<strong>and</strong> to connect to the gdbserver<br />
running on the target machine 192.168.1.10. After that you can continue with normal<br />
debugging process.<br />
[rrehman@desktop 5]$ gdb sum<br />
GNU gdb 5.1.1<br />
Copyright 2002 Free Software Foundation, Inc.<br />
GDB is free software, covered by the GNU General Public<br />
License, <strong>and</strong> you are<br />
welcome to change it <strong>and</strong>/or distribute copies of it under<br />
certain conditions.<br />
Type "show copying" to see the conditions.<br />
<strong>The</strong>re is absolutely no warranty for GDB. Type "show warranty"<br />
for details.<br />
This GDB was configured as "i686-pc-linux-gnu"...<br />
(gdb) target remote 192.168.1.10:2000<br />
Remote debugging using 192.168.1.10:2000<br />
0x40001930 in ?? ()<br />
(gdb) break main<br />
Breakpoint 1 at 0x8048496: file sum.c, line 6.<br />
(gdb) continue<br />
Continuing.<br />
Breakpoint 1, main () at sum.c:6<br />
6 printf("Enter first number : ");<br />
(gdb) n<br />
7 scanf("%d", &num1);<br />
(gdb) n<br />
8 printf("Enter second number : ");<br />
(gdb) n<br />
9 scanf("%d", &num2);<br />
(gdb) n<br />
11 total = num1 + num2;<br />
(gdb) n<br />
13 printf("\n<strong>The</strong> sum is : %d\n", total);<br />
(gdb) n<br />
14 }<br />
(gdb) n<br />
warning: Cannot insert breakpoint 0:<br />
Cannot access memory at address 0x1
CH08.fm Page 253 Monday, October 7, 2002 9:16 PM<br />
Connecting to Target 253<br />
(gdb) quit<br />
<strong>The</strong> program is running. Exit anyway? (y or n) y<br />
[rrehman@desktop 5]$<br />
Note that after each scanf statement, you have to enter the input value on the target. This<br />
is because the program is actually running on the target machine. Since both host <strong>and</strong> target are<br />
connected over a network, you can open a Telnet window on the target for input <strong>and</strong> output.<br />
8.5.1.3 Running gdbserver on Target <strong>Using</strong> Serial Port<br />
You can also use gdbserver to connect a host <strong>and</strong> target machine over a serial port link.<br />
In the following example, you start gdbserver to communicate to the debugger over serial<br />
port /dev/ttyS1. GNU debugger uses its own serial port protocol to exchange information<br />
between host <strong>and</strong> target machines. <strong>The</strong> program being debugged is stored as /tmp/sum on the<br />
target machine. This example session is completed on an Arcom single-board computer running<br />
embedded <strong>Linux</strong>.<br />
root@SBC-GXx /bin# gdbserver /dev/ttyS1 /tmp/sum<br />
Process /tmp/sum created; pid = 180<br />
Remote debugging using /dev/ttyS1<br />
Enter first number : 3<br />
Enter second number : 8<br />
<strong>The</strong> sum is : 11<br />
Killing inferior<br />
root@SBC-GXx /bin#<br />
Note that if you are running any other program on the serial port, it should be stopped. In<br />
most cases a getty process is running on serial ports. You can edit the /etc/inittab file to<br />
stop the getty process from using the serial port.<br />
8.5.1.4 Running gdb on Host <strong>Using</strong> Serial Port<br />
To connect to a target over a serial port /dev/ttyS0, you can use “target remote<br />
/dev/ttyS0” comm<strong>and</strong> after starting GNU debugger. A typical session to debug the sum.c<br />
program is shown below.<br />
[root@desktop /root]# gdb sum<br />
GNU gdb 5.1.1<br />
Copyright 2002 Free Software Foundation, Inc.<br />
GDB is free software, covered by the GNU General Public<br />
License, <strong>and</strong> you are<br />
welcome to change it <strong>and</strong>/or distribute copies of it under<br />
certain conditions.<br />
Type "show copying" to see the conditions.<br />
<strong>The</strong>re is absolutely no warranty for GDB. Type "show warranty"<br />
for details.<br />
This GDB was configured as "i686-pc-linux-gnu"...<br />
(gdb) break main<br />
Breakpoint 1 at 0x8048496: file sum.c, line 6.
CH08.fm Page 254 Monday, October 7, 2002 9:16 PM<br />
254 Chapter 8 • Cross-<strong>Platform</strong> <strong>and</strong> Embedded Systems <strong>Development</strong><br />
(gdb) target remote /dev/ttyS0<br />
Remote debugging using /dev/ttyS0<br />
0x40001930 in ?? ()<br />
(gdb) continue<br />
Continuing.<br />
Breakpoint 1, main () at sum.c:6<br />
6 printf("Enter first number : ");<br />
(gdb) n<br />
7 scanf("%d", &num1);<br />
(gdb) n<br />
8 printf("Enter second number : ");<br />
(gdb) n<br />
9 scanf("%d", &num2);<br />
(gdb) n<br />
11 total = num1 + num2;<br />
(gdb) n<br />
13 printf("\n<strong>The</strong> sum is : %d\n", total);<br />
(gdb) n<br />
14 }<br />
(gdb) n<br />
warning: Cannot insert breakpoint 0:<br />
Cannot access memory at address 0x1<br />
(gdb) quit<br />
<strong>The</strong> program is running. Exit anyway? (y or n) y<br />
[root@desktop /root]#<br />
You do not use the run comm<strong>and</strong> in this session because the program has already been<br />
started by the gdbserver running on the target machine.<br />
8.5.1.5 Serial Cable<br />
You can use a null modem cable to connect serial ports on the host <strong>and</strong> target machines.<br />
Connections for the null modem cable for a DB-9 connector are as shown in Table 8-1. However,<br />
I hope that most people can simply go out <strong>and</strong> buy a null modem cable, without worrying<br />
about pinouts.
CH08.fm Page 255 Monday, October 7, 2002 9:16 PM<br />
Connecting to Target 255<br />
Table 8-1 Null modem connection for DB-9 connector serial cable<br />
DB-9 pin number (Host)<br />
DB-9 pin number (Target)<br />
TXD (3) RXD (2)<br />
RXD (2) TXD (3)<br />
RTS (7) CTS (8)<br />
CTS (8) RTS (7)<br />
Signal Ground (5) Signal Ground (5)<br />
DSR (6) DTR (4)<br />
DTR (4) DSR (6)<br />
For a DB-25 connector, the cable connections are as listed in Table 8-2.<br />
Table 8-2 Null modem connection for DB-25 connector serial cable<br />
DB-25 pin number (Host)<br />
DB-25 pin number (Target)<br />
Frame Ground (1) Frame Ground (1)<br />
TXD (2) RXD (3)<br />
RXD (3) TXD (2)<br />
RTS (4) CTS (5)<br />
CTS (5) RTS (4)<br />
Signal Ground (7) Signal Ground (7)<br />
DSR (6) DTR (20)<br />
DTR (20) DSR (6)<br />
8.5.2 Attaching to a Running Process <strong>Using</strong> gdbserver<br />
<strong>Using</strong> the gdbserver program, you can also connect to a running process on the target.<br />
For example, the following comm<strong>and</strong> can be executed on the target to connect to a process with<br />
process ID equal to 375.<br />
gdbserver /dev/ttyS1 375<br />
You can also use the TCP/IP connection by replacing the /dev/ttyS1 with hostname:port<br />
number as you have seen earlier.
CH08.fm Page 256 Monday, October 7, 2002 9:16 PM<br />
256 Chapter 8 • Cross-<strong>Platform</strong> <strong>and</strong> Embedded Systems <strong>Development</strong><br />
8.5.3 <strong>Using</strong> Stubs with GNU Debugger<br />
Stubs are software routines that you can link with your program. <strong>Using</strong> a stub, you can<br />
connect the process created by the program to the GNU debugger from a remote target, eliminating<br />
the need for the gdbserver program.<br />
Stubs are different for different targets. <strong>The</strong> GNU debugger contains some stubs by default<br />
in the source code tree. For example, the i386-stub.c file can be used for targets that use<br />
Intel CPUs. However you have to customize your stub depending on the target. Some instructions<br />
are included in the example source code files for the stub.<br />
8.5.4 Debugging the Debug Session<br />
If you are not successful in connecting to the target machine using GDB, you can get help<br />
from the remote debug mode of GNU debugger. After turning this mode ON, you will see a lot<br />
on information on your screen when gdb establishes or tries to establish connection to a remote<br />
target. This information shows packets sent <strong>and</strong> received by gdb. <strong>The</strong> following session shows<br />
that we set the baud rate to 9600 using the remotebaud comm<strong>and</strong>, turn the remote debug<br />
mode ON <strong>and</strong> then connect to the remote target on serial port /dev/ttyS0.<br />
[root@desktop /root]# gdb sum<br />
GNU gdb 5.1.1<br />
Copyright 2002 Free Software Foundation, Inc.<br />
GDB is free software, covered by the GNU General Public<br />
License, <strong>and</strong> you are<br />
welcome to change it <strong>and</strong>/or distribute copies of it under<br />
certain conditions.<br />
Type "show copying" to see the conditions.<br />
<strong>The</strong>re is absolutely no warranty for GDB. Type "show warranty"<br />
for details.<br />
This GDB was configured as "i686-pc-linux-gnu"...<br />
(gdb) break main<br />
Breakpoint 1 at 0x8048496: file sum.c, line 6.<br />
(gdb) set remotebaud 9600<br />
(gdb) set debug remote 1<br />
(gdb) target remote /dev/ttyS0<br />
Remote debugging using /dev/ttyS0<br />
Sending packet: $Hc-1#09...Ack<br />
Packet received: OK<br />
Sending packet: $qC#b4...Ack<br />
Packet received:<br />
Sending packet: $qOffsets#4b...Ack<br />
Packet received:<br />
Sending packet: $?#3f...Ack<br />
Packet received: T0508:30190040;05:00000000;04:f8fdffbf;<br />
Sending packet: $m40001930,8#62...Ack<br />
Packet received: 54e8520000005b89<br />
Sending packet: $m40001930,7#61...Ack
CH08.fm Page 257 Monday, October 7, 2002 9:16 PM<br />
Connecting to Target 257<br />
Packet received: 54e8520000005b<br />
0x40001930 in ?? ()<br />
Sending packet: $qSymbol::#5b...Ack<br />
Packet received:<br />
Packet qSymbol (symbol-lookup) is NOT supported<br />
(gdb) continue<br />
Continuing.<br />
Sending packet: $Z0,8048496,1#8a...Ack<br />
Packet received:<br />
Packet Z0 (software-breakpoint) is NOT supported<br />
Sending packet: $m8048496,1#41...Ack<br />
Packet received: 83<br />
Sending packet: $X8048496,0:#65...Ack<br />
Packet received:<br />
binary downloading NOT supported by target<br />
Sending packet: $M8048496,1:cc#21...Ack<br />
Packet received: OK<br />
Sending packet: $m4000e060,1#89...Ack<br />
Packet received: 8b<br />
Sending packet: $M4000e060,1:cc#69...Ack<br />
Packet received: OK<br />
Sending packet: $Hc0#db...Ack<br />
Packet received: OK<br />
Sending packet: $c#63...Ack<br />
Packet received: T0508:97840408;05:a8fdffbf;04:90fdffbf;<br />
Sending packet: $Hg0#df...Ack<br />
Packet received: OK<br />
Sending packet: $g#67...Ack<br />
Packet received:<br />
f830114090840408384f1140ac40114090fdffbfa8fdffbfa0b60040fcfdff<br />
bf9784040886020000230000002b0000002b0000002b000000000000000000<br />
00000000000000000000000000000000000000000000000000000000000000<br />
00000000000000000000000000000000000000000000000000000000000000<br />
00000000000000000000000000000000000000000000000000000000000000<br />
00000000000000000000000000000000000000000000000000000000000000<br />
00000000000000000000000000000000000000000000000000000000000000<br />
00000000000000000000000000000000000000000000000000000000000000<br />
00000000000000000000000000000000000000000000000000000000000000<br />
0000000000000000000000000000000000000000000000000000000000<br />
Sending packet: $P8=96840408#6c...Ack<br />
Packet received:<br />
Sending packet:<br />
$Gf830114090840408384f1140ac40114090fdffbfa8fdffbfa0b60040fcfd<br />
ffbf9684040886020000230000002b0000002b0000002b0000000000000000<br />
00000000000000000000000000000000000000000000000000000000000000<br />
00000000000000000000000000000000000000000000000000000000000000<br />
00000000000000000000000000000000000000000000000000000000000000<br />
00000000000000000000000000000000000000000000000000000000000000
CH08.fm Page 258 Monday, October 7, 2002 9:16 PM<br />
258 Chapter 8 • Cross-<strong>Platform</strong> <strong>and</strong> Embedded Systems <strong>Development</strong><br />
00000000000000000000000000000000000000000000000000000000000000<br />
00000000000000000000000000000000000000000000000000000000000000<br />
00000000000000000000000000000000000000000000000000000000000000<br />
000000000000000000000000000000000000000000000000000000000000#9<br />
2...Ack<br />
Packet received: OK<br />
Sending packet: $M8048496,1:83#c6...Ack<br />
Packet received: OK<br />
Sending packet: $M4000e060,1:8b#3d...Ack<br />
Packet received: OK<br />
Breakpoint 1, main () at sum.c:6<br />
6 printf("Enter first number : ");<br />
(gdb)<br />
All of this information is very useful to resolve problems in establishing connection<br />
between a host <strong>and</strong> a target machine.<br />
8.6 Hardware Used for Cross-<strong>Platform</strong> <strong>and</strong> Embedded Systems<br />
<strong>Development</strong><br />
During development of this book, especially this chapter, I have used two single board computers.<br />
This was done to create examples <strong>and</strong> test functionality of code for cross <strong>and</strong> embedded systems<br />
development. Arcom (http://www.arcomcontrols.com) <strong>and</strong> Artesyn (http://<br />
www.artesyn.com) are the two companies that provided these systems for experimentation.<br />
Information about these two boards is provided here for reference.<br />
8.6.1 Arcom SBC-GX1 Board<br />
<strong>The</strong> Arcom people were very helpful in providing their SBC-GX1board development kit.<br />
This kit includes the SBC-GX1 board, cables, <strong>and</strong> adapter for supplying power to the board,<br />
documentation <strong>and</strong> software CDs. It also includes a PS/2 mouse that can be connected to the<br />
board during experimentation. Everything is enclosed in a box to carry the kit.<br />
<strong>The</strong> CPU used on this board is an x86 compatible processor from National Semiconductor’s<br />
Geode® GX1 processor family. It is a low voltage, low power consumption CPU that can<br />
be used in application where long batter life <strong>and</strong> low power consumption are important factors.<br />
If you recall the earlier discussion in this chapter, both of these factors are very important in<br />
embedded systems applications. <strong>The</strong> CPU contains additional hardware components that are not<br />
part of x86 class CPUs. <strong>The</strong>se components are:<br />
• Integrated VGA controller, which has graphic acceleration features. Can be used to<br />
connect to CRT or TFT flat panel video devices.<br />
• A PCI host controller.<br />
• Additional features for graphics <strong>and</strong> audio applications.<br />
• Integrated I/O lines.
CH08.fm Page 259 Monday, October 7, 2002 9:16 PM<br />
Hardware Used for Cross-<strong>Platform</strong> <strong>and</strong> Embedded Systems <strong>Development</strong> 259<br />
A complete list of features can be found in the accompanying Arcom CD. <strong>The</strong> CPU on the<br />
board I received has a clock speed of 333 MHz with no fans or requirement of any other cooling<br />
method. This is a cool CPU board.<br />
<strong>The</strong> Arcom board has the following features that make it suitable for many applications.<br />
All of this is integrated to a small sized board.<br />
• Floppy disk controller<br />
• Hard disk controller to which you can connect hard drives or CD/DVD drives.<br />
• Sound Blaster<br />
• Four serial ports<br />
• Parallel port<br />
• VGA connector for CRT monitors<br />
• Interface for flat panel monitor<br />
• PC/104 bus<br />
• PCI bus<br />
• 16 MB flash that can be used as a disk<br />
• 64 MB RAM<br />
• Ethernet controller to connect to a LAN<br />
• PS/2 mouse <strong>and</strong> keyboard connectors<br />
• Compact flash socket that can be used to increase storage space in case you need large<br />
applications<br />
<strong>The</strong> board comes with <strong>Linux</strong> kernel 2.4.4 pre-installed with many features that are important<br />
for embedded systems. Arcom embedded <strong>Linux</strong> is optimized for space but has all of the<br />
commonly used applications <strong>and</strong> utilities. <strong>The</strong>se include:<br />
• A Telnet server <strong>and</strong> client<br />
• NFS support<br />
• FTP server <strong>and</strong> client that can be used to transfer files from host computer to the target<br />
computer<br />
• HTTP server. You can start using the HTTP server right from the beginning. A default<br />
page is already present on the board.<br />
• X-Windows support<br />
• <strong>The</strong> inetd daemon that can be used to launch network applications on dem<strong>and</strong><br />
In addition to these, Arcom embedded <strong>Linux</strong> has the following features that may be of<br />
interest to the developers of embedded applications.<br />
• Kernel 2.2.4<br />
• Journaling Flash File System (JFFS2), which is a compressed file system used on flash<br />
storage.
CH08.fm Page 260 Monday, October 7, 2002 9:16 PM<br />
260 Chapter 8 • Cross-<strong>Platform</strong> <strong>and</strong> Embedded Systems <strong>Development</strong><br />
• Glibc 2.1.3, which allows dynamically linked programs to run on the embedded<br />
platform.<br />
• X-Free version 4.0.2<br />
• Ncruses library<br />
• Bash shell<br />
• Busybox which is a Swiss army knife of generally used UNIX utilities<br />
• Networking suite <strong>and</strong> utilities<br />
• Use management utilities<br />
• Modules h<strong>and</strong>ling utilities<br />
• Syslogd/klogd<br />
• Terminal h<strong>and</strong>ling<br />
Onboard flash memory is divided into three parts. Partition mounted on / is read-only at<br />
the boot time <strong>and</strong> contains <strong>Linux</strong> system. Two other file systems /var <strong>and</strong> /var/tmp are<br />
mounted as read-write at the boot time <strong>and</strong> can be used to store temporary files. In addition to<br />
that, you can also use the removable flash card to store files. Bundled utilities on accompanying<br />
disks can be used to re-install the operating system or add new components. In networked systems,<br />
you can also use a NFS server to add more storage space.<br />
Arcom also provides RedHat 6.2 CD that you can use to install <strong>Linux</strong> on a PC. This PC<br />
will be used as the development system or a host machine. <strong>The</strong> Arcom embedded <strong>Linux</strong> board<br />
will act as the target system. This means that in addition to the single board computer with<br />
Embedded <strong>Linux</strong> installed on it, you also get the <strong>Linux</strong> operating system to use as a development<br />
platform.<br />
8.6.2 Artesyn PM/PPC Mezzanine Card<br />
<strong>The</strong> other embedded system used in the development of this book is Artesyn PM/PPC<br />
mezzanine card that can be plugged into a carrier card. Artesyn also supplied the carrier card for<br />
this purpose. It is a PowerPC 750 based card <strong>and</strong> provides the Ethernet <strong>and</strong> serial interfaces to<br />
the outside world directly from the PMC (PCI Mezzanine Card). It contains 64 Mbytes of RAM,<br />
I 2 C bus, general purpose timers, real-time clock, LEDs <strong>and</strong> so on. <strong>The</strong> board also contains flash<br />
memory that can be used to store the operating system <strong>and</strong> utilities. It has a real-time clock <strong>and</strong><br />
PLD used to setup memory map <strong>The</strong> CPU runs at 333 MHz. Boot flash is used to store the operating<br />
system. <strong>The</strong> optional JTAG connector can be used to download <strong>and</strong> debug code.<br />
As mentioned earlier, you need a career card to power up the PMC <strong>and</strong> Artesyn provides<br />
you with a CC1000 PMC carrier card that can host up to two PMC. CC1000 can be placed into a<br />
Compact PCI chassis that allows 6U cards to be plugged in.<br />
More information can be found on the Artesyn web site http://www.artesyncp.com or by<br />
sending an email to info@artesyncp.com.
CH08.fm Page 261 Monday, October 7, 2002 9:16 PM<br />
References 261<br />
8.7 References<br />
1. Arcom web site at http://www.arcomcontrols.com<br />
2. Artesyn web site at http://www.artesyncp.com<br />
3. Embedded <strong>Linux</strong> web site at http://www.linux-embedded.org<br />
4. Busybox for Embedded <strong>Linux</strong> at http://www.busybox.net/
CH08.fm Page 262 Monday, October 7, 2002 9:16 PM
CH09.fm Page 263 Monday, October 7, 2002 9:18 PM<br />
C HAPTER 9<br />
<strong>Platform</strong><br />
Independent<br />
<strong>Development</strong> with<br />
Java<br />
I<br />
n previous chapters most of the discussion centered around GNU development<br />
tools <strong>and</strong> programming in C <strong>and</strong> C++ languages. This chapter<br />
is devoted to Java development <strong>and</strong> describes how to use some Java tools<br />
<strong>and</strong> a Java virtual machine.<br />
As many of the readers already know, Java is a different language compared<br />
to other compile-<strong>and</strong>-execute languages in that it needs a Java virtual<br />
machine (JVM) to execute what is called byte code. Each platform<br />
has its own implementation of the Java virtual machine. <strong>The</strong>re are many<br />
JVMs available on <strong>Linux</strong> platform in free <strong>and</strong> open source as well as commercial<br />
domains. Some virtual machines are also available for embedded<br />
<strong>Linux</strong> platforms that are very small in size <strong>and</strong> need little memory to execute.<br />
You can select a virtual machine based upon your requirements. Java<br />
virtual machines are built on Java Language Specifications (JLS). Information<br />
about JLS <strong>and</strong> books in downloadable format can be found at<br />
http://java.sun.com/docs/books/jls/.<br />
This chapter provides some information about how to use different development<br />
tools on <strong>Linux</strong>. <strong>The</strong> most commonly available tools are Sun SDK<br />
<strong>and</strong> GNU gcj compiler. Kaffe <strong>and</strong> Jboss are other very popular open<br />
source development tools on <strong>Linux</strong> <strong>and</strong> these are introduced in this chapter.<br />
However please note that this chapter is not a tutorial on Java lan-<br />
263
CH09.fm Page 264 Monday, October 7, 2002 9:18 PM<br />
264 Chapter 9 • <strong>Platform</strong> Independent <strong>Development</strong> with Java<br />
guage <strong>and</strong> if you are new to the language, you get help from many other<br />
resources on the Internet as well as in print media. Some of the most popular<br />
include Sun Java SDK, IBM Java SDK, Kaffe, <strong>and</strong> gcj.<br />
9.1 How Java Applications Work<br />
Java is a sort of interpreted language. Any program you write in Java is first compiled to generate<br />
byte code. Depending upon type of output, the byte code may be in the form of a Java application<br />
or a Java applet. In the case of Java applications, you can directly invoke the Java virtual machine<br />
to execute it. If the output type is an applet, it is usually loaded into a browser for execution.<br />
9.1.1 Java Compiler<br />
<strong>The</strong> Java compiler is used to build Java applications or applets from source code files. In<br />
most of the cases, the compiler is invoked as javac comm<strong>and</strong>. It also uses st<strong>and</strong>ard class libraries<br />
that are usually part of the Java distributions.<br />
9.1.2 Java Virtual Machine<br />
<strong>The</strong> purpose of the Java virtual machine is to execute Java code. In most cases, the virtual<br />
machine is available as the comm<strong>and</strong> java. To run any application, you can just invoke the<br />
java comm<strong>and</strong> with the application name as the comm<strong>and</strong> line argument.<br />
9.2 Kaffe<br />
Kaffe is one of the popular freely available implementations of the Java virtual machine. You<br />
can download it from its web site http://www.kaffee.org. At the time of writing this book, version<br />
1.0.6 is available from the web site. I am using RedHat 7.1 for the development of this book<br />
<strong>and</strong> this version is also part of the distribution. Most of the binaries are installed in /usr/bin<br />
directory. <strong>The</strong> following comm<strong>and</strong> displays version information for Kaffe:<br />
[root@desktop Java]# java -version<br />
Kaffe Virtual Machine<br />
Copyright (c) 1996-2000<br />
Transvirtual Technologies, Inc. All rights reserved<br />
Engine: Just-in-time v3 Version: 1.0.6<br />
Java Version: 1.1<br />
[root@desktop Java]#<br />
Note that the actual Kaffe Virtual machine is present as /usr/bin/kaffe <strong>and</strong> /usr/<br />
bin/java is simply a shell script like the following to invoke Kaffe.<br />
#! /bin/sh<br />
# Pretend Kaffe is Java<br />
prefix=/usr<br />
exec_prefix=/usr<br />
exec /usr/bin/kaffe ${1+"$@"}
CH09.fm Page 265 Monday, October 7, 2002 9:18 PM<br />
Kaffe 265<br />
Kaffe also include class libraries associated with the Virtual machine. However, Kaffe is<br />
not official Java, which is a registered trademark of Sun Microsystems. <strong>The</strong> open source nature<br />
of Kaffe provides you with information about the internal implementation <strong>and</strong> workings of the<br />
Java virtual machine.<br />
Basic help on using the Kaffe virtual machine is available using the java or kaffe comm<strong>and</strong><br />
without any argument. <strong>The</strong> kaffe comm<strong>and</strong> produces the following output.<br />
[root@desktop /root]# kaffe<br />
usage: kaffe [-options] class<br />
Options are:<br />
-help<br />
-version<br />
-fullversion<br />
-ss <br />
-mx <br />
-ms <br />
-as <br />
-classpath <br />
-verify *<br />
-verifyremote *<br />
-noverify<br />
-D=<br />
-verbosegc<br />
-noclassgc<br />
-v, -verbose<br />
-verbosejit<br />
-verbosemem<br />
-nodeadlock<br />
-prof<br />
-debug *<br />
-noasyncgc *<br />
-cs, -checksource *<br />
-oss *<br />
-jar<br />
* Option currently ignored.<br />
[root@desktop /root]#<br />
Print this message<br />
Print version number<br />
Print verbose version info<br />
Maximum native stack size<br />
Maximum heap size<br />
Initial heap size<br />
Heap increment<br />
Set classpath<br />
Verify all bytecode<br />
Verify bytecode loaded from<br />
network<br />
Do not verify any bytecode<br />
Set a property<br />
Print message during<br />
garbage collection<br />
Disable class garbage<br />
collection<br />
Be verbose<br />
Print message during JIT<br />
code generation<br />
Print detailed memory<br />
allcation statistics<br />
Disable deadlock detection<br />
Enable profiling of Java<br />
methods<br />
Trace method calls<br />
Do not garbage collect<br />
asynchronously<br />
Check source against class<br />
files<br />
Maximum java stack size<br />
Executable is a JAR
CH09.fm Page 266 Monday, October 7, 2002 9:18 PM<br />
266 Chapter 9 • <strong>Platform</strong> Independent <strong>Development</strong> with Java<br />
9.3 <strong>The</strong> Jboss Java <strong>Development</strong> System<br />
<strong>The</strong> Jboss is probably the most popular open source Java development products suite <strong>and</strong> it provides<br />
services similar to Sun’s Java 2 Enterprise Edition (J2EE). You can download it from free<br />
from http://www.jboss.org. <strong>The</strong> best thing about Jboss is that it is open source <strong>and</strong> free for use.<br />
At the time of writing this book Jboss version 2.4.4 is the stable release. Since J2EE is a big platform<br />
<strong>and</strong> this is not a programming tutorial text, you will learn only how to install the Jboss<br />
package here.<br />
Following is a step-by-step outline how to build Jboss on <strong>Linux</strong> system.<br />
• Download the latest version jboss-all.tgz from its web site.<br />
• Unpack it using the tar zxvf jboss-all.tgz comm<strong>and</strong><br />
• You must have Java SDK installed to build it <strong>and</strong> JAVA_HOME variable properly set. Use<br />
the “export JAVA_HOME=/usr/java/j2sdk1.4.0/” comm<strong>and</strong> if you have<br />
SDK version 1.4 installed. If you have any other environment, use appropriate comm<strong>and</strong>.<br />
• Go to jboss-all directory.<br />
• Run the following comm<strong>and</strong> <strong>and</strong> it should display a result like the one shown.<br />
[root@conformix jboss-all]# ./build/build.sh -version<br />
Ant version 1.4 compiled on September 3 2001<br />
[root@conformix jboss-all]#<br />
• Execute the build/build.sh init comm<strong>and</strong>.<br />
•Run the build/build.sh comm<strong>and</strong>.<br />
• Run Jboss using the following comm<strong>and</strong>. It will show a list of message as it starts<br />
different processes.<br />
[root@conformix jboss-all]# ./build/build.sh run-jboss<br />
Searching for build.xml ...<br />
Buildfile: /opt/jboss-all/build/build.xml<br />
_buildmagic:init:<br />
_buildmagic:init:local-properties:<br />
_buildmagic:init:buildlog:<br />
configure:<br />
[echo] groups: default<br />
[echo] modules:<br />
jmx,common,system,j2ee,naming,management,server,security,messa<br />
ging,pool,connector,cluster,admin,jetty,varia,jboss.net,iiop<br />
init:<br />
run-jboss:
CH09.fm Page 267 Monday, October 7, 2002 9:18 PM<br />
Java 2 SDK 267<br />
[echo] Starting JBoss (redirected /opt/jboss-all/build/<br />
run.log)<br />
run-jboss-check-os:<br />
_buildmagic:init:<br />
_buildmagic:init:local-properties:<br />
_buildmagic:init:buildlog:<br />
configure:<br />
[echo] groups: default<br />
[echo] modules:<br />
jmx,common,system,j2ee,naming,management,server,security,messa<br />
ging,pool,connector,cluster,admin,jetty,varia,jboss.net,iiop<br />
init:<br />
run-jboss-unix:<br />
If everything goes well, the startup will be successful. You can see a log of messages in the<br />
build/run.log file. You can also run Jboss using the run.sh script.<br />
9.4 Java 2 SDK<br />
Java SDK is distributed by Sun Microsystems. <strong>The</strong>re are two main versions of the SDK. <strong>The</strong><br />
St<strong>and</strong>ard Edition or J2SE is introduced in this book. <strong>The</strong> Enterprise Edition or J2EE is the premier<br />
product <strong>and</strong> it is comparable to Jboss discussed in this book. Please note that neither of<br />
J2SE nor J2EE are open source products. You have a limited license to use these. Please go<br />
through the license terms <strong>and</strong> conditions if you are inclined towards using Java SDK.<br />
At the time of writing this book, Version 1.4 of the SDK is available.<br />
9.4.1 Java 2 SDK St<strong>and</strong>ard Edition<br />
<strong>The</strong> latest version of Java SDK released by Sun Microsystems is 1.4 at the time of writing<br />
this book. <strong>The</strong>re are some new features added to this version. Some important features are<br />
listed here.<br />
9.4.1.1 Non-blocking I/O<br />
After a long waiting period, a non-blocking I/O library is finally added to the SDK as<br />
java.nio package. Non-blocking I/O is important when you don’t want to create threads for<br />
each connection in large network application. Creation of threads is very expensive compared to<br />
non-blocking I/O where you can open many I/O streams <strong>and</strong> use mechanisms similar to<br />
poll() <strong>and</strong> select() which are available with C language since long. <strong>Using</strong> this mechanism<br />
one thread may h<strong>and</strong>le several connections, for example in the case of a web server.
CH09.fm Page 268 Monday, October 7, 2002 9:18 PM<br />
268 Chapter 9 • <strong>Platform</strong> Independent <strong>Development</strong> with Java<br />
It is interesting to note that a non-blocking I/O library was available in the open source<br />
before it is included in SDK version 1.4. You can find more information about this open source<br />
implementation at http://www.cs.berkeley.edu/~mdw/proj/java-nbio/.<br />
9.4.1.2 Security Enhancements<br />
Many new features have been added for security enhancements to the SDK <strong>and</strong> some<br />
existing features are refined. <strong>The</strong>se features include Java Certification Path API, Cryptography,<br />
Java Authentication <strong>and</strong> Authorization Service security extensions, GSS-API with Kerberos<br />
support <strong>and</strong> so on.<br />
9.4.1.3 Web Services<br />
J2SE version 1.4 lays foundation for XML-based web services. Now the XML is part of<br />
the core platform which allows building interoperable web applications <strong>and</strong> services.<br />
Different building blocks for Java platform st<strong>and</strong>ard edition version 1.4 are shown in Figure<br />
9-1 taken from the Sun Microsystems web site.<br />
Figure 9-1 Building blocks of J2SE version 1.4.
CH09.fm Page 269 Monday, October 7, 2002 9:18 PM<br />
Java 2 SDK 269<br />
9.4.2 Getting <strong>and</strong> Installing Java SDK from Sun<br />
You can download the current version from http://java.sun.com. <strong>The</strong> file is available as<br />
j2sdk-1_4_0-linux-i386-rpm.bin. <strong>The</strong> best way is to copy this file to a temporary<br />
directory <strong>and</strong> then install it from there. I have copied this file into the /download directory<br />
where the first step is to make it executable using the following comm<strong>and</strong>:<br />
chmod a+x j2sdk-1_4_0-linux-i386-rpm.bin<br />
<strong>The</strong>n you can execute this file just by typing in the following comm<strong>and</strong>:<br />
./j2sdk-1_4_0-linux-i386-rpm.bin<br />
It will display the license agreement <strong>and</strong> you have to type in “yes” to agree to this<br />
license agreement. After that the self-extracting file will extract j2sdk-1_4_0-fcslinux-i386.rpm<br />
file that you can install using the rpm package with the help of the following<br />
comm<strong>and</strong>:<br />
rpm --install j2sdk-1_4_0-fcs-linux-i386.rpm<br />
If you have any previous version of SDK installed on your system, you should un-install it<br />
first. To list files installed by the rpm package, you can use the following comm<strong>and</strong>.<br />
rpm --query -l j2sdk-1.4.0-fcs|more<br />
By default, files are installed under the /usr/java/j2sdk1.4.0/ directory. <strong>The</strong> /<br />
usr/java/j2sdk1.4.0/bin directory contains all binary files for the SDK.<br />
9.4.3 Creating jar Files<br />
<strong>The</strong> jar utility is used to create Java-class archives. It can take multiple class files, compress<br />
these <strong>and</strong> put them into a single .jar file. <strong>The</strong> syntax for using the jar utility is similar<br />
to the tar program widely used on <strong>Linux</strong> <strong>and</strong> other UNIX systems. <strong>The</strong> following comm<strong>and</strong><br />
creates a file myclasses.jar from two class file first.class <strong>and</strong> second.class.<br />
jar cvf myclasses.jar first.class second.class<br />
You can also add or extract classes from the existing .jar files. <strong>The</strong> following comm<strong>and</strong><br />
adds third.class to myclasses.jar archive.<br />
jar uf myclasses.jar third.class<br />
<strong>The</strong> following comm<strong>and</strong> will extract second.class from the myclasses.jar file.<br />
jar x second.class<br />
You can also use wild cards with the jar comm<strong>and</strong>. If you use directory names, all files<br />
in that directory are added to the .jar file.<br />
To list all files in a .jar file, use t comm<strong>and</strong> line option. <strong>The</strong> following comm<strong>and</strong> lists all<br />
files in myclasses.jar file.<br />
jar tf myclasses.jar
CH09.fm Page 270 Monday, October 7, 2002 9:18 PM<br />
270 Chapter 9 • <strong>Platform</strong> Independent <strong>Development</strong> with Java<br />
9.5 Building Java Applications<br />
A Java application is a compiled Java program that can be executed using a Java virtual machine.<br />
<strong>The</strong>re are three basic steps to create a Java application. <strong>The</strong>se steps are:<br />
1. Create source code.<br />
2. Compile it.<br />
3. Run it using the virtual machine.<br />
Let’s see how you can go through these steps.<br />
9.5.1 Creating Source Code File<br />
Like any other programming language, Java source code files are created using an editor.<br />
<strong>The</strong>se source code files contain Java instructions. <strong>The</strong> simplest source code file contains an<br />
instruction to print the message “Hello World”, similar to your first C program. Please note that<br />
Java examples in this chapter are just to demonstrate how to use development tools.<br />
<strong>The</strong> program that prints the “Hello World” message is shown below:<br />
class HelloWorld {<br />
public static void main(String[] args) {<br />
System.out.println("Hello World!");<br />
}<br />
}<br />
<strong>The</strong> program must have a function main(), like C programs. <strong>The</strong> program may be saved<br />
as HelloWorld.java text file.<br />
Note that you can use any editor to create the source code file. I would recommend using<br />
Emacs which you have already learned in Chapter 2. Emacs underst<strong>and</strong>s Java programming language<br />
syntax. <strong>The</strong>re are other GUI editors <strong>and</strong> integrated development environment (IDE) packages<br />
that you can use to create Java source code.<br />
9.5.2 Compiling Java Code<br />
<strong>The</strong> Java compiler will compile the Java code into an executable. <strong>The</strong> following comm<strong>and</strong><br />
creates an output file HelloWorld.class from source code file HelloWorld.java.<br />
/usr/java/j2sdk1.4.0/bin/javac HelloWorld.java<br />
Note that the output file name is the same as the name of the class that contains function<br />
main().<br />
You can check the type of the output file type by using the file comm<strong>and</strong>. <strong>The</strong> following<br />
comm<strong>and</strong> shows type of the output file as compiled class data.<br />
[root@desktop /root]# file HelloWorld.class<br />
HelloWorld.class: compiled Java class data, version 46.0<br />
[root@desktop /root]#
CH09.fm Page 271 Monday, October 7, 2002 9:18 PM<br />
Building Applets 271<br />
Note that in large projects, there may be many source code files, class files <strong>and</strong> other<br />
object code files to generate the output executables. In such cases, you usually don’t use the Java<br />
compiler on the comm<strong>and</strong> line to compile individual files. <strong>The</strong> best way to carry out such tasks<br />
is to use the make utility that you have already learned previously in this book.<br />
9.5.3 Running Java Applications<br />
Java applications run on the top of Java virtual machine. <strong>The</strong> “Hello World” application<br />
that you created in the previous section can be executed using the Java virtual machine.<br />
[root@desktop /root]# java HelloWorld<br />
Hello World!<br />
[root@desktop /root]#<br />
Note that when you run this application, you don’t use HelloWorld.class on the<br />
comm<strong>and</strong> line. If you do, the Java virtual machine will not be able to execute the comm<strong>and</strong>. I<br />
have seen many messages in mailing lists <strong>and</strong> newsgroups from people who make this mistake<br />
<strong>and</strong> then wonder why they get error messages.<br />
9.5.4 <strong>Using</strong> gcj to Build Java Applications<br />
<strong>The</strong> gcj compiler is part of the GCC compiler suite. It is able to compile the Java language<br />
programs. One benefit of compiling Java programs with gcj is that you can create binary<br />
executable applications instead of Java byte code. <strong>The</strong>se applications can be executed on <strong>Linux</strong><br />
without the need of Java virtual machine. <strong>The</strong> downside is that you can execute applications<br />
built this way only on the platform for which you compiled. This is in contrast to the basic Java<br />
notion of compile once, run everywhere. Detailed information about using gcj is present at its<br />
web site http://gcc.gnu.org/java/.<br />
You can use GNU debugger for programs compiled with gcj, which is a big advantage<br />
for many programmers who are familiar with gdb. To be able to compile a program with gcj,<br />
you must have libgcj available on your system. <strong>The</strong> libgcj provides class libraries, byte<br />
code interpreter <strong>and</strong> garbage collector at the runtime. Latest version of libgcj is available<br />
from ftp://sourceware.cygnus.com/pub/java/ <strong>and</strong> method of its compilation <strong>and</strong> installation is<br />
discussed in Chapter 3. Refer to Chapter 3 for a description of how to compile programs with<br />
gcj compiler.<br />
9.6 Building Applets<br />
Like any Java applications, applets are also compiled using the Java compiler. <strong>The</strong> only difference<br />
is that a Java applet is not like a st<strong>and</strong>ard application <strong>and</strong> can be run only inside a browser.<br />
Following is a source code for the applet HelloWorld.java that is used as an example here.<br />
<strong>The</strong> applet, when compiled with the Java compiler results in HelloWorld.class file, which<br />
is Java byte code.
CH09.fm Page 272 Monday, October 7, 2002 9:18 PM<br />
272 Chapter 9 • <strong>Platform</strong> Independent <strong>Development</strong> with Java<br />
import java.applet.*;<br />
import java.awt.*;<br />
public class HelloWorld extends java.applet.Applet {<br />
public void paint (java.awt.Graphics gc) {<br />
gc.drawString("Hello World", 100, 90);<br />
}<br />
}<br />
<strong>The</strong> main thing to note here is that compiling Java applets is not different in any way from<br />
compiling Java applications. <strong>The</strong> only difference between a Java application <strong>and</strong> a Java applet is<br />
in the source code.<br />
9.7 Testing Applets with Netscape<br />
As mentioned earlier, a Java applet must run inside a browser. For this you have to write an<br />
HTML file. <strong>The</strong> following HTML file incorporates the applet <strong>and</strong> can be loaded to a browser<br />
like Netscape.<br />
<br />
<br />
<br />
<br />
<br />
<br />
<br />
<br />
When you load this file in the browser, the browser will execute the Java code <strong>and</strong> you can<br />
see the “Hello World” message printed in the browser window. Applets can also be viewed by<br />
applet viewers.<br />
9.8 Jikes for Java<br />
Jikes is an open source compiler for Java from IBM. It is fully compatible with the Java Language<br />
Specifications. You can download it from its web site at http://oss.software.ibm.com/<br />
developerworks/opensource/jikes/. Jikes version 1.15 is available right now. You have to download<br />
<strong>and</strong> install it the usual way. Typical steps are:<br />
• Download it from its web site.<br />
• Uncompress it using tar –zxvf jikes-1.15.tar.gz comm<strong>and</strong>.<br />
• Go to jikes-1.15 directory.<br />
• Run the configure script using the ./configure comm<strong>and</strong>.<br />
•Run the make comm<strong>and</strong>.<br />
•Run the make install comm<strong>and</strong>.
CH09.fm Page 273 Monday, October 7, 2002 9:18 PM<br />
Jikes for Java 273<br />
<strong>The</strong> Jikes FAQ can also be found on the above-mentioned web site. Since Jikes is a comm<strong>and</strong><br />
line compiler, it can be used in Makefiles for large projects. <strong>The</strong> compiler is invoked using<br />
the jikes comm<strong>and</strong>. <strong>The</strong> following comm<strong>and</strong> lists available options with Jikes:<br />
[root@conformix jikes-1.15]# jikes<br />
Jikes Compiler<br />
(C) Copyright IBM Corp. 1997, 2001.<br />
- Licensed Materials - Program Property of IBM - All Rights<br />
Reserved.<br />
use: jikes [-bootclasspath path][-classpath path][-d dir][-<br />
debug][-depend|-Xdepend][-deprecation][-encoding encoding][-<br />
extdirs path][-g][-nowarn][-nowrite][-O][-sourcepath path][-<br />
verbose][-<br />
Xstdout][++][+B][+c][+OLDCSO][+D][+DR=filename][+E][+F][+Kname<br />
=TypeKeyWord][+M][+P][+Td...d][+U][+Z] file.java...<br />
-bootclasspath path prepend path to CLASSPATH<br />
-classpath path use path for CLASSPATH<br />
-d dir write class files in directory dir<br />
-debug<br />
no effect (recognized for<br />
compatibility)<br />
-depend | -Xdepend recompile all used classes<br />
-deprecation report uses of deprecated features<br />
-encoding encoding use specified encoding to read source<br />
files<br />
-extdirs path prepend all zip files in path to<br />
CLASSPATH<br />
-g debug (generate LocalVariableTable)<br />
-nowarn<br />
do not issue warning messages<br />
-nowrite<br />
do not write any class files<br />
-O do not write LineNumberTable<br />
-sourcepath path also search for source files in path<br />
-verbose<br />
list files read <strong>and</strong> written<br />
-Xstdout<br />
redirect output listings to stdout<br />
++ compile in incremental mode<br />
+B do not invoke bytecode generator<br />
+c do not discard comments from lexer<br />
output<br />
+OLDCSO<br />
perform original Jikes classpath order<br />
for compatibility<br />
+D report errors immediately in emacs-form<br />
without buffering<br />
+DR=filename generate dependence report in filename<br />
+E list errors in emacs-form<br />
+F do full dependence check except for Zip<br />
<strong>and</strong> Jar files
CH09.fm Page 274 Monday, October 7, 2002 9:18 PM<br />
274 Chapter 9 • <strong>Platform</strong> Independent <strong>Development</strong> with Java<br />
+Kname=TypeKeyWord map name to type keyword<br />
+M generate makefile dependencies<br />
+P pedantic compilation - issues lots of<br />
warnings<br />
+Td...d<br />
set value of tab d...d spaces; each d<br />
is a decimal digit<br />
+U do full dependence check including Zip<br />
<strong>and</strong> Jar files<br />
+Z treat cautions as errors<br />
Version 1.15 - 26 Sept 2001<br />
Originally written by Philippe Charles <strong>and</strong> David Shields<br />
of IBM Research, Jikes is now maintained <strong>and</strong> refined by the<br />
Jikes Project at:<br />
http://ibm.com/developerworks/opensource/jikes<br />
Please consult this URL for more information <strong>and</strong> to learn<br />
how to report problems.<br />
[root@conformix jikes-1.15]#<br />
<strong>The</strong> following comm<strong>and</strong> will compile the hello.java program to create the<br />
hello.class output.<br />
jikes hello.java -classpath /usr/java/j2sdk1.4.0/jre/lib/<br />
rt.jar<br />
Note that you must have core classes installed on you system to use the compiler. In the<br />
above example, the classpath is mentioned on the comm<strong>and</strong> line.<br />
9.9 Miscellaneous<br />
This section contains a brief summary of information <strong>and</strong> links to some other fields related to<br />
Java. With major industry players like Sun <strong>and</strong> IBM behind Java technologies, it is being pushed<br />
in many different areas.<br />
9.9.1 Embedded Java<br />
Sun has introduced Java Embedded Server, which enables developers to build embedded<br />
applications based upon the Java platform. In addition to other things, it includes a Java implementation<br />
of SSL. Information about Embedded Java is available at http://java.sun.com/products/embeddedjava/.<br />
9.9.2 Real Time Java<br />
Efforts are being made to implement a real-time Java virtual machine. Specifications for<br />
real-time Java can be found at http://www.rtj.org/. <strong>The</strong> specifications include information about<br />
how to manage memory, interrupts, scheduling, garbage collection <strong>and</strong> so on.
CH09.fm Page 275 Monday, October 7, 2002 9:18 PM<br />
References 275<br />
9.9.3 Wireless Applications<br />
Java 2 Micro Edition or J2ME from Sun Microsystems introduces Wireless Java Technology.<br />
Information about using Java technology in wireless applications can be found at http://<br />
java.sun.com/products/embeddedjava/ .<br />
9.10 References<br />
1. Kaffe is available from its web site http://www.kaffe.org<br />
2. Most of the Sun Java information is available from http://java.sun.com<br />
3. Non-blocking library at http://www.cs.berkeley.edu/~mdw/proj/java-nbio/<br />
4. <strong>The</strong> Jboss at its web site http://www.jboss.org/<br />
5. <strong>The</strong> Jboss information at sourceforge.net http://sourceforge.net/projects/jboss/<br />
6. Java Language Specifications at http://java.sun.com/docs/books/jls/<br />
7. <strong>The</strong> Jikes compiler at http://oss.software.ibm.com/developerworks/opensource/jikes/<br />
8. Information about gcj compiler at http://gcc.gnu.org/java/<br />
9. <strong>The</strong> libgcj library from ftp://sourceware.cygnus.com/pub/java/<br />
10. Real-time Java specifications at http://www.rtj.org/<br />
11. Embedded Java at http://java.sun.com/products/embeddedjava/
CH09.fm Page 276 Monday, October 7, 2002 9:18 PM
AppA.fm Page 277 Monday, October 7, 2002 9:19 PM<br />
A PPENDIX<br />
A<br />
Typical Hardware<br />
Requirements for a<br />
<strong>Linux</strong> <strong>Development</strong><br />
Workstation<br />
T<br />
here are many factors that go into selecting an appropriate hardware specification for any<br />
given task; <strong>and</strong> the final specification will vary greatly depending on a particular environment,<br />
budget <strong>and</strong> time available to accomplish the task. In general, however, the things that need<br />
to be considered are: the speed of the processor, the amount of memory, size of the local hard<br />
drives, network connectivity, the video card <strong>and</strong> the display. Depending on the development<br />
projects to be undertaken, additional devices such as modems, sounds cards <strong>and</strong> the like will<br />
also need to be considered.<br />
<strong>The</strong> three situations that we will consider are a single developer working on a project<br />
alone, a distributed environment in which multiple developers are accessing a single machine via<br />
remote log-on (telnet, ssh or X-Windows), <strong>and</strong> a distributed environment utilizing a software<br />
repository.<br />
A.1 Parts of a Workstation<br />
Computers consist of many parts working in conjunction with each other to turn fluctuations in<br />
current into meaningful output on the display screen. Much of the work of the computer takes<br />
place using the motherboard, the processor(s) <strong>and</strong> the computer’s memory. <strong>The</strong>se components<br />
provide the “horsepower” that largely determines how fast the computer runs.<br />
Working in conjunction with these parts are things like the hard disk drive that provides<br />
the internal long-term storage. <strong>The</strong>re is also the video card that is used to convert the information<br />
in the computer into something that is readily usable to us mere mortals <strong>and</strong> the modem or network<br />
interface card that permit computers to communicate with one another.<br />
277
AppA.fm Page 278 Monday, October 7, 2002 9:19 PM<br />
278 Appendix A • Typical Hardware Requirements for a <strong>Linux</strong> <strong>Development</strong> Workstation<br />
Externally there are things such as the keyboard <strong>and</strong> the mouse that permit the user to<br />
enter data into the system, <strong>and</strong> the monitor which enables the computer to present information in<br />
a way that the operator can easily underst<strong>and</strong>.<br />
When evaluating a new computer system, remember that the motherboard, the processor<br />
<strong>and</strong> the memory determine how fast your computer will be able to perform the tasks required of<br />
it.<br />
<strong>The</strong> hard disk drives, the network <strong>and</strong> video cards, etc. determine what <strong>and</strong> how much<br />
your computer will be able to do. However, speed of hard drive is also a major factor in overall<br />
speed of compilation in case your computer is low on memory.<br />
Lastly, the input <strong>and</strong> output devices determine how much style your computer will have<br />
while it goes about doing whatever it was told to do.<br />
While there is some overlap in function, these definitions provide a general outline of the<br />
parts of the computer <strong>and</strong> can give us a basis for determining a base-line system.<br />
A.2 Section 1—<strong>The</strong> Processor <strong>and</strong> Memory<br />
Systems are available with one or multiple processors. R<strong>and</strong>om Access Memory (RAM) is presently<br />
cheap <strong>and</strong> easy to find. Processor speed seems to double every eighteen months <strong>and</strong> almost<br />
as soon as a new system is purchased, it becomes obsolete.<br />
<strong>The</strong> speed <strong>and</strong> the number of processors will determine the sheer raw power that a computer<br />
has. Speed is measured in megahertz (MHz) <strong>and</strong> more is always better.<br />
<strong>The</strong> memory that a system has installed will also effect the overall speed of the computer.<br />
If the system runs out of physical memory, it will, if the space has been set aside for it, start paging<br />
memory to disk. This is the process of writing a portion of memory that has not been used<br />
recently (in computer terms that could mean milliseconds) to the disk in order to free the memory<br />
up for more immediate usage. When the information on the disk is required again, the computer<br />
frees up physical memory <strong>and</strong> reads the data from the disk into that area.<br />
As the hard disk drive is several orders of magnitude slower than simply reading the information<br />
from memory, this slows down the entire computer as it waits for the information to be<br />
written <strong>and</strong> read from the drive. If your computer sits idle while there are large amounts of<br />
access to the disks, it is possible that the computer is low on memory <strong>and</strong> swapping to the disk.<br />
Adding more memory to the system should speed it up.<br />
A.3 Section 2—<strong>The</strong> Disk Drive<br />
At present, there are two main types of drives available on the market for personal computers:<br />
IDE <strong>and</strong> SCSI (pronounced “scuzzy”). <strong>The</strong> first <strong>and</strong> most common is the IDE drive. This is the<br />
type sold with most off-the-shelf workstations. A st<strong>and</strong>ard computer will be able to support up to<br />
four IDE drives at a time. <strong>The</strong>se drives may be hard drives, CD-ROMs, DVD drives or even tape<br />
drives. Once the maximum of four devices has been installed into the computer, no more may be<br />
added until one is removed. This <strong>and</strong> the fact that IDE drives have traditionally been slower than
AppA.fm Page 279 Monday, October 7, 2002 9:19 PM<br />
Sizing the Task 279<br />
SCSI drives are the main limitations in using this type of device. <strong>The</strong>y are however, cheaper <strong>and</strong><br />
somewhat easier to install than SCSI drives.<br />
SCSI devices may also be used for mass storage, CD-ROM <strong>and</strong> DVD drives, but SCSI<br />
devices can also include scanners, printers <strong>and</strong> other devices as well.<br />
Up to seven devices may be attached to a single SCSI interface card inside the computer<br />
<strong>and</strong> a computer may have more than one interface card. <strong>The</strong> total number of SCSI devices<br />
installed on one computer is limited to the number of available interface slots on the motherboard,<br />
times seven. On most modern workstations <strong>and</strong> servers this will allow a total number of<br />
SCSI devices ranging from seven to over thirty. New SCSI st<strong>and</strong>ards allow more devices to be<br />
connected to a single SCSI adapter.<br />
SCSI drives are often configured in a Redundant Array of Inexpensive Disks (RAID) that<br />
can be used to increase the reliability or the speed of the system. <strong>The</strong> trade-off in this configuration<br />
is a loss of available drive space. <strong>The</strong> decrease in available space may be anywhere from<br />
negligible to 50% of the total space on the drives depending on the RAID level used.<br />
A.4 Sizing the Task<br />
When developing requirements for any computer system, it is important to underst<strong>and</strong> exactly<br />
what the system will be used for <strong>and</strong> how it will be used. Once the purpose of the computer is<br />
understood, potential bottlenecks can be located <strong>and</strong> the potential for these to cause problems<br />
can be minimized or eliminated.<br />
A.5 St<strong>and</strong> Alone <strong>Development</strong> Workstation<br />
In this configuration a workstation will be used to develop applications locally. <strong>The</strong> source code<br />
will be kept on the local hard drive <strong>and</strong> the editing <strong>and</strong> compiling will take place on the same<br />
machine.<br />
<strong>The</strong> main concern with this configuration would be in the area of processor <strong>and</strong> memory,<br />
<strong>and</strong> in having a backup system in place to ensure that data is not lost in the even of a hardware<br />
failure.<br />
A typical developer’s machine will have a processor in the 800+ MHz range <strong>and</strong>, depending<br />
on the scope of the application being developed, may have more than one processor. <strong>The</strong><br />
available memory will again depend on the type of application be written with typical machines<br />
having in excess of 256 MB of memory <strong>and</strong>, in the event that large amounts of data have to be<br />
manipulated, more than a gigabyte of memory.<br />
<strong>The</strong> <strong>Linux</strong> OS, with development tools, can be installed utilizing approximately 1<br />
gigabyte (GB) of disk space. <strong>The</strong> source code for the OS, which represents a decade of work<br />
from people all over the globe, can be installed in less than 50 megabytes of space. A single<br />
developer working full-time would have to be very productive in order to fill up most drives<br />
available today as these typically come in 60GB sizes. Hard drive space is more often used for<br />
development libraries <strong>and</strong> tools, separate runtime environments, etc.
AppA.fm Page 280 Monday, October 7, 2002 9:19 PM<br />
280 Appendix A • Typical Hardware Requirements for a <strong>Linux</strong> <strong>Development</strong> Workstation<br />
Again, disk size may have to be increased if large volumes of data are being used in the<br />
testing of the application.<br />
<strong>The</strong>se estimates for simply generic in nature <strong>and</strong> would be a good starting place for new<br />
equipment purchases. It is entirely possible for productive development to take place on older,<br />
used equipment in the sub 300 MHz range. It depends entirely upon the application being developed<br />
<strong>and</strong> the time available to accomplish the task.<br />
However, with the cost of equipment constantly falling, it is often well worth the investment<br />
in newer equipment in order to reduce the compile time of the application.<br />
A.6 Distributed <strong>Development</strong>—Remote Access<br />
This example supposes that multiple developers will be accessing a remote server <strong>and</strong> developing<br />
on that platform. <strong>The</strong> source code will reside on the server <strong>and</strong> the server will be used to<br />
compile the programs.<br />
In this instance, the requirements for the workstations will be modest compared to the previous<br />
example, but the need for central server is added. This server will need to be far more powerful<br />
than the previously specified workstation.<br />
<strong>The</strong> server should be as fast as the budget <strong>and</strong> circumstances permit, <strong>and</strong> the number of<br />
simultaneous developers using the platform should be considered. You will almost certainly<br />
want a server with several processors.<br />
It will require more disk space, preferably with RAID enabled <strong>and</strong> the most utilized file<br />
systems spread out over several physical disks. A complete backup strategy should be in place<br />
<strong>and</strong> tested on a regular basis in order to ensure that the data is secure <strong>and</strong> can be restored in the<br />
event that any problems should arise.<br />
This server will require a large amount of memory as well. Several gigabytes is not unreasonable<br />
for a small number of developers. Several developers trying to compile at once can<br />
quickly drain the system’s resources.<br />
If the remote access strategy includes using a secure shell (ssh) to connect to the server,<br />
additional processing power will be required due to the encryption overhead.<br />
On the other h<strong>and</strong>, the actual workstation in this example would be comparatively modest.<br />
Most workstations capable of h<strong>and</strong>ling word processing <strong>and</strong> e-mail tasks should be up to h<strong>and</strong>ling<br />
this type of load with little difficulty. All of the storage, access <strong>and</strong> intensive processor use<br />
will take place on the server.<br />
A.7 Distributed <strong>Development</strong>—Source Code Repository<br />
This last example is a combination of the other two designs, <strong>and</strong> has probably supported more<br />
Open Source developers than any other model. In this design, a relatively small-scale server is<br />
used as a software repository <strong>and</strong> individual workstations similar to the one in the first example<br />
are used to provide the actual processing power.<br />
<strong>The</strong> main requirement for the server is a large disk storage space <strong>and</strong> a modest amount of<br />
memory. CVS, the source code control application used in this book, as well as others, can use
AppA.fm Page 281 Monday, October 7, 2002 9:19 PM<br />
Summing Up 281<br />
quite a bit of memory while comparing old <strong>and</strong> new versions of files with one another. As a<br />
result, the server should have at least 256 MB of memory <strong>and</strong> potentially much more if you<br />
expect to use large source code files.<br />
<strong>The</strong> server will not be responsible for compiling the application, so a fast processor is not<br />
necessary.<br />
What would be helpful, however, would be to ensure that the server has a well-tuned networking<br />
subsystem, <strong>and</strong> possibly some redundancy in that area as well. Additionally, if required<br />
by a particularly active source code repository, multiple NICs (Network Interface Cards) may be<br />
set up on different subnets to help reduce any network congestion that might arise.<br />
As previously mentioned, individual workstations will resemble the ones listed in the first<br />
example in this section—the st<strong>and</strong>-alone developer workstation.<br />
A.8 Summing Up<br />
While there is no way to accurately give minimal <strong>and</strong> optimal recommendations for any <strong>and</strong> all<br />
software development projects, these guidelines should give you an underst<strong>and</strong>ing of some of<br />
the issues that arise in selecting the servers <strong>and</strong> workstations necessary to provide development<br />
support.
AppA.fm Page 282 Monday, October 7, 2002 9:19 PM
index.fm Page 283 Wednesday, October 16, 2002 11:02 AM<br />
I NDEX<br />
A<br />
-a option:<br />
nm utility, 230–31<br />
objdump utility, 235–36<br />
strings utility, 237<br />
Actions, jCVS, 194–95<br />
Ada, 44<br />
add option, CVS, 186–87<br />
Adding break points, 156–58<br />
Aegis, 13<br />
Applets:<br />
building, 271–72<br />
testing with Netscape, 272<br />
Applications, Java:<br />
building, 270–71<br />
running, 271<br />
using gcj compiler to build, 271<br />
ar utility, 13, 226–28<br />
Architecture, creating, 4<br />
Archive, 226<br />
Arcom SBC-GX1 board, 258–60<br />
Artesyn PM/PPC mezzanine card, 260<br />
Assembler code, creating, 62<br />
Assemblers, 10, 12, 43–44, 91–92, See also<br />
Compilers<br />
GNU assembler, 44<br />
Automatic indentation, VIM, 40–41<br />
B<br />
-b option:<br />
cscope , 221<br />
diff comm<strong>and</strong>, 217<br />
-B option, diff comm<strong>and</strong>, 217<br />
-bad option, indent program, 209<br />
-bap option, indent program, 209<br />
-bbb option, indent program, 210<br />
Berkley style, 208–9<br />
Block reordering pass, 46<br />
Branches, 8<br />
break comm<strong>and</strong>, GDB, 141, 146, 156–58<br />
Break points, GDB:<br />
adding, 156–58<br />
continuing from, 158<br />
deleting, 160<br />
disabling, 159<br />
enabling, 159–60<br />
Build process, 101<br />
C<br />
C language, <strong>and</strong> GCC, 45<br />
283
index.fm Page 284 Wednesday, October 16, 2002 11:02 AM<br />
284 Index<br />
-c option:<br />
cscope, 221<br />
diff comm<strong>and</strong>, 218<br />
C++ code, compiling, 66<br />
C++ language, <strong>and</strong> GCC, 45<br />
C90/C95/C99, 45<br />
Caldera Inc., 16<br />
cbrowser utility, 203, 221<br />
ccl compiler, 70<br />
C_INCLUDE_PATH environment variable,<br />
55, 58<br />
clean target, 104–5<br />
collect2 program, 70<br />
commit option, CVS, 186<br />
Compilation:<br />
assembling a program, 91–92<br />
compiling a program, 53–91<br />
compiling to intermediate levels, 61–62<br />
creating assembler code, 62<br />
with debug support, 63–64<br />
of Fortran programs, 96–97<br />
include files, 92<br />
libraries:<br />
creating, 92<br />
st<strong>and</strong>ard libraries, 93–94<br />
linking a program, 91<br />
with optimization, 63–64<br />
of Pascal programs, 94–96<br />
Free Pascal (fpc), 95–96<br />
GNU Pascal, 96<br />
simple, 59<br />
of source code for languages other than C,<br />
66–70<br />
C++ code, 66<br />
Java code, 68–70<br />
Objective C code, 66–67<br />
static <strong>and</strong> dynamic linking, 65–66<br />
warning <strong>and</strong> error messages, h<strong>and</strong>ling, 92<br />
COMPILER_PATH environment variable,<br />
55<br />
Compilers, 10, 12, 43–91, See also Assemblers<br />
compilation process, stages in, 44<br />
default file types, 60–61<br />
g77 compiler, 96–97<br />
GCC (GNU Compiler Collection), 47<br />
GCC 3.x new features, 46–47<br />
GNU C library, 45<br />
languages supported by, 44–45<br />
<strong>and</strong> st<strong>and</strong>ard libraries, 45<br />
GNU C compiler, 43, 135<br />
installing, 48–58<br />
languages supported by, 43<br />
Oberon, 98<br />
Ruby, 98<br />
Smalltalk, 98<br />
Concurrent Versions System (CVS), 7, 12,<br />
175–201<br />
add option, 186–87<br />
checkout comm<strong>and</strong>, with -r option, 189<br />
client, using, 180–81<br />
commit option, 186<br />
configuring, 177–79<br />
conflict resolution, 185–86<br />
diff option, 184–85<br />
differences, determining, 184–85<br />
installing, 176–80<br />
jCVS, 190–96<br />
actions/verbs, 194–95<br />
checking out a project, 191–93<br />
client, configuring, 191<br />
editing projects, 195–96<br />
installing, 190<br />
server definitions file, setting up,<br />
193–94<br />
using, 191–96<br />
WorkBench, 196<br />
local repositories, 181–82<br />
managing, 176–80<br />
policies, 176<br />
project:<br />
adding files to, 186–87<br />
checking back in, 186<br />
checking out, 182–83<br />
finding the status of, 183–84<br />
importing into the repository, 179–<br />
80<br />
removing files from, 187–88<br />
renaming files within, 188
index.fm Page 285 Wednesday, October 16, 2002 11:02 AM<br />
Index 285<br />
project management <strong>and</strong> communication,<br />
176<br />
remote repositories, 182<br />
remove option, 187–88<br />
secure remote access with, 199–201<br />
Secure Shell (ssh) access, 199–201<br />
status option, 183<br />
tags <strong>and</strong> releases, 189<br />
update option, 185–86, 188<br />
using Emacs with, 196–99<br />
pcl-cvs, 197–99<br />
working copy:<br />
removing, 188–89<br />
configure script, GCC, 49, 52<br />
continue comm<strong>and</strong>, GDB, 138, 144, 158<br />
CPLUS_INCLUDE_PATH environment<br />
variable, 55<br />
cproto utility, 222–23<br />
Cross compilation tools, 247–50<br />
BDM (background debugging mode),<br />
249–50<br />
cross debugger, 248<br />
building, 250<br />
in-circuit emulators, 249<br />
JTAG (Joint Test Action Group), 249–50<br />
software emulators, 248<br />
Cross-platform development, 239–61<br />
Arcom SBC-GX1 board, 258–60<br />
Artesyn PM/PPC mezzanine card, 260<br />
development cycle, 241–43<br />
building on the host machine, 241–<br />
42<br />
remote debugging, 243<br />
transfer to the target machine, 242–<br />
43<br />
writing code, 241<br />
hardware used for, 258–60<br />
host machine, 240<br />
native <strong>and</strong> cross compilers, 241<br />
target machine, 240<br />
cscope utility, 203, 219–21<br />
cscope.out symbol file, 219<br />
initial screen, 219<br />
options used with, 221<br />
using, 219–21<br />
ctags utilities, 18<br />
Cut <strong>and</strong> paste comm<strong>and</strong>s, Emacs, 24<br />
CVS, See Concurrent Versions System<br />
(CVS)<br />
cvs diff comm<strong>and</strong>, 215<br />
$CVSEDITOR environment variable, 180<br />
CVSROOT variable, 181–82<br />
CVS_RSH environment variable, 181<br />
D<br />
-d option:<br />
ltrace utility, 224<br />
objdump utility, 236<br />
Davis, John E., 18<br />
ddd debugger, 172<br />
Dead code elimination pass, 46<br />
Deadlines, creating, 14<br />
Debian Project, 16<br />
Debuggers, 5, 10, 12<br />
ddd debugger, 172<br />
KDE debugger, 169<br />
xxgdb debugger, 173–74<br />
--debugging option, objdump utility, 236<br />
Default goal, 104<br />
delete comm<strong>and</strong>, GDB, 160<br />
Deletion comm<strong>and</strong>s, Emacs, 21<br />
Dependencies, resolving, 15<br />
<strong>Development</strong> team, managing, 14, 15<br />
diff option, CVS, 184–85<br />
diff utility, 203, 215–18<br />
defined, 215<br />
diff3 utility, 218<br />
oher forms of, 218<br />
options used with, 217–18<br />
sdiff utility, 218<br />
using, 215–18<br />
Directives, make utility, 131–33<br />
ifdef directive, 132<br />
ifeq directive, 132<br />
ifndef directive, 133<br />
ifneq directive, 132<br />
disable comm<strong>and</strong>, GDB, 159
index.fm Page 286 Wednesday, October 16, 2002 11:02 AM<br />
286 Index<br />
disable display comm<strong>and</strong>, GDB, 154<br />
display comm<strong>and</strong>, GDB, 153–54<br />
Documentation, 1<br />
Dynamic linking, 65–66<br />
E<br />
e l comm<strong>and</strong>, sdiff utility, 218<br />
E-mail <strong>and</strong> collaboration, 13<br />
e r comm<strong>and</strong>, sdiff utility, 218<br />
echo comm<strong>and</strong>, suppression of, 111<br />
$EDITOR environment variable, 180<br />
Editors, 10, 11<br />
Emacs, 11, 17–32, 135<br />
extensibility, 17–18<br />
folding code, 18<br />
Jed, 11, 18, 32–36<br />
syntax, 18<br />
tag support, 18<br />
VIM, 37–42<br />
what to look for in, 17–18<br />
Elisp, 17<br />
Emacs, 11, 17–32, 135<br />
auto-completion option, 23<br />
basic concepts, 20–24<br />
buffers, 24–25<br />
c-mode comm<strong>and</strong>s, 26<br />
comm<strong>and</strong>s related to TAGS, 29<br />
compiling with, 30–31<br />
comm<strong>and</strong>s, 31<br />
cut <strong>and</strong> paste comm<strong>and</strong>s, 24<br />
defined, 18–19<br />
deletion comm<strong>and</strong>s, 21<br />
file comm<strong>and</strong>s, 22<br />
initial screen, 19<br />
language modes, 26<br />
movement comm<strong>and</strong>s, 20–21<br />
search <strong>and</strong> replace comm<strong>and</strong>s, 22–24<br />
options, 23<br />
starting from within X-Windows, 19<br />
tags, 27–29<br />
tags-search function, 28<br />
tutorial, 20<br />
using with CVS, 196–99<br />
pcl-cvs, 196–99<br />
windows, 24–25<br />
comm<strong>and</strong>s, 25<br />
Xemacs, 32<br />
Embedded <strong>Linux</strong>, 245<br />
Embedded systems, 239, 243–61<br />
Arcom SBC-GX1 board, 258–60<br />
Artesyn PM/PPC mezzanine card, 260<br />
defined, 243–44<br />
development systems for, 246–47<br />
everyday examples of, 244<br />
<strong>and</strong> moving parts, 244<br />
operating systems, 245<br />
<strong>and</strong> power consumption, 245<br />
software applications for, 246<br />
target system hardware, 246–47<br />
real-time, 247<br />
testing methodology, 247<br />
<strong>and</strong> timing/clock-cycle changes due to<br />
code optimization, 65<br />
Empty comm<strong>and</strong>s, 107<br />
enable comm<strong>and</strong>, GDB, 159–60<br />
enable display comm<strong>and</strong>, GDB, 154<br />
End-user manuals/guides, 9<br />
Environment variables, GNU C compiler:<br />
C_INCLUDE_PATH, 55<br />
COMPILER_PATH, 55<br />
CPLUS_INCLUDE_PATH, 55<br />
GCC_EXEC_PREFIX, 55<br />
LD_LIBRARY_PATH, 55<br />
LIBRARY_PATH, 55<br />
OBJC_INCLUDE_PATH, 55<br />
TMPDIR, 54<br />
etags comm<strong>and</strong>, 27<br />
etags utilities, 18<br />
Explicit rules, make utility, 118<br />
F<br />
-f option:<br />
ltrace utility, 224<br />
objdump utility, 236<br />
sed utility, 215<br />
strings utility, 237<br />
-f reffile option, cscope , 221<br />
file comm<strong>and</strong>, GDB, 137, 166
index.fm Page 287 Wednesday, October 16, 2002 11:02 AM<br />
Index 287<br />
File comm<strong>and</strong>s, Emacs, 22<br />
finish comm<strong>and</strong>, GDB, 144–46, 166–68<br />
Folding code, 18<br />
Fortran programs:<br />
compilation of, 96–97<br />
<strong>and</strong> GCC, 45, 45–46<br />
FQDN (fully qualifed domain name), 194,<br />
200<br />
frame comm<strong>and</strong>, GDB, 146<br />
Free Pascal (fpc), 95–96<br />
Functional testing, 7<br />
G<br />
g77 compiler, 96–97<br />
gcc comm<strong>and</strong>, 55–56<br />
machine dependent options, 77–90<br />
AMD29K options, 79<br />
ARC options, 87<br />
ARM options, 79–80<br />
AVR options, 88<br />
Clipper options, 86<br />
Convex options, 78–79<br />
DEC Alpha options, 85–86<br />
H8/300 options, 86<br />
HPPA options, 84–85<br />
i386 options, 84<br />
IA-64 options, 89<br />
Intel 960 options, 85<br />
M32R/D options, 80<br />
M68hclx options, 77–78<br />
M88K options, 80–81<br />
M680x0 options, 77<br />
MCore options, 88–89<br />
MIPS options, 83–84<br />
MN10200 options, 80<br />
MN10300 options, 80<br />
NS32K options, 88<br />
RS/6000 <strong>and</strong> PowerPC options, 81–<br />
82<br />
RT options, 82–83<br />
S/390 <strong>and</strong> zSeries options, 89<br />
SH options, 86<br />
SPARC options, 78<br />
System V options, 87<br />
TMS320C3x/C4x options, 87<br />
V850 options, 87<br />
VAX options, 78<br />
Xtensa options, 89–90<br />
options, 68–70<br />
assembler option, 76<br />
C language options, 70–71<br />
C-only warning options, 73<br />
C++ language options, 71–72<br />
code generation options, 90–91<br />
debugging options, 73–74<br />
directory options, 77<br />
language independent options, 72<br />
linker options, 76–77<br />
machine dependent options, 77–90<br />
Objective-C language options, 72<br />
optimization options, 74–75<br />
overall options, 70<br />
preprocessor options, 76<br />
target options, 77<br />
warning options, 72–73<br />
GCC (GNU Compiler Collection), 12, 47<br />
file types used with, 60–61<br />
GCC 3.x new features, 46–47<br />
GCC version 3.0.1 improvements, 47<br />
GCC version 3.0.2 improvements, 47<br />
GCC version 3.0.3 improvements, 47<br />
improved documentation, 47<br />
language improvements, 46<br />
new language support, 46<br />
new targets, addition of, 47<br />
optimization improvements, 46<br />
target specific improvements, 47<br />
GCC_EXEC_PREFIX environment variable,<br />
55<br />
gdb, See also GNU debugger<br />
common comm<strong>and</strong>s, 137–38<br />
downloading/building, 168<br />
final installation, 168<br />
installing, 168<br />
running on host using serial port, 253–54<br />
sample gdb session, 138–41<br />
using with GNU Emacs, 164–65<br />
gdbserver program, 250–58, 253<br />
attaching to a running process using, 255<br />
running on host using TCP/IP, 252–53
index.fm Page 288 Wednesday, October 16, 2002 11:02 AM<br />
288 Index<br />
running on target using serial port, 253<br />
running on target using TCP/IP, 251–52<br />
serial cable, 254<br />
step-by-step procedures, 250–51<br />
using with GNU debugger, 250–55<br />
glibc, 45<br />
Global Null pointer elimination test elimination<br />
pass, 46<br />
GNU assembler, 44<br />
GNU binary utilities, 203, 226–38<br />
addr2line utility, 237–38<br />
ar utility, 226–28<br />
ldd utility, 238<br />
nm utility, 228–31<br />
listing debug symbols, 231<br />
listing line numbers in source files,<br />
230–31<br />
objcopy utility, 231–32<br />
objdump utility, 232–36<br />
ranlib utility, 228<br />
size utility, 236<br />
strings utility, 237<br />
strip utility, 228–31<br />
GNU C compiler, 43, 135<br />
building/installing, 48–54<br />
configure script, running, 49–51<br />
final install, 52<br />
make bootstrap comm<strong>and</strong>, 51<br />
make install comm<strong>and</strong>, 52<br />
typical directory tree after installation,<br />
52–54<br />
unpacking source code, 48–49<br />
<strong>and</strong> development tools installations, 58<br />
downloading the latest version, 48<br />
environment variables, 54–56<br />
C_INCLUDE_PATH, 55<br />
COMPILER_PATH, 55<br />
CPLUS_INCLUDE_PATH, 55<br />
GCC_EXEC_PREFIX, 55<br />
LD_LIBRARY_PATH, 55<br />
LIBRARY_PATH, 55<br />
OBJC_INCLUDE_PATH, 55<br />
TMPDIR, 54<br />
installing, 48–58<br />
languages supported by, 43<br />
location of include files, setting, 57–58<br />
location of libraries, setting, 56–57<br />
manual pages path, setting, 58<br />
PATH variable, setting, 56<br />
post-installation tasks, 56–58<br />
GNU debugger (GDB), 12, 135–74<br />
break comm<strong>and</strong>, 141, 146, 156–58<br />
break points:<br />
adding, 156–58<br />
continuing from, 158<br />
deleting, 160<br />
disabling, 159<br />
enabling, 159–60<br />
continue comm<strong>and</strong>, 138, 144, 158<br />
controlling execution, 144–46<br />
defined, 136<br />
delete comm<strong>and</strong>, 160<br />
disable comm<strong>and</strong>, 159<br />
disable display comm<strong>and</strong>, 154<br />
display comm<strong>and</strong>, 153–54<br />
enable comm<strong>and</strong>, 159–60<br />
enable display comm<strong>and</strong>, 154<br />
file comm<strong>and</strong>, 137<br />
files <strong>and</strong> shared libraries, 163<br />
finish comm<strong>and</strong>, 144–46, 166–68<br />
frame comm<strong>and</strong>, 146<br />
getting started with, 136–43<br />
common gdb comm<strong>and</strong>s, 137–38<br />
passing comm<strong>and</strong>-line arguments to<br />
program being debugged,<br />
141–43<br />
sample gdb session, 138–41<br />
info display comm<strong>and</strong>, 154<br />
kill comm<strong>and</strong>, 144<br />
list comm<strong>and</strong>, 141<br />
next comm<strong>and</strong>, 137–38, 141, 144, 146<br />
object file formats supported by, 136<br />
optimized code:<br />
debugging, 160–62<br />
print expr comm<strong>and</strong>, 138<br />
pwd comm<strong>and</strong>, 154<br />
quit comm<strong>and</strong>, 137–38, 141, 144<br />
return comm<strong>and</strong>, 144<br />
run comm<strong>and</strong>, 138, 142-44<br />
running processing:<br />
debugging, 165–68
index.fm Page 289 Wednesday, October 16, 2002 11:02 AM<br />
Index 289<br />
set comm<strong>and</strong>, 155–56<br />
set env comm<strong>and</strong>, 155<br />
show comm<strong>and</strong>, 143<br />
show environment comm<strong>and</strong>, 154–55<br />
show path comm<strong>and</strong>, 154<br />
stack, dealing with, 146–51<br />
step comm<strong>and</strong>, 137–38, 144–46<br />
sum.c program, 151<br />
undisplay comm<strong>and</strong>, 154<br />
unset env comm<strong>and</strong>, 155<br />
using stubs with, 256<br />
variables:<br />
automatically displaying with each<br />
comm<strong>and</strong>, 153–54<br />
displaying, 151–56<br />
environment variables, 154–55<br />
modifying, 155–56<br />
program, 151–52<br />
GNU Emacs, 12<br />
GNU make utility, See make utility<br />
GNU Pascal, 96<br />
GNU Public License (GPL), 190<br />
GNU style, 206–7<br />
H<br />
-h option:<br />
ltrace utility, 224<br />
objdump utility, 233–34<br />
Hardware platform, 10–11<br />
selection criteria for, 13–14<br />
hexdump utility, 13<br />
I<br />
-i option, diff comm<strong>and</strong>, 217<br />
IDE drives, 278–79<br />
ifdef directive, 132<br />
ifeq directive, 132<br />
ifndef directive, 133<br />
ifneq directive, 132<br />
Implicit rules, make utility, 118–19<br />
indent utility, 203, 204–14<br />
blank lines/comments, 209–10<br />
braces, formatting, 210–11<br />
coding styles, selecting, 206–9<br />
declarations, formatting, 211–12<br />
efficient use of, 206<br />
getting started with, 205–6<br />
long lines, breaking, 212–13<br />
options summary, 213–14<br />
.indent.pro, 206<br />
info break comm<strong>and</strong>, 159–60<br />
info display comm<strong>and</strong>:<br />
GDB, 154<br />
J<br />
Java:<br />
applets:<br />
building, 271–72<br />
testing with Netscape, 272<br />
applications:<br />
building, 270–71<br />
running, 271<br />
using gcj compiler to build, 271<br />
compiler, 264<br />
Embedded Java, 274<br />
<strong>and</strong> GCC, 45<br />
Java 2 Micro Edition (J2ME), 275<br />
Java 2 SDK, 267–69<br />
Java code, compiling, 270–71<br />
Java Virtual Machine (JVM), 263–64<br />
Jboss, 266–67<br />
Jikes, 272–74<br />
Kaffe, 264–65<br />
platform independent development with,<br />
263–75<br />
real-time, 274<br />
source code file:<br />
creating, 270<br />
wireless applications, 275<br />
Java 2 Micro Edition (J2ME), 275<br />
Java 2 SDK, 267–69<br />
Enterprise Edition, 267<br />
getting/installing from Sun Microsystems,<br />
269<br />
jar files, creating, 269<br />
St<strong>and</strong>ard Edition, 267–68<br />
non-blocking I/O, 267–68<br />
security enhancements, 268<br />
Web services, 268
index.fm Page 290 Wednesday, October 16, 2002 11:02 AM<br />
290 Index<br />
Java code, compiling, 68–70<br />
Java Runtime Environment, 190<br />
Java Virtual Machine (JVM), 263–64<br />
Jboss, 266–67<br />
jcl program, 70<br />
jCVS, 190–96<br />
actions/verbs, 194–95<br />
checking out a project, 191–93<br />
client, configuring, 191<br />
editing projects, 195–96<br />
installing, 190<br />
Project Window, 192–93<br />
server definitions file, setting up, 193–94<br />
using, 191–96<br />
WorkBench, 196<br />
Jed, 11, 18, 32–36<br />
configuring, 33<br />
folding code, 35–36<br />
comm<strong>and</strong>s, 36<br />
text interface, 34<br />
using, 34<br />
Jikes, 272–74<br />
jvgenmain program, 70<br />
K<br />
K&R style, 207–8<br />
Kaffe, 264–65<br />
kdbg, 169–71<br />
KDE debugger, 169–71<br />
Kibaale Children’s Center (KCC), 37<br />
kill comm<strong>and</strong>, 144<br />
killall comm<strong>and</strong>, 179<br />
L<br />
L comm<strong>and</strong>, sdiff utility, 218<br />
-l option:<br />
ar utility, 227<br />
nm utility, 230–31<br />
ldconfig program, 57<br />
LD_LIBRARY_PATH environment variable,<br />
55, 57<br />
Libraries:<br />
creating, 92<br />
GNU C library, 45<br />
location of, 163<br />
shared, 163<br />
st<strong>and</strong>ard libraries, 45, 93–94<br />
LIBRARY_PATH environment variable,<br />
55<br />
<strong>Linux</strong>:<br />
configuring X-Windows on, 13<br />
as operating system, 11<br />
<strong>Linux</strong> <strong>Development</strong> <strong>Platform</strong> Specifications<br />
(LDPS), 15<br />
<strong>Linux</strong> development workstation, 277–82<br />
disk drive, 278–79<br />
distributed development:<br />
remote access, 280<br />
source code repository, 280–81<br />
memory, 278<br />
parts of, 277–78<br />
processor, 278<br />
sizing the task, 279<br />
st<strong>and</strong>alone development workstation,<br />
279–80<br />
<strong>Linux</strong> St<strong>and</strong>ard Base (LSB), 15–16<br />
current contributors to, 16<br />
libraries, 15–16<br />
list comm<strong>and</strong>, GDB, 141<br />
ltrace utility, 203, 223–24<br />
options used with, 224<br />
M<br />
make bootstrap comm<strong>and</strong>, 51<br />
make utility, 13, 101–34<br />
basic terminology, 103–5<br />
control structures, 131–33<br />
for control structure, 133<br />
default goal, 104<br />
default goal, building, 108<br />
dependencies, 104<br />
directives, 131–33<br />
ifdef directive, 132<br />
ifeq directive, 132<br />
ifndef directive, 133<br />
ifneq directive, 132<br />
include files, 109–10<br />
input files, 103, 105–6
index.fm Page 291 Wednesday, October 16, 2002 11:02 AM<br />
Index 291<br />
latest distribution:<br />
compilation, 133–34<br />
installation, 134<br />
obtaining, 133<br />
makefile contents, 106–7<br />
comments <strong>and</strong> blank lines, 107<br />
rule to build the default goal, 107<br />
rules to build individual objects, 107<br />
rules to build other goals, 107<br />
rules to clean previous builds, 107<br />
rules to install, 107<br />
variables, 106<br />
multiple makefiles/directories, working<br />
with, 122–29<br />
building targets, 128–29<br />
cleaning process, 129<br />
individual targets, making, 129<br />
makefile in common-dir directory,<br />
125–26<br />
makefile in dns-dir directory, 127–<br />
28<br />
makefile in ftp-dir directory, 126<br />
makefile in tftp-dir directory, 127<br />
makefile in the top directory, 123–<br />
25<br />
non-default goal, building, 108<br />
phony target, 104–5<br />
rules, 103, 110–19<br />
anatomy of, 110–11<br />
basic makefile, 111–13<br />
comm<strong>and</strong> echoing, 111<br />
example makefiles, 111–18<br />
explicit, 118<br />
implicit, 118–19<br />
multiple comm<strong>and</strong>s in the same line,<br />
110<br />
with no dependencies, 111<br />
running, 108<br />
shell to execute comm<strong>and</strong>s, 109<br />
special features, 130–31<br />
non-stop execution, 130–31<br />
running comm<strong>and</strong>s in parallel, 130<br />
target, 104<br />
updating a target, rules for, 108<br />
variables, 119–22<br />
automatic, 121–22<br />
defining, 120<br />
pre-defined, 121<br />
types of, 120–21<br />
Makefile.in, 106<br />
M<strong>and</strong>rakeSoft, 16<br />
Marketing Requirement Document (MRD), 3, 5<br />
Marketing/sales, 1–3<br />
Members, archive, 226<br />
Memory leakage, 6<br />
Meta key, 20<br />
Miscellaneous tools, 13, 203–38, 219–21<br />
cbrowser utility, 203, 221<br />
cproto utility, 222–23<br />
cscope utility, 203, 219–21<br />
cscope.out symbol file, 219<br />
initial screen, 219<br />
options used with, 221<br />
using, 219–21<br />
diff utility, 203, 215–18<br />
defined, 215<br />
diff3 utility, 218<br />
oher forms of, 218<br />
options used with, 217–18<br />
sdiff utility, 218<br />
using, 215–18<br />
GNU binary utilities, 203, 226–38<br />
addr2line utility, 237–38<br />
ar utility, 226–28<br />
ldd utility, 238<br />
nm utility, 228–31<br />
objcopy utility, 231–32<br />
objdump utility, 232–36<br />
ranlib utility, 228<br />
size utility, 236<br />
strings utility, 237<br />
strip utility, 228–31<br />
indent utility, 203, 204–14<br />
blank lines/comments, 209–10<br />
braces, formatting, 210–11<br />
coding styles, selecting, 206–9<br />
declarations, formatting, 211–12<br />
efficient use of, 206<br />
getting started with, 205–6<br />
long lines, breaking, 212–13<br />
options summary, 213–14
index.fm Page 292 Wednesday, October 16, 2002 11:02 AM<br />
292 Index<br />
ltrace utility, 203, 223–24<br />
options used with, 224<br />
sed utility, 203, 215<br />
strace utility, 203, 224–25<br />
Moolenaar, Bram, 37<br />
Movement comm<strong>and</strong>s, Emacs, 20–21<br />
N<br />
-n option, diff comm<strong>and</strong>, 218<br />
-nbad option, indent program, 210<br />
next comm<strong>and</strong>, GDB, 137–38, 141, 144, 146<br />
nm utility, 228–31<br />
debug symbols, listing, 231<br />
line numbers, listing in source files, 230–<br />
31<br />
O<br />
-o filename option, ltrace utility, 224<br />
Oberon, 44, 98<br />
OBJC_INCLUDE_PATH environment<br />
variable, 55<br />
objcopy utility, 231–32<br />
objdump utility, 232–36<br />
file dissassembly, 234–35<br />
header information, displaying, 232–33<br />
library files, displaying information<br />
about, 236<br />
section headers, displaying, 233–34<br />
source code disassembly, 235–36<br />
Objective C, <strong>and</strong> GCC, 45<br />
Objective C code, 45<br />
compiling, 66–67<br />
OpenSSH, 199<br />
Operating system, 10, 11<br />
OSDN (Open Source Developers Network), 7<br />
P<br />
-p option:<br />
diff comm<strong>and</strong>, 217<br />
unified diff comm<strong>and</strong>, 216<br />
Pascal programs:<br />
compilation of, 94–96<br />
Free Pascal (fpc), 95–96<br />
GNU Pascal, 96<br />
pcl-cvs, 196–99<br />
installing, 197<br />
using, 197–99<br />
Phony targets, 104–5<br />
PRCS, 13<br />
print expr comm<strong>and</strong>, GDB, 138<br />
printf() function, 92<br />
Project management software, 14<br />
ps comm<strong>and</strong>, GDB, 166<br />
pserver method, 182<br />
pSOS, 245<br />
pwd comm<strong>and</strong>, GDB, 154<br />
Q<br />
Q comm<strong>and</strong>, sdiff utility, 218<br />
QNX, 245<br />
Quality Assurance (QA), 6<br />
quit comm<strong>and</strong>, GDB, 137–38, 141, 144<br />
R<br />
R comm<strong>and</strong>, sdiff utility, 218<br />
-r option:<br />
diff comm<strong>and</strong>, 218<br />
ltrace utility, 224<br />
-R option, cscope , 221<br />
ranlib utility, 13, 228<br />
RCS, 13<br />
Red Hat Software, 16<br />
Register-renaming pass, 46<br />
Regression (stress) testing, 6–7<br />
Release notes, 8<br />
remove option, CVS, 187–88<br />
return comm<strong>and</strong>, GDB, 144<br />
Review meetings, 5–6<br />
RIP (Routing Information Protocol), 4<br />
Ruby, 98<br />
Rules, make utility, 103, 110–19<br />
anatomy of, 110–11<br />
basic makefile, 111–13<br />
comm<strong>and</strong> echoing, 111<br />
example makefiles, 111–18<br />
explicit, 118
index.fm Page 293 Wednesday, October 16, 2002 11:02 AM<br />
Index 293<br />
implicit, 118–19<br />
multiple comm<strong>and</strong>s in the same line, 110<br />
with no dependencies, 111<br />
run comm<strong>and</strong>, GDB, 138, 142, 143, 144<br />
S<br />
-s option:<br />
ltrace utility, 224<br />
nm utility, 228<br />
-S option, objdump utility, 235, 236<br />
Sanity testing, 6<br />
Santa Cruz Operations, 218<br />
SCCS, 13<br />
SCSI drives, 278–79<br />
Search <strong>and</strong> replace comm<strong>and</strong>s, Emacs, 22–24<br />
options, 23<br />
sed utility, 203, 215<br />
set comm<strong>and</strong>, GDB, 155–56<br />
set env comm<strong>and</strong>, GDB, 155<br />
show comm<strong>and</strong>, GDB, 143<br />
show environment comm<strong>and</strong>, GDB, 154–55<br />
show path comm<strong>and</strong>, GDB, 154<br />
-silent flag, 111<br />
Smalltalk, 44, 98<br />
-sob option, indent program, 210<br />
Software build process, 101<br />
Software development:<br />
complexity of, 1<br />
components of a development system,<br />
10–13<br />
assemblers, 12<br />
compilers, 12<br />
debuggers, 12<br />
editors, 11<br />
e-mail <strong>and</strong> collaboration, 13<br />
hardware platform, 10–11<br />
operating system, 11<br />
version control systems, 12–13<br />
X-Windows, 13<br />
hardware platform, selection criteria for,<br />
13–14<br />
<strong>Linux</strong> <strong>Development</strong> <strong>Platform</strong> Specifications<br />
(LDPS), 15<br />
<strong>Linux</strong> St<strong>and</strong>ard Base (LSB), 15–16<br />
current contributors to, 16<br />
libraries, 15–16<br />
managing the development process, 14–<br />
15<br />
deadlines, creating, 14<br />
dependencies, resolving, 15<br />
development team, managing, 15<br />
miscellaneous tools, 13<br />
software development tools, selection criteria<br />
for, 14<br />
Software development project life cycle, 2–9<br />
architecture, creating, 4<br />
coding, 5–6<br />
design documents, creating, 4–5<br />
documentation, 8–9<br />
functional specifications, writing, 4<br />
implementation, 5–6<br />
new features, 9<br />
requirement gathering, 2–3<br />
software releases, 8<br />
branches, 8<br />
release notes, 8<br />
support, 9<br />
testing, 6–7<br />
functional testing, 7<br />
regression (stress) testing, 6–7<br />
sanity testing, 6<br />
unit testing, 6<br />
Software development tools, <strong>and</strong> GNU C<br />
compiler, 58<br />
Software testing, 1<br />
Static linking, 65–66<br />
Static Single Assignment (SSA), 46<br />
status option, CVS, 183<br />
step comm<strong>and</strong>, GDB, 137–38, 144–46, 146<br />
Step into actions, debuggers, 138<br />
Step over actions, debuggers, 138<br />
strace utility, 203, 224–25<br />
Stress testing, 6–7<br />
strip utility, 228–31<br />
sum.c program, GDB, 151<br />
Support cycle, 1
index.fm Page 294 Wednesday, October 16, 2002 11:02 AM<br />
294 Index<br />
SuSE, 16<br />
Syntax, editors, 18<br />
T<br />
-t option:<br />
ar utility, 227<br />
objdump utility, 236<br />
TAB character, 103, 107, 110<br />
Tag support, editors, 18<br />
:tags Comm<strong>and</strong>, VIM, 41–42<br />
Tags-search function, Emacs, 28<br />
tar comm<strong>and</strong>, 48<br />
Target machine connection, 250–58<br />
debugging the debug session, 256–58<br />
gdb, running on host using serial port,<br />
253–54<br />
gdbserver program, 250–58, 253<br />
attaching to a running process using,<br />
255<br />
running on host using TCP/IP, 252–<br />
53<br />
running on target using serial port,<br />
253<br />
running on target using TCP/IP,<br />
251–52<br />
serial cable, 254<br />
step-by-step procedures, 250–51<br />
using with GNU debugger, 250–55<br />
using stubs with GNU debugger, 256<br />
Technical documentation, 9<br />
Testing, 6–7<br />
functional testing, 7<br />
regression (stress) testing, 6–7<br />
sanity testing, 6<br />
unit testing, 6<br />
TMPDIR environment variable, 54<br />
:tselect Comm<strong>and</strong>, VIM, 41<br />
-tt option, ltrace utility, 224<br />
Turbo<strong>Linux</strong> Inc., 16<br />
U<br />
-u option, diff comm<strong>and</strong>, 217<br />
undisplay comm<strong>and</strong>, GDB, 154<br />
unified diff comm<strong>and</strong>, 216<br />
Unit testing, 6<br />
unset env comm<strong>and</strong>, GDB, 155<br />
update option, CVS, 185–86, 188<br />
User manuals, 9<br />
V<br />
-V option:<br />
ar utility, 226<br />
ltrace utility, 224<br />
VA <strong>Linux</strong>, 16<br />
Verbs, jCVS, 194–95<br />
Version control systems, 10, 12–13<br />
VIM, 37–42<br />
automatic indentation, 40–41<br />
basic concepts, 38<br />
basic editing, 38–42<br />
navigation, 38–39<br />
defined, 37<br />
folding code, 42<br />
comm<strong>and</strong>s, 39<br />
gvim, 37<br />
indenting options, 40–41<br />
insert mode, 39–40<br />
:tags comm<strong>and</strong>, 41–42<br />
:tselect comm<strong>and</strong>, 41<br />
using tags with, 41–42<br />
vim (vi) editor, 11<br />
VxWorks, 245<br />
W<br />
Windows CE, 245<br />
X<br />
-x option, ar utility, 227<br />
X-Windows, 13<br />
Xemacs, 11, 32<br />
xxgdb debugger, 135, 173–74<br />
Y<br />
-y option, diff comm<strong>and</strong>, 217, 218