T-Mobile MDA Vario/Compact II Setup
T-Mobile MDA Vario/Compact II Setup
T-Mobile MDA Vario/Compact II Setup

You also want an ePaper? Increase the reach of your titles
YUMPU automatically turns print PDFs into web optimized ePapers that Google loves.
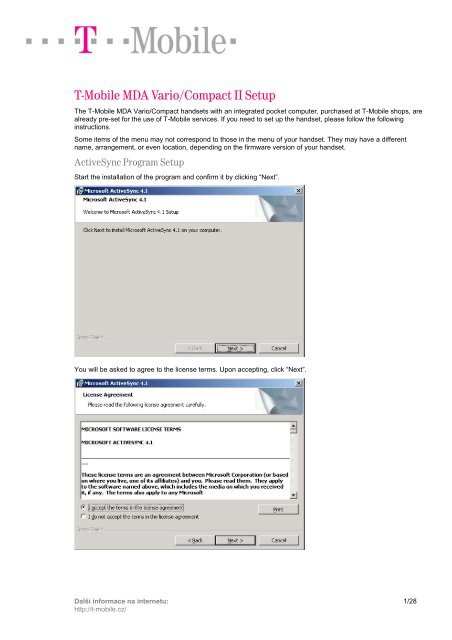
T-<strong>Mobile</strong> <strong>MDA</strong> <strong>Vario</strong>/<strong>Compact</strong> <strong>II</strong> <strong>Setup</strong><br />
The T-<strong>Mobile</strong> <strong>MDA</strong> <strong>Vario</strong>/<strong>Compact</strong> handsets with an integrated pocket computer, purchased at T-<strong>Mobile</strong> shops, are<br />
already pre-set for the use of T-<strong>Mobile</strong> services. If you need to set up the handset, please follow the following<br />
instructions.<br />
Some items of the menu may not correspond to those in the menu of your handset. They may have a different<br />
name, arrangement, or even location, depending on the firmware version of your handset.<br />
ActiveSync Program <strong>Setup</strong><br />
Start the installation of the program and confirm it by clicking “Next”.<br />
You will be asked to agree to the license terms. Upon accepting, click “Next”.<br />
Další informace na internetu:<br />
http://t-mobile.cz/<br />
1/28
Enter your name and organization. Click “Next”.<br />
The installation program will check the free space on your hard disk and offer you to change the destination folder.<br />
To continue, click “Next”.<br />
Další informace na internetu:<br />
http://t-mobile.cz/<br />
2/28
To start the installation, click “Install”.<br />
After the installation is complete, click “Finish”.<br />
Další informace na internetu:<br />
http://t-mobile.cz/<br />
3/28
After confirming the end of the installation, you will be asked to restart your computer. Click “Yes”.<br />
The ActiveSync program starts and asks you to connect your device to your PC. After doing so, click “Next”.<br />
As soon as the connection is established, the device will automatically start to install all necessary drivers.<br />
Další informace na internetu:<br />
http://t-mobile.cz/<br />
4/28
When your pocket PC is detected, the data synchronization wizard will start. To continue, click “Next”.<br />
A window will appear asking you to select the information you want to synchronize. Make your selection and click<br />
“Next”.<br />
Další informace na internetu:<br />
http://t-mobile.cz/<br />
5/28
To complete the synchronization setup, click “Finish”.<br />
When the setup is finished, your settings will be saved and synchronization software will start.<br />
Další informace na internetu:<br />
http://t-mobile.cz/<br />
6/28
WAP <strong>Setup</strong> for GPRS connection<br />
WAP is a service which enables you to access the internet and many other services via your mobile handset. GPRS<br />
is a “package data transfer” which means that you pay for the data transferred and not for the time spent on the<br />
internet or WAP. To use the service, you must have a handset supporting GPRS and data services and activate the<br />
GPRS service on your SIM card. For more information, please go to http://t-mobile.cz/gprs.<br />
Your handset can be set up in the following way:<br />
Click “Start” and “Settings”. Select the “Connections” bookmark and the “Connections” icon.<br />
Select the “Advanced“ bookmark and click “Select Networks“.<br />
Další informace na internetu:<br />
http://t-mobile.cz/<br />
7/28
Click “New”. Select the “General“ bookmark and enter a name for your settings, e.g. WAP GPRS TMCZ.<br />
Select the “Modem“ bookmark and click “New”. In next window, enter a name for the connection, select a modem<br />
from the roll-out menu and click “Next”.<br />
Další informace na internetu:<br />
http://t-mobile.cz/<br />
8/28
Enter the Access point name and click “Next”. Enter the User name (wap) and Password (wap) and click<br />
“Advanced”.<br />
Set up the parameters for the “TCP/IP“ and “Servers“ bookmarks according to the pictures below and click “OK”.<br />
Další informace na internetu:<br />
http://t-mobile.cz/<br />
9/28
To continue, click “Finish”.<br />
Select “Proxy Settings” and set up the parameters according to the picture below.<br />
Další informace na internetu:<br />
http://t-mobile.cz/<br />
10/28
In the next window, click “WAP” and enter the parameters according to the picture below.<br />
Save the settings by clicking “OK” (2x).<br />
Další informace na internetu:<br />
http://t-mobile.cz/<br />
11/28
MMS <strong>Setup</strong><br />
The MMS service enables you to send and receive texts, pictures, sounds and their combinations via your mobile<br />
handset. To use the service, you must have an MMS-enabled handset and activate the GPRS and MMS services on<br />
your SIM card. For more information, please visit http://t-mobile.cz/mms.<br />
Click “Start” and “Settings”. Select the “Connections” bookmark and the “Connections” icon.<br />
Select the “Advanced“ bookmark and click “Select Networks“.<br />
Další informace na internetu:<br />
http://t-mobile.cz/<br />
12/28
Click “New”. Choose the “General“ bookmark and enter a name for your settings, e.g. MMS.<br />
Select the “Modem“ bookmark and click “New”. In the next window, enter a name for the connection, select a<br />
modem from the roll-out menu and click “Next”.<br />
Další informace na internetu:<br />
http://t-mobile.cz/<br />
13/28
Enter the Access point name and click “Next”. Type in the User name (mms) and Password (mms) and select<br />
“Advanced”.<br />
Set up the parameters for the “TCP/IP“ and “Servers“ bookmarks according to the pictures below and click “OK”.<br />
Další informace na internetu:<br />
http://t-mobile.cz/<br />
14/28
To continue, click “Finish”. Select “Proxy Settings” and set up the parameters according to the picture below.<br />
Click “Start” and “Messages” and in the next window select the “Messaging” icon.<br />
Další informace na internetu:<br />
http://t-mobile.cz/<br />
15/28
Click “Menu” and select “MMS Configuration” from the roll-out menu.<br />
Select the “Servers” bookmark and continue by clicking “New”. Set up the parameters according to the picture below<br />
and confirm it by clicking “OK”. (For “Connect via”, select the access point which you have created in the previous<br />
steps.)<br />
Další informace na internetu:<br />
http://t-mobile.cz/<br />
16/28
To save your settings, click “Set as Default” and confirm it by clicking “OK”.<br />
Další informace na internetu:<br />
http://t-mobile.cz/<br />
17/28
GPRS Internet <strong>Setup</strong><br />
This service can be used to access the internet and to send and receive e-mails.<br />
Click “Start” and “Settings”. Select the “Connections” bookmark and the “Connections” icon.<br />
Select the “Advanced“ bookmark and click “Select Networks“.<br />
Další informace na internetu:<br />
http://t-mobile.cz/<br />
18/28
Click “New”. Select the “General“ bookmark and enter a name for your settings, e.g. T-<strong>Mobile</strong> Internet.<br />
Select the “Modem” bookmark and click “New”. In the next window, enter a name for the connection and select a<br />
modem from the roll-out menu. Click “Next”.<br />
Další informace na internetu:<br />
http://t-mobile.cz/<br />
19/28
Enter the Access point name according to the picture below and click “Next”. In the next window, leave the “User<br />
name”, “Password” and “Domain” empty and click “Advanced”.<br />
Set up the parameters for the “TCP/IP“ and “Servers“ bookmarks according to the pictures below and click “OK”.<br />
Další informace na internetu:<br />
http://t-mobile.cz/<br />
20/28
To continue, click “Finish“ and save your settings by clicking “OK”.<br />
Další informace na internetu:<br />
http://t-mobile.cz/<br />
21/28
E-mail Client <strong>Setup</strong><br />
E-mail client enables you to send and receive e-mails via your handset.<br />
Click “Start“ and “Messages“. In the next window, select “EmailWiz”.<br />
Click “Menu” and select “Tools” and then “New Account” from the roll-out menu.<br />
Další informace na internetu:<br />
http://t-mobile.cz/<br />
22/28
Enter your e-mail address and click “Next” (2x).<br />
Enter your name, user name and password for access to your mailbox and click “Next”. In the next window, select<br />
the account type (usually POP3) and enter the account name. Click “Next”.<br />
Další informace na internetu:<br />
http://t-mobile.cz/<br />
23/28
Type in the incoming mail server (depends on the e-mail provider) and the outgoing mail server (always<br />
smtp.t-email.cz). Click “Options” and select the connection which you have made in the previous steps (T-<strong>Mobile</strong><br />
Internet), see the “GPRS Internet <strong>Setup</strong>”. “Connect and check for new messages” is an optional item. Click “Next”.<br />
Leave “Outgoing mail requires authentication” unchecked. Check “Require SSL connection” if your mailbox requires<br />
secure SSL connection. “Only display messages from...” is an optional item. Click “Next” and complete the following<br />
items as you like. Click “Finish”.<br />
Další informace na internetu:<br />
http://t-mobile.cz/<br />
24/28
The system will offer you an immediate access to your mailbox. You can choose whether you want to connect now<br />
or later.<br />
Další informace na internetu:<br />
http://t-mobile.cz/<br />
25/28
SMS <strong>Setup</strong><br />
The short message service enables you to send and receive SMS messages on your handset.<br />
For more information, please visit http://t-mobile.cz/sms.<br />
Click “Start” and “Messages”. In the next window, select “Messaging”.<br />
Click “Menu” and select “Tools” and “Options” from the roll-out menu.<br />
Další informace na internetu:<br />
http://t-mobile.cz/<br />
26/28
Select the “Accounts” bookmark and click “Text Messages”. In next window, you can choose whether you want to<br />
receive delivery notifications. The other item should be left unchecked. Click “OK”.<br />
<strong>Setup</strong> of your mobile provider’s SMS Centre<br />
Click “Start“ and “Settings“. Select the “Phone” icon.<br />
Další informace na internetu:<br />
http://t-mobile.cz/<br />
27/28
Select the “Services” bookmark and the “Voice Mail and Text Messages” item. Click “Get Settings”. Here you can<br />
modify the phone number of the text messages service center. Confirm it by clicking “OK” (2x).<br />
Další informace na internetu:<br />
http://t-mobile.cz/<br />
28/28