Montageanleitung âEX3â - Kettler USA
Montageanleitung âEX3â - Kettler USA
Montageanleitung âEX3â - Kettler USA

You also want an ePaper? Increase the reach of your titles
YUMPU automatically turns print PDFs into web optimized ePapers that Google loves.
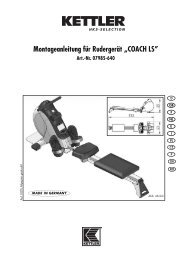
<strong>Montageanleitung</strong> „EX3“<br />
Art.-Nr. 07680-000<br />
A<br />
C<br />
B<br />
A B C<br />
105 53<br />
cm<br />
128<br />
35 kg<br />
110 kg<br />
max.<br />
D<br />
GB<br />
F<br />
NL<br />
E<br />
I<br />
PL<br />
CZ<br />
DK<br />
P<br />
Der Umwelt zuliebe: wir drucken auf 100% Altpapier!<br />
Abb. ähnlich
GB<br />
Assembly Instructions<br />
Before assembling or using the exercise cycle , please read the following instructions carefully. They contain important<br />
information for use and maintenance of the equipment as well as for your personal safety. Keep these instructions in a<br />
safe place for maintenance purposes or for ordering spare parts.<br />
For Your Safety<br />
■ ! ATTENTION! The crosstrainer should be used only for its for a longer period.<br />
intended purpose, i.e. for physical exercise by adult people.<br />
■ ! ATTENTION! Any other use of the equipment is prohibited<br />
and may be dangerous. The manufacturer cannot be held liable<br />
for damage or injury caused by improper use of the equipment.<br />
■ Exercise has been designed in accordance with the latest standards<br />
of safety. Any features which may have been a possible<br />
cause of injury have been avoided or made as safe as possible.<br />
■ Incorrect repairs and structural modifications (e.g. removal or<br />
replacement of original parts) may endanger the safety of the<br />
user.<br />
■ Damaged components may endanger your safety or reduce the<br />
lifetime of the equipment. For this reason, worn or damaged parts<br />
should be replaced immediately and the equipment taken out<br />
of use until this has been done. Use only original KETTLER spare<br />
parts.<br />
■ If the equipment is in regular use, check all its components thoroughly<br />
every 1 -2 months. Pay particular attention to the tightness<br />
of bolts and nuts.This applies especially to the securing bolts for<br />
saddle and handelbars.<br />
■ To ensure that the safety level is kept to the highest possible<br />
standard, determined by its construction, this product should be<br />
serviced regulary (once a year) by specialist retailers.<br />
■ !<br />
■ ! ATTENTION! Instruct people using the equipment (in particular<br />
children) on possible sources of danger during exercising.<br />
■ The device requires a supply voltage of 230V, 50 Hz.<br />
Connect the power cord with a protective contact socket.<br />
■ ! IMPORTANT! Do not under any circumstances carry out electrical<br />
repairs or alterations yourself. Always ensure that such work<br />
is done by a properly qualified electrician.<br />
■ ! IMPORTANT! disconnect the apparatus from the mains before<br />
doing repair, maintenance or cleaning work.<br />
■ Do not use a multiple power socket for the running belt. If an<br />
extension cable is being used, ensure that it complies with the<br />
VDE regulations.<br />
■ Unplug the power cord of the device from the socket if not used<br />
■<br />
■<br />
!<br />
!<br />
■ Ensure that the power cable is not pinched and that no-one can<br />
trip over it.<br />
■ All electric appliances emit electromagnetic radiation when in<br />
operation. Please do not leave especially radiation-intensive<br />
appliances (e.g. mobile telephones) directly next to the cockpit<br />
or the electronic controlsystem as otherwise values displayed might<br />
be distorted (e.g. pulse measurement).<br />
■ Before beginning your program of exercise, consult your doctor<br />
to ensure that you are fit enough to use the equipment. Base your<br />
program of exercise on the advice given by your doctor. Incorrect<br />
or excessive exercise may damage your health!<br />
■ Any interference with parts of the product that are not described<br />
within the manual may cause damage, or endanger the person<br />
using this machine. Extensive repairs must only be carried out<br />
by KETTLER service staff or qualified personnel trained by<br />
KETTLER.<br />
■ Always observe the general safety rules and precautions for<br />
working with electrical equipment.<br />
ATTENTION! Before beginning your program of training, study<br />
the instructions for training carefully.<br />
■ Our products are subject to a constant innovative quality<br />
assurance. We reserve the right to perform technical modifications.<br />
■ In case of enquiry, please contact your KETTLER dealer.<br />
In choosing the location of the apparatus, ensure a sufficient safety<br />
distance from any obstacles. The apparatus must not be mounted<br />
in the immediate vicinity of main passageways (paths, doorways,<br />
corridors).<br />
■ For a comfortable training position please adjust the handlebar<br />
andsaddle position to your body height.<br />
ATTENTION! While assembly of the product keep off<br />
children’s reach (Choking hazard - contains small parts).<br />
WARNING! Heart rate monitoring systems may be inaccurate.<br />
Over exercise may result in serious injury or death. If you<br />
feel faint stop exercising immediately.<br />
Handling the equipment<br />
■ Before using the equipment for exercise, check carefully to<br />
ensure that it has been correctly assembled.<br />
■ It is not recommended to use or store the apparatus in a damp<br />
room as this may cause it to rust. Please ensure that no part of<br />
the machine comes in contact with liquids (drinks, perspiration<br />
etc.). This may cause corrosion.<br />
■ The machine is designed for use by adults and children should<br />
not be allowed to play with it. Children at play behave unpredictably<br />
and dangerous situations may occur for which the<br />
manufacturer cannot be held liable. If, in spite of this, children<br />
are allowed to use the equipment, ensure that they are instructed<br />
in its proper use and supervised accordingly.<br />
■ The exercise cycle complies with the DIN EN 957 - 1/5, class<br />
HA.<br />
■ Before beginning your first training session, familiarize yourself<br />
thoroughly with all the functions and settings of the unit.<br />
■ A slight production of noise at the bearing of the centrifugal mass<br />
is due to the construction and has no negative effect upon operation.<br />
Possibly occurring noise during reverse pedalling result<br />
from engineering and are absolutely safe.<br />
4
■ The exercise cycle has a magnetic brake system.<br />
■ The equipment is independent of revolutions per minute.<br />
■ Please ensure that liquids or perspiration never enter the machine<br />
or the electronics.<br />
■ Before use, always check all screws and plug-in connections as<br />
well as respective safety devices fit correctly.<br />
■ Always wear suitable shoes when using.<br />
■ Use for your regular cleaning, maintenance and care our<br />
appliance maintenance set (Article no. 07921-000) specifically<br />
licensed for KETTLER Sports apparatus and available from the<br />
Sport specialized trade.<br />
■ Nobody may be in the moving range of a training person<br />
during training.<br />
Instructions for Assembly<br />
■ Ensure that you have received all the parts required (see check<br />
list) and that they are undamaged. Should you have any cause<br />
for complaint, please contact your KETTLER dealer.<br />
■ Before assembling the equipment, study the drawings carefully<br />
and carry out the operations in the order shown by the diagrams.<br />
The correct sequence is given in capital letters.<br />
■ The equipment must be assembled with due care by an adult<br />
person. If in doubt call upon the help of a second person, if possible<br />
technically talented.<br />
■ Please note that there is always a danger of injury when working<br />
with tools or doing manual work. Therefore please be careful<br />
when assembling this machine.<br />
■ Ensure that your working area is free of possible sources of danger,<br />
for example don’t leave any tools lying around. Always dispose<br />
packaging material in such a way that it may not cause any<br />
danger. There is always a risk of suffocation if children play with<br />
plastic bags!<br />
■ The fastening material required for each assembly step is shown<br />
in the diagram inset. Use the fastening material exactly as<br />
instructed. The required tools are supplied with the equipment.<br />
■ Bolt all the parts together loosely at first, and check that they have<br />
been assembled correctly. Tighten the locknuts by hand until resistance<br />
is felt, then use spanner to finally tighten nuts completely<br />
against resistance (locking device). Then check that all screw<br />
connections have been tightened firmly. Attention: once locknuts<br />
have been unscrewed they no longer function correctly (the<br />
locking device is destroyed), and must be replaced.<br />
■ For technical reasons, we reserve the right to carry out preliminary<br />
assembly work (e.g. addition of tubing plugs).<br />
List of spare parts page 30-32<br />
When ordering spare parts, always state the full article number,<br />
spare-partnumber, the quantity required and the S/N of the product<br />
(see handling).<br />
Example order: Art.no. 07680-000 / spare-part no. 10100030<br />
/ 2 pieces / S/N ....................<br />
Please keep original packaging of this article, so that it may be<br />
used for transport at a later date, if necessary.<br />
Goods may only be returned after prior arrangement and in<br />
(internal) packaging, which is safe for transportation, in the original<br />
box if possible.<br />
It is important to provide a detailed defect description / damage<br />
report!<br />
Important: spare part prices do not include fastening material; if<br />
fastening material (bolts, nuts, washers etc.) is required, this should<br />
be clearly stated on the order by adding the words „with fastening<br />
material“.<br />
Waste Disposal<br />
KETTLER products are recyclable. At the end of its<br />
useful life please dispose of this article correctly and<br />
safely (local refuse sites).<br />
GB<br />
KETTLER (GB) Ltd.<br />
Merse Road · North Moons Moat · Redditch,<br />
Worcestershire B98 9HL · Great Britain<br />
http://www.kettler.co.uk<br />
<strong>USA</strong><br />
KETTLER International Inc.<br />
1355 London Bridge Road · Virginia Beach · Virginia VA<br />
23453 <strong>USA</strong><br />
http://www.kettlerusa.com<br />
5
Messhilfe für Verschraubungsmaterial<br />
GB<br />
Measuring help for screw connections<br />
I<br />
Misura per il materiale di avvitamento<br />
F<br />
Gabarit pour système de serrage<br />
PL<br />
Wzornik do połączeń śrubowych<br />
NL<br />
Meethulp voor schroefmateriaal<br />
CZ<br />
Měřící pomůcka pro materiál k přišroubování<br />
E<br />
Referencia de medición para el material de atornilladura<br />
DK<br />
Hjælp til måling af skruer<br />
P<br />
Auxiliar de medição para materiais de aparafusamento<br />
Beispiele Examples Examples Bij voorbeeld<br />
Ejemplos<br />
Esempio Przyktady<br />
Příklad Eksempel Exemplo<br />
22
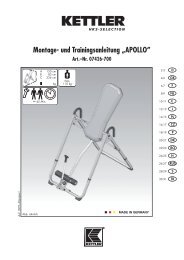
Checkliste<br />
Stck.<br />
1<br />
2<br />
2/2<br />
2<br />
Pulsmesser<br />
M 8<br />
M 16<br />
M 8<br />
M 8 x 70<br />
1<br />
1<br />
1<br />
1<br />
1<br />
4<br />
1<br />
4<br />
1<br />
1<br />
1<br />
1<br />
M 8 x 60<br />
M 8 x 20<br />
3,9 x 25<br />
ø 6 x 9,5<br />
1<br />
2<br />
1<br />
2<br />
3<br />
4<br />
1<br />
1<br />
1<br />
1<br />
Steckschlüssel<br />
SW 10/13<br />
Mehrzweckschlüssel<br />
1<br />
1<br />
1<br />
1<br />
1/1<br />
23
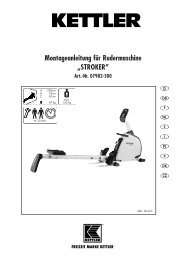
1 1a 1b<br />
2<br />
A<br />
B<br />
klack<br />
klack<br />
24
3<br />
M 8 x 70<br />
4a<br />
4b<br />
A<br />
B<br />
ø 6 x 9,5<br />
25
5 6<br />
C<br />
F<br />
A<br />
B<br />
E<br />
D<br />
M 8 x 20<br />
8<br />
7<br />
ø 6 x 9,5<br />
M 8<br />
26
9<br />
10<br />
MAX.<br />
A<br />
B<br />
M 16<br />
3,9 x 25<br />
11<br />
12<br />
A<br />
B<br />
C<br />
A<br />
1x<br />
B<br />
M8 x 60<br />
27
13<br />
C<br />
D<br />
A<br />
B<br />
A<br />
14<br />
L<br />
L<br />
R<br />
28
Handhabungshinweise<br />
GB Handling F Indications relatives à la manipulation NL Bedieningsinstrukties E<br />
Instrucciones de manejo<br />
I Avvertenze per il maneggio PL Wskazówki obsługowe CZ Pokyny k manipulaci DK Håndtering<br />
P Notas sobre o manuseamento<br />
D<br />
GB<br />
F<br />
NL<br />
E<br />
I<br />
PL<br />
CZ<br />
DK<br />
P<br />
Beispiel Typenschild - Seriennummer<br />
Example Type label - Serial number<br />
Example Plaque signalétiqu - Numèro de serie<br />
Bij voorbeeld Typeplaatje - Seriennummer<br />
Ejemplo Placa identificativa - Número de serie<br />
Esempio Targhetta tecnica - Numero di serie<br />
Przyklady Tabliczka identifikacyna - Numer serii<br />
Přiklad typového štítku – sériové číslo<br />
Eksempel type label – serienummer<br />
Exemplo placa de características - número de série<br />
!<br />
A<br />
C<br />
MAX.<br />
B<br />
D<br />
B<br />
B<br />
A<br />
C<br />
A<br />
29
Handhabungshinweise<br />
D<br />
Bei Geräten mit Netzteil: Achtung! Betrieb nur mit mitgeliefertem<br />
Original-Netzteil oder Original-KETTLER-Ersatzteil<br />
(siehe Ersatzteilliste) zulässig. Ansonsten Gefahr der<br />
Beschädigung.<br />
GB<br />
For products with power supply: Attention! Only use with<br />
original power unit as supplied, or with original KETTLER<br />
spare part (see spare part list). Otherwis this may result<br />
in damage.<br />
F<br />
Pour les appareils avec bloc secteur: Attention! Exploiter<br />
uniquement l’appareil avec son bloc secteur original qui<br />
fait partie de la fourniture ou une pièce de rechange originale<br />
de KETTLER (voir liste des pièces de rechange). Sinon<br />
risque de détérioration.<br />
B<br />
A<br />
NL<br />
E<br />
Bij apparaten met transformator: Let op! Gebruik alleen toegestaan<br />
met de bijgeleverde orginele transformator of<br />
orgineel KETTLER-onderdeel (zie onderdelenlijst). Anders<br />
gevaar voor beschadiging.<br />
En aparatos con fuente de alimentación: ¡Atención!<br />
Funcionamiento solamente autorizado con la fuente de alimentación<br />
original suministrada o con pieza de recambio<br />
original de KETTLER (ver lista de piezas de recambio). De<br />
lo contrario podría ocasionar daños.<br />
I<br />
Apparecchi con alimentatore: Attenzione! L’utilizzo è consentito<br />
soltanto con l’alimentatore originale fornito in dotazione<br />
oppure con parte di ricambio originale della KETTLER<br />
(vedasi lista delle parti di ricambio). Altrimenti sussiste il<br />
rischio di danneggiamenti.<br />
PL<br />
Dotyczy urządzeń z zasilaczem: Uwaga! Eksploatacja<br />
urządzenia jest możliwa tylko z dostarczonym oryginalnym<br />
zasilaczem lub z oryginalnym urządzeniem zastępczym<br />
marki KETTLER (patrz ? Lista części zamiennych). W przeciwnym<br />
razie istnieje ryzyko uszkodzenia.<br />
CZ<br />
U přístrojů se síťovým zdrojem: Pozor! Provoz je přípustný<br />
pouze s originálním síťovým zdrojem obsaženým v dodávce<br />
nebo originálním náhradním dílem od firmy KETTLER (viz<br />
seznam náhradních dílů). Jinak vzniká nebezpečí poškození.<br />
30
Handhabungshinweise<br />
DK<br />
P<br />
Maskiner med netdel: OBS! Det er kun tilladt at bruge den<br />
medleverede originale netdel eller den originale reservedel<br />
fra KETTLER (se reservedelslisten). I modsat fald kan maskinen<br />
beskadiges.<br />
Em aparelhos com cabo: Atenção! O funcionamento só<br />
é permitido com o cabo original fornecido ou com a<br />
peça sobressalente original KETTLER (ver lista de peças<br />
sobressalentes). Caso contrário, perigo de danos.<br />
Demontage der Pedalarme<br />
Demontage der Pedalarme<br />
NL<br />
Demontage van de krenk<br />
Voor het losmaken van de cranken, verwijdert u eerst het beschermdopje<br />
en schroef (A). Houd de crank vast en draai e<br />
g van de schroefdraad (B). Na enkele omwentelingen kunt u de crank<br />
verwijderen (C).<br />
Desmontaje de las manivelas de pedal<br />
E<br />
Para quitar la manivela de pedal hay que quitar primero la tapa<br />
protectora y el tornillo (A). Retenga la manivela de pedal y apriete<br />
un tornillo M12 (no forma parte del volumen de suministro) en la<br />
rosca (B). Después de haber efectuado algunas vueltas podrá<br />
quitar la manivela de pedal (C).<br />
A<br />
B<br />
C<br />
Smontaggio dell’attacco del pedale<br />
I<br />
Per togliere l’attacco del pedale togliete prima il coperchietto protettivo<br />
e la vite (A). Tenete fermo l’attacco del pedale e girate una<br />
vite M12 (non compresa nella fornitura) nella filettatura (B). Dopo<br />
aver effettuato alcuni giri, potete togliere l’attacco del pedale (C).<br />
PL<br />
Demontaż ramion pedału<br />
W celu zdjęcia ramienia pedału należy najpierw usunąć osłonę i<br />
wykręcić śrubę. (A). Przytrzymując ramię pedału wkręć śrubę M12<br />
(nie należy do zakresu dostawy) w gwintowany otwór (B). Po kilku<br />
obrotach możesz zdjąć ramię pedału (C).<br />
– D – Gehört nicht zum Lieferumfang.<br />
– GB – Not included.<br />
– F – Ne fait pas partie du domaine de livraison.<br />
– NL – Is niet bij de levering inbegrepen.<br />
– E – No forma parte del volumen de entrega.<br />
– I – Non in dotazione alla fornitura.<br />
– PL – Nie należy do zakresu dostawy.<br />
– CZ – Nepatří do rozsahu dodávky<br />
– P – Não está incluído nas peças fornecidas<br />
– DK – Er ikke inkluderet i leveringsomfanget.<br />
Demontáž kliky pedálu<br />
CZ<br />
Pro sejmutí kliky pedálu nejprve odejměte ochrannou čepičku a šroub<br />
(A). Pevně přidržte kliku pedálu a do závitového otvoru (B) zašroubujte<br />
šroub M12 (nepatří do rozsahu dodávky). Po několika<br />
otočeních lze kliku pedálu odebrat (C).<br />
DK<br />
Afmontering af pedalarme<br />
Fjern først beskyttelseskappen og skruen (A) inden pedalarmen<br />
tages af. Tag fat i pedalarmen og skru en M 12 bolt (er ikke inkluderet<br />
i leveringsomfanget) i gevindåbningen (B). Efter nogle få<br />
omdrejninger kan pedalarmen tages af (C).<br />
P<br />
Desmontagem dos braços do pedal<br />
Para retirar o braço do pedal, remova primeiro a capa de protecção<br />
e o parafuso (A). Segure bem o braço do pedal e aparafuse um parafuso<br />
M12 (não está incluído nas peças fornecidas) no furo da rosca<br />
(B). Depois de dar algumas voltas, pode levantar o braço do pedal (C).<br />
Zum Abziehen des Pedalarms entfernen Sie zuerst die Schutzkappe<br />
und Schraube (A). Halten Sie den Pedalarm fest und drehen Sie<br />
eine Schraube M12 (gehört nicht zum Lieferumfang) in die<br />
Gewindeöffnung (B). Nach einigen Umdrehungen können Sie den<br />
Pedalarm abnehmen (C).<br />
Removal of pedal arms<br />
GB<br />
To pull off the pedal arms remove cap and screw (A). Grip the pedal<br />
arm tightly, and screw in an M12 bolt (not supplied) into the<br />
thread (B). After a few turns you may take off the pedal arm (C)<br />
F<br />
Démontage de la manivelle<br />
Enlevez d'abord le capot de protection ainsi que la vis (A) avant<br />
de retirer le bras de la pédale. Tenez le bras de la pédale et vissez<br />
une vis M12 (ne fait pas partie de la gamme de livraison) dans<br />
l'ouverture de filetage (B). Vous pouvez retirer le bras de la pédale<br />
(C) après plusieurs tours.<br />
31
32<br />
Ersatzteilzeichnung<br />
12<br />
12<br />
23<br />
38<br />
14<br />
60<br />
21<br />
47<br />
48<br />
10<br />
27<br />
6<br />
11<br />
59<br />
7<br />
13<br />
37<br />
18<br />
4<br />
39<br />
9<br />
53<br />
30<br />
17<br />
27<br />
1<br />
35<br />
32<br />
30<br />
26<br />
24<br />
15<br />
31<br />
19<br />
40<br />
33<br />
34<br />
8<br />
22<br />
36<br />
28<br />
50<br />
57<br />
58<br />
29<br />
54<br />
56<br />
41<br />
42<br />
20<br />
44<br />
45<br />
51<br />
16<br />
49<br />
55<br />
25<br />
43<br />
2<br />
5<br />
24<br />
3<br />
52<br />
46<br />
31<br />
61
Ersatzteilliste Ergometer „EX3“<br />
Pos. Beschreibung Stück Ersatzteil-Nr.<br />
1 Rahmen gepulvert 1 91111700<br />
2 Antriebsrad mit VKT-Achse 1 91130125<br />
3 Kugellager 6203 ZZ (paarweise je Achse wechseln) 2 33100054<br />
4 Federscheibe ø 17,3 mm (zu Pos. 7) 2 10601003<br />
5 Seegerring ø 17 mm (zu Pos. 7) 1 10709021<br />
6 Spannrolle mit Umlenkhebel montiert 1 91140373<br />
7 Zugfeder mit Gewindeeinsatz 1 25638032<br />
8 Schwungrad mit Achse, Freilauf, Lagern und Befestigung 1 91140441<br />
9 Antriebshülse ø 34,5 mm mit Freilauf HFL 1626 1 91140269<br />
10 Sicherungsring (ø16 mm) für Schwungrad 3 10709016<br />
11 Kugellager 6203 ZZ (paarweise je Achse wechseln) 2 33100023<br />
12 Lageraufnahme (2579) mit Buchsen und Befestigung 2 98585006<br />
13 Keilrippenriemen 1092mm, PJ8 1 67005123<br />
14 Steuerung für Magnetspule mit Befestigung 1 91170428<br />
15 Aufnahmeblech BD 1333A mit Befestigung 1 97201007<br />
16 Aufnahmewinkel 1 97200243<br />
17 Geschwindigkeitsabn. mit Kabel 375 mm und Befestig. 1 91170417<br />
18 Spulenkörper gewickelt mit Splint 1 91140276<br />
19 Spulenbleche 15 1701305B<br />
20 Leitung 700 mm, mit Buchse 1 42860007<br />
21 Stromkabel unten, 1200 mm 1 67000125<br />
22 Stromkabel oben, 1000 mm 1 67000126<br />
23 Aufnahme (2297) für Netzstecker 1 70127365<br />
24 Bodenrohr ø 60x1,5x450 mm 2 91111855-10<br />
25 Rollenschoner rechts, f. Rohr ø 60 mm 1 70127921<br />
26 Rollenschoner links, f. Rohr ø 60 mm 1 70127922<br />
27 Verstellschoner f. Rohr ø 60 mm 2 70127568<br />
28 Führungs-Stopfen (3773) für Rahmen 1 70127716<br />
29 Drehgriffschraube M16 (für Höhenverstell.) mit Rasterstift 1 10103801<br />
30 Pedalarm paar 1 33001010<br />
31 Pedale paar, Typ SP-240 HT mit Fußriemen 1 33300014<br />
32 Zehriemen links 1 33300101<br />
33 Zehriemen rechts 1 33300102<br />
34 Sattelrohr verchromt, mit Sattelrohrabdeckungen .Pos.35 und 36 1 91160129<br />
35 Sattelrohrabdeckung rechts (4687) (mit Teil 36 bestellen) 1 70129292<br />
36 Sattelrohrabdeckung links (4688) (mit Teil 35 bestellen) 1 70129293<br />
37 Gleitprofil 1 97100571<br />
38 Griffmutter M8 1 91170637<br />
39 Sattel 1 72002610<br />
40 Sattelabdeckung (3097) 1 70128291<br />
41 Lenksäule gepulvert 1 91150568<br />
42 Lasche 1 97200363<br />
43 Griffbügel mit Griffschläuchen und Stopfen 1 91150593<br />
44 Griffschlauch 580 mm lang 2 10118095<br />
45 Stopfen für ø 25 mm 2 10100030<br />
46 Cockpit-Unterteil (3716) mit Befestigung 1 70127523<br />
47 Cockpit-Oberteil (3717) mit Befestigung 1 70127468<br />
48 Cockpit-Vorderteil (3715) mit Befestigungselementen 1 70127522<br />
49 Computer (SF3B) 1 91170642<br />
33
Ersatzteilliste Ergometer „EX3“<br />
Pos. Beschreibung Stück Ersatzteil-Nr.<br />
50 Schnittstelle mit Kabel 300 mm lang 1 67000743<br />
51 Pulsabnehmer M 3406 1 67000421<br />
52 Erdungskabel 1 67000805<br />
53 Distanzhülse 16x3,9x12 1 97200562<br />
54 Griffschraube M8x60 mm 1 91170643<br />
55 Seitenverkleidung rechts (3693) 1 70129414<br />
56 Seitenverkleidung links (3694) 1 70129415<br />
57 Lenkrohrabdeckung (3695) 1 70128246<br />
58 Lüftungsgitter (3338) 1 70129307<br />
59 Tretlagerblende (3337) 2 70129416<br />
60 Netztrafo kpl. 1 42860006<br />
61 Abdeckung (3749) 1 70128536<br />
62 Schraubenbeutel (ohne Abbildung) 1 91180495<br />
34
HEINZ KETTLER GmbH & Co. KG · Postfach 1020 · D-59463 Ense-Parsit<br />
www.kettler.de<br />
docu 2510a/08.09