December 2005 — Vol. 22, No. 12 - RC Soaring - RCSoaring.com
December 2005 — Vol. 22, No. 12 - RC Soaring - RCSoaring.com
December 2005 — Vol. 22, No. 12 - RC Soaring - RCSoaring.com

You also want an ePaper? Increase the reach of your titles
YUMPU automatically turns print PDFs into web optimized ePapers that Google loves.
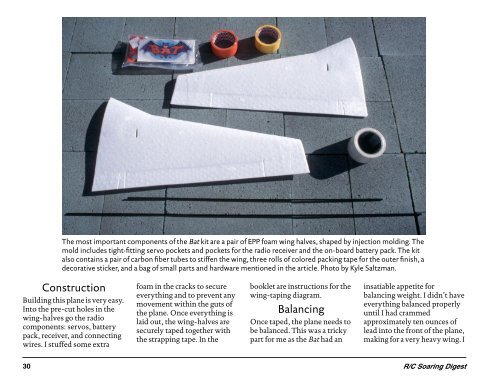
The most important <strong>com</strong>ponents of the Bat kit are a pair of EPP foam wing halves, shaped by injection molding. The<br />
mold includes tight-fitting servo pockets and pockets for the radio receiver and the on-board battery pack. The kit<br />
also contains a pair of carbon fiber tubes to stiffen the wing, three rolls of colored packing tape for the outer finish, a<br />
decorative sticker, and a bag of small parts and hardware mentioned in the article. Photo by Kyle Saltzman.<br />
Construction<br />
Building this plane is very easy.<br />
Into the pre-cut holes in the<br />
wing-halves go the radio<br />
<strong>com</strong>ponents: servos, battery<br />
pack, receiver, and connecting<br />
wires. I stuffed some extra<br />
foam in the cracks to secure<br />
everything and to prevent any<br />
movement within the guts of<br />
the plane. Once everything is<br />
laid out, the wing-halves are<br />
securely taped together with<br />
the strapping tape. In the<br />
booklet are instructions for the<br />
wing-taping diagram.<br />
Balancing<br />
Once taped, the plane needs to<br />
be balanced. This was a tricky<br />
part for me as the Bat had an<br />
insatiable appetite for<br />
balancing weight. I didn’t have<br />
everything balanced properly<br />
until I had crammed<br />
approximately ten ounces of<br />
lead into the front of the plane,<br />
making for a very heavy wing. I<br />
30 R/C <strong>Soaring</strong> Digest