DIGITAL THERMOSTAT
DIGITAL THERMOSTAT
DIGITAL THERMOSTAT

Create successful ePaper yourself
Turn your PDF publications into a flip-book with our unique Google optimized e-Paper software.
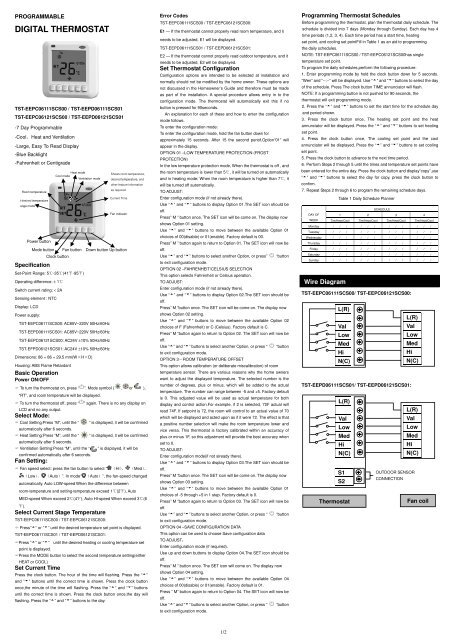
PROGRAMMABLE<br />
<strong>DIGITAL</strong> <strong>THERMOSTAT</strong><br />
TST-EEPC06111SCS00 / TST-EEPD06111SCS01<br />
TST-EEPC06121SCS00 / TST-EEPD06121SCS01<br />
-7 Day Programmable<br />
-Cool、Heat and Ventilation<br />
-Large, Easy To Read Display<br />
-Blue Backlight<br />
-Fahrenheit or Centigrade<br />
Room temperature<br />
Set desired temperature<br />
Change mode<br />
Specification<br />
Set-Point Range: 5℃-35℃(41℉-95℉)<br />
Operating difference: ± 1℃<br />
Switch current rating: < 2A<br />
Sensing element : NTC<br />
Display: LCD<br />
Power button<br />
Power supply:<br />
Mode button<br />
TST-EEPC06111SCS00: AC85V~220V 50Hz/60Hz<br />
TST-EEPD06111SCS01: AC85V~220V 50Hz/60Hz<br />
TST-EEPC06121SCS00: AC24V ±10% 50Hz/60Hz<br />
TST-EFPD06121SCS01: AC24V ±10% 50Hz/60Hz<br />
Dimensions: 86 × 86 × 29.5 mm(W×H×D)<br />
Housing: ABS Flame Retardant<br />
Basic Operation<br />
Power ON/OFF<br />
To turn the thermostat on, press “ ”. Mode symbol ( , or ),<br />
“RT”, and room temperature will be displayed.<br />
To turn the thermostat off, press “<br />
LCD and no any output.<br />
Select Mode:<br />
Cool Setting:Press “M”, until the “<br />
automatically after 6 seconds.<br />
Heat Setting:Press “M”, until the “<br />
automatically after 6 seconds.<br />
Ventilation Setting:Press “M”, until the “<br />
confirmed automatically after 6 seconds.<br />
Fan Setting:<br />
” again. There is no any display on<br />
” is displayed, it will be confirmed<br />
” is displayed, it will be confirmed<br />
” is displayed, it will be<br />
Fan speed select: press the fan button to select “ (Hi)、 (Med)、<br />
(Low)、 (Auto)”. In mode“ (Auto)”, the fan-speed changed<br />
automatically. Auto LOW-speed When the difference between<br />
room-temperature and setting-temperature exceed 1℃(2℉), Auto<br />
MED-speed When exceed 2℃(4℉), Auto HI-speed When exceed 3℃(6<br />
℉).<br />
Select Current Stage Temperature<br />
TST-EEPC06111SCS00 / TST-EEPC06121SCS00:<br />
Press”5” or ”6” until the desired temperature set point is displayed.<br />
TST-EEPD06111SCS01 / TST-EEPD06121SCS01:<br />
Press ”5” or ”6” until the desired heating or cooling temperature set<br />
point is displayed.<br />
Press the MODE button to select the second temperature setting(either<br />
HEAT or COOL)<br />
Set Current Time<br />
Heat mode<br />
Cool mode<br />
Ventilation mode<br />
SET<br />
Clock button<br />
Fan button Down button Up button<br />
Press the clock button. The hour of the time will flashing. Press the “5”<br />
and “6” buttons until the correct time is shown. Press the clock button<br />
once,the minute of the time will flashing. Press the “5” and “6” buttons<br />
until the correct time is shown. Press the clock button once,the day will<br />
flashing. Press the “5” and “6” buttons to the day.<br />
Shows room temperature,<br />
desired temperature, and<br />
other feature information<br />
as required.<br />
Current Time<br />
Fan indicator<br />
Error Codes<br />
TST-EEPC06111SCS00 / TST-EEPC06121SCS00:<br />
E1 — If the thermostat cannot properly read room temperature, and it<br />
needs to be adjusted, E1 will be displayed.<br />
TST-EEPD06111SCS01 / TST-EEPD06121SCS01:<br />
E2 — If the thermostat cannot properly read outdoor temperature, and it<br />
needs to be adjusted, E2 will be displayed.<br />
Set Thermostat Configuration<br />
Configuration options are intended to be selected at installation and<br />
normally should not be modified by the home owner. These options are<br />
not discussed in the Homeowner’s Guide and therefore must be made<br />
as part of the installation. A special procedure allows entry in to the<br />
configuration mode. The thermostat will automatically exit this if no<br />
button is pressed for 90seconds.<br />
An explanation for each of these and how to enter the configuration<br />
mode follows.<br />
To enter the configuration mode:<br />
To enter the configuration mode, hold the fan button down for<br />
approximately 15 seconds. After 15 the second periof,Option”01” will<br />
appear in the display.<br />
OPTION 01 –LOW TEMPERATURE PROTECTION (FROST<br />
PROTECTION)<br />
In the low temperature protection mode, When the thermostat is off , and<br />
the room temperature is lower than 5℃, it will be turned on automatically<br />
and in heating mode; When the room temperature is higher than 7℃, it<br />
will be turned off automatically.<br />
TO ADJUST:<br />
Enter configuration mode (if not already there).<br />
Use “5” and “6” buttons to display Option 01.The SET icon should be<br />
off.<br />
Press” M ” button once. The SET icon will be come on. The display now<br />
shows Option 01 setting.<br />
Use “5” and “6” buttons to move between the available Option 01<br />
choices of 00(disable) or 01(enable). Factory default is 00.<br />
Press” M ” button again to return to Option 01. The SET icon will now be<br />
off.<br />
Use “5” and “6” buttons to select another Option, or press”<br />
to exit configuration mode.<br />
OPTION 02 –FAHRENHEIT/CELSIUS SELECTION<br />
This option selects Fahrenheit or Celsius operation.<br />
TO ADJUST:<br />
Enter configuration mode (if not already there).<br />
“button<br />
Use “5” and “6” buttons to display Option 02.The SET icon should be<br />
off.<br />
Press” M ”button once. The SET icon will be come on. The display now<br />
shows Option 02 setting.<br />
Use “5” and “6” buttons to move between the available Option 02<br />
choices of F (Fahrenheit) or C (Celsius). Factory default is C.<br />
Press” M ”button again to return to Option 02. The SET icon will now be<br />
off.<br />
Use “5” and “6” buttons to select another Option, or press “<br />
to exit configuration mode.<br />
OPTION 3-ROOM TEMPERATURE OFFSET<br />
This option allows calibration (or deliberate miscalibration) of room<br />
“button<br />
temperature sensor. There are various reasons why the home owners<br />
want to adjust the displayed temperature. The selected number is the<br />
number of degrees, plus or minus, which will be added to the actual<br />
temperature. The number can range between -5 and +5. Factory default<br />
is 0. This adjusted value will be used as actual temperature for both<br />
display and control action.For example, if 2 is selected, 72F actual will<br />
read 74F. If setpoint is 72, the room will control to an actual value of 70<br />
which will be displayed and acted upon as if it were 72. The effect is that<br />
a positive number selection will make the room temperature lower and<br />
vice versa. This thermostat is factory calibrated within an accuracy of<br />
plus or minus 1F, so this adjustment will provide the best accuracy when<br />
set to 0.<br />
TO ADJUST:<br />
Enter configuration mode(if not already there).<br />
Use “5” and “6” buttons to display Option 03.The SET icon should be<br />
off.<br />
Press” M ”button once. The SET icon will be come on. The display now<br />
shows Option 03 setting.<br />
Use “5” and “6” buttons to move between the available Option 01<br />
choices of -5 through +5 in 1 step. Factory default is 0.<br />
Press” M ”button again to return to Option 03. The SET icon will now be<br />
off.<br />
Use “5” and “6” buttons to select another Option, or press “<br />
to exit configuration mode.<br />
OPTION 04 –SAVE CONFIGURATION DATA<br />
This option can be used to choose Save configuration data<br />
TO ADJUST:<br />
Enter configuration mode (if required).<br />
“button<br />
Use up and down buttons to display Option 04.The SET icon should be<br />
off.<br />
Press” M ” button once. The SET icon will come on. The display now<br />
shows Option 04 setting.<br />
Use “5” and “6” buttons to move between the available Option 04<br />
choices of 00(disable) or 01(enable). Factory default is 01.<br />
Press ” M” button again to return to Option 04. The SET icon will now be<br />
off.<br />
Use “5” and “6” buttons to select another Option, or press “<br />
to exit configuration mode.<br />
“button<br />
Programming Thermostat Schedules<br />
Before programming the thermostat, plan the thermostat daily schedule. The<br />
schedule is divided into 7 days (Monday through Sunday). Each day has 4<br />
time periods (1,2, 3, 4). Each time period has a start time, heating<br />
set point, and cooling set pointFill in Table 1 as an aid to programming<br />
the daily schedules.<br />
NOTE: TST-EEPC06111SCS00 / TST-EEPC06121SCS00has single<br />
temperature set point.<br />
To program the daily schedules,perform the following procedure:<br />
1. Enter programming mode by hold the clock button down for 5 seconds.<br />
“Wen” and ”--:--” will be displayed. Use “5” and “6” buttons to select the day<br />
of the schedule. Press The clock button TIME annunciator will flash.<br />
NOTE: If a programming button is not pushed for 90 seconds, the<br />
thermostat will exit programming mode.<br />
2. Press the “5” and “6” buttons to set the start time for the schedule day<br />
and period shown.<br />
3. Press the clock button once, The heating set point and the heat<br />
annunciator will be displayed. Press the “5” and “6” buttons to set heating<br />
set point.<br />
4. Press the clock button once, The cooling set point and the cool<br />
annunciator will be displayed. Press the “5” and “6” buttons to set cooling<br />
set point.<br />
5. Press the clock button to advance to the next time period.<br />
6. Perform Steps 2 through 5 until the times and temperature set points have<br />
been entered for the entire day. Press the clock button and display”copy”,use<br />
“5” and “6” buttons to select the day for copy, press the clock button to<br />
confirm.<br />
7. Repeat Steps 2 through 6 to program the remaining schedule days.<br />
Table 1 Daily Schedule Planner<br />
SCHEDULE<br />
DAY OF<br />
1 2 3 4<br />
WEEK Tim/Heat/Cool Tim/Heat/Cool Tim/Heat/Cool Tim/Heat/Cool<br />
Monday / / / / / / / / / / / /<br />
Tuesday / / / / / / / / / / / /<br />
Wednesday / / / / / / / / / / / /<br />
Thursday / / / / / / / / / / / /<br />
Friday / / / / / / / / / / / /<br />
Saturday / / / / / / / / / / / /<br />
Sunday / / / / / / / / / / / /<br />
Wire Diagram<br />
TST-EEPC06111SCS00/ TST-EEPC06121SCS00:<br />
L(R)<br />
L(R)<br />
Val<br />
Val<br />
Low<br />
Low<br />
Med<br />
Med<br />
Hi<br />
Hi<br />
N(C)<br />
N(C)<br />
TST-EEPD06111SCS01/ TST-EEPD06121SCS01:<br />
L(R)<br />
L(R)<br />
Val<br />
Low<br />
Med<br />
Hi<br />
N(C)<br />
S1<br />
S2<br />
Val<br />
Low<br />
Med<br />
Hi<br />
N(C)<br />
OUTDOOR SENSOR<br />
CONNECTION<br />
Thermostat<br />
Fan coil<br />
1/2
Installation:<br />
Thermostat Location<br />
Thermostat should be mounted:<br />
• Approximately 5 ft (1.5m) from floor.<br />
• Close to or in a frequently used room, preferably on an inside<br />
partitioning wall.<br />
• On a section of wall without pipes or duct work.<br />
1. Cut off the power, the mark of wire should be clear.<br />
2. Take the main control panel<br />
3.Push up by force, open the clip.<br />
apart.<br />
4. As per wiring drawing, connect<br />
with terminals, fix it by crewdriver.<br />
5. Fix by the two screws in the<br />
packing box.<br />
6. Push the downside by force,<br />
lock the up panel, and finish the<br />
installation.<br />
2/2