get inspired by the natural textures and organic ... - Hobby Lobby
get inspired by the natural textures and organic ... - Hobby Lobby
get inspired by the natural textures and organic ... - Hobby Lobby

You also want an ePaper? Increase the reach of your titles
YUMPU automatically turns print PDFs into web optimized ePapers that Google loves.
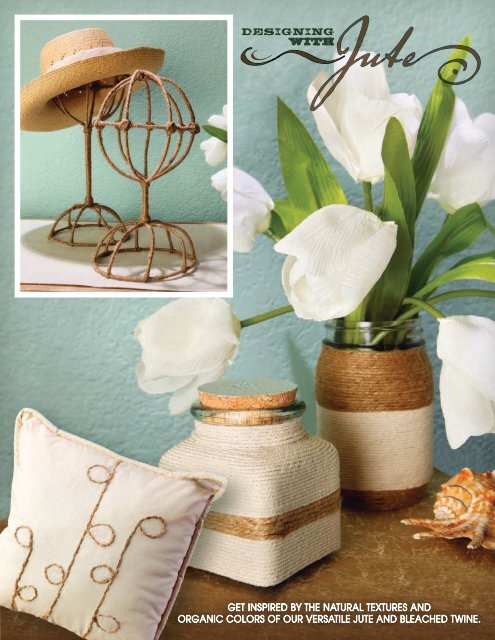
designing<br />
with<br />
GET INSPIRED BY THE NATURAL TEXTURES AND<br />
ORGANIC COLORS OF OUR VERSATILE JUTE AND BLEACHED TWINE.
Sublime Seating<br />
This little stool is all kinds of cool!<br />
And it’s all because of jute! Starting<br />
from <strong>the</strong> center, we carefully spiraled<br />
thick jute twine (6-ply), as shown.<br />
We used hot glue to secure <strong>the</strong> twine<br />
as we worked. What a sweet (<strong>and</strong><br />
durable!) way to decorate a seat! A<br />
great cover up for thrift store finds.<br />
2 Hob<strong>by</strong> Lob<strong>by</strong> Product Inspirations<br />
FloorIt<br />
Jute rugs are just divine! They’re<br />
<strong>natural</strong>, <strong>the</strong>y’re chic <strong>and</strong> <strong>the</strong>y’re<br />
perfect for any décor—but<br />
<strong>the</strong>y’re not always <strong>the</strong> size you<br />
need. So <strong>get</strong> on trend <strong>and</strong> totally<br />
customized <strong>by</strong> making one from<br />
scratch! You’ll need jute twine, rug<br />
canvas, <strong>and</strong> a few essential tools.<br />
Check out <strong>the</strong> detailed step-<strong>by</strong>step<br />
instructions on <strong>the</strong> next page<br />
to make one just for you!
Cut a Rug! Here, fashion <strong>and</strong> function are literally<br />
intertwined—that’s jute twine, people!<br />
This trendy jute rug is a blast to create. And<br />
we’ve given you step-<strong>by</strong>-step instructions<br />
to make it yourself! Get ready to weave…<br />
supplies:<br />
• #48 Jute Twine<br />
• #28 Jute Twine<br />
• #20 Jute Twine<br />
• Scissors<br />
• 2 Dowel Rods<br />
(3/8 x 36˝)<br />
• Rug Canvas<br />
• Latch Hook Needle<br />
• Hot Glue Gun<br />
• Hot Glue Sticks<br />
• Rug Binding<br />
1. Cut numerous<br />
lengths of<br />
jute twine<br />
for weaving.<br />
Ours were<br />
32˝ long.<br />
2. Knot twine onto dowels as shown.<br />
The number of knots on one dowel<br />
should correspond with <strong>the</strong><br />
desired length of your rug, with<br />
an additional 4-5˝ for trimming<br />
<strong>and</strong> finishing. The number<br />
of knots on <strong>the</strong> o<strong>the</strong>r dowel<br />
should correspond with <strong>the</strong><br />
desired width of your rug,<br />
with an additional 4-5˝<br />
for trimming <strong>and</strong><br />
finishing.<br />
3. Place dowels at right angles on<br />
work surface, as shown. Weave,<br />
working until you’ve<br />
reached <strong>the</strong> ends of<br />
<strong>the</strong> twine.<br />
4. Carefully<br />
trim raw edges to<br />
straighten.<br />
5. As you work,<br />
hot glue <strong>the</strong> edges to<br />
prevent raveling.<br />
6. Cut 4 strips of rug canvas. Two strips should<br />
correspond with <strong>the</strong> desired length of your rug, <strong>and</strong><br />
two strips should correspond with <strong>the</strong> desired width<br />
of your rug. Each strip should measure 12 squares<br />
across.<br />
7. Fold over approximately<br />
1 ¼˝along <strong>the</strong> entire<br />
length of each strip of rug<br />
canvas. The fold will occur<br />
between squares 7 <strong>and</strong> 8.<br />
Hob<strong>by</strong> Lob<strong>by</strong> Product Inspirations 3
9. Hook 5-6 loops before pulling <strong>the</strong><br />
hook through <strong>the</strong> loops to lock into<br />
place, as shown. You’ll need a total<br />
of 6 hooked rows.<br />
8. Using <strong>the</strong> latch<br />
hook needle, begin<br />
hooking #28 jute<br />
into <strong>the</strong> second row<br />
of canvas, using<br />
#20 jute as your<br />
locking string.<br />
10. Repeat process for each strip<br />
of rug canvas.<br />
11. Hot glue each strip of rug<br />
canvas to <strong>the</strong> corresponding<br />
edge of woven jute. S<strong>and</strong>wich<br />
<strong>the</strong> woven jute between <strong>the</strong><br />
sides of <strong>the</strong> fold as shown,<br />
with <strong>the</strong> hooked side of<br />
<strong>the</strong> canvas on what<br />
will become <strong>the</strong><br />
front side of<br />
<strong>the</strong> rug.<br />
12.<br />
On front<br />
of rug, use<br />
double str<strong>and</strong>s<br />
of #48 jute to<br />
disguise <strong>the</strong> raw edges<br />
of rug canvas. Hot glue into<br />
place, as shown.<br />
13. Wrap ends of double<br />
str<strong>and</strong>s to back of rug, hot<br />
gluing to secure.<br />
14. Measure<br />
<strong>and</strong> cut lengths<br />
of rug binding to<br />
correspond with <strong>the</strong><br />
edges of your rug. Hot<br />
glue binding over exposed rug<br />
canvas, as shown.<br />
15. For<br />
a finished<br />
look, miter <strong>the</strong><br />
corners as you<br />
work.<br />
4 Hob<strong>by</strong> Lob<strong>by</strong> Product Inspirations
Because of Burlap<br />
What’s a<br />
<strong>natural</strong> match<br />
for our earthy twines?<br />
It’s burlap, of course! In<br />
color, texture <strong>and</strong> overall aes<strong>the</strong>tic, it’s <strong>the</strong><br />
perfect textile to pair with jute’s understated,<br />
<strong>organic</strong> appeal. Case in point? This simple glass<br />
bottle. Held in place with a few dots of hot glue,<br />
we wrapped it with burlap. Then, we tied on a<br />
length of twine. Done!<br />
Bottled U<br />
We’ve got wrappings <strong>and</strong> trappings <strong>by</strong> <strong>the</strong> bottleful! And that’s a really<br />
good thing when it comes to jute. These pretty glass bottles, available in <strong>the</strong><br />
Home Accents Department, were simply wrapped with contrasting colors <strong>and</strong><br />
thicknesses (plys). We used a combination of hot glue <strong>and</strong> double-sided adhesive<br />
tape to hold <strong>the</strong> twine in place.<br />
Hob<strong>by</strong> Lob<strong>by</strong> Product Inspirations 5
Tray Way<br />
What’s ano<strong>the</strong>r way to say “earthy <strong>and</strong> chic?” A jutewrapped<br />
tray! This bare wood piece is available in <strong>the</strong><br />
Craft Department. We painted it with a trendy seafoam<br />
acrylic paint before applying <strong>the</strong> twine. For <strong>the</strong> look shown,<br />
work in rows around <strong>the</strong> perimeter of <strong>the</strong> tray. Begin each<br />
row at a different corner to avoid an obvious seam, securing<br />
with double-sided adhesive <strong>and</strong> hot glue as you work.<br />
Hold a C<strong>and</strong>le<br />
We loved <strong>the</strong> shape of <strong>the</strong>se<br />
dramatic metal c<strong>and</strong>leholders,<br />
but we needed a softer look<br />
for <strong>the</strong> <strong>natural</strong> aes<strong>the</strong>tic of<br />
<strong>the</strong> room. So, what did<br />
we do? We went under<br />
wraps with bleached<br />
twine, held tight with<br />
double-sided adhesive<br />
<strong>and</strong> dots of ordinary hot<br />
glue. Instant customized<br />
décor!<br />
Hat Head<br />
Wrap up a world of hip home<br />
accents with our <strong>natural</strong> jute<br />
twine. It works with metal,<br />
wood, resin <strong>and</strong> more. Just look<br />
at this one-of-a-kind hat st<strong>and</strong>!<br />
This wire piece was a funky off<strong>the</strong>-shelf<br />
find. We primed it with<br />
double-sided adhesive before<br />
carefully wrapping it with jute.<br />
Now it’s just as funky…but it’s<br />
also fabulous for our<br />
botanically-<strong>inspired</strong> décor!<br />
6 Hob<strong>by</strong> Lob<strong>by</strong> Product Inspirations
Want a room that’s groomed with a <strong>natural</strong> flair? Make it happen with jute!<br />
From wrapped-up knickknacks to beautifully embellished furniture, we’ve got a<br />
bevy of inspiring projects…all created with our earthy jute twine. And what’s <strong>the</strong><br />
best part of <strong>the</strong>se <strong>organic</strong>ally-<strong>inspired</strong> designs? Every single project is easy to do!<br />
Twine Detail<br />
Experiment with ways of adding one-of-a-kind detail<br />
to your jute décor. Try twists, shapes, knots…or quirky<br />
little spirals. They were <strong>the</strong> perfect finishing touch on<br />
our artfully-wrapped coat rack.<br />
Here’s a metal coat rack that’s showing<br />
its softer side, thanks to our versatile jute<br />
twine. For <strong>the</strong> look shown, wrap section<br />
<strong>by</strong> section, using hot glue to secure <strong>the</strong><br />
twine as you work. It takes some time,<br />
but it’s worth <strong>the</strong> effort for a piece that’s<br />
custom-designed just for you! Tip: We used<br />
two thicknesses of twine to add interest to our<br />
overall design.<br />
Hob<strong>by</strong> Lob<strong>by</strong> Product Inspirations 7
EASY<br />
ACCESSORIES...<br />
Q uick Stitch<br />
This simple muslin tote, available in <strong>the</strong><br />
Craft Department, features a monogram<br />
made entirely of jute! To make your own,<br />
draw in your initial with a disappearing<br />
ink fabric pen. Then, use a tapestry<br />
needle <strong>and</strong> 3-ply jute to embroider<br />
over your marks. Tip: Be sure to choose<br />
a muslin tote. Canvas is too thick for <strong>the</strong><br />
twine to pass through.<br />
Pillow Power<br />
A twine design on a fluffy throw pillow?<br />
You bet! It’s unique, it’s chic, <strong>and</strong> it’s just<br />
so easy! Experiment with shapes, scenes<br />
<strong>and</strong> artsy renditions. This pillow is made<br />
from simple muslin. We drew in <strong>the</strong> design<br />
before embroidering with 3-ply jute, as<br />
shown. Tip: This project requires a needle<br />
with a very large eye—tapestry needles<br />
are a good choice. You may also wish to use<br />
jewelry pliers to help you pull <strong>the</strong> needle<br />
through <strong>the</strong> fabric more easily.<br />
8 Hob<strong>by</strong> Lob<strong>by</strong> Product Inspirations<br />
Precious Pennant<br />
Our twine ‘twas divine on this cute little pennant.<br />
That’s right…it’s crocheted! We combined jute<br />
<strong>and</strong> bleached twine for a two-toned look, <strong>and</strong><br />
we added a simple heart to finish off <strong>the</strong> design.<br />
Make a whole set of <strong>the</strong>se friendly flags. Then,<br />
string <strong>the</strong>m along to create your own adorable<br />
jute banner. Didn’t know you could crochet jute?<br />
We show you how on <strong>the</strong> next page!
Home Sweet Jute<br />
Are you at home with our earthy jute <strong>and</strong> twines? Then, you’ll love this<br />
adorable pennant-style banner! Look closely…<strong>the</strong> flags are sweet little<br />
houses! Follow our simple, step-<strong>by</strong>-step instructions to make one for<br />
yourself.<br />
supplies:<br />
• Jute Twine<br />
• Sisal Twine<br />
• Scissors<br />
• Crochet Hooks, Size J<br />
• Hot Glue Gun<br />
• Hot Glue Sticks<br />
1. Using sisal twine (lighter<br />
color), make a 10-stitch<br />
foundation chain.<br />
2. Then, crochet 6 rows<br />
of single crochet before<br />
switching to jute (darker<br />
color) <strong>by</strong> joining <strong>the</strong> twines.<br />
3. Continue with jute twine,<br />
crocheting 9<br />
rows of single crochet,<br />
losing one stitch<br />
in each row.<br />
4. When you’ve finished <strong>the</strong><br />
last row, cut twine from <strong>the</strong><br />
ball, leaving an 8˝ tail.<br />
5. Fasten off twine <strong>by</strong> drawing<br />
<strong>the</strong> tail of <strong>the</strong> twine through<br />
<strong>the</strong> last loop in <strong>the</strong> hook.<br />
Tug on twine to tighten.<br />
6. Chain stitch small lengths<br />
of jute to serve as “door”<br />
embellishments. Hot glue<br />
into place on <strong>the</strong> front of<br />
each house as shown.<br />
7. Shape sisal into hearts <strong>and</strong><br />
stitch into place on <strong>the</strong> back<br />
of each house as shown.<br />
8. Create <strong>the</strong> garl<strong>and</strong> <strong>by</strong> chain<br />
stitching jute to <strong>the</strong> desired<br />
length.<br />
9. Tie houses onto garl<strong>and</strong>.<br />
Hob<strong>by</strong> Lob<strong>by</strong> Product Inspirations 9
This h<strong>and</strong>-me-down<br />
lamp is in <strong>the</strong> right<br />
light…now that it’s<br />
wrapped in rows <strong>and</strong><br />
rows of our versatile<br />
jute twine. We started<br />
with <strong>the</strong> base, wrapping<br />
tightly with multiple<br />
sizes of twine (we carry<br />
various thicknesses) <strong>and</strong><br />
hot gluing in place as we<br />
worked. We finished with<br />
<strong>the</strong> ultra-cool shade,<br />
using jute <strong>and</strong> bleached<br />
twine to create a series<br />
of preppy-meets-<strong>organic</strong><br />
stripes.<br />
10 Hob<strong>by</strong> Lob<strong>by</strong> Product Inspirations
A TREE<br />
FOR ME...<br />
Tree Glee<br />
Leaf <strong>the</strong> artwork to<br />
jute! This whimsical<br />
yet contemporary<br />
display shows <strong>the</strong> artsy<br />
side of our earthy jute<br />
twine. We painted<br />
a trio of canvases to<br />
coordinate with <strong>the</strong> wall<br />
before penciling in our<br />
branched-out designs.<br />
Then, we carefully filled<br />
in <strong>the</strong> design with twine,<br />
securing with hot glue<br />
as we worked. Tip: Love<br />
<strong>the</strong> over-<strong>the</strong>-top tree? It’s<br />
made from foam board!<br />
Just trace, cut, paint <strong>and</strong><br />
outline <strong>the</strong> silhouette<br />
with twine!<br />
Leaf Love<br />
These little leaves won’t have you up a tree. They’re oh-so-easy<br />
to create. Draw <strong>the</strong> desired shape—here we went with a very<br />
basic leaf shape. Then, work from <strong>the</strong> center to fill in with<br />
twine. Secure with hot-glue as you work. Artwork done!<br />
Hob<strong>by</strong> Lob<strong>by</strong> Product Inspirations 11
Frame Fab<br />
This resin frame is<br />
really something!<br />
That’s because<br />
it’s embellished<br />
with rows of jute<br />
<strong>and</strong> twine—<strong>the</strong><br />
contrasting colors<br />
added interest <strong>and</strong><br />
depth. Simply work<br />
<strong>the</strong> twine into rows as<br />
shown, securing with<br />
hot glue as you go.<br />
P lant P lus<br />
Turn traditional décor upside down<br />
with an imaginative jute-wrapped<br />
planter. This piece is actually a metal topiary<br />
form, available in <strong>the</strong> Floral Department. We<br />
simply inverted it as shown <strong>and</strong> tightly wrapped<br />
it with our rugged jute twine. Hot glue <strong>and</strong><br />
double-sided adhesive held <strong>the</strong> twine perfectly in<br />
place. And to add a little contrast? We wired in a<br />
simple twine-wrapped vase.<br />
©2011 Hob<strong>by</strong> Lob<strong>by</strong>® - Photography <strong>by</strong> Sanford Mauldin • Crafts - 100172<br />
www.hob<strong>by</strong>lob<strong>by</strong>.com • • www.<strong>get</strong><strong>inspired</strong><strong>by</strong>hl.com<br />
DO NOT ALLOW CHILDREN TO COMPLETE PROJECTS ALONE. ADULT SUPERVISION REQUIRED.