1.5 Watt Solar Battery Charger - Harbor Freight Tools
1.5 Watt Solar Battery Charger - Harbor Freight Tools
1.5 Watt Solar Battery Charger - Harbor Freight Tools
Create successful ePaper yourself
Turn your PDF publications into a flip-book with our unique Google optimized e-Paper software.
Specifications<br />
Rated Output<br />
Panel Size<br />
12/24 V~ / <strong>1.5</strong> W<br />
14-3/4 IN. L x 6-1/2 IN. W<br />
Note: Output will decrease as the panel gets hotter<br />
than room temperature (~70° F). Angle, solar intensity,<br />
cloud cover and other factors will effect output.<br />
Installation<br />
IMPORTANT! Read the ENTIRE IMPORTANT<br />
SAFETY INFORMATION section at the beginning of<br />
this manual including all text under subheadings<br />
therein before set up or use of this product:<br />
Note: For additional information regarding the<br />
parts listed in the following pages, refer to the<br />
Assembly Diagram near the end of this manual.<br />
Location<br />
1. Locate the <strong>Charger</strong> panel where it will receive<br />
full, unobstructed sunlight, especially during<br />
midday. Nearby trees or tall plants will drop debris,<br />
requiring the panel to be cleaned more frequently.<br />
2. The installation location for panels, charge<br />
controller/regulator, and batteries must be<br />
inaccessible to children to prevent electric<br />
shock. Build a childproof enclosure if needed.<br />
3. Install the charge controller/regulator and batteries<br />
in a weatherproof enclosure with proper ventilation.<br />
Assembly/Mounting<br />
1. Select a mounting location for the <strong>Charger</strong> Frame<br />
(1). The solar panel should face the Sun, and not<br />
be blocked by shadows. The location should allow<br />
the panel to be protected from accidental damage.<br />
The mounting location should be sturdy enough to<br />
support the weight of the <strong>Charger</strong> Frame, and any<br />
additional accessories. Before mounting, be sure<br />
that the main cable to either the <strong>Battery</strong> Clamp<br />
Wire (3) or the Lighter Plug Wire (4) will reach from<br />
the <strong>Charger</strong> Frame to the battery to be charged.<br />
WARNING! Depending on the mounting location and<br />
possible weather conditions, you may need longer<br />
mounting screws (not included) to securely install the<br />
<strong>Charger</strong> Frame.<br />
WARNING! If using mounting screws, do NOT<br />
drill through the <strong>Charger</strong>’s aluminum frame. You<br />
may damage the frame or break the glass.<br />
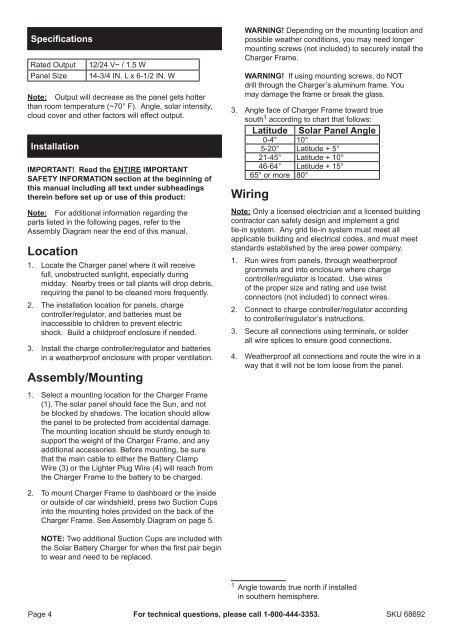
3. Angle face of <strong>Charger</strong> Frame toward true<br />
south 1 according to chart that follows:<br />
Latitude <strong>Solar</strong> Panel Angle<br />
0-4° 10°<br />
5-20° Latitude + 5°<br />
21-45° Latitude + 10°<br />
46-64° Latitude + 15°<br />
65° or more 80°<br />
Wiring<br />
Note: Only a licensed electrician and a licensed building<br />
contractor can safely design and implement a grid<br />
tie-in system. Any grid tie-in system must meet all<br />
applicable building and electrical codes, and must meet<br />
standards established by the area power company.<br />
1. Run wires from panels, through weatherproof<br />
grommets and into enclosure where charge<br />
controller/regulator is located. Use wires<br />
of the proper size and rating and use twist<br />
connectors (not included) to connect wires.<br />
2. Connect to charge controller/regulator according<br />
to controller/regulator’s instructions.<br />
3. Secure all connections using terminals, or solder<br />
all wire splices to ensure good connections.<br />
4. Weatherproof all connections and route the wire in a<br />
way that it will not be torn loose from the panel.<br />
2. To mount <strong>Charger</strong> Frame to dashboard or the inside<br />
or outside of car windshield, press two Suction Cups<br />
into the mounting holes provided on the back of the<br />
<strong>Charger</strong> Frame. See Assembly Diagram on page 5.<br />
NOTE: Two additional Suction Cups are included with<br />
the <strong>Solar</strong> <strong>Battery</strong> <strong>Charger</strong> for when the first pair begin<br />
to wear and need to be replaced.<br />
1 Angle towards true north if installed<br />
in southern hemisphere.<br />
Page 4 For technical questions, please call 1-800-444-3353. SKU 68692


