USER'S GUIDE - Thane
USER'S GUIDE - Thane
USER'S GUIDE - Thane

Create successful ePaper yourself
Turn your PDF publications into a flip-book with our unique Google optimized e-Paper software.
U S E R ’ S G U I D E<br />
U S E R ’ S G U I D E<br />
PRODUCT DESCRIPTION<br />
The H2O Portable Steam Cleaner has a high degree of cleaning and degreasing power on a wide variety of<br />
surfaces. The steam emitted from the tip can assist in the removal of dirt, grease and grime. Since the H2O<br />
Portable Steam Cleaner uses only ordinary tap water without additives, it is environmentally friendly.<br />
Some of the surfaces which can be safely cleaned by the H2O Portable Steam Cleaner include upholstery, sealed<br />
grout, bathroom and kitchen tile, stove tops, removable exhaust filters over stoves, windows and mirrors.<br />
INSTRUCTIONS FOR USE<br />
1. Press down and slowly unscrew the Safety Lid (6). Take 175ml (6oz)<br />
clean water with the Measuring Cup (1) (about one and a half cup of<br />
water), and add the water into the tank. (Max. capacity of the tank is<br />
300ml (10oz). Do not overfill the tank, some space must be left in the<br />
tank). (FIGURE A).<br />
2. Rescrew the Safety Lid (6) securely into place, press it down and turn<br />
clockwise until it is securely closed.<br />
3. Plug the appliance into an outlet. The Power Indicator (9) will light.<br />
4. Wait approximatelly 4-5 minutes until the H2O Portable Steam Cleaner<br />
reaches operating temperature. When the H2O Portable Steam Cleaner<br />
FIGURE A.<br />
is ready to emit steam, the Power Indicator (9) will turn off. Press the<br />
Steam Button (7) and the H2O Portable Steam Cleaner will emit a stream of steam.<br />
5. When water needs to be refilled, press the Steam Button (7) to release steam completely. Disconnect the<br />
plug from the outlet. WAIT AT LEAST TEN MINUTES for the unit to cool down before unscrewing the Safety<br />
Lid (6). Then repeat steps 1 to 4 if needed.<br />
6. How to install Straight Nozzle - slide the Straight Nozzle ( 4 ) onto the Small Pivotal Nozzle ( 5 ) and align the<br />
straight line mark on the Straight Nozzle ( 4 ) with the single line mark on the steamer body. Rotate the<br />
Straight Nozzle ( 4 ) in clockwise direction, and align the straight line mark on the Straight Nozzle ( 4 ) with<br />
the double line mark on the steamer body.<br />
7. How to install Round Brush - slide the Round Brush ( 3 ) onto the Small Pivotal Nozzle ( 5 ), until it’s securely<br />
attached.<br />
CAUTION: Never direct steam towards people, animals or plants, or other objects unable to withstand high<br />
temperature. Avoid skin contact with the steam jet. The high temperature may cause serious physical injury<br />
including burns. The steam must not be directed towards equipment containing electrical components, such<br />
as the interior of ovens.<br />
Do not use the steamer on cold glass. It may cause the glass to break or crack.<br />
This appliance must be grounded. Use only the proper type outlet when plugging in the appliance, do not<br />
attempt to override the ground wire feature.<br />
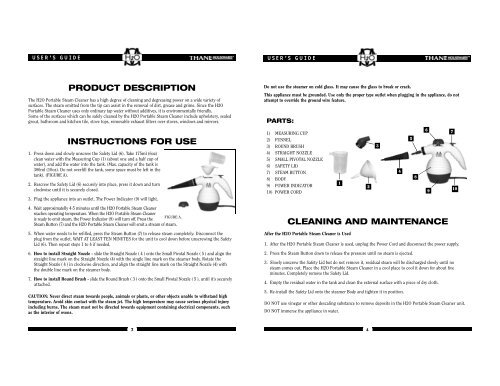
PARTS:<br />
1) MEASURING CUP<br />
2) FUNNEL<br />
3) ROUND BRUSH<br />
4) STRAIGHT NOZZLE<br />
5) SMALL PIVOTAL NOZZLE<br />
6) SAFETY LID<br />
7) STEAM BUTTON<br />
8) BODY<br />
9) POWER INDICATOR<br />
10) POWER CORD<br />
1<br />
2<br />
CLEANING AND MAINTENANCE<br />
After the H2O Portable Steam Cleaner is Used<br />
1. After the H2O Portable Steam Cleaner is used, unplug the Power Cord and disconnect the power supply.<br />
2. Press the Steam Button down to release the pressure until no steam is ejected.<br />
3. Slowly unscrew the Safety Lid but do not remove it, residual steam will be discharged slowly until no<br />
steam comes out. Place the H2O Portable Steam Cleaner in a cool place to cool it down for about five<br />
minutes. Completely remove the Safety Lid.<br />
4. Empty the residual water in the tank and clean the external surface with a piece of dry cloth.<br />
5. Re-install the Safety Lid onto the steamer Body and tighten it in position.<br />
DO NOT use vinegar or other descaling substance to remove deposits in the H2O Portable Steam Cleaner unit.<br />
DO NOT immerse the appliance in water.<br />
3<br />
4<br />
5<br />
8<br />
6<br />
9<br />
7<br />
10<br />
3<br />
4