
You also want an ePaper? Increase the reach of your titles
YUMPU automatically turns print PDFs into web optimized ePapers that Google loves.
<strong>Archer</strong> 2<br />
Smart<br />
Motorized<br />
Stage<br />
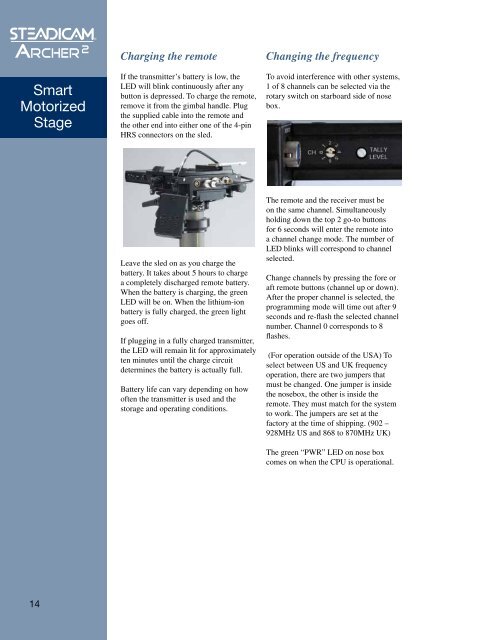
Charging the remote<br />
If the transmitter’s battery is low, the<br />
LED will blink continuously after any<br />
button is depressed. To charge the remote,<br />
remove it from the gimbal handle. Plug<br />
the supplied cable into the remote and<br />
the other end into either one of the 4-pin<br />
HRS connectors on the sled.<br />
Changing the frequency<br />
To avoid interference with other systems,<br />
1 of 8 channels can be selected via the<br />
rotary switch on starboard side of nose<br />
box.<br />
Leave the sled on as you charge the<br />
battery. It takes about 5 hours to charge<br />
a completely discharged remote battery.<br />
When the battery is charging, the green<br />
LED will be on. When the lithium-ion<br />
battery is fully charged, the green light<br />
goes off.<br />
If plugging in a fully charged transmitter,<br />
the LED will remain lit for approximately<br />
ten minutes until the charge circuit<br />
determines the battery is actually full.<br />
Battery life can vary depending on how<br />
often the transmitter is used and the<br />
storage and operating conditions.<br />
The remote and the receiver must be<br />
on the same channel. Simultaneously<br />
holding down the top 2 go-to buttons<br />
for 6 seconds will enter the remote into<br />
a channel change mode. The number of<br />
LED blinks will correspond to channel<br />
selected.<br />
Change channels by pressing the fore or<br />
aft remote buttons (channel up or down).<br />
After the proper channel is selected, the<br />
programming mode will time out after 9<br />
seconds and re-flash the selected channel<br />
number. Channel 0 corresponds to 8<br />
flashes.<br />
(For operation outside of the USA) To<br />
select between US and UK frequency<br />
operation, there are two jumpers that<br />
must be changed. One jumper is inside<br />
the nosebox, the other is inside the<br />
remote. They must match for the system<br />
to work. The jumpers are set at the<br />
factory at the time of shipping. (902 –<br />
928MHz US and 868 to 870MHz UK)<br />
The green “PWR” LED on nose box<br />
comes on when the CPU is operational.<br />
14