Belt-Drive Turntable - Barnsly.ru
Belt-Drive Turntable - Barnsly.ru
Belt-Drive Turntable - Barnsly.ru

You also want an ePaper? Increase the reach of your titles
YUMPU automatically turns print PDFs into web optimized ePapers that Google loves.
<strong>Belt</strong>-<strong>Drive</strong> <strong>Turntable</strong><br />
PROFESSIONAL TURNTABLE WITH AUTO SPEED CORRECTION<br />
USER GUIDE<br />
TVT1001BLK | TVT2002BLK
SAFETY PRECAUTIONS<br />
CAUTION<br />
RISK OF ELECTRIC SHOCK<br />
DO NOT OPEN<br />
CAUTION: TO REDUCE THE RISK OF ELECTRIC SHOCK, DO NOT REMOVE COVER (OR BACK). NO USER-SERVICEABLE PARTS<br />
INSIDE. REFER SERVICING TO QUALIFIED SERVICE PERSONNEL.<br />
DANGEROUS VOLTAGE:<br />
The lightning flash with arrowhead symbol within an equilateral triangle is intended to alert the user<br />
to the presence of uninsulated dangerous voltage within the product’s enclosure that may be of<br />
sufficient magnitude to constitute a risk of electric shock to persons.<br />
ATTENTION:<br />
The exclamation point within an equilateral triangle is intended to alert the user to the presence<br />
of important operating and maintenance (servicing) inst<strong>ru</strong>ctions in the literature accompanying<br />
the appliance.<br />
FCC WARNING:<br />
This equipment may generate or use radio frequency energy. Changes or modifications to this equipment<br />
may cause harmful interference unless the modifications are expressly approved in the inst<strong>ru</strong>ction manual. The<br />
user could lose the authority to operate this equipment if an unauthorized change or modification is made.<br />
ATTENTION: POUR ÉVITER LES CHOC ÉLECTRIQUES, INTRODUIRE LA LAME LA PLUS LARGE DE LA FICHE DANS<br />
LA BORNE CORRESPONDANTE DE LA PRISES ET POUSSER JUSQU’AU FOND.<br />
3
SAFETY PRECAUTIONS<br />
NOTE: This equipment has been tested and found to comply with the limits for a Class B digital device, pursuant to<br />
part 15 of the FCC Rules. These limits are designed to provide reasonable protection against harmful interference in<br />
a residential installation. This equipment generates, uses and can radiate radio frequency energy and, if not installed<br />
and used in accordance with the inst<strong>ru</strong>ctions, may cause harmful interference to radio communications. However,<br />
there is no guarantee that interference will not occur in a particular installation. If this equipment does cause harmful<br />
interference to radio or television reception, which can be determined by turning the equipment off and on, the<br />
user is encouraged to try to correct the interference by one or more of the following measures:<br />
• Reorient or relocate the receiving antenna.<br />
• Increase the separation between the equipment and receiver.<br />
• Connect the equipment into an outlet on a circuit different from that to which the receiver is connected.<br />
• Consult the dealer or an experienced radio/TV technician for help.<br />
• The rating information is located at the bottom of the apparatus.<br />
SURGE PROTECTORS: It is recommended to use a surge protector for AC connection. Lightning and power surges<br />
ARE NOT covered under warranty for this product.<br />
WARNING: TO PREVENT FIRE OR SHOCK HAZARD, DO NOT EXPOSE THIS UNIT TO RAIN OR MOISTURE.<br />
This Class B digital apparatus complies with Canadian ICES-003.<br />
Cet appareil numérique de la classe B est conforme à la norme NMB-003 du Canada.<br />
Only use attachments/accessories specified by the manufacturer.<br />
To be completely disconnected from the power input, the main plug of the AC/DC adapter shall be disconnected from the<br />
electrical outlet. The main plug of the AC/DC adapter should not be obst<strong>ru</strong>cted OR should be easily accessed during intended<br />
use. Do not expose the product to dripping or splashing. Do not place liquid filled objects such as vases on the product.<br />
Microsoft , XP, and Vista are either registered trademarks or trademarks of Microsoft Corporation in the United States and/or other countries.<br />
Mac is either a registered trademark or trademark of Apple.<br />
This product is not endorsed or manufactured by Microsoft Corporation or Apple.<br />
4
IMPORTANT SAFETY INSTRUCTIONS<br />
1. Read these Inst<strong>ru</strong>ctions.<br />
2. Keep these Inst<strong>ru</strong>ctions.<br />
3. Heed all Warnings.<br />
4. Follow all inst<strong>ru</strong>ctions.<br />
5. Do not use this apparatus near water.<br />
6. Clean only with a dry cloth.<br />
7. Do not block any of the ventilation openings. Install in accordance with the manufacturer’s inst<strong>ru</strong>ctions.<br />
8. Do not install near any heat sources such as radiators, heat registers, stoves, or other apparatus (including amplifiers) that<br />
produce heat.<br />
9. Do not defeat the safety purpose of the polarized or grounding-type plug. A polarized plug has two blades with one wider<br />
than the other. A grounding-type plug has two blades and a third grounding prong. The wide blade or the third prong are<br />
provided for your safety. When the provided plug does not fit into your outlet, consult an electrician for replacement of the<br />
obsolete outlet.<br />
10. Protect the power cord from being walked on or pinched particularly at plugs, convenience receptacles, and the point<br />
where they exit from the apparatus.<br />
11. Only use attachments/accessories specified by the manufacturer.<br />
12. Use only with a cart, stand, tripod, bracket, or table specified by the manufacturer, or sold with the<br />
apparatus. When a cart is used, use caution when moving the cart/apparatus combination to avoid injury<br />
from tip-over.<br />
13. Unplug this apparatus during lightning storms or when unused for long periods of time.<br />
14. Refer all servicing to qualified service personnel. Servicing is required when the apparatus has been<br />
damaged in any way, such as power-supply cord or plug is damaged, liquid has been spilled or objects<br />
have fallen into the apparatus, the apparatus has been exposed to rain or moisture, does not operate normally, or has been<br />
dropped.<br />
15. Do not expose this product to dripping or splashing. Do not place objects filled with liquids, such as vases, on this product.<br />
16. Main plug is used as disconnect device and it should remain readily operable during intended use. In order to disconnect<br />
the apparatus from the mains completely, the mains plug should be disconnected from the mains socket outlet completely.<br />
17. CAUTION: To reduce the risk of fire or explosion, do not expose batteries to excessive heat such as sunshine,<br />
fire or other heat sources.<br />
5
WHAT’S INCLUDED<br />
AC Adapter<br />
Part No. 001-41E130-01R*<br />
Main Unit<br />
Platter with <strong>Belt</strong><br />
Platter Part No. 434-E13000-00R*<br />
<strong>Belt</strong> Part No. 447-E13000-00R*<br />
Platter Cover<br />
Part No. 507-E13000-00R*<br />
*Consumer Replaceable Part (See page 34 to order.)<br />
6
WHAT’S INCLUDED (CONTINUED)<br />
<strong>Belt</strong> Cover<br />
Part No. 447-E13000-00R*<br />
Dust Cover<br />
Part No. 301-E13000-00R*<br />
CD ROM<br />
(TVT2002 only)<br />
Part No. 393-E13000-000R*<br />
A<br />
B<br />
B Type USB Cable<br />
(TVT2002 only)<br />
Part No. 061-100100-04RP*<br />
Audio Cable<br />
Part No. 008-000015-10P*<br />
45 Adapter<br />
Part No. 456-E13000-00R*<br />
Included but not pictured: Owner’s Manual and Quick Start Guide<br />
*Consumer Replaceable Part (See page 34 to order.)<br />
Counter Weight<br />
Part No. (A) 449-E13000-00R*<br />
(B) 278-E130N00-001R*<br />
7
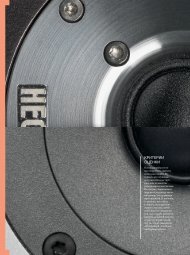
LOCATION OF CONTROLS<br />
TOP<br />
REAR<br />
9<br />
1<br />
2 3 4 5 6 7 8<br />
10 11 12 13 14<br />
1. Motor/Motor Cover<br />
2. <strong>Drive</strong> <strong>Belt</strong><br />
3. Spindle<br />
4. Tone Arm Lifter<br />
5. Counter Weight<br />
6. Anti-Skate Control<br />
7. Cue Lever<br />
8. Tone Arm Rest<br />
9. 33/OFF/45 Control with<br />
Power Indicator<br />
10. Platter<br />
11. Tone Arm Light<br />
12. Stylus (Stylus Part No.<br />
069-MG2801-01R*)<br />
13. Display<br />
14. Tone Arm<br />
15. Audio Out Jacks<br />
16. PRE-AMP ON/OFF Switch<br />
(Please see caution on use<br />
of this switch on page 12.)<br />
17. B Type USB Out Jack<br />
(TVT2002 only)<br />
18. Power Jack<br />
15 16 17 18<br />
*Consumer Replaceable Part<br />
(See page 34 to order.)<br />
8
SETUP<br />
After unpacking, set up the unit as follows:<br />
1. Gently place the Platter onto the Spindle,<br />
making certain that the Platter is fully seated<br />
before proceeding to the next step.<br />
3b. Gently pull the <strong>Drive</strong> <strong>Belt</strong> around the Motor<br />
Pulley. Be careful to not allow finger grease or<br />
other contamination to foul the belt.<br />
NOTE:<br />
The <strong>Drive</strong> <strong>Belt</strong> comes installed around the Platter.<br />
4. Place the Motor Cover onto the Motor,<br />
making sure each side has the <strong>Drive</strong> <strong>Belt</strong><br />
coming through.<br />
2. Place the Platter Cover onto the Platter.<br />
3a. Remove the plastic<br />
cover from the stylus.<br />
9
SETUP (CONTINUED)<br />
5. Installation of the Counterweight<br />
As with all quality turntables built to utilize<br />
aftermarket cartridges, the weight of<br />
the cartridge must be balanced with a<br />
counterweight to allow accurate setting of the<br />
cartridge’s downward force.<br />
5a. The first step is to insure a level, stable surface for<br />
your new turntable.<br />
5b. While carefully securing the tonearm from<br />
movement and protecting the stylus from<br />
damage; gently glide the counterweight with<br />
the numerals facing forward onto the rear of the<br />
tonearm.<br />
5c. Rotate the weight in a clockwise fashion from<br />
the perspective of the end of the arm opposite<br />
of the cartridge until the threads are just<br />
engaged.<br />
5d. With the tonearm lift lowered and the stylus<br />
protector removed, seek to instill a state<br />
of equilibrium in the arm by rotating the<br />
counterweight so that balance will be achieved<br />
in the form of a tonearm that is level and free<br />
from interference.<br />
5e. The next step is to create a reference to this<br />
position by rotating the numerically enhanced<br />
ring at the front of the counterweight to indicate<br />
“0” at the top position in alignment with the<br />
mark on the tonearm while holding the rear<br />
portion of the counterweight to prohibit its<br />
movement.<br />
5f. From this “0” reference place, grasp both<br />
the front and back of these two parts of the<br />
counterweight and set the weight to indicate<br />
“3” on the dial to align with the marking on the<br />
top of the tonearm. This will indicate 3 grams of<br />
downward force, the recommended tracking<br />
weight for this cartridge.<br />
5g. Finally, set the antiskating control to “3” to<br />
match the downward force setting. See page<br />
16 in the Operation section for possible further<br />
adjustments.<br />
NOTE:<br />
Other cartridges will have other requirements;<br />
therefore see the cartridge manufacturer’s<br />
documentation for settings such as downward<br />
force and anti-skating recommendations.<br />
10
SETUP (CONTINUED)<br />
A. TO USE WITH A COMPUTER (TVT2002 only):<br />
Install recording software as shown on page 22.<br />
With the unit NOT connected to AC, connect the<br />
small end of the USB Cable (included) to the USB<br />
Out jack on the rear of this unit and the other end<br />
to a USB jack on your computer.<br />
USB jack<br />
USB cable<br />
<strong>Turntable</strong><br />
NOTES:<br />
• When connecting the unit, refer to the owner’s<br />
manual of the computer, as well as this manual.<br />
• Make sure the power is off and both units are<br />
unplugged before making any connections.<br />
• When connected via the USB cable, the USB<br />
indicator will light in the display.<br />
Computer<br />
6a. Insert the small end of the AC adapter into the Power jack<br />
(located on the rear of the unit). Connect the other end<br />
to a wall outlet having 120V AC, 60 Hz.<br />
NOTES:<br />
• Remove both the DC plug and the AC IN plug to<br />
disconnect the AC adapter when not in use.<br />
• Only use the supplied AC adapter which has the<br />
following specs: DC 12V.<br />
TO AC<br />
JACK<br />
CONTINUE TO PAGE 15 TO USE THE TURNTABLE WITH A COMPUTER<br />
11
R L<br />
OUTPUT<br />
SETUP (CONTINUED)<br />
B. TO USE WITH A UNIT WITH LINE IN JACK (HOME STEREO, BOOM BOX, ETC.):<br />
NOTES:<br />
• When connecting the unit, refer to the owner’s manual<br />
of the external unit, as well as this manual.<br />
• Make sure the power is off and both units are unplugged<br />
before making any connections.<br />
R<br />
L<br />
<strong>Turntable</strong><br />
6b. Connect the left and right plugs of the Audio Cable<br />
(included) to the Left and Right Out jacks on the rear<br />
of this unit, matching the red to red and white to white.<br />
Connect the other end of the Audio Cable to the Line In<br />
jacks of the Home Stereo or similar equipment.<br />
R<br />
L<br />
Amplifier<br />
Warning Regarding the PRE-AMP Switch<br />
This unit is equipped with a moving magnet phono<br />
preamplifier with RIAA equalization. This is a very convenient<br />
addition for those customers not possessing an amplifier or receiver with a phono input. However, caution<br />
should be applied to the use of this preamplifier. When you are using this preamplifier’s output as indicated<br />
by the “ON” designation of the switch located on the back center panel of the turntable, do not under any<br />
circumstances connect the RCA output connectors of the turntable to the input connections of an additional<br />
phono preamplifier on a receiver or amplifier often marked “Phono Input”. Excess gain from the use of the<br />
preamplifier in the turntable as well as the preamplifier in your amplifier or receiver may cause damage to<br />
your amplifier and/or speakers.<br />
12
SETUP (CONTINUED)<br />
On the contrary, if you have this switch in the “OFF” position and attempt to connect the turntable’s RCA<br />
connectors to the line input levels of a receiver or amplifier such as “Tape” or “VCR”, you will find that the<br />
level is insufficient and will not allow you to hear the output sufficiently. Under no circumstances do we<br />
recommend switching the preamplifier “ON/OFF” switch while monitoring the output with an amplifier. To<br />
be safe, select the appropriate switch position with the power off on the amplifier or receiver. The PRE-AMP<br />
switch position will not affect users of the USB function.<br />
7b. Slide the PRE-AMP ON/OFF switch on the rear of the<br />
unit to the ON position.<br />
8b. Insert the small end of the AC adapter into the Power<br />
jack (located on the rear of the unit). Connect the<br />
other end to a wall outlet having 120V AC, 60 Hz.<br />
TO AC<br />
JACK<br />
NOTES:<br />
• Remove both the DC plug and the AC IN plug to<br />
disconnect the AC adapter when not in use.<br />
• Only use the supplied AC adapter which has the following specs: DC 12V.<br />
• After connecting, set the external unit to receive the signal from its Line In jacks.<br />
13
R L<br />
OUTPUT<br />
SETUP (CONTINUED)<br />
C. TO USE WITH A UNIT WITH PHONO PREAMPLIFIER INPUTS (RECEIVER, PRE-AMP, ETC.):<br />
(See page 10 for the Warning regarding the PRE-AMP switch.)<br />
6c. Slide the PRE-AMP ON/OFF switch on the rear of the<br />
unit to the OFF position.<br />
7c. Connect the left and right plugs of the Audio Cable<br />
(included) to the Left and Right Out jacks on the rear<br />
of this unit, matching the red to red and white to white.<br />
Connect the other end of the Audio Cable to the Phono<br />
In jacks of the Home Stereo or similar equipment.<br />
8c. Insert the small end of the AC adapter into the Power jack<br />
(located on the rear of the unit). Connect the other end<br />
to a wall outlet having 120V AC, 60 Hz.<br />
R<br />
L<br />
R<br />
L<br />
<strong>Turntable</strong><br />
Amplifier<br />
NOTES:<br />
• Remove both the DC plug and the AC IN plug to<br />
disconnect the AC adapter when not in use.<br />
• Only use the supplied AC adapter which has the<br />
following specs: DC 12V.<br />
• After connecting, set the external unit to receive the<br />
signal from its Phono Input jacks.<br />
TO AC<br />
JACK<br />
14
OPERATION<br />
1. Put a record on the turntable and remember to use the 45<br />
adapter if using a 45 single record.<br />
NOTE: Some 45 single records may not need the 45 adapter.<br />
2. Rotate the 33/OFF/45 control to the 33 or 45 position<br />
(to match the record being played); the Power indicator<br />
and display will light.<br />
3. Lift the Tone Arm and move over the Platter. The Platter will<br />
start spinning and the Tone Arm light will illuminate.<br />
4. Lower the Cue Lever.<br />
5. Place the Tone Arm on the edge of the record to start at the<br />
beginning or anywhere on the record’s playing surface to start<br />
playback at that point. The display will show the spect<strong>ru</strong>m of the<br />
record’s output.<br />
6. If the sound is distorted, check the tonearm balance,<br />
counterweight and anti-skating setting previously adjusted.<br />
Also check for accumulated dust on the stylus by visual<br />
inspection.<br />
(See page 10 for Installation of the counterweight.)<br />
15
OPERATION (CONTINUED)<br />
7. If necessary, adjust the Anti-Skating control as previously discussed<br />
in the initial setup. In most cases, the Anti-Skating control should<br />
be set to the same number as the counterweight. Anti-Skating<br />
compensates for inward tracking forces that occur with all<br />
cartridges and typically worsen when the stylus nears the center<br />
of the record. If the turntable is experiencing excessive skipping<br />
during playback while nearing the center spindle, try increasing<br />
the Anti-Skating control in small increments. This control’s<br />
effectiveness is also dependant on tracking force used with the<br />
arm (i.e., the heavier the tracking weight, typically the less antiskating<br />
is required).<br />
8. To pause playback, raise the Cue Lever; to resume playback,<br />
lower the Cue Lever.<br />
9. When the record reaches the end, the turntable will stop rotating<br />
and the Tone Arm light will turn off. Raise the Cue Lever and move<br />
the Tone Arm back over the Tone Arm rest; then lower the Cue<br />
Lever. To stop playback before the end of the record is reached,<br />
raise the Cue Lever and move the Tone Arm back over the Tone<br />
Arm rest; then lower the Cue Lever.<br />
16
OPERATION (CONTINUED)<br />
10. To turn the unit off, rotate the 33/OFF/45 control to the OFF position;<br />
the Power indicator and display will turn off. Replace plastic Stylus<br />
cover to protect stylus.<br />
NOTE: If connected to a computer (TVT2002 only), see page 23 to<br />
utilize the included software to record and edit the recording.<br />
17
OPERATION (CONTINUED)<br />
REPLACING THE TURNTABLE STYLUS (NEEDLE)<br />
Your stylus should last for up to 400 hours. However, when the time comes to replace,<br />
follow the inst<strong>ru</strong>ctions below.<br />
1. Very gently, slide the stylus towards the front and remove<br />
from the assembly.<br />
2. To replace, slide new stylus onto the assembly.<br />
Stylus Part No. 069-MG2801-01R*<br />
*Consumer Replaceable Part (See page 34 to order.)<br />
18
COMPUTER REQUIREMENTS (TVT2002 ONLY)<br />
PC REQUIREMENTS:<br />
• Windows 7 (32 bit)<br />
• Windows Vista (32 bit)<br />
• Windows XP (32 bit)<br />
MAC REQUIREMENTS:<br />
The Vinyl Recorder software is not available for<br />
Macintosh. Audacity is recommended for Mac<br />
users. The Audacity software, along with complete<br />
documentation, can be downloaded for the Mac at<br />
http://audacity.sourceforge.net.<br />
FOR MAC AND PC: The performance of the software<br />
is dependent upon the processing power available,<br />
as well as the operating system in use. More capable<br />
systems offer higher performance.<br />
IMPORTANT NOTE REGARDING<br />
THE INCLUDED SOFTWARE:<br />
This manual touches the basics of the software<br />
included. It is suggested you download the full<br />
manual at the link provided below to utilize all the<br />
software’s features and effects.<br />
TDK Vinyl Recorder: http://www.cakewalk.com<br />
NOTE: When using USB audio devices such as the<br />
TDK Life on Record turntable, it is expected that the<br />
drivers installed when the unit is connected to your<br />
computing device will be used to route your audio.<br />
This may mute or disable your previous sound card’s<br />
driver while temporarily using the USB drivers. When<br />
the USB device is disconnected, the normal audio<br />
card drivers will be used again. Depending on the<br />
system and the hardware installed, you may need<br />
to adjust which audio drivers are used by navigating<br />
to the Control Panel, clicking on Sounds and Audio<br />
Devices and then clicking on the audio tab and<br />
adjusting your default playback or recording device<br />
according to your needs. Typically this is seamless<br />
and does not require any user interaction.<br />
19
INSTALLING TDK LIFE ON RECORD VINYL RECORDER – WINDOWS<br />
INSTALLING THE VINYL RECORDER SOFTWARE<br />
FOR WINDOWS<br />
3. The Welcome to the Vinyl Recorder Setup Wizard<br />
screen will appear. Click Next to start installation.<br />
1. Insert the CD ROM. If the computer is set to<br />
auto<strong>ru</strong>n, the installation will begin automatically.<br />
If it is not set to auto<strong>ru</strong>n, then select CD ROM in<br />
MY COMPUTER and double-click on the Vinyl<br />
Recorder Setup.exe file.<br />
2. The Select Setup Language screen will appear.<br />
Select the language to be used during<br />
installation and click OK.<br />
4. The Software License Agreement screen will<br />
appear. Click the I accept the terms in the<br />
License Agreement button and then click Next.<br />
20
INSTALLING TDK LIFE ON RECORD VINYL RECORDER – WINDOWS (CONT.)<br />
5. The Select Destination Folder screen will appear.<br />
Follow the inst<strong>ru</strong>ctions on the screen to select a<br />
destination folder other than the default folder,<br />
or click Next to continue with the default<br />
destination folder.<br />
7. The Shared Folders screen will appear. Select the<br />
folder where audio plugins and utilities will be<br />
installed and then click Next.<br />
6. The Select Start Menu Folder screen will appear.<br />
Select the folder where the program’s shortcuts<br />
will be installed and then click Next.<br />
8. The Select Additional Tasks screen will appear.<br />
Click the box to create a desktop icon, if desired.<br />
Then click Next.<br />
21
INSTALLING TDK LIFE ON RECORD VINYL RECORDER – WINDOWS (CONT.)<br />
9. The Ready to Install screen will appear.<br />
Click Install to proceed with the installation.<br />
11. The Complete Registration screen will appear<br />
next. Follow the inst<strong>ru</strong>ctions to register your copy<br />
of the Vinyl Recorder software<br />
10. The Completing the Vinyl Recorder Setup<br />
Wizard screen will then appear. Click Finish<br />
to launch the program.<br />
NOTES:<br />
• The installation process for Windows Vista and XP<br />
is very similar to that of Windows 7, which has<br />
been described here. After inserting the CD ROM,<br />
follow the respective on-screen inst<strong>ru</strong>ctions in the<br />
Setup Wizard for these installations.<br />
• If for any reason you are re-installing the Vinyl<br />
Recorder Software, please remove the existing<br />
installation through the Windows control panel<br />
application for removing software before you<br />
install again. This will minimize the possibility of<br />
errors occurring during the re-installation.<br />
22
USING TDK LIFE ON RECORD VINYL RECORDER – WINDOWS<br />
After completing the installation process, the<br />
program will automatically launch and the TDK Life<br />
on Record Vinyl Recorder welcome screen appears.<br />
This screen contains links to helpful tutorials about the<br />
operation of the software. It will appear every time<br />
you open the program unless you deselect the Show<br />
at Startup? box at the bottom left of the window.<br />
With the turntable connected to your computer,<br />
launch the software (if not already open) by doubleclicking<br />
on the Vinyl Recorder icon on your desktop.<br />
The Vinyl Recorder toolbar will appear. The buttons<br />
on this toolbar open windows that contain the<br />
controls for operation of the software. The following<br />
pages provide more detailed operating inst<strong>ru</strong>ctions.<br />
23
USING TDK LIFE ON RECORD VINYL RECORDER – WINDOWS (CONT.)<br />
First click on the Options button. This will bring up<br />
the Audio Options window, which contains the<br />
recording settings. Within the General tab, you can<br />
select the desired Playback Device, Recording<br />
Device, Bit Depth, Sample Rate and <strong>Drive</strong>r Mode.<br />
The recommended settings are Bit Depth: 16, Sample<br />
Rate: 44100 and <strong>Drive</strong>r Mode: MME (32 Bit). Then<br />
click OK.<br />
The Recorder Module<br />
To make a recording, use the turntable according to<br />
the inst<strong>ru</strong>ctions beginning on page 15. Click on the<br />
Recorder button; the Recorder window will appear.<br />
Or, if no changes are necessary, simply click OK<br />
to accept the default settings. For more detailed<br />
explanations, click on the Help button within the<br />
Audio Options window.<br />
This manual provides a brief summary of the recording<br />
process using the Vinyl Recorder software. For more<br />
detailed explanations, click on the Help button within<br />
the Recorder window. To utilize all the effects and<br />
features of this software, download the complete<br />
user’s manual at http://www.cakewalk.com.<br />
24
USING TDK LIFE ON RECORD VINYL RECORDER – WINDOWS (CONT.)<br />
The Recorder Transport buttons are shown below.<br />
2. If desired, click the Input Monitor button. This will<br />
output the sound as it is recording.<br />
1. Input Monitor 5. Stop<br />
2. Rewind (to beginning) 6. Play<br />
3. Record 7. Jump to end<br />
4. Pause<br />
To Record an Audio File:<br />
1. Click the Record button and the Pause function will<br />
automatically engage.<br />
3. Click the Pause button to start recording. Start<br />
playback of the record; the meters on the right will<br />
start showing activity and the waveform will begin.<br />
25
USING TDK LIFE ON RECORD VINYL RECORDER – WINDOWS (CONT.)<br />
4. When the first side of the record has ended, click<br />
the Pause button, flip the record over and start<br />
playback; then click the Pause button again to<br />
continue recording.<br />
6. Click the Rewind button to go back<br />
to the beginning of the recording.<br />
5. When the second side of the record has<br />
ended, click the Stop button. You will now<br />
have two separate recordings, one for each<br />
side of the record.<br />
7. Click the Play button to playback the recording.<br />
Follow the inst<strong>ru</strong>ctions in the next section to save<br />
your audio files.<br />
26
USING TDK LIFE ON RECORD VINYL RECORDER – WINDOWS (CONT.)<br />
To Save an Audio File:<br />
1. Using the pull-down menu bar at the top of<br />
the Recorder window, go to File>Save As. Then<br />
choose the format (WAV, MP3, WMA or Project)<br />
in which you want to save the file.<br />
NOTE: Project is not an audio file. This option allows<br />
you to save the file so that you can open it again<br />
later in the Recorder module and do more editing<br />
if you desire.<br />
3. Click the Save button.<br />
Repeat these steps for each file you want to save.<br />
The Encoder Module<br />
This module allows you to encode MP3 files. Click on<br />
the Encoder button on the Vinyl Recorder toolbar.<br />
The Encoder window will appear. Click on the Preset<br />
icon as shown below.<br />
2. Select the destination and name the file. Make<br />
sure the Channel Format is set to Stereo, the<br />
Sample Rate is 44100 and the Bit Depth is 16.<br />
27
USING TDK LIFE ON RECORD VINYL RECORDER – WINDOWS (CONT.)<br />
When the Encoder Options window appears, select<br />
the desired settings and click OK. Then drag an<br />
audio file onto the target in the Encoder window.<br />
The file will be automatically converted to the format<br />
that is configured for that target.<br />
For the target configuration procedure and more<br />
The Tagger Module<br />
Click on the Tagger button on the Vinyl Recorder<br />
toolbar. The Tagger window will appear.<br />
detailed explanations, click on the Help button within<br />
the Encoder window.<br />
NOTE: After the 30-day trial period, you will no longer<br />
be able to encode MP3 files unless you upgrade to<br />
the full version of the Encoder module. If you already<br />
have an MP3 encoder installed on the computer<br />
from another software application, this software will<br />
utilize that encoder.<br />
With this module, you can add information tags<br />
(Title, Artist, Album, Genre, etc.) to the files that you<br />
record. After you enter the desired information in the<br />
appropriate fields, click the WRITE TAGS button. Now<br />
the information will be embedded in the files.<br />
For more detailed explanations, click on the Help<br />
button within the Tagger window.<br />
28
USING TDK LIFE ON RECORD VINYL RECORDER – WINDOWS (CONT.)<br />
The Burner Module<br />
Click on the Burner button on the Vinyl Recorder<br />
toolbar. The Burner window will appear. This module<br />
allows you to burn your recordings onto audio CDs.<br />
To Burn an Audio File to CD:<br />
1. Insert a blank CD into your computer’s disc drive.<br />
2. Click on the Audio CD tab in the Burner window.<br />
3. Click ADD to select the desired audio files.<br />
4. Select the desired disc drive.<br />
5. Click BURN DISC to complete the process.<br />
For more detailed explanations, click on the Help<br />
button within the Burner window.<br />
29
Many issues can be resolved by the following:<br />
• unplugging and re-plugging in the turntable<br />
• downloading the latest software<br />
• restarting the computer<br />
TROUBLESHOOTING GUIDE<br />
For detailed troubleshooting of the TDK Life on Record Vinyl Recorder software, please refer to its manual.<br />
You can download the complete user’s manual at http://www.cakewalk.com.<br />
<strong>Turntable</strong> does not operate.<br />
1. Make sure the AC cord is plugged into an AC outlet<br />
and that the AC outlet is “live.” Also make sure that<br />
the DC plug is attached to the turntable.<br />
2. Check the drive belt to make certain it is on<br />
correctly (see page 9).<br />
3. Make sure the 33/OFF/45 control is set to either<br />
33 or 45.<br />
<strong>Turntable</strong> operates, but no sound is heard.<br />
1. The stylus guard is still in place.<br />
2. The Cue Lever is raised.<br />
3. If connected to a Home Stereo, Amp, etc, it is<br />
possible that the external unit’s controls are set<br />
incorrectly, i.e., tape monitor on, speakers switched<br />
off, etc.<br />
4. Check the stylus on phono cartridge for correct<br />
placement. If not positioned correctly, see page 18.<br />
<strong>Turntable</strong> operates, but sound is very low.<br />
1. Either make sure the turnable is connected to<br />
powered (AUX) jacks or set the PRE-AMP switch<br />
to the ON position.<br />
(See page 12 for the Warning regarding the PRE-<br />
AMP switch.)<br />
2. The volume of the external device this turntable<br />
is connected to is not set high enough.<br />
3. The stylus is broken or missing.<br />
30
TROUBLESHOOTING GUIDE (CONTINUED)<br />
Sound is very distorted.<br />
The turntable may be connected to an amplifier’s<br />
PHONO input: If the PRE-AMP switch is set to the ON<br />
position, a phono input will be overloaded.<br />
Record/Tone Arm moves slightly or skips.<br />
1. Slight movement is a normal condition and not<br />
usually a problem. If this causes skipping, make sure<br />
the turntable is level and adjust the counterweight<br />
and the anti-skating as per page 10.<br />
2. Make sure the turntable is not picking up vibrations<br />
from the floor or walls, or from direct speaker sound.<br />
Record is playing too fast or too slow.<br />
The 33/OFF/45 control is set incorrectly; make sure it is<br />
set to the corresponding speed.<br />
MAINTENANCE<br />
• Clean the stylus tip frequently with a soft b<strong>ru</strong>sh in a back to front motion only. If using Stylus fluid, use it<br />
very sparingly.<br />
• When not in use, it is recommended to keep the dust cover on the unit.<br />
• Wipe the dust cover and turntable housing gently with a soft cloth. A small amount of mild detergent<br />
may be used to clean the dust cover and turntable base only. NEVER use harsh chemicals or solvents<br />
to clean.<br />
• When moving the turntable, secure the Tone Arm to the Tone Arm Rest with a twist tie and put the dust<br />
cover on. If you are moving the turntable a long distance, please re-use the original packing material<br />
and place the components of the turntable in their original locations.<br />
31
SPECIFICATIONS<br />
Dimensions..............................................................................................4.5 (H) x 15 (W) x 17.9 (L) inches<br />
Weight.............................................................................................................................................. 14.3 lbs<br />
Power Supply..................................................................................... DC 12V Adapter (Center Positive)<br />
Power Consumption....................................................................................................................... 5 Watts<br />
Supported Systems............................................................................... Windows 7/Vista/XP, Mac 10.4+<br />
Type..............................................................................................................................<strong>Belt</strong> <strong>Drive</strong> <strong>Turntable</strong><br />
Motor........................................................................................................................ DC, Servo Controlled<br />
Wow & Flutter.........................................................................................................Less than 0.25% (WTD)<br />
Signal to Noise Ratio........................................................................................................ More than 50dB<br />
Output Level (PRE-AMP set to ON)................................................................................................ 200mV<br />
Output Level (PRE-AMP set to OFF)................................................................................................... 3mV<br />
Pre-Amp Gain..................................................................................................................................... 36dB<br />
Replacement Stylus..................................................................................................................... MG-2801<br />
Cartridge Type............................................................................................ Moving Magnetic Cartridge<br />
Speeds......................................................................................................................... 33-1/3 and 45 RPM<br />
USB........................................................................................................................................ B Type USB 2.0<br />
32
CONTACT INFORMATION<br />
FOR ADDITIONAL SET-UP OR OPERATING ASSISTANCE<br />
PLEASE VISIT OUR WEBSITE AT:<br />
TDKPERFORMANCE.COM<br />
FOR CONSUMER REPLACEABLE PART(S), CONTACT OUR PARTS<br />
AND ACCESSORIES FULFILLMENT CENTER AT: 1-800-379-8439.<br />
Imation Enterprises Corp.<br />
1 Imation Way, Oakdale, MN 55128-3414 USA<br />
The TDK Life on Record logo is a trademark of TDK Corporation<br />
and is used under license from TDK Corporation.<br />
34
Imation Enterprises Corp.<br />
1 Imation Way, Oakdale, MN 55128-3414 USA<br />
The TDK Life on Record logo is a trademark<br />
of TDK Corporation used under license.<br />
TVT1001BLK | TVT2002BLK<br />
63952289-B