
You also want an ePaper? Increase the reach of your titles
YUMPU automatically turns print PDFs into web optimized ePapers that Google loves.
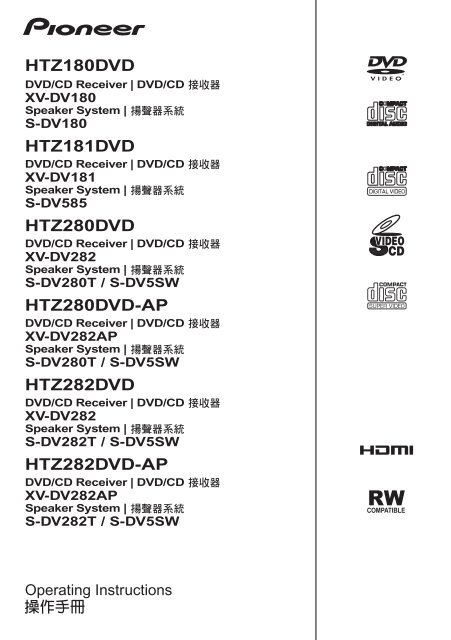
HTZ180DVD<br />
DVD/CD Receiver | DVD/CD<br />
XV-DV180<br />
Speaker System |<br />
S-DV180<br />
HTZ181DVD<br />
DVD/CD Receiver | DVD/CD<br />
XV-DV181<br />
Speaker System |<br />
S-DV585<br />
<strong>HTZ280DVD</strong><br />
DVD/CD Receiver | DVD/CD<br />
XV-DV282<br />
Speaker System |<br />
S-DV280T / S-DV5SW<br />
<strong>HTZ280DVD</strong>-<strong>AP</strong><br />
DVD/CD Receiver | DVD/CD<br />
XV-DV282<strong>AP</strong><br />
Speaker System |<br />
S-DV280T / S-DV5SW<br />
HTZ282DVD<br />
DVD/CD Receiver | DVD/CD<br />
XV-DV282<br />
Speaker System |<br />
S-DV282T / S-DV5SW<br />
HTZ282DVD-<strong>AP</strong><br />
DVD/CD Receiver | DVD/CD<br />
XV-DV282<strong>AP</strong><br />
Speaker System |<br />
S-DV282T / S-DV5SW<br />
Operating Instructions
IMPORTANT<br />
CAUTION<br />
RISK OF ELECTRIC SHOCK<br />
DO NOT OPEN<br />
The lightning flash with arrowhead symbol,<br />
within an equilateral triangle, is intended to<br />
alert the user to the presence of uninsulated<br />
“dangerous voltage” within the product’s<br />
enclosure that may be of sufficient<br />
magnitude to constitute a risk of electric<br />
shock to persons.<br />
CAUTION:<br />
TO PREVENT THE RISK OF ELECTRIC<br />
SHOCK, DO NOT REMOVE COVER (OR<br />
BACK). NO USER-SERVICEABLE PARTS<br />
INSIDE. REFER SERVICING TO QUALIFIED<br />
SERVICE PERSONNEL.<br />
The exclamation point within an equilateral<br />
triangle is intended to alert the user to the<br />
presence of important operating and<br />
maintenance (servicing) instructions in the<br />
literature accompanying the appliance.<br />
D3-4-2-1-1_A1_En<br />
<br />
<br />
<br />
<br />
<br />
<br />
<br />
<br />
<br />
<br />
<br />
<br />
<br />
<br />
<br />
WARNING<br />
To prevent a fire hazard, do not place any naked<br />
flame sources (such as a lighted candle) on the<br />
equipment.<br />
D3-4-2-1-7a_A_En<br />
VENTILATION CAUTION<br />
When installing this unit, make sure to leave space<br />
around the unit for ventilation to improve heat<br />
radiation (at least 10 cm at top, 10 cm at rear, and<br />
10 cm at each side).<br />
WARNING<br />
Slots and openings in the cabinet are provided for<br />
ventilation to ensure reliable operation of the<br />
product, and to protect it from overheating. To<br />
prevent fire hazard, the openings should never be<br />
blocked or covered with items (such as newspapers,<br />
table-cloths, curtains) or by operating the<br />
equipment on thick carpet or a bed. D3-4-2-1-7b_A_En<br />
CAUTION<br />
The STANDBY/ON switch on this unit will not<br />
completely shut off all power from the AC outlet.<br />
Since the power cord serves as the main disconnect<br />
device for the unit, you will need to unplug it from<br />
the AC outlet to shut down all power. Therefore,<br />
make sure the unit has been installed so that the<br />
power cord can be easily unplugged from the AC<br />
outlet in case of an accident. To avoid fire hazard,<br />
the power cord should also be unplugged from the<br />
AC outlet when left unused for a long period of time<br />
(for example, when on vacation).<br />
D3-4-2-2-2a_A_En
CAUTION<br />
This product is a class 1 laser product, but this<br />
product contains a laser diode higher than Class 1.<br />
To ensure continued safety, do not remove any covers<br />
or attempt to gain access to the inside of the product.<br />
Refer all servicing to qualified personnel.<br />
The following caution label appears on your unit.<br />
Location: top of the unit<br />
CLASS 1<br />
LASER PRODUCT<br />
D3-4-2-1-8*_C_En<br />
POWER-CORD CAUTION<br />
Handle the power cord by the plug. Do not pull out the<br />
plug by tugging the cord and never touch the power<br />
cord when your hands are wet as this could cause a<br />
short circuit or electric shock. Do not place the unit, a<br />
piece of furniture, etc., on the power cord, or pinch the<br />
cord. Never make a knot in the cord or tie it with other<br />
cords. The power cords should be routed such that they<br />
are not likely to be stepped on. A damaged power cord<br />
can cause a fire or give you an electrical shock. Check<br />
the power cord once in a while. When you find it<br />
damaged, ask your nearest PIONEER authorized<br />
service center or your dealer for a replacement. S002*_En<br />
<br />
<br />
<br />
<br />
<br />
<br />
<br />
Operating Environment<br />
Operating environment temperature and humidity:<br />
+5 °C to +35 °C (+41 °F to +95 °F); less than 85 %RH<br />
(cooling vents not blocked)<br />
Do not install this unit in a poorly ventilated area, or in<br />
locations exposed to high humidity or direct sunlight (or<br />
strong artificial light)<br />
D3-4-2-1-7c*_A1_En<br />
If the AC plug of this unit does not match the AC<br />
outlet you want to use, the plug must be removed<br />
and appropriate one fitted. Replacement and<br />
mounting of an AC plug on the power supply cord of<br />
this unit should be performed only by qualified<br />
service personnel. If connected to an AC outlet, the<br />
cut-off plug can cause severe electrical shock. Make<br />
sure it is properly disposed of after removal.<br />
The equipment should be disconnected by removing<br />
the mains plug from the wall socket when left unused<br />
for a long period of time (for example, when on<br />
vacation).<br />
D3-4-2-2-1a_A1_En
Thank you for buying this Pioneer product.<br />
Please read through these operating instructions so that you will know how to operate your model<br />
properly. After you have finished reading the instructions, put them in a safe place for future reference.<br />
Contents<br />
01 Speaker Setup Guide<br />
Home theater sound setup . . . . . . . . . . . . . . . 6<br />
5 spot/4 spot speaker layout . . . . . . . . . . . . . 6<br />
3 spot/2 spot speaker layout . . . . . . . . . . . . . 6<br />
Preparing the speakers. . . . . . . . . . . . . . . . . . 6<br />
Preparation common to all models . . . . . . . 6<br />
Preparation for the <strong>HTZ280DVD</strong>/<br />
<strong>HTZ280DVD</strong>-<strong>AP</strong>/HTZ282DVD/<br />
HTZ282DVD-<strong>AP</strong> . . . . . . . . . . . . . . . . . . . . . . 6<br />
Preparation only for the HTZ181DVD . . . . . . 7<br />
Wall mounting the speakers . . . . . . . . . . . . . . 7<br />
Before mounting . . . . . . . . . . . . . . . . . . . . . 7<br />
Attaching the brackets only for the HTZ180/<br />
181DVD . . . . . . . . . . . . . . . . . . . . . . . . . . . . 8<br />
Additional notes on speaker placement . . . . . 8<br />
02 Connecting up<br />
Basic connections . . . . . . . . . . . . . . . . . . . . . 9<br />
03 Controls and displays<br />
Front panel . . . . . . . . . . . . . . . . . . . . . . . . . . 13<br />
Display . . . . . . . . . . . . . . . . . . . . . . . . . . . . . 13<br />
Remote control . . . . . . . . . . . . . . . . . . . . . . . 14<br />
Putting the batteries in the remote<br />
control . . . . . . . . . . . . . . . . . . . . . . . . . . . . 15<br />
Using the remote control . . . . . . . . . . . . . . 16<br />
04 Getting started<br />
Setting Speaker Layout . . . . . . . . . . . . . . . . . 17<br />
Setting the channel levels . . . . . . . . . . . . . 17<br />
Using the on-screen displays . . . . . . . . . . . . 18<br />
Playing discs . . . . . . . . . . . . . . . . . . . . . . . . 18<br />
Basic playback controls . . . . . . . . . . . . . . . 19<br />
Resume and Last Memory . . . . . . . . . . . . . 19<br />
DVD-Video disc menus. . . . . . . . . . . . . . . . 19<br />
Video CD/Super VCD PBC menus . . . . . . . 19<br />
Listening to the radio . . . . . . . . . . . . . . . . . . 20<br />
Improving poor FM reception . . . . . . . . . . . 20<br />
Reducing AM reception noise . . . . . . . . . . 20<br />
Memorizing stations. . . . . . . . . . . . . . . . . . 20<br />
Listening to station presets . . . . . . . . . . . . 21<br />
Listening to other sources . . . . . . . . . . . . . . 21<br />
Setting the sleep timer . . . . . . . . . . . . . . . . . 21<br />
05 Listening to your system<br />
Selecting Listening mode . . . . . . . . . . . . . . . 22<br />
Auto listening mode . . . . . . . . . . . . . . . . . . . 22<br />
Listening in surround sound . . . . . . . . . . . . . 22<br />
Using Front Surround . . . . . . . . . . . . . . . . . . 23<br />
Listening in stereo. . . . . . . . . . . . . . . . . . . . . 23<br />
Listening with headphones . . . . . . . . . . . . . . 23<br />
Adjusting the bass and treble . . . . . . . . . . . . 23<br />
Using the SFC modes . . . . . . . . . . . . . . . . . . 23<br />
Boosting the bass level . . . . . . . . . . . . . . . . . 24<br />
Using the MP3 Expander. . . . . . . . . . . . . . . . 24<br />
Using the Voice Enhancer mode . . . . . . . . . . 24<br />
Effective Sound (for optimum sound) . . . . . . 24<br />
06 Disc playback features<br />
Scanning discs . . . . . . . . . . . . . . . . . . . . . . . 25<br />
Playing in slow motion . . . . . . . . . . . . . . . . . 25<br />
Frame advance/frame reverse . . . . . . . . . . . . 25<br />
Playing a JPEG slideshow . . . . . . . . . . . . . . . 25<br />
Browsing DVD or Video CD/Super VCD discs<br />
with the Disc Navigator . . . . . . . . . . . . . . . . . 26<br />
Browsing Windows Media TM Audio (WMA),<br />
MP3, MPEG-4 AAC, DivX video/WMV and<br />
JPEG files with the Disc Navigator . . . . . . . . 27<br />
Using Playlists. . . . . . . . . . . . . . . . . . . . . . . . 27<br />
Programming playlists . . . . . . . . . . . . . . . . 27<br />
Listening to playlists . . . . . . . . . . . . . . . . . . 28<br />
Clearing files from a playlist . . . . . . . . . . . . 28<br />
Looping a section of a disc . . . . . . . . . . . . . . 28<br />
Using repeat play . . . . . . . . . . . . . . . . . . . . . 28<br />
Using random play . . . . . . . . . . . . . . . . . . . . 28<br />
Creating a program list . . . . . . . . . . . . . . . . . 29<br />
Other functions available from the program<br />
menu . . . . . . . . . . . . . . . . . . . . . . . . . . . . . 29<br />
Searching a disc . . . . . . . . . . . . . . . . . . . . . . 29<br />
Switching subtitles . . . . . . . . . . . . . . . . . . . . 30<br />
Switching language/audio channels . . . . . . . 30<br />
Zooming the screen . . . . . . . . . . . . . . . . . . . 30<br />
Switching camera angles . . . . . . . . . . . . . . . 30<br />
Displaying disc information. . . . . . . . . . . . . . 30<br />
4<br />
En
07 USB playback and Recording<br />
Using the USB interface . . . . . . . . . . . . . . . . 31<br />
Recording the tracks of a music CD on<br />
a USB device. . . . . . . . . . . . . . . . . . . . . . . . . 31<br />
Recording all the tracks . . . . . . . . . . . . . . . 31<br />
Recording specific tracks . . . . . . . . . . . . . . 32<br />
08 Singing karaoke<br />
Singing karaoke . . . . . . . . . . . . . . . . . . . . . . 33<br />
Changing the vocal mix . . . . . . . . . . . . . . . 33<br />
Changing the backing track . . . . . . . . . . . . 33<br />
09 Audio Settings and Video Adjust<br />
menus<br />
Audio Settings menu. . . . . . . . . . . . . . . . . . . 34<br />
Audio DRC . . . . . . . . . . . . . . . . . . . . . . . . . 34<br />
Video Adjust menu . . . . . . . . . . . . . . . . . . . . 34<br />
10 Initial Settings menu<br />
Using the Initial Settings menu . . . . . . . . . . . 35<br />
Video Output settings . . . . . . . . . . . . . . . . . . 35<br />
Language settings. . . . . . . . . . . . . . . . . . . . . 36<br />
Display settings. . . . . . . . . . . . . . . . . . . . . . . 37<br />
Options settings . . . . . . . . . . . . . . . . . . . . . . 37<br />
Speakers settings . . . . . . . . . . . . . . . . . . . . . 37<br />
Parental Lock . . . . . . . . . . . . . . . . . . . . . . . 37<br />
About DivX ® VOD content . . . . . . . . . . . . . 38<br />
Speaker Distance . . . . . . . . . . . . . . . . . . . . 39<br />
11 Other connections<br />
Connecting auxiliary audio components . . . . 40<br />
Connecting using the component video<br />
output . . . . . . . . . . . . . . . . . . . . . . . . . . . . . . 41<br />
About progressive scan video . . . . . . . . . . . 41<br />
Connecting using HDMI . . . . . . . . . . . . . . . . 41<br />
Switching the HDMI audio setting . . . . . . . 41<br />
Resetting the HDMI connection . . . . . . . . . 42<br />
About HDMI . . . . . . . . . . . . . . . . . . . . . . . . 42<br />
Connecting external antennas. . . . . . . . . . . . 42<br />
Bluetooth ® AD<strong>AP</strong>TER for Wireless Enjoyment<br />
of Music . . . . . . . . . . . . . . . . . . . . . . . . . . . . 42<br />
Wireless music play . . . . . . . . . . . . . . . . . . 42<br />
Remote control operation . . . . . . . . . . . . . . 43<br />
Connecting Optional Bluetooth<br />
AD<strong>AP</strong>TER . . . . . . . . . . . . . . . . . . . . . . . . . . 43<br />
Pairing Bluetooth AD<strong>AP</strong>TER and Bluetooth<br />
wireless technology device . . . . . . . . . . . . . 43<br />
Listening to Music Contents of Bluetooth<br />
wireless technology device with<br />
Your System . . . . . . . . . . . . . . . . . . . . . . . . 44<br />
Clearing Pairing . . . . . . . . . . . . . . . . . . . . . 44<br />
12 KURO LINK<br />
Making the KURO LINK connections. . . . . . . 45<br />
KURO LINK Setup . . . . . . . . . . . . . . . . . . . . . 45<br />
Setting the KURO LINK mode . . . . . . . . . . . 45<br />
Before using synchronization . . . . . . . . . . . . 46<br />
Synchronized amp mode . . . . . . . . . . . . . . . . 46<br />
Synchronized amp mode operations . . . . . . 46<br />
Canceling synchronized amp mode . . . . . . 46<br />
13 Additional information<br />
Disc/content format playback<br />
compatibility . . . . . . . . . . . . . . . . . . . . . . . . . 47<br />
Disc compatibility table. . . . . . . . . . . . . . . . 47<br />
About DVD+R/DVD+RW compatibility. . . . 48<br />
About DivX . . . . . . . . . . . . . . . . . . . . . . . . . 48<br />
About WMV. . . . . . . . . . . . . . . . . . . . . . . . . 49<br />
About MPEG-4 AAC. . . . . . . . . . . . . . . . . . . 49<br />
About WMA . . . . . . . . . . . . . . . . . . . . . . . . 49<br />
Using and taking care of discs. . . . . . . . . . . . 49<br />
DVD Video regions . . . . . . . . . . . . . . . . . . . 50<br />
Installation and maintenance . . . . . . . . . . . . 50<br />
Hints on installation . . . . . . . . . . . . . . . . . . 50<br />
Cleaning the pickup lens. . . . . . . . . . . . . . . 50<br />
Problems with condensation. . . . . . . . . . . . 50<br />
Moving the system unit . . . . . . . . . . . . . . . . 50<br />
Screen sizes and disc formats . . . . . . . . . . . . 51<br />
Widescreen TV users. . . . . . . . . . . . . . . . . . 51<br />
Standard TV users . . . . . . . . . . . . . . . . . . . . 51<br />
TV system setting. . . . . . . . . . . . . . . . . . . . . . 51<br />
Frequency step setting. . . . . . . . . . . . . . . . . . 52<br />
Dimming the Display . . . . . . . . . . . . . . . . . . . 52<br />
Setting the Key Lock . . . . . . . . . . . . . . . . . . . 52<br />
Troubleshooting. . . . . . . . . . . . . . . . . . . . . . . 53<br />
General . . . . . . . . . . . . . . . . . . . . . . . . . . . . 53<br />
DVD/CD/Video CD player. . . . . . . . . . . . . . . 54<br />
Tuner. . . . . . . . . . . . . . . . . . . . . . . . . . . . . . 55<br />
USB connection . . . . . . . . . . . . . . . . . . . . . 55<br />
HDMI connection . . . . . . . . . . . . . . . . . . . . 55<br />
Bluetooth connection . . . . . . . . . . . . . . . . . 56<br />
Error Messages . . . . . . . . . . . . . . . . . . . . . . 56<br />
Resetting the system . . . . . . . . . . . . . . . . . . . 57<br />
Using the language code list . . . . . . . . . . . . . 57<br />
Language code list. . . . . . . . . . . . . . . . . . . . . 58<br />
Country/Area code list . . . . . . . . . . . . . . . . . . 58<br />
Specifications . . . . . . . . . . . . . . . . . . . . . . . . 59<br />
English Français<br />
Deutsch Nederlands<br />
Italiano Español<br />
5<br />
En
01<br />
Speaker Setup Guide<br />
Chapter 1<br />
Speaker Setup Guide<br />
6<br />
En<br />
Home theater sound setup<br />
Depending on the size and characteristics of<br />
your room, you can place your speakers in one<br />
of two ways using this system. For the speaker<br />
configuration, see the Setup Guide.<br />
5 spot/4 spot speaker layout<br />
This is a standard multichannel surround<br />
sound speaker setup for optimal 5.1 channel<br />
home theater sound.<br />
3 spot/2 spot speaker layout<br />
This setup is ideal when rear surround speaker<br />
placement isn’t possible or you want to avoid<br />
running long speaker cables in your listening<br />
area.<br />
Preparing the speakers<br />
Preparation common to all models<br />
Attaching non-skid pads<br />
• Attach the smaller non-skid pads to the<br />
base of each of the speakers. The four large<br />
non-skid pads are for the subwoofer.<br />
Use the supplied adhesive to attach 3 or 4 pads to<br />
the base (flat surface) of each speaker.<br />
Preparation for the <strong>HTZ280DVD</strong>/<br />
<strong>HTZ280DVD</strong>-<strong>AP</strong>/HTZ282DVD/<br />
HTZ282DVD-<strong>AP</strong><br />
The layouts of the 5-spot speaker and 3-spot<br />
speaker are the same:<br />
Assembling the speaker stands<br />
• Attach the speaker stand bases to the<br />
stems using the screws provided.<br />
Once you have aligned the stem and base,<br />
secure with the small screws at the points see<br />
the Setup Guide. Note that the speaker should<br />
face in the direction of the base of the isosceles<br />
triangle.<br />
CAUTION<br />
• Be careful not to tighten screws<br />
excessively.<br />
• If excessive force is used to tighten screws,<br />
the threads of screw and/or nut may be<br />
damaged. Use a middle-sized manual<br />
screwdriver during assembly.<br />
• Do not use power screwdrivers or oversized<br />
screwdrivers that may exert excessive force<br />
on the screws and nuts.<br />
• Confirm that no foreign matter is stuck to<br />
the stand base or the tall speaker during<br />
assembly.<br />
• If the unit is assembled with foreign matter<br />
stuck between the stand base and the tall<br />
speaker the unit may not be assembled<br />
securely, resulting in tipping or falling.<br />
• Do not stand on the speaker stand base of<br />
the tall speaker to push or swing the<br />
speaker. The speaker may fall and break, or<br />
someone may be injured. Pay special<br />
attention to children.<br />
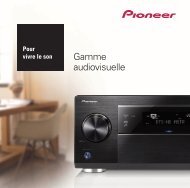
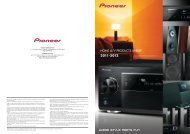
Securing your front and surround<br />
speakers<br />
• Secure each of the front and surround<br />
speakers using the plastic catch provided.<br />
Screw two supporting hooks into the wall behind<br />
the speaker. Pass a thick cord around the hooks<br />
and through the plastic catch so that the speaker<br />
is stabilized (make sure to test that it supports the<br />
weight of the speaker). After installing, make sure<br />
the speaker is securely fixed.<br />
Sufficiently thick<br />
cord<br />
Plastic catch
Speaker Setup Guide 01<br />
CAUTION<br />
• The plastic catch is not a mounting fixture,<br />
and the speaker should not be hung<br />
directly from the wall using this catch.<br />
Always use a cord when stabilizing the<br />
speaker.<br />
• Pioneer disclaims all responsibility for any<br />
losses or damage resulting from improper<br />
assembly, installation, insufficient<br />
strength of the installation materials,<br />
misuse, or natural disasters.<br />
• When placing this unit, ensure that it is<br />
firmly secured and avoid areas where it<br />
may be likely to fall and cause injury in the<br />
event of a natural disaster (such as an<br />
earthquake).<br />
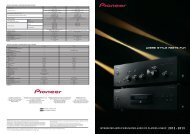
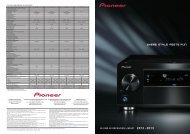
Preparation only for the HTZ181DVD<br />
Stack the speakers and fix the brackets<br />
Each speaker is provided with a color-coded<br />
indicator on the model label on the rear side to<br />
assist identification. Refer to the color<br />
indicators and install the speakers correctly.<br />
As shown in the illustration, stack the<br />
speakers. 1 Align the bracket with the<br />
respective upper and lower screw holes as<br />
shown in each figure below and fasten the<br />
screws securely.<br />
4 spot/3 spot speaker layout:<br />
4 spot:<br />
3 spot:<br />
Left<br />
Green Center speaker Green<br />
White Front speaker Red<br />
Model label<br />
Color indicator<br />
Bracket<br />
Screw<br />
Right<br />
Left<br />
Blue<br />
Surround<br />
speaker<br />
White Front speaker<br />
Front<br />
speaker<br />
Right<br />
Gray<br />
Red<br />
2 spot speaker layout:<br />
Model label<br />
Screw<br />
Color indicator<br />
Bracket<br />
Left<br />
Blue<br />
Green<br />
White<br />
Surround speaker<br />
Center speaker<br />
Front speaker<br />
Right<br />
Gray<br />
Green<br />
CAUTION<br />
• Do not attempt to carry the speakers when<br />
they are connected with the bracket. Doing<br />
so may cause damage to the bracket or<br />
worsen damage to the bracket and<br />
speakers in the event they are dropped.<br />
Wall mounting the speakers<br />
For the HTZ180DVD, the front and surround<br />
speaker have mounting brackets. For the<br />
HTZ181DVD, the front, center and surround<br />
speaker have mounting brackets. For the<br />
<strong>HTZ280DVD</strong>/280DVD-<strong>AP</strong>, the center and<br />
surround speaker have mounting holes. For<br />
the HTZ282DVD/HTZ282DVD-<strong>AP</strong>, only the<br />
center speaker has a mounting hole.<br />
Before mounting<br />
• Remember that the speaker system is<br />
heavy and that its weight could cause the<br />
screws to work loose, or the wall material to<br />
fail to support it, resulting in the speaker<br />
Red<br />
Surround<br />
speaker<br />
Center<br />
speaker<br />
Front<br />
speaker<br />
English Deutsch Français<br />
Italiano Nederlands<br />
Español<br />
Note<br />
1 When using the Front Surround mode, do not stack the surround speakers, but place them beside the front speaker and face<br />
them about 60 degrees outward from the front speaker to obtain the best sound effect.<br />
7<br />
En
01<br />
Speaker Setup Guide<br />
falling. Make sure that the wall you intend<br />
to mount the speakers on is strong enough<br />
to support them. Do not mount on plywood<br />
or soft surface walls.<br />
• Mounting screws are not supplied. Use<br />
screws suitable for the wall material and<br />
support the weight of the speaker.<br />
CAUTION<br />
• If you are unsure of the qualities and<br />
strength of the wall, consult a professional<br />
for advice.<br />
• Pioneer is not responsible for any<br />
accidents or damage that result from<br />
improper installation.<br />
Mounting screw<br />
(not supplied)<br />
5 mm to 7 mm<br />
Attaching the brackets only for the<br />
HTZ180/181DVD<br />
• Make sure to tighten the supplied screw as<br />
securely as possible when attaching the<br />
bracket to the back of the speaker.<br />
• Please do not attach the brackets to the<br />
center speaker.<br />
Bracket screw<br />
(supplied)<br />
5 mm<br />
10 mm<br />
• When using the 5 spot speaker layout,<br />
install the surround speakers slightly<br />
above ear level for optimum effect.<br />
Precautions:<br />
• When installing the center speaker on top<br />
of the TV, be sure to secure it with tape or<br />
some other suitable means. Otherwise, the<br />
speaker may fall from the TV due to<br />
external shocks such as earthquakes,<br />
endangering those nearby or damaging<br />
the speaker.<br />
• Make sure that all the bare speaker wire is<br />
twisted together and inserted fully into the<br />
speaker terminal. If any of the bare speaker<br />
wire touches the back panel it may cause<br />
the power to cut off as a safety measure.<br />
• The front, center and surround speakers<br />
supplied with this system are magnetically<br />
shielded. However, depending on the<br />
installation location, color distortion may<br />
occur if the speaker is installed extremely<br />
close to the screen of a television set. If this<br />
case happens, turn the power switch of the<br />
television set OFF, and turn it ON after<br />
15 min. to 30 min. If the problem persists,<br />
place the speaker system away from the<br />
television set.<br />
• The subwoofer is not magnetically shielded<br />
and so should not be placed near a TV or<br />
monitor. Magnetic storage media (such as<br />
floppy discs and tape or video cassettes)<br />
should also not be kept close to the<br />
subwoofer.<br />
• Do not attach the center speaker (only of<br />
the HTZ180DVD) the front (of the HTZ280/<br />
282DVD)/surround speaker (only of the<br />
HTZ282DVD) and subwoofer to a wall or<br />
ceiling. They may fall off and cause injury.<br />
• Do not place the surround speaker on the<br />
top of the front speaker, as it may injure<br />
someone in the event that it falls (only for<br />
the <strong>HTZ280DVD</strong>).<br />
8<br />
En<br />
Additional notes on speaker<br />
placement<br />
• Install the main front left and right<br />
speakers at an equal distance from the TV.
Connecting up 02<br />
Chapter 2<br />
Connecting up<br />
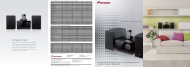
Basic connections<br />
For the best surround sound, setup your speakers as below. The front left and right speaker should<br />
be about 1.8 m to 2.7 m apart.<br />
The speakers in the illustration below are the HTZ180DVD.<br />
AC IN<br />
LINE 1<br />
Surround left<br />
(Blue)<br />
L<br />
R<br />
R SURROUND L<br />
ANALOG AUDIO IN SPEAKERS (4 Ω )<br />
Front left<br />
(White)<br />
Important<br />
• When connecting this system or changing<br />
connections, be sure to switch power off<br />
and disconnect the power cord from the<br />
wall socket.<br />
After completing all connections, connect<br />
the power cords to the wall socket.<br />
WARNING<br />
R FRONT L<br />
CENTER<br />
• Pioneer bears no responsibility for<br />
accidents resulting from faulty assembly or<br />
installation, insufficient mounting strength<br />
of walls, mounting fixtures (or other<br />
building fixtures), misuse or natural<br />
disasters.<br />
SUB<br />
WOOFER<br />
Center<br />
(Green)<br />
Listening position<br />
Front right<br />
(Red)<br />
COMPONENT<br />
VIDEO<br />
VIDEO(TV)<br />
Subwoofer<br />
(Purple)<br />
Surround right<br />
(Grey)<br />
VIDEO OUT<br />
PR<br />
PB<br />
Y<br />
A<br />
N<br />
TE<br />
N<br />
N<br />
A<br />
AM LOOP<br />
FM<br />
UNBAL 75 Ω<br />
HDMI OUT<br />
To video input<br />
TV<br />
FM antenna<br />
AM loop antenna<br />
1 Assemble the AM loop antenna.<br />
fig. a fig. b fig. c<br />
a. Bend the stand in the direction indicated by<br />
the arrow.<br />
b. Clip the loop onto the stand.<br />
c. If you want to fix to a wall or other surface,<br />
perform step b after first securing the<br />
stand with screws.<br />
It is recommended that you determine the<br />
reception strength before securing the<br />
stand with the screws.<br />
English Deutsch Français<br />
Italiano Nederlands<br />
Español<br />
9<br />
En
02<br />
Connecting up<br />
2 Connect the AM and FM antennas. 1<br />
a. Pull off the protective shields of both AM<br />
antenna wires. Connect one wire of the AM<br />
loop antenna to each AM antenna<br />
terminal. 2<br />
• Match the color-coded wire with the color<br />
indicator on the label, then insert the colorcoded<br />
wire into the red (+) side and the<br />
other wire into the black (–) side.<br />
Black (–) Red (+)<br />
Color-coded wire<br />
For each terminal, press down on the tab to<br />
open; insert the wire, then release to<br />
secure.<br />
3 1<br />
b. Push the FM antenna 3 plug onto the center<br />
pin of the FM antenna socket.<br />
3-1 Connect each speaker.<br />
• Connect the wires to the speaker.<br />
2<br />
HTZ180DVD only:<br />
When you select the 3 spot speaker layout,<br />
follow steps a through c below to set up the<br />
speakers.<br />
a. The base of each surround speaker fits<br />
into the circular groove on the top of the<br />
front speakers as shown.<br />
Color-coded wire<br />
(Connect to speaker)<br />
Color-coded connector<br />
(Connect to rear panel)<br />
• Twist and pull off the protective shields on<br />
each wire.<br />
10<br />
En<br />
Note<br />
1 • Keep antenna cables away from the receiver and other cables.<br />
• If reception with the supplied antenna is poor, see Improving poor FM reception on page 20 or Connecting external<br />
antennas on page 42.<br />
• Do not attach any antenna other than the provided loop antenna, or an external antenna as described on page 42.<br />
2 • Don’t let it come into contact with metal objects and avoid placing near computers, television sets or other electrical<br />
appliances.<br />
• If radio reception is poor, you may be able improve it by re-inserting each antenna wire into the opposite terminal.<br />
• For best reception, do not untwist the AM loop antenna wires or wrap them around the loop antenna.<br />
3 To ensure optimum reception, make sure the FM antenna is fully extended and not coiled or hanging at the rear of<br />
the unit.
Connecting up 02<br />
b. Secure the speaker wire.<br />
After testing for the slack necessary to turn the<br />
speaker (see the following step), use the groove<br />
provided to secure the speaker wire.<br />
c. Turn the speakers towards the closest<br />
wall, lining the arrows up for optimal Front<br />
Surround.<br />
For Front Surround mode, turn each surround<br />
speaker so that the arrow at the base is lined<br />
up with the (FRONT SURROUND) arrow on<br />
the front speaker. For Extra Power mode, have<br />
all the speakers facing forward. See the<br />
Listening to your system for more on using<br />
Front Surround and Extra Power modes.<br />
CAUTION<br />
• To prevent accidents, make sure the<br />
surround speaker is placed securely on top<br />
of the front speaker.<br />
• Please don’t attach the speakers to the wall<br />
or speaker stands for 3 spot speaker layout.<br />
HTZ181DVD only :<br />
a. When connecting the center speakers,<br />
connect the Y-cable dual end to the two<br />
center speakers in the same way.<br />
To Main Unit<br />
Y-cable<br />
When you select a 4-spot, 3-spot or 2-spot<br />
layout where the brackets are used for<br />
assembling, also follow step b below.<br />
b. When connections are completed, secure<br />
the speaker cables. Fix the cables to the<br />
groove in the brackets.<br />
3-2 Connect each speaker terminals on the<br />
receiver.<br />
• Connect the other end to the color-coded<br />
speaker terminals on the rear of the<br />
receiver. Make sure to insert completely.<br />
The small lug at the wire-end of the speaker<br />
plug should face up or down depending on<br />
whether it’s being plugged into one of the<br />
upper or lower speaker terminals. Please<br />
make sure to connect correctly.<br />
English Deutsch Français<br />
Italiano Nederlands<br />
Español<br />
Upper terminal<br />
Lower terminal<br />
11<br />
En
02<br />
Connecting up<br />
• Connect the power cord to AC inlet on the<br />
CAUTION<br />
receiver. Connect the power cord to a wall<br />
• These speaker terminals carry<br />
socket.<br />
HAZARDOUS LIVE voltage. To prevent<br />
the risk of electric shock when connecting<br />
or disconnecting the speaker cables,<br />
disconnect the power cord before touching<br />
any uninsulated parts.<br />
AC IN<br />
• Do not connect any speakers other than<br />
those supplied to this system.<br />
• Do not connect the supplied speakers to<br />
any amplifier other than the one supplied<br />
with this system. Connection to any other<br />
To AC outlet<br />
amplifier may result in malfunction or fire.<br />
• After connecting the plugs, pull lightly on<br />
the cables to make sure that the ends of<br />
the cables are securely connected to the<br />
terminals. Poor connections can create<br />
noise and interruptions on the sound.<br />
• If the cable’s wires happen to be pushed<br />
out of the terminals, allowing the wires to<br />
come into contact with each other, it<br />
places an excessive additional load on the<br />
amp. This may cause the amp to stop<br />
functioning, and may even damage the<br />
amp.<br />
4 Connect one end to a video input on your<br />
TV.<br />
• Use the supplied video cable.<br />
5 Connect the other end to the video<br />
output of the receiver.<br />
• This unit is equipped with copy protection<br />
technology. Do not connect this unit to<br />
your TV via a VCR using AV cables, as the<br />
picture from this unit will not appear<br />
properly on your TV.<br />
6 Connect the power cord. 1<br />
Note<br />
1 • Do not use any power cord other than the one supplied with this system.<br />
• Do not use the supplied power cord for any purpose other than connecting to this system.<br />
12<br />
En
USB<br />
MAIN MIC SUB<br />
PHONES<br />
Controls and displays 03<br />
Chapter 3<br />
Controls and displays<br />
Front panel<br />
1<br />
STANDBY/ON<br />
OPEN/CLOSE<br />
FUNCTION<br />
VOLUME<br />
1 STANDBY/ON (page 17, 32, 43, 50, 52<br />
and 54)<br />
2 OPEN/CLOSE (page 18, 32 and 53)<br />
3 Function<br />
4 <br />
5 <br />
6 VOLUME +/– (page 19)<br />
7 Disc tray (page 18)<br />
8 Remote Sensor (page 15)<br />
9 Display<br />
10 USB interface (page 31)<br />
11 MIC input jacks (page 33)<br />
12 PHONES jack (page 23)<br />
<br />
7 8 9<br />
USB<br />
2<br />
3 4 5 6<br />
MAIN<br />
<br />
MIC<br />
SUB<br />
PHONES<br />
10 11 12<br />
Display<br />
1 2 3 4<br />
PRGSVE SOUND<br />
DTS F.SURR.<br />
2D<br />
2PL<br />
1 Decord indicators (page 22)<br />
DTS lights during playback of a DTS source.<br />
2PL II lights during 2Dolby Pro Logic II<br />
decoding and 2D lights during playback of<br />
Dolby Digital sources.<br />
2 PRGSVE (page 41)<br />
Lights when progressive scan video signal is<br />
given from the component video output<br />
terminal.<br />
3 SOUND (page 23)<br />
Lights when the SFC modes, the tone controls<br />
(treble, bass or bass boost), MP3 Expander<br />
mode, Voice Enhancer mode are active.<br />
4 F.SURR. (page 23)<br />
Lights when the Extra Power mode/Front<br />
surround mode is selected.<br />
5 RPT and RPT-1 (page 28)<br />
RPT lights during repeat play. RPT-1 lights<br />
during repeat one-track play.<br />
6 PGM (page 27 and 29)<br />
Lights during program or playlist playback.<br />
7 Tuner indicators (page 20)<br />
Lights when a broadcast is being received,<br />
Lights when a stereo FM broadcast is<br />
being received, Lights when FM mono<br />
reception is selected.<br />
8 RDM (page 28)<br />
Lights during random play.<br />
6<br />
RPT -1<br />
kHz PGM<br />
MHz RDM<br />
12 11<br />
10<br />
9 8 7<br />
5<br />
English Français<br />
Deutsch Nederlands<br />
Italiano Español<br />
13<br />
En
03<br />
Controls and displays<br />
9 kHz/MHz (page 20)<br />
Indicates the frequency unit shown in the<br />
character display (kHz for AM, MHz for FM).<br />
10 Character display<br />
Remote control<br />
The illustration shows the HTZ280/282DVD-<strong>AP</strong>.<br />
11 (page 21)<br />
Lights when sleep timer is active.<br />
12 <br />
Lights during playback.<br />
1<br />
2<br />
STANDBY<br />
/ON<br />
1<br />
USB REC<br />
DVD/CD<br />
TUNER<br />
(FM/AM)<br />
AD<strong>AP</strong>TER PORT USB LINE<br />
2 3<br />
AUDIO SUBTITLE<br />
OPEN/CLOSE<br />
PLAYLIST<br />
1<br />
2<br />
11<br />
12<br />
3<br />
4 5 6<br />
ANGLE ZOOM<br />
7 8 9<br />
SLEEP<br />
CLEAR<br />
DISPLAY<br />
0<br />
3<br />
MIC VOL<br />
13<br />
4<br />
5<br />
TOP MENU<br />
SETUP<br />
PRESET<br />
TUNE<br />
ECHO<br />
ENTER<br />
MENU<br />
PRESET<br />
14<br />
6<br />
7<br />
HOME<br />
MENU<br />
AUTO/<br />
STEREO<br />
KARAOKE<br />
TUNE<br />
SURROUND SOUND<br />
RETURN<br />
MP3 EXP/<br />
V.ENH<br />
15<br />
8<br />
9<br />
10<br />
TV CONTROL<br />
INPUT CHANNEL VOLUME<br />
SHIFT<br />
VOLUME<br />
CLASS<br />
T.EDIT<br />
MUTE<br />
16<br />
17<br />
18<br />
Note<br />
1 Only the HTZ280/282DVD-<strong>AP</strong> models are equipped with the adapter port.<br />
1 STANDBY/ON (page 17, 32, 43, 50, 52<br />
and 54)<br />
2 Function select buttons 1<br />
3 Number buttons, CLEAR, DISPLAY, SLEEP<br />
and DVD controls<br />
CLEAR<br />
DISPLAY (page 30)<br />
SHIFT+SLEEP (page 21)<br />
SHIFT+USB REC (page 31)<br />
SHIFT+AUDIO (page 30)<br />
SHIFT+SUBTITLE (page 30)<br />
14<br />
En
Controls and displays 03<br />
SHIFT+ANGLE (page 30)<br />
SHIFT+ZOOM (page 30)<br />
4 TOP MENU (page 19 and 30)<br />
SHIFT+SETUP (page 17, 20, 41, 43, 44, 45,<br />
51, 52 and 57)<br />
5 SHIFT+KARAOKE (page 33)<br />
SHIFT+ECHO (page 33)<br />
SHIFT+ / SHIFT+ (page 33)<br />
Cursor buttons<br />
ENTER<br />
TUNE (page 20)<br />
PRESET (page 20)<br />
6 HOME MENU<br />
7 Sound controls<br />
AUTO/STEREO (page 22 and 23)<br />
SURROUND (page 22 and 23)<br />
SOUND (page 23 and 24)<br />
MP3 EXP/V.ENH (page 24)<br />
8 Playback controls (page 19 and 25)<br />
9 TV CONTROL buttons<br />
These control Pioneer flat screen TVs. 1<br />
10 SHIFT<br />
11 OPEN/CLOSE (page 18, 32 and 53)<br />
12 PLAYLIST buttons (page 27)<br />
13 MIC VOL +/– (page 33)<br />
14 MENU (page 19, 26 and 30)<br />
15 RETURN<br />
16 Tuner controls<br />
CLASS (page 21)<br />
SHIFT+T.EDIT (page 20)<br />
17 MUTE<br />
18 VOLUME +/– (page 18)<br />
Putting the batteries in the remote<br />
control<br />
1 Open the battery compartment cover<br />
on the back of the remote control.<br />
2 Insert two AA/R6 batteries into the<br />
battery compartment following the<br />
indications (, ) inside the compartment.<br />
3 Close the cover.<br />
CAUTION<br />
Incorrect use of batteries can result in hazards<br />
such as leakage and bursting. Please observe<br />
the following:<br />
• Always insert batteries into the battery<br />
compartment correctly matching the<br />
positive and negative polarities, as<br />
shown by the display inside the<br />
compartment.<br />
• Never mix new and used batteries.<br />
• Batteries of the same size may have<br />
different voltages, depending on brand. Do<br />
not mix different brands of batteries.<br />
• When disposing of used batteries, please<br />
comply with governmental regulations or<br />
environmental public instruction’s rules<br />
that apply in your country or area.<br />
Note<br />
1 Hold down the number button 1 for over three seconds with the CLEAR pressed. If the TV refuses to respond, hold down the<br />
number button 2. After control is properly switched over, the power to the TV can be operated by directing the TV CONTROL <br />
toward the TV and pressing it.<br />
English Français<br />
Deutsch Nederlands<br />
Italiano Español<br />
15<br />
En
03<br />
Controls and displays<br />
• In order to prevent battery leakage, remove<br />
the batteries when not using the remote<br />
control for an extended period (one month<br />
or more). If leakage occurs, carefully wipe<br />
away any battery fluid inside the<br />
compartment, and replace the batteries<br />
with new ones.<br />
• Do not allow books or other objects to rest<br />
on top of the remote control, since the<br />
buttons may be depressed, causing faster<br />
exhaustion of the batteries.<br />
• Do not use or store batteries in direct<br />
sunlight or excessively hot places, such as<br />
inside a car or near a heater. This can<br />
cause batteries to leak, overheat, explode<br />
or catch fire. It can also reduce the life or<br />
performance of batteries.<br />
Using the remote control<br />
The remote control can be used within a range<br />
of about 7 meters from the remote sensor on<br />
the front panel, and within a 30 degree angle.<br />
• The remote control may not work if there is<br />
an obstacle between the remote control<br />
and the display unit, or if the remote<br />
control is not directed towards the remote<br />
sensor of the display unit at the correct<br />
angle.<br />
• The remote control may not work properly if<br />
strong light such as direct sunlight or<br />
fluorescent light is shining onto the unit’s<br />
remote sensor.<br />
• The remote control may not work properly<br />
when this unit is used near devices<br />
emitting infrared rays, or when remote<br />
controls of other devices which use<br />
infrared rays are used. Also, the use of this<br />
remote control may cause other devices to<br />
work improperly.<br />
• When the operating range of the remote<br />
becomes too short, replace the batteries.<br />
16<br />
En
Getting started 04<br />
Chapter 4<br />
Getting started<br />
Setting Speaker Layout<br />
Select the speaker layout for the speaker<br />
setting you arranged to your listening area<br />
environment.<br />
First time you switch on the system, the<br />
following speaker layout setting appears. If you<br />
switch off the system without finishing this<br />
setting, the same appears again next time you<br />
switch on the system.<br />
1 Press STANDBY/ON and confirm<br />
WELCOME is shown on the display.<br />
2 SELECT SPEAKER LAYOUT will run on<br />
the display for about 10 seconds.<br />
3 Use / to select appropriate speaker<br />
layout.<br />
There are two speaker layout modes – 5 spot<br />
speaker layout and 3 spot speaker layout.<br />
See Setup Guide for more details about<br />
speaker layout and mode description.<br />
• 5 SPOT – Optimal for 5.1 channel home<br />
theater sound by placing the two surround<br />
speakers in the rear of the listening<br />
position.<br />
• 4 SPOT (HTZ181DVD only) – This is the<br />
standard layout for listening to the<br />
surround sound, which is similar to the 5<br />
spot speaker layout. The two center<br />
speakers are separated to the right and left<br />
sides, and neatly arranged around the TV.<br />
• 3 SPOT – This is the classic layout for the<br />
Front Surround mode. The two surround<br />
speakers are placed in front of the listening<br />
position.<br />
• 2 SPOT (HTZ181DVD only) – This layout<br />
for the Front Surround mode is the same<br />
as the 3 spot speaker layout. The two<br />
center speakers are separated to the right<br />
and left sides, and neatly arranged around<br />
the TV.<br />
4 Press ENTER to confirm. 1<br />
Setting the channel levels<br />
Set the relative channel levels from your main<br />
listening position. 2<br />
1 Press SHIFT+SETUP.<br />
2 Use / to select SOUNDSET, then<br />
press ENTER.<br />
3 Use / to select CH LEVEL, then<br />
press ENTER.<br />
4 Use / to select TESTTONE, then<br />
press ENTER.<br />
The test tone is output in the following order<br />
(from the speakers active in the current<br />
listening mode):<br />
• L – Front left speaker<br />
• C – Center speaker<br />
• R – Front right speaker<br />
• SR – Surround right speaker<br />
• SL – Surround left speaker<br />
• SW – Subwoofer 3<br />
English Français<br />
Deutsch Nederlands<br />
Italiano Español<br />
Note<br />
1 To change the setting, press SHIFT+SETUP, use / to select SYS SET, then use / to select LAYOUT to start setting<br />
procedure.<br />
2 • This is only available when DVD/CD is selected and playback is stopped. Also make sure headphones are unplugged.<br />
• To adjust the overall balance while listening to any sound source you want, press SHIFT+SETUP, use / to select<br />
SOUNDSET, then press ENTER. Use / to select CH LEVEL, then press ENTER. Use / to switch between channels, and<br />
/ to adjust the channel levels. Press ENTER when you’re finished.<br />
3 Since the subwoofer produces ultra-low frequencies its sound may seem quieter than it actually is.<br />
17<br />
En
04<br />
Getting started<br />
5 Use the VOLUME +/– to adjust the<br />
volume to an appropriate level. 1<br />
6 Use / to adjust the channel levels in<br />
turn.<br />
You should hear the test tone at the same<br />
volume from each speaker when seated in the<br />
main listening position. The channel level<br />
range is ±10 dB.<br />
7 When you’re done, press ENTER to exit<br />
test tone setup.<br />
Using the on-screen displays<br />
For ease of use, this system makes extensive<br />
use of graphical on-screen displays (OSDs).<br />
All the screens are navigated in basically the<br />
same way, using , , , to change the<br />
highlighted item and pressing ENTER to select<br />
it. 2<br />
Important<br />
• Throughout this manual, ‘Select’ means<br />
use the cursor buttons to highlight an item<br />
on-screen, then press ENTER.<br />
Button What it does<br />
HOME Displays/exits the on-screen display.<br />
MENU<br />
Changes the highlighted menu<br />
item.<br />
ENTER Selects the highlighted menu item.<br />
RETURN Returns to the main menu without<br />
saving changes.<br />
Tip<br />
• The button guide at the bottom of every<br />
OSD screen shows you which buttons<br />
you’ll need to use for that screen.<br />
Playing discs<br />
The basic playback controls for playing DVD,<br />
CD, Video CD/Super VCD, DivX video/WMV<br />
and WMA/MP3/MPEG-4 AAC discs are<br />
covered here. Further functions are detailed in<br />
chapter 6.<br />
Important<br />
• Throughout this manual, the term ‘DVD’<br />
means DVD-Video, DVD-R and DVD-RW.<br />
1 If the player isn’t already on, switch it on.<br />
If you’re playing a disc with video, also turn on<br />
your TV and make sure that it is set to the<br />
correct video input.<br />
2 Press OPEN/CLOSE to load a disc.<br />
Load a disc with the label side facing up, using<br />
the disc tray guide to align the disc (if you’re<br />
loading a double-sided DVD disc, load it with<br />
the side you want to play face down).<br />
3 Press (play) to start playback.<br />
If you’re playing a DVD or Video CD/Super VCD,<br />
a menu may appear. See DVD-Video disc<br />
menus and Video CD/Super VCD PBC menus on<br />
page 19 to navigate these.<br />
If you loaded a disc containing JPEGs, a<br />
slideshow will start. See Playing a JPEG<br />
slideshow on page 25 for more on this.<br />
• If a disc contains a mixture of DivX video/<br />
WMV and other media file types (MP3, for<br />
example), first select whether to play the<br />
DivX video/WMV files (DivX/WMV) or the<br />
other media file types (MP3/WMA/JPEG/<br />
MPEG-4 AAC) from the on-screen display.<br />
Note<br />
1 When the volume is set to 51 or more, TESTTONE cannot be selected and the channel level setting range is restricted. In addition,<br />
if the channel level range of any speaker is set to the + side, the maximum volume is also restricted.<br />
2 The screen saver will appear after five minutes of inactivity.<br />
18<br />
En
Getting started 04<br />
• Please see Disc/content format playback<br />
compatibility on page 47 if you want to play<br />
a DualDisc (DVD/CD hybrid disc).<br />
4 Adjust the volume.<br />
Use the VOLUME +/– control.<br />
Basic playback controls<br />
The following table shows the basic controls on<br />
the remote for playing discs. 1 You can find<br />
other playback features in chapter 6.<br />
Button What it does<br />
Starts/resumes normal playback.<br />
• If the display shows RESUME or<br />
LAST MEM playback starts from the<br />
resume or last memory point (see<br />
Resume and Last Memory below).<br />
Pauses/unpauses a disc.<br />
Stops playback or cancels the resume<br />
function (if the display shows RESUME).<br />
Press to start fast reverse scanning.<br />
Press to start fast forward scanning.<br />
Skips to the start of the current track or<br />
chapter, then previous tracks/chapters.<br />
Skips to the next track or chapter.<br />
Numbers Use to enter a title/chapter/track<br />
number. Press ENTER to select.<br />
• If the disc is stopped, playback starts<br />
from the selected title (for DVD) or<br />
track (for CD/Video CD/Super VCD).<br />
• If the disc is playing, playback jumps<br />
to the start of the selected title (VR<br />
mode DVD-R/-RW), chapter (DVD-<br />
Video) or track (CD/Video CD/Super<br />
VCD).<br />
Resume and Last Memory<br />
When you stop playback of a disc, RESUME<br />
shows in the display indicating that you can<br />
resume playback from that point.<br />
With DVDs and Video CD/Super VCDs, even if<br />
ejected, the play position is stored in memory. 2<br />
The next time you load the disc, the display<br />
shows LAST MEM and you can resume<br />
playback.<br />
If you want to clear the resume point, press<br />
(stop) while RESUME is displayed.<br />
DVD-Video disc menus<br />
Many DVD-Video discs contain menus from<br />
which you can select what you want to watch.<br />
Sometimes DVD-Video menus are displayed<br />
automatically when you start playback; others<br />
only appear when you press MENU or TOP<br />
MENU.<br />
Button What it does<br />
TOP MENU Displays the ‘top menu’ of a DVD<br />
disc — this varies with the disc.<br />
MENU Displays a DVD disc menu — this<br />
varies with the disc and may be<br />
the same as the ‘top menu’.<br />
Moves the cursor around the<br />
screen.<br />
ENTER Selects the current menu option.<br />
RETURN Returns to the previously<br />
displayed menu screen.<br />
Numbers Highlights a numbered menu<br />
option (some discs only). Press<br />
ENTER to select.<br />
Video CD/Super VCD PBC menus<br />
Some Video CD/Super VCDs have menus from<br />
which you can choose what you want to watch.<br />
These are PBC (Playback control) menus.<br />
English Français<br />
Deutsch Nederlands<br />
Italiano Español<br />
Note<br />
1 You may find with some DVD discs that some playback controls don’t work in certain parts of the disc.<br />
2 •The Resume and the Last Memory functions may not work with some discs.<br />
• For DVD-Video discs (except VR mode DVD-R/-RW), the player stores the play position of the last five discs.<br />
19<br />
En
04<br />
Getting started<br />
You can play a PBC Video CD/Super VCD<br />
without having to navigate the PBC menu by<br />
starting playback using a number button to<br />
select a track, rather than the (play) button.<br />
Button<br />
RETURN<br />
Numbers<br />
<br />
<br />
What it does<br />
Displays the PBC menu.<br />
Selects numbered menu options.<br />
Press ENTER to select.<br />
Displays the previous menu page<br />
(if there is one).<br />
Displays the next menu page<br />
(if there is one).<br />
Listening to the radio<br />
The tuner can receive both FM and AM<br />
broadcasts, and lets you memorize your<br />
favorite stations so you don’t have to manually<br />
tune in every time you want to listen.<br />
1 Press TUNER to switch to the tuner, then<br />
press repeatedly to select the AM or FM band.<br />
The display shows the band and frequency.<br />
2 Tune to a frequency.<br />
There are three tuning modes — manual, auto,<br />
and high-speed:<br />
• Manual tuning: Press TUNE repeatedly to<br />
change the displayed frequency.<br />
• Auto tuning: Press and hold TUNE until<br />
the frequency display starts to move, then<br />
release. The tuner will stop on the next<br />
station it finds. Repeat to keep searching.<br />
• High-speed tuning: Press and hold<br />
TUNE until the frequency display starts to<br />
move rapidly. Keep the button held down<br />
until you reach the frequency you want. If<br />
necessary, fine tune the frequency using<br />
the manual tuning method.<br />
Improving poor FM reception<br />
If you’re listening to an FM station in stereo but<br />
the reception is weak, you can improve the<br />
sound quality by switching to mono.<br />
1 Tune to an FM radio station then press<br />
SHIFT+SETUP.<br />
2 Use / to choose TUNERSET then press<br />
ENTER.<br />
3 Use / to choose FM MODE then press<br />
ENTER.<br />
4 Use / to select FM MONO then press<br />
ENTER.<br />
The mono indicator ( ) lights when the tuner<br />
is in mono reception mode.<br />
Select FM AUTO above to switch back to autostereo<br />
mode (the stereo indicator ( ) lights<br />
when receiving a stereo broadcast).<br />
Reducing AM reception noise<br />
If AM reception seems particularly poor, or the<br />
AM radio station you’re listening to seems<br />
noisy, try using the Noise Cut feature for better<br />
sound quality.<br />
1 Tune to an AM radio station then press<br />
SHIFT+SETUP.<br />
2 Use / to choose TUNERSET then<br />
press ENTER.<br />
3 Use / to choose NOISECUT then press<br />
ENTER.<br />
4 Use / to select the noise cut mode<br />
then press ENTER.<br />
Select an effect level between 1 or 2.<br />
Memorizing stations<br />
This system can memorize up to 30 stations,<br />
stored in three banks, or classes (A, B and C) of<br />
10 stations each.<br />
1 Tune to an AM or FM radio station.<br />
For the FM band, select mono or auto-stereo<br />
reception as necessary. This setting is saved<br />
along with the preset.<br />
2 Press SHIFT+T.EDIT.<br />
3 Press CLASS to select one of the three<br />
classes, then use the PRESET buttons to select<br />
the station preset you want.<br />
You can also use the number buttons to select<br />
a preset.<br />
20<br />
En
Getting started 04<br />
4 Press ENTER.<br />
After pressing ENTER, the preset class and<br />
number stop blinking and the system<br />
memorize station.<br />
Listening to station presets<br />
You will need to have some presets stored to do<br />
this.<br />
1 Make sure the TUNER function is<br />
selected.<br />
2 Press CLASS to select the class in which<br />
the channel is stored. Press repeatedly to<br />
cycle through classes A, B and C.<br />
3 Use the PRESET buttons to select a station<br />
preset.<br />
• You can also use the number buttons to do<br />
this.<br />
Listening to other sources<br />
You can connect auxiliary sources (TV, satellite<br />
receiver, etc.) to this unit for playback through<br />
the speaker system. See Connecting auxiliary<br />
audio components on page 40 for more on this.<br />
• To connect a USB device to the USB<br />
terminal, see USB playback and Recording<br />
on page 31.<br />
• HTZ280/282DVD-<strong>AP</strong> only: Bluetooth<br />
AD<strong>AP</strong>TER is selectable when it is plugged<br />
and detected. See Bluetooth ® AD<strong>AP</strong>TER for<br />
Wireless Enjoyment of Music on page 42 for<br />
1 Make sure that the external source (TV,<br />
satellite receiver, etc.) is switched on.<br />
2 Press LINE to select the source.<br />
3 If necessary, start playback of the source.<br />
Setting the sleep timer<br />
The sleep timer switches off the system after<br />
about an hour so you can fall asleep without<br />
worrying about it. 1<br />
• Press SHIFT+SLEEP repeatedly to select an<br />
option then press ENTER.<br />
Choose between the following options:<br />
• SLP ON – Switches off after about an hour.<br />
The indicator lights.<br />
• SLP OFF – Cancels the sleep timer.<br />
After selecting SLP ON, you can press<br />
SHIFT+SLEEP again to check how much time<br />
is left. Each line indicates approximately 12<br />
minutes (remaining):<br />
SLP --- --<br />
English Français<br />
Deutsch Nederlands<br />
Italiano Español<br />
Note<br />
1 The display dims when the sleep timer is set.<br />
21<br />
En
05<br />
Listening to your system<br />
Chapter 5<br />
Listening to your system<br />
Important<br />
• This unit’s audio function may be restricted<br />
depending on the sound source, HDMI<br />
audio setting (page 41) or karaoke mode<br />
with the microphone plugged in (page 33).<br />
In this event, the menus may not appear, or<br />
a message may be displayed instead<br />
(page 56).<br />
Selecting Listening mode<br />
Various listening modes are available for<br />
enjoyment of diverse sound effects and for<br />
sound field correction according to your<br />
preference. Depending on the speaker layout<br />
you have chosen in the Home theater sound<br />
setup on page 6, the listening mode you can<br />
set differs. Read the following and proceed<br />
with each setting.<br />
• 5 spot/4 spot speaker layout<br />
When you have chosen 5 spot speaker layout,<br />
select one listening mode from the surround<br />
sound mode. See Listening in surround sound<br />
below.<br />
• 3 spot/2 spot speaker layout<br />
When you have chosen 3 spot speaker layout<br />
which places the surround speakers in front of<br />
you, select one listening mode from the front<br />
surround mode. See Using Front Surround on<br />
page 23.<br />
Auto listening mode<br />
The Auto listening mode is the simplest way to<br />
listen to any source as it was mastered: the<br />
output from the speakers mirrors the channels<br />
in the source material.<br />
• Press AUTO/STEREO to select the AUTO<br />
listening mode. 1<br />
The listening mode is automatically allotted<br />
according to the source material as shown in<br />
the table below.<br />
source<br />
5 SPOT<br />
4 SPOT<br />
3 SPOT<br />
2 SPOT<br />
two-ch STEREO STEREO<br />
multi-ch STANDARD F.SURR<br />
Listening in surround sound<br />
When you set up the system for 5 spot/4 spot<br />
speaker layout, the surround sound mode is<br />
available.<br />
You can listen to stereo or multichannel<br />
sources in surround sound. 2 Surround sound<br />
is generated from stereo sources using one of<br />
the Dolby Pro Logic decoding modes.<br />
• Press SURROUND repeatedly to select a<br />
listening mode. 1<br />
The choices that appear in the display will vary<br />
according to the type of source that’s playing.<br />
• STANDARD – Standard decoding mode<br />
(This mode can be selected only when the<br />
source is multi channel)<br />
• MOVIE (Dolby Pro Logic II Movie) – Pro<br />
Logic II 5.1 channel surround sound,<br />
especially suited to movie sources (use<br />
with any two-channel source)<br />
22<br />
En<br />
Note<br />
1 If the source is Dolby Digital or DTS, the corresponding indicator lights in the front panel display.<br />
2 Note that the input source must be switched to DVD/CD or USB for multichannel playback.
Listening to your system 05<br />
• MUSIC (Dolby Pro Logic II Music) – Pro<br />
Logic II 5.1 channel surround sound,<br />
especially suited to music sources (use<br />
with any two-channel source)<br />
• DOLBY PL (Dolby Pro Logic) – 4.1 channel<br />
surround sound (use with any two-channel<br />
source)<br />
Using Front Surround<br />
The Front Surround mode and Extra Power<br />
mode are effective when DVD/CD or USB is<br />
selected as the input source and you are using<br />
3 spot (/2 spot only for HTZ181DVD) speaker<br />
layout as described in Home theater sound<br />
setup on page 6.<br />
• Press SURROUND repeatedly to select a<br />
front surround mode.<br />
• F.SURR – Use to provide rich surround<br />
sound effect.<br />
• EXTR<strong>AP</strong>WR – Outputs stereo sound (in the<br />
case of multi-channel sources, downmixed<br />
stereo sound) from the surround<br />
speakers for powerful stereo effect.<br />
For HTZ180DVD<br />
For Front Surround<br />
mode<br />
For HTZ181DVD<br />
For Front Surround<br />
mode<br />
Surround Speaker<br />
For Extra Power<br />
mode<br />
For Extra Power<br />
mode<br />
This illustration is 3 spot layout.<br />
Listening in stereo<br />
You can listen to any source — stereo or<br />
multichannel — in stereo. When playing a<br />
multichannel source, all channels are<br />
downmixed to the front left/right speakers and<br />
the subwoofer.<br />
• Press AUTO/STEREO repeatedly until<br />
STEREO shows in the display.<br />
Listening with headphones<br />
When headphones are connected, the<br />
STEREO playback mode starts. The listening<br />
mode cannot be changed. 1<br />
Adjusting the bass and treble<br />
Use the bass and treble controls to adjust the<br />
overall tone.<br />
1 Press SOUND.<br />
2 Use / to select BASS/TRE then press<br />
ENTER.<br />
3 Use / to select BASS or TREBLE.<br />
4 Use / to adjust the sound then press<br />
ENTER to confirm.<br />
• Bass and Treble can be adjusted from –6dB<br />
to +6dB.<br />
Using the SFC modes<br />
The SFC (Sound Field Control) modes can be<br />
used with any multichannel or stereo source for<br />
a variety of additional surround sound effects.<br />
1 Press SOUND.<br />
2 Use / to select SFC MODE then press<br />
ENTER.<br />
3 Press / then ENTER to select an SFC<br />
Sound mode.<br />
Select between OFF, LIVE, HALL, POP, ROCK,<br />
DRAMA or ACTION.<br />
English Français<br />
Deutsch Nederlands<br />
Italiano Español<br />
Note<br />
1 When you disconnect the headphones, the system reverts to the previous surround setting mode.<br />
23<br />
En
05<br />
Listening to your system<br />
Boosting the bass level<br />
There are two bass modes you can use to<br />
enhance the bass in a source.<br />
1 Press SOUND.<br />
2 Use / to select BASSMODE then press<br />
ENTER.<br />
3 Use / to adjust the sound then press<br />
ENTER to confirm.<br />
Select between OFF, MUSIC or CINEMA.<br />
Using the MP3 Expander<br />
Reproduce the comfortable sound for<br />
compressed music (MP3, WMA, MPEG-4<br />
AAC).<br />
• Press MP3 EXP/V.ENH repeatedly to select<br />
MP3 EXP. 1<br />
Using the Voice Enhancer mode<br />
This mode is used for easy listening to the<br />
spoken lines of the movies or dialogs.<br />
• Press MP3 EXP/V.ENH repeatedly to select<br />
VOICE E. 2<br />
Effective Sound (for optimum<br />
sound)<br />
With the uniquely shaped high-quality<br />
speakers supplied with this unit, the Effective<br />
Sound mode enables the following Pioneer<br />
exclusive audio technologies designed to<br />
maximize the real experience of sound<br />
originally inherent in movies and music.<br />
Turn on the Effective Sound mode under<br />
normal circumstances to maximize the<br />
capabilities of this unit. 3<br />
• Dynamic Range Compression<br />
Resuscitates detailed sound susceptible to<br />
ambient noise to create an acoustic<br />
environment where you feel as if you are right<br />
in the action.<br />
• Frequency Characteristic Correction<br />
Realizes the playback characteristic optimized<br />
for long hours of listening in addition to the<br />
added features of the supplied speaker units.<br />
1 Press SHIFT+SETUP and use / to<br />
select SOUNDSET, then press ENTER.<br />
2 Use / to select S.FIELD then press<br />
ENTER.<br />
3 Use / to adjust the setting then press<br />
ENTER to confirm.<br />
• EFFECT (Effective Sound) – Plays the sound<br />
with the characteristics optimized for the<br />
included speakers.<br />
• DIRECT (Direct Sound) – Turns off the<br />
Effective Sound mode.<br />
Note<br />
1 When turned on, the SFC mode will be turned off.<br />
2 • When turned on, the SFC mode will be turned off.<br />
• Not applicable to the HTZ180/181DVD model - Effective only for the center channel when a multi channel source is played.<br />
3 The Sound Field will not affect the headphone outputs.<br />
24<br />
En
Disc playback features 06<br />
Chapter 6<br />
Disc playback features<br />
Important<br />
• Many of the functions covered in this<br />
chapter apply to DVD discs, Video CDs/<br />
Super VCDs, CDs, DivX video/WMV and<br />
WMA/MP3/MPEG-4 AAC/JPEG discs,<br />
although the exact operation of some<br />
varies slightly with the kind of disc loaded.<br />
• Some DVDs restrict the use of some<br />
functions (random or repeat, for example)<br />
in some or all parts of the disc. This is not a<br />
malfunction.<br />
• When playing Video CD/Super VCDs, some<br />
of the functions are not available during<br />
PBC playback. If you want to use them,<br />
start the disc playing using a number<br />
button to select a track.<br />
Scanning discs<br />
You can fast-scan discs forward or backward at<br />
various different speeds. 1<br />
• During playback, press or to start<br />
scanning.<br />
Press repeatedly to increase the scanning<br />
speed (shown on-screen).<br />
• To resume playback, press (play). 2<br />
Playing in slow motion<br />
You can play DVDs, Video CD/Super VCDs and<br />
DivX video/WMV at four different forward slow<br />
motion speeds. DVD discs can also be played<br />
in reverse slow motion.<br />
1 During playback, press (pause).<br />
2 Press and hold / or / until slow<br />
motion playback starts.<br />
Press repeatedly to change the slow motion<br />
speed (shown on-screen).<br />
• To resume playback, press (play). 2<br />
Frame advance/frame reverse<br />
You can advance or back up DVD discs frameby-frame.<br />
With Video CD/Super VCDs and DivX<br />
video/WMV you can only use frame advance.<br />
1 During playback, press (pause).<br />
2 Press / or / to reverse or<br />
advance a frame at a time.<br />
• To resume playback, press (play). 2<br />
Playing a JPEG slideshow<br />
After loading a disc containing JPEG pictures,<br />
press to start a slideshow from the first<br />
folder/picture on the disc. 3 The player displays<br />
the pictures in each folder in alphabetical<br />
order.<br />
• If the disc contains WMA/MP3/MPEG-4<br />
AAC files, playback of the slideshow and<br />
audio files repeats. During audio playback,<br />
you can still use the skip (/), scan<br />
(/) and pause () functions.<br />
Pictures are automatically adjusted so that<br />
they fill as much of the screen as possible.<br />
Note<br />
1 Only one speed is available for DivX video/WMV discs.<br />
2 • Depending on the disc, normal playback may automatically resume when a new chapter is reached on a DVD disc.<br />
• For Video CDs/Super VCDs in PBC mode and WMA/MP3/MPEG-4 AAC tracks (in Scan mode only) normal playback resumes<br />
when you reach the beginning or the end of track.<br />
3 • The time it takes for the player to load a file increases with large file sizes.<br />
• Discs can contain up to 299 folders and up to 648 folders and files combined.<br />
English Français<br />
Deutsch Nederlands<br />
Italiano Español<br />
25<br />
En
06<br />
Disc playback features<br />
While the slideshow is running:<br />
Button<br />
<br />
<br />
<br />
What it does<br />
Browsing DVD or Video CD/<br />
Super VCD discs with the Disc<br />
Navigator<br />
Use the Disc Navigator to browse through the<br />
contents of a DVD or Video CD/Super VCD disc<br />
to find the part you want to play.<br />
1 During playback, press HOME MENU<br />
and select ‘Disc Navigator’ from the onscreen<br />
menu.<br />
2 Select a view option.<br />
Pauses the slideshow (or audio);<br />
press again to restart.<br />
Jumps to the previous picture (or<br />
audio file with audio playback).<br />
Jumps to the next picture (or<br />
audio file with audio playback).<br />
/// Pauses the slideshow and<br />
rotates/flips the displayed<br />
picture (Press (play) to restart<br />
slideshow).<br />
SHIFT+ZOOM Pauses the slideshow and zooms<br />
the picture. Press again to toggle<br />
between 1x, 2x and 4x zoom<br />
(Press (play) to restart<br />
slideshow).<br />
MENU<br />
Displays the Disc Navigator<br />
screen (see below).<br />
Disc Navigator<br />
The options available depend on the kind of<br />
disc loaded and whether the disc is playing or<br />
not, but include:<br />
• Title – Titles from a DVD-Video disc.<br />
• Chapter – Chapters from the current title<br />
of a DVD-Video disc.<br />
• Track – Tracks from a Video CD/Super VCD<br />
disc.<br />
• Time – Thumbnails from a Video CD/Super<br />
VCD disc at 10 minute intervals.<br />
• Original: Title – Original titles from a VR<br />
mode DVD-R/-RW disc.<br />
• Playlist: Title – Playlist titles from a VR<br />
mode DVD-R/-RW disc.<br />
• Original: Time – Thumbnails from the<br />
Original content at 10 minute intervals.<br />
• Playlist: Time – Thumbnails from the<br />
Playlist at 10 minute intervals.<br />
The screen shows up to six moving thumbnail<br />
images displayed one after another. To display<br />
the previous/next six thumbnails, press /<br />
.<br />
3 Select the thumbnail image for what<br />
you want to play.<br />
01<br />
04<br />
Disc Navigator: Title<br />
01- 49: --<br />
02<br />
05<br />
You can use either /// and ENTER to<br />
select a thumbnail, or the number buttons.<br />
To select using the number buttons, enter a<br />
two-digit number then press ENTER.<br />
03<br />
06<br />
Disc Navigator<br />
Title<br />
Chapter<br />
26<br />
En
Disc playback features 06<br />
Browsing Windows Media TM<br />
Audio (WMA), MP3, MPEG-4<br />
AAC, DivX video/WMV and JPEG<br />
files with the Disc Navigator<br />
Use the Disc Navigator to find a particular file<br />
or folder by filename.<br />
1 Press HOME MENU and select ‘Disc<br />
Navigator’ from the on-screen menu.<br />
00:00/ 00:00 0kbps<br />
Folder1<br />
Folder2<br />
Folder3<br />
Folder4<br />
2 Use /// and ENTER to navigate.<br />
Use / to move up and down the folder/file list.<br />
Use to return to the parent folder. 1<br />
Use ENTER or to open a highlighted folder.<br />
• When a JPEG file is highlighted, a<br />
thumbnail image is displayed on the right.<br />
00:00/ 00:00 0kbps<br />
File1<br />
File2<br />
File3<br />
File4<br />
File5<br />
Folder2<br />
3 To play the highlighted track or<br />
DivX video/WMV file or display the<br />
highlighted JPEG file, press ENTER.<br />
• When a WMA/MP3/MPEG-4 AAC or DivX<br />
video/WMV file is selected, playback<br />
begins from that file, and continues until<br />
the end of the folder.<br />
• When a JPEG file is selected, a slideshow<br />
begins, starting with that file, and<br />
continues to the end of the folder.<br />
Note<br />
1 You can also do this by going to the ‘..’ folder at the top, then pressing ENTER.<br />
2 The disc must be loaded for the files in your playlist to play back.<br />
Tip<br />
• You can also play a JPEG slideshow while<br />
listening to WMA/MP3/MPEG-4 AAC<br />
playback. Simply select the audio file you<br />
want to listen to followed by the JPEG from<br />
which you want the slideshow to start.<br />
Playback of both the slideshow and the<br />
audio files repeats. Playback controls are<br />
effective for the JPEG slideshow only.<br />
• To play the contents of the whole disc<br />
rather than just the current folder, exit the<br />
Disc Navigator and start playback using<br />
the (play) button.<br />
Using Playlists<br />
With this feature, you can make up to three<br />
playlists of 30 files each for discs containing<br />
WMA, MP3, MPEG-4 AAC and JPEG files.<br />
Since this unit will remember all playlists for<br />
the last ten discs you have loaded, this is useful<br />
if you have a large number of files that you<br />
want to organize quickly and easily. 2<br />
Programming playlists<br />
1 With the disc stopped, press HOME<br />
MENU and select ‘Disc Navigator’ from the<br />
on-screen menu.<br />
2 Select the file you want to add to the<br />
playlist.<br />
See Browsing Windows Media TM Audio (WMA),<br />
MP3, MPEG-4 AAC, DivX video/WMV and JPEG<br />
files with the Disc Navigator above if you don’t<br />
know how to do this.<br />
3 Press PLAYLIST 1, 2 or 3.<br />
The file is added to the playlist you select.<br />
4 Repeat steps 2 and 3 until you’re done.<br />
English Français<br />
Deutsch Nederlands<br />
Italiano Español<br />
27<br />
En
06<br />
Disc playback features<br />
28<br />
En<br />
Tip<br />
• To add files without the on-screen display,<br />
simply press PLAYLIST 1, 2 or 3 during<br />
normal playback of the file you want<br />
(except when a JPEG slideshow is playing<br />
at the same time as audio).<br />
Listening to playlists<br />
• With playback stopped, press PLAYLIST<br />
1, 2 or 3.<br />
During playback, PGM lights in the front panel<br />
display. If no playlist has been programmed,<br />
NO LIST shows in the display.<br />
• If the playlist contains both JPEG and audio<br />
files, playback of the slideshow and audio<br />
files starts.<br />
Clearing files from a playlist<br />
1 Start playback of your playlist.<br />
2 From the ‘Disc Navigator’ screen,<br />
highlight the file you want to remove<br />
from the playlist and press CLEAR.<br />
Looping a section of a disc<br />
The A-B Repeat function allows you to specify<br />
two points (A and B) within a track (CD, Video<br />
CD/Super VCD) or title (DVD) that form a loop<br />
which is played over and over.<br />
1 During playback, press HOME MENU and<br />
select ‘Play Mode’.<br />
Play Mode<br />
2 Select ‘A-B Repeat’.<br />
3 Press ENTER on ‘A(Start Point)’ to set the<br />
loop start point.<br />
4 Press ENTER on ‘B(End Point)’ to set the<br />
loop end point.<br />
After pressing ENTER, playback jumps back to<br />
the start point and plays the loop.<br />
5 To resume normal playback, select ‘Off’.<br />
Using repeat play<br />
In addition to various repeat play options, it’s<br />
also possible to use repeat play together with<br />
program play (see Creating a program list on<br />
page 29).<br />
1 During playback, press HOME MENU and<br />
select ‘Play Mode’.<br />
2 Select ‘Repeat’ then select a repeat play<br />
option. 1<br />
If program play is active, select Program<br />
Repeat to repeat the program list, or Repeat<br />
Off to cancel.<br />
• For DVD discs, select Title Repeat or<br />
Chapter Repeat.<br />
• For CDs and Video CD/Super VCDs, select<br />
Disc Repeat or Track Repeat.<br />
• For DivX video/WMV discs, select Title<br />
Repeat (or Repeat Off).<br />
Using random play<br />
Use this function to play titles or chapters<br />
(DVD-Video) or tracks (CD and Video CD/Super<br />
VCD) in a random order. 2<br />
1 During playback, press HOME MENU and<br />
select ‘Play Mode’.<br />
2 Select ‘Random’ then select an option.<br />
• For DVD discs, select Random Title or<br />
Random Chapter.<br />
• For CDs and Video CD/Super VCDs, select<br />
On or Off to switch random play on or off.<br />
Note<br />
1 You can’t use repeat play with WMA/MP3/MPEG-4 AAC discs.<br />
2 • You can set the random play option when a disc is playing or stopped. However, you can’t use random play together with<br />
program play.<br />
• You can’t use random play with VR format DVD-R/-RW discs, WMA/MP3/MPEG-4 AAC discs, DivX video/WMV discs, or while<br />
a DVD disc menu is being displayed.
Disc playback features 06<br />
Tip<br />
• Use the following controls during random<br />
play:<br />
Button<br />
<br />
<br />
What it does<br />
Selects a new track/title/chapter<br />
at random.<br />
Returns to the beginning of the<br />
current track/title/chapter;<br />
further presses select another<br />
random track/title/chapter.<br />
• Random play remains in effect until you<br />
select Random Off from the random play<br />
menu options.<br />
Creating a program list<br />
This feature lets you program the play order of<br />
titles/chapters/tracks on a disc. 1<br />
1 During playback, press HOME MENU and<br />
select ‘Play Mode’.<br />
2 Select ‘Program’ then select ‘Create/Edit’<br />
from the list of program options.<br />
3 Use /// and ENTER to select a<br />
title, chapter or track for the current step in<br />
the program list.<br />
• For a DVD disc, you can add a title or a<br />
chapter.<br />
• For a CD or Video CD/Super VCD, select a<br />
track to add to the program list.<br />
After pressing ENTER to select the title/<br />
chapter/track, the step number automatically<br />
moves down one.<br />
4 Repeat step 3 to build up a program list.<br />
A program list can contain up to 24 steps.<br />
• You can insert steps by just highlighting<br />
the position where you want the new step<br />
to appear and entering a title/chapter/track<br />
number.<br />
• To delete a step, highlight it and press<br />
CLEAR.<br />
5 To play the program list, press (play).<br />
Program play remains active until you turn off<br />
program play (see below), erase the program<br />
list (see below), eject the disc or switch off.<br />
Tip<br />
• Use the following controls during program<br />
play:<br />
Button What it does<br />
HOME<br />
MENU<br />
<br />
Save the program list and exit<br />
without starting playback.<br />
Skip to the next step in the<br />
program list.<br />
Other functions available from the<br />
program menu<br />
There are a number of other options in the<br />
program menu in addition to Create/Edit.<br />
• Playback Start – Starts playback of a<br />
saved program list<br />
• Playback Stop – Turns off program play,<br />
but does not erase the program list<br />
• Program Delete – Erases the program list<br />
and turns off program play<br />
Searching a disc<br />
You can search DVD discs by title or chapter<br />
number, or by time; CDs and Video CD/Super<br />
VCDs by track number or time; DivX video/<br />
WMV discs by time.<br />
1 Press HOME MENU and select ‘Play<br />
Mode’.<br />
2 Select ‘Search Mode’.<br />
The search options that appear depend on the<br />
kind of disc loaded.<br />
3 Select a search mode.<br />
• The disc must be playing in order to use<br />
time search.<br />
Note<br />
1 You can’t use Program play with VR format DVD-R/-RW discs, WMA/MP3/MPEG-4 AAC discs, DivX video/WMV discs, or while<br />
a DVD disc menu is being displayed.<br />
English Français<br />
Deutsch Nederlands<br />
Italiano Español<br />
29<br />
En
06<br />
Disc playback features<br />
4 Use the number buttons to enter a title,<br />
chapter or track number, or a time.<br />
• For a time search, enter the number of<br />
minutes and seconds into the currently<br />
playing title (DVD/DivX video/WMV) or<br />
track (CD/Video CD/Super VCD) you want<br />
playback to resume from. For example,<br />
press 4, 5, 0, 0 to have playback start from<br />
45 minutes into the disc. For 1 hour, 20<br />
minutes and 30 seconds, press 8, 0, 3, 0.<br />
5 Press ENTER to start playback.<br />
Switching subtitles<br />
Some DVD discs and DivX video discs have<br />
subtitles in one or more languages; the disc<br />
box will usually tell you which subtitle<br />
languages are available. You can switch<br />
subtitle language during playback. 1<br />
• Press SHIFT+SUBTITLE repeatedly to<br />
select a subtitle option.<br />
• To set subtitle preferences, see Language<br />
settings on page 36.<br />
•See Displaying DivX subtitle files on<br />
page 48 for more on DivX subtitles.<br />
Switching language/audio<br />
channels<br />
When playing discs recorded with dialogue in<br />
two or more languages, or with dual-mono<br />
audio 2 you can switch these during playback. 3<br />
When playing a Video CD/Super VCD, you can<br />
switch between stereo, just the left channel or<br />
just the right channel.<br />
• Press SHIFT+AUDIO repeatedly to select<br />
an audio language option.<br />
• To set audio language preferences, see<br />
Language settings on page 36.<br />
Zooming the screen<br />
Using the zoom feature you can magnify a<br />
part of the screen by a factor of 2 or 4, while<br />
watching a DVD, DivX video/WMV title or<br />
Video CD/Super VCD or playing a JPEG disc.<br />
1 During playback, press SHIFT+ZOOM to<br />
select the zoom factor (Normal, 2x or 4x).<br />
2 Use /// to change the zoomed<br />
area.<br />
You can change the zoom factor and the<br />
zoomed area freely during playback. 4<br />
Switching camera angles<br />
Some DVD discs feature scenes shot from two<br />
or more angles — check the disc box for<br />
details.<br />
When a multi-angle scene is playing, a<br />
icon appears on screen (this can be switched<br />
off if you prefer — see Display settings on<br />
page 37).<br />
• During playback (or when paused), press<br />
SHIFT+ANGLE to switch angle.<br />
Displaying disc information<br />
Various track, chapter and title information can<br />
be displayed on-screen during playback.<br />
• To show/switch/hide the information<br />
displayed, press DISPLAY repeatedly.<br />
Limited disc information also appears in the<br />
front panel display. Press DISPLAY to change<br />
the displayed information.<br />
Note<br />
1 Some discs only allow you to change subtitle language from the disc menu. Press TOP MENU or MENU to access.<br />
2 Some Super VCDs have two soundtracks. With these discs you can switch between the two soundtracks as well as individual<br />
channels in each.<br />
3 Some discs only allow you to change audio language from the disc menu. Press TOP MENU or MENU to access.<br />
4 • Since DVD, Video CD/Super VCD, DivX video/WMV title and JPEG pictures have a fixed resolution, picture quality will<br />
deteriorate, especially at 4x zoom. This is not a malfunction.<br />
• If the navigation square at the top of the screen disappears, press SHIFT+ZOOM again to display it.<br />
30<br />
En
USB<br />
USB playback and Recording 07<br />
Chapter 7<br />
USB playback and Recording<br />
Using the USB interface<br />
It is possible to listen to two-channel audio 1<br />
and watch DivX video/WMV/JPEG files using<br />
the USB interface on the front of this unit.<br />
Connect a USB mass storage device 2 as<br />
shown below.<br />
1 With the player switched on, press USB.<br />
Make sure your TV is on and set to the correct<br />
video input.<br />
2 Connect your USB device.<br />
The USB terminal is located on the front panel.<br />
USB<br />
(Type A)<br />
USB<br />
USB mass<br />
storage device<br />
3 Press (play) to start playback.<br />
If your USB device contains JPEGs, a<br />
slideshow will start. See Playing a JPEG<br />
slideshow on page 25 for more on this.<br />
•Make sure USB DATA is showing in the<br />
front panel display (or the system is in<br />
standby) when disconnecting.<br />
Important<br />
If a USB ERR message lights in the display, it<br />
may mean that the power requirements of the<br />
USB device are too high for this player, or that<br />
the device is incompatible. Try the following:<br />
• Switch the player off, then on again.<br />
• Reconnecting the USB device with the<br />
player switched off.<br />
• Selecting to another input source (like<br />
DVD/CD), then back to USB.<br />
• Using a dedicated AC adapter (supplied<br />
with the device) for USB power.<br />
If this doesn’t remedy the problem, it is likely<br />
your USB device is incompatible.<br />
Recording the tracks of a<br />
music CD on a USB device<br />
The tracks of a music CD loaded in this unit<br />
can be recorded on a USB connected to the<br />
USB port.<br />
Recording all the tracks<br />
1 Load the music CD.<br />
Press to stop playback.<br />
English Français<br />
Deutsch Nederlands<br />
Italiano Español<br />
Note<br />
1 This includes playback of DivX video/WMV/WMA/MP3/MPEG-4 AAC files (except files with copy-protection or restricted<br />
playback).<br />
2 • Compatible USB devices include external magnetic hard drives, portable flash memory (particularly keydrives) and digital<br />
audio players (MP3 players) of format FAT16/32. It is not possible to connect this unit to a personal computer for USB playback.<br />
• Pioneer cannot guarantee compatibility (operation and/or bus power) with all USB mass storage devices and assumes no<br />
responsibility for any loss of data that may occur when connected to this unit.<br />
• With large amounts of data, it may take longer for the system to read the contents of a USB device.<br />
• Some USB devices may not be properly recognized.<br />
• Even when they are in a supported format, some files may not play or display depending on the content.<br />
31<br />
En
07<br />
USB playback and Recording<br />
2 Press SHIFT+USB REC to display the<br />
‘CD -> USB Rec’ screen.<br />
CD –> USB Rec<br />
Select Track<br />
Bitrate<br />
Start<br />
Selected Track<br />
Total Time<br />
128kbps<br />
13<br />
055:07<br />
3 Press ENTER to start recording.<br />
Recording starts. The screen shown below is<br />
displayed during recording. 1<br />
CD –> USB Rec<br />
Track Progress<br />
Total Progress<br />
Selected Track<br />
Total Time<br />
Cancel<br />
13<br />
055:07<br />
Recording specific tracks<br />
1 Load the music CD.<br />
Press to stop playback.<br />
Track 1–13<br />
Track01<br />
Track02<br />
Track03<br />
Track04<br />
Track05<br />
Track06<br />
Track07<br />
Track08<br />
Track 1–13<br />
Track01<br />
Track02<br />
Track03<br />
Track04<br />
Track05<br />
Track06<br />
Track07<br />
Track08<br />
01:43<br />
03:17<br />
04:18<br />
04:59<br />
04:20<br />
04:38<br />
04:40<br />
04:11<br />
01:43<br />
03:17<br />
04:18<br />
04:59<br />
04:20<br />
04:38<br />
04:40<br />
04:11<br />
2 Press HOME MENU and select ‘CD ->USB<br />
Rec’.<br />
CD -> USB Rec can only be selected when the<br />
music CD is stopped.<br />
CD – > USB Rec<br />
4 Select the track you want to record.<br />
CD –> USB Rec<br />
Select Track<br />
Bitrate<br />
Start<br />
Selected Track<br />
Total Time<br />
• Individual — Select one track at a time.<br />
• Select All — Select all the tracks.<br />
• All Clear — Clear all selected tracks.<br />
5 Select the bit rate (transfer rate).<br />
Select 128 kbps, 192 kbps or 320 kbps.<br />
CD –> USB Rec<br />
Select Track<br />
Bitrate<br />
Start<br />
Selected Track<br />
Total Time<br />
6 Select ‘Start’ using the ///, then<br />
press ENTER. 2<br />
CD –> USB Rec<br />
Select Track<br />
Bitrate<br />
Start<br />
Selected Track<br />
Total Time<br />
Recording starts.<br />
Individual<br />
Select All<br />
All Clear<br />
01<br />
003:17<br />
128kbps<br />
192kbps<br />
320kbps<br />
03<br />
012:17<br />
128kbps<br />
03<br />
012:17<br />
Track 1–13<br />
Track01<br />
Track02<br />
Track03<br />
Track04<br />
Track05<br />
Track06<br />
Track07<br />
Track08<br />
Track 1–13<br />
Track01<br />
Track02<br />
Track03<br />
Track04<br />
Track05<br />
Track06<br />
Track07<br />
Track08<br />
Track 1–13<br />
Track01<br />
Track02<br />
Track03<br />
Track04<br />
Track05<br />
Track06<br />
Track07<br />
Track08<br />
01:43<br />
03:17<br />
04:18<br />
04:59<br />
04:20<br />
04:38<br />
04:40<br />
04:11<br />
01:43<br />
03:17<br />
04:18<br />
04:59<br />
04:20<br />
04:38<br />
04:40<br />
04:11<br />
01:43<br />
03:17<br />
04:18<br />
04:59<br />
04:20<br />
04:38<br />
04:40<br />
04:11<br />
3 Make setting using /// and<br />
ENTER.<br />
CD –> USB Rec<br />
Track Progress<br />
Track 1–13<br />
Track01<br />
Track02<br />
01:43<br />
03:17<br />
Total Progress<br />
Track03<br />
Track04<br />
04:18<br />
04:59<br />
CD –> USB Rec<br />
Select Track<br />
Bitrate<br />
Individual<br />
Select All<br />
All Clear<br />
Track 1–13<br />
Track01<br />
Track02<br />
Track03<br />
01:43<br />
03:17<br />
04:18<br />
Cancel<br />
Selected Track<br />
03<br />
Total Time<br />
012:17<br />
Track05<br />
Track06<br />
Track07<br />
Track08<br />
04:20<br />
04:38<br />
04:40<br />
04:11<br />
Track04<br />
04:59<br />
Track05<br />
04:20<br />
Start<br />
Track06<br />
04:38<br />
Selected Track<br />
00<br />
Track07<br />
04:40<br />
Total Time<br />
000:00<br />
Track08<br />
04:11<br />
Note<br />
1 Recording cannot be started if there is not enough free space on the USB device. In this case, “Available USB space is low” is<br />
displayed.<br />
2 • When recording is finished, a folder named “PIONEER” is created automatically on the USB device. The recorded tracks are<br />
stored in this folder.<br />
• Up to 99 “PIONEER” folders can be created.<br />
• Recording is not possible if the USB device contains 300 folders or more.<br />
• When recording on a USB device is under way, all DVD-related key operations are disabled except for the operation of<br />
STANDBY/ON and OPEN/CLOSE buttons and switchover of the functions.<br />
• When the sleep timer is ON, it is cancelled once recording on a USB device is started.<br />
32<br />
En
Singing karaoke 08<br />
Chapter 8<br />
Singing karaoke<br />
Singing karaoke<br />
Using the karaoke features you can plug in a<br />
microphone and mix the sound of your own<br />
voice with a backing track. 1 You can select a<br />
backing track from audio sources such as CDs,<br />
DVDs, VCDs or USB devices. Adjust the<br />
microphone level relative to the backing track.<br />
1 Plug in the microphone(s).<br />
If you’re only using one mic, plug it into the<br />
MIC (MAIN) jack. The MIC (SUB) jack can be<br />
used only if MIC (MAIN) is also connected.<br />
• If the microphone has an on/off switch,<br />
make sure it’s on.<br />
2 Load a karaoke backing disc.<br />
You can also use tracks on a USB device as<br />
source material for a backing track.<br />
3 Adjust KARAOKE mode settings.<br />
• Press SHIFT+KARAOKE to turn KARAOKE<br />
mode on or off for discs that have vocals on<br />
both Left and Right channels:<br />
KARAOKE (Vocal Fade) – Vocals in the<br />
backing track are partially eliminated.<br />
MAIN<br />
MIC<br />
SUB<br />
OFF (default) – Switches the Karaoke mode off.<br />
• Press SHIFT+AUDIO to switch between<br />
audio channels (except Data discs and USB<br />
sources) with discs that have vocal tracks on<br />
only one channel:<br />
Left – Left channel only. Use for tracks that<br />
have a vocal recorded in the right channel.<br />
Right – Right channel only. Use for tracks that<br />
have a vocal recorded in the left channel.<br />
STEREO – Switches the Karaoke mode off.<br />
4 Play the backing track.<br />
5 Adjust the MIC VOL +/– to get the sound<br />
you want. 2<br />
To avoid unpleasant feedback, make sure you<br />
don’t point the microphone(s) at the speakers. 3<br />
Changing the vocal mix<br />
Adding some effects to the microphone mix<br />
can sometimes improve the overall sound. 4<br />
You can choose between three echo levels.<br />
• To add effects to the microphone mix,<br />
press SHIFT+ECHO.<br />
Pressing repeatedly switches between echo<br />
levels 1 to 3 and off.<br />
Changing the backing track<br />
You may want to lower or raise the pitch of the<br />
backing track to match your vocal range. 5<br />
• Press SHIFT+ or SHIFT+ to lower or<br />
raise the pitch of the backing track.<br />
English Français<br />
Deutsch Nederlands<br />
Italiano Español<br />
Note<br />
1 • These features are only possible when a microphone is connected. If you try to use SHIFT+KARAOKE, SHIFT+ECHO,<br />
SHIFT+, SHIFT+ or MIC VOL when no mic is connected, a NO MIC error message is displayed. Also note that during DVD<br />
playback, when you connect a mic sound settings are automatically switched to STEREO playback and the player downmixes<br />
multichannel sources to 2.1 channels.<br />
• These features are only available with the DVD/CD or USB input functions.<br />
2 MIC VOL is set to 0 when you remove the microphone, change the function or turn the power off.<br />
3 Depending on the microphone level, the sound of the disc may distort. If this happens, turn down the volume.<br />
4 You cannot adjust SFC modes, tone controls (bass, treble, and bass boost), Extra Power mode, Front Surround mode,<br />
MP3 Expander mode or Voice Enhancer mode when a microphone is plugged in.<br />
5 This feature is not compatible with DTS signals.<br />
33<br />
En
09<br />
Audio Settings and Video Adjust menus<br />
Chapter 9<br />
Audio Settings and Video<br />
Adjust menus<br />
Audio Settings menu<br />
The Audio Settings menu offers features for<br />
adjusting the way discs sound.<br />
1 Press HOME MENU and select ‘Audio<br />
Settings’ from the on-screen display.<br />
1 Press HOME MENU and select ‘Video<br />
Adjust’ from the on-screen display.<br />
Video Adjust<br />
2 Make settings using /// and<br />
ENTER.<br />
Audio Settings<br />
Video Adjust<br />
2 Select and change settings using //<br />
/ and ENTER.<br />
Sharpness<br />
Brightness<br />
Contrast<br />
Gamma<br />
Hue<br />
Chroma Level<br />
Standard<br />
0<br />
0<br />
Off<br />
0<br />
0<br />
Audio DRC<br />
Audio Settings<br />
High<br />
Medium<br />
Low<br />
Off<br />
Audio DRC<br />
•Settings: High, Medium, Low,<br />
Off (default)<br />
When watching Dolby Digital DVDs at low<br />
volume, it’s easy to lose the quieter sounds<br />
completely — including some of the dialog.<br />
Switching Audio DRC (Dynamic Range<br />
Control) to on can help by bringing up the<br />
quieter sounds, while controlling loud peaks.<br />
How much of a difference you hear depends on<br />
the material you’re listening to. If the material<br />
doesn’t have wide variations in volume, you<br />
may not notice much change. 1<br />
Video Adjust menu<br />
From the Video Adjust screen you can adjust<br />
settings that affect picture presentation.<br />
You can adjust the following settings:<br />
• Sharpness – Adjusts the sharpness of<br />
edges in the picture (Fine, Standard, Soft)<br />
• Brightness – Adjusts the overall<br />
brightness (–20 to +20)<br />
• Contrast – Adjusts the contrast between<br />
light and dark (–16 to +16)<br />
• Gamma – Adjusts the ‘warmth’ of the<br />
picture (High, Medium, Low, Off)<br />
• Hue – Adjusts the red/green balance<br />
(Green 9 to Red 9)<br />
• Chroma Level – Adjusts how saturated<br />
colors appear (–9 to +9)<br />
Adjust the Brightness, Contrast, Hue and<br />
Chroma Level settings using /.<br />
Brightness min max 0<br />
3 Press ENTER to return to the Video Adjust<br />
screen, or HOME MENU to exit.<br />
Note<br />
1 Audio DRC is only effective with Dolby Digital audio sources.<br />
34<br />
En
Initial Settings menu 10<br />
Chapter 10<br />
Initial Settings menu<br />
Using the Initial Settings menu<br />
The Initial Settings menu provides audio and<br />
video output settings, parental lock settings,<br />
and display settings, among others.<br />
If an option is grayed out it means that it<br />
cannot be changed at the current time. This is<br />
usually because a disc is playing. Stop the<br />
disc, then change the setting.<br />
Video Output settings<br />
Setting Option What it means<br />
TV Screen<br />
(See also Screen sizes<br />
and disc formats on<br />
page 51.)<br />
Component Out<br />
(See also Connecting<br />
auxiliary audio<br />
components on<br />
page 40.)<br />
1 Press DVD/CD.<br />
2 With playback stopped, press HOME<br />
MENU and select ‘Initial Settings’.<br />
Initial Settings<br />
3 Use /// and ENTER to select the<br />
setting and option you want to set.<br />
All the settings and options are explained on<br />
the following pages. 1<br />
4:3 (Letter Box) Set if you have a conventional 4:3 TV. Widescreen movies are<br />
shown with black bars top and bottom.<br />
4:3 (Pan & Scan) Set if you have a conventional 4:3 TV. Widescreen movies are<br />
shown with the sides cropped so that the image fills the screen.<br />
16:9 (Wide) Set if you have a widescreen TV.<br />
16:9 (Compressed) Set if you have a widescreen TV. 4:3 material is shown with<br />
black bars on either side of the screen. 2<br />
Interlace<br />
Set if your TV is not compatible with progressive scan video.<br />
Progressive<br />
Set if your TV is compatible with progressive scan video (see<br />
your TV’s instruction manual for details). Press ENTER once<br />
more to confirm (or RETURN to cancel).<br />
Note that progressive scan video is only output from the<br />
component video jacks.<br />
English Français<br />
Deutsch Nederlands<br />
Italiano Español<br />
Note<br />
1 • In the table, the default setting is shown in bold: other settings are shown in italics.<br />
• Some settings, such as TV Screen, Audio Language and Subtitle Language may be overridden by the DVD disc. Often<br />
these settings can also be made from the DVD disc menu.<br />
• The HDMI Resolution and HDMI Color settings only need to be set if you connected this player to an HDMI-compatible<br />
component using the HDMI connector.<br />
2 This setting can only be used when you are connected via HDMI and have the HDMI resolution set to 1920x1080p, 1920x1080i<br />
or 1280x720p. When using this setting, only the HDMI connection is available.<br />
35<br />
En
10<br />
Initial Settings menu<br />
Setting Option What it means<br />
HDMI Resolution*<br />
(See Connecting using<br />
HDMI on page 41.)<br />
* Default changes with<br />
TV format (PAL/NTSC).<br />
HDMI Color*<br />
(See Connecting using<br />
HDMI on page 41.)<br />
* Default changes<br />
depending on device<br />
connected.<br />
1920x1080p<br />
1920x1080i<br />
1280x720p<br />
720x480p (NTSC)/<br />
720x576p (PAL)<br />
720x480i (NTSC)/<br />
720x576i (PAL)<br />
Full range RGB<br />
RGB<br />
Component<br />
Set if your TV supports 1920 x 1080 pixel progressive-scan video.<br />
Set if your TV supports 1920 x 1080 pixel interlace video.<br />
Set if your TV supports 1280 x 720 pixel progressive-scan video.<br />
Set if your TV supports 720 x 480 (NTSC)/720 x 576 (PAL) pixel<br />
progressive-scan video.<br />
Set if your TV supports 720 x 480 (NTSC)/720 x 576 (PAL) pixel<br />
interlace video.<br />
If colors are weak, this gives brighter colors and deeper black<br />
(default setting for HDMI-compatible DVI devices).<br />
Use this setting if colors appear overly rich on the Full Range<br />
RGB setting.<br />
Outputs 8-bit component video format (default setting for<br />
HDMI-compatible devices).<br />
Language settings<br />
Setting Option What it means<br />
Audio Language English If there is an English soundtrack on the disc, it is played.<br />
Languages as displayed If there is a language selected on the disc, it is played.<br />
Other Language<br />
Select to choose a language other than the ones displayed (see<br />
Using the language code list on page 57).<br />
Subtitle Language English If there are English subtitles on the disc they are displayed.<br />
Languages as displayed The subtitle language selected on the disc is displayed.<br />
Other Language<br />
Select to choose a language other than the ones displayed (see<br />
Using the language code list on page 57).<br />
DVD Menu<br />
Language<br />
w/Subtitle Lang. DVD disc menus are displayed in the same language as your<br />
selected subtitle language, if possible.<br />
Languages as displayed DVD menus are displayed in the selected language, if possible.<br />
Other Language<br />
Select to choose a language other than the ones displayed (see<br />
Using the language code list on page 57).<br />
Subtitle Display On Subtitles are displayed in your selected subtitle language.<br />
Off<br />
Subtitles are always off by default when you play a DVD disc.<br />
36<br />
En
Initial Settings menu 10<br />
Display settings<br />
Setting Option What it means<br />
OSD Language English On-screen displays are shown in English.<br />
Languages as displayed On-screen displays are shown in the language selected.<br />
Angle Indicator On A camera icon is displayed on-screen during multi-angle<br />
scenes on a DVD disc.<br />
Off<br />
No multi-angle indication is shown.<br />
Options settings<br />
Setting Option What it means<br />
Parental Lock – See Parental Lock below.<br />
DivX(R) VOD Display See About DivX ® VOD content below.<br />
Speakers settings<br />
Setting Option What it means<br />
Speaker Distance – Specify the distance of your speakers from your listening<br />
position (see Speaker Distance on page 39).<br />
Parental Lock<br />
• Default level: Off; Default password: none;<br />
Default Country/Area code: us (2119)<br />
To give you some control over what your<br />
children watch on your DVD player, some DVD-<br />
Video discs feature a Parental Lock level. If your<br />
player is set to a lower level than the disc, the<br />
disc won’t play.<br />
Some discs also support the Country/Area<br />
Code feature. The player does not play certain<br />
scenes on these discs, depending on the<br />
Country/Area Code you set.<br />
Registering a new password<br />
Register a password to change the Parental<br />
Lock level or enter a Country/Area code. 1 1 Select ‘Password’.<br />
Initial Settings<br />
Video Output<br />
Language<br />
Display<br />
Options<br />
Speakers<br />
Parental Lock<br />
DivX (R) VOD<br />
Password<br />
Level Change<br />
Country Code<br />
2 Use the number buttons to input a fourdigit<br />
password then press ENTER.<br />
Changing your password<br />
To change your password, confirm your<br />
existing password then enter a new one.<br />
1 Select ‘Password Change’, input your<br />
existing password, then press ENTER.<br />
2 Enter a new password and press ENTER.<br />
English Français<br />
Deutsch Nederlands<br />
Italiano Español<br />
Note<br />
1 • Not all discs use Parental Lock, and will play without requiring the password first.<br />
• If you forget your password, you’ll need to reset the player to register a new password (see Resetting the system on page 57).<br />
37<br />
En
10<br />
Initial Settings menu<br />
Setting/changing the Parental Lock<br />
1 Select ‘Level Change’.<br />
2 Use number buttons to enter your<br />
password, then press ENTER.<br />
3 Select a new level and press ENTER.<br />
• Press repeatedly to lock more levels<br />
(more discs will require the password);<br />
press to unlock levels. You can’t lock<br />
level 1.<br />
Setting/changing the Country/Area code<br />
You can find the Country/Area code list on<br />
page 58.<br />
1 Select ‘Country Code’, input your<br />
password, then press ENTER.<br />
2 Select a Country/Area code then press<br />
ENTER.<br />
There are two ways you can do this:<br />
• Select by code letter: Use / to change<br />
the Country/Area code.<br />
• Select by code number: Press then use<br />
the number buttons to enter the four-digit<br />
Country/Area code.<br />
The new Country/Area code takes effect after<br />
ejecting the disc once.<br />
About DivX ® VOD content<br />
In order to play DivX VOD (video on demand)<br />
content on this player, you first need to register<br />
the player with your DivX VOD content<br />
provider. You do this by generating a DivX VOD<br />
registration code, which you submit to your<br />
provider. 1<br />
Important<br />
• DivX VOD content is protected by a DRM<br />
(Digital Rights Management) system. This<br />
restricts playback of content to specific,<br />
registered devices.<br />
• If you load a disc that contains DivX VOD<br />
content not authorized for your player, the<br />
message Authorization Error is displayed<br />
and the content will not play.<br />
Displaying your DivX VOD registration<br />
code<br />
1 Press HOME MENU and select ‘Initial<br />
Settings’.<br />
2 Select ‘Options’, then ‘DivX (R) VOD’.<br />
Initial Settings<br />
Video Output<br />
Language<br />
Display<br />
Options<br />
Speakers<br />
Parental Lock<br />
DivX (R) VOD<br />
Display<br />
3 Select ‘Display’.<br />
Your eight-digit registration code is displayed.<br />
Make a note of the code as you will need it<br />
when you register with a DivX VOD provider.<br />
Playing DivX ® VOD content<br />
Some DivX VOD content may only be playable for<br />
a fixed number of times. When you load a disc<br />
containing this type of DivX VOD content, the<br />
remaining number of plays is shown on-screen<br />
and you then have the option of playing the disc<br />
(thereby using up one of the remaining plays), or<br />
stopping. If you load a disc that contains expired<br />
DivX VOD content (for example, content that has<br />
zero remaining plays), the message Rental<br />
Expired is displayed.<br />
If your DivX VOD content allows an unlimited<br />
number of plays, then you may load the disc<br />
into your player and play the content as often<br />
as you like, and no message will be displayed.<br />
Note<br />
1 Resetting the player (as described in Resetting the system on page 57) will not cause you to lose your registration code.<br />
38<br />
En
Initial Settings menu 10<br />
Speaker Distance<br />
•Default setting: 3.0m<br />
To get the best surround sound from your<br />
system, you should set up the speakers equal<br />
distances from your listening position.<br />
1 Press HOME MENU and select ‘Initial<br />
Settings’.<br />
2 Select ‘Speakers’, then ‘Speaker Distance’.<br />
Initial Settings<br />
Video Output<br />
Language<br />
Display<br />
Options<br />
Speakers<br />
Speaker Distance<br />
3 Use / to select a speaker.<br />
Initial Settings<br />
Video Output<br />
Language<br />
Display<br />
Options<br />
Speakers<br />
L<br />
C<br />
R<br />
SR<br />
SL<br />
SW<br />
3.0m<br />
3.0m<br />
3.0m<br />
3.0m<br />
3.0m<br />
3.0m<br />
4 Press to change the speaker distance<br />
for the highlighted speaker.<br />
5 Use / to change the distance.<br />
• When you change the distance settings of<br />
the front left (L) or front right (R) speakers,<br />
all the other speaker distances change<br />
relative to it.<br />
•Front left/right (L/R) speaker distances can<br />
be set from 30 cm to 9 m in 30 cm<br />
increments. 1<br />
• The center speaker (C) can be set from<br />
–2.1 m to 0 m relative to the front left/right<br />
speakers.<br />
• Surround left/right (SL/SR) speakers can<br />
be set from –6.0 m to 0 m relative to the<br />
front left/right speakers. 2<br />
•The subwoofer (SW) can be set from –2.1 m<br />
to 0 m relative to the front left/right<br />
speakers.<br />
6 Press to go back to the speaker list if<br />
you want to modify another speaker, or press<br />
ENTER to exit the Speaker Distance screen.<br />
English Français<br />
Deutsch Nederlands<br />
Italiano Español<br />
Note<br />
1The L and R speakers are paired; you can’t set them differently.<br />
2 Make sure to set them the same distance when using the Extra Power mode (page 23).<br />
39<br />
En
11<br />
Other connections<br />
Chapter 11<br />
Other connections<br />
Important<br />
• When making or changing connections on the rear panel of this unit, be sure to switch power<br />
off and disconnect the power cord from the wall socket.<br />
After completing all connections, connect the power cord to the wall socket.<br />
Outdoor antenna<br />
To component<br />
input<br />
Indoor antenna<br />
(vinyl-coated wire)<br />
TV<br />
5 m to 6 m<br />
AM loop<br />
antenna<br />
LINE 1<br />
R FRONT L<br />
CENTER<br />
COMPONENT<br />
VIDEO<br />
PR<br />
A<br />
N<br />
TE<br />
N<br />
L<br />
VIDEO(TV)<br />
PB<br />
N<br />
A<br />
AM LOOP<br />
FM<br />
UNBAL 75 Ω<br />
AC IN<br />
R<br />
SUB<br />
R SURROUND<br />
WOOFER<br />
ANALOG AUDIO IN SPEAKERS (4 Ω )<br />
AD<strong>AP</strong>TER PORT<br />
VIDEO OUT<br />
Y<br />
HDMI OUT<br />
Tape deck, etc.<br />
From audio output<br />
Bluetooth®<br />
AD<strong>AP</strong>TER<br />
PAL connector<br />
To<br />
HDMI input<br />
From<br />
audio output<br />
KURO LINK-compatible<br />
Pioneer flat screen TV<br />
Connecting auxiliary audio<br />
components<br />
Using the stereo analog inputs, you can connect<br />
an external component such as a tape deck or<br />
MD player for playback through this system.<br />
For the connection diagram, see 1 above.<br />
• Connect the ANALOG AUDIO IN (LINE 1)<br />
jacks to the analog outputs of an external<br />
playback component.<br />
Connect using RCA pin-plug stereo cables.<br />
40<br />
En
Other connections 11<br />
Connecting using the<br />
component video output<br />
If your TV has component video inputs, you can<br />
use these instead of the standard video outputs<br />
for a better quality picture. 1<br />
For the connection diagram, see 2 on page 40.<br />
• Use a component video cable to connect<br />
the COMPONENT VIDEO OUT to a set of<br />
component inputs on your TV.<br />
About progressive scan video<br />
Compared to interlace video, progressive scan<br />
video effectively doubles the scanning rate of<br />
the picture, resulting in a very stable, flickerfree<br />
image. Progressive scan video is available<br />
only from the component video output.<br />
Compatibility of this player with<br />
progressive-scan and high-definition TVs.<br />
• This player is compatible with progressive<br />
video Macro Vision System Copy Guard. 2<br />
Connecting using HDMI<br />
If you have a HDMI or DVI (with HDCP)<br />
equipped monitor or display, you can connect<br />
it to this player using a commercially available<br />
HDMI cable for high quality digital video. 3<br />
For the connection diagram, see 3 on page 40.<br />
• Use an HDMI cable to connect the HDMI<br />
OUT interconnect on this player to an HDMI<br />
interconnect on a HDMI-compatible display.<br />
• The arrow on the cable connector body<br />
should be face down for correct alignment<br />
with the connector on the player.<br />
You can also adjust the HDMI settings for<br />
resolution and color. For more on these<br />
settings see Video Output settings on page 35.<br />
Switching the HDMI audio setting<br />
You can select the system speaker or the TV<br />
through the HDMI to output the audio sound of<br />
the DVD/CD or USB function. 4 You cannot use<br />
a number of sound functions of this system<br />
when HDMI audio is set to TV.<br />
1 Press SHIFT+SETUP.<br />
2 Use / to select HDMI SET then press<br />
ENTER.<br />
3 Use / to choose HDMI MODE then<br />
press ENTER.<br />
4 Use / to choose the setting you want<br />
then press ENTER.<br />
• AMP – Output Audio sound of the DVD/CD<br />
and USB function signal from this system.<br />
English Français<br />
Deutsch Nederlands<br />
Italiano Español<br />
Note<br />
1 • The component video output is switchable between interlaced and progressive formats. See Video Output settings on page 35.<br />
• While the player is connected using HDMI cable, the component video output cannot be switched between Interlace and<br />
Progressive formats. When HDMI Resolution is set to 720x480i (NTSC)/720x576i (PAL), Interlace format is automatically<br />
selected, and Progressive format is automatically selected in other settings.<br />
2 Consumers should note that not all high-definition television sets are fully compatible with this product and may cause<br />
artifacts to be displayed in the picture. In case of 525 progressive scan picture problems, it is recommended that the user switch<br />
the connection to the ‘standard definition’ output (Interlace). If there are questions regarding our TV set compatibility with this<br />
model, please contact our customer service center.<br />
3 • An HDMI connection can only be made with DVI-equipped components compatible with both DVI and High Bandwidth<br />
Digital Content Protection (HDCP). If you choose to connect to a DVI connector, you will need a separate adaptor (DVIHDMI)<br />
to do so. A DVI connection, however, does not support audio signals. Consult your local audio dealer for more information.<br />
• Depending on the component you have connected, using a DVI connection may result in unreliable signal transfers.<br />
• When you change the component connected to the HDMI output, you will also need to change the HDMI settings to match<br />
the new component (see Video Output settings on page 35 to do this).<br />
4 It is not possible to switch this setting when KURO LINK setting is ON and flat screen TV is in synchronized amp mode.<br />
41<br />
En
11<br />
Other connections<br />
• TV – Output Audio sound of the DVD/CD<br />
and USB function signal from a TV or flat<br />
screen TV. 1<br />
Resetting the HDMI connection<br />
If you get an error message (the display shows<br />
HDMI ERR) or if the screen goes blank (for<br />
example, after changing the resolution), check<br />
the troubleshooting guide on page 53. If this<br />
doesn’t solve the problem, follow the steps<br />
below to reset the HDMI connection.<br />
1 Press SHIFT+SETUP.<br />
2 Use / to select INITIAL then press<br />
ENTER.<br />
3 Use / to choose HDMIINIT then press<br />
ENTER.<br />
4 Press ENTER while INIT OK is blinking.<br />
The system will restart and the HDMI settings<br />
are automatically reset to the factory defaults.<br />
See Video Output settings on page 35 for more<br />
on these settings.<br />
About HDMI<br />
HDMI (High Definition Multimedia Interface)<br />
supports both video and audio on a single<br />
digital connection for use with DVD players,<br />
DTV, set-top boxes, and other AV devices. HDMI<br />
was developed to provide the technologies of<br />
High Bandwidth Digital Content Protection<br />
(HDCP) as well as Digital Visual Interface (DVI)<br />
in one specification. HDCP is used to protect<br />
digital content transmitted and received by DVIcompliant<br />
displays.<br />
HDMI has the capability to support standard,<br />
enhanced, or high-definition video plus<br />
standard to multichannel surround-sound<br />
audio. HDMI features include uncompressed<br />
digital video, a bandwidth of up to five<br />
gigabytes per second (with HDTV signals), one<br />
connector (instead of several cables and<br />
connectors), and communication between the<br />
AV source and AV devices such as DTVs.<br />
HDMI, the HDMI logo and High-Definition<br />
Multimedia Interface are trademarks or<br />
registered trademarks of HDMI Licensing, LLC.<br />
Connecting external antennas<br />
For an external AM antenna, use 5 m to 6 m of<br />
vinyl-insulated wire and set up either indoors or<br />
outdoors. Leave the loop antenna connected.<br />
Only use the included AM loop antenna.<br />
For an external FM antenna, use a PAL<br />
connector to hook up an external FM antenna.<br />
For the connection diagram, see 4 on page 40.<br />
Bluetooth ® AD<strong>AP</strong>TER for<br />
Wireless Enjoyment of Music<br />
HTZ280/282DVD-<strong>AP</strong> models only<br />
Wireless music play<br />
When the Bluetooth AD<strong>AP</strong>TER (Pioneer Model<br />
No. AS-BT100) is connected to this unit, a<br />
product equipped with Bluetooth wireless<br />
technology (portable cell phone, digital music<br />
player, etc.) can be used to listen to music<br />
wirelessly. 2 Also, by using a commercially<br />
available transmitter supporting Bluetooth<br />
wireless technology, you can listen to music on<br />
a device not equipped with Bluetooth wireless<br />
technology. The AS-BT100 model supports<br />
SCMS-T contents protection, so music can<br />
also be enjoyed on devices equipped with<br />
SCMS-T type Bluetooth wireless technology.<br />
Note<br />
1 This makes it possible to use the TV’s built-in speakers to listen to the audio input from a DVD or USB device. Audio output from<br />
the HDMI terminal is 2 channel linear PCM only. In this event, no sound will be heard from this unit’s speakers (or headphones).<br />
All other audio sources (including TUNER) are output from this unit normally.<br />
2 It may be necessary that the Bluetooth wireless technology enabled device supports A2DP profiles.<br />
42<br />
En
Other connections 11<br />
Remote control operation<br />
The remote control supplied with this system<br />
allows you to play and stop media, and perform<br />
other operations. 1<br />
Bluetooth<br />
wireless<br />
technology<br />
enabled device:<br />
cell phone<br />
Bluetooth wireless<br />
technology<br />
enabled device:<br />
Digital music<br />
player<br />
Bluetooth ®<br />
AD<strong>AP</strong>TER<br />
Music data<br />
This unit<br />
Remote control operation<br />
Device not<br />
equipped with<br />
Bluetooth wireless<br />
technology:<br />
Digital music<br />
player<br />
+<br />
Bluetooth audio<br />
transmitter<br />
(sold commercially)<br />
Connecting Optional Bluetooth<br />
AD<strong>AP</strong>TER<br />
1 Switch the system into standby and<br />
connect Bluetooth AD<strong>AP</strong>TER to the AD<strong>AP</strong>TER<br />
PORT located in the rear panel.<br />
For the connection diagram, see 5 on page 40.<br />
2 Press STANDBY/ON.<br />
3 Press AD<strong>AP</strong>TER PORT and to switch to BT<br />
AUDIO input mode. 2<br />
Pairing Bluetooth AD<strong>AP</strong>TER and<br />
Bluetooth wireless technology<br />
device<br />
“Pairing” must be done before you start<br />
playback of Bluetooth wireless technology<br />
content using Bluetooth AD<strong>AP</strong>TER. Make sure<br />
to perform pairing first time you operate the<br />
system or any time pairing data is cleared.<br />
“Pairing” is the step necessary to register<br />
Bluetooth wireless technology device to enable<br />
Bluetooth communications. 3 For more details,<br />
see also the operating instructions of your<br />
Bluetooth wireless technology device.<br />
1 Press SHIFT+SETUP to select BT SETUP,<br />
then press ENTER.<br />
2 Use / to select PAIRING, then press<br />
ENTER.<br />
3 Select the PIN code to be used from 0000/<br />
1234/8888 using /, then press ENTER.<br />
PAIRING blinks.<br />
CAUTION<br />
• You can use any of 0000/1234/8888 PIN<br />
codes. Bluetooth wireless technology<br />
device using any other PIN code cannot be<br />
used with this system.<br />
4 Switch on the Bluetooth wireless<br />
technology device that you want to make<br />
pairing, place it near the system and set it<br />
into the pairing mode.<br />
English Français<br />
Deutsch Nederlands<br />
Italiano Español<br />
Note<br />
1 • It may be necessary that the Bluetooth wireless technology enabled device supports AVRCP profiles.<br />
• Remote control operations cannot be guaranteed for all Bluetooth wireless technology enabled devices.<br />
2 When the Bluetooth AD<strong>AP</strong>TER is not plugged in the AD<strong>AP</strong>TER PORT, BT AUDIO input mode cannot be entered even if<br />
AD<strong>AP</strong>TER PORT is pressed.<br />
3 • Pairing is required when you first use Bluetooth wireless technology device and Bluetooth AD<strong>AP</strong>TER.<br />
• To enable Bluetooth communication, pairing should be done with both of your system and Bluetooth wireless technology<br />
device.<br />
43<br />
En
11<br />
Other connections<br />
5 Check to see that the Bluetooth AD<strong>AP</strong>TER<br />
is detected by the Bluetooth wireless<br />
technology device.<br />
When the Bluetooth wireless technology<br />
device detects the Bluetooth AD<strong>AP</strong>TER, the<br />
adapter’s identification “AS-BT100” appears in<br />
the Bluetooth wireless technology device list. 1<br />
6 From the Bluetooth wireless technology<br />
device list, select Bluetooth AD<strong>AP</strong>TER and<br />
enter the PIN code selected in the step 3. 2<br />
Listening to Music Contents of<br />
Bluetooth wireless technology<br />
device with Your System<br />
1 Press AD<strong>AP</strong>TER PORT and to switch to BT<br />
AUDIO input mode.<br />
2 Connect the Bluetooth wireless<br />
<br />
technology device to the Bluetooth<br />
(remote control)<br />
AD<strong>AP</strong>TER.<br />
When Bluetooth wireless technology device is Clearing Pairing 5<br />
connected:<br />
Bluetooth wireless technology device name<br />
appears in the system display. 3<br />
When Bluetooth wireless technology device is<br />
not connected:<br />
NODEVICE appears in the system display.<br />
3 Start playback of music contents stored in<br />
Bluetooth wireless technology device.<br />
The following operations are now possible for<br />
Bluetooth wireless technology devices, using<br />
the button at the top of the system and remote<br />
controller. 4<br />
Button<br />
/ (system)<br />
What it does<br />
Starts normal playback and<br />
pauses/unpauses playback.<br />
Button What it does<br />
<br />
Starts normal playback.<br />
(remote control)<br />
<br />
Pauses playback.<br />
(remote control)<br />
(system/ Stops playback.<br />
remote control)<br />
<br />
(remote control)<br />
<br />
(remote control)<br />
<br />
(remote control)<br />
Press to start fast reverse<br />
scanning.<br />
Press to start fast forward<br />
scanning.<br />
Skips to the start of the<br />
current file, then previous<br />
files.<br />
Skips to the next file.<br />
1 Press SHIFT+SETUP, select BT SETUP,<br />
then press ENTER.<br />
2 Use / to select PAIR CLR, then press<br />
ENTER.<br />
3 When CLR OK appears, press ENTER.<br />
The Bluetooth ® word mark and logos are<br />
registered trademarks owned by Bluetooth<br />
SIG, Inc. and any use of such marks by Pioneer<br />
Corporation is under license. Other<br />
trademarks and trade names are those of their<br />
respective owners.<br />
Note<br />
1 When a Bluetooth wireless technology device does not appear in the list of detected devices or has no display, the Bluetooth<br />
wireless technology device list does not appear. In some cases, you may pair the Bluetooth AD<strong>AP</strong>TER and that Bluetooth wireless<br />
technology device by using the pairing mode.<br />
2 PIN code may in some case be referred to as PASSKEY.<br />
3 The system can display alphanumeric characters only. Other characters may not be displayed correctly.<br />
4• Bluetooth wireless technology device should be compatible with AVRCP profile.<br />
• Depending on Bluetooth wireless technology device you use, operation may differ from what is shown in this table.<br />
5 • Clearing should be done with Bluetooth wireless technology device being disconnected.<br />
• When you connect Bluetooth wireless technology device again after clearing, repeat the pairing steps referring to Pairing<br />
Bluetooth AD<strong>AP</strong>TER and Bluetooth wireless technology device on page 43.<br />
44<br />
En
USB<br />
MAIN MIC SUB PHONES<br />
KURO LINK 12<br />
Chapter 12<br />
KURO LINK<br />
Not applicable to the HTZ180/181DVD models<br />
By connecting this unit to a KURO LINKcompatible<br />
Pioneer flat screen TV with a HDMI<br />
cable, you can control this unit from the<br />
remote control of a connected flat screen TV,<br />
as well as have the connected flat screen TV<br />
automatically change inputs in response to<br />
operations carried out on this unit.<br />
In addition, when language information is<br />
input from the connected flat screen TV, this<br />
unit’s GUI display language automatically<br />
changes (only when playback is stopped and<br />
GUI screen is not displayed, with DVD/CD<br />
function only).<br />
Refer to the operating instructions for your flat<br />
screen TV for more information about which<br />
operations can be carried out by connecting<br />
via HDMI cable.<br />
• You cannot use this function with<br />
components that do not support KURO<br />
LINK.<br />
• We cannot guarantee this unit will work<br />
with KURO LINK-compatible components<br />
other than those made by Pioneer.<br />
Making the KURO LINK<br />
connections<br />
You can use synchronized operation for a<br />
connected flat screen TV.<br />
Be sure to connect the flat screen TV’s audio<br />
cable to the audio input of this unit.<br />
For the connection diagram, see 3 on page 40.<br />
• KURO LINK may not operate properly if you<br />
do not use a High Speed HDMI cable.<br />
• Connect the flat screen TV directly to this<br />
unit. Interrupting a direct connection with<br />
other amps or an AV converter (such as an<br />
HDMI switch) can cause operational errors.<br />
HDMI input<br />
HDMI output<br />
HDMI input<br />
HDMI OUT<br />
KURO LINK-compatible<br />
Pioneer flat screen TV<br />
HDMI cable<br />
Other amps<br />
or AV converter<br />
HDMI cable<br />
This unit<br />
Important<br />
• When connecting this system or changing<br />
connections, be sure to switch the power<br />
off and disconnect the power cord from the<br />
wall socket.<br />
After completing all connections, connect<br />
the power cords to the wall socket.<br />
KURO LINK Setup<br />
You must adjust the settings of this unit as well<br />
as KURO LINK-compatible connected<br />
components in order to make use of the KURO<br />
LINK function. For more information see the<br />
operating instructions for each component.<br />
Setting the KURO LINK mode<br />
Choose whether to set this unit’s KURO LINK<br />
function ON or OFF. You will need to set it to<br />
LINK ON to use the KURO LINK function.<br />
• When using a TV that does not support the<br />
KURO LINK function, set this to LINK OFF.<br />
English Deutsch Français<br />
Italiano Nederlands<br />
Español<br />
45<br />
En
12<br />
KURO LINK<br />
1 Press SHIFT+SETUP.<br />
2 Use / to select HDMI SET then press<br />
ENTER.<br />
3 Use / to select KURO LINK, then<br />
press ENTER.<br />
4 Use / to select the setting then press<br />
ENTER to confirm.<br />
• LINK ON – Enables the KURO LINK<br />
function.<br />
• LINK OFF – The KURO LINK is disabled.<br />
Synchronized operations cannot be used.<br />
Before using synchronization<br />
Once you have finished all connections and<br />
settings, you must:<br />
1 Put all components into standby mode.<br />
2 Turn the power ON for all components,<br />
with the power for the flat screen TV being<br />
turned on last.<br />
3 Choose DVD/CD and see if video output<br />
displays properly on the screen or not.<br />
Synchronized amp mode<br />
The synchronized amp mode can be set from<br />
the KURO LINK-compatible TV’s remote<br />
control. See the explanation below for<br />
operations in the synchronized amp mode.<br />
These functions are set from the TV’s menu<br />
screen. For more information, refer to the<br />
operating instructions of the KURO LINKcompatible<br />
TV.<br />
Synchronized amp mode operations<br />
When using the synchronized amp mode, the<br />
KURO LINK-compatible component<br />
connected to this unit operates in sync as<br />
described below.<br />
• The unit’s volume can be set and the sound<br />
can be muted using the TV’s remote<br />
control.<br />
• When the TV’s power is set to standby, the<br />
unit’s power is also set to standby. (The<br />
unit’s power is automatically turned off<br />
when the TV’s power is turned off while a<br />
video DVD is being played on the unit.<br />
However, the unit’s power may not turn off<br />
automatically in some cases, for example,<br />
if you are listening to a CD or radio and turn<br />
off the output device.)<br />
• The unit’s input switches automatically<br />
when the TV’s channel is switched.<br />
• The synchronized amp mode remains in<br />
effect even if the unit’s input is switched to<br />
a function other than the DVD/CD.<br />
The operations below can also be used on<br />
Pioneer KURO LINK-compatible flat screen<br />
TVs.<br />
• When the unit’s volume is adjusted or the<br />
sound is muted, the volume status is<br />
displayed on the flat screen TV’s screen.<br />
• When the OSD language is switched on<br />
the flat screen TV, the unit’s language<br />
setting also switches accordingly.<br />
Canceling synchronized amp mode<br />
• When the synchronized amp mode is<br />
canceled, the unit’s power turns off if you<br />
were viewing a TV program on the TV.<br />
• When in the synchronized amp mode, the<br />
synchronized amp mode is canceled when<br />
the unit’s power is turned off. To turn the<br />
synchronized amp mode back on, select<br />
the synchronized amp mode using the TV’s<br />
remote control.<br />
• When in the synchronized amp mode, the<br />
synchronized amp mode is canceled if an<br />
operation that produces sound from the TV<br />
is performed from the TV’s menu screen,<br />
etc.<br />
46<br />
En
Additional information 13<br />
Chapter 13<br />
Additional information<br />
Disc/content format playback<br />
compatibility<br />
This player is compatible with a wide range of<br />
disc types (media) and formats. Playable discs<br />
will generally feature one of the following logos<br />
on the disc and/or disc packaging. Note<br />
however that some disc types, such as<br />
recordable CD and DVD, may be in an<br />
unplayable format.<br />
See the Disc compatibility table below for more<br />
information.<br />
DVD-Video DVD-R DVD-RW<br />
Audio CD Video CD CD-R CD-RW<br />
Fujicolor CD<br />
• This unit will play DVD+R/+RW discs.<br />
• is a trademark of FUJIFILM Corporation.<br />
• is a trademark of DVD Format/Logo<br />
Licensing Corporation.<br />
• Also compatible with KODAK Picture CD.<br />
This player supports the IEC’s Super VCD<br />
standard for superior picture quality, dual<br />
soundtracks, and widescreen support.<br />
Super Video CD (Super VCD)<br />
About DualDisc playback<br />
A DualDisc is a new two -sided disc, one side<br />
of which contains DVD content video, audio,<br />
etc. while the other side contains non-DVD<br />
content such as digital audio material.<br />
The non-DVD, audio side of the disc is not<br />
compliant with the CD Audio specification and<br />
therefore may not play.<br />
The DVD side of a DualDisc plays in this<br />
product. DVD-Audio content will not play.<br />
For more detailed information on the DualDisc<br />
specification, please refer to the disc<br />
manufacturer or disc retailer.<br />
Disc compatibility table<br />
Media Compatible formats<br />
CD-R/-RW<br />
DVD-R/-RW<br />
PC-created<br />
disc<br />
• CD-Audio, Video CD/Super VCD,<br />
ISO 9660 CD-ROM* containing MP3,<br />
WMA, MPEG-4 AAC, JPEG or DivX<br />
video/WMV files.<br />
* ISO 9660 Level 1 or 2 compliant. CD<br />
physical format: Mode1, Mode2 XA<br />
Form1. Romeo and Joliet file systems<br />
are both compatible.<br />
• Multi-session playback: No<br />
• Unfinalized disc playback: No<br />
• DVD-Video (Video mode), Video<br />
Recording (VR)*, UDF Bridge DVD-ROM<br />
containing MP3, WMA, MPEG-4 AAC,<br />
JPEG or DivX video/WMV files.<br />
* Edit points may not play exactly as<br />
edited; screen may go momentarily<br />
blank at edited points.<br />
• Multi Border playback: No<br />
• Unfinalized playback: No<br />
• Discs recorded using a PC may not<br />
be playable due to the setting of the<br />
software used to create the disc. In<br />
these instances, check the DVD-R/-RW<br />
or CD-R/-RW software manual or disc<br />
boxes for more on compatibility.<br />
• Discs recorded in packet write mode<br />
are not compatible.<br />
English Français<br />
Deutsch Nederlands<br />
Italiano Español<br />
47<br />
En
13<br />
Additional information<br />
Media<br />
Compressed<br />
audio<br />
JPEG file<br />
Compatible formats<br />
• MPEG-1 Audio Layer 3 (MP3),<br />
Windows Media Audio (WMA), MPEG-<br />
4 AAC<br />
• Sampling rates: 32 kHz/44.1 kHz/<br />
48 kHz<br />
• Bit-rates: Any (128 kbps or higher<br />
recommended)<br />
• VBR (variable bit rate) MP3/WMA/<br />
MPEG-4 AAC playback: No<br />
• WMA lossless encoding: No<br />
• DRM (Digital Rights Management)<br />
compatible: Yes (DRM-protected audio<br />
files will not play in this player.)<br />
• File extensions: .mp3, .wma, .m4a<br />
(these must be used for the player to<br />
recognize MP3/WMA/MPEG-4 AAC files)<br />
• File structure (may differ): Up to 299<br />
folders on a disc; up to 648 folders and<br />
files (combined) within each folder<br />
• Baseline JPEG and EXIF 2.2* still<br />
image files up to a resolution of<br />
3072 x 2048<br />
*File format for digital still cameras<br />
• Progressive JPEG compatible: No<br />
• File extensions: .jpg (must be used<br />
for the player to recognize JPEG files)<br />
• File structure (may differ): Up to 299<br />
folders on a disc; up to 648 folders and<br />
files (combined) within each folder<br />
About DVD+R/DVD+RW compatibility<br />
Only DVD+R/DVD+RW discs recorded in<br />
‘Video Mode (DVD Video Mode)’ which have<br />
been finalized, can be played back. However,<br />
some editing made during the recording may<br />
not be played back accurately.<br />
About DivX<br />
DivX is a digital video format created by DivX,<br />
Inc. This player can play DivX videos recorded<br />
on DVDs, CDs, or USB storage devices.<br />
Keeping the same terminology as DVD-Video,<br />
individual DivX video files are called “Titles”.<br />
DivX video compatibility<br />
• Plays DivX ® video 1<br />
• File extensions: .avi and .divx (these must<br />
be used for the player to recognize DivX<br />
video files). Note that all files with the .avi<br />
extension are recognized as MPEG4, but not<br />
all of these are necessarily DivX video files<br />
and therefore may not be playable on this<br />
player.<br />
Displaying DivX subtitle files<br />
The font sets listed below are available for DivX<br />
external subtitle files. You can see the proper<br />
font set on-screen by setting the Subtitle<br />
Language (in Language settings on page 36)<br />
to match the subtitle file. 2<br />
Group 1: Albanian (sq), Basque (eu), Catalan (ca),<br />
Danish (da), Dutch (nl), English (en), Faroese (fo),<br />
Finnish (fi), French (fr), German (de), Icelandic (is),<br />
Irish (ga), Italian (it), Norwegian (no), Portuguese (pt),<br />
Rhaeto-Romanic (rm), Scottish (gd), Spanish (es),<br />
Swedish (sv)<br />
Group 2: Albanian (sq), Croatian (hr), Czech (cs),<br />
Hungarian (hu), Polish (pl), Romanian (ro), Slovak (sk),<br />
Slovenian (sl)<br />
Note<br />
1 Playback of .avi video files larger than 4 GB is not possible.<br />
2 • For external subtitle files the following subtitle format filename extensions are supported (please note that these files are not<br />
shown within the disc navigation menu): .srt, .sub, .ssa, .smi<br />
• Some external subtitle files may be displayed incorrectly or not at all.<br />
• The filename of the movie file has to be repeated at the beginning of the filename for the external subtitle file.<br />
• The number of external subtitle files which can be switched for the same movie file is limited to a maximum of 10.<br />
48<br />
En
Additional information 13<br />
Group 3: Bulgarian (bg), Byelorussian (be),<br />
Macedonian (mk), Russian (ru), Serbian (sr),<br />
Ukrainian (uk)<br />
Group 4: Hebrew (iw), Yiddish (ji)<br />
Group 5: Turkish (tr)<br />
DivX ® is a registered trademark of DivX, Inc., and<br />
is used under license.<br />
About WMV<br />
WMV is an acronym for Windows Media Video<br />
and refers to a video compression technology<br />
developed by Microsoft Corporation. WMV<br />
content can be encoded by using Windows<br />
Media Encoder.<br />
• This player is compatible with WMV9 files<br />
that are encoded by using the Windows<br />
Media Encoder 9 Series, with .wmv as an<br />
extension.<br />
• Compatible with size under 720 x 576 pixels/<br />
720 x 480 pixels.<br />
• Advanced Profile is not supported.<br />
• DRM-protected video files will not play in<br />
this player.<br />
• File extensions .wmv.<br />
• Compatible with bit rate under 192 kbps.<br />
About MPEG-4 AAC<br />
Advanced Audio Coding (AAC) is at the core of<br />
the MPEG-4 AAC standard, which incorporates<br />
MPEG-2 AAC, forming the basis of the MPEG-4<br />
audio compression technology. The file format<br />
and extension used depend on the application<br />
used to encode the AAC file. This unit plays<br />
back AAC files encoded by iTunes ® bearing the<br />
extension ‘.m4a’. DRM-protected files will not<br />
play, and files encoded with some versions of<br />
iTunes ® may not play, or filenames may display<br />
incorrectly.<br />
Apple and iTunes are trademarks of Apple Inc.,<br />
registered in the U.S. and other countries.<br />
About WMA<br />
This player can playback Windows Media<br />
Audio content.<br />
WMA is an acronym for Windows Media Audio<br />
and refers to an audio compression technology<br />
developed by Microsoft Corporation. WMA<br />
content can be encoded by using Windows<br />
Media Player version 7.7.1, Windows Media<br />
Player for Windows XP, or Windows Media<br />
Player 9 series.<br />
Windows Media is a trademark of Microsoft<br />
Corporation.<br />
This product includes technology owned by<br />
Microsoft Corporation and cannot be used or<br />
distributed without a license from Microsoft<br />
Licensing, Inc.<br />
Using and taking care of discs<br />
Handling discs<br />
Hold the disc by its edges when handling so as<br />
not to leave fingerprints, dirt or scratches on<br />
either side of the disc. Damaged or dirty discs<br />
can affect playback performance.<br />
If a disc becomes marked with fingerprints,<br />
dust, etc., clean using a soft, dry cloth.<br />
Wipe lightly from the center of the disc using<br />
straight strokes. Don’t wipe the disc surface<br />
with circular strokes.<br />
If necessary, use a cloth soaked in alcohol, or a<br />
commercially available CD/DVD cleaning kit to<br />
clean a disc more thoroughly. Never use<br />
benzine, thinner or other cleaning agents such<br />
as those designed for cleaning vinyl records.<br />
Storing discs<br />
Avoid leaving discs in excessively cold, humid,<br />
or hot environments (including under direct<br />
sunlight). Don’t glue paper or put stickers onto<br />
the disc, or use a pencil, ball-point pen or other<br />
sharp-tipped writing instrument. These could<br />
all damage the disc.<br />
English Français<br />
Deutsch Nederlands<br />
Italiano Español<br />
49<br />
En
13<br />
Additional information<br />
Discs to avoid<br />
Discs spin at high speed inside the player. If a<br />
disc is cracked, chipped, warped, or otherwise<br />
damaged, don’t risk using it in your player —<br />
you could end up damaging the unit.<br />
This unit is designed for use with conventional,<br />
fully circular discs only. Pioneer disclaims all<br />
liability arising in connection with the use of<br />
shaped discs.<br />
DVD Video regions<br />
All DVD Video discs carry a region mark that<br />
indicates which region(s) of the world the disc<br />
is compatible with. Your DVD system also has<br />
a region mark (on the rear panel). Discs from<br />
incompatible regions will not play in this<br />
player. Discs marked ALL play in any player.<br />
When you insert a disc that cannot be played<br />
on this player, one of the following messages is<br />
displayed:<br />
Incompatible disc region number<br />
Can’t play disc<br />
Installation and maintenance<br />
Hints on installation<br />
We want you to enjoy using this system for<br />
years to come, so please bear in mind the<br />
following points when choosing a location:<br />
Do...<br />
Use in a well-ventilated room.<br />
Place on a solid, flat, level surface, such as a<br />
table, shelf or stereo rack.<br />
Don’t...<br />
Use in a place exposed to high temperatures or<br />
humidity, including near radiators and other<br />
heat-generating appliances.<br />
Place on a window sill or other place where the<br />
system will be exposed to direct sunlight.<br />
Use in an excessively dusty or damp<br />
environment.<br />
Place directly on top of an amplifier, or other<br />
component in your stereo system that becomes<br />
hot in use.<br />
Use near a television or monitor as you may<br />
experience interference — especially if the<br />
television uses an indoor antenna.<br />
Use in a kitchen or other room where the system<br />
may be exposed to smoke or steam.<br />
Use on a thick rug or carpet, or cover with cloth<br />
— this may prevent proper cooling of the system<br />
unit.<br />
Place on an unstable surface, or one that is not<br />
large enough to support all four of the system<br />
unit’s feet.<br />
Cleaning the pickup lens<br />
The DVD player’s lens should not become dirty<br />
in normal use, but if for some reason it should<br />
malfunction due to dust or dirt, consult your<br />
nearest Pioneer authorized service center.<br />
Although lens cleaners are commercially<br />
available, we do not recommend using them<br />
since some may damage the lens.<br />
Problems with condensation<br />
Condensation may form inside the player if it is<br />
brought into a warm room from outside, or if<br />
the temperature of the room rises quickly.<br />
Although the condensation won’t damage the<br />
player, it may temporarily impair performance.<br />
Leave it to adjust to the warmer temperature<br />
for about an hour before switching on.<br />
Moving the system unit<br />
If you need to move the main unit, first remove<br />
a disc if there’s one in the player, then press<br />
STANDBY/ON on the front panel to turn the<br />
system off. Wait for -OFF- to disappear from<br />
the display, then unplug the power cord. 1<br />
Never lift or move the unit during playback —<br />
discs rotate at high speeds and may damage.<br />
Note<br />
1 Unplugging the unit before -OFF- disappears from the display may cause the system to return to the factory settings.<br />
50<br />
En
Additional information 13<br />
Screen sizes and disc formats<br />
DVD-Video discs come in different screen<br />
aspects, ranging from TV programs, which are<br />
generally 4:3, to CinemaScope widescreen<br />
movies 1 , with an aspect ratio of up to about 7:3.<br />
Televisions also come in different aspect ratios;<br />
‘standard’ 4:3 and widescreen 16:9. 2<br />
Widescreen TV users<br />
If you have a widescreen TV, the TV Screen<br />
setting (page 35) of this player should be set<br />
to 16:9 (Wide) or 16:9 (Compressed).<br />
When you watch discs recorded in 4:3 format<br />
with the 16:9 (Wide) setting, you can use the<br />
TV controls to select how the picture is<br />
presented. Your TV may offer various zoom and<br />
stretch options; see the instructions that came<br />
with your TV for details.<br />
Please note that some movie aspect ratios are<br />
wider than 16:9, so even though you have a<br />
widescreen TV, these discs will still play in a<br />
‘letter box’ style with black bars at the top and<br />
bottom of the screen.<br />
Standard TV users<br />
If you have a standard TV, the TV Screen<br />
setting (page 35) of this player should be<br />
set to 4:3 (Letter Box) or 4:3 (Pan & Scan),<br />
depending on which you prefer.<br />
Set to 4:3 (Letter Box), widescreen<br />
discs are shown with black bars top<br />
and bottom.<br />
Please note that many widescreen discs<br />
override the player’s setting so that the disc<br />
is shown in letter box format regardless of the<br />
setting.<br />
TV system setting<br />
The default setting of this system is AUTO, and<br />
unless you notice that the picture is distorted<br />
when playing some discs, you should leave it<br />
set to AUTO. If you find picture distortion with<br />
some discs, set the TV system to match your<br />
country or region’s system. However, this may<br />
restrict the kinds of disc you can watch. See<br />
the table for the kinds of discs compatible with<br />
each setting (AUTO, PAL and NTSC). 3<br />
1 Press SHIFT+SETUP.<br />
Set to 4:3 (Pan & Scan), widescreen<br />
discs are shown with the left and right<br />
sides cropped. Although the picture<br />
looks larger, you don’t actually see<br />
the whole picture.<br />
2 Use / to select SYS SET then press<br />
ENTER.<br />
3 Use / to choose TV SYS then press<br />
ENTER.<br />
The TV system changes as follows:<br />
• AUTO NTSC<br />
• NTSC PAL<br />
• PAL AUTO<br />
English Français<br />
Deutsch Nederlands<br />
Italiano Español<br />
Note<br />
1 Many widescreen discs override the system’s settings so that the disc is shown in letterbox format regardless of the setting.<br />
2Using the 16:9 (Wide) or 16:9 (Compressed) setting with a standard 4:3 TV, or one of the 4:3 settings with a widescreen TV,<br />
will result in picture distortion.<br />
3 Most models of the newly developed countdown PAL TV system detect 50 Hz (PAL)/60 Hz (NTSC) and automatically switch<br />
vertical amplitude, resulting in a display without vertical shrinkage. However, in some cases, the image may appear without color.<br />
If your PAL TV does not have a V-Hold control, you may not be able to watch NTSC discs because of picture roll. If the TV has a<br />
V-Hold control, adjust it until the picture stops rolling. On some TVs, the picture may shrink vertically, leaving black bands at the<br />
top and bottom of the screen.<br />
51<br />
En
13<br />
Additional information<br />
4 Press ENTER while CHANGE is blinking.<br />
The system will automatically enter standby<br />
mode, then turn on again. You’ll see the new TV<br />
system setting in the display after seeing<br />
POWER ON. 1<br />
Player setting<br />
Media Type Format NTSC PAL AUTO<br />
DVD/Super VCD/<br />
Video CD/DivX<br />
video/WMV<br />
CD/MP3/WMA/<br />
MPEG-4 AAC/<br />
JPEG/no disc<br />
NTSC NTSC PAL NTSC<br />
PAL NTSC PAL PAL<br />
— NTSC PAL NTSC or<br />
PAL<br />
Setting the Key Lock<br />
You can disable the front panel buttons by<br />
switching the Key Lock feature on.<br />
1 Press SHIFT+SETUP.<br />
2 Use / to select SYS SET then press<br />
ENTER.<br />
3 Use / to choose KEYLOCK then press<br />
ENTER.<br />
4 Use / to select LOCK ON or LOCK OFF<br />
then press ENTER.<br />
Frequency step setting<br />
Not applicable to Saudi Arabia, Israel, South<br />
Africa, other middle eastern contries and duty<br />
free models<br />
If you find that you can’t tune into stations<br />
successfully, the frequency step may not be<br />
suitable for your country/region.<br />
1 Press SHIFT+SETUP.<br />
2 Use / to choose AM 9K/10K then<br />
press ENTER.<br />
3 Use / to select AM 9K or AM 10K then<br />
press ENTER.<br />
Dimming the Display<br />
You can adjust the brightness of the text in the<br />
front panel display.<br />
1 Press SHIFT+SETUP.<br />
2 Use / to select SYS SET then press<br />
ENTER.<br />
3 Use / to select DIMMER then press<br />
ENTER.<br />
This is shown in the front panel display.<br />
52<br />
En<br />
4 Use / to select LIGHT or DARK then<br />
press ENTER.<br />
Note<br />
1 You have to switch the player into standby (press STANDBY/ON) before each change.
Additional information 13<br />
Troubleshooting<br />
Incorrect operations are often mistaken for trouble and malfunctions. If you think that there is<br />
something wrong with this component, check the points below. Sometimes the trouble may lie in<br />
another component. Investigate the other components and electrical appliances being used. If the<br />
trouble cannot be rectified even after exercising the checks listed below, ask your nearest Pioneer<br />
authorized service center or your dealer to carry out repair work.<br />
• If the system does not operate normally due to external effects such as static electricity,<br />
disconnect the plug from the outlet and insert again to return to normal operating conditions.<br />
General<br />
Problem<br />
The power does not turn<br />
on, or switches off<br />
suddenly (an error<br />
message may be<br />
displayed at startup).<br />
No sound is output when<br />
a function is selected.<br />
No sound from surround<br />
or center speakers.<br />
Can’t operate the remote<br />
control.<br />
The microphone can’t be<br />
heard.<br />
Feedback noise when<br />
mic is switched on.<br />
TRAYLOCK shows in the<br />
display and the tray can’t<br />
be ejected.<br />
Remedy<br />
• Wait for one minute before switching back on.<br />
• Make sure there are no loose strands of wire touching the unit. This could cause<br />
the system to shut off automatically.<br />
• Check that the speakers are connected correctly.<br />
• Make sure the voltage of the mains power source is correct for the model.<br />
• Try reducing the volume level.<br />
• If the problem persists, take it to your nearest Pioneer authorized service center or<br />
your dealer for servicing.<br />
• If you’re using the line input, make sure the component is connected correctly (see<br />
Connecting auxiliary audio components on page 40).<br />
• No audio is output from the speakers connected to this unit if HDMI audio mode is<br />
set to TV (page 41).<br />
• Press MUTE on the remote control to turn muting off.<br />
• Turn up the volume.<br />
• Refer to Setting the channel levels on page 17 to check the speaker levels.<br />
• When TUNER, AD<strong>AP</strong>TER PORT or LINE is selected, you can only hear the source<br />
in stereo. Switch the input source to DVD/CD or USB for multichannel sound.<br />
• Check that you haven’t selected the STEREO mode (see Listening in surround<br />
sound on page 22).<br />
• Check if a microphone is connected or not.<br />
• Connect the speakers properly (see Basic connections on page 9).<br />
• Replace the batteries (see Putting the batteries in the remote control on page 15).<br />
• Operate within 7 m, 30° of the remote sensor (see Using the remote control on<br />
page 16).<br />
• Remove any obstacles or operate from another position.<br />
• Avoid exposing the remote sensor on the front panel to direct light.<br />
• You are only using one microphone and it’s plugged into the MIC (SUB) jack. The<br />
MIC (SUB) jack can only be used if there is also a microphone plugged into the MIC<br />
(MAIN) jack.<br />
• Adjust the MIC VOL +/–.<br />
• The mic is pointing toward the speakers. Keep the mic pointed away from the<br />
speakers.<br />
• The microphone level is set too high. Turn down the mic control level.<br />
• Press and hold OPEN/CLOSE on the front panel for about eight seconds. Then<br />
the tray can be opened/closed using OPEN/CLOSE.<br />
English Français<br />
Deutsch Nederlands<br />
Italiano Español<br />
53<br />
En
13<br />
Additional information<br />
DVD/CD/Video CD player<br />
Problem<br />
The disc is ejected<br />
automatically after<br />
loading.<br />
Playback not possible.<br />
Picture playback stops<br />
and buttons cannot be<br />
used.<br />
Settings are canceled.<br />
No picture/No color.<br />
Screen is stretched or<br />
aspect doesn’t change.<br />
When recorded on a VCR<br />
or passed through an AV<br />
selector, there is<br />
disturbance in the<br />
playback picture.<br />
Picture disturbance<br />
during playback or dark.<br />
Noticeable difference in<br />
DVD and CD volume.<br />
CD-ROM disc is not<br />
recognized.<br />
DVD-ROM disc is not<br />
recognized.<br />
Files don’t show up in the<br />
Disc Navigator/Photo<br />
Browser.<br />
Can’t play WMA or<br />
MPEG-4 AAC files.<br />
Remedy<br />
• Clean the disc and align the disc properly in the disc guide.<br />
• If the region number on a DVD-video disc does not match the number on the<br />
player, the disc cannot be used (see DVD Video regions on page 50). In this instance,<br />
one of the following messages appears on screen: Incompatible disc region<br />
number/Can’t play disc.<br />
• Allow time for any condensation inside the player to evaporate. Avoid using the<br />
player near an air-conditioning unit.<br />
• If the disc is loaded upside down, reload the disc with label side face up.<br />
• Press (stop), then (play) to start playback again.<br />
• Switch the power off once, then on again using the front panel STANDBY/ON<br />
button.<br />
• When the power is cut, settings will be canceled.<br />
• Check that connections are correct and that plugs are inserted fully.<br />
• Check the manual of the TV/monitor to make sure the settings are correct.<br />
• If the Progressive setting is selected and you have used component video cables<br />
to connect a TV that is not compatible with a progressive scan signal, you will not<br />
be able to see any picture at all. With your TV connected using either the<br />
composite or S-video terminals, change the Component Out setting to Interlace<br />
(see Video Output settings on page 35).<br />
• The TV Screen setting is incorrect. Set the TV Screen option to match the TV/<br />
monitor you’re using (see Video Output settings on page 35).<br />
• This system uses copy-protection technology which may prevent recording or<br />
cause picture problems when connected through a VCR or AV selector. This is not a<br />
malfunction.<br />
• This player is compatible with Macro-Vision System copy guard. Some discs<br />
include a copy prevention signal, and when this type of disc is played back, stripes<br />
etc., may appear on some sections of the picture depending on the TV. This is not a<br />
malfunction.<br />
• Discs respond differently to particular player functions. This may result in the<br />
screen becoming black for a brief instant or shaking slightly when the function is<br />
executed. These problems are largely due to differences between discs and disc<br />
content and are not malfunctions of this player.<br />
• DVDs and CDs use different recording methods. This is not a malfunction.<br />
• Make sure that the CD-ROM was recorded using the ISO 9660 disc format. See<br />
Disc compatibility table on page 47 for more on disc compatibility.<br />
• Make sure that the DVD-ROM was recorded using the UDF bridge format. See Disc<br />
compatibility table on page 47 for more on disc compatibility.<br />
• The files on the disc must be named with the correct file extension: .mp3 for MP3<br />
files; .wma for WMA files; .m4a for MPEG-4 AAC files; .jpg for JPEG files (upper or<br />
lower-case is OK). See Disc compatibility table on page 47.<br />
• The files were recorded using DRM (digital rights management). This is not a<br />
malfunction.<br />
54<br />
En
Additional information 13<br />
Problem<br />
Can’t play WMV files.<br />
Tuner<br />
Problem<br />
Considerable noise in<br />
radio broadcasts.<br />
Auto tuning does not<br />
pick up some stations.<br />
USB connection<br />
Problem<br />
USB mass storage device<br />
is not recognized by the<br />
system.<br />
Files don’t show up in the<br />
Navigator/Photo<br />
Browser.<br />
Can’t play WMA or<br />
MPEG-4 AAC files.<br />
HDMI connection<br />
Problem<br />
No HDMI video output.<br />
Color problems occur<br />
with your monitor after<br />
changing the HDMI Color<br />
setting (page 36).<br />
Remedy<br />
• When the bit rate the file is more than 192 kbps, the file cannot be played back.<br />
Remedy<br />
• Connect the AM antenna (see Basic connections on page 9) and adjust the<br />
direction and position for best reception. You may also connect an additional internal<br />
or external AM antenna (refer to Connecting external antennas on page 42).<br />
• Fully extend the FM wire antenna, position for best reception, and secure to a wall.<br />
You may also connect an outdoor FM antenna (see Connecting external antennas on<br />
page 42).<br />
• Turn off other equipment that may be causing the noise or move it further away.<br />
• The tuning interval is incorrect for your country or region. See Frequency step<br />
setting on page 52 to switch the tuning interval.<br />
• The radio signal is weak. Auto tuning will only detect radio stations with a good<br />
signal. For more sensitive tuning, connect an outdoor antenna.<br />
Remedy<br />
• Make sure you have completely inserted the USB connector to this unit.<br />
• Check that the memory format is FAT16 or FAT32.<br />
• USB devices with an internal USB hub are not supported.<br />
• The files must have the correct file extension: .mp3 for MP3 files; .wma for WMA<br />
files; .m4a for MPEG-4 AAC files; .jpg for JPEG files (upper or lower-case is OK).<br />
• Make sure the file permission hasn’t been restricted (through a password, etc.).<br />
• The files were recorded using DRM (digital rights management). This is not a<br />
malfunction.<br />
Remedy<br />
• Make sure that you’ve selected this player as the HDMI input in the settings for the<br />
component you’re using (refer to the component’s instruction manual).<br />
• Check that the HDMI cable is connected properly and isn’t damaged.<br />
• Check that components connected using the HDMI interface are switched on and<br />
HDMI compatible (components must be compatible with both DVI and High<br />
Bandwidth Digital Content Protection (HDCP)).<br />
• Depending on the component you have connected, using a DVI connection may<br />
result in unreliable signal transfers.<br />
• Make sure the resolution on this player matches that of the component you have<br />
connected using HDMI. See Video Output settings on page 35 to change the HDMI<br />
resolution.<br />
• If the screen goes blank after changing the resolution, it means the resolution you<br />
selected is incompatible with your monitor. See Resetting the HDMI connection on<br />
page 42 to reset to the factory defaults.<br />
• Depending on the connected equipment, some HDMI Color settings may cause<br />
the picture to be displayed incorrectly. In this case, use the TV’s own video input<br />
settings to select RGB, if possible. Alternatively, revert to the previous HDMI Color<br />
setting.<br />
English Français<br />
Deutsch Nederlands<br />
Italiano Español<br />
55<br />
En
13<br />
Additional information<br />
Problem<br />
No picture or sound.<br />
No HDMI audio output.<br />
KURO LINK does not<br />
function.<br />
Your TV automatically<br />
change inputs.<br />
Remedy<br />
• If the problem still persists when connecting your HDMI component directly to your<br />
monitor, please consult the component or monitor manual or contact the<br />
manufacturer for support.<br />
• See Switching the HDMI audio setting on page 41 to make sure that TV is<br />
selected.<br />
• Verify that the HDMI cable is firmly connected.<br />
• Make sure that this unit’s KURO LINK mode is set to LINK ON (page 45).<br />
• Check whether the connected component supports KURO LINK or not. For more<br />
information refer to the operating manual of your flat screen TV.<br />
• KURO LINK may not work properly if a SCART cable and an HDMI cable are<br />
connected simultaneously. Set KURO LINK mode to LINK OFF when connecting<br />
SCART and HDMI cables simultaneously.<br />
• The connected TV automatically may change inputs in response to this unit<br />
starting playback DVD or having the GUI screen (ex. Disc Navigator) displayed, etc. If<br />
you do not want your TV to change inputs in this way, set this unit KURO LINK mode<br />
to LINK OFF (page 45).<br />
Bluetooth connection<br />
Problem<br />
Remedy<br />
The Bluetooth wireless<br />
technology device<br />
cannot be connected or<br />
operated. Sound from<br />
the Bluetooth wireless<br />
technology device is not<br />
emitted or the sound is<br />
interrupted.<br />
Error Messages<br />
Message<br />
• Check that no object that emits electromagnetic waves in the 2.4 GHz band<br />
(microwave oven, wireless LAN device or Bluetooth wireless technology apparatus)<br />
is near the unit. If such an object is near the unit, set the unit far from it. Or, stop<br />
using the object emitting the electromagnetic waves.<br />
• Check that the Bluetooth wireless technology device is not too far from the unit<br />
and that obstructions are not set between the Bluetooth wireless technology device<br />
and the unit. Set the Bluetooth wireless technology device and the unit so that the<br />
distance between them is less than about 10 m and no obstructions exist between<br />
them.<br />
• Check that the Bluetooth AD<strong>AP</strong>TER and the AD<strong>AP</strong>TER PORT of the unit are<br />
correctly connected.<br />
• The Bluetooth wireless technology device may not be set to the communication<br />
mode supporting the Bluetooth wireless technology. Check the setting of the<br />
Bluetooth wireless technology device.<br />
• Check that pairing is correct. The pairing setting was deleted from this unit or the<br />
Bluetooth wireless technology device. Reset the pairing.<br />
• Check that the profile is correct. Use a Bluetooth wireless technology device that<br />
supports A2DP profile and AVRCP profile.<br />
Description<br />
EXTR<strong>AP</strong>WR<br />
• You cannot adjust SFC modes, tone controls (bass, treble, and bass boost),<br />
MP3 Expander mode, Voice Enhancer mode when using Extra Power mode.<br />
CANNOT<br />
• Operation is prohibited because DVD/CD or USB isn’t selected, or<br />
SHIFT+KARAOKE, SHIFT+ECHO, SHIFT+ or SHIFT+ has been pressed.<br />
• Appears when DVD/CD is not selected and SHIFT+USB REC is pressed.<br />
TRAYLOCK • The tray lock is on. See General in Troubleshooting on page 53.<br />
56<br />
En
Additional information 13<br />
Message<br />
STEREO<br />
Resetting the system<br />
Use this procedure to reset all system settings<br />
to the factory default.<br />
Using the language code list<br />
1 With the system on, press SHIFT+SETUP.<br />
1 Select ‘Other Language’.<br />
4 Press ENTER while INIT OK is blinking. 1<br />
2 Use / to select INITIAL then press<br />
ENTER.<br />
3 Use / to select ALL INIT then press<br />
ENTER.<br />
• INIT OK is displayed.<br />
Description<br />
• STEREO appears when SURROUND or AUTO/STEREO is pressed in the TUNER,<br />
LINE or AD<strong>AP</strong>TER PORT input mode.<br />
KEYLOCK • The key lock is enabled. See Setting the Key Lock on page 52.<br />
USB ERR<br />
• See Important in Using the USB interface on page 31 for more on this.<br />
HDMI ERR<br />
• See HDMI connection above for troubleshooting tips. See also Resetting the HDMI<br />
connection on page 42 if the problem persists.<br />
EEP ERR<br />
• Contact your Pioneer authorized service center or your dealer for servicing.<br />
EXIT<br />
• Appears when any prohibited signal is input or the headphones are connected<br />
while the menu screen is displayed, and then the display returns to the normal<br />
display.<br />
NO MIC<br />
• Appears when you press SHIFT+KARAOKE, SHIFT+ECHO, SHIFT+, SHIFT+ or<br />
MIC VOL +/– when no mic is inserted.<br />
OC ERR 1<br />
OC ERR 2<br />
OVER TEMP<br />
BT ERR<br />
TV AUDIO<br />
KARAOKE<br />
PHONESIN<br />
• Check whether the speaker cables are short-circuited. If the error message<br />
continues to be displayed, contact your Pioneer authorized service center or your<br />
dealer for servicing.<br />
• Try lowering the volume. If this problem is not fixed by removing and inserting the<br />
power cable, this unit may be damaged. In such an event, please contact a Pioneerauthorized<br />
service center or your nearest dealer.<br />
• Power consumption by Bluetooth AD<strong>AP</strong>TER is too high to supply the power.<br />
Reconnect the Bluetooth AD<strong>AP</strong>TER.<br />
• Indicator is lit for two seconds if the listening mode is changed while HDMI audio<br />
mode is set for TV.<br />
• Appears when you press SURROUND, SOUND, AUTO/STEREO or MP3 EXP/<br />
V.ENH when a mic is inserted.<br />
• Appears when you press SURROUND, SOUND, AUTO/STEREO or MP3 EXP/<br />
V.ENH when a headphone is inserted.<br />
Some of the language options (see Language<br />
settings on page 36) allow you to set your<br />
preferred language from any of the 136<br />
languages in the Language code list below.<br />
2 Use / to select either a code letter or<br />
a code number.<br />
3 Use / to select a code letter or a code<br />
number.<br />
See the Language code list below for a<br />
complete list of languages and codes.<br />
English Français<br />
Deutsch Nederlands<br />
Italiano Español<br />
Note<br />
1 Do not operate the unit without reason or pull the power cord because the system’s power automatically turns on.<br />
57<br />
En
13<br />
Additional information<br />
Language code list<br />
Language (Language code letter), Language code<br />
Japanese (ja), 1001<br />
English (en), 0514<br />
French (fr), 0618<br />
German (de), 0405<br />
Italian (it), 0920<br />
Spanish (es), 0519<br />
Dutch (nl), 1412<br />
Russian (ru), 1821<br />
Chinese (zh), 2608<br />
Korean (ko), 1115<br />
Greek (el), 0512<br />
Afar (aa), 0101<br />
Abkhazian (ab), 0102<br />
Afrikaans (af), 0106<br />
Amharic (am), 0113<br />
Arabic (ar), 0118<br />
Assamese (as), 0119<br />
Aymara (ay), 0125<br />
Azerbaijani (az), 0126<br />
Bashkir (ba), 0201<br />
Byelorussian (be), 0205<br />
Bulgarian (bg), 0207<br />
Bihari (bh), 0208<br />
Bislama (bi), 0209<br />
Bengali (bn), 0214<br />
Tibetan (bo), 0215<br />
Breton (br), 0218<br />
Catalan (ca), 0301<br />
Corsican (co), 0315<br />
Czech (cs), 0319<br />
Welsh (cy), 0325<br />
Danish (da), 0401<br />
Bhutani (dz), 0426<br />
Esperanto (eo), 0515<br />
Country/Area code list<br />
Country/Area, Country/Area code, Country/Area code letter<br />
Argentina, 0118, ar<br />
Australia, 0121, au<br />
Austria, 0120, at<br />
Belgium, 0205, be<br />
Brazil, 0218, br<br />
Canada, 0301, ca<br />
Chile, 0312, cl<br />
China, 0314, cn<br />
Denmark, 0411, dk<br />
Finland, 0609, fi<br />
France, 0618, fr<br />
Germany, 0405, de<br />
Estonian (et), 0520<br />
Basque (eu), 0521<br />
Persian (fa), 0601<br />
Finnish (fi), 0609<br />
Fiji (fj), 0610<br />
Faroese (fo), 0615<br />
Frisian (fy), 0625<br />
Irish (ga), 0701<br />
Scots-Gaelic (gd), 0704<br />
Galician (gl), 0712<br />
Guarani (gn), 0714<br />
Gujarati (gu), 0721<br />
Hausa (ha), 0801<br />
Hindi (hi), 0809<br />
Croatian (hr), 0818<br />
Hungarian (hu), 0821<br />
Armenian (hy), 0825<br />
Interlingua (ia), 0901<br />
Interlingue (ie), 0905<br />
Inupiak (ik), 0911<br />
Indonesian (in), 0914<br />
Icelandic (is), 0919<br />
Hebrew (iw), 0923<br />
Yiddish (ji), 1009<br />
Javanese (jw), 1023<br />
Georgian (ka), 1101<br />
Kazakh (kk), 1111<br />
Greenlandic (kl), 1112<br />
Cambodian (km), 1113<br />
Kannada (kn), 1114<br />
Kashmiri (ks), 1119<br />
Kurdish (ku), 1121<br />
Kirghiz (ky), 1125<br />
Latin (la), 1201<br />
Hong Kong, 0811, hk<br />
India, 0914, in<br />
Indonesia, 0904, id<br />
Italy, 0920, it<br />
Japan, 1016, jp<br />
Korea, Republic of, 1118, kr<br />
Malaysia, 1325, my<br />
Mexico, 1324, mx<br />
Netherlands, 1412, nl<br />
New Zealand, 1426, nz<br />
Norway, 1415, no<br />
Pakistan, 1611, pk<br />
Lingala (ln), 1214<br />
Laothian (lo), 1215<br />
Lithuanian (lt), 1220<br />
Latvian (lv), 1222<br />
Malagasy (mg), 1307<br />
Maori (mi), 1309<br />
Macedonian (mk), 1311<br />
Malayalam (ml), 1312<br />
Mongolian (mn), 1314<br />
Moldavian (mo), 1315<br />
Marathi (mr), 1318<br />
Malay (ms), 1319<br />
Maltese (mt), 1320<br />
Burmese (my), 1325<br />
Nauru (na), 1401<br />
Nepali (ne), 1405<br />
Norwegian (no), 1415<br />
Occitan (oc), 1503<br />
Oromo (om), 1513<br />
Oriya (or), 1518<br />
Panjabi (pa), 1601<br />
Polish (pl), 1612<br />
Pashto, Pushto (ps), 1619<br />
Portuguese (pt), 1620<br />
Quechua (qu), 1721<br />
Rhaeto-Romance (rm), 1813<br />
Kirundi (rn), 1814<br />
Romanian (ro), 1815<br />
Kinyarwanda (rw), 1823<br />
Sanskrit (sa), 1901<br />
Sindhi (sd), 1904<br />
Sangho (sg), 1907<br />
Serbo-Croatian (sh), 1908<br />
Sinhalese (si), 1909<br />
Slovak (sk), 1911<br />
Slovenian (sl), 1912<br />
Samoan (sm), 1913<br />
Shona (sn), 1914<br />
Somali (so), 1915<br />
Albanian (sq), 1917<br />
Serbian (sr), 1918<br />
Siswati (ss), 1919<br />
Sesotho (st), 1920<br />
Sundanese (su), 1921<br />
Swedish (sv), 1922<br />
Swahili (sw), 1923<br />
Tamil (ta), 2001<br />
Telugu (te), 2005<br />
Tajik (tg), 2007<br />
Thai (th), 2008<br />
Tigrinya (ti), 2009<br />
Turkmen (tk), 2011<br />
Tagalog (tl), 2012<br />
Setswana (tn), 2014<br />
Tonga (to), 2015<br />
Turkish (tr), 2018<br />
Tsonga (ts), 2019<br />
Tatar (tt), 2020<br />
Twi (tw), 2023<br />
Ukrainian (uk), 2111<br />
Urdu (ur), 2118<br />
Uzbek (uz), 2126<br />
Vietnamese (vi), 2209<br />
Volapük (vo), 2215<br />
Wolof (wo), 2315<br />
Xhosa (xh), 2408<br />
Yoruba (yo), 2515<br />
Zulu (zu), 2621<br />
Philippines, 1608, ph<br />
Portugal, 1620, pt<br />
Russian Federation, 1821, ru<br />
Singapore, 1907, sg<br />
Spain, 0519, es<br />
Switzerland, 0308, ch<br />
Sweden, 1905, se<br />
Taiwan, 2023, tw<br />
Thailand, 2008, th<br />
United Kingdom, 0702, gb<br />
United States of America, 2119, us<br />
58<br />
En
Additional information 13<br />
Specifications<br />
• Amplifier section<br />
RMS Power Output:<br />
Front, Center, Surround . . . 60 W per channel<br />
(1 kHz, 10 % T.H.D., 4 Ω)<br />
Subwoofer . . . 60 W (100 Hz, 10 % T.H.D., 4 Ω)<br />
• Disc section<br />
Type. . . . . . . .DVD system, Video CD/Super VCD<br />
system and Compact Disc digital audio system<br />
• FM tuner section<br />
Frequency range . . . . . . . . 87.5 MHz to 108 MHz<br />
Antenna . . . . . . . . . . . . . . . . . . 75 Ω, unbalanced<br />
• AM tuner section<br />
Frequency range:<br />
Saudi Arabia, Israel, South Africa, other middle<br />
eastern contries and duty free models<br />
. . . . . . . . . . . . . . . . . . . . . . . . 531 kHz to 1602 kHz<br />
All other models<br />
With 9 kHz step . . . . . . . . 531 kHz to 1602 kHz<br />
With 10 kHz step . . . . . . . 530 kHz to 1700 kHz<br />
Antenna . . . . . . . . . . . . . . . . . . . . . Loop antenna<br />
• Miscellaneous<br />
Power requirements:<br />
Singapore, Indonesia, Hong Kong, Malaysia,<br />
Philippines models<br />
. . . . . . . . . . . . AC 220 V to 240 V, 50 Hz/60 Hz<br />
All other models<br />
. . . . . . . . . . . . AC 110 V to 240 V, 50 Hz/60 Hz<br />
Power consumption . . . . . . . . . . . . . . . . . . .55 W<br />
Power consumption in standby:<br />
For HTZ180/181DVD . . . . . . . . . . . . . . . 0.48 W<br />
Others<br />
KURO LINK ON . . . . . . . . . . . . . . . . . 0.73 W<br />
KURO LINK OFF. . . . . . . . . . . . . . . . . 0.48 W<br />
Dimensions<br />
. . . . . . . .420 mm (W) x 62 mm (H) x 331 mm (D)<br />
Weight . . . . . . . . . . . . . . . . . . . . . . . . . . . . . 2.8 kg<br />
• Accessories (DVD/CD receiver)<br />
Remote control . . . . . . . . . . . . . . . . . . . . . . . . . . 1<br />
AA/R6 dry cell batteries<br />
(to confirm system operation) . . . . . . . . . . . . . . 2<br />
Video cable (yellow plugs) . . . . . . . . . . . . . . . . . 1<br />
AM loop antenna . . . . . . . . . . . . . . . . . . . . . . . . . 1<br />
FM antenna . . . . . . . . . . . . . . . . . . . . . . . . . . . . . 1<br />
Power cord . . . . . . . . . . . . . . . . . . . . . . . . . . . . . . 1<br />
Setup Guide<br />
Operating instructions (This document)<br />
S-DV180 Speaker system<br />
• Front speakers<br />
Enclosure . . . . . . . . . Closed-box bookshelf type<br />
(magnetically shielded)<br />
System . . . . . . . . . . . . . . . . . 7.7 cm 1-way system<br />
Speakers . . . . . . . . . . . . . . . . . . 7.7 cm cone type<br />
Impedance . . . . . . . . . . . . . . . . . . . . . . . . . . . 4 Ω<br />
Frequency range . . . . . . . . . . . . 90 Hz to 20 kHz<br />
Maximum input power . . . . . . . . . . . . . . . . . 60 W<br />
Dimensions<br />
. . . . . . 105 mm (W) x 115 mm (H) x 114 mm (D)<br />
Weight . . . . . . . . . . . . . . . . . . . . . . . . . . . . . 0.6 kg<br />
• Center speaker<br />
Enclosure . . . . . . . . . Closed-box bookshelf type<br />
(magnetically shielded)<br />
System . . . . . . . . . . . . . . . . . 7.7 cm 1-way system<br />
Speakers . . . . . . . . . . . . . . . . . . 7.7 cm cone type<br />
Impedance . . . . . . . . . . . . . . . . . . . . . . . . . . . 4 Ω<br />
Frequency range . . . . . . . . . . . . 90 Hz to 20 kHz<br />
Maximum input power . . . . . . . . . . . . . . . . . 60 W<br />
Dimensions<br />
. . . . . . 115 mm (W) x 105 mm (H) x 114 mm (D)<br />
Weight . . . . . . . . . . . . . . . . . . . . . . . . . . . . . 0.6 kg<br />
• Surround speaker<br />
Enclosure . . . . . . . . . Closed-box bookshelf type<br />
(magnetically shielded)<br />
System . . . . . . . . . . . . . . . . . 7.7 cm 1-way system<br />
Speakers . . . . . . . . . . . . . . . . . . 7.7 cm cone type<br />
Impedance . . . . . . . . . . . . . . . . . . . . . . . . . . . 4 Ω<br />
Frequency range . . . . . . . . . . . . 98 Hz to 20 kHz<br />
Maximum input power . . . . . . . . . . . . . . . . . 60 W<br />
Dimensions<br />
. . . . . . 105 mm (W) x 118 mm (H) x 114 mm (D)<br />
Weight . . . . . . . . . . . . . . . . . . . . . . . . . . . . . 0.6 kg<br />
• Subwoofer<br />
Enclosure . . . . . . Bass-reflex floorstanding type<br />
System . . . . . . . . . . . . . . . . . 16 cm 1-way system<br />
Speaker . . . . . . . . . . . . . . . . . . . .16 cm cone type<br />
Impedance . . . . . . . . . . . . . . . . . . . . . . . . . . . 4 Ω<br />
Frequency range . . . . . . . . . . . . . 28 Hz to 1 kHz<br />
Maximum Input Power. . . . . . . . . . . . . . . . . 60 W<br />
Dimensions<br />
. . . . . . 190 mm (W) x 360 mm (H) x 317 mm (D)<br />
Weight . . . . . . . . . . . . . . . . . . . . . . . . . . . . . 3.8 kg<br />
• Accessories<br />
Non-skid pads (small) . . . . . . . . . . . . . . . . . . . .12<br />
Non-skid pads (large) . . . . . . . . . . . . . . . . . . . . . 4<br />
Mounting brackets . . . . . . . . . . . . . . . . . . . . . . . 4<br />
Screws (for mounting brackets) . . . . . . . . . . . . 4<br />
English Français<br />
Deutsch Nederlands<br />
Italiano Español<br />
59<br />
En
13<br />
Additional information<br />
60<br />
En<br />
S-DV585 Speaker system<br />
• Front/surround speakers<br />
Enclosure. . . . . . . . Closed-box bookshelf type<br />
. . . . . . . . . . . . . . . . . . .(magnetically shielded)<br />
System . . . . . . . . . . . . . . . 6.6 cm 1-way system<br />
Speakers . . . . . . . . . . . . . . . . 6.6 cm cone type<br />
Impedance . . . . . . . . . . . . . . . . . . . . . . . . . 4 Ω<br />
Frequency range . . . . . . . . . . 82 Hz to 20 kHz<br />
Maximum input power . . . . . . . . . . . . . . 100 W<br />
Dimensions<br />
. . . . . . . 96 mm (W) x 96 mm (H) x 96 mm (D)<br />
Weight . . . . . . . . . . . . . . . . . . . . . . . . . . . 0.5 kg<br />
• Center speaker<br />
Enclosure. . . . . . . . Closed-box bookshelf type<br />
(magnetically shielded)<br />
System . . . . . . . . . . . . . . . 6.6 cm 1-way system<br />
Speakers . . . . . . . . . . . . . . . . 6.6 cm cone type<br />
Impedance . . . . . . . . . . . . . . . . . . . . . . . . . 8 Ω<br />
Frequency range . . . . . . . . . . 82 Hz to 20 kHz<br />
Maximum input power . . . . . . . . . . . . . . . 50 W<br />
Dimensions<br />
. . . . . . . 96 mm (W) x 96 mm (H) x 96 mm (D)<br />
Weight . . . . . . . . . . . . . . . . . . . . . . . . . . . 0.5 kg<br />
• Subwoofer<br />
Enclosure. . . . . Bass-reflex floorstanding type<br />
System . . . . . . . . . . . . . . . 16 cm 1-way system<br />
Speaker . . . . . . . . . . . . . . . . . 16 cm cone type<br />
Impedance . . . . . . . . . . . . . . . . . . . . . . . . . 4 Ω<br />
Frequency range . . . . . . . . . . . 34 Hz to 1 kHz<br />
Maximum Input Power. . . . . . . . . . . . . . 100 W<br />
Dimensions<br />
. . . . 230 mm (W) x 380 mm (H) x 360 mm (D)<br />
Weight . . . . . . . . . . . . . . . . . . . . . . . . . . . 5.4 kg<br />
• Accessories<br />
Speaker cables . . . . . . . . . . . . . . . . . . . . . . . . 5<br />
Brackets. . . . . . . . . . . . . . . . . . . . . . . . . . . . . . 2<br />
Mounting brackets . . . . . . . . . . . . . . . . . . . . . 6<br />
Screws (common use for brackets and<br />
mounting brackets) . . . . . . . . . . . . . . . . . . . . 8<br />
Non-skid pads (small) . . . . . . . . . . . . . . . . . 18<br />
Non-skid pads (large) . . . . . . . . . . . . . . . . . . . 4<br />
S-DV280T Speaker system<br />
• Front speakers<br />
Enclosure . . . . Closed-box floorstanding type<br />
. . . . . . . . . . . . . . . . . . .(magnetically shielded)<br />
System . . . . . . . . . . . . . . . . . . . . 2-way system<br />
Speakers:<br />
Woofer . . . . . . . . . . . . . . . . . 7.7 cm cone type<br />
Tweeter . . . . . . . . . . .2.6 cm semi-dome type<br />
Impedance . . . . . . . . . . . . . . . . . . . . . . . . 4 Ω<br />
Frequency range . . . . . . . . . . 62 Hz to 20 kHz<br />
Maximum input power . . . . . . . . . . . . . . .60 W<br />
Dimensions<br />
. . . .260 mm (W) x 1097 mm (H) x 260 mm (D)<br />
Weight . . . . . . . . . . . . . . . . . . . . . . . . . . . 3.8 kg<br />
• Center speaker<br />
Enclosure . . . . . . . Closed-box bookshelf type<br />
. . . . . . . . . . . . . . . . . . . (magnetically shielded)<br />
System . . . . . . . . . . . . . . 7.7 cm 1-way system<br />
Speaker . . . . . . . . . . . . . . . . 7.7 cm cone type<br />
Impedance . . . . . . . . . . . . . . . . . . . . . . . . 4 Ω<br />
Frequency range . . . . . . . . . . 72 Hz to 20 kHz<br />
Maximum input power . . . . . . . . . . . . . . .60 W<br />
Dimensions<br />
. . . . . .220 mm (W) x 90 mm (H) x 100 mm (D)<br />
Weight . . . . . . . . . . . . . . . . . . . . . . . . . . 0.7 kg<br />
• Surround speakers<br />
Enclosure . . . . . . . Closed-box bookshelf type<br />
. . . . . . . . . . . . . . . . . . . (magnetically shielded)<br />
System . . . . . . . . . . . . . . 7.7 cm 1-way system<br />
Speakers. . . . . . . . . . . . . . . . 7.7 cm cone type<br />
Impedance . . . . . . . . . . . . . . . . . . . . . . . . . 4 Ω<br />
Frequency range . . . . . . . . . . . 84 Hz to 20 kHz<br />
Maximum input power . . . . . . . . . . . . . .100 W<br />
Dimensions<br />
. . . . .100 mm (W) x 100 mm (H) x 100 mm (D)<br />
Weight . . . . . . . . . . . . . . . . . . . . . . . . . . . 0.5 kg<br />
• Accessories<br />
Speaker cables. . . . . . . . . . . . . . . . . . . . . . . . 5<br />
Non-skid pads (small) . . . . . . . . . . . . . . . . . . 8<br />
Non-skid pads (large) . . . . . . . . . . . . . . . . . . 8<br />
Speaker stand bases . . . . . . . . . . . . . . . . . . 2<br />
Screws (for bases) . . . . . . . . . . . . . . . . . . . . 6<br />
S-DV282T Speaker system<br />
• Front/surround speakers<br />
Same as S-DV280T Front speakers (see above)<br />
• Center speaker<br />
Same as S-DV280T Center speaker (see above)<br />
• Accessories<br />
Speaker cables. . . . . . . . . . . . . . . . . . . . . . . . . . 5<br />
Non-skid pads (large) . . . . . . . . . . . . . . . . . . . 16<br />
Speaker stand bases . . . . . . . . . . . . . . . . . . . . 4<br />
Screws (for bases) . . . . . . . . . . . . . . . . . . . . . . 12
Additional information 13<br />
S-DV5SW Speaker system<br />
• Subwoofer<br />
Enclosure . . . . . . .Bass-reflex floorstanding type<br />
System . . . . . . . . . . . . . . . . . 16 cm 1-way system<br />
Speaker. . . . . . . . . . . . . . . . . . . . 16 cm cone type<br />
Impedance . . . . . . . . . . . . . . . . . . . . . . . . . . . . 4 Ω<br />
Frequency range . . . . . . . . . . . . . . 34 Hz to 1 kHz<br />
Maximum Input Power . . . . . . . . . . . . . . . .100 W<br />
Dimensions<br />
. . . . . . .230 mm (W) x 380 mm (H) x 360 mm (D)<br />
Weight . . . . . . . . . . . . . . . . . . . . . . . . . . . . . 5.4 kg<br />
• Accessories<br />
Non-skid pads (large) . . . . . . . . . . . . . . . . . . . . . 4<br />
Note<br />
• Specifications and design subject to<br />
possible modification without notice, due<br />
to improvements.<br />
This product includes FontAvenue ®<br />
fonts licenced by NEC Corporation.<br />
FontAvenue is a registered trademark<br />
of NEC Corporation.<br />
This product incorporates copyright<br />
protection technology that is protected<br />
by method claims of certain U.S. patents<br />
and other intellectual property rights<br />
owned by Macrovision Corporation and<br />
other rights owners. Use of this copyright<br />
protection technology must be authorized<br />
by Macrovision Corporation, and is intended<br />
for home and other limited viewing uses<br />
only unless otherwise authorized by<br />
Macrovision Corporation. Reverse<br />
engineering or disassembly is prohibited.<br />
Manufactured under license from Dolby<br />
Laboratories. “Dolby”, “Pro Logic”, and the<br />
double-D symbol are trademarks of Dolby<br />
Laboratories.<br />
Manufactured under license under U.S. Patent<br />
#’s: 5,451,942; 5,956,674; 5,974,380; 5,978,762;<br />
6,487,535 & other U.S. and worldwide patents<br />
issued & pending. DTS and DTS Digital Surround<br />
are registered trademarks and the DTS logos and<br />
Symbol are trademarks of DTS, Inc. © 1996-2008<br />
DTS, Inc. All Rights Reserved.<br />
Published by Pioneer Corporation.<br />
Copyright © 2009 Pioneer Corporation.<br />
All rights reserved.<br />
English Français<br />
Deutsch Nederlands<br />
Italiano Español<br />
DRM (digital rights management)<br />
copy protection is a technology<br />
designed to prevent unauthorized<br />
copying by restricting playback, etc. of<br />
compressed audio files on devices<br />
other than the PC (or other recording<br />
equipment) used to record it. For<br />
detailed information, please see the<br />
instruction manuals or help files that<br />
came with your PC and/or software.<br />
61<br />
En
D3-4-2-1-1_A1_Zhtw<br />
<br />
<br />
<br />
<br />
<br />
<br />
D3-4-2-1-7c*_A1_Zhtw
感 謝 您 購 買 本 台 先 鋒 產 品 。<br />
請 徹 底 閱 讀 本 操 作 手 冊 , 以 便 正 確 地 操 作 您 的 產 品 。 在 您 閱 讀 完 手 冊 後 , 請 妥 為 保 管 以 便 將 來 參<br />
考 之 用 。<br />
目 錄<br />
01 揚 聲 器 安 裝 指 南<br />
家 庭 劇 院 音 效 設 置 . . . . . . . . . . . . . . . . . . . . . 6<br />
5 點 /4 點 揚 聲 器 擺 設 . . . . . . . . . . . . . . . . . . 6<br />
3 點 /2 點 揚 聲 器 擺 設 . . . . . . . . . . . . . . . . . . 6<br />
準 備 揚 聲 器 . . . . . . . . . . . . . . . . . . . . . . . . . . . 6<br />
所 有 機 型 的 相 同 準 備 工 作 . . . . . . . . . . . . . . . 6<br />
<strong>HTZ280DVD</strong>/<strong>HTZ280DVD</strong>-<strong>AP</strong>/HTZ282DVD/<br />
HTZ282DVD-<strong>AP</strong> 的 準 備 工 作 . . . . . . . . . . . . 6<br />
僅 適 用 於 HTZ181DVD 機 型 的 準 備 工 作 . . . 7<br />
將 揚 聲 器 安 裝 在 牆 上 . . . . . . . . . . . . . . . . . . . . 7<br />
安 裝 前 . . . . . . . . . . . . . . . . . . . . . . . . . . . . . 7<br />
僅 適 用 於 安 裝 HTZ180/181DVD 機 型 的<br />
托 架 . . . . . . . . . . . . . . . . . . . . . . . . . . . . . . . 8<br />
揚 聲 器 擺 設 之 其 他 注 意 事 項 . . . . . . . . . . . . . . 8<br />
02 接 線<br />
基 本 接 線 方 式 . . . . . . . . . . . . . . . . . . . . . . . . . 9<br />
03 控 制 與 顯 示<br />
前 面 板 . . . . . . . . . . . . . . . . . . . . . . . . . . . . . 13<br />
顯 示 幕 . . . . . . . . . . . . . . . . . . . . . . . . . . . . . 13<br />
遙 控 器 . . . . . . . . . . . . . . . . . . . . . . . . . . . . . 14<br />
安 裝 遙 控 器 電 池 . . . . . . . . . . . . . . . . . . . . . 15<br />
運 用 遙 控 器 . . . . . . . . . . . . . . . . . . . . . . . . . 16<br />
04 開 始 操 作<br />
設 定 揚 聲 器 擺 設 . . . . . . . . . . . . . . . . . . . . . . 17<br />
設 置 聲 道 音 量 . . . . . . . . . . . . . . . . . . . . . . . 17<br />
使 用 在 屏 顯 示 畫 面 (OSD) . . . . . . . . . . . . . 18<br />
碟 片 播 放 . . . . . . . . . . . . . . . . . . . . . . . . . . . . 18<br />
基 本 播 放 控 制 . . . . . . . . . . . . . . . . . . . . . . . 19<br />
恢 復 播 放 及 最 終 記 憶 播 放 . . . . . . . . . . . . . . 19<br />
DVD-Video 碟 片 選 單 . . . . . . . . . . . . . . . . . 19<br />
VCD/ 超 級 VCD PBC 選 單 . . . . . . . . . . . . . 19<br />
聆 聽 收 音 機 . . . . . . . . . . . . . . . . . . . . . . . . . . 20<br />
改 善 FM 接 收 不 良 . . . . . . . . . . . . . . . . . . . 20<br />
抑 制 AM 接 收 雜 訊 . . . . . . . . . . . . . . . . . . . 20<br />
記 憶 電 台 . . . . . . . . . . . . . . . . . . . . . . . . . . 20<br />
收 聽 預 設 電 台 . . . . . . . . . . . . . . . . . . . . . . . 21<br />
聆 聽 其 他 來 源 . . . . . . . . . . . . . . . . . . . . . . . . 21<br />
設 置 睡 眠 定 時 器 . . . . . . . . . . . . . . . . . . . . . . 21<br />
05 聆 聽 您 的 系 統<br />
選 取 聆 聽 模 式 . . . . . . . . . . . . . . . . . . . . . . . . 22<br />
自 動 聆 聽 模 式 . . . . . . . . . . . . . . . . . . . . . . . . 22<br />
以 環 繞 聲 聆 聽 . . . . . . . . . . . . . . . . . . . . . . . . 22<br />
使 用 前 置 環 繞 聲 . . . . . . . . . . . . . . . . . . . . . . 23<br />
以 立 體 聲 聆 聽 . . . . . . . . . . . . . . . . . . . . . . . . 23<br />
以 耳 機 聆 聽 . . . . . . . . . . . . . . . . . . . . . . . . . . 23<br />
調 整 低 音 及 高 音 . . . . . . . . . . . . . . . . . . . . . . 23<br />
使 用 SFC 模 式 . . . . . . . . . . . . . . . . . . . . . . . . 23<br />
加 重 低 音 音 量 . . . . . . . . . . . . . . . . . . . . . . . . 24<br />
使 用 MP3 擴 展 器 . . . . . . . . . . . . . . . . . . . . . 24<br />
使 用 聲 音 強 化 器 模 式 . . . . . . . . . . . . . . . . . . . 24<br />
有 效 聲 音 ( 用 於 取 得 最 佳 聲 音 ). . . . . . . . . . 24<br />
06 碟 片 播 放 功 能<br />
碟 片 掃 描 . . . . . . . . . . . . . . . . . . . . . . . . . . . . 25<br />
慢 動 作 播 放 . . . . . . . . . . . . . . . . . . . . . . . . . . 25<br />
格 進 / 格 退 播 放 . . . . . . . . . . . . . . . . . . . . . . 25<br />
播 放 JPEG 幻 燈 片 秀 . . . . . . . . . . . . . . . . . . . 25<br />
使 用 「 碟 片 導 向 」 瀏 覽 DVD 或 VCD/<br />
超 級 VCD 碟 片 . . . . . . . . . . . . . . . . . . . . . . . 26<br />
可 利 用 「 碟 片 導 向 」 功 能 瀏 覽 Windows<br />
Media Audio (WMA)、MP3、MPEG-4<br />
AAC、DivX 視 頻 /WMV 及 JPEG 檔 案 . . . . . 27<br />
使 用 播 放 清 單 . . . . . . . . . . . . . . . . . . . . . . . . 27<br />
製 作 播 放 清 單 . . . . . . . . . . . . . . . . . . . . . . . 27<br />
聆 聽 播 放 清 單 . . . . . . . . . . . . . . . . . . . . . . . 28<br />
清 除 播 放 清 單 上 的 檔 案 . . . . . . . . . . . . . . . . 28<br />
循 環 播 放 碟 片 某 個 片 段 . . . . . . . . . . . . . . . . . 28<br />
使 用 重 複 播 放 功 能 . . . . . . . . . . . . . . . . . . . . . 28<br />
使 用 隨 機 播 放 功 能 . . . . . . . . . . . . . . . . . . . . . 28<br />
建 立 程 序 編 輯 清 單 . . . . . . . . . . . . . . . . . . . . . 29<br />
程 序 編 輯 選 單 中 其 他 可 用 的 功 能 . . . . . . . . . 29<br />
搜 索 碟 片 . . . . . . . . . . . . . . . . . . . . . . . . . . . . 29<br />
切 換 字 幕 . . . . . . . . . . . . . . . . . . . . . . . . . . . . 30<br />
切 換 對 白 語 言 / 音 頻 聲 道 . . . . . . . . . . . . . . . 30<br />
放 大 畫 面 . . . . . . . . . . . . . . . . . . . . . . . . . . . . 30<br />
切 換 拍 攝 角 度 . . . . . . . . . . . . . . . . . . . . . . . . 30<br />
顯 示 碟 片 資 訊 . . . . . . . . . . . . . . . . . . . . . . . . 30<br />
4<br />
Zhtw
07 USB 播 放 與 錄 製<br />
使 用 USB 介 面 . . . . . . . . . . . . . . . . . . . . . . . . 31<br />
在 USB 裝 置 上 錄 製 音 樂 CD 的 曲 目 . . . . . . . 31<br />
錄 製 所 有 曲 目 . . . . . . . . . . . . . . . . . . . . . . . 31<br />
錄 製 特 定 曲 目 . . . . . . . . . . . . . . . . . . . . . . . 32<br />
08 卡 拉 OK 伴 唱<br />
卡 拉 OK 伴 唱 . . . . . . . . . . . . . . . . . . . . . . . . 33<br />
變 更 混 聲 效 果 . . . . . . . . . . . . . . . . . . . . . . . 33<br />
變 更 背 景 音 樂 . . . . . . . . . . . . . . . . . . . . . . . 33<br />
09 音 頻 設 置 及 視 頻 調 整 選 單<br />
「 音 頻 設 置 」 選 單 . . . . . . . . . . . . . . . . . . . . . 34<br />
音 頻 DRC ( 動 態 範 圍 控 制 ). . . . . . . . . . . . 34<br />
「 視 頻 調 整 」 選 單 . . . . . . . . . . . . . . . . . . . . . 34<br />
10 「 初 始 設 置 」 選 單<br />
使 用 「 初 始 設 置 」 選 單 . . . . . . . . . . . . . . . . . 35<br />
視 頻 輸 出 設 定 值 . . . . . . . . . . . . . . . . . . . . . . . 35<br />
語 言 設 定 值 . . . . . . . . . . . . . . . . . . . . . . . . . . 36<br />
顯 示 幕 設 定 值 . . . . . . . . . . . . . . . . . . . . . . . . 37<br />
選 項 設 定 值 . . . . . . . . . . . . . . . . . . . . . . . . . . 37<br />
揚 聲 器 設 置 . . . . . . . . . . . . . . . . . . . . . . . . . . 37<br />
成 人 鎖 定 . . . . . . . . . . . . . . . . . . . . . . . . . . . 37<br />
關 於 DivX ® VOD 內 容 . . . . . . . . . . . . . . . . 38<br />
揚 聲 器 距 離 . . . . . . . . . . . . . . . . . . . . . . . . . 39<br />
11 其 他 接 線<br />
連 接 輔 助 音 頻 設 備 . . . . . . . . . . . . . . . . . . . . . 40<br />
使 用 色 差 視 頻 輸 出 連 接 . . . . . . . . . . . . . . . . . 41<br />
關 於 逐 行 掃 描 視 頻 . . . . . . . . . . . . . . . . . . . 41<br />
使 用 HDMI 連 接 . . . . . . . . . . . . . . . . . . . . . . 41<br />
切 換 HDMI 音 頻 設 置 值 . . . . . . . . . . . . . . . . 41<br />
重 新 設 定 HDMI 連 接 . . . . . . . . . . . . . . . . . 42<br />
關 於 HDMI . . . . . . . . . . . . . . . . . . . . . . . . . 42<br />
連 接 外 部 天 線 . . . . . . . . . . . . . . . . . . . . . . . . 42<br />
用 於 無 線 享 受 音 樂 的 Bluetooth ® 傳 輸 器 . . . 42<br />
無 線 音 樂 播 放 . . . . . . . . . . . . . . . . . . . . . . . 42<br />
遙 控 器 操 作 . . . . . . . . . . . . . . . . . . . . . . . . . 43<br />
連 接 選 購 的 Bluetooth 傳 輸 器 . . . . . . . . . . 43<br />
配 對 Bluetooth 傳 輸 器 和 Bluetooth 無 線 技 術<br />
裝 置 . . . . . . . . . . . . . . . . . . . . . . . . . . . . . . 43<br />
使 用 您 的 系 統 聆 聽 Bluetooth 無 線 技 術 裝 置 的<br />
音 樂 內 容 . . . . . . . . . . . . . . . . . . . . . . . . . . . 44<br />
清 除 配 對 . . . . . . . . . . . . . . . . . . . . . . . . . . . 44<br />
12 KURO LINK<br />
連 接 KURO LINK . . . . . . . . . . . . . . . . . . . . . . 45<br />
KURO LINK 設 定 . . . . . . . . . . . . . . . . . . . . . . 45<br />
設 定 KURO LINK 模 式 . . . . . . . . . . . . . . . . . 45<br />
使 用 同 步 化 之 前 . . . . . . . . . . . . . . . . . . . . . . . 46<br />
同 步 化 擴 大 模 式 . . . . . . . . . . . . . . . . . . . . . . . 46<br />
同 步 化 擴 大 模 式 操 作 . . . . . . . . . . . . . . . . . . 46<br />
取 消 同 步 化 擴 大 模 式 . . . . . . . . . . . . . . . . . . 46<br />
13 其 他 資 訊<br />
碟 片 / 內 容 格 式 播 放 相 容 性 . . . . . . . . . . . . . . 47<br />
碟 片 相 容 性 參 照 表 . . . . . . . . . . . . . . . . . . . . 47<br />
關 於 DVD+R/DVD+RW 相 容 性 . . . . . . . . . . 48<br />
關 於 DivX . . . . . . . . . . . . . . . . . . . . . . . . . . 48<br />
關 於 WMV . . . . . . . . . . . . . . . . . . . . . . . . . 49<br />
關 於 MPEG-4 AAC. . . . . . . . . . . . . . . . . . . 49<br />
關 於 WMA . . . . . . . . . . . . . . . . . . . . . . . . . 49<br />
碟 片 的 使 用 及 維 護 . . . . . . . . . . . . . . . . . . . . . 49<br />
DVD Video 適 用 地 區 . . . . . . . . . . . . . . . . . 50<br />
安 裝 及 保 養 . . . . . . . . . . . . . . . . . . . . . . . . . . 50<br />
安 裝 提 示 . . . . . . . . . . . . . . . . . . . . . . . . . . . 50<br />
清 潔 讀 寫 頭 時 . . . . . . . . . . . . . . . . . . . . . . . 50<br />
水 氣 凝 結 問 題 . . . . . . . . . . . . . . . . . . . . . . . 50<br />
搬 動 系 統 主 機 . . . . . . . . . . . . . . . . . . . . . . . 50<br />
畫 面 大 小 及 碟 片 格 式 . . . . . . . . . . . . . . . . . . . 51<br />
寬 螢 幕 電 視 使 用 者 . . . . . . . . . . . . . . . . . . . . 51<br />
標 準 電 視 使 用 者 . . . . . . . . . . . . . . . . . . . . . 51<br />
電 視 系 統 設 置 . . . . . . . . . . . . . . . . . . . . . . . . . 51<br />
頻 率 間 距 設 置 . . . . . . . . . . . . . . . . . . . . . . . . . 52<br />
調 暗 顯 示 幕 亮 度 . . . . . . . . . . . . . . . . . . . . . . . 52<br />
設 定 按 鍵 鎖 (Key Lock) . . . . . . . . . . . . . . . 52<br />
故 障 排 除 . . . . . . . . . . . . . . . . . . . . . . . . . . . . 53<br />
一 般 問 題 . . . . . . . . . . . . . . . . . . . . . . . . . . . 53<br />
DVD/CD/VCD 播 放 器 . . . . . . . . . . . . . . . . . 54<br />
調 諧 器 . . . . . . . . . . . . . . . . . . . . . . . . . . . . . 55<br />
USB 連 接 . . . . . . . . . . . . . . . . . . . . . . . . . . . 55<br />
HDMI 連 接 . . . . . . . . . . . . . . . . . . . . . . . . . 55<br />
Bluetooth 連 線 . . . . . . . . . . . . . . . . . . . . . . 56<br />
錯 誤 訊 息 . . . . . . . . . . . . . . . . . . . . . . . . . . . 56<br />
重 新 設 置 系 統 . . . . . . . . . . . . . . . . . . . . . . . . . 57<br />
使 用 語 言 代 碼 清 單 . . . . . . . . . . . . . . . . . . . . . 57<br />
語 言 代 碼 清 單 . . . . . . . . . . . . . . . . . . . . . . . . . 58<br />
國 家 / 地 區 代 碼 清 單 . . . . . . . . . . . . . . . . . . . 58<br />
規 格 . . . . . . . . . . . . . . . . . . . . . . . . . . . . . . . . 59<br />
English Español<br />
5<br />
Zhtw
01<br />
揚 聲 器 安 裝 指 南<br />
第 1 章<br />
揚 聲 器 安 裝 指 南<br />
家 庭 劇 院 音 效 設 置<br />
視 您 房 間 的 大 小 及 特 性 而 定 , 您 可 以 在 兩 種 方<br />
式 中 選 取 其 一 來 擺 設 您 的 揚 聲 器 以 使 用 本 系<br />
統 。 關 於 揚 聲 器 配 置 , 請 參 閱 「 設 定 指 南 」。<br />
5 點 /4 點 揚 聲 器 擺 設<br />
這 是 一 種 能 提 供 最 佳 5.1 聲 道 家 庭 劇 院 音 效 的<br />
標 準 多 聲 道 環 繞 聲 揚 聲 器 設 定 方 式 。<br />
3 點 /2 點 揚 聲 器 擺 設<br />
此 種 設 定 方 式 在 無 法 進 行 後 環 繞 揚 聲 器 的 擺 設<br />
時 , 或 您 希 望 能 避 免 在 聆 聽 區 內 佈 設 過 長 的 揚<br />
聲 器 線 時 , 相 當 的 實 用 。<br />
準 備 揚 聲 器<br />
所 有 機 型 的 相 同 準 備 工 作<br />
安 裝 防 滑 墊<br />
• 將 小 片 防 滑 墊 貼 到 每 個 揚 聲 器 的 底 座 上 。 四<br />
塊 大 片 的 防 滑 墊 則 請 貼 到 重 低 音 上 。<br />
使 用 用 隨 附 的 膠 水 將 3 到 4 片 防 滑 墊 貼 到 每 個 揚<br />
聲 器 的 底 座 ( 平 坦 表 面 ) 上 。<br />
<strong>HTZ280DVD</strong>/<strong>HTZ280DVD</strong>-<strong>AP</strong>/<br />
HTZ282DVD/HTZ282DVD-<strong>AP</strong> 的 準 備<br />
工 作<br />
5 點 揚 聲 器 和 3 點 揚 聲 器 的 擺 設 相 同 :<br />
組 裝 揚 聲 器 腳 架<br />
• 利 用 所 附 贈 的 螺 絲 將 揚 聲 器 底 座 安 裝 到 支<br />
柱 上 。<br />
對 正 支 柱 及 底 座 後 , 請 參 閱 「 設 定 指 南 」 將 小<br />
螺 絲 鎖 入 各 個 螺 絲 孔 內 。 請 注 意 , 揚 聲 器 應 朝<br />
向 等 腰 三 角 形 的 底 座 的 方 向 。<br />
注 意<br />
• 請 小 心 不 要 將 螺 絲 鎖 太 緊 。<br />
• 如 果 太 用 力 鎖 緊 螺 絲 , 螺 絲 和 / 或 螺 帽 的 螺<br />
紋 可 能 會 損 壞 。 使 用 中 等 尺 寸 的 手 動 螺 絲 起<br />
子 組 裝 。<br />
• 請 勿 使 用 可 能 會 對 螺 絲 和 螺 帽 施 加 過 大 力<br />
量 的 電 動 螺 絲 起 子 或 尺 寸 太 大 的 螺 絲 起 子 。<br />
• 組 裝 時 , 確 認 沒 有 異 物 黏 在 腳 架 底 座 或 高 的<br />
揚 聲 器 上 。<br />
• 如 果 組 裝 本 機 時 , 腳 架 底 座 與 高 揚 聲 器 之 間<br />
卡 住 異 物 , 則 可 能 無 法 安 全 地 組 裝 本 機 , 導<br />
致 本 機 翻 覆 或 摔 落 。<br />
• 請 勿 站 在 高 揚 聲 器 的 揚 聲 器 腳 架 底 座 上 推<br />
動 或 搖 晃 揚 聲 器 。 揚 聲 器 可 能 摔 落 和 破 裂 ,<br />
或 導 致 人 員 受 傷 。 請 注 意 小 孩 。<br />
固 定 您 的 前 置 與 環 繞 聲 揚 聲 器<br />
• 使 用 隨 附 的 塑 膠 鉤 固 定 每 個 前 置 與 環 繞 揚<br />
聲 器 。<br />
將 兩 個 支 撐 鉤 鎖 入 揚 聲 器 後 面 的 牆 壁 中 。 將 一 條<br />
粗 纜 線 穿 過 鉤 子 和 塑 膠 鉤 來 固 定 揚 聲 器 ( 確 定<br />
先 測 試 它 是 否 能 支 撐 揚 聲 器 的 重 量 )。 安 裝 後 ,<br />
確 定 已 牢 牢 固 定 揚 聲 器 。<br />
<br />
<br />
6<br />
Zhtw
揚 聲 器 安 裝 指 南 01<br />
注 意<br />
• 塑 膠 鉤 不 是 固 定 配 件 , 而 且 也 不 應 使 用 此 鉤<br />
子 直 接 將 揚 聲 器 掛 在 牆 壁 上 。 一 律 使 用 纜 線<br />
保 持 揚 聲 器 的 穩 定 。<br />
• 對 於 因 不 當 組 裝 、 安 裝 、 安 裝 材 料 強 度 不<br />
足 、 誤 用 或 天 然 災 害 造 成 的 任 何 損 失 或 損<br />
壞 , 先 鋒 概 不 擔 負 任 何 責 任 。<br />
• 放 置 本 機 時 , 請 確 定 已 牢 牢 固 定 本 機 , 並 避<br />
免 放 置 在 可 能 因 天 然 災 害 ( 例 如 地 震 ) 而<br />
掉 落 並 造 成 人 員 受 傷 的 區 域 。<br />
僅 適 用 於 HTZ181DVD 機 型 的 準 備 工 作<br />
堆 疊 揚 聲 器 並 使 用 托 架 固 定<br />
每 個 揚 聲 器 背 面 的 機 型 標 籤 上 都 有 協 助 識 別 的<br />
顏 色 標 示 指 示 。 請 參 照 顏 色 指 示 並 正 確 安 裝 揚<br />
聲 器 。<br />
如 圖 所 示 堆 疊 揚 聲 器 。 1 如 以 下 每 張 圖 片 所 示 ,<br />
將 托 架 對 齊 各 自 的 上 側 與 下 側 螺 絲 孔 , 然 後 安<br />
全 地 固 定 螺 絲 。<br />
4 點 /3 點 揚 聲 器 配 置 :<br />
4 <br />
3 <br />
<br />
<br />
<br />
<br />
<br />
<br />
<br />
<br />
<br />
<br />
<br />
<br />
<br />
2 點 揚 聲 器 配 置 :<br />
<br />
<br />
<br />
注 意<br />
<br />
<br />
<br />
<br />
<br />
<br />
<br />
<br />
<br />
<br />
<br />
<br />
<br />
<br />
<br />
• 連 接 托 架 時 , 不 可 嘗 試 拿 著 揚 聲 器 。 這 樣<br />
做 會 造 成 托 架 損 壞 , 或 如 果 托 架 和 揚 聲 器<br />
掉 落 時 導 致 它 們 的 損 壞 更 加 嚴 重 。<br />
將 揚 聲 器 安 裝 在 牆 上<br />
HTZ180DVD 機 型 的 環 繞 揚 聲 器 有 固 定 托 架 。<br />
HTZ181DVD 機 型 的 前 置 、 中 置 和 環 繞 揚 聲 器<br />
有 固 定 托 架 。<strong>HTZ280DVD</strong>/280DVD-<strong>AP</strong> 機 型<br />
的 中 置 和 環 繞 揚 聲 器 有 固 定 孔 。HTZ282DVD/<br />
HTZ282DVD-<strong>AP</strong> 機 型 只 有 中 置 揚 聲 器 有 固 定<br />
孔 。<br />
安 裝 前<br />
• 請 記 得 揚 聲 器 很 重 , 同 時 其 重 量 可 導 致 螺 絲<br />
鬆 脫 , 或 牆 壁 用 材 損 壞 難 以 支 撐 , 而 造 成 揚<br />
聲 器 掉 落 。 請 確 定 您 要 安 裝 的 那 面 牆 的 強 度<br />
足 以 支 援 這 些 揚 聲 器 。 請 勿 安 裝 在 膠 合 板 或<br />
軟 質 的 牆 壁 上 。<br />
English Español Español<br />
附 註<br />
1 使 用 前 置 環 繞 聲 模 式 時 , 請 勿 疊 起 環 繞 聲 揚 聲 器 , 而 是 將 它 們 放 在 前 置 揚 聲 器 旁 , 然 後 朝 外 60° 面 向 前 置 揚 聲 器 以 取 得 最<br />
佳 音 效 。<br />
7<br />
Zhtw
01<br />
揚 聲 器 安 裝 指 南<br />
• 安 裝 螺 絲 未 附 。 請 使 用 適 合 牆 壁 的 材 料 及 可<br />
以 支 撐 揚 聲 器 的 螺 絲 。<br />
注 意<br />
• 如 果 您 不 確 定 牆 壁 的 材 質 及 強 度 , 請 洽 詢 專<br />
業 人 員 的 意 見 。<br />
• 先 鋒 對 於 因 不 正 確 安 裝 所 造 成 的 意 外 或 損<br />
壞 , 一 概 不 負 任 何 責 任 。<br />
<br />
<br />
5 mm 7 mm<br />
僅 適 用 於 安 裝 HTZ180/181DVD 機 型<br />
的 托 架<br />
• 在 將 托 架 安 裝 到 揚 聲 器 背 面 時 , 請 確 實 儘 量<br />
將 隨 機 附 贈 的 螺 絲 上 緊 固 定 。<br />
• 請 勿 將 托 架 安 裝 到 中 置 揚 聲 器 。<br />
<br />
5 mm<br />
10 mm<br />
揚 聲 器 擺 設 之 其 他 注 意 事 項<br />
• 將 主 要 的 左 前 置 及 右 前 置 揚 聲 器 安 裝 在 電<br />
視 機 兩 側 同 等 的 距 離 上 。<br />
• 使 用 5 點 揚 聲 器 擺 設 時 , 將 環 繞 揚 聲 器 安 裝<br />
在 稍 高 於 耳 朵 高 度 的 位 置 以 得 到 最 佳 效 果 。<br />
預 防 事 項 :<br />
• 將 中 置 揚 聲 器 安 裝 在 電 視 機 上 方 時 , 請 確 實<br />
用 膠 帶 或 其 他 適 當 的 方 法 將 其 固 定 。 否 則 ,<br />
揚 聲 器 可 能 會 因 地 震 等 外 力 震 動 而 從 電 視<br />
機 上 掉 落 , 危 及 鄰 近 的 人 員 或 造 成 揚 聲 器 損<br />
壞 。<br />
• 請 確 定 所 有 裸 露 的 揚 聲 器 線 已 捲 繞 在 一 起<br />
並 完 全 插 入 揚 聲 器 端 子 。 若 有 任 何 裸 露 的 導<br />
線 碰 觸 到 背 面 板 , 則 電 源 可 能 會 因 此 切 斷 以<br />
策 安 全 。<br />
• 本 前 置 、 中 置 、 環 繞 揚 聲 器 均 經 過 防 磁 處<br />
理 。 然 而 , 需 視 安 裝 位 置 而 定 , 如 果 揚 聲 器<br />
安 裝 太 過 靠 近 電 視 機 畫 面 時 , 仍 有 可 能 發 生<br />
色 彩 失 真 的 現 象 。 如 有 發 生 此 種 情 形 , 請 將<br />
電 視 機 的 電 源 關 閉 ,15 分 鐘 至 30 分 鐘 後<br />
再 打 開 。 如 果 問 題 仍 然 存 在 , 請 將 揚 聲 器 安<br />
裝 在 遠 離 電 視 機 的 地 方 。<br />
• 重 低 音 未 經 防 磁 處 理 , 因 此 不 可 擺 得 太 過 靠<br />
近 電 視 機 或 顯 示 器 。 磁 性 儲 存 媒 體 ( 如 磁<br />
碟 片 及 錄 音 帶 或 錄 影 帶 等 ) 所 擺 放 的 位 置<br />
亦 不 應 太 過 接 近 重 低 音 。<br />
• 請 勿 將 中 置 揚 聲 器 ( 僅 適 用 於<br />
HTZ180DVD 機 型 )、 前 置 (HTZ280/<br />
282DVD 機 型 )/ 環 繞 揚 聲 器 ( 僅<br />
HTZ282DVD 機 型 ) 和 重 低 音 揚 聲 器 安 裝<br />
在 牆 上 或 天 花 板 上 。 它 們 可 能 會 掉 落 而 使 人<br />
受 傷 。<br />
• 請 勿 將 環 繞 揚 聲 器 放 在 前 置 揚 聲 器 的 上 面 ,<br />
否 則 掉 落 時 可 能 導 致 人 員 受 傷 ( 僅 適 用 於<br />
<strong>HTZ280DVD</strong> 機 型 )。<br />
8<br />
Zhtw
接 線 02<br />
第 2 章<br />
接 線<br />
基 本 接 線 方 式<br />
為 了 得 到 最 好 的 環 繞 音 效 , 請 如 下 所 示 設 定 您 的 揚 聲 器 。 左 前 置 和 右 前 置 揚 聲 器 應 該 相 距 約<br />
1.8 m 至 2.7 m。<br />
下 圖 中 的 揚 聲 器 型 號 HTZ180DVD。<br />
AC IN<br />
重 要 提 示<br />
• 在 連 接 本 系 統 或 變 更 接 線 方 式 時 , 請 確 實 將<br />
電 源 關 閉 並 從 牆 壁 插 座 拔 下 電 源 線 。<br />
完 成 所 有 接 線 後 , 請 將 電 源 線 連 接 至 牆 壁 插<br />
座 上 。<br />
警 告<br />
L<br />
LINE 1<br />
<br />
<br />
R FRONT L<br />
CENTER<br />
R<br />
R SURROUND L<br />
ANALOG AUDIO IN SPEAKERS (4 Ω )<br />
<br />
<br />
• 對 於 錯 誤 組 裝 或 安 裝 、 牆 壁 安 裝 強 度 不 足 、<br />
安 裝 固 定 配 件 ( 或 其 他 房 屋 固 定 配 件 )、 使<br />
用 錯 誤 或 天 然 災 害 造 成 的 意 外 事 件 , 先 鋒 概<br />
不 擔 負 任 何 責 任 。<br />
SUB<br />
WOOFER<br />
<br />
<br />
<br />
<br />
<br />
COMPONENT<br />
VIDEO<br />
VIDEO(TV)<br />
<br />
<br />
<br />
<br />
VIDEO OUT<br />
PR<br />
PB<br />
Y<br />
FM<br />
UNBAL 75 Ω<br />
HDMI OUT<br />
1 組 裝 AM 環 型 天 線 。<br />
A<br />
N<br />
TE<br />
N<br />
N<br />
A<br />
AM LOOP<br />
<br />
<br />
FM <br />
AM <br />
a b c<br />
a. 將 腳 架 折 向 箭 頭 所 指 方 向 。<br />
b. 把 環 圈 夾 到 腳 架 上 。<br />
c. 如 果 您 想 固 定 到 牆 上 或 其 他 表 面 上 , 請 在 利<br />
用 螺 絲 先 固 定 腳 架 之 後 , 接 著 執 行 步 驟 b。<br />
建 議 您 先 利 用 螺 絲 固 定 腳 架 後 再 來 決 定 接<br />
收 強 度 。<br />
English Español Español<br />
9<br />
Zhtw
02<br />
接 線<br />
2 連 接 AM 及 FM 天 線 。 1<br />
a. 請 拉 除 AM 天 線 金 屬 線 上 的 保 護 外 皮 。 連 接<br />
AM 環 型 天 線 的 每 股 金 屬 線 至 各 個 AM 天<br />
線 端 子 上 。 2<br />
• 將 顏 色 標 示 線 配 好 標 籤 上 的 顏 色 指 示 , 然 後<br />
將 顏 色 標 示 線 插 入 紅 色 (+) 端 , 而 另 一<br />
條 線 插 入 黑 色 (–) 端 。<br />
(–)<br />
(+)<br />
<br />
在 各 個 端 子 上 , 將 固 定 片 往 下 壓 打 開 ; 然 後<br />
插 入 金 屬 線 , 再 放 開 、 關 上 固 定 。<br />
b. 把<br />
3<br />
FM 天 線 插 頭 壓 入 FM 天 線 插 座 的 中 間 接<br />
腳 內 。<br />
3-1 連 接 每 只 揚 聲 器 。<br />
• 連 接 金 屬 線 至 揚 聲 器 上 。<br />
2<br />
3 1<br />
僅 適 用 於 HTZ180DVD 機 種 :<br />
選 擇 3 點 揚 聲 器 擺 設 時 , 請 依 照 以 下 的 步 驟 a<br />
到 c 來 放 置 揚 聲 器 。<br />
a. 每 只 揚 聲 器 的 底 座 要 對 準 前 置 揚 聲 器 上 方<br />
的 圓 槽 裝 上 , 如 圖 所 示 。<br />
<br />
<br />
<br />
<br />
• 扭 轉 並 扯 下 每 條 金 屬 線 上 的 保 護 外 皮 。<br />
附 註<br />
1 • 將 天 線 放 置 在 遠 離 接 收 器 或 其 他 連 接 線 的 位 置 。<br />
• 如 果 使 用 所 附 天 線 的 接 收 不 良 , 則 請 參 閱 第 20 頁 的 改 善 FM 接 收 不 良 或 第 42 頁 的 連 接 外 部 天 線 來 改 善 。<br />
• 請 勿 將 安 裝 隨 附 的 環 形 天 線 以 外 的 任 何 天 線 , 或 如 第 42 頁 所 述 的 外 部 天 線 。<br />
2 • 請 勿 讓 其 接 觸 到 金 屬 物 體 並 避 免 擺 在 電 腦 、 電 視 機 或 其 他 電 氣 設 備 的 附 近 。<br />
• 如 果 收 音 機 接 收 不 良 , 您 可 以 將 每 條 天 線 金 屬 線 重 新 插 入 相 對 的 端 子 內 或 可 有 所 改 善 。<br />
• 為 了 能 有 最 佳 的 接 收 條 件 , 請 勿 將 AM 環 型 天 線 金 屬 線 解 開 或 將 它 們 環 繞 整 個 環 型 天 線 。<br />
3 欲 確 保 最 佳 的 接 收 條 件 , 請 確 實 將 FM 天 線 完 全 伸 展 開 來 , 不 可 捲 曲 或 懸 掛 於 本 機 的 後 方 。<br />
10<br />
Zhtw
接 線 02<br />
b. 固 定 揚 聲 器 線 。<br />
在 測 定 揚 聲 器 轉 動 所 需 的 鬆 緊 度 後 ( 請 參 閱 接<br />
下 來 之 步 驟 ), 請 利 用 所 提 供 的 凹 槽 來 固 定 揚<br />
聲 器 線 。<br />
c. 將 揚 聲 器 轉 向 最 近 的 牆 壁 , 令 箭 頭 對 齊 以 完<br />
成 最 佳 的 「 前 置 環 繞 聲 」 設 置 。<br />
關 於 「 前 置 環 繞 聲 」 模 式 , 請 轉 動 每 個 揚 聲 器<br />
使 底 座 上 的 箭 頭 能 對 齊 前 置 揚 聲 器 上 的<br />
( FRONT SURROUND) 箭 頭 。 關 於 「 加 大<br />
功 率 」 模 式 , 請 將 所 有 揚 聲 器 朝 向 前 面 。 如 需<br />
有 關 使 用 「 前 置 環 繞 聲 」 與 「 加 大 功 率 」 模 式<br />
的 詳 細 資 訊 , 請 參 閱 聆 聽 您 的 系 統 。<br />
注 意<br />
• 為 了 避 免 發 生 意 外 , 請 確 定 環 繞 揚 聲 器 是 正<br />
確 固 定 於 前 置 揚 聲 器 之 上 。<br />
• 請 勿 將 揚 聲 器 安 裝 到 牆 上 或 揚 聲 器 腳 架 上<br />
來 完 成 3 點 揚 聲 器 擺 設 。<br />
僅 適 用 於 HTZ181DVD 機 種 :<br />
a. 連 接 中 置 揚 聲 器 時 , 以 相 同 方 法 將 Y 接 線<br />
兩 端 連 接 至 兩 個 中 置 揚 聲 器 。<br />
<br />
Y <br />
選 擇 用 托 架 組 裝 的 4 點 、3 點 或 2 點 擺 設 時 ,<br />
請 依 照 下 列 的 步 驟 b。<br />
b. 完 成 接 線 時 , 請 固 定 揚 聲 器 連 接 線 。 將 連<br />
接 線 固 定 在 托 架 的 溝 槽 中 。<br />
3-2 連 接 接 收 器 上 的 每 一 個 揚 聲 器 端 子 。<br />
• 連 接 另 一 端 至 接 收 器 背 面 上 有 標 示 顏 色 的<br />
揚 聲 器 端 子 上 。 確 定 已 完 全 插 入 。<br />
揚 聲 器 插 頭 在 金 屬 線 端 處 的 小 型 端 子 應 視<br />
連 接 的 是 上 或 下 揚 聲 器 端 子 來 面 朝 上 或 朝<br />
下 。 請 確 實 正 確 地 連 接 。<br />
English Español Español<br />
<br />
<br />
11<br />
Zhtw
02<br />
接 線<br />
注 意<br />
• 這 些 揚 聲 器 端 子 均 帶 有 危 險 電 壓 。 為 避 免 在<br />
連 接 或 脫 離 揚 聲 器 線 時 發 生 電 擊 危 險 , 在 觸<br />
摸 任 何 未 絕 緣 部 分 之 前 , 請 先 將 電 源 線 插 頭<br />
拔 離 。<br />
• 請 勿 將 隨 機 附 贈 以 外 的 揚 聲 器 連 接 至 本 系<br />
統 上 。<br />
• 請 勿 將 隨 附 的 揚 聲 器 連 接 至 不 是 隨 本 系 統<br />
一 起 附 上 的 擴 大 器 。 連 接 至 其 他 的 擴 大 器 上<br />
可 能 會 導 致 故 障 或 起 火 。<br />
• 連 接 插 頭 後 , 輕 拉 連 接 線 以 確 定 連 接 線 端 牢<br />
牢 連 接 至 端 子 。 連 接 不 良 可 能 造 成 雜 訊 和 聲<br />
音 中 斷 。<br />
• 如 果 連 接 線 的 線 路 正 好 退 出 端 子 外 , 讓 線 路<br />
互 相 接 觸 , 造 成 擴 大 器 過 大 的 額 外 負 載 。 這<br />
樣 可 能 導 致 擴 大 器 停 止 作 用 , 甚 至 可 能 損 壞<br />
擴 大 器 。<br />
4 將 其 中 一 端 連 接 至 您 的 電 視 機 的 視 頻 輸 入<br />
插 孔 。<br />
• 請 使 用 附 贈 的 視 頻 連 接 線 。<br />
5 將 另 一 端 連 接 至 接 收 器 的 視 頻 輸 出 插 孔 。<br />
• 本 機 配 備 防 拷 技 術 。 請 勿 使 用 影 音 連 接 線 透<br />
過 錄 放 影 機 將 本 機 連 接 至 您 的 電 視 機 , 否 則<br />
本 機 的 影 像 無 法 在 您 的 電 視 機 上 正 常 顯 示 。<br />
6 連 接 電 源 線 。 1<br />
• 連 接 電 源 線 至 接 收 器 上 的 AC 插 座 。 連 接 電<br />
源 線 至 牆 壁 插 座 。<br />
AC IN<br />
AC <br />
附 註<br />
1 • 請 勿 使 用 非 隨 本 系 統 所 附 贈 的 其 他 電 源 線 。<br />
• 隨 機 附 贈 的 電 源 線 除 了 連 接 本 系 統 外 , 請 勿 做 其 他 用 途 。<br />
12<br />
Zhtw
USB<br />
MAIN MIC SUB<br />
PHONES<br />
控 制 與 顯 示 03<br />
第 3 章<br />
控 制 與 顯 示<br />
前 面 板<br />
1 STANDBY/ON ( 第 17、32、43、50、<br />
52 以 及 54 頁 )<br />
2 OPEN/CLOSE ( 第 18、32 以 及 53 頁 )<br />
3 功 能<br />
4 <br />
5 <br />
1<br />
STANDBY/ON<br />
6 VOLUME +/– ( 第 19 頁 )<br />
7 碟 盤 ( 第 18 頁 )<br />
8 遙 控 感 應 器 ( 第 15 頁 )<br />
9 顯 示 幕<br />
OPEN/CLOSE<br />
FUNCTION<br />
10 USB 介 面 ( 第 31 頁 )<br />
11 MIC 輸 入 插 孔 ( 第 33 頁 )<br />
12 PHONES 插 孔 ( 第 23 頁 )<br />
<br />
7 8 9<br />
USB<br />
2<br />
3 4 5 6<br />
MAIN<br />
<br />
MIC<br />
SUB<br />
VOLUME<br />
PHONES<br />
10 11 12<br />
顯 示 幕<br />
1 2 3 4<br />
PRGSVE SOUND<br />
DTS F.SURR.<br />
2D<br />
2PL<br />
1 解 碼 指 示 燈 ( 第 22 頁 )<br />
DTS 在 DTS 來 源 播 放 期 間 會 亮 起 。2PL II 在<br />
2Dolby Pro Logic II 解 碼 時 亮 起 ,2D 在 播 放<br />
杜 比 數 位 音 源 時 亮 起 。<br />
2 PRGSVE ( 第 41 頁 )<br />
色 差 影 像 輸 出 端 子 輸 出 逐 行 掃 描 訊 號 時 , 便 會<br />
亮 起 。<br />
3 SOUND ( 第 23 頁 )<br />
SFC 模 式 、 音 調 控 制 ( 高 音 、 低 音 或 重 低 音 )、<br />
MP3 擴 展 器 模 式 、 聲 音 強 化 器 模 式 起 動 時 會 亮<br />
起 。<br />
4 F.SURR. ( 第 23 頁 )<br />
選 取 「 加 大 功 率 」 模 式 / 「 前 置 環 繞 聲 」 模 式<br />
時 會 亮 起 。<br />
5 RPT 及 RPT-1 ( 第 28 頁 )<br />
RPT 在 重 複 播 放 期 間 會 亮 起 。RPT-1 在 重 複 播<br />
放 單 曲 期 間 會 亮 起 。<br />
6 PGM ( 第 27 以 及 29 頁 )<br />
此 燈 於 節 目 或 播 放 清 單 播 放 期 間 會 亮 起 。<br />
7 調 諧 器 指 示 燈 ( 第 20 頁 )<br />
收 聽 到 廣 播 節 目 時 會 亮 起 ,<br />
體 聲 FM 廣 播 節 目 時 會 亮 起 ,<br />
聲 道 接 收 時 會 亮 起 。<br />
8 RDM ( 第 28 頁 )<br />
此 燈 在 隨 機 播 放 期 間 會 亮 起 。<br />
6<br />
RPT -1<br />
kHz PGM<br />
MHz RDM<br />
12 11<br />
10<br />
9 8 7<br />
5<br />
收 聽 到 立<br />
在 選 取 FM 單<br />
English Español Español<br />
13<br />
Zhtw
03<br />
控 制 與 顯 示<br />
9 kHz/MHz ( 第 20 頁 )<br />
為 指 示 字 元 顯 示 幕 中 所 顯 示 的 頻 率 單 位 (kHz<br />
適 用 於 AM,MHz 適 用 於 FM)。<br />
遙 控 器<br />
下 圖 顯 示 HTZ280/282DVD-<strong>AP</strong>。<br />
10 字 元 顯 示 幕<br />
11 ( 第 21 頁 )<br />
此 燈 在 睡 眠 定 時 啟 動 時 會 亮 起 。<br />
12 <br />
此 燈 在 播 放 期 間 會 亮 起 。<br />
1<br />
2<br />
3<br />
STANDBY<br />
/ON<br />
DVD/CD<br />
AD<strong>AP</strong>TER PORT USB LINE<br />
1 2 3<br />
USB REC AUDIO SUBTITLE<br />
4 5 6<br />
ANGLE ZOOM<br />
7 8 9<br />
SLEEP<br />
CLEAR<br />
DISPLAY<br />
0<br />
TUNER<br />
(FM/AM)<br />
OPEN/CLOSE<br />
PLAYLIST<br />
1<br />
2<br />
3<br />
MIC VOL<br />
11<br />
12<br />
13<br />
4<br />
5<br />
TOP MENU<br />
SETUP<br />
PRESET<br />
TUNE<br />
ECHO<br />
ENTER<br />
MENU<br />
PRESET<br />
14<br />
6<br />
7<br />
HOME<br />
MENU<br />
AUTO/<br />
STEREO<br />
KARAOKE<br />
TUNE<br />
SURROUND SOUND<br />
RETURN<br />
MP3 EXP/<br />
V.ENH<br />
15<br />
8<br />
9<br />
10<br />
TV CONTROL<br />
INPUT CHANNEL VOLUME<br />
SHIFT<br />
VOLUME<br />
CLASS<br />
T.EDIT<br />
MUTE<br />
16<br />
17<br />
18<br />
1 STANDBY/ON ( 第 17、32、43、50、<br />
52 以 及 54 頁 )<br />
1<br />
2 功 能 選 取 按 鍵<br />
3 數 字 鍵 、CLEAR、DISPLAY、SLEEP 和 DVD<br />
控 制<br />
CLEAR<br />
DISPLAY ( 第 30 頁 )<br />
SHIFT+SLEEP ( 第 21 頁 )<br />
SHIFT+USB REC ( 第 31 頁 )<br />
SHIFT+AUDIO ( 第 30 頁 )<br />
附 註<br />
1 只 有 HTZ280/282DVD-<strong>AP</strong> 機 型 配 備 傳 輸 埠 。<br />
14<br />
Zhtw
控 制 與 顯 示 03<br />
SHIFT+SUBTITLE ( 第 30 頁 )<br />
SHIFT+ANGLE ( 第 30 頁 )<br />
SHIFT+ZOOM ( 第 30 頁 )<br />
4 TOP MENU ( 第 19 以 及 30 頁 )<br />
SHIFT+SETUP ( 第 17、20、41、43、44、<br />
45、51、52 以 及 57 頁 )<br />
5 SHIFT+KARAOKE ( 第 33 頁 )<br />
SHIFT+ECHO ( 第 33 頁 )<br />
SHIFT+ / SHIFT+ ( 第 33 頁 )<br />
遊 標 按 鍵<br />
ENTER<br />
TUNE ( 第 20 頁 )<br />
PRESET ( 第 20 頁 )<br />
6 HOME MENU<br />
7 音 效 控 制<br />
AUTO/STEREO ( 第 22 以 及 23 頁 )<br />
SURROUND ( 第 22 以 及 23 頁 )<br />
SOUND ( 第 23 以 及 24 頁 )<br />
MP3 EXP/V.ENH ( 第 24 頁 )<br />
8 播 放 控 制 ( 第 19 以 及 25 頁 )<br />
9 TV CONTROL 按 鍵<br />
可 用 於 控 制 先 鋒 平 面 電 視 。 1<br />
10 SHIFT<br />
11 OPEN/CLOSE ( 第 18、32 以 及 53 頁 )<br />
12 PLAYLIST 按 鍵 ( 第 27 頁 )<br />
16 調 諧 器 控 制 鍵<br />
CLASS ( 第 21 頁 )<br />
SHIFT+T.EDIT ( 第 20 頁 )<br />
17 MUTE<br />
18 VOLUME +/– ( 第 18 頁 )<br />
安 裝 遙 控 器 電 池<br />
1 打 開 遙 控 器 背 面 上 的 電 池 室 蓋 。<br />
2 對 照 電 池 室 內 的 標 示 (,) 將 兩 顆<br />
AA/R6 電 池 插 入 電 池 室 內 。<br />
3 關 上 電 池 室 蓋 。<br />
注 意<br />
電 池 使 用 不 當 會 導 致 如 電 池 液 外 漏 及 爆 裂 等 危<br />
險 發 生 。 請 遵 守 下 列 事 項 :<br />
• 將 電 池 插 入 電 池 槽 時 , 請 務 必 依 電 池 槽 內<br />
的 指 示 , 將 電 池 的 極 性 對 準 正 極 與 負 極<br />
極 性 。<br />
• 切 勿 將 新 舊 電 池 混 用 。<br />
• 相 同 類 型 的 電 池 可 能 有 不 同 的 電 壓 , 視 品<br />
牌 而 定 。 請 勿 混 用 不 同 品 牌 的 電 池 。<br />
• 處 理 廢 舊 電 池 時 , 請 遵 守 政 府 條 例 或 適 用 於<br />
貴 國 或 地 區 的 環 境 公 共 指 令 規 則 。<br />
English Español Español<br />
13 MIC VOL +/– ( 第 33 頁 )<br />
14 MENU ( 第 19、26 以 及 30 頁 )<br />
15 RETURN<br />
附 註<br />
1 按 住 數 字 鍵 1 超 過 三 秒 , 同 時 按 下 CLEAR。 如 果 電 視 拒 絕 回 應 , 請 按 住 數 字 鍵 2。 正 確 切 換 控 制 後 , 將 TV CONTROL 朝<br />
向 電 視 並 按 下 它 可 操 作 到 電 視 機 的 功 率 。<br />
15<br />
Zhtw
03<br />
控 制 與 顯 示<br />
• 為 了 避 免 電 池 漏 液 , 長 時 間 ( 一 個 月 或 更<br />
久 ) 不 使 用 遙 控 器 時 , 請 取 出 遙 控 器 的 電<br />
池 。 如 果 漏 液 , 請 小 心 擦 掉 電 池 槽 內 的 任 何<br />
電 池 液 , 然 後 換 用 新 電 池 。<br />
• 請 勿 讓 書 本 或 其 他 物 體 壓 在 遙 控 器 上 , 因 為<br />
這 樣 可 能 壓 住 按 鍵 , 造 成 電 池 的 電 量 更 快 耗<br />
盡 。<br />
• 切 勿 在 車 內 或 加 熱 器 附 近 等 會 受 到 陽 光 直<br />
射 或 過 熱 的 環 境 中 使 用 或 存 放 電 池 。 過 熱 的<br />
環 境 可 能 導 致 電 池 破 漏 、 過 熱 、 爆 炸 或 起<br />
火 。 還 會 減 少 電 池 的 使 用 壽 命 或 效 能 。<br />
運 用 遙 控 器<br />
遙 控 器 的 使 用 範 圍 為 距 離 前 面 板 感 應 器 的 7 m<br />
內 , 而 且 在 30° 內 。<br />
• 如 果 遙 控 器 和 顯 示 裝 置 之 間 有 障 礙 物 , 或 如<br />
果 遙 控 器 未 以 正 確 角 度 指 向 顯 示 裝 置 的 遙<br />
控 感 應 器 , 則 遙 控 器 可 能 無 法 作 用 。<br />
• 如 果 陽 光 直 射 或 螢 光 燈 等 強 制 照 到 本 機 的<br />
遙 控 感 應 器 上 , 則 遙 控 器 可 能 無 法 正 常 作<br />
用 。<br />
• 如 果 在 靠 近 會 發 射 紅 外 線 的 裝 置 , 或 其 他 裝<br />
置 的 紅 外 線 遙 控 器 的 位 置 使 用 本 機 , 則 遙 控<br />
器 可 能 無 法 正 常 作 用 。 此 外 , 使 用 此 遙 控 器<br />
可 能 造 成 其 他 裝 置 的 運 作 異 常 。<br />
• 遙 控 器 的 操 作 範 圍 變 得 太 短 時 , 請 更 換 電<br />
池 。<br />
16<br />
Zhtw
開 始 操 作 04<br />
第 4 章<br />
開 始 操 作<br />
設 定 揚 聲 器 擺 設<br />
選 擇 您 為 您 的 聆 聽 區 環 境 安 排 的 揚 聲 器 設 定 的<br />
揚 聲 器 擺 設 。<br />
第 一 次 開 啟 系 統 電 源 時 , 顯 示 下 列 的 揚 聲 器 擺<br />
設 設 定 。 如 果 您 未 完 成 此 設 定 即 關 閉 系 統 電 源 ,<br />
下 次 開 啟 系 統 電 源 時 會 再 次 顯 示 相 同 內 容 。<br />
1 按 STANDBY/ON, 然 後 確 認 顯 示 幕 顯 示<br />
WELCOME ( 歡 迎 使 用 )。<br />
2 SELECT SPEAKER LAYOUT 將 在 顯 示 幕 上<br />
執 行 約 10 秒 鐘 。<br />
3 使 用 / 選 取 適 當 的 揚 聲 器 擺 設 。<br />
有 兩 種 揚 聲 器 擺 設 模 式 - 5 點 揚 聲 器 擺 設 和<br />
3 點 揚 聲 器 擺 設 。<br />
如 需 有 關 揚 聲 器 擺 設 與 模 式 說 明 的 詳 細 資 料 ,<br />
請 參 閱 「 設 定 指 南 」。<br />
• 5 SPOT - 將 兩 個 環 繞 揚 聲 器 放 置 在 聆 聽 位<br />
置 後 面 , 最 適 用 於 5.1 聲 道 家 庭 電 影 院 的<br />
聲 音 。<br />
• 4 SPOT ( 僅 適 用 於 HTZ181DVD)- 這 是<br />
用 於 聆 聽 環 繞 聲 的 標 準 擺 設 , 類 似 5 點 揚<br />
聲 器 擺 設 。 兩 個 中 置 揚 聲 器 分 別 放 在 右 側<br />
和 左 則 , 並 整 齊 地 擺 放 在 電 視 旁 邊 。<br />
• 3 SPOT - 這 是 用 於 「 前 置 環 繞 聲 」 模 式 的<br />
典 型 擺 設 。 兩 個 環 繞 揚 聲 器 放 在 聆 聽 位 置<br />
前 面 。<br />
• 2 SPOT ( 僅 適 用 於 HTZ181DVD)- 此 配<br />
置 適 用 於 「 前 置 環 繞 聲 」 模 式 , 和 3 點 揚<br />
聲 器 擺 設 相 同 。 兩 個 中 置 揚 聲 器 分 別 放 在<br />
右 側 和 左 則 , 並 整 齊 地 擺 放 在 電 視 旁 邊 。<br />
4 按 下 ENTER 確 認 調 整 。 1<br />
設 置 聲 道 音 量<br />
設 置 您 主 要 聆 聽 位 置 的 相 對 聲 道 音 量 。 2<br />
1 按 下 SHIFT+SETUP。<br />
2 使 用 / 以 選 取 SOUNDSET, 然 後 按 下<br />
ENTER。<br />
3 使 用 / 以 選 取 CH LEVEL, 然 後 按 下<br />
ENTER。<br />
4 使 用 / 以 選 取 TESTTONE, 然 後 按 下<br />
ENTER。<br />
測 試 音 調 會 按 以 下 順 序 輸 出 ( 從 目 前 聆 聽 模 式<br />
下 啟 動 中 的 揚 聲 器 ):<br />
• L - 左 前 置 揚 聲 器<br />
• C - 中 置 揚 聲 器<br />
• R - 右 前 置 揚 聲 器<br />
English Español Español<br />
• SR - 右 環 繞 揚 聲 器<br />
• SL - 左 環 繞 揚 聲 器<br />
• SW - 重 低 音<br />
3<br />
附 註<br />
1 若 要 變 更 設 定 , 請 按 SHIFT+SETUP, 使 用 / 選 取 SYS SET, 然 後 使 用 / 選 取 LAYOUT 以 開 始 設 定 程 序 。<br />
2 • 此 項 僅 在 選 取 DVD/CD 且 停 止 播 放 時 , 才 能 使 用 。 另 請 確 定 耳 機 尚 未 接 上 。<br />
• 要 調 整 所 聆 聽 音 效 來 源 的 整 體 平 衡 , 請 按 下 SHIFT+SETUP, 使 用 / 選 取 SOUNDSET, 然 後 按 下 ENTER。 使 用 /<br />
以 選 取 CH LEVEL, 然 後 按 下 ENTER。 使 用 / 切 換 聲 道 , 再 以 / 調 整 聲 道 位 準 。 在 您 完 成 時 , 按 下 ENTER。<br />
3 由 於 重 低 音 會 產 生 超 低 階 頻 率 , 因 此 其 音 效 聽 起 來 會 較 實 際 上 的 音 量 安 靜 一 些 。<br />
17<br />
Zhtw
04<br />
開 始 操 作<br />
5 使 用 VOLUME +/– 以 調 整 音 量 至 適 度 的 範<br />
圍 。 1<br />
6 使 用 / 以 輪 流 調 整 聲 道 的 音 量 。<br />
當 坐 在 主 要 聆 聽 位 置 上 , 您 應 該 會 聽 到 來 自 每<br />
個 揚 聲 器 同 樣 音 量 的 測 試 音 調 。 聲 道 音 量 範 圍<br />
為 ±10 dB。<br />
7 在 您 完 成 時 , 按 下 ENTER 以 退 出 測 試 音 調<br />
設 置 。<br />
使 用 在 屏 顯 示 畫 面 (OSD)<br />
為 了 使 用 方 便 , 本 系 統 採 用 了 大 量 圖 形 化 的 在<br />
屏 顯 示 畫 面 (OSD)。<br />
所 有 畫 面 的 導 覽 方 式 基 本 上 並 無 不 同 , 請 使 用<br />
、、、 變 更 反 白 項 目 , 並 按 下 ENTER<br />
完 成 選 取 。 2<br />
重 要 提 示<br />
• 整 本 手 冊 ,「 選 取 」 是 指 使 用 游 標 按 鍵 反 白<br />
在 屏 畫 面 中 的 項 目 , 再 按 下 ENTER 之 意 。<br />
按 鍵 按 鍵 功 能<br />
HOME 顯 示 / 退 出 在 屏 顯 示 畫 面 (OSD)。<br />
MENU<br />
變 更 反 白 的 選 單 項 目 。<br />
ENTER 選 取 反 白 的 選 單 項 目 。<br />
RETURN 返 回 主 選 單 不 做 任 何 變 更 。<br />
提 示<br />
• 在 OSD 畫 面 下 方 的 按 鍵 指 南 可 告 訴 您 操 作<br />
畫 面 所 需 使 用 的 按 鍵 。<br />
碟 片 播 放<br />
播 放 DVD、CD、VCD/ 超 級 VCD、DivX 視<br />
頻 /WMV 及 WMA/MP3/MPEG-4 AAC 等 碟<br />
片 的 基 本 播 放 控 制 , 在 此 均 適 用 。 更 多 的 功 能<br />
會 在 第 6 章 中 詳 細 說 明 。<br />
重 要 提 示<br />
• 在 整 本 手 冊 中 ,「DVD」 一 詞 指 的 是 DVD-<br />
Video、DVD-R 和 DVD-RW。<br />
1 如 果 播 放 器 尚 未 開 機 , 請 將 它 開 機 。<br />
如 果 您 正 在 播 放 含 有 影 像 的 碟 片 , 請 同 時 將 電<br />
視 機 打 開 並 確 定 設 置 的 是 正 確 的 視 頻 輸 入 。<br />
2 按 下 OPEN/CLOSE 以 置 入 碟 片 。<br />
標 籤 面 朝 上 置 入 碟 片 , 利 用 碟 片 導 槽 對 準 碟 片<br />
( 如 果 您 置 入 的 是 雙 面 DVD 碟 片 , 置 入 時 請 將<br />
想 要 播 放 的 一 面 朝 下 )。<br />
3 按 下 ( 播 放 ) 以 開 始 播 放 。<br />
如 果 您 播 放 的 是 DVD 或 VCD/ 超 級 VCD, 便<br />
會 出 現 一 選 單 。 請 參 閱 第 19 頁 的 DVD-Video<br />
碟 片 選 單 及 VCD/ 超 級 VCD PBC 選 單 內 容 ,<br />
以 熟 知 導 覽 的 方 法 。<br />
若 是 您 置 入 的 碟 片 當 中 含 有 JPEG, 則 會 開 始 幻<br />
燈 片 秀 。 與 其 相 關 的 更 多 資 訊 , 請 參 閱 第 25 頁<br />
的 播 放 JPEG 幻 燈 片 秀 。<br />
• 若 碟 片 內 含 DivX 視 頻 /WMV 及 其 他 媒 體 檔<br />
案 類 型 ( 例 如 MP3), 首 先 請 從 螢 幕 操 作<br />
畫 面 (OSD) 中 選 取 要 播 放 DivX 視 頻 /<br />
WMV 檔 案 (DivX/WMV) 或 其 他 媒 體 檔<br />
案 類 型 (MP3/WMA/JPEG/MPEG-4<br />
AAC)。<br />
附 註<br />
1 音 量 設 定 為 51 或 以 上 時 , 您 無 法 選 擇 TESTTONE 且 聲 道 音 量 設 定 範 圍 受 到 限 制 。 此 外 , 如 果 任 何 揚 聲 器 的 聲 道 音 量 範 圍 設<br />
定 在 + 端 , 則 最 大 音 量 也 會 受 到 限 制 。<br />
2 螢 幕 保 護 程 序 會 在 系 統 閒 置 五 分 鐘 後 出 現 。<br />
18<br />
Zhtw
開 始 操 作 04<br />
• 如 果 您 要 播 放 DualDisc (DVD/CD 混 合 碟<br />
片 ), 請 參 閱 第 47 頁 的 碟 片 / 內 容 格 式 播<br />
放 相 容 性 。<br />
4 音 量 調 整 。<br />
請 使 用 VOLUME +/– 來 控 制 音 量 。<br />
基 本 播 放 控 制<br />
以 下 表 格 所 示 為 遙 控 器 上 用 以 播 放 碟 片 的 基 本<br />
控 制 。 1 您 在 第 6 章 中 可 以 找 到 其 他 的 播 放 功<br />
能 。<br />
按 鍵 按 鍵 功 能<br />
開 始 / 恢 復 正 常 播 放 。<br />
• 如 果 螢 幕 上 顯 示 RESUME( 恢 復 ) 或<br />
LAST MEM ( 最 終 記 憶 ) 的 字 樣 , 則 播<br />
放 作 業 便 會 從 恢 復 播 放 或 最 後 記 憶 的 位<br />
置 開 始 ( 請 參 閱 下 列 恢 復 播 放 及 最 終<br />
記 憶 播 放 )。<br />
暫 停 / 繼 續 播 放 碟 片 。<br />
可 停 止 播 放 或 取 消 恢 復 播 放 功 能 ( 如 果<br />
螢 幕 上 顯 示 RESUME ( 恢 復 ) 字 樣 )。<br />
按 下 可 開 始 向 後 快 轉 。<br />
按 下 可 開 始 向 前 快 轉 。<br />
可 跳 至 目 前 曲 目 或 章 節 的 開 頭 , 以 及 前<br />
一 個 曲 目 / 章 節 。<br />
可 跳 至 下 一 個 曲 目 或 章 節 。<br />
數 字 鍵 可 用 以 輸 入 標 題 / 章 節 / 曲 目 的 編 號 。<br />
按 下 ENTER 按 鍵 以 作 出 選 取 。<br />
• 如 果 碟 片 停 止 , 則 會 從 所 選 標 題<br />
(DVD) 或 曲 目 (CD/VCD/ 超 級<br />
VCD) 的 開 頭 處 開 始 播 放 。<br />
• 如 果 碟 片 正 在 播 放 , 則 會 從 所 選 標 題<br />
(VR 模 式 DVD-R/-RW)、 章 節<br />
(DVD-Video) 或 曲 目 (CD/VCD/ 超<br />
級 VCD) 的 開 頭 處 開 始 播 放 。<br />
恢 復 播 放 及 最 終 記 憶 播 放<br />
您 停 止 播 放 碟 片 時 ,RESUME ( 恢 復 ) 字 樣 會<br />
出 現 在 螢 幕 中 , 表 示 您 可 以 從 該 點 位 置 來 恢 復<br />
播 放 。<br />
對 於 DVD 及 VCD/ 超 級 VCD 而 言 , 即 使 退 出 ,<br />
播 放 位 置 亦 會 儲 存 在 記 憶 體 裏 。 2 下 次 您 置 入<br />
碟 片 時 , 螢 幕 上 即 會 顯 示 LAST MEM( 最 終 記<br />
憶 ) 的 字 樣 , 同 時 讓 您 從 此 恢 復 播 放 。<br />
如 果 您 想 要 清 除 恢 復 播 放 的 位 置 , 請 在 螢 幕 上<br />
顯 示 RESUME( 恢 復 ) 的 字 樣 時 , 按 下 ( 停<br />
止 )。<br />
DVD-Video 碟 片 選 單<br />
許 多 DVD-Video 碟 片 內 含 您 可 以 選 取 想 要 觀<br />
賞 內 容 的 選 單 。<br />
有 時 ,DVD-Video 選 單 會 自 動 在 您 開 始 播 放 時<br />
顯 示 在 螢 幕 上 ; 其 他 碟 片 只 會 在 您 按 下 MENU<br />
或 TOP MENU 時 才 會 顯 示 。<br />
按 鍵 按 鍵 功 能<br />
TOP MENU 顯 示 DVD 碟 片 的 「 上 層 選 單 」<br />
- 此 項 功 能 會 視 碟 片 而 有 所 不<br />
同 。<br />
MENU 可 顯 示 DVD 碟 片 選 單 - 這 會 依 碟<br />
片 而 有 所 不 同 , 同 時 可 能 與 「 上<br />
層 選 單 」 功 能 相 同 。<br />
在 畫 面 上 四 面 移 動 游 標 。<br />
ENTER 選 取 目 前 選 單 上 的 選 項 。<br />
RETURN 返 回 前 一 個 顯 示 的 選 單 畫 面 。<br />
數 字 鍵<br />
附 註<br />
1 在 您 播 放 某 些 DVD 碟 片 時 , 您 會 發 現 有 些 播 放 控 制 可 能 無 法 用 來 播 放 碟 片 中 的 某 些 部 分 。<br />
2 •「 恢 復 播 放 」 及 「 最 終 記 憶 播 放 」 功 能 可 能 不 適 用 某 些 碟 片 。<br />
• 對 於 DVD-Video 碟 片 ( 除 VR 模 式 DVD-R/-RW 外 ), 本 機 可 儲 存 最 後 五 片 的 播 放 位 置 。<br />
可 選 取 編 有 號 碼 的 選 單 選 項<br />
( 僅 適 用 於 某 些 碟 片 )。 按 下<br />
ENTER 按 鍵 以 作 出 選 取 。<br />
VCD/ 超 級 VCD PBC 選 單<br />
某 些 VCD/ 超 級 VCD 具 有 您 可 從 中 選 取 想 要 觀<br />
賞 內 容 的 選 單 。 這 些 便 是 PBC ( 播 放 控 制 ) 選<br />
單 。<br />
English Español Español<br />
19<br />
Zhtw
04<br />
開 始 操 作<br />
您 可 以 直 接 利 用 數 字 鍵 選 取 曲 目 , 不 用 按 下<br />
( 播 放 ) 按 鍵 來 開 始 播 放 , 而 無 須 導 覽 PBC<br />
選 單 , 便 可 播 放 整 張 PBC VCD/ 超 級 VCD。<br />
按 鍵 按 鍵 功 能<br />
RETURN 顯 示 PBC 選 單 。<br />
數 字 鍵<br />
<br />
<br />
選 取 編 有 號 碼 的 選 單 選 項 。 按 下<br />
ENTER 按 鍵 以 作 出 選 取 。<br />
顯 示 前 一 個 選 單 頁<br />
( 如 果 有 的 話 )。<br />
顯 示 下 一 個 選 單 頁<br />
( 如 果 有 的 話 )。<br />
聆 聽 收 音 機<br />
調 諧 器 可 以 接 收 FM 及 AM 兩 種 廣 播 , 並 讓 您<br />
記 憶 喜 愛 收 聽 的 電 台 , 使 您 無 須 每 次 要 收 聽 時<br />
還 要 手 動 調 諧 。<br />
1 按 下 TUNER 以 切 換 調 諧 器 , 然 後 連 續 按 以<br />
選 取 AM 或 FM 波 段 。<br />
螢 幕 此 時 會 顯 示 波 段 及 頻 率 。<br />
2 調 選 需 要 的 頻 率 。<br />
這 裡 有 三 種 調 諧 模 式 - 手 動 、 自 動 及 高 速 :<br />
• 手 動 調 諧 : 連 續 按 TUNE 以 改 變 所 顯 示 的 頻<br />
率 。<br />
• 自 動 調 諧 : 按 住 TUNE, 直 到 所 顯 示 的 頻 率<br />
開 始 變 動 為 止 , 然 後 將 按 鍵 放 開 。 一 旦 找 到<br />
下 一 個 電 台 , 調 諧 器 即 會 停 止 動 作 。 重 複 步<br />
驟 以 繼 續 搜 索 。<br />
• 高 速 調 諧 : 按 住 TUNE, 直 到 顯 示 的 頻 率 開<br />
始 快 速 變 動 為 止 。 如 有 必 要 , 可 使 用 手 動 調<br />
諧 功 能 來 微 調 頻 率 。<br />
改 善 FM 接 收 不 良<br />
如 果 您 正 在 以 立 體 聲 收 聽 FM 電 台 , 但 接 收 卻<br />
很 微 弱 , 那 麼 您 可 以 將 它 切 換 成 單 聲 道 來 改 善<br />
聲 音 的 品 質 。<br />
1 調 選 至 FM 廣 播 電 台 , 然 後 按 下<br />
SHIFT+SETUP。<br />
2 使 用 / 選 取 TUNERSET, 然 後 按 下<br />
ENTER。<br />
3 使 用 / 以 選 取 FM MODE, 然 後 按 下<br />
ENTER。<br />
4 使 用 / 以 選 取 FM MONO, 然 後 按 下<br />
ENTER。<br />
調 諧 器 在 單 聲 道 接 收 模 式 下 , 單 聲 道 指 示 燈<br />
( ) 會 亮 起 。<br />
選 取 上 述 的 FM AUTO 以 切 換 回 自 動 立 體 聲 模<br />
式 ( 收 聽 立 體 聲 廣 播 時 , 立 體 聲 指 示 燈 ( )<br />
會 亮 起 )。<br />
抑 制 AM 接 收 雜 訊<br />
若 AM 接 收 情 況 非 常 不 好 , 或 正 在 收 聽 的 AM<br />
電 台 太 過 吵 雜 , 則 請 嘗 試 使 用 「 雜 訊 抑 制 」 功<br />
能 調 整 至 較 佳 的 音 質 。<br />
1 調 諧 至 AM 廣 播 電 台 , 然 後 按 下<br />
SHIFT+SETUP。<br />
2 使 用 / 選 取 TUNERSET, 然 後 按 下<br />
ENTER。<br />
3 使 用 / 選 取 NOISECUT, 然 後 按 下<br />
ENTER。<br />
4 使 用 / 選 取 雜 訊 抑 制 模 式 , 然 後 按 下<br />
ENTER。<br />
選 取 1 或 2 之 間 的 效 果 位 準 。<br />
記 憶 電 台<br />
此 系 統 可 以 記 憶 最 多 30 個 電 台 , 儲 存 在 三 個<br />
類 別 (A、B 和 C) 中 , 每 個 類 別 可 儲 存 10 個<br />
電 台 。<br />
1 調 諧 至 AM 或 FM 廣 播 電 台 。<br />
對 於 FM 波 段 , 可 視 需 要 來 選 取 單 聲 道 或 自 動<br />
立 體 聲 的 接 收 方 式 。 此 項 設 定 值 會 連 同 預 設 電<br />
台 一 併 存 。<br />
2 按 下 SHIFT+T.EDIT。<br />
3 按 下 CLASS 可 選 取 三 個 類 別 的 其 中 之 一 ,<br />
然 後 使 用 PRESET 按 鍵 選 取 您 要 的 預 設 電 台 。<br />
您 也 可 以 使 用 數 字 鍵 來 選 取 預 設 電 台 。<br />
20<br />
Zhtw
開 始 操 作 04<br />
4 按 下 ENTER。<br />
按 ENTER 後 , 預 設 類 別 和 編 號 停 止 閃 爍 , 然 後<br />
系 統 記 憶 電 台 。<br />
收 聽 預 設 電 台<br />
您 必 須 先 儲 存 一 些 預 設 值 才 能 執 行 此 操 作 。<br />
1 確 定 已 選 取 TUNER 功 能 。<br />
2 按 下 CLASS 以 選 取 儲 存 頻 道 所 在 的 類 別 。<br />
重 覆 按 下 可 切 換 A、B 和 C 類 別 。<br />
3 使 用 PRESET 按 鍵 以 選 取 一 預 設 電 台 。<br />
• 您 也 可 以 使 用 數 字 鍵 來 選 取 預 設 電 台 。<br />
聆 聽 其 他 來 源<br />
可 將 輔 助 來 源 ( 電 視 機 、 衛 星 接 收 器 等 ) 連 接<br />
至 本 機 上 , 透 過 揚 聲 器 系 統 播 放 。 與 其 相 關 的<br />
更 多 資 訊 , 請 參 閱 第 40 頁 的 連 接 輔 助 音 頻 設<br />
備 。<br />
• 要 將 一 USB 裝 置 連 接 至 USB 端 子 上 , 請 參 閱<br />
第 31 頁 的 USB 播 放 與 錄 製 。<br />
• 僅 適 用 於 HTZ280/282DVD-<strong>AP</strong>: 插 入 和<br />
偵 測 到 Bluetooth 傳 輸 器 後 , 即 可 選 擇<br />
Bluetooth 傳 輸 器 。 與 其 相 關 的 更 多 資<br />
訊 , 請 參 閱 第 42 頁 的 用 於 無 線 享 受 音 樂<br />
的 Bluetooth ® 傳 輸 器 。<br />
1 確 定 外 部 來 源 ( 電 視 機 、 衛 星 接 收 器 等 )<br />
已 經 開 機 。<br />
2 按 下 LINE 以 選 取 來 源 。<br />
設 置 睡 眠 定 時 器<br />
睡 眠 定 時 器 可 在 您 睡 著 約 一 小 時 後 將 系 統 關<br />
機 , 您 完 全 無 須 擔 心 。 1<br />
• 連 續 按 SHIFT+SLEEP 以 選 取 選 項 , 然 後 按 下<br />
ENTER。<br />
選 取 下 列 選 項 :<br />
• SLP ON - 約 在 一 小 時 後 關 機 。 指 示 燈 會<br />
亮 起 。<br />
• SLP OFF - 取 消 睡 眠 定 時 器 。<br />
在 選 取 SLP ON 後 , 您 可 以 再 按 下 SHIFT+SLEEP<br />
以 確 認 一 下 剩 餘 的 時 間 。 每 條 線 代 表 約 12 分<br />
鐘 ( 剩 餘 時 間 ):<br />
SLP -----<br />
English Español Español<br />
3 如 有 必 要 , 可 開 始 播 放 來 源 。<br />
附 註<br />
1 顯 示 幕 在 睡 眠 定 時 設 置 好 時 會 變 暗 。<br />
21<br />
Zhtw
05<br />
聆 聽 您 的 系 統<br />
第 5 章<br />
聆 聽 您 的 系 統<br />
重 要 提 示<br />
• 本 機 音 頻 功 能 是 否 受 限 視 音 源 、HDMI 音 頻<br />
設 置 ( 第 41 頁 ) 或 有 插 入 麥 克 風 的 伴 唱 模<br />
式 ( 第 33 頁 ) 而 定 。 此 時 選 單 可 能 不 會 顯<br />
示 , 或 改 為 顯 示 訊 息 ( 第 56 頁 )。<br />
選 取 聆 聽 模 式<br />
您 可 以 使 用 各 種 聆 聽 模 式 享 受 不 同 的 音 效 , 及<br />
根 據 您 的 喜 好 修 正 音 場 。 您 可 以 設 定 不 同 的 聆<br />
聽 模 式 , 視 您 在 第 6 頁 的 家 庭 劇 院 音 效 設 置 選<br />
擇 的 揚 聲 器 擺 設 而 定 。 請 閱 讀 以 下 內 容 並 進 行<br />
每 個 設 定 。<br />
• 5 點 /4 點 揚 聲 器 擺 設<br />
當 您 已 選 擇 5 點 揚 聲 器 配 置 時 , 請 從 環 繞 聲 模<br />
式 中 選 擇 一 個 聆 聽 模 式 。 請 參 閱 下 列 以 環 繞 聲<br />
聆 聽 。<br />
• 3 點 /2 點 揚 聲 器 擺 設<br />
當 您 已 選 擇 將 環 繞 揚 聲 器 放 在 您 前 面 的 3 點 揚<br />
聲 器 配 置 時 , 請 從 前 置 環 繞 聲 模 式 中 選 擇 一 個<br />
聆 聽 模 式 。 請 參 閱 第 23 頁 的 使 用 前 置 環 繞 聲 。<br />
自 動 聆 聽 模 式<br />
自 動 聆 聽 模 式 是 聆 聽 主 要 控 制 的 各 種 來 源 最 簡<br />
單 的 方 法 : 自 揚 聲 器 的 輸 出 反 映 出 來 源 題 材 中<br />
的 通 道 。<br />
• 按 下 AUTO/STEREO 以 選 取 AUTO 聆 聽 模<br />
式 。 1<br />
聆 聽 模 式 根 據 下 表 所 示 的 來 源 媒 體 自 動 分 配 聲<br />
音 。<br />
來 源<br />
5 SPOT<br />
4 SPOT<br />
3 SPOT<br />
2 SPOT<br />
雙 聲 道 STEREO STEREO<br />
多 聲 道 STANDARD F.SURR<br />
以 環 繞 聲 聆 聽<br />
當 您 將 系 統 擺 設 為 5 點 /4 點 揚 聲 器 擺 設 時 , 可<br />
使 用 環 繞 聲 模 式 。<br />
您 可 以 環 繞 聲 來 聆 聽 立 體 聲 或 多 聲 道 來 源 。 2<br />
環 繞 聲 來 自 於 採 用 某 種 Dolby Pro Logic 解 碼<br />
模 式 的 立 體 聲 來 源 。<br />
• 連 續 按 SURROUND 以 選 取 一 種 聆 聽 模 式 。 1<br />
顯 示 幕 中 所 出 現 的 選 取 會 依 播 放 的 來 源 類 型 而<br />
有 所 不 同 。<br />
• STANDARD - 標 準 解 碼 模 式 ( 只 有 在 來 源<br />
為 多 聲 道 時 , 才 能 選 擇 此 模 式 )<br />
• MOVIE (Dolby Pro Logic II Movie) - Pro<br />
Logic II 5.1 聲 道 環 繞 音 效 , 特 別 適 合 電 影<br />
來 源 ( 可 用 於 任 何 一 種 雙 聲 道 來 源 )<br />
附 註<br />
1 若 來 源 為 Dolby Digital 或 DTS, 則 前 面 板 顯 示 幕 中 的 相 對 指 示 燈 會 亮 起 。<br />
2 注 意 需 將 輸 入 來 源 切 換 至 DVD/CD 或 USB, 才 能 進 行 多 聲 道 播 放 。<br />
22<br />
Zhtw
聆 聽 您 的 系 統 05<br />
• MUSIC (Dolby Pro Logic II Music) - 可<br />
產 生 Pro Logic II 5.1 聲 道 環 繞 音 效 , 特 別<br />
適 合 音 樂 來 源 ( 適 用 於 雙 聲 道 來 源 )<br />
• DOLBY PL (Dolby Pro Logic) - 可 產 生<br />
4.1 聲 道 環 繞 音 效 ( 適 用 於 雙 聲 道 來 源 )<br />
使 用 前 置 環 繞 聲<br />
選 取 DVD/CD 或 USB 作 為 輸 入 來 源 並 如 第 6<br />
頁 的 家 庭 劇 院 音 效 設 置 中 所 述 使 用 3 點 (/2<br />
點 僅 適 用 於 HTZ181DVD 機 型 ) 揚 聲 器 擺 設<br />
時 , 前 置 環 繞 聲 模 式 和 加 大 功 率 模 式 發 揮 作 用 。<br />
• 重 複 按 SURROUND 以 選 取 前 置 環 繞 聲 模<br />
式 。<br />
• F.SURR - 可 用 於 提 供 豐 富 的 環 繞 音 效 。<br />
• EXTR<strong>AP</strong>WR - 從 環 繞 揚 聲 器 輸 出 立 體 聲 音<br />
效 ( 若 為 多 聲 道 來 源 , 向 下 混 合 立 體 音 效 ),<br />
以 獲 得 強 大 的 立 體 聲 效 果 。<br />
HTZ180DVD<br />
<br />
<br />
HTZ181DVD<br />
<br />
<br />
<br />
<br />
<br />
<br />
<br />
3<br />
以 立 體 聲 聆 聽<br />
您 可 以 在 立 體 聲 音 效 下 聆 聽 任 何 一 種 來 源 ─ 立<br />
體 聲 或 多 聲 道 。 在 播 放 多 聲 道 來 源 時 , 所 有 聲<br />
道 會 經 縮 混 後 傳 送 至 前 置 左 / 右 揚 聲 器 及 重 低<br />
音 之 中 。<br />
• 連 續 按 下 AUTO/STEREO 直 到 顯 示 幕 中 出<br />
現 STEREO 的 字 樣 為 止 。<br />
以 耳 機 聆 聽<br />
插 入 耳 機 時 ,STEREO 播 放 模 式 啟 動 。 聆 聽 模<br />
式 無 法 變 更 。 1<br />
調 整 低 音 及 高 音<br />
使 用 低 音 及 高 音 控 制 可 調 整 全 面 的 音 調 。<br />
1 按 下 SOUND。<br />
2 使 用 / 以 選 取 BASS/TRE, 然 後 按 下<br />
ENTER。<br />
3 使 用 / 以 選 取 BASS 或 TREBLE。<br />
4 使 用 / 調 整 聲 音 , 然 後 按 下 ENTER 確 認 。<br />
• 低 音 和 高 音 的 調 整 範 圍 在 –6dB 至 +6dB 之<br />
間 。<br />
使 用 SFC 模 式<br />
SFC( 音 場 控 制 ) 模 式 可 以 適 用 於 任 何 的 多 聲 道<br />
或 立 體 聲 來 源 , 以 提 供 各 式 其 他 的 環 繞 聲 效 果 。<br />
1 按 下 SOUND。<br />
2 使 用 / 以 選 取 SFC MODE, 然 後 按 下<br />
ENTER。<br />
3 按 下 /, 然 後 按 下 ENTER 以 選 取 SFC 音<br />
效 模 式 。<br />
請 選 取 OFF、LIVE、HALL、POP、ROCK、DRAMA<br />
或 ACTION。<br />
English Español Español<br />
附 註<br />
1 在 您 拔 下 耳 機 時 , 即 會 恢 復 成 先 前 的 環 繞 聲 設 定 模 式 。<br />
23<br />
Zhtw
05<br />
聆 聽 您 的 系 統<br />
加 重 低 音 音 量<br />
本 機 共 有 二 種 低 音 模 式 , 您 可 用 來 增 強 來 源 中<br />
的 低 音 音 量 。<br />
1 按 下 SOUND。<br />
2 使 用 / 以 選 取 BASSMODE, 然 後 按 下<br />
ENTER。<br />
3 使 用 / 調 整 聲 音 , 然 後 按 下 ENTER 確 認 。<br />
選 取 OFF,MUSIC 或 CINEMA。<br />
使 用 MP3 擴 展 器<br />
重 現 壓 縮 音 樂 的 美 聲 (MP3、WMA、<br />
MPEG-4 AAC)。<br />
• 重 複 按 MP3 EXP/V.ENH 選 取 MP3 EXP。 1<br />
使 用 聲 音 強 化 器 模 式<br />
此 模 式 可 用 於 聆 聽 電 影 或 對 白 中 的 台 詞 。<br />
• 重 複 按 MP3 EXP/V.ENH 選 取 VOICE E。 2<br />
有 效 聲 音 ( 用 於 取 得 最 佳 聲 音 )<br />
本 機 隨 附 特 殊 形 狀 的 高 品 質 揚 聲 器 ,「 有 效 聲<br />
音 」 模 式 啟 用 下 列 針 對 電 影 和 音 樂 的 原 音 最 佳<br />
真 實 體 驗 的 先 鋒 獨 家 音 頻 技 術 而 設 計 。<br />
在 正 常 情 況 下 , 開 啟 有 效 聲 音 模 式 可 最 佳 化 本<br />
機 的 功 能 。 3<br />
• 動 態 範 圍 壓 縮<br />
重 現 容 易 遭 受 環 境 噪 音 影 響 的 細 部 聲 音 會 創 造<br />
出 一 個 讓 您 感 覺 身 歷 其 境 的 原 音 環 境 。<br />
• 頻 率 特 性 修 正<br />
瞭 解 除 了 隨 附 的 揚 聲 器 裝 置 的 新 增 功 能 外 , 針<br />
對 長 時 間 聆 聽 而 最 佳 化 的 播 放 特 性 。<br />
1 按 下 SHIFT+SETUP 並 使 用 / 選 取<br />
SOUNDSET, 然 後 按 下 ENTER。<br />
2 使 用 / 以 選 取 S.FIELD, 然 後 按 下<br />
ENTER。<br />
3 使 用 / 以 調 整 設 定 值 , 再 按 下 ENTER<br />
確 認 。<br />
• EFFECT ( 有 效 聲 音 )- 播 放 特 性 已 針 對 隨<br />
附 揚 聲 器 最 佳 化 的 聲 音 。<br />
• DIRECT( 直 接 聲 音 )- 關 閉 有 效 聲 音 模 式 。<br />
附 註<br />
1 開 啟 此 設 定 時 ,SFC 模 式 關 閉 。<br />
2 • 開 啟 此 設 定 時 ,SFC 模 式 關 閉 。<br />
• 不 適 用 於 HTZ180/181DVD 機 型 - 僅 對 播 放 多 聲 道 來 源 的 中 置 聲 道 有 效 。<br />
3 音 場 不 會 影 響 耳 機 輸 出 。<br />
24<br />
Zhtw
碟 片 播 放 功 能 06<br />
第 6 章<br />
碟 片 播 放 功 能<br />
重 要 提 示<br />
• 即 使 某 些 功 能 的 實 際 操 作 會 因 置 入 的 碟 片<br />
種 類 而 有 些 許 上 的 差 異 , 本 章 所 涵 蓋 的 許 多<br />
功 能 仍 可 適 用 於 DVD 碟 片 、VCD/ 超 級<br />
VCD、CD、DivX 視 頻 /WMV 以 及 WMA/<br />
MP3/MPEG-4 AAC/JPEG 碟 片 。<br />
• 有 些 DVD 會 限 制 某 些 功 能 ( 例 如 隨 機 或 重<br />
複 播 放 ) 對 碟 片 的 部 分 或 全 部 的 使 用 。 這 並<br />
不 是 故 障 。<br />
• 在 播 放 VCD/ 超 級 VCD 時 , 某 些 功 能 在 PBC<br />
播 放 期 間 並 不 適 用 。 如 果 您 想 要 使 用 這 些<br />
功 能 , 請 使 用 數 字 鍵 選 取 曲 目 來 開 始 碟 片<br />
的 播 放 。<br />
碟 片 掃 描<br />
您 可 以 各 種 的 速 度 向 前 或 向 後 快 速 掃 描 碟 片 。 1<br />
• 播 放 期 間 , 按 下 或 以 開 始 掃 描 。<br />
連 續 按 下 以 增 加 掃 描 速 度 ( 如 在 屏 顯 示 )。<br />
• 要 恢 復 播 放 , 按 下 ( 播 放 ) 按 鍵 。 2<br />
慢 動 作 播 放<br />
您 可 以 四 種 慢 動 作 速 度 來 播 放 DVD、VCD/ 超<br />
級 VCD 及 DivX 視 頻 /WMV。DVD 碟 片 還 可<br />
以 反 向 慢 動 作 播 放 。<br />
1 播 放 期 間 , 按 下 ( 暫 停 ) 按 鍵 。<br />
2 按 住 / 或 / 按 鍵 , 直 到 開 始 慢 動<br />
作 播 放 為 止 。<br />
連 續 按 以 變 更 慢 動 作 播 放 速 度 ( 如 在 屏 顯 示 )。<br />
• 要 恢 復 播 放 , 按 下 ( 播 放 ) 按 鍵 。 2<br />
格 進 / 格 退 播 放<br />
您 可 以 逐 格 向 前 或 後 退 的 方 式 播 放 DVD 碟 片 。<br />
對 於 VCD/ 超 級 VCD 及 DivX 視 頻 /WMV, 您<br />
只 可 以 使 用 格 進 播 放 。<br />
1 播 放 期 間 , 按 下 ( 暫 停 ) 按 鍵 。<br />
2 按 下 / 或 / 按 鍵 以 後 退 或 前 進 的<br />
方 式 一 次 一 格 播 放 。<br />
• 要 恢 復 播 放 , 按 下 ( 播 放 ) 按 鍵 。 2<br />
播 放 JPEG 幻 燈 片 秀<br />
在 置 入 內 含 JPEG 圖 片 的 碟 片 後 , 請 按 下 以<br />
開 始 從 碟 片 上 的 第 一 個 資 料 夾 / 圖 片 開 始 幻 燈<br />
片 秀 。 3 本 機 會 按 字 母 順 序 來 顯 示 每 一 個 資 料<br />
夾 中 的 圖 片 。<br />
• 若 該 裝 置 內 含 有 WMA/MP3/MPEG-4<br />
AAC 檔 案 , 則 幻 燈 片 秀 及 音 頻 檔 案 會 不 斷<br />
重 複 播 放 。 音 頻 播 放 期 間 , 您 仍 然 可 以 使<br />
用 跳 過 (/)、 掃 描 (/) 及<br />
暫 停 () 等 各 項 功 能 。<br />
圖 片 會 自 動 調 整 以 盡 量 填 滿 整 個 螢 幕 畫 面 。<br />
English Español Español<br />
附 註<br />
1DivX 視 頻 /WMV 碟 片 僅 適 用 一 種 速 度 。<br />
2 • 視 碟 片 而 定 , 正 常 的 播 放 會 在 讀 取 到 DVD 碟 片 上 新 的 章 節 時 , 自 動 恢 復 。<br />
• 對 於 PBC 模 式 中 的 VCD/ 超 級 VCD 以 及 WMA/MP3/MPEG-4 AAC 曲 目 ( 限 「 掃 描 模 式 」 中 ), 到 達 曲 目 的 開 頭 或 結<br />
尾 時 將 恢 復 正 常 播 放 。<br />
3 • 本 機 將 一 份 檔 案 載 入 的 時 間 會 隨 著 檔 案 容 量 愈 大 而 增 加 。<br />
• 一 張 碟 片 可 包 含 多 達 299 個 資 料 夾 及 648 個 合 併 的 資 料 夾 與 檔 案 。<br />
25<br />
Zhtw
06<br />
碟 片 播 放 功 能<br />
幻 燈 片 秀 播 放 時 :<br />
按 鍵<br />
<br />
<br />
<br />
按 鍵 功 能<br />
使 用 「 碟 片 導 向 」 瀏 覽 DVD 或<br />
VCD/ 超 級 VCD 碟 片<br />
使 用 「 碟 片 導 向 」 可 瀏 覽 整 張 DVD 或 VCD/<br />
超 級 VCD 碟 片 的 內 容 , 找 到 您 想 要 播 放 的 部 分 。<br />
1 播 放 期 間 , 按 下 HOME MENU 並 從 在 屏 選<br />
單 中 選 取 「Disc Navigator ( 碟 片 導 向 )」。<br />
2 選 取 檢 視 選 項 。<br />
可 暫 停 幻 燈 片 秀 ( 或 音 頻 ) 的 播<br />
放 ; 再 按 時 可 再 度 開 始 播 放 。<br />
可 跳 至 前 一 張 圖 片 ( 或 音 頻 檔 案<br />
的 音 頻 播 放 )。<br />
可 跳 至 下 一 張 圖 片 ( 或 音 頻 檔 案<br />
的 音 頻 播 放 )。<br />
/// 可 暫 停 幻 燈 片 秀 的 播 放 , 並 旋 轉<br />
/ 翻 動 所 顯 示 的 圖 片 ( 按 下<br />
( 播 放 ) 按 鍵 可 重 新 開 始 播 放<br />
幻 燈 片 秀 )。<br />
SHIFT+ZOOM 可 暫 停 幻 燈 片 秀 的 播 放 , 並 將 圖<br />
片 放 大 。 再 按 時 可 切 換 一 倍 、 二<br />
倍 及 四 倍 的 放 大 倍 數 ( 按 下<br />
( 播 放 ) 按 鍵 可 重 新 開 始 播 放<br />
幻 燈 片 秀 )。<br />
MENU<br />
可 顯 示 「 碟 片 導 向 」 畫 面 ( 請<br />
參 閱 以 下 說 明 )。<br />
Disc Navigator<br />
可 以 使 用 的 選 項 視 置 入 的 碟 片 種 類 及 是 否 要 播<br />
放 碟 片 而 定 , 然 而 仍 包 含 :<br />
• Title ( 標 題 )- 指 DVD-Video 碟 片 中 的<br />
標 題 。<br />
• Chapter ( 章 節 )- 指 DVD-Video 碟 片<br />
目 前 標 題 中 的 章 節 。<br />
• Track( 曲 目 )- 指 VCD/ 超 級 VCD 碟 片<br />
中 的 曲 目 。<br />
• Time ( 時 間 )- 指 VCD/ 超 級 VCD 碟 片<br />
中 每 十 分 鐘 一 個 的 縮 圖 。<br />
• Original: Title ( 標 題 )- 指 VR 模 式<br />
DVD-R/-RW 碟 片 中 的 原 始 標 題 。<br />
• Playlist: Title ( 標 題 )- 指 VR 模 式<br />
DVD-R/-RW 碟 片 當 中 的 播 放 清 單 標 題 。<br />
• Original: Time ( 時 間 )- 指 原 始 內 容 中<br />
每 十 分 鐘 一 個 的 縮 圖 。<br />
• Playlist: Time ( 時 間 )- 指 播 放 清 單 中<br />
每 十 分 鐘 一 個 的 縮 圖 。<br />
整 個 螢 幕 畫 面 前 後 一 次 最 多 可 接 連 顯 示 六 張 縮<br />
圖 影 像 。 要 顯 示 前 一 組 / 下 一 組 六 張 縮 圖 , 按<br />
下 /。<br />
3 選 取 您 要 播 放 的 縮 圖 影 像 。<br />
01<br />
04<br />
Disc Navigator: Title<br />
01- 49: --<br />
02<br />
05<br />
您 可 使 用 /// 及 ENTER 選 取 縮 圖 或 數<br />
字 鍵 。<br />
要 使 用 數 字 鍵 選 取 時 , 請 輸 入 兩 位 數 字 , 然 後<br />
按 下 ENTER。<br />
03<br />
06<br />
Disc Navigator<br />
Title<br />
Chapter<br />
26<br />
Zhtw
碟 片 播 放 功 能 06<br />
可 利 用 「 碟 片 導 向 」 功 能 瀏 覽<br />
Windows Media Audio<br />
(WMA)、MP3、MPEG-4 AAC、<br />
DivX 視 頻 /WMV 及 JPEG 檔 案<br />
使 用 「 碟 片 導 向 」 按 照 檔 名 尋 找 一 特 定 的 檔 案<br />
或 資 料 夾 。<br />
1 按 下 HOME MENU 並 從 在 屏 顯 示 選 單 中 選<br />
取 「Disc Navigator ( 碟 片 導 向 )」。<br />
00:00/ 00:00 0kbps<br />
Folder1<br />
Folder2<br />
Folder3<br />
Folder4<br />
2 使 用 /// 及 ENTER 來 瀏 覽 。<br />
使 用 / 可 上 下 移 動 資 料 夾 / 檔 案 清 單 。<br />
使 用 以 回 到 根 資 料 夾 。 1<br />
使 用 ENTER 或 可 開 啟 一 反 白 的 資 料 夾 。<br />
• 當 反 白 JPEG 檔 案 , 便 有 一 縮 圖 影 像 顯 示 在<br />
螢 幕 右 側 。<br />
00:00/ 00:00 0kbps<br />
File1<br />
File2<br />
File3<br />
File4<br />
File5<br />
Folder2<br />
3 要 播 放 反 白 的 曲 目 或 DivX 視 頻 /WMV 檔<br />
案 或 顯 示 反 白 的 JPEG 檔 案 時 , 可 按 下 ENTER。<br />
• 當 已 選 取 WMA/MP3/MPEG-4 AAC 或<br />
DivX 視 頻 /WMV 檔 案 , 則 會 自 該 檔 案 開 始<br />
播 放 到 整 個 資 料 夾 結 束 為 止 。<br />
• 當 選 取 了 JPEG 檔 案 , 幻 燈 片 秀 即 會 開 始 ,<br />
並 從 所 選 檔 案 開 始 播 放 , 一 直 到 整 個 資 料 夾<br />
播 放 完 為 止 。<br />
提 示<br />
• 在 聆 聽 WMA/MP3/MPEG-4 AAC 的 播 放<br />
時 , 也 可 以 同 時 播 放 JPEG 幻 燈 片 秀 。 只 需<br />
選 取 想 要 聆 聽 的 音 頻 檔 案 , 再 選 取 想 要 播<br />
放 幻 燈 片 秀 的 JPEG 檔 案 即 可 。 此 時 幻 燈 片<br />
秀 及 音 頻 檔 案 會 同 時 不 斷 重 複 播 放 。 各 項<br />
播 放 控 制 僅 適 用 於 JPEG 幻 燈 片 秀 。<br />
• 要 播 放 整 張 碟 片 而 不 是 只 有 目 前 資 料 夾 的<br />
內 容 , 請 先 退 出 「 碟 片 導 向 」, 然 後 使 用<br />
( 播 放 ) 按 鍵 來 開 始 播 放 。<br />
使 用 播 放 清 單<br />
配 合 此 項 功 能 , 您 可 以 將 含 有 WMA、MP3、<br />
MPEG-4 AAC 及 JPEG 檔 案 的 碟 片 , 製 作 成 三<br />
份 播 放 清 單 ( 每 份 30 個 檔 案 )。 由 於 本 機 會<br />
記 住 最 後 十 張 置 入 碟 片 的 所 有 播 放 清 單 , 這 在<br />
您 想 要 快 速 且 輕 鬆 地 整 理 大 量 的 檔 案 時 , 相 當<br />
有 用 。 2<br />
製 作 播 放 清 單<br />
1 在 碟 片 停 止 時 , 按 下 HOME MENU 並 從 螢<br />
幕 功 能 選 單 上 選 取 「Disc Navigator ( 碟 片 導<br />
向 )」。<br />
2 選 取 想 要 加 到 播 放 清 單 上 的 檔 案 。<br />
若 不 知 道 怎 麼 做 , 請 參 閱 上 述 可 利 用 「 碟 片<br />
導 向 」 功 能 瀏 覽 Windows Media Audio<br />
(WMA)、MP3、MPEG-4 AAC、DivX 視 頻 /<br />
WMV 及 JPEG 檔 案 。<br />
3 按 下 PLAYLIST 1、2 或 3。<br />
此 時 檔 案 會 加 到 所 選 取 的 播 放 清 單 上 。<br />
4 重 複 步 驟 2 及 3, 直 到 整 個 操 作 完 成 。<br />
English Español Español<br />
附 註<br />
1 您 也 可 以 進 入 最 上 層 的 「..」 資 料 夾 , 然 後 按 下 ENTER 來 完 成 此 項 動 作 。<br />
2 該 碟 片 必 須 置 入 才 能 播 放 在 播 放 清 單 當 中 的 檔 案 。<br />
27<br />
Zhtw
06<br />
碟 片 播 放 功 能<br />
提 示<br />
• 要 在 沒 有 在 屏 顯 示 畫 面 的 情 況 下 加 入 檔<br />
案 , 只 需 在 正 常 播 放 所 需 檔 案 期 間 按 下<br />
PLAYLIST 1、2 或 3 即 可 ( 除 在 播 放 音 頻<br />
的 同 時 , 又 播 放 JPEG 幻 燈 片 秀 外 )。<br />
聆 聽 播 放 清 單<br />
• 播 放 停 止 時 , 按 下 PLAYLIST 1、2 或 3。<br />
播 放 期 間 , 前 面 板 顯 示 幕 中 的 PGM 指 示 燈 會<br />
起 。 若 未 設 定 任 何 播 放 清 單 , 則 顯 示 幕 中 會 顯<br />
示 NO LIST。<br />
• 若 播 放 清 單 內 含 有 JPEG 及 音 頻 兩 種 檔 案 ,<br />
則 會 開 始 播 放 幻 燈 片 秀 及 音 頻 檔 案 。<br />
清 除 播 放 清 單 上 的 檔 案<br />
1 開 始 播 放 您 的 播 放 清 單 。<br />
2 從 「Disc Navigator ( 碟 片 導 向 )」 畫 面<br />
上 , 反 白 想 從 播 放 清 單 上 清 除 的 檔 案 並 按 下<br />
CLEAR。<br />
循 環 播 放 碟 片 某 個 片 段<br />
「A-B 重 複 」 功 能 可 讓 您 指 定 一 曲 目 (CD、<br />
VCD/ 超 級 VCD) 或 一 標 題 (DVD) 中 的 兩 點<br />
(A 及 B), 來 一 直 不 斷 地 循 環 播 放 。<br />
1 播 放 期 間 , 按 下 HOME MENU 並 選 取<br />
「Play Mode ( 播 放 模 式 )」。<br />
Play Mode<br />
2 選 取 「A-B Repeat (A-B 重 複 )」。<br />
3 在 「A(Start Point) ( 開 始 點 )」 上 按 下<br />
ENTER 以 設 置 循 環 播 放 的 開 始 點 。<br />
4 在 「B(End Point) ( 結 束 點 )」 上 按 下<br />
ENTER 以 設 置 循 環 播 放 的 結 束 點 。<br />
在 按 下 ENTER 後 , 播 放 作 業 會 跳 回 至 開 始 點 ,<br />
然 後 開 始 循 環 播 放 。<br />
5 要 恢 復 正 常 播 放 , 請 選 取 「Off ( 關 )」。<br />
使 用 重 複 播 放 功 能<br />
除 了 各 種 的 重 複 播 放 選 項 外 , 也 可 以 將 重 複 播<br />
放 同 程 序 播 放 一 起 使 用 ( 請 參 閱 第 29 頁 的 建<br />
立 程 序 編 輯 清 單 )。<br />
1 播 放 期 間 , 按 下 HOME MENU 並 選 取<br />
「Play Mode ( 播 放 模 式 )」。<br />
2 選 取 「Repeat ( 重 複 )」, 然 後 選 取 重 複<br />
播 放 選 項 。 1<br />
如 果 程 序 播 放 功 能 啟 動 , 可 選 取 Program<br />
Repeat( 重 複 播 放 程 式 ) 來 重 複 播 放 程 序 編 輯<br />
清 單 , 或 選 取 Repeat Off( 關 閉 重 複 播 放 ) 取<br />
消 重 複 播 放 。<br />
• 播 放 DVD 碟 片 時 , 可 選 取 Title Repeat( 重<br />
複 播 放 標 題 ) 或 Chapter Repeat( 重 複 播<br />
放 章 )。<br />
• 播 放 CD 及 VCD/ 超 級 VCD 時 , 可 選 取 Disc<br />
Repeat( 重 複 播 放 單 碟 ) 或 Track Repeat<br />
( 重 複 播 放 曲 目 )。<br />
• 對 於 DivX 視 頻 /WMV 碟 片 , 可 選 取 Title<br />
Repeat ( 重 複 播 放 標 題 )( 或 是 Repeat<br />
Off ( 關 閉 重 複 播 放 ))。<br />
使 用 隨 機 播 放 功 能<br />
可 使 用 此 項 功 能 以 隨 意 的 順 序 來 播 放 標 題 或 章<br />
節 (DVD-Video) 或 曲 目 (CD 和 VCD/ 超 級<br />
VCD)。 2<br />
1 播 放 期 間 , 按 下 HOME MENU 並 選 取<br />
「Play Mode ( 播 放 模 式 )」。<br />
附 註<br />
1 您 無 法 使 用 重 複 播 放 功 能 播 放 WMA/MP3/MPEG-4 AAC 碟 片 。<br />
2 • 您 可 以 在 碟 片 播 放 或 停 止 的 同 時 , 設 置 隨 機 播 放 的 選 項 。 然 而 , 您 無 法 將 隨 機 播 放 搭 配 程 序 播 放 一 起 使 用 。<br />
• 您 不 能 使 用 隨 機 播 放 來 播 放 VR 格 式 DVD-R/-RW 碟 片 、WMA/MP3/MPEG-4 AAC 碟 片 、DivX 視 頻 /WMV 碟 片 , 或 在<br />
DVD 碟 片 選 單 已 顯 示 的 情 況 下 使 用 。<br />
28<br />
Zhtw
碟 片 播 放 功 能 06<br />
2 選 取 「Random( 隨 機 )」, 然 後 選 取 選 項 。<br />
• 播 放 DVD 碟 片 時 , 可 選 取 Random Title<br />
( 隨 機 播 放 標 題 ) 或 Random Chapter( 隨<br />
機 播 放 章 )。<br />
• 播 放 CD 及 VCD/ 超 級 VCD 時 , 可 選 取 On<br />
( 開 ) 或 Off( 關 ) 以 開 啟 或 關 閉 隨 機 播 放<br />
功 能 。<br />
提 示<br />
• 隨 機 播 放 期 間 使 用 以 下 控 制 功 能 :<br />
按 鍵<br />
<br />
<br />
按 鍵 功 能<br />
隨 機 播 放 下 選 取 一 新 的 曲 目 / 標<br />
題 / 章 節 。<br />
可 返 回 至 目 前 曲 目 / 標 題 / 章 節<br />
的 開 頭 ; 再 按 時 可 隨 機 選 取 其 他<br />
的 曲 目 / 標 題 / 章 節 。<br />
• 隨 機 播 放 會 繼 續 執 行 , 直 到 您 從 隨 機 播 放 選<br />
單 選 項 中 選 取 了 Random Off ( 隨 機 播 放<br />
關 閉 ) 為 止 。<br />
建 立 程 序 編 輯 清 單<br />
本 項 功 能 可 讓 您 編 輯 碟 片 上 標 題 / 章 節 / 曲 目<br />
的 播 放 順 序 程 序 。 1<br />
1 播 放 期 間 , 按 下 HOME MENU 並 選 取<br />
「Play Mode ( 播 放 模 式 )」。<br />
2 選 取 「Program( 程 序 編 輯 )」, 然 後 從 程<br />
式 選 項 清 單 中 選 取 「Create/Edit<br />
( 編 序 創 建 / 編 輯 )」。<br />
3 使 用 /// 及 ENTER 以 選 取 一 標 題 、<br />
章 節 或 曲 目 作 為 目 前 在 節 目 清 單 中 的 步 驟 。<br />
• 對 於 DVD 碟 片 , 您 還 可 以 增 加 標 題 或 是 章<br />
節 。<br />
• 對 於 CD 或 VCD/ 超 級 VCD, 可 選 取 曲 目 加<br />
到 程 序 編 輯 清 單 之 中 。<br />
在 按 下 ENTER 選 取 標 題 / 章 節 / 曲 目 後 , 編 序<br />
步 驟 編 號 會 自 動 向 下 移 動 一 位 。<br />
4 請 重 複 步 驟 3 以 建 立 一 編 序 列 表 。<br />
一 份 編 序 列 表 中 可 包 含 多 達 24 個 編 序 步 驟 。<br />
• 您 只 需 將 您 想 顯 示 新 編 序 步 驟 的 位 置 加 以<br />
反 白 再 輸 入 標 題 / 章 節 / 曲 目 編 號 , 便 可<br />
插 入 編 序 步 驟 。<br />
• 要 刪 除 編 序 步 驟 , 請 將 其 反 白 後 按 下<br />
CLEAR 即 可 。<br />
5 要 播 放 編 序 列 表 , 請 按 下 ( 播 放 ) 按 鍵 。<br />
程 序 編 輯 清 單 會 繼 續 存 在 , 直 到 您 關 閉 程 序 播<br />
放 ( 請 參 閱 以 下 說 明 )、 刪 除 程 序 編 輯 清 單 ( 請<br />
參 閱 以 下 說 明 ), 退 出 碟 片 或 關 機 為 止 。<br />
提 示<br />
• 程 序 播 放 期 間 使 用 以 下 控 制 功 能 :<br />
按 鍵<br />
HOME<br />
MENU<br />
<br />
按 鍵 功 能<br />
可 儲 存 程 序 編 輯 清 單 並 退 出 但 不<br />
播 放 。<br />
可 跳 至 程 序 編 輯 清 單 中 的 下 一 個<br />
編 序 步 驟 。<br />
程 序 編 輯 選 單 中 其 他 可 用 的 功 能<br />
在 程 序 編 輯 選 單 中 尚 有 除 了 編 序 創 建 / 編 輯 以<br />
外 的 其 他 選 項 。<br />
• Playback Start ( 編 序 播 放 開 始 )- 可 開<br />
始 播 放 儲 存 的 程 序 編 輯 清 單<br />
• Playback Stop ( 編 序 播 放 停 止 ) - 可 關<br />
閉 程 序 播 放 , 但 不 會 刪 除 程 序 編 輯 清 單<br />
• Program Delete( 編 序 刪 除 )- 可 刪 除 程<br />
序 編 輯 清 單 並 關 閉 程 序 播 放<br />
搜 索 碟 片<br />
您 可 以 按 標 題 或 章 節 編 號 , 或 按 時 間 來 搜 索<br />
DVD 碟 片 ;CD 及 VCD/ 超 級 VCD 可 按 曲 目<br />
編 號 或 時 間 ;DivX 視 頻 /WMV 碟 片 則 可 按 時<br />
間 來 搜 索 。<br />
1 按 下 HOME MENU 並 選 取 「Play Mode<br />
( 播 放 模 式 )」。<br />
English Español Español<br />
附 註<br />
1VR 格 式 的 DVD-R/-RW 碟 片 、WMA/MP3/MPEG-4 AAC 碟 片 、DivX 視 頻 /WMV 碟 片 或 DVD 碟 片 選 單 顯 示 時 , 無 法 使 用<br />
程 序 播 放 功 能 。<br />
29<br />
Zhtw
06<br />
碟 片 播 放 功 能<br />
2 選 取 「Search Mode ( 搜 索 模 式 )」。<br />
所 呈 現 的 搜 索 選 項 會 視 置 入 的 碟 片 種 類 而 定 。<br />
3 選 取 搜 索 模 式 。<br />
• 碟 片 必 須 按 序 播 放 以 便 使 用 時 間 搜 索 功 能 。<br />
4 使 用 數 字 鍵 輸 入 標 題 、 章 節 或 曲 目 編 號 , 或<br />
時 間 。<br />
• 使 用 時 間 搜 索 時 , 請 按 照 您 想 要 恢 復 播 放 的<br />
位 置 來 輸 入 目 前 播 放 標 題 (DVD/DivX 視<br />
頻 /WMV) 或 曲 目 (CD/VCD/ 超 級 VCD)<br />
的 分 鐘 數 及 秒 數 。 例 如 , 按 下 4、5、0、0<br />
即 會 從 碟 片 上 的 第 45 分 鐘 位 置 開 始 播 放 。<br />
想 要 輸 入 1 小 時 、20 分 鐘 又 30 秒 時 , 可<br />
按 下 8、0、3、0。<br />
5 按 下 ENTER 開 始 播 放 。<br />
切 換 字 幕<br />
某 些 DVD 碟 片 及 DivX 視 頻 碟 片 擁 有 一 種 以 上<br />
語 言 的 字 幕 ; 在 碟 片 包 裝 上 會 清 楚 告 訴 您 可 以<br />
使 用 的 字 幕 語 言 種 類 。 您 可 以 在 播 放 期 間 來 切<br />
換 字 幕 語 言 。 1<br />
• 連 續 按 下 SHIFT+SUBTITLE 以 選 取 一 種 字<br />
幕 選 項 。<br />
• 要 設 置 字 幕 的 喜 好 設 定 , 請 參 閱 第 36 頁 的<br />
語 言 設 定 值 。<br />
• 更 多 關 於 DivX 字 幕 的 資 訊 , 請 參 閱 第 48 頁<br />
的 顯 示 DivX 字 幕 檔 案 。<br />
切 換 對 白 語 言 / 音 頻 聲 道<br />
在 播 放 錄 有 兩 種 或 更 多 語 言 對 白 內 容 , 或 錄 有<br />
雙 單 聲 道 音 效 的 碟 片 時<br />
2 , 您 可 以 在 播 放 期 間 來<br />
切 換 這 些 功 能 。 3<br />
播 放 VCD/ 超 級 VCD 時 , 您 可 以 切 換 立 體 聲 、<br />
僅 左 聲 道 或 僅 右 聲 道 。<br />
• 連 續 按 下 SHIFT+AUDIO 以 選 取 一 種 對 白 語<br />
言 選 項 。<br />
• 要 設 置 對 白 語 言 的 喜 好 設 定 , 請 參 閱 第 36<br />
頁 的 語 言 設 定 值 。<br />
放 大 畫 面<br />
使 用 放 大 功 能 , 您 可 以 在 觀 賞 DVD、DivX 視<br />
頻 /WMV 標 題 或 VCD/ 超 級 VCD, 或 播 放 JPEG<br />
碟 片 時 , 將 畫 面 某 個 部 位 放 大 二 倍 或 四 倍 。<br />
1 播 放 期 間 , 按 下 SHIFT+ZOOM 以 選 取 放 大<br />
的 倍 數 ( 正 常 、2 x 或 4 x )。<br />
2 使 用 /// 來 變 更 縮 放 區 域 。<br />
您 可 以 在 播 放 期 間 自 由 切 換 放 大 倍 數 , 以 及 放<br />
大 區 域 。 4<br />
切 換 拍 攝 角 度<br />
某 些 DVD 碟 片 錄 有 兩 種 或 更 多 角 度 拍 攝 而 成 的<br />
場 景 - 請 參 閱 碟 片 包 裝 上 的 詳 細 說 明 。<br />
在 播 放 多 角 度 場 景 時 , 屏 幕 上 會 出 現 的 圖 示<br />
( 您 也 可 以 選 取 將 它 關 閉 - 請 參 閱 第 37 頁 的 顯<br />
示 幕 設 定 值 )。<br />
• 播 放 期 間 ( 或 暫 停 時 ), 按 下 SHIFT+ANGLE<br />
以 切 換 角 度 。<br />
顯 示 碟 片 資 訊<br />
播 放 期 間 , 可 將 各 種 曲 目 、 章 節 及 標 題 的 資 訊<br />
顯 示 在 屏 幕 上 。<br />
• 要 顯 示 / 切 換 / 隱 藏 顯 示 的 資 訊 , 可 連 續 按<br />
下 DISPLAY。<br />
有 限 的 碟 片 資 訊 亦 會 出 現 前 面 板 的 螢 幕 中 。 按<br />
下 DISPLAY 以 變 更 所 顯 示 的 資 訊 。<br />
附 註<br />
1 某 些 碟 片 僅 允 許 您 從 碟 片 選 單 中 來 改 變 字 幕 語 言 。 按 下 TOP MENU 或 MENU 即 可 進 入 選 單 。<br />
2 某 些 超 級 VCD 錄 有 兩 種 音 軌 。 在 播 放 這 些 碟 片 時 , 您 可 以 切 換 這 兩 種 音 軌 , 以 及 每 個 音 軌 獨 有 的 聲 道 。<br />
3 某 些 碟 片 僅 允 許 您 從 碟 片 選 單 中 來 改 變 對 白 語 言 。 按 下 TOP MENU 或 MENU 即 可 進 入 選 單 。<br />
4 • 由 於 DVD、VCD/ 超 級 VCD、DivX 視 頻 /WMV 標 題 及 JPEG 圖 片 只 有 固 定 的 解 析 度 , 因 此 畫 質 特 別 在 放 大 四 倍 時 會 有 失<br />
真 的 情 形 。 這 並 不 是 故 障 。<br />
• 如 果 畫 面 上 方 的 導 向 方 塊 消 失 , 可 按 下 SHIFT+ZOOM 再 將 它 顯 示 在 螢 幕 上 。<br />
30<br />
Zhtw
USB 播 放 與 錄 製 07<br />
第 7 章<br />
USB 播 放 與 錄 製<br />
使 用 USB 介 面<br />
利 用 本 機 前 面 的 USB 介 面 就 可 以 聆 聽 雙 聲 道 音<br />
頻<br />
1<br />
並 觀 看 DivX 視 頻 /WMV/JPEG 檔 案 。 按 下<br />
圖 方 式 連 接 一 USB 大 量 儲 存 裝 置<br />
2 。<br />
1 開 啟 播 放 器 後 , 按 下 USB。<br />
確 定 電 視 機 已 開 並 設 定 為 正 確 的 視 頻 輸 入 。<br />
2 連 接 您 的 USB 裝 置 。<br />
USB 端 子 的 位 置 就 在 前 面 板 上 。<br />
USB<br />
A <br />
USB<br />
USB <br />
<br />
3 按 下 ( 播 放 ) 以 開 始 播 放 。<br />
若 是 您 的 USB 裝 置 當 中 含 有 JPEG, 則 會 開 始<br />
幻 燈 片 秀 。 與 其 相 關 的 更 多 資 訊 , 請 參 閱 第 25<br />
頁 的 播 放 JPEG 幻 燈 片 秀 。<br />
• 確 定 在 脫 離 時 ( 或 系 統 在 待 機 狀 態 下 ), 前<br />
面 板 顯 示 幕 上 顯 示 USB DATA。<br />
重 要 提 示<br />
若 顯 示 幕 中 的 USB ERR 訊 息 指 示 燈 亮 起 , 則 表<br />
示 該 USB 裝 置 的 電 源 需 求 對 於 本 機 來 說 太 高 ,<br />
或 該 裝 置 不 相 容 。 請 嘗 試 以 下 方 法 :<br />
• 關 閉 播 放 器 , 然 後 再 開 啟 。<br />
• 重 新 在 播 放 器 關 閉 時 將 USB 裝 置 接 上 。<br />
• 選 取 其 他 輸 入 來 源 ( 如 DVD/CD), 然 後 回<br />
頭 選 取 USB。<br />
• 使 用 原 廠 專 用 的 AC 電 源 變 壓 器 ( 隨 裝 置 附<br />
贈 ) 供 應 USB 電 源 。<br />
若 上 述 方 式 無 法 解 決 問 題 , 則 應 該 是 您 的 USB<br />
裝 置 不 相 容 。<br />
在 USB 裝 置 上 錄 製 音 樂 CD 的 曲<br />
目<br />
在 連 接 至 USB 埠 的 USB 上 可 以 錄 製 載 入 本 機<br />
中 的 音 樂 CD 曲 目 。<br />
錄 製 所 有 曲 目<br />
1 載 入 音 樂 CD。<br />
按 下 停 止 播 放 。<br />
English Español Español<br />
附 註<br />
1 這 包 括 DivX 視 頻 /WMV/WMA/MP3/MPEG-4 AAC 檔 案 ( 除 含 防 拷 內 容 或 限 制 播 放 內 容 的 檔 案 外 ) 的 播 放 。<br />
2 • 相 容 的 USB 裝 置 包 括 屬 於 FAT16/32 格 式 的 磁 碟 機 、 可 攜 式 快 閃 記 憶 體 ( 特 殊 隨 身 碟 ) 及 數 位 音 頻 播 放 器 (MP3 播 放<br />
器 )。 本 機 不 能 連 接 至 個 人 電 腦 上 進 行 USB 播 放 。<br />
• 先 鋒 概 不 保 證 所 有 USB 大 量 儲 存 裝 置 的 相 容 性 ( 操 作 及 / 或 匯 流 排 電 源 ), 亦 不 承 擔 連 接 至 本 機 時 可 能 造 成 資 料 遺 失 的<br />
相 關 責 任 。<br />
• 資 料 含 量 很 大 時 , 系 統 會 需 要 較 長 的 時 間 來 讀 取 USB 裝 置 的 內 容 。<br />
• 本 機 可 能 無 法 正 確 識 別 某 些 USB 裝 置 。<br />
• 即 使 是 支 援 的 格 式 , 仍 會 因 內 容 而 無 法 播 放 或 顯 示 某 些 檔 案 。<br />
31<br />
Zhtw
07<br />
USB 播 放 與 錄 製<br />
2 按 SHIFT+USB REC 以 顯 示<br />
「CD -> USB Rec (CD -> USB 轉 錄 )」 畫 面 。<br />
CD –> USB Rec<br />
Select Track<br />
Bitrate<br />
Start<br />
Selected Track<br />
Total Time<br />
128kbps<br />
13<br />
055:07<br />
Track 1–13<br />
Track01<br />
Track02<br />
Track03<br />
Track04<br />
Track05<br />
Track06<br />
Track07<br />
Track08<br />
01:43<br />
03:17<br />
04:18<br />
04:59<br />
04:20<br />
04:38<br />
04:40<br />
04:11<br />
3 按 下 ENTER 開 始 錄 製 。<br />
開 始 錄 製 。 錄 製 時 , 顯 示 以 下 所 示 的 畫 面 。 1<br />
CD –> USB Rec<br />
Track Progress<br />
Total Progress<br />
Selected Track<br />
Total Time<br />
Cancel<br />
13<br />
055:07<br />
Track 1–13<br />
Track01<br />
Track02<br />
Track03<br />
Track04<br />
Track05<br />
Track06<br />
Track07<br />
Track08<br />
01:43<br />
03:17<br />
04:18<br />
04:59<br />
04:20<br />
04:38<br />
04:40<br />
04:11<br />
4 選 取 您 要 錄 製 的 曲 目 。<br />
CD –> USB Rec<br />
Select Track<br />
Bitrate<br />
Start<br />
Selected Track<br />
Total Time<br />
Individual<br />
Select All<br />
All Clear<br />
01<br />
003:17<br />
Track 1–13<br />
Track01<br />
Track02<br />
Track03<br />
Track04<br />
Track05<br />
Track06<br />
Track07<br />
Track08<br />
01:43<br />
03:17<br />
04:18<br />
04:59<br />
04:20<br />
04:38<br />
04:40<br />
04:11<br />
• Individual ( 個 別 選 取 ) — 一 次 選 取 一 個<br />
曲 目 。<br />
• Select All ( 選 擇 全 部 ) — 選 取 所 有 曲 目 。<br />
• All Clear ( 清 除 全 部 ) — 清 除 所 選 取 的 所<br />
有 曲 目 。<br />
5 選 擇 位 元 率 ( 傳 輸 率 )。<br />
選 擇 128 kbps、192 kbps 或 320 kbps。<br />
CD –> USB Rec<br />
Track 1–13<br />
錄 製 特 定 曲 目<br />
Select Track<br />
Bitrate<br />
128kbps<br />
192kbps<br />
320kbps<br />
Track01<br />
Track02<br />
Track03<br />
Track04<br />
01:43<br />
03:17<br />
04:18<br />
04:59<br />
1 載 入 音 樂 CD。<br />
按 下 停 止 播 放 。<br />
Start<br />
Selected Track<br />
Total Time<br />
03<br />
012:17<br />
Track05<br />
Track06<br />
Track07<br />
Track08<br />
04:20<br />
04:38<br />
04:40<br />
04:11<br />
2 按 HOME MENU, 然 後 選 擇<br />
「CD -> USB Rec (CD -> USB 轉 錄 )」。<br />
只 有 在 停 止 播 放 音 樂 CD 時 , 才 能 選 擇<br />
CD -> USB Rec (CD -> USB 轉 錄 )。<br />
CD – > USB Rec<br />
3 使 用 /// 及 ENTER 完 成 各 項 設 定<br />
值 。<br />
6 使 用 /// 選 擇 「Start ( 開 始 )」,<br />
然 後 按 ENTER。 2<br />
開 始 錄 製 。<br />
CD –> USB Rec<br />
Select Track<br />
Bitrate<br />
Start<br />
Selected Track<br />
Total Time<br />
128kbps<br />
03<br />
012:17<br />
Track 1–13<br />
Track01<br />
Track02<br />
Track03<br />
Track04<br />
Track05<br />
Track06<br />
Track07<br />
Track08<br />
01:43<br />
03:17<br />
04:18<br />
04:59<br />
04:20<br />
04:38<br />
04:40<br />
04:11<br />
CD –> USB Rec<br />
Select Track Individual<br />
Bitrate<br />
Select All<br />
All Clear<br />
Start<br />
Selected Track<br />
00<br />
Total Time<br />
000:00<br />
Track 1–13<br />
Track01<br />
Track02<br />
Track03<br />
Track04<br />
Track05<br />
Track06<br />
Track07<br />
Track08<br />
01:43<br />
03:17<br />
04:18<br />
04:59<br />
04:20<br />
04:38<br />
04:40<br />
04:11<br />
CD –> USB Rec<br />
Track Progress<br />
Total Progress<br />
Cancel<br />
Selected Track<br />
03<br />
Total Time<br />
012:17<br />
Track 1–13<br />
Track01<br />
Track02<br />
Track03<br />
Track04<br />
Track05<br />
Track06<br />
Track07<br />
Track08<br />
01:43<br />
03:17<br />
04:18<br />
04:59<br />
04:20<br />
04:38<br />
04:40<br />
04:11<br />
附 註<br />
1 如 果 USB 裝 置 沒 有 足 夠 的 空 間 , 則 無 法 開 始 錄 製 。 在 這 種 情 況 中 , 顯 示 「 可 用 USB 空 間 不 足 」。<br />
2 • 完 成 錄 製 時 , 在 USB 裝 置 上 會 自 動 建 立 一 個 名 為 「 先 鋒 」 的 資 料 夾 。 所 錄 製 的 曲 目 儲 存 在 此 資 料 夾 中 。<br />
• 最 多 可 建 立 99 個 「 先 鋒 」 資 料 夾 。<br />
• 如 果 USB 裝 置 包 含 300 個 或 以 上 的 資 料 夾 , 則 無 法 進 行 錄 製 。<br />
• 在 USB 裝 置 上 進 行 錄 製 時 , 除 了 操 作 STANDBY/ON 和 OPEN/CLOSE 按 鍵 與 切 換 功 能 外 , 停 止 所 有 與 DVD 相 關 的<br />
主 要 操 作 。<br />
• 睡 眠 定 時 器 ON ( 開 啟 ) 時 , 開 始 在 USB 裝 置 錄 製 後 即 將 它 取 消 開 啟 。<br />
32<br />
Zhtw
卡 拉 OK 伴 唱 08<br />
第 8 章<br />
卡 拉 OK 伴 唱<br />
卡 拉 OK 伴 唱<br />
使 用 伴 唱 功 能 , 您 可 以 將 麥 克 風 插 上 後 , 將 自<br />
己 的 聲 音 溶 入 背 景 音 樂 當 中 。 1 您 可 以 選 取 來<br />
自 CD、DVD、VCD 或 USB 裝 置 等 音 源 的 背 景<br />
音 樂 。 請 調 整 麥 克 風 與 背 景 相 對 的 音 量 。<br />
MAIN<br />
1 插 入 麥 克 風 。<br />
如 果 只 有 使 用 一 隻 麥 克 風 , 請 將 它 插 上 MIC<br />
(MAIN) 插 孔 。MIC (SUB) 插 孔 只 能 在 有 接 上<br />
MIC (MAIN) 的 情 況 下 才 能 使 用 。<br />
• 如 果 麥 克 風 上 有 開 關 , 請 撥 至 開 的 位 置 。<br />
2 置 入 有 伴 唱 背 景 音 樂 的 碟 片 。<br />
您 也 可 以 利 用 USB 裝 置 的 曲 目 作 為 背 景 音 樂 的<br />
來 源 媒 體 。<br />
3 調 整 KARAOKE 模 式 設 定 。<br />
• 按 SHIFT+KARAOKE 可 開 啟 或 關 閉 碟 片<br />
( 左 右 置 聲 道 有 人 聲 ) 的 KARAOKE 模 式 :<br />
KARAOKE ( 人 聲 消 音 )- 背 景 音 樂 中 的 人 聲<br />
有 部 分 會 消 音 。<br />
MIC<br />
SUB<br />
OFF ( 預 設 值 )- 可 將 伴 唱 模 式 關 閉 。<br />
• 按 SHIFT+AUDIO 可 切 換 碟 片 ( 僅 單 聲 道 有<br />
人 聲 曲 目 ) 的 音 頻 聲 道 ( 除 資 料 碟 片 和 USB 來<br />
源 外 ):<br />
Left - 僅 左 聲 道 。 用 於 右 聲 道 中 錄 製 有 人 聲 道<br />
的 曲 目 。<br />
Right - 僅 右 聲 道 。 用 於 左 聲 道 中 錄 製 有 人 聲<br />
道 的 曲 目 。<br />
STEREO - 可 將 伴 唱 模 式 關 閉 。<br />
4 播 放 背 景 音 樂 。<br />
5 調 整 MIC VOL +/– 旋 鈕 至 您 想 要 的 聲 音 。 2<br />
為 避 免 產 生 惱 人 的 回 饋 信 號 , 請 確 定 您 沒 有 將<br />
麥 克 風 朝 向 揚 聲 器 。 3<br />
變 更 混 聲 效 果<br />
在 麥 克 風 混 聲 中 加 入 一 些 效 果 有 時 可 以 改 善 整<br />
體 聲 音 的 感 覺 。 4 您 可 以 選 取 三 種 迴 音 位 準 。<br />
• 要 在 麥 克 風 中 加 入 效 果 , 請 按 下<br />
SHIFT+ECHO。<br />
連 續 按 下 以 切 換 音 量 1 到 音 量 3 及 關 。<br />
變 更 背 景 音 樂<br />
您 可 能 需 要 降 低 或 提 高 背 景 音 樂 的 音 量 以 配 合<br />
您 的 聲 音 。 5<br />
• 按 下 SHIFT+ 或 SHIFT+ 以 降 低 或 提 高 背<br />
景 音 樂 的 音 量 高 低 。<br />
English Español Español<br />
附 註<br />
1 • 這 些 功 能 只 有 在 接 上 麥 克 風 時 才 可 使 用 。 如 果 您 嘗 試 在 未 接 上 麥 克 風 時 使 用 SHIFT+KARAOKE、SHIFT+ECHO、<br />
SHIFT+、SHIFT+ 或 MIC VOL, 則 螢 幕 會 顯 示 NO MIC ( 未 接 上 麥 克 風 ) 訊 息 。 另 請 注 意 , 在 播 放 DVD 的 期 間 , 當 您 接 上<br />
麥 克 風 時 , 聲 音 設 定 自 動 切 換 成 STEREO 播 放 , 並 將 多 聲 道 來 源 縮 混 成 2.1 聲 道 。<br />
• 這 些 功 能 只 能 搭 配 DVD/CD 或 USB 輸 入 功 能 使 用 。<br />
2MIC VOL 在 您 取 下 麥 克 風 , 變 更 功 能 或 關 閉 電 源 時 設 定 為 0。<br />
3 視 麥 克 風 音 量 而 定 , 碟 片 的 聲 音 可 能 會 失 真 。 如 果 發 生 此 種 情 形 , 請 將 音 量 調 低 。<br />
4 插 入 麥 克 風 時 , 無 法 調 整 SFC 模 式 、 音 調 控 制 ( 低 音 、 高 音 和 低 音 加 重 )、 加 大 功 率 模 式 、 前 置 環 繞 聲 模 式 、MP3 擴 展 器<br />
模 式 或 聲 音 強 化 器 模 式 。<br />
5 此 功 能 與 DTS 訊 號 不 相 容 。<br />
33<br />
Zhtw
09<br />
音 頻 設 置 及 視 頻 調 整 選 單<br />
第 9 章<br />
音 頻 設 置 及 視 頻 調 整 選 單<br />
「 音 頻 設 置 」 選 單<br />
「 音 頻 設 置 」 選 單 可 提 供 調 整 碟 片 聲 音 的 功 能 。<br />
1 按 下 HOME MENU 並 從 在 屏 顯 示 畫 面 選 取<br />
「Audio Settings ( 音 頻 設 置 )」。<br />
2 使 用 /// 及 ENTER 來 完 成 設 定 值 。<br />
Video Adjust<br />
Sharpness<br />
Standard<br />
Brightness<br />
0<br />
Contrast<br />
0<br />
Gamma<br />
Off<br />
Hue<br />
0<br />
Chroma Level 0<br />
Audio Settings<br />
2 使 用 /// 及 ENTER 來 選 取 及 變 更<br />
設 定 值 。<br />
Audio DRC<br />
Audio Settings<br />
High<br />
Medium<br />
Low<br />
Off<br />
音 頻 DRC ( 動 態 範 圍 控 制 )<br />
• 設 置 : High ( 高 )、Medium ( 中 )、<br />
Low ( 低 )、Off ( 關 )( 預 設 值 )<br />
在 以 低 音 量 觀 賞 Dolby Digital DVD 時 , 很 容<br />
易 完 全 失 去 較 靜 的 聲 音 - 包 括 一 些 對 白 在 內 。<br />
將 音 頻 DRC( 動 態 範 圍 控 制 ) 啟 動 可 有 助 於 突<br />
顯 較 輕 的 聲 音 , 同 時 有 效 控 制 較 重 的 聲 音 。<br />
所 聽 到 聲 音 的 差 別 , 視 您 聆 聽 的 媒 體 內 容 而 定 。<br />
如 果 媒 體 內 容 在 音 量 上 沒 有 太 多 變 化 , 那 您 便<br />
不 會 注 意 有 何 不 同 。 1<br />
「 視 頻 調 整 」 選 單<br />
從 「 視 頻 調 整 」 的 功 能 畫 面 中 , 您 可 以 調 整 能<br />
影 響 影 像 呈 現 的 設 定 值 。<br />
1 按 下 HOME MENU 並 從 在 屏 顯 示 畫 面 選 取<br />
「Video Adjust ( 視 頻 調 整 )」。<br />
您 可 以 調 整 以 下 的 設 定 值 :<br />
• Sharpness ( 銳 度 )- 可 調 整 畫 面 邊 緣 的<br />
銳 利 度 (Fine( 精 細 )、Standard( 標 準 )、<br />
Soft ( 柔 和 ))<br />
• Brightness ( 亮 度 )- 可 調 整 整 體 呈 現 的<br />
亮 度 (–20 至 +20)<br />
• Contrast ( 對 比 度 )- 可 調 整 亮 與 暗 之 間<br />
的 對 比 呈 現 (–16 至 +16)<br />
• Gamma( 伽 瑪 )- 可 調 整 影 像 的 「 暖 度 」<br />
(High ( 高 )、Medium ( 中 )、<br />
Low ( 低 )、Off ( 關 ))<br />
• Hue ( 色 調 )- 可 調 整 紅 / 綠 平 衡<br />
(Green 9( 綠 色 9) 至 Red 9( 紅 色 9))<br />
• Chroma Level( 色 度 等 級 )- 可 調 色 彩 呈<br />
現 的 飽 和 度 (–9 至 +9)<br />
使 用 / 來 調 整 亮 度 、 對 比 度 、 色 調 及 色 度<br />
等 級 等 設 定 值 。<br />
Brightness min max 0<br />
3 按 下 ENTER 以 返 回 「Video Adjust ( 視<br />
頻 調 整 )」 功 能 畫 面 , 或 按 下 HOME MENU 退<br />
出 功 能 畫 面 。<br />
Video Adjust<br />
附 註<br />
1 音 頻 DRC 僅 對 Dolby Digital 音 頻 來 源 能 發 揮 效 用 。<br />
34<br />
Zhtw
「 初 始 設 置 」 選 單 10<br />
第 10 章<br />
「 初 始 設 置 」 選 單<br />
使 用 「 初 始 設 置 」 選 單<br />
「 初 始 設 置 」 選 單 提 供 音 頻 及 視 頻 輸 出 設 定 值 、<br />
成 人 鎖 定 , 以 及 顯 示 設 定 值 等 。<br />
如 果 選 項 呈 現 淡 出 的 灰 色 , 則 表 示 此 時 無 法 接<br />
受 變 更 。 此 種 情 形 通 常 是 因 為 碟 片 正 在 播 放 的<br />
緣 故 。 請 停 止 碟 片 的 播 放 , 再 變 更 設 定 值 。<br />
視 頻 輸 出 設 定 值<br />
1 按 下 DVD/CD。<br />
2 停 止 播 放 時 , 按 下 HOME MENU 並 選 取<br />
「Initial Settings ( 初 始 設 置 )」。<br />
Initial Settings<br />
3 使 用 /// 及 ENTER 以 選 取 想 要 設<br />
定 的 設 定 值 及 選 項 。<br />
所 有 設 定 值 及 選 項 將 會 在 後 續 的 內 容 中 詳 加 說<br />
明 。 1<br />
設 定 值 選 項 說 明<br />
TV Screen<br />
( 電 視 機 屏 幕 )<br />
4:3 (Letter Box) 如 果 您 使 用 的 是 傳 統 4:3 電 視 機 時 , 需 設 置 此 項 。 寬 螢 幕 電<br />
影 在 播 放 時 , 上 下 兩 側 會 有 黑 色 條 邊 。<br />
( 另 請 參 閱 第 51 頁 的 畫 4:3 (Pan & Scan) 如 果 您 使 用 的 是 傳 統 4:3 電 視 機 時 , 需 設 置 此 項 。 寬 螢 幕 電<br />
面 大 小 及 碟 片 格 式 。)<br />
影 在 播 放 時 會 裁 掉 左 右 兩 側 一 部 分 , 以 利 填 滿 整 個 螢 幕 。<br />
16:9 (Wide) 如 果 您 使 用 的 是 寬 螢 幕 電 視 機 時 , 需 設 置 此 項 。<br />
16:9 (Compressed) 如 果 您 使 用 的 是 寬 螢 幕 電 視 機 時 , 需 設 置 此 項 。 播 放 4:3 的 內<br />
容 時 , 畫 面 其 中 一 側 將 顯 示 黑 色 條 邊 。 2<br />
Component Out Interlace ( 隔 行 掃 描 ) 您 的 電 視 機 若 不 適 用 於 逐 行 掃 描 視 頻 時 , 需 設 置 此 項 。<br />
( 色 差 視 頻 輸 出 )<br />
Progressive ( 逐 行 掃 描 ) 您 的 電 視 機 如 果 適 用 於 逐 行 掃 描 視 頻 時 , 需 設 置 此 項 ( 請 參<br />
( 另 請 參 閱 第 40 頁 的 連<br />
閱 您 電 視 機 操 作 手 冊 中 的 詳 細 說 明 )。 再 按 一 次 ENTER 確 認<br />
接 輔 助 音 頻 設 備 。)<br />
( 或 按 下 RETURN 取 消 設 置 )。<br />
請 注 意 , 逐 行 掃 描 視 頻 僅 可 經 由 色 差 視 頻 插 孔 輸 出 。<br />
English Español Español<br />
附 註<br />
1 • 在 表 中 , 預 設 值 會 以 粗 體 字 顯 示 ; 其 他 的 設 定 值 則 會 以 斜 體 字 顯 示 在 螢 幕 上 。<br />
• 某 些 設 定 值 , 像 是 TV Screen ( 電 視 機 屏 幕 )、Audio Language ( 對 白 語 言 ) 及 Subtitle Language ( 字 幕 語 言 ) 可 能<br />
對 DVD 碟 片 並 不 具 效 用 。 通 常 這 些 設 定 值 亦 可 從 DVD 的 碟 片 選 單 中 來 完 成 設 置 。<br />
• HDMI Resolution (HDMI 解 析 度 ) 與 HDMI Color (HDMI 色 彩 ) 設 定 值 只 有 在 您 利 用 HDMI 接 頭 將 本 播 放 器 連 接 至<br />
HDMI 相 容 設 備 時 , 才 有 必 要 進 行 設 定 。<br />
2 當 您 經 由 HDMI 連 接 方 式 、 並 將 HDMI 解 析 度 設 為 1920 x 1080p、1920 x 1080i 或 1280 x 720p 時 , 才 能 使 用 此 設 定 。<br />
使 用 此 設 定 值 時 , 您 只 能 使 用 HDMI 連 接 方 式 。<br />
35<br />
Zhtw
10<br />
「 初 始 設 置 」 選 單<br />
設 定 值 選 項 說 明<br />
HDMI Resolution<br />
(HDMI 解 析 度 ) *<br />
( 請 參 閱 第 41 頁 的 使 用<br />
HDMI 連 接 。)<br />
* 預 設 值 會 配 合 電 視 格<br />
720 x 480p (NTSC)/<br />
720 x 576p (PAL)<br />
式 (PAL/NTSC) 改 變 。<br />
720 x 480i (NTSC)/<br />
720 x 576i (PAL)<br />
HDMI Color<br />
Full range RGB<br />
(HDMI 色 彩 ) * ( 進 階 RGB)<br />
( 請 參 閱 第 41 頁 的 使 用<br />
HDMI 連 接 。)<br />
Component ( 色 差 )<br />
* 預 設 值 會 視 連 接 的 設<br />
備 改 變 。<br />
1920 x 1080p 如 果 電 視 機 支 援 1920 x 1080 畫 素 逐 行 掃 描 , 則 請 設 定 此 項 。<br />
1920 x 1080i 如 果 電 視 機 支 援 1920 x 1080 畫 素 隔 行 掃 描 , 則 請 設 定 此 項 。<br />
1280 x 720p 如 果 電 視 機 支 援 1280 x 720 畫 素 逐 行 掃 描 , 則 請 設 定 此 項 。<br />
如 果 電 視 機 支 援 720 x 480 (NTSC)/720 x 576 (PAL) 畫 素 逐<br />
行 掃 描 , 請 設 定 此 項 。<br />
如 果 電 視 機 支 援 720 x 480 (NTSC)/720 x 576 (PAL) 畫 素 隔<br />
行 掃 描 , 請 設 定 此 項 。<br />
色 彩 微 弱 時 , 可 提 供 更 亮 麗 的 色 彩 及 更 深 的 黑 色 ( 此 預 設 值<br />
適 用 於 HDMI 相 容 的 DVI 設 備 )。<br />
RGB 使 用 「 進 階 RGB」 設 定 值 時 , 若 色 彩 太 過 飽 滿 , 請 設 定 此 項 。<br />
可 輸 出 8-bit 的 色 差 視 頻 格 式 ( 此 預 設 值 適 用 於 HDMI 相 容<br />
設 備 )。<br />
語 言 設 定 值<br />
設 定 值 選 項 說 明<br />
Audio Language English ( 英 語 ) 如 果 碟 片 上 錄 有 英 語 的 音 軌 , 即 會 播 放 。<br />
( 對 白 語 言 )<br />
同 顯 示 的 語 言 如 果 選 取 了 碟 片 上 語 言 , 即 會 播 放 。<br />
其 他 語 言<br />
選 取 所 顯 示 以 外 的 語 言 ( 請 參 閱 第 57 頁 的 使 用 語 言 代 碼 清<br />
單 )。<br />
Subtitle Language English ( 英 語 ) 如 果 碟 片 上 有 英 語 字 幕 , 即 會 顯 示 。<br />
( 字 幕 語 言 )<br />
同 顯 示 的 語 言 會 顯 示 在 碟 片 上 選 取 的 字 幕 語 言 。<br />
其 他 語 言<br />
選 取 所 顯 示 以 外 的 語 言 ( 請 參 閱 第 57 頁 的 使 用 語 言 代 碼 清<br />
單 )。<br />
DVD Menu Language<br />
(DVD 菜 單 語 言 )<br />
Subtitle Display<br />
( 字 幕 顯 示 )<br />
w/Subtitle Lang.<br />
( 字 幕 語 言 連 動 )<br />
可 能 的 話 ,DVD 碟 片 選 單 會 以 和 您 所 選 字 幕 語 言 相 同 的 語 言<br />
顯 示 。<br />
同 顯 示 的 語 言 可 能 的 話 ,DVD 選 單 會 以 所 選 的 語 言 顯 示 。<br />
其 他 語 言<br />
選 取 所 顯 示 以 外 的 語 言 ( 請 參 閱 第 57 頁 的 使 用 語 言 代 碼 清<br />
單 )。<br />
On ( 開 ) 字 幕 會 按 您 所 選 的 字 幕 語 言 顯 示 。<br />
Off ( 關 ) 在 您 播 放 DVD 碟 片 時 , 字 幕 會 依 預 設 方 式 保 持 關 閉 的 狀 態 。<br />
36<br />
Zhtw
「 初 始 設 置 」 選 單 10<br />
顯 示 幕 設 定 值<br />
設 定 值 選 項 說 明<br />
OSD Language English ( 英 語 ) 在 屏 顯 示 畫 面 會 按 英 語 顯 示 。<br />
( 在 屏 顯 示 語 言 )<br />
同 顯 示 的 語 言 在 屏 顯 示 畫 面 會 按 所 選 的 語 言 顯 示 。<br />
Angle Indicator<br />
( 角 度 指 示 燈 )<br />
On ( 開 )<br />
在 播 放 DVD 碟 片 上 的 多 角 度 場 景 期 間 , 螢 幕 上 會 顯 示 相 機<br />
圖 示 。<br />
Off ( 關 ) 不 顯 示 多 角 度 指 示 圖 示 。<br />
選 項 設 定 值<br />
設 定 值 選 項 說 明<br />
Parental Lock – 請 參 閱 下 列 成 人 鎖 定 。<br />
( 成 人 鎖 定 )<br />
DivX(R) VOD<br />
Display<br />
請 參 閱 下 列 關 於 DivX ® VOD 內 容 。<br />
揚 聲 器 設 置<br />
設 定 值 選 項 說 明<br />
Speaker Distance<br />
( 揚 聲 器 距 離 )<br />
– 可 指 定 揚 聲 器 與 聆 聽 位 置 的 距 離 ( 請 參 閱 第 39 頁 的 揚 聲<br />
器 距 離 )。<br />
成 人 鎖 定<br />
• 預 設 等 級 : Off ( 關 ); 預 設 密 碼 : 無 ;<br />
預 設 國 家 / 地 區 代 碼 : us (2119)<br />
為 了 讓 您 可 以 控 制 不 讓 您 的 小 孩 使 用 您 的 DVD<br />
播 放 器 觀 賞 影 片 , 某 些 DVD-Video 碟 片 結 合<br />
有 成 人 鎖 定 的 分 級 功 能 。 如 果 您 的 播 放 器 設 置<br />
的 等 級 較 碟 片 為 低 , 碟 片 便 無 法 播 放 。<br />
某 些 碟 片 也 有 支 援 國 家 / 地 區 代 碼 功 能 。 本 機<br />
無 法 播 放 這 些 碟 片 上 的 某 些 場 景 , 視 您 設 置 的<br />
國 家 / 地 區 代 碼 而 定 。<br />
登 錄 新 密 碼<br />
請 輸 入 密 碼 以 變 更 成 人 鎖 定 等 級 或 輸 入 國 家 /<br />
地 區 代 碼 。 1 1 選 取 「Password ( 密 碼 )」。<br />
Initial Settings<br />
Video Output Parental Lock Password<br />
Language<br />
DivX (R) VOD<br />
Level Change<br />
Display<br />
Country Code<br />
Options<br />
Speakers<br />
2 使 用 數 字 鍵 輸 入 四 位 數 字 密 碼 , 然 後 按 下<br />
ENTER。<br />
更 換 密 碼<br />
要 更 改 密 碼 , 請 先 確 認 現 有 密 碼 , 再 輸 入 新 的<br />
密 碼 。<br />
1 選 取 「Password Change( 更 換 密 碼 )」,<br />
輸 入 現 行 的 密 碼 , 然 後 按 下 ENTER。<br />
2 輸 入 新 密 碼 並 按 下 ENTER。<br />
English Español Español<br />
附 註<br />
1 • 並 非 所 有 種 類 的 碟 片 都 適 用 成 人 鎖 定 功 能 , 而 且 亦 無 須 先 輸 入 密 碼 才 能 播 放 。<br />
• 如 果 您 忘 記 密 碼 , 您 會 需 要 將 播 放 器 重 置 才 能 登 記 新 的 密 碼 ( 請 參 閱 第 57 頁 的 重 新 設 置 系 統 )。<br />
37<br />
Zhtw
10<br />
「 初 始 設 置 」 選 單<br />
設 置 / 改 變 成 人 鎖 定<br />
1 選 取 「Level Change ( 改 變 級 別 )」。<br />
2 使 用 數 字 鍵 輸 入 您 的 密 碼 , 然 後 按 下<br />
ENTER。<br />
3 選 取 新 的 等 級 並 按 下 ENTER。<br />
• 連 續 按 以 鎖 定 在 更 高 的 層 次 ( 更 多 碟 片<br />
需 要 使 用 密 碼 ); 按 下 以 取 消 鎖 定 層 次 。<br />
您 不 能 鎖 在 等 級 1。<br />
設 置 / 變 更 國 家 / 地 區 代 碼<br />
您 可 以 從 第 58 頁 的 國 家 / 地 區 代 碼 清 單 當 中<br />
找 到 。<br />
1 選 取 「Country Code ( 國 家 代 碼 )」, 輸<br />
入 密 碼 , 然 後 按 下 ENTER。<br />
2 選 取 國 家 / 地 區 代 碼 , 然 後 按 下 ENTER。<br />
在 此 提 供 兩 種 設 置 的 方 法 :<br />
• 按 字 母 代 碼 選 取 : 使 用 / 以 變 更 國 家 /<br />
地 區 代 碼 。<br />
• 按 數 字 代 碼 選 取 : 按 下 , 然 後 使 用 數 字<br />
鍵 輸 入 四 位 數 字 的 國 家 / 地 區 代 碼 。<br />
在 退 出 碟 片 後 , 新 的 國 家 / 地 區 代 碼 便 立 即 生<br />
效 。<br />
關 於 DivX ® VOD 內 容<br />
為 了 讓 DivX VOD ( 隨 選 視 頻 ) 的 內 容 能 在 本<br />
機 上 播 放 , 您 必 須 先 向 您 的 DivX VOD 內 容 供<br />
應 商 登 錄 本 機 的 資 料 。 您 可 以 藉 由 產 生 一 組<br />
DivX VOD 登 錄 代 碼 , 發 送 給 您 的 供 應 商 來 完<br />
成 登 錄 作 業 。 1<br />
顯 示 您 的 DivX VOD 登 錄 代 碼<br />
1 按 下 HOME MENU 並 選 取 「Initial<br />
Settings ( 初 始 設 置 )」。<br />
2 選 取 「Options ( 選 項 )」, 然 後 是<br />
「DivX (R) VOD」。<br />
Initial Settings<br />
Video Output<br />
Language<br />
Display<br />
Options<br />
Speakers<br />
Parental Lock<br />
DivX (R) VOD<br />
Display<br />
3 選 取 「Display」。<br />
螢 幕 上 顯 示 您 的 八 位 數 字 登 錄 代 碼 。<br />
請 記 下 代 碼 , 因 為 在 向 您 的 DivX VOD 供 應 商<br />
登 錄 時 會 需 要 用 到 。<br />
播 放 DivX ® VOD 內 容<br />
某 些 DivX VOD 內 容 僅 能 作 一 定 時 間 的 播 放 。 在<br />
您 置 入 含 有 此 種 DivX VOD 內 容 的 碟 片 時 , 剩 餘<br />
播 放 次 數 便 會 顯 示 在 螢 幕 上 , 然 後 您 便 可 以 選 取<br />
要 播 放 碟 片 ( 因 此 可 以 用 上 其 中 一 種 剩 餘 播 放<br />
次 數 ), 或 停 止 播 放 。 如 果 您 置 入 的 是 含 有 期 限<br />
已 過 的 DivX VOD 內 容 ( 例 如 , 內 容 的 剩 餘 播<br />
放 次 數 是 零 ), 則 螢 幕 上 便 會 顯 示 Rental<br />
Expired ( 租 期 已 過 ) 的 訊 息 。<br />
如 果 您 的 DivX VOD 內 容 允 許 不 限 次 數 的 播 放 ,<br />
那 您 便 可 以 將 碟 片 置 入 本 機 , 並 播 放 您 常 看 的<br />
內 容 , 螢 幕 上 亦 不 會 顯 示 任 何 訊 息 。<br />
重 要 提 示<br />
• DivX VOD 內 容 受 DRM ( 數 位 版 權 管 理 )<br />
系 統 所 保 護 。 這 會 限 制 只 有 一 些 特 定 、 已 登<br />
錄 的 裝 置 才 能 播 放 。<br />
• 如 果 您 在 本 機 內 置 入 一 片 未 經 授 權 使 用 , 內<br />
含 DivX VOD 內 容 的 碟 片 , 螢 幕 上 即 會 顯<br />
示 Authorization Error ( 授 權 錯 誤 ) 的 訊<br />
息 , 同 時 內 容 亦 無 法 播 放 。<br />
附 註<br />
1 重 置 本 機 ( 請 參 閱 第 57 頁 的 重 新 設 置 系 統 ) 不 致 使 您 失 去 您 的 登 錄 代 碼 。<br />
38<br />
Zhtw
「 初 始 設 置 」 選 單 10<br />
揚 聲 器 距 離<br />
• 預 設 值 : 3.0m<br />
想 要 從 您 的 系 統 中 產 生 最 佳 的 環 繞 音 效 , 應 將<br />
相 距 聆 聽 位 置 兩 側 的 揚 聲 器 設 定 為 同 等 距 離 。<br />
1 按 下 HOME MENU 並 選 取<br />
「Initial Settings ( 初 始 設 置 )」。<br />
2 選 取 「Speakers ( 揚 聲 器 )」, 然 後 是<br />
「Speaker Distance ( 揚 聲 器 距 離 )」。<br />
Initial Settings<br />
Video Output<br />
Language<br />
Display<br />
Options<br />
Speakers<br />
Speaker Distance<br />
3 使 用 / 以 選 取 一 揚 聲 器 。<br />
Initial Settings<br />
Video Output<br />
Language<br />
Display<br />
Options<br />
Speakers<br />
L<br />
C<br />
R<br />
SR<br />
SL<br />
SW<br />
3.0m<br />
3.0m<br />
3.0m<br />
3.0m<br />
3.0m<br />
3.0m<br />
4 按 下 以 變 更 反 白 揚 聲 器 的 揚 聲 器 間 距 。<br />
5 使 用 / 變 更 間 距 。<br />
• 在 您 變 更 左 前 置 (L) 或 右 前 置 (R) 揚 聲<br />
器 的 間 距 設 定 值 時 , 所 有 其 他 揚 聲 器 的 間 距<br />
亦 會 相 對 變 更 。<br />
• 左 / 右 前 置 (L/R) 揚 聲 器 間 距 可 以 每<br />
30 cm 為 增 加 單 位 , 從 30 cm 增 至 9 m。 1<br />
• 中 置 揚 聲 器 (C) 可 以 –2.1 m 至 0 m 的 距 離<br />
相 對 於 左 / 右 前 置 揚 聲 器 設 置 。<br />
• 左 / 右 環 繞 (SL/SR) 揚 聲 器 可 以 設 置 從 可<br />
以 –6.0 m 至 0 m 的 距 離 相 對 於 左 / 右 前<br />
置 揚 聲 器 設 置 。 2<br />
• 重 低 音 (SW) 可 以 設 置 從 可 以 –2.1 m 至<br />
0 m 的 距 離 相 對 於 左 / 右 前 置 揚 聲 器 設 置 。<br />
6 如 果 您 想 要 變 更 其 他 的 揚 聲 器 間 距 值 , 請<br />
按 下 以 返 回 揚 聲 器 清 單 , 或 按 下 ENTER<br />
以 退 出 揚 聲 器 間 距 畫 面 。<br />
English Español Español<br />
附 註<br />
1 L 及 R 揚 聲 器 均 是 成 對 的 ; 您 無 法 分 開 來 設 置 。<br />
2 在 使 用 加 大 功 率 模 式 ( 第 23 頁 ) 時 , 請 確 實 設 置 以 相 同 的 間 距 。<br />
39<br />
Zhtw
11<br />
其 他 接 線<br />
第 11 章<br />
其 他 接 線<br />
重 要 提 示<br />
• 在 本 機 後 面 板 連 接 或 變 更 接 線 方 式 時 , 請 確 實 將 電 源 關 閉 並 從 牆 壁 插 座 拔 下 電 源 線 。<br />
完 成 所 有 接 線 後 , 請 將 電 源 線 連 接 至 牆 壁 插 座 上 。<br />
<br />
<br />
5 m 6 m<br />
<br />
<br />
<br />
<br />
AM <br />
<br />
LINE 1<br />
R FRONT L<br />
CENTER<br />
COMPONENT<br />
VIDEO<br />
PR<br />
A<br />
N<br />
TE<br />
N<br />
L<br />
VIDEO(TV)<br />
PB<br />
N<br />
A<br />
AM LOOP<br />
FM<br />
UNBAL 75 Ω<br />
AC IN<br />
R<br />
SUB<br />
R SURROUND<br />
WOOFER<br />
ANALOG AUDIO IN SPEAKERS (4 Ω )<br />
AD<strong>AP</strong>TER PORT<br />
VIDEO OUT<br />
Y<br />
HDMI OUT<br />
<br />
<br />
Bluetooth®<br />
<br />
HDMI<br />
<br />
PAL <br />
<br />
<br />
KURO LINK <br />
<br />
連 接 輔 助 音 頻 設 備<br />
使 用 立 體 聲 類 比 輸 入 可 連 接 卡 式 錄 音 座 或 MD<br />
播 放 器 等 外 部 設 備 , 經 由 本 系 統 播 放 。<br />
關 於 接 線 圖 , 請 參 閱 上 述 的 1。<br />
• 連 接 (LINE 1) AUDIO IN 插 孔 至 外 部 播 放 設<br />
備 的 類 比 輸 出 上 。<br />
可 使 用 RCA 針 頭 型 立 體 聲 連 接 線 來 連 接 。<br />
40<br />
Zhtw
其 他 接 線 11<br />
使 用 色 差 視 頻 輸 出 連 接<br />
如 果 您 的 電 視 機 有 色 差 視 頻 輸 入 , 您 可 以 使 用<br />
這 些 輸 入 取 代 標 準 視 頻 輸 出 以 得 到 更 好 的 畫<br />
質 。 1<br />
關 於 接 線 圖 , 請 參 閱 第 40 頁 上 的 2。<br />
• 使 用 色 差 視 頻 連 接 線 連 接 COMPONENT<br />
VIDEO OUT 至 您 電 視 機 上 的 色 差 輸 入 組 。<br />
關 於 逐 行 掃 描 視 頻<br />
相 較 隔 行 掃 描 視 頻 , 逐 行 掃 描 視 頻 更 能 有 效 的<br />
加 倍 影 像 的 掃 描 頻 率 , 產 生 相 當 穩 定 , 無 跳 動<br />
的 影 像 。 逐 行 掃 描 視 頻 僅 可 透 過 色 差 視 頻 輸 出<br />
端 子 輸 出 。<br />
本 機 與 逐 行 掃 描 及 高 傳 真 電 視 機 之 相 容 性 。<br />
• 本 機 與 逐 行 掃 描 視 頻 Macro Vision<br />
System Copy Guard 相 容 。 2<br />
使 用 HDMI 連 接<br />
若 配 備 HDMI 或 DVI ( 結 合 HDCP) 的 顯 示 器<br />
或 顯 示 裝 置 , 可 利 用 一 般 市 面 上 的 HDMI 連 接<br />
線 將 它 連 接 至 本 播 放 器 , 以 提 供 高 品 質 的 數 位<br />
視 頻 。 3<br />
關 於 接 線 圖 , 請 參 閱 第 40 頁 上 的 3。<br />
• 使 用 HDMI 連 接 線 將 本 播 放 器 的 HDMI<br />
OUT 連 接 端 子 連 接 至 HDMI 相 容 顯 示 器 上 的<br />
HDMI 連 接 端 子 。<br />
• 連 接 線 接 頭 的 箭 頭 應 朝 下 精 確 對 準 播 放 器<br />
的 接 頭 。<br />
您 也 可 以 調 整 解 析 度 及 色 彩 等 HDMI 設 定 值 。<br />
欲 了 解 與 這 些 設 定 值 相 關 的 更 多 資 訊 , 請 參 閱<br />
第 35 頁 的 視 頻 輸 出 設 定 值 。<br />
切 換 HDMI 音 頻 設 置 值<br />
您 可 以 選 擇 系 統 揚 聲 器 或 電 視 , 透 過 HDMI 輸<br />
出 DVD/CD 或 USB 功 能 的 聲 音 。 4 HDMI 音 頻<br />
設 定 為 TV 時 , 您 無 法 使 用 本 系 統 的 多 個 聲 音<br />
功 能 。<br />
1 按 下 SHIFT+SETUP。<br />
2 使 用 / 以 選 取 HDMI SET, 然 後 按 下<br />
ENTER。<br />
3 使 用 / 以 選 取 HDMI MODE, 然 後 按<br />
下 ENTER。<br />
4 使 用 / 選 取 想 要 的 設 定 值 , 然 後 按 下<br />
ENTER。<br />
• AMP – 從 本 系 統 輸 出 DVD/CD 的 聲 音 與<br />
USB 功 能 訊 號 。<br />
English Español Español<br />
附 註<br />
1 • 色 差 視 頻 輸 出 可 在 隔 行 掃 描 及 逐 行 掃 描 格 式 之 間 作 切 換 。 請 參 閱 第 35 頁 的 視 頻 輸 出 設 定 值 。<br />
• 使 用 HDMI 線 連 接 播 放 器 時 , 設 備 的 影 像 輸 出 不 可 在 Interlace ( 隔 行 掃 描 ) 與 Progressive ( 逐 行 掃 描 ) 格 式 之 間 切<br />
換 。HDMI 解 析 度 設 為 720x480i (NTSC)/720x576i(PAL) 格 式 時 , 將 自 動 選 取 Interlace ( 隔 行 掃 描 ) 格 式 。 但 在 其 他 設 定<br />
中 , 則 是 自 動 選 取 Progressive ( 逐 行 掃 描 ) 格 式 。<br />
2 消 費 者 應 注 意 , 並 非 所 有 的 高 傳 真 電 視 機 均 能 與 本 產 品 完 全 相 容 , 且 可 能 導 致 畫 面 上 出 現 人 為 造 成 的 現 象 。 對 於 525 逐 行<br />
掃 描 畫 面 問 題 , 建 議 使 用 者 可 將 連 接 端 子 切 換 至 「 標 準 解 析 度 」 輸 出 ( 隔 行 掃 描 ) 來 加 以 改 善 。 如 果 發 生 電 視 機 與 本 機 在 相<br />
容 性 方 面 的 問 題 , 請 與 本 公 司 的 客 服 中 心 聯 繫 。<br />
3 • HDMI 連 接 方 式 僅 適 用 於 與 DVI 及 HDCP (High Bandwidth Digital Content Protection) 相 容 的 DVI 型 設 備 。 若 選 取 連<br />
接 至 DVI 接 頭 , 則 需 使 用 另 外 的 轉 接 頭 (DVIHDMI) 完 成 連 接 。 然 而 ,DVI 連 接 方 式 並 不 支 援 音 頻 信 號 。 欲 了 解 更 多 相 關<br />
資 訊 , 請 洽 當 地 音 響 經 銷 商 。<br />
• 視 連 接 的 設 備 而 定 , 使 用 DVI 連 接 可 能 導 致 信 號 傳 輸 不 穩 。<br />
• 若 改 變 連 接 至 HDMI 輸 出 的 設 備 , 也 必 須 變 更 HDMI 設 定 值 以 符 合 新 的 設 備 ( 請 參 閱 第 35 頁 的 視 頻 輸 出 設 定 值 完 成 此<br />
項 操 作 )。<br />
4 KURO LINK 設 定 為 ON 且 平 面 電 視 在 同 步 放 化 模 式 中 時 , 無 法 切 換 此 設 定 。<br />
41<br />
Zhtw
11<br />
其 他 接 線<br />
• TV – 從 電 視 機 或 平 面 電 視 機 出 DVD/CD 的<br />
聲 音 與 USB 功 能 訊 號 。 1<br />
重 新 設 定 HDMI 連 接<br />
若 出 現 錯 誤 訊 息 ( 顯 示 幕 屏 示 HDMI ERR) 或<br />
若 畫 面 一 片 空 白 ( 如 在 變 更 解 析 度 後 ), 則 請<br />
參 閱 第 53 頁 的 故 障 排 除 指 南 。 若 仍 無 法 解 決<br />
問 題 , 則 請 依 下 述 步 驟 重 新 設 定 HDMI 連 接 。<br />
1 按 下 SHIFT+SETUP。<br />
2 使 用 / 以 選 取 INITIAL, 然 後 按 下<br />
ENTER。<br />
3 使 用 / 選 取 HDMIINIT, 然 後 按 下<br />
ENTER。<br />
4 INIT OK 閃 爍 時 , 按 下 ENTER。<br />
系 統 會 重 新 啟 動 且 HDMI 設 定 值 會 自 動 重 新 設<br />
回 原 廠 預 設 值 。 欲 了 解 與 這 些 設 定 值 相 關 的 更<br />
多 資 訊 , 請 參 閱 第 35 頁 的 視 頻 輸 出 設 定 值 。<br />
關 於 HDMI<br />
HDMI (High Definition Multimedia<br />
Interface) 可 支 援 以 單 一 數 位 連 接 線 連 接<br />
DVD 播 放 器 、DTV、 機 上 盒 及 其 他 影 音 設 備 ,<br />
並 同 時 提 供 視 頻 及 音 頻 。HDMI 的 研 發 是 為 了<br />
提 供 能 將 HDCP (High Bandwidth Digital<br />
Content Protection) 與 DVI (Digital Visual<br />
Interface) 兩 項 技 術 合 而 為 一 的 規 格 。HDCP<br />
是 用 來 保 護 由 DVI 相 容 顯 示 器 所 傳 輸 及 接 收 的<br />
數 位 內 容 。<br />
HDMI 擁 有 能 支 援 標 準 、 增 強 或 高 畫 質 視 頻 及<br />
多 聲 道 環 繞 聲 音 效 標 準 的 能 力 。HDMI 的 功 能<br />
包 括 : 未 壓 縮 數 位 視 頻 、 每 秒 可 達 5 GB 頻 寬<br />
( 含 HDTV 信 號 )、 單 一 接 頭 ( 取 代 數 條 接 線<br />
及 接 線 ), 以 及 能 在 影 音 來 源 及 DTV 等 影 音 設<br />
備 間 進 行 通 訊 等 。<br />
HDMI、HDMI 標 誌 及 High-Definition<br />
Multimedia Interface 均 為 HDMI Licensing,<br />
LLC 的 商 標 或 註 冊 商 標 。<br />
連 接 外 部 天 線<br />
連 接 外 部 AM 天 線 時 , 可 使 用 5 m 至 6 m 乙<br />
烯 基 金 屬 線 並 安 裝 於 室 內 或 室 外 。 保 留 連 接 的<br />
環 型 天 線 。 限 使 用 隨 附 的 AM 環 形 天 線 。<br />
連 接 外 部 FM 天 線 時 , 可 使 用 PAL 連 接 頭 接 上<br />
一 組 FM 天 線 。<br />
關 於 接 線 圖 , 請 參 閱 第 40 頁 上 的 4。<br />
用 於 無 線 享 受 音 樂 的<br />
Bluetooth ® 傳 輸 器<br />
僅 適 用 於 HTZ280/282DVD-<strong>AP</strong> 機 型<br />
無 線 音 樂 播 放<br />
Bluetooth 傳 輸 器 ( 先 鋒 型 號 AS-BT100) 連<br />
接 至 本 機 時 , 可 使 用 搭 載 Bluetooth 無 線 技 術<br />
( 行 動 電 話 、 數 位 音 樂 播 放 器 等 ) 的 產 品 來 無<br />
線 聆 聽 音 樂 。 2 此 外 , 使 用 市 售 的 支 援 Bluetooth<br />
無 線 技 術 的 發 射 器 , 可 以 聆 聽 未 配 備 Bluetooth<br />
無 線 技 術 的 裝 置 上 的 音 樂 。AS-BT100 機 型 支<br />
援 SCMS-T 內 容 保 護 , 因 此 在 配 備 SCMS-T 型<br />
Bluetooth 無 線 技 術 的 產 品 上 也 可 以 享 受 音 樂 。<br />
附 註<br />
1 同 樣 可 以 使 用 電 視 機 內 建 的 揚 聲 器 來 聆 聽 自 DVD 或 USB 裝 置 輸 入 的 音 訊 。HDMI 端 子 的 音 頻 輸 出 僅 僅 適 用 於 雙 聲 道 線 型<br />
PCM。 此 時 , 聽 不 到 來 自 本 機 揚 聲 器 ( 或 耳 機 ) 的 任 何 聲 音 。 所 有 其 他 音 頻 ( 包 括 TUNER) 從 本 機 正 常 輸 出 。<br />
2 Bluetooth 無 線 技 術 啟 用 裝 置 可 能 須 支 援 A2DP 設 定 。<br />
42<br />
Zhtw
其 他 接 線 11<br />
遙 控 器 操 作<br />
本 系 統 隨 附 的 遙 控 器 允 許 您 播 放 和 停 止 媒 體 ,<br />
以 及 執 行 其 他 操 作 。 1<br />
<br />
<br />
<br />
<br />
<br />
<br />
<br />
<br />
<br />
<br />
Bluetooth ®<br />
<br />
<br />
<br />
<br />
連 接 選 購 的 Bluetooth 傳 輸 器<br />
<br />
<br />
<br />
<br />
<br />
+<br />
<br />
<br />
<br />
1 將 系 統 切 換 至 待 機 狀 態 , 然 後 將 Bluetooth<br />
傳 輸 器 連 接 至 位 於 後 面 板 的 AD<strong>AP</strong>TER PORT。<br />
關 於 接 線 圖 , 請 參 閱 第 40 頁 上 的 5。<br />
2 按 下 STANDBY/ON。<br />
3 按 AD<strong>AP</strong>TER PORT, 然 後 切 換 到 BT AUDIO<br />
輸 入 模 式 。 2<br />
配 對 Bluetooth 傳 輸 器 和 Bluetooth<br />
無 線 技 術 裝 置<br />
在 使 用 Bluetooth 傳 輸 器 開 始 播 放 Bluetooth<br />
無 線 技 術 內 容 之 前 , 必 須 完 成 「 配 對 」。 第 一<br />
次 操 作 系 統 或 任 何 時 候 清 除 配 對 資 料 時 , 請 確<br />
定 執 行 配 對 。 「 配 對 」 是 登 錄 Bluetooth 無 線<br />
技 術 裝 置 以 啟 用 Bluetooth 通 訊 的 必 要 步 驟 。 3<br />
如 需 詳 細 資 料 , 另 請 參 閱 您 的 Bluetooth 無 線<br />
技 術 裝 置 的 操 作 手 冊 。<br />
1 按 下 SHIFT+SETUP 以 選 取 BT SETUP, 然<br />
後 按 下 ENTER。<br />
2 使 用 / 以 選 取 PAIRING, 然 後 按 下<br />
ENTER。<br />
3 使 用 /, 從 0000/1234/8888 中 選 擇 要<br />
使 用 的 PIN 碼 , 然 後 按 ENTER。<br />
PAIRING 閃 爍 。<br />
注 意<br />
• 您 可 以 使 用 任 一 個 0000/1234/8888 PIN<br />
碼 。Bluetooth 無 線 技 術 裝 置 使 用 除 本 系 統<br />
使 用 的 任 何 其 他 PIN 碼 。<br />
4 開 啟 您 要 配 對 的 Bluetooth 無 線 技 術 裝 置 ,<br />
將 它 放 在 靠 近 系 統 的 位 置 , 並 設 定 在 配 對 模 式 。<br />
English Español Español<br />
附 註<br />
1 • Bluetooth 無 線 技 術 啟 用 裝 置 可 能 須 支 援 AVRCP 設 定 。<br />
• 我 們 不 保 證 使 用 遙 控 器 可 以 操 作 Bluetooth 無 線 技 術 啟 用 的 裝 置 。<br />
2 在 Bluetooth 傳 輸 器 尚 未 插 入 AD<strong>AP</strong>TER PORT 時 , 即 使 按 下 AD<strong>AP</strong>TER PORT 也 無 法 進 入 BT AUDIO 輸 入 模 式 。<br />
3 • 第 一 次 使 用 Bluetooth 無 線 技 術 裝 置 和 Bluetooth 傳 輸 器 時 , 需 要 配 對 。<br />
• 若 要 啟 用 Bluetooth 通 訊 , 您 的 系 統 和 Bluetooth 無 線 技 術 裝 置 都 應 該 完 成 配 對 。<br />
43<br />
Zhtw
11<br />
其 他 接 線<br />
5 檢 查 Bluetooth 無 線 裝 置 是 否 偵 測 到<br />
Bluetooth 傳 輸 器 。<br />
當 Bluetooth 無 線 技 術 裝 置 偵 測 到 Bluetooth<br />
傳 輸 器 時 , 傳 輸 器 的 識 別 編 號 「AS-BT100」<br />
顯 示 在 Bluetooth 無 線 技 術 裝 置 清 單 中 。 1<br />
6 從 Bluetooth 無 線 技 術 裝 置 清 單 中 , 選 取<br />
Bluetooth 傳 輸 器 , 然 後 在 步 驟 3 輸 入 所 選 取<br />
的 PIN 碼 。 2<br />
使 用 您 的 系 統 聆 聽 Bluetooth 無 線 技<br />
術 裝 置 的 音 樂 內 容<br />
1 按 AD<strong>AP</strong>TER PORT, 然 後 切 換 到 BT AUDIO<br />
輸 入 模 式 。<br />
2 將 Bluetooth 無 線 技 術 裝 置 連 接 至<br />
Bluetooth 傳 輸 器 。<br />
連 接 Bluetooth 無 線 技 術 裝 置 時 :<br />
Bluetooth 無 線 技 術 裝 置 名 稱 顯 示 在 系 統 顯 示<br />
幕 中 。 3<br />
未 連 接 Bluetooth 無 線 技 術 裝 置 時 :<br />
NODEVICE 顯 示 在 系 統 顯 示 幕 中 。<br />
3 開 始 播 放 儲 存 在 Bluetooth 無 線 技 術 裝 置<br />
中 的 音 樂 內 容 。<br />
使 用 系 統 頂 端 和 遙 控 器 上 的 按 鍵 , 對 Bluetooth<br />
無 線 技 術 裝 置 進 行 下 列 操 作 。 4<br />
按 鍵<br />
按 鍵 功 能<br />
/<br />
( 系 統 )<br />
<br />
( 遙 控 器 )<br />
<br />
( 遙 控 器 )<br />
開 始 正 常 播 放 和 暫 停 / 取 消<br />
暫 停 播 放 。<br />
開 始 正 常 播 放 。<br />
可 暫 停 播 放 。<br />
<br />
停 止 播 放 。<br />
( 系 統 / 遙 控 器 )<br />
按 鍵<br />
<br />
( 遙 控 器 )<br />
<br />
( 遙 控 器 )<br />
<br />
( 遙 控 器 )<br />
按 鍵 功 能<br />
按 下 可 開 始 向 後 快 轉 。<br />
按 下 可 開 始 向 前 快 轉 。<br />
可 跳 至 目 前 播 放 檔 案 的 最 前<br />
面 位 置 , 再 跳 至 前 一 個 檔 案 。<br />
<br />
可 跳 至 下 一 個 檔 案 。<br />
( 遙 控 器 )<br />
5<br />
清 除 配 對<br />
1 請 按 SHIFT+SETUP, 選 取 BT SETUP, 然<br />
後 按 ENTER。<br />
2 使 用 / 以 選 取 PAIR CLR, 然 後 按 下<br />
ENTER。<br />
3 顯 示 CLR OK 時 , 請 按 ENTER。<br />
Bluetooth ® 字 標 和 商 標 為 Bluetooth SIG, Inc.<br />
所 有 , 先 鋒 公 司 使 用 這 些 標 誌 皆 需 獲 得 授 權 。<br />
其 他 商 標 和 商 品 名 稱 分 屬 其 各 自 的 擁 有 者 所<br />
有 。<br />
附 註<br />
1 當 Bluetooth 無 線 技 術 裝 置 未 顯 示 在 偵 測 到 的 裝 置 清 單 中 或 未 顯 示 時 , 則 不 會 顯 示 Bluetooth 無 線 技 術 裝 置 清 單 。 在 有 些<br />
情 況 中 , 您 可 以 使 用 配 對 模 式 來 配 對 Bluetooth 傳 輸 器 和 該 Bluetooth 無 線 技 術 裝 置 。<br />
2 有 些 情 況 的 PIN 碼 也 稱 為 「 通 行 碼 」。<br />
3 系 統 只 能 顯 示 英 數 字 元 。 其 他 字 元 可 能 無 法 正 確 顯 示 。<br />
4 • Bluetooth 無 線 技 術 裝 置 應 與 AVRCP 設 定 相 容 。<br />
• 視 您 使 用 的 Bluetooth 無 線 技 術 裝 置 而 定 , 操 作 可 能 與 此 表 所 示 有 所 不 同 。<br />
5 • 中 斷 連 接 Bluetooth 無 線 技 術 裝 置 即 可 完 成 清 除 。<br />
• 當 您 在 清 除 後 重 新 連 接 Bluetooth 無 線 技 術 裝 置 時 , 請 參 閱 第 43 頁 的 配 對 Bluetooth 傳 輸 器 和 Bluetooth 無 線 技 術 裝 置<br />
來 重 複 配 對 步 驟 。<br />
44<br />
Zhtw
USB<br />
MAIN MIC SUB PHONES<br />
KURO LINK 12<br />
第 12 章<br />
KURO LINK<br />
不 適 用 於 HTZ180/181DVD 機 型<br />
使 用 HDMI 連 接 線 將 本 機 連 接 至 KURO LINK<br />
相 容 先 鋒 平 面 電 視 後 , 您 可 以 使 用 所 連 接 平 面<br />
電 視 的 遙 控 器 控 制 本 機 , 並 且 讓 所 連 接 的 平 面<br />
電 視 自 動 切 換 輸 入 , 以 回 應 本 機 執 行 的 操 作 。<br />
此 外 , 從 連 接 的 平 面 電 視 輸 入 語 言 資 訊 時 , 本<br />
機 的 圖 形 使 用 者 介 面 顯 示 語 言 自 動 切 換 ( 僅 在<br />
停 止 播 放 或 圖 形 使 用 者 介 面 的 畫 面 未 顯 示 , 只<br />
能 使 用 DVD/CD 功 能 時 )。<br />
如 需 有 關 透 過 HDMI 連 接 線 可 執 行 哪 些 操 作 的<br />
詳 細 資 訊 , 請 參 閱 平 面 電 視 的 操 作 手 冊 。<br />
• 您 無 法 搭 配 不 支 援 KURO LINK 的 設 備 來 使<br />
用 此 功 能 。<br />
• 我 們 不 保 證 本 機 能 搭 配 先 鋒 以 外 所 製 造 的<br />
KURO LINK 相 容 設 備 使 用 。<br />
連 接 KURO LINK<br />
您 可 以 同 步 操 作 所 連 接 的 平 面 電 視 。<br />
確 定 將 平 面 電 視 的 音 頻 線 連 接 至 本 機 的 音 頻 輸<br />
入 插 孔 。<br />
關 於 接 線 圖 , 請 參 閱 第 40 頁 上 的 3。<br />
• 如 果 不 使 用 高 速 HDMI 連 接 線 ,KURO LINK<br />
可 能 無 法 正 常 運 作 。<br />
• 將 平 面 電 視 直 接 連 接 至 本 機 。 中 斷 與 其 他 擴<br />
大 器 或 影 音 轉 換 器 ( 例 如 HDMI 開 關 ) 的<br />
直 接 連 接 會 導 致 操 作 發 生 錯 誤 。<br />
HDMI <br />
HDMI <br />
HDMI <br />
HDMI <br />
重 要 提 示<br />
KURO LINK <br />
<br />
HDMI <br />
<br />
<br />
HDMI <br />
<br />
• 在 連 接 本 系 統 或 變 更 接 線 方 式 時 , 請 確 實<br />
將 電 源 關 閉 並 從 牆 壁 插 座 拔 下 電 源 線 。<br />
完 成 所 有 接 線 後 , 請 將 電 源 線 連 接 至 牆 壁<br />
插 座 上 。<br />
KURO LINK 設 定<br />
為 了 充 份 運 用 KURO LINK 功 能 , 您 必 須 調 整<br />
本 機 的 設 定 及 KURO LINK 相 容 的 連 接 設 備 。 如<br />
需 詳 細 資 訊 , 請 參 閱 每 個 設 備 的 操 作 手 冊 。<br />
English Español Español<br />
設 定 KURO LINK 模 式<br />
選 取 是 否 將 本 機 的 KURO LINK 功 能 設 定 為 ON<br />
或 OFF。 您 必 須 將 它 設 定 為 LINK ON 才 能 使 用<br />
KURO LINK 功 能 。<br />
• 使 用 不 支 援 KURO LINK 功 能 的 電 視 時 , 請<br />
將 此 設 定 為 LINK OFF。<br />
45<br />
Zhtw
12<br />
KURO LINK<br />
1 按 下 SHIFT+SETUP。<br />
2 使 用 / 以 選 取 HDMI SET, 然 後 按 下<br />
ENTER。<br />
3 使 用 / 以 選 取 KURO LINK, 然 後 按 下<br />
ENTER。<br />
4 使 用 / 以 選 取 設 定 值 , 再 按 下 ENTER<br />
確 認 。<br />
• LINK ON - 啟 用 KURO LINK 功 能 。<br />
• LINK OFF - 已 停 用 KURO LINK。 無 法 使 用<br />
同 步 化 操 作 。<br />
使 用 同 步 化 之 前<br />
一 完 成 所 有 連 接 與 設 定 後 , 您 必 須 :<br />
1 讓 所 有 設 備 進 入 待 機 模 式 。<br />
2 開 啟 所 有 設 備 的 電 源 , 最 後 才 開 啟 平 面 電 視<br />
的 電 源 。<br />
3 選 擇 DVD/CD, 並 查 看 畫 面 上 的 視 訊 輸 出<br />
顯 示 是 否 正 常 。<br />
同 步 化 擴 大 模 式<br />
使 用 KURO LINK 相 容 電 視 的 遙 控 器 可 以 設 定<br />
同 步 放 大 模 式 。 有 關 同 步 放 大 模 式 的 從 電 視 的<br />
選 單 畫 面 中 可 以 設 定 這 些 功 能 。<br />
從 電 視 的 選 單 畫 面 中 可 以 設 定 這 些 功 能 。 如 需<br />
詳 細 資 訊 , 請 參 閱 KURO LINK 相 容 電 視 的 操<br />
作 手 冊 。<br />
• 電 視 的 電 源 設 定 為 待 機 時 , 本 機 的 電 源 也 會<br />
設 定 為 待 機 。( 本 機 正 在 播 放 視 頻 DVD 時 ,<br />
關 閉 電 視 的 電 源 也 會 自 動 關 閉 本 機 的 電 源 。<br />
但 有 些 情 況 中 , 本 機 電 源 無 法 自 動 關 閉 , 例<br />
如 , 當 您 正 在 聆 聽 CD 或 廣 播 並 關 閉 輸 出 裝<br />
置 時 。)<br />
• 本 機 輸 入 在 切 換 電 視 頻 道 時 自 動 切 換 。<br />
• 即 使 本 機 輸 入 切 換 至 DVD/CD 以 外 的 功 能 ,<br />
同 步 放 大 模 式 仍 然 有 效 。<br />
在 先 鋒 KURO LINK 相 容 平 面 電 視 上 也 可 以 使<br />
用 以 下 的 操 作 。<br />
• 調 整 本 機 音 量 或 聲 音 靜 音 時 , 音 量 狀 態 會 顯<br />
示 在 平 面 電 視 的 畫 面 上 。<br />
• 在 平 面 電 視 上 切 換 OSD 語 言 時 , 本 機 的 語<br />
言 設 定 也 會 隨 著 切 換 。<br />
取 消 同 步 化 擴 大 模 式<br />
• 取 消 同 步 放 大 模 式 時 , 如 果 您 正 在 觀 看 電 視<br />
上 的 電 視 節 目 , 則 本 機 電 源 會 關 閉 。<br />
• 在 同 步 放 大 模 式 時 , 本 機 電 源 若 關 閉 , 同 步<br />
放 大 模 式 會 取 消 。 若 要 重 新 開 啟 同 步 放 大 模<br />
式 , 請 使 用 電 視 的 遙 控 器 選 取 同 步 放 大 模<br />
式 。<br />
• 在 同 步 放 大 模 式 時 , 如 果 從 電 視 選 單 畫 面 執<br />
行 從 電 視 產 生 聲 音 的 操 作 , 則 會 取 消 同 步 放<br />
大 模 式 。<br />
同 步 化 擴 大 模 式 操 作<br />
使 用 同 步 放 大 模 式 時 , 連 接 至 本 機 的 KURO<br />
LINK 相 容 設 備 如 下 所 述 同 步 運 作 。<br />
• 使 用 電 視 的 遙 控 器 可 以 設 定 本 機 音 量 及 將<br />
聲 音 靜 音 。<br />
46<br />
Zhtw
其 他 資 訊 13<br />
第 13 章<br />
其 他 資 訊<br />
碟 片 / 內 容 格 式 播 放 相 容 性<br />
本 機 適 合 播 放 各 種 類 型 ( 媒 體 ) 及 格 式 的 碟 片 。<br />
可 播 放 的 碟 片 一 般 在 碟 片 及 / 或 碟 片 包 裝 上 會<br />
有 下 列 其 中 一 種 標 誌 。 然 而 請 注 意 有 些 類 型 的<br />
碟 片 , 像 是 可 燒 錄 式 CD 及 DVD, 可 能 仍 屬 於<br />
不 可 播 放 的 格 式 。<br />
更 多 資 訊 , 請 參 閱 下 列 碟 片 相 容 性 參 照 表 。<br />
DVD-Video DVD-R DVD-RW<br />
CD VCD CD-R CD-RW<br />
Fujicolor CD<br />
• 本 機 可 播 放 DVD+R/+RW 碟 片 。<br />
• 是 FUJIFILM Corporation 的 商 標 。<br />
• 是 DVD Format/Logo Licensing<br />
Corporation 的 商 標 。<br />
• 本 機 亦 與 KODAK Picture CD 相 容 。<br />
本 播 放 器 可 支 援 能 產 生 優 異 畫 質 、 雙 聲 道 的 IEC<br />
的 超 級 VCD 標 準 , 並 可 支 援 寬 屏 幕 畫 面 。<br />
Super Video CD ( VCD)<br />
關 於 DualDisc 的 播 放<br />
DualDisc 是 一 種 全 新 、 雙 面 的 碟 片 , 一 面 可 容<br />
納 DVD 格 式 的 影 像 、 聲 音 等 , 另 一 面 則 可 容 納<br />
非 DVD 格 式 的 內 容 , 如 數 位 音 頻 媒 體 內 容 。<br />
而 此 種 碟 片 容 納 非 DVD 音 頻 的 一 面 因 不 符<br />
CD-Audio 的 規 格 , 故 可 能 會 無 法 播 放 。<br />
DualDisc 的 DVD 面 可 在 本 產 品 中 播 放 。<br />
DVD-Audio 內 容 不 能 播 放 。<br />
有 關 DualDisc 規 格 的 更 多 詳 盡 資 訊 , 請 洽 詢 碟<br />
片 製 造 商 或 碟 片 零 售 商 。<br />
碟 片 相 容 性 參 照 表<br />
媒 體 相 容 格 式<br />
CD-R/-RW • CD-Audio、VCD/ 超 級 VCD、<br />
ISO 9660 CD-ROM*, 包 含 MP3、<br />
WMA、MPEG-4 AAC、JPEG 或<br />
DivX 視 頻 /WMV 檔 案 。<br />
* 符 合 ISO 9660 Level 1 或 2 之 標<br />
準 。CD 實 體 格 式 : Mode1、<br />
Mode2 XA Form1。 與 Romeo 及<br />
Joliet 兩 種 檔 案 系 統 相 容 。<br />
• 多 區 段 播 放 : 否<br />
• 未 最 終 化 碟 片 播 放 : 否<br />
DVD-R/-RW • DVD-Video( 視 頻 模 式 )、 視 頻 錄<br />
製 (VR)*、UDF Bridge DVD-ROM,<br />
包 含 MP3、WMA、MPEG-4 AAC、<br />
JPEG 或 DivX 視 頻 /WMV 檔 案 。<br />
* 編 輯 點 可 能 無 法 完 全 按 照 編 輯 的<br />
方 式 播 放 ; 播 放 到 編 輯 點 時 畫 面 可 能<br />
會 有 短 暫 空 白 的 情 形 。<br />
• 多 重 邊 界 播 放 : 否<br />
• 未 最 終 化 播 放 : 否<br />
PC 製 作 碟 片 • 使 用 PC 錄 製 的 碟 片 可 能 會 因 為 用<br />
以 製 作 碟 片 的 軟 體 本 身 的 設 置 而 無<br />
法 播 放 。 此 時 , 請 檢 查 DVD-R/<br />
-RW 或 CD-R/-RW 軟 體 手 冊 或 碟 片<br />
包 裝 上 更 多 關 於 相 容 性 的 說 明 。<br />
• 以 封 包 燒 錄 方 式 錄 製 的 碟 片 不 相<br />
容 。<br />
English Español Español<br />
47<br />
Zhtw
13<br />
其 他 資 訊<br />
媒 體<br />
音 頻 壓 縮<br />
JPEG 檔 案<br />
相 容 格 式<br />
• MPEG-1 Audio Layer 3 (MP3)、<br />
Windows Media Audio (WMA)、<br />
MPEG-4 AAC<br />
• 取 樣 頻 率 : 32 kHz/44.1 kHz/<br />
48 kHz<br />
• 位 元 率 : 任 何 傳 輸 率 ( 建 議 採 用<br />
128 kbps 以 上 )<br />
• VBR ( 可 變 位 元 率 ) MP3/WMA/<br />
MPEG-4 AAC 播 放 : 否<br />
• WMA 無 失 真 編 碼 : 否<br />
• DRM ( 數 位 版 權 管 理 ) 相 容 性 :<br />
相 容 ( 受 DRM 保 護 之 音 樂 檔 案 將 無<br />
法 在 本 機 上 播 放 。)<br />
• 副 檔 名 :.mp3、.wma、.m4a ( 需<br />
使 用 這 些 副 檔 名 以 利 播 放 器 辨 識<br />
MP3/WMA/MPEG-4 AAC 檔 案 )<br />
• 檔 案 結 構 ( 可 能 有 所 不 同 ): 一 張<br />
碟 片 上 最 多 可 儲 存 299 個 資 料 夾 ;<br />
每 個 資 料 夾 中 最 多 可 存 放 648 資 料<br />
夾 及 檔 案 ( 合 併 後 )<br />
• Baseline JPEG 及 EXIF 2.2* 靜 態 影<br />
像 檔 案 可 達 3072 x 2048 解 析 度 畫<br />
素<br />
* 為 數 位 相 機 專 用 之 檔 案 格 式<br />
• 逐 行 掃 描 JPEG 相 容 性 : 否<br />
• 副 檔 名 :.jpg ( 必 須 使 用 這 些 副<br />
檔 名 , 以 利 本 機 辨 識 JPEG 檔 案 )<br />
• 檔 案 結 構 ( 可 能 有 所 不 同 ): 一<br />
張 碟 片 上 最 多 可 儲 存 299 個 資 料<br />
夾 ; 每 個 資 料 夾 中 最 多 可 存 放 648<br />
資 料 夾 及 檔 案 ( 合 併 後 )<br />
關 於 DVD+R/DVD+RW 相 容 性<br />
僅 可 播 放 以 「 視 頻 模 式 (DVD-Video 模 式 )」<br />
錄 製 並 已 完 成 封 片 的 DVD+R/DVD+RW。 然<br />
而 , 有 些 在 錄 影 期 間 所 完 成 的 編 輯 內 容 可 能 會<br />
無 法 精 確 地 播 放 。<br />
關 於 DivX<br />
DivX 是 DivX, Inc. 發 明 的 數 位 音 訊 格 式 。 本 播<br />
放 器 可 以 播 放 錄 製 在 DVD、CD 或 USB 儲 存 裝<br />
置 中 的 DivX 視 訊 。<br />
保 有 與 DVD-Video 相 同 的 術 語 , 獨 特 的 DivX<br />
視 頻 檔 案 均 稱 作 「 標 題 」。<br />
DivX 視 頻 相 容 性<br />
• 播 放 DivX ® 1<br />
視 訊<br />
• 副 檔 名 :.avi 及 .divx ( 必 須 使 用 這 些 副 檔<br />
名 , 以 利 本 機 辨 識 DivX 視 頻 檔 案 )。 請 注<br />
意 , 所 有 採 用 .avi 副 檔 名 的 檔 案 均 會 辨 識<br />
成 MPEG4, 但 所 有 這 些 檔 案 並 非 一 定 是<br />
DivX 視 頻 檔 案 , 亦 因 此 不 見 得 能 在 本 機 上<br />
播 放 。<br />
顯 示 DivX 字 幕 檔 案<br />
以 下 所 列 為 DivX 外 部 字 幕 檔 案 所 適 用 的 字 型<br />
組 。 您 可 以 藉 由 設 定 能 符 合 字 幕 檔 案 的 Subtitle<br />
Language ( 字 幕 語 言 )( 在 第 36 頁 的 語 言 設<br />
定 值 ), 於 螢 幕 上 見 到 正 確 的 字 型 組 合 。 2<br />
小 組 1: Albanian ( 阿 爾 巴 尼 亞 語 ) (sq),Basque<br />
( 巴 斯 克 語 ) (eu),Catalan ( 嘉 泰 羅 尼 亞 語 ) (ca),<br />
Danish ( 丹 麥 語 ) (da),Dutch ( 荷 蘭 語 ) (nl),English<br />
( 英 語 ) (en),Faroese ( 法 羅 語 ) (fo),Finnish<br />
( 芬 蘭 語 ) (fi),French ( 法 語 ) (fr),German ( 德 語 )<br />
(de),Icelandic ( 冰 島 語 ) (is),Irish ( 愛 爾 蘭 語 ) (ga),<br />
Italian ( 義 大 利 語 ) (it),Norwegian ( 挪 威 語 ) (no),<br />
Portuguese ( 葡 萄 牙 語 ) (pt),Rhaeto-Romanic<br />
( 里 托 羅 曼 斯 語 ) (rm),Scottish ( 蘇 格 蘭 語 ) (gd),<br />
Spanish ( 西 班 牙 語 ) (es),Swedish ( 瑞 典 語 ) (sv)<br />
附 註<br />
1 無 法 播 放 容 量 大 於 4 GB 的 .avi 視 頻 檔 案 。<br />
2 • 在 外 部 字 幕 檔 案 部 分 , 本 機 可 支 援 以 下 的 字 幕 格 式 檔 案 名 稱 ( 請 注 意 , 這 些 檔 案 不 會 在 碟 片 導 向 選 單 中 顯 示 ): .srt、<br />
.sub、.ssa、.smi<br />
• 某 些 外 部 字 幕 檔 案 可 能 無 法 正 確 顯 示 或 完 全 無 法 顯 示 。<br />
• 影 片 檔 案 的 檔 名 必 須 重 複 出 現 在 外 部 字 幕 檔 案 檔 名 的 開 頭 處 。<br />
• 同 一 影 片 檔 案 能 夠 切 換 的 外 部 字 幕 檔 案 數 量 , 最 多 限 定 為 10。<br />
48<br />
Zhtw
其 他 資 訊 13<br />
小 組 2: Albanian ( 阿 爾 巴 尼 亞 語 ) (sq),Croatian<br />
( 克 羅 埃 西 亞 語 ) (hr),Czech ( 捷 克 語 ) (cs),<br />
Hungarian ( 匈 牙 利 語 ) (hu),Polish ( 波 蘭 語 ) (pl),<br />
Romanian ( 羅 馬 尼 亞 語 ) (ro),Slovak ( 斯 洛 伐 克 語 )<br />
(sk),Slovenian ( 斯 洛 維 尼 亞 語 ) (sl)<br />
小 組 3: Bulgarian ( 保 加 利 亞 語 ) (bg),Byelorussian<br />
( 白 俄 羅 斯 語 ) (be),Macedonian ( 馬 其 頓 語 ) (mk),<br />
Russian ( 俄 語 ) (ru),Serbian ( 塞 爾 維 亞 語 ) (sr),<br />
Ukrainian ( 烏 克 蘭 語 ) (uk)<br />
小 組 4: Hebrew ( 希 伯 來 語 ) (iw),Yiddish<br />
( 意 第 緒 語 ) (ji)<br />
小 組 5: Turkish ( 土 耳 其 語 ) (tr)<br />
DivX ® 是 DivX, Inc. 的 註 冊 商 標 , 並 獲 授 權 使 用 。<br />
關 於 WMV<br />
WMV 是 Windows Media Video 的 縮 寫 , 且<br />
為 Microsoft Corporation 所 研 發 出 來 的 視 頻<br />
壓 縮 技 術 。 可 使 用 Windows Media Encoder<br />
將 WMV 內 容 加 以 編 碼 。<br />
• 本 播 放 器 可 播 放 使 用 Windows Media<br />
Encoder 9 Series 編 碼 、 使 用 .wmv 副 檔<br />
名 的 WMV9 檔 案 。<br />
• 可 使 用 720 x 576 畫 素 /720 x 480 畫 素 以 下<br />
的 大 小 。<br />
• 不 支 援 Advanced Profile。<br />
• 受 DRM 保 護 之 視 頻 檔 案 將 無 法 在 本 機 上 播<br />
放 。<br />
• 檔 案 副 檔 名 .wmv。<br />
• 可 使 用 192 kbps 以 下 的 位 元 率 。<br />
關 於 MPEG-4 AAC<br />
AAC (Advanced Audio Coding) 是 MPEG-4<br />
AAC 標 準 的 核 心 技 術 , 主 要 結 合 MPEG-2<br />
AAC, 是 構 成 MPEG-4 音 頻 壓 縮 技 術 的 基 礎 。<br />
所 使 用 的 檔 案 格 式 及 副 檔 名 需 視 用 以 進 行<br />
AAC 檔 案 編 碼 的 應 用 程 式 而 定 。 本 機 可 播 放 由<br />
iTunes ® 所 編 碼 , 副 檔 名 為 「.m4a」 的 AAC<br />
檔 案 。DRM 所 保 護 的 檔 案 不 能 播 放 , 以 及 由 某<br />
些 iTunes ® 版 本 所 編 碼 的 檔 案 也 可 能 無 法 播 放 ,<br />
或 檔 名 可 能 無 法 正 確 顯 示 。<br />
Apple 及 iTunes 均 是 Apple Inc. 於 美 國 及 其<br />
他 國 家 註 冊 的 商 標 。<br />
關 於 WMA<br />
本 播 放 器 可 播 放 Windows Media Audio 的 內<br />
容 。<br />
WMA 是 Windows Media Audio 的 縮 寫 , 且<br />
為 Microsoft Corporation 所 研 發 出 來 的 音 頻<br />
壓 縮 技 術 。WMA 內 容 可 應 用 Windows<br />
Media Player version 7.7.1,Windows<br />
Media Player 用 于 Windows XP, 或<br />
Windows Media Player 9 Series 等 軟 體 進 行<br />
編 碼 。<br />
Windows Media 是 Microsoft Corporation 的<br />
商 標 。<br />
本 產 品 採 用 Microsoft Corporation 開 發 之 技<br />
術 , 未 獲 Microsoft Licensing, Inc. 授 權 不 得<br />
使 用 或 散 布 本 技 術 。<br />
碟 片 的 使 用 及 維 護<br />
手 拿 碟 片 時<br />
拿 取 碟 片 時 , 請 握 住 其 邊 緣 以 免 在 碟 片 任 何 一<br />
面 留 下 指 紋 、 灰 塵 或 刮 痕 。 已 經 損 壞 或 髒 污 的<br />
碟 片 會 影 響 播 放 的 效 能 。<br />
如 果 碟 片 上 留 有 指 紋 、 灰 塵 等 不 潔 物 , 請 使 用<br />
柔 軟 、 乾 燥 的 布 料 擦 拭 乾 淨 。<br />
請 直 向 輕 輕 由 碟 片 中 央 向 外 擦 拭 。 請 勿 以 畫 圓<br />
的 方 式 擦 拭 碟 片 的 表 面 。<br />
如 有 必 要 , 請 用 拭 布 沾 上 酒 精 , 或 市 面 所 購 買<br />
的 CD/DVD 清 潔 工 具 來 更 徹 底 清 潔 碟 片 。 絕 不<br />
使 用 揮 發 劑 、 稀 釋 劑 或 其 他 設 計 用 來 清 潔 黑 膠<br />
唱 片 的 清 潔 劑 。<br />
English Español Español<br />
49<br />
Zhtw
13<br />
其 他 資 訊<br />
儲 放 碟 片 時<br />
避 免 將 碟 片 留 在 太 冷 、 太 濕 或 太 熱 ( 包 括 受 到<br />
陽 光 直 射 ) 的 環 境 中 。 不 要 將 紙 張 或 貼 紙 黏 在<br />
碟 片 上 , 或 用 鉛 筆 、 鋼 珠 筆 或 其 他 尖 銳 的 書 寫<br />
用 具 在 上 面 書 寫 。 這 樣 會 損 壞 碟 片 。<br />
碟 片 應 避 免 事 項<br />
碟 片 係 以 高 速 在 本 機 內 旋 轉 。 如 果 碟 片 發 生 爆<br />
裂 、 碎 裂 、 扭 曲 或 其 他 損 壞 情 形 , 請 勿 冒 險 置<br />
於 本 機 中 播 放 — 最 終 您 可 能 會 使 本 機 損 壞 。<br />
本 機 在 設 計 上 為 僅 可 使 用 傳 統 、 全 圓 的 碟 片 。<br />
先 鋒 聲 明 : 對 於 因 使 用 變 形 的 碟 片 所 引 起 的 所<br />
有 責 任 , 概 不 負 責 。<br />
DVD Video 適 用 地 區<br />
所 有 的 DVD Video 碟 片 上 均 有 印 上 地 區 標 示 ,<br />
以 指 出 該 碟 片 於 全 球 適 用 的 地 區 。 您 的 DVD 系<br />
統 亦 有 一 地 區 標 示 ( 就 在 背 面 板 上 )。 來 自 不<br />
相 容 地 區 的 碟 片 將 無 法 在 本 機 上 播 放 。 標 示<br />
ALL 的 碟 片 可 在 任 何 的 播 放 器 上 播 放 。<br />
當 您 插 入 一 片 本 播 放 器 無 法 播 放 的 碟 片 時 , 將<br />
會 出 現 以 下 訊 息 :<br />
Incompatible disc region number<br />
( 非 兼 容 碟 片 區 域 碼 )<br />
Can't play disc<br />
( 無 法 播 放 碟 片 )<br />
安 裝 及 保 養<br />
安 裝 提 示<br />
本 公 司 希 望 您 未 來 幾 年 內 都 能 盡 情 的 享 用 本 系<br />
統 , 因 此 在 選 取 安 裝 部 位 時 , 敬 請 牢 記 以 下 各<br />
點 :<br />
務 必 ...<br />
在 通 風 良 好 的 室 內 使 用 。<br />
置 於 平 坦 、 水 平 的 表 面 , 像 書 桌 、 擱 架 或 音 響 架<br />
上 。<br />
切 勿 ...<br />
在 高 溫 或 極 濕 的 地 點 使 用 , 包 括 暖 爐 或 其 他 會 產<br />
生 高 熱 的 設 備 附 近 。<br />
置 於 窗 檯 或 其 他 會 使 系 統 受 到 陽 光 直 射 的 地 點 。<br />
在 多 灰 或 極 濕 的 環 境 中 使 用 。<br />
直 接 擺 在 擴 大 器 或 音 響 系 統 裡 使 用 時 會 逐 漸 變<br />
熱 的 其 他 元 件 上 。<br />
在 電 視 機 或 顯 示 器 附 近 使 用 , 因 為 有 可 能 會 產 生<br />
干 擾 - 特 別 是 如 果 電 視 機 有 使 用 室 內 天 線 時 。<br />
在 廚 房 或 其 他 會 使 系 統 暴 露 在 濃 煙 或 蒸 氣 之 中<br />
的 地 點 。<br />
在 厚 毛 毯 或 地 毯 上 使 用 , 或 覆 蓋 布 料 - 這 樣 可<br />
能 會 妨 礙 系 統 主 機 的 正 確 散 熱 效 果 。<br />
置 於 不 平 穩 的 表 面 , 或 面 積 不 足 以 支 撐 系 統 主 機<br />
四 腳 的 表 面 上 。<br />
清 潔 讀 寫 頭 時<br />
DVD 播 放 器 的 讀 寫 頭 一 般 使 用 是 不 會 弄 髒 的 ,<br />
但 如 因 某 些 原 因 積 灰 或 髒 污 時 , 請 洽 詢 您 所 在<br />
地 的 先 鋒 授 權 服 務 中 心 。 雖 然 讀 取 頭 清 潔 劑 一<br />
般 市 面 上 都 可 買 得 到 , 但 本 公 司 不 建 議 使 用 以<br />
免 可 能 造 成 讀 取 頭 損 壞 。<br />
水 氣 凝 結 問 題<br />
如 果 將 本 機 由 溫 暖 的 室 內 搬 到 室 外 , 或 室 內 溫<br />
度 遽 然 上 升 時 , 內 部 便 可 能 會 有 水 氣 凝 結 。 雖<br />
然 凝 結 的 水 氣 不 會 對 本 機 造 成 損 壞 , 但 可 能 會<br />
使 效 能 短 時 間 內 受 到 影 響 。 請 讓 其 有 大 約 一 小<br />
時 的 時 間 恢 復 至 較 暖 熱 的 溫 度 , 再 行 開 機 。<br />
搬 動 系 統 主 機<br />
如 果 您 有 必 要 移 動 到 主 機 , 且 播 放 器 內 有 碟 片 ,<br />
請 先 將 其 取 出 , 然 後 按 下 前 面 板 上 的<br />
STANDBY/ON 將 系 統 關 機 。 等 到 螢 幕 上 的<br />
-OFF- 字 樣 消 失 後 , 再 將 電 源 插 頭 拔 下 。 1 絕 不<br />
可 在 播 放 期 間 將 主 機 舉 起 或 搬 動 — 可 能 會 使<br />
高 速 旋 轉 下 的 碟 片 損 壞 。<br />
附 註<br />
1 如 在 -OFF- 字 樣 自 螢 幕 上 消 失 前 便 將 主 機 插 頭 拔 掉 , 可 能 會 使 系 統 恢 復 成 原 廠 的 設 置 。<br />
50<br />
Zhtw
其 他 資 訊 13<br />
畫 面 大 小 及 碟 片 格 式<br />
DVD-Video 碟 片 能 收 錄 各 種 的 畫 面 比 例 , 範 例<br />
從 一 般 為 4:3 的 電 視 節 目 到 畫 面 比 例 高 達 7:3<br />
1<br />
的 CinemaScope 寬 螢 幕 電 影 都 可 以 。<br />
電 視 機 也 有 各 種 不 同 的 畫 面 比 例 ;「 標 準 」 的<br />
4:3 以 及 寬 屏 幕 16:9。 2<br />
寬 螢 幕 電 視 使 用 者<br />
如 果 使 用 寬 螢 幕 電 視 , 則 本 播 放 器 的<br />
TV Screen ( 電 視 機 屏 幕 ) 設 定 應 設 為 16:9<br />
(Wide) 或 16:9 (Compressed) ( 第 35 頁 )。<br />
當 您 使 用 16:9 (Wide) 設 定 觀 賞 以 4:3 格 式 所<br />
錄 製 的 碟 片 , 您 可 以 使 用 電 視 控 制 功 能 來 選 取<br />
影 像 呈 現 的 方 式 。 您 的 電 視 機 可 能 會 不 同 的 縮<br />
放 及 伸 展 功 能 ; 細 節 部 分 請 參 閱 您 電 視 機 所 附<br />
的 操 作 手 冊 。<br />
請 注 意 , 部 分 電 影 的 畫 面 比 例 大 於 16:9, 因<br />
此 即 便 使 用 寬 螢 幕 電 視 觀 賞 , 仍 會 以 「Letter<br />
Box」 樣 式 播 放 該 種 碟 片 ( 螢 幕 上 下 兩 側 出 現<br />
黑 色 條 邊 )。<br />
標 準 電 視 使 用 者<br />
如 果 使 用 標 準 電 視 , 則 本 播 放 器 的 TV Screen<br />
( 電 視 機 屏 幕 ) 設 定 可 依 您 的 喜 好 設 為<br />
4:3 (Letter Box) 或 4:3 (Pan & Scan) ( 第 35<br />
頁 )。<br />
設 置 成 4:3 (Letter Box) 時 , 寬 螢 幕<br />
碟 片 在 顯 示 畫 面 時 , 上 下 都 會 出 現 黑<br />
色 條 邊 。<br />
請 注 意 , 多 數 寬 螢 幕 碟 片 會 無 視 播 放 器 的 設 定 ,<br />
因 此 無 論 設 定 為 何 , 碟 片 皆 會 以 「Letter Box」<br />
格 式 顯 示 。<br />
電 視 系 統 設 置<br />
本 系 統 的 預 設 值 為 AUTO, 除 非 您 在 播 放 部 分<br />
碟 片 時 注 意 到 影 像 有 失 真 現 象 , 否 則 請 將 其 設<br />
置 為 AUTO。 如 果 您 發 現 在 播 放 某 些 碟 片 時 畫<br />
面 出 現 失 真 的 情 形 , 請 將 電 視 系 統 設 置 成 符 合<br />
您 所 在 國 家 或 地 區 的 系 統 。 不 過 , 這 樣 一 來 可<br />
能 會 限 制 您 可 以 觀 看 的 碟 片 種 類 。 請 參 閱 下 列<br />
對 照 表 , 以 了 解 各 種 碟 片 所 適 用 的 設 定 值<br />
(AUTO、PAL 及 NTSC)。 3<br />
1 按 下 SHIFT+SETUP。<br />
2 使 用 / 以 選 取 SYS SET, 然 後 按 下<br />
ENTER。<br />
3 使 用 / 以 選 取 TV SYS, 然 後 按 下<br />
ENTER。<br />
電 視 機 系 統 會 切 換 如 下 :<br />
• AUTO NTSC<br />
• NTSC PAL<br />
• PAL AUTO<br />
English Español Español<br />
設 置 成 4:3 (Pan & Scan) 時 , 寬 螢 幕<br />
碟 片 在 顯 示 畫 面 時 , 左 右 邊 會 有 截 短<br />
的 情 形 。 雖 然 畫 面 看 起 來 大 些 , 但 您<br />
看 到 的 不 是 實 際 的 整 個 畫 面 。<br />
附 註<br />
1 許 多 寬 螢 幕 碟 片 都 會 無 視 系 統 的 設 定 值 , 因 此 不 管 設 定 值 為 何 , 碟 片 都 會 以 「Letterbox」 的 格 式 顯 示 。<br />
2 如 果 在 標 準 4:3 的 電 視 機 上 採 用 16:9 (Wide) 或 16:9 (Compressed) 的 設 定 值 , 或 寬 螢 幕 電 視 機 採 用 任 何 一 種 4:3 設 定 值 ,<br />
便 會 導 致 畫 面 失 真 。<br />
3 多 數 新 型 的 PAL 電 視 機 系 統 可 偵 測 50 Hz (PAL)/60 Hz (NTSC), 並 可 自 動 切 換 垂 直 振 幅 , 以 消 除 顯 示 畫 面 中 的 垂 直 收 縮 現<br />
象 。 不 過 , 有 些 情 況 是 影 像 中 呈 現 不 出 色 彩 。 如 果 您 的 PAL TV 沒 有 V-Hold 控 制 功 能 , 便 會 因 為 NTSC 碟 片 中 畫 面 搖 晃 而 無<br />
法 觀 看 。 如 果 電 視 機 有 V-Hold 控 制 功 能 , 請 動 手 調 整 直 到 畫 面 停 止 滾 動 為 止 。 部 分 電 視 機 上 , 畫 面 會 有 垂 直 收 縮 的 現 象 , 致<br />
使 螢 幕 上 下 兩 側 留 有 黑 色 條 邊 。<br />
51<br />
Zhtw
13<br />
其 他 資 訊<br />
4 CHANGE 閃 爍 時 , 請 按 ENTER。<br />
系 統 將 自 動 進 入 待 機 模 式 , 然 後 再 重 新 開 啟 電<br />
源 。 看 到 POWER ON 後 , 您 將 在 顯 示 幕 上 看<br />
到 新 的 電 視 系 統 設 定 。 1<br />
媒 體 類 型<br />
DVD/ 超 級 VCD/<br />
VCD/DivX 視 頻 /<br />
WMV<br />
CD/MP3/WMA/<br />
MPEG-4 AAC/<br />
JPEG/ 無 碟 片<br />
系 統<br />
格 式<br />
播 放 器 設 定 值<br />
NTSC PAL AUTO<br />
NTSC NTSC PAL NTSC<br />
PAL NTSC PAL PAL<br />
— NTSC PAL NTSC 或<br />
PAL<br />
設 定 按 鍵 鎖 (Key Lock)<br />
將 按 鍵 鎖 功 能 打 開 , 即 可 停 用 前 面 板 上 的 各 項<br />
按 鍵 。<br />
1 按 下 SHIFT+SETUP。<br />
2 使 用 / 以 選 取 SYS SET, 然 後 按 下<br />
ENTER。<br />
3 使 用 / 以 選 取 KEYLOCK, 然 後 按 下<br />
ENTER。<br />
4 使 用 / 選 取 LOCK ON 或 LOCK OFF,<br />
然 後 按 下 ENTER。<br />
頻 率 間 距 設 置<br />
不 適 用 於 沙 烏 地 阿 拉 伯 、 以 色 列 、 南 非 或 其 他<br />
中 東 國 家 與 免 稅 機 型<br />
如 果 您 發 現 您 無 法 成 功 調 選 到 電 台 , 則 表 示 頻<br />
率 間 距 可 能 不 適 用 您 所 在 的 國 家 / 地 區 。<br />
1 按 下 SHIFT+SETUP。<br />
2 使 用 / 以 選 取 AM 9K/10K, 然 後 按 下<br />
ENTER。<br />
3 使 用 / 以 選 取 AM 9K 或 AM 10K, 然<br />
後 按 下 ENTER。<br />
調 暗 顯 示 幕 亮 度<br />
您 可 以 調 整 前 面 板 顯 示 幕 文 字 的 亮 度 。<br />
1 按 下 SHIFT+SETUP。<br />
2 使 用 / 以 選 取 SYS SET, 然 後 按 下<br />
ENTER。<br />
3 使 用 / 以 選 取 DIMMER, 然 後 按 下<br />
ENTER。<br />
這 會 顯 示 在 前 面 板 顯 示 幕 上 。<br />
4 使 用 / 以 選 取 LIGHT 或 DARK, 然 後 按<br />
下 ENTER。<br />
附 註<br />
1 進 行 每 項 設 定 值 變 更 之 前 , 您 必 須 先 將 本 機 切 換 成 待 機 ( 按 下 STANDBY/ON)。<br />
52<br />
Zhtw
其 他 資 訊 13<br />
故 障 排 除<br />
人 們 經 常 錯 將 不 正 確 之 操 作 當 成 系 統 故 障 或 異 常 。 如 果 您 認 為 本 機 有 任 何 問 題 , 請 按 照 以 下 各 點<br />
進 行 檢 查 。 有 時 問 題 可 能 是 來 自 其 他 裝 置 。 請 仔 細 檢 查 其 他 使 用 中 的 裝 置 和 電 器 設 備 。 如 果 在 查<br />
證 過 以 下 各 點 後 問 題 還 是 無 法 改 善 , 請 就 近 洽 詢 您 的 先 鋒 授 權 服 務 中 心 或 經 銷 商 , 前 來 代 為 維 修 。<br />
• 如 果 本 系 統 是 因 為 受 到 靜 電 等 外 來 效 應 致 使 無 法 正 常 操 作 , 請 將 電 源 插 頭 從 輸 出 插 座 上 拔 下<br />
再 插 回 去 , 以 回 復 正 常 的 操 作 狀 態 。<br />
一 般 問 題<br />
問 題<br />
電 源 沒 有 打 開 , 或 突 然 關<br />
機 ( 啟 動 時 可 能 會 有 一<br />
錯 誤 訊 息 顯 示 )。<br />
選 取 功 能 後 , 沒 有 聲 音 輸<br />
出 。<br />
沒 有 聲 音 來 自 環 繞 聲 或 中<br />
置 揚 聲 器 。<br />
解 決 辦 法<br />
• 重 開 機 前 請 等 待 一 分 鐘 。<br />
• 確 定 主 機 上 的 線 束 無 鬆 脫 的 情 形 。 如 有 鬆 脫 , 可 能 會 造 成 系 統 自 動 關 機 。<br />
• 檢 查 揚 聲 器 連 接 是 否 正 確 。<br />
• 確 定 主 電 源 的 電 壓 確 實 適 用 於 本 型 機 種 。<br />
• 嘗 試 降 低 音 量 。<br />
• 如 果 問 題 仍 然 存 在 , 請 將 本 機 攜 至 最 近 的 先 鋒 授 權 服 務 中 心 或 您 的 經 銷 商 處 接 受<br />
維 修 。<br />
• 如 果 您 正 使 用 線 路 輸 入 , 請 確 定 設 備 連 接 是 否 正 確 ( 請 參 閱 第 40 頁 的 連 接 輔 助 音<br />
頻 設 備 )。<br />
• 如 果 HDMI 音 訊 模 式 設 定 為 TV ( 第 41 頁 ), 則 不 會 從 連 接 至 本 機 的 揚 聲 器 上 輸 出<br />
任 何 聲 音 。<br />
• 按 下 遙 控 器 上 的 MUTE 以 關 閉 靜 音 功 能 。<br />
• 調 高 音 量 。<br />
• 請 參 閱 第 17 頁 的 設 置 聲 道 音 量 以 檢 查 揚 聲 器 位 準 。<br />
• 當 選 取 TUNER、AD<strong>AP</strong>TER PORT 或 LINE 時 , 您 只 能 以 立 體 聲 聽 取 來 源 。 將 輸 入 來<br />
源 切 換 至 DVD/CD 或 USB 產 生 多 聲 道 音 效 。<br />
• 確 定 您 並 未 選 取 STEREO 的 音 效 模 式 ( 請 參 閱 第 22 頁 的 以 環 繞 聲 聆 聽 )。<br />
• 檢 查 是 否 接 上 麥 克 風 。<br />
• 正 確 連 接 揚 聲 器 ( 請 參 閱 第 9 頁 的 基 本 接 線 方 式 )。<br />
無 法 操 作 遙 控 器 。 • 更 新 電 池 ( 請 參 閱 第 15 頁 的 安 裝 遙 控 器 電 池 )。<br />
• 請 在 遙 控 感 應 器 的 7 m、30° 範 圍 內 操 作 ( 第 16 頁 的 運 用 遙 控 器 )。<br />
• 移 除 障 礙 物 或 從 其 他 位 置 操 作 。<br />
• 避 免 前 面 板 上 的 遙 控 感 應 器 受 到 陽 光 直 射 。<br />
麥 克 風 的 聲 音 聽 不 到 。<br />
麥 克 風 打 開 時 有 回 饋 雜<br />
音 。<br />
顯 示 幕 上 會 顯 示<br />
TRAYLOCK, 同 時 無 法<br />
退 出 碟 盤 。<br />
• 您 只 能 使 用 一 隻 麥 克 風 並 須 將 其 插 入 MIC (SUB) 插 孔 。MIC (SUB) 插 孔 只 有 在 另 外<br />
有 一 隻 麥 克 風 插 入 MIC (MAIN) 插 孔 的 情 況 下 才 能 使 用 。<br />
• 調 整 MIC VOL +/–。<br />
• 麥 克 風 正 對 著 揚 聲 器 。 移 開 麥 克 風 不 直 對 著 揚 聲 器 。<br />
• 麥 克 風 音 量 調 太 高 。 向 下 轉 動 麥 克 風 音 量 控 制 鈕 。<br />
• 按 住 前 面 板 上 的 OPEN/CLOSE 按 鍵 不 放 約 八 秒 鐘 。 接 著 便 可 使 用<br />
OPEN/CLOSE 按 鍵 來 開 啟 或 關 閉 碟 盤 。<br />
English Español Español<br />
53<br />
Zhtw
13<br />
其 他 資 訊<br />
DVD/CD/VCD 播 放 器<br />
問 題<br />
碟 片 在 置 入 後 又 自 動 退<br />
出 。<br />
解 決 辦 法<br />
• 清 潔 碟 片 並 將 碟 片 正 確 對 準 碟 片 導 槽 。<br />
• 如 果 DVD-video 碟 片 上 的 地 區 代 碼 與 本 機 上 的 代 碼 不 相 符 , 該 碟 片 便 不 能 使 用 ( 請<br />
參 閱 第 50 頁 的 DVD Video 適 用 地 區 )。 在 此 情 況 下 , 螢 幕 上 會 出 現 下 列 訊 息 :<br />
Incompatible disc region number/Can't play disc<br />
( 非 兼 容 碟 片 區 域 碼 / 無 法 播 放 碟 片 )。<br />
• 讓 播 放 器 內 部 的 水 氣 有 時 間 蒸 發 。 避 免 在 空 調 設 備 附 近 使 用 本 機 。<br />
無 法 進 行 播 放 。 • 如 果 碟 片 在 置 入 時 放 反 , 請 重 新 將 碟 片 標 籤 面 朝 上 放 入 。<br />
影 像 播 放 中 止 , 且 按 鍵 無<br />
法 使 用 。<br />
• 按 下 ( 停 止 ) 按 鍵 , 然 後 按 下 ( 播 放 ) 按 鍵 開 始 播 放 。<br />
• 先 將 電 源 關 閉 , 然 後 再 使 用 前 面 板 上 的 STANDBY/ON 按 鍵 將 電 源 打 開 。<br />
設 定 值 全 部 消 除 。 • 電 源 發 生 中 斷 時 , 將 會 消 除 設 定 值 。<br />
沒 有 影 像 / 沒 有 色 彩 。 • 檢 查 連 接 是 否 正 確 以 及 插 頭 是 否 完 全 插 入 。<br />
• 查 閱 電 視 機 / 顯 示 器 的 操 作 手 冊 , 以 確 定 設 定 值 是 否 正 確 。<br />
• 若 是 選 取 Progressive ( 逐 行 掃 描 ) 設 定 值 卻 已 用 色 差 視 頻 連 接 線 來 連 接 逐 行 掃 描<br />
信 號 不 相 容 的 電 視 機 , 將 完 全 無 法 看 到 任 何 畫 面 。 使 用 合 成 或 S-video 端 子 接 上 電 視<br />
機 後 , 請 將 Component Out( 色 差 視 頻 輸 出 ) 設 定 值 變 更 為 Interlace( 隔 行 掃 描 )<br />
( 請 參 閱 第 35 頁 的 視 頻 輸 出 設 定 值 )。<br />
螢 幕 畫 面 拉 長 或 比 例 沒<br />
變 。<br />
當 在 VCR 上 或 透 過 AV<br />
選 取 器 進 行 錄 製 , 便 會 干<br />
擾 到 影 像 的 播 放 。<br />
畫 面 在 播 放 期 間 受 到 干 擾<br />
或 呈 現 一 片 漆 黑 。<br />
DVD 與 CD 音 量 有 明 顯<br />
差 異 。<br />
CD-ROM 碟 片 無 法 辨<br />
識 。<br />
無 法 辨 識 DVD-ROM 碟<br />
片 。<br />
檔 案 無 法 在 碟 片 導 向 / 相<br />
片 瀏 覽 器 當 中 顯 示 。<br />
無 法 播 放 WMA 或<br />
MPEG-4 AAC 檔 案 。<br />
• TV Screen ( 電 視 機 屏 幕 ) 的 設 定 值 不 正 確 。 重 新 設 置 電 視 機 螢 幕 的 選 項 , 使 其 與<br />
您 使 用 的 電 視 機 / 顯 示 器 相 符 ( 請 參 閱 第 35 頁 的 視 頻 輸 出 設 定 值 )。<br />
• 本 系 統 為 採 用 防 拷 技 術 , 以 避 免 透 過 VCR 或 AV 選 取 器 發 生 錄 製 或 影 像 方 面 的 問 題 。<br />
這 並 不 是 故 障 。<br />
• 本 播 放 器 與 Macro-Vision System 防 拷 系 統 相 容 。 有 些 碟 片 內 含 防 拷 訊 號 , 而 且 此<br />
種 碟 片 在 播 放 時 , 在 畫 面 上 一 些 地 方 會 出 現 如 線 條 等 的 雜 訊 ( 視 使 用 的 電 視 機 類 型<br />
而 定 )。 這 並 不 是 故 障 。<br />
• 碟 片 對 特 別 的 播 放 器 功 能 反 應 不 同 。 這 可 能 會 導 致 畫 面 在 功 能 執 行 當 時 , 短 時 間 呈<br />
現 漆 黑 或 輕 微 晃 動 的 現 象 。 這 些 問 題 便 因 為 碟 片 與 碟 片 內 容 之 間 的 差 異 而 更 加 突 顯 ,<br />
但 並 不 是 本 機 故 障 所 致 。<br />
• DVD 與 CD 使 用 的 錄 製 方 式 不 同 。 這 並 不 是 故 障 。<br />
• 確 定 CD-ROM 是 使 用 ISO 9660 的 碟 片 格 式 錄 製 。 更 多 關 於 碟 片 相 容 性 的 資 訊 , 請<br />
參 閱 第 47 頁 的 碟 片 相 容 性 參 照 表 。<br />
• 確 定 DVD-ROM 是 採 用 UDF bridge 格 式 錄 製 。 更 多 關 於 碟 片 相 容 性 的 資 訊 , 請 參 閱<br />
第 47 頁 的 碟 片 相 容 性 參 照 表 。<br />
• 碟 片 上 的 檔 案 必 須 以 正 確 的 副 檔 名 命 名 : 譬 如 ,MP3 檔 案 採 用 .mp3;WMA 檔 案<br />
採 用 .wma;MPEG-4 AAC 檔 案 採 用 .m4a;JPEG 採 用 .jpg( 大 寫 或 小 寫 都 可 以 )。<br />
請 參 閱 第 47 頁 的 碟 片 相 容 性 參 照 表 。<br />
• 這 些 檔 案 為 採 用 DRM ( 數 位 版 權 管 理 ) 所 錄 製 的 。 這 並 不 是 故 障 。<br />
無 法 播 放 WMV 檔 案 。 • 無 法 播 放 位 元 率 超 過 192 kbps 的 檔 案 。<br />
54<br />
Zhtw
其 他 資 訊 13<br />
調 諧 器<br />
問 題<br />
收 聽 電 台 廣 播 時 有 明 顯 的<br />
雜 音 。<br />
自 動 調 諧 功 能 無 法 接 收 到<br />
某 些 電 台 。<br />
USB 連 接<br />
問 題<br />
本 系 統 無 法 辨 識 USB 大<br />
量 儲 存 裝 置 。<br />
檔 案 無 法 在 導 覽 器 / 相 片<br />
瀏 覽 器 中 顯 示 。<br />
無 法 播 放 WMA 或<br />
MPEG-4 AAC 檔 案 。<br />
HDMI 連 接<br />
問 題<br />
無 HDMI 視 頻 輸 出 。<br />
在 變 更 HDMI Color<br />
(HDMI 色 彩 ) 設 定 值<br />
後 , 顯 示 器 的 色 彩 出 現 問<br />
題 ( 第 36 頁 )。<br />
解 決 辦 法<br />
• 連 接 AM 天 線 ( 請 參 閱 第 9 頁 的 基 本 接 線 方 式 ) 並 調 整 其 方 向 及 位 置 以 得 到 最 佳 的<br />
接 收 條 件 。 您 也 可 以 另 外 接 一 條 內 部 或 外 部 AM 天 線 ( 請 參 閱 第 42 頁 的 連 接 外 部 天<br />
線 )。<br />
• 完 全 伸 展 開 FM 線 型 天 線 , 調 整 至 最 佳 接 收 的 位 置 , 然 後 固 定 於 牆 上 。 您 也 可 以 另<br />
外 接 一 組 外 部 FM 天 線 ( 請 參 閱 第 42 頁 的 連 接 外 部 天 線 )。<br />
• 關 閉 其 他 可 能 造 成 雜 訊 的 設 備 或 將 其 移 走 。<br />
• 調 諧 間 距 不 適 用 您 所 在 的 國 家 或 地 區 。 請 參 閱 第 52 頁 的 頻 率 間 距 設 置 的 說 明 以 切<br />
換 調 諧 間 隔 。<br />
• 電 台 訊 號 微 弱 。 自 動 調 諧 功 能 僅 能 偵 測 到 訊 號 發 射 良 好 的 無 線 電 台 。 想 要 獲 得 更 加<br />
靈 敏 的 調 諧 條 件 , 可 接 上 一 組 室 外 天 線 。<br />
解 決 辦 法<br />
• 確 定 已 將 USB 接 頭 完 全 插 入 本 機 內 。<br />
• 確 認 記 憶 體 格 式 為 FAT16 或 FAT32。<br />
• 不 支 援 內 建 有 USB 集 線 器 的 USB 裝 置 。<br />
• 檔 案 必 須 要 有 正 確 的 副 檔 名 : 譬 如 ,MP3 檔 案 採 用 .mp3;WMA 檔 案 採 用 .wma;<br />
MPEG-4 AAC 檔 案 採 用 .m4a;JPEG 採 用 .jpg ( 大 寫 或 小 寫 都 可 以 )。<br />
• 確 定 檔 案 許 可 權 未 受 限 制 ( 透 過 密 碼 等 )。<br />
• 這 些 檔 案 為 採 用 DRM ( 數 位 版 權 管 理 ) 所 錄 製 的 。 這 並 不 是 故 障 。<br />
解 決 辦 法<br />
• 確 定 在 針 對 使 用 設 備 的 設 定 中 , 已 選 取 本 播 放 器 作 為 HDMI 輸 入 ( 請 參 閱 設 備 的 操<br />
作 手 冊 )。<br />
• 確 認 HDMI 連 接 線 已 正 確 接 上 且 未 損 壞 。<br />
• 確 認 使 用 HDMI 介 面 接 上 的 設 備 已 開 啟 且 與 HDMI 相 容 ( 這 些 設 備 須 與 DVI 及<br />
HDCP (High Bandwidth Digital Content Protection) 相 容 )。<br />
• 視 連 接 的 設 備 而 定 , 使 用 DVI 連 接 可 能 導 致 信 號 傳 輸 不 穩 。<br />
• 確 定 本 播 放 器 上 的 解 析 度 與 使 用 HDMI 連 接 的 設 備 一 致 。 請 參 閱 第 35 頁 的 視 頻 輸 出<br />
設 定 值 變 更 解 析 度 。<br />
• 若 變 更 解 析 度 後 畫 面 一 片 空 白 , 則 表 示 選 取 的 解 析 度 與 您 的 顯 示 器 不 符 。 請 參 閱<br />
第 42 頁 的 重 新 設 定 HDMI 連 接 重 新 設 回 原 廠 預 設 值 。<br />
• 視 連 接 的 設 備 而 定 , 有 些 HDMI Color(HDMI 色 彩 ) 設 定 值 可 能 造 成 畫 面 無 法 正 確<br />
顯 示 。 此 時 , 請 視 狀 況 使 用 電 視 機 的 視 頻 輸 入 設 定 值 選 取 RGB。 或 者 可 恢 復 先 前 的<br />
HDMI Color (HDMI 色 彩 ) 設 定 值 。<br />
English Español Español<br />
55<br />
Zhtw
13<br />
其 他 資 訊<br />
問 題<br />
沒 有 影 像 或 聲 音 。<br />
無 HDMI 音 頻 輸 出 。<br />
Bluetooth 連 線<br />
• 如 果 問 題 仍 然 存 在 , 在 將 您 的 HDMI 設 備 直 接 連 接 至 顯 示 器 時 , 請 參 閱 設 備 或 顯 示<br />
器 的 操 作 手 冊 , 或 洽 詢 製 造 商 以 尋 求 協 助 。<br />
• 請 參 閱 第 41 頁 的 切 換 HDMI 音 頻 設 置 值 , 確 定 已 選 取 TV。<br />
KURO LINK 不 作 用 。 • 確 認 是 否 已 牢 牢 連 接 HDMI 連 接 線 。<br />
• 確 定 本 機 的 KURO LINK 模 式 已 設 定 為 LINK ON ( 第 45 頁 )。<br />
• 檢 查 所 連 接 設 備 是 否 支 援 KURO LINK。 如 需 詳 細 資 訊 , 請 參 閱 您 的 平 面 電 視 的 操 作<br />
手 冊 。<br />
• 如 果 同 時 連 接 SCART 連 接 線 和 HDMI 連 接 線 , 則 KURO LINK 可 能 無 法 正 常 作 用 。 同<br />
時 連 接 SCART 和 HDMI 連 接 線 時 , 請 將 KURO LINK 模 式 設 定 為 LINK OFF。<br />
您 的 電 視 機 自 動 切 換 輸<br />
入 。<br />
問 題<br />
無 法 連 接 或 操 作<br />
Bluetooth 無 線 技 術 裝<br />
置 。 來 自 Bluetooth 無 線<br />
技 術 裝 置 的 聲 音 未 發 出 ,<br />
或 聲 音 中 斷 。<br />
解 決 辦 法<br />
• 連 接 電 視 機 自 動 切 換 輸 入 以 回 應 本 機 開 機 播 放 DVD 或 顯 示 圖 形 使 用 者 介 面 畫 面<br />
( 例 如 碟 片 導 向 ) 等 。 如 果 您 不 要 您 的 電 視 機 以 這 種 方 式 切 換 輸 入 , 請 將 本 機 的 KURO<br />
LINK 模 式 設 定 為 LINK OFF ( 第 45 頁 )。<br />
解 決 辦 法<br />
• 檢 查 靠 近 本 機 的 位 置 是 否 沒 有 任 何 發 射 2.4 GHz 頻 段 電 池 波 的 物 體 ( 微 波 爐 、 無 線<br />
LAN 裝 置 或 Bluetooth 無 線 技 術 設 備 )。 如 果 有 這 類 物 體 靠 近 本 機 , 請 將 本 機 放 在 遠<br />
離 它 的 位 置 。 或 者 , 請 停 止 使 用 發 出 電 磁 波 的 物 體 。<br />
• 檢 查 Bluetooth 無 線 裝 置 是 否 沒 有 離 本 機 太 遠 , 而 且 Bluetooth 無 線 技 術 裝 置 與 本 機<br />
之 間 是 否 沒 有 任 何 障 礙 物 。 將 Bluetooth 無 線 技 術 裝 置 和 本 機 放 置 在 彼 此 不 超 過<br />
10 m 的 距 離 內 , 而 且 中 間 不 可 以 有 任 何 障 礙 物 。<br />
• 檢 查 Bluetooth 傳 輸 器 與 本 機 的 AD<strong>AP</strong>TER PORT 是 否 正 確 連 接 。<br />
• Bluetooth 無 線 技 術 裝 置 無 法 設 定 為 支 援 Bluetooth 無 線 技 術 的 通 訊 模 式 。 檢 查<br />
Bluetooth 無 線 技 術 裝 置 的 設 定 。<br />
• 檢 查 配 對 是 否 正 確 。 配 對 設 定 已 自 本 機 或 Bluetooth 無 線 技 術 裝 置 中 被 刪 除 。 重 設<br />
配 對 。<br />
• 檢 查 設 定 是 否 正 確 。 使 用 支 援 A2DP 設 定 和 AVRCP 設 定 的 Bluetooth 無 線 技 術 裝 置 。<br />
錯 誤 訊 息<br />
訊 息<br />
說 明<br />
EXTR<strong>AP</strong>WR • 使 用 加 大 功 率 模 式 時 , 無 法 調 整 SFC 模 式 、 音 調 控 制 ( 低 音 、 高 音 和 低 音 加 重 )、<br />
MP3 擴 展 器 模 式 、 聲 音 強 化 器 模 式 。<br />
CANNOT<br />
• 由 於 未 選 擇 DVD/CD 或 USB, 或 在 已 按 下 SHIFT+KARAOKE、SHIFT+ECHO、<br />
SHIFT+ 或 SHIFT+ 時 禁 止 操 作 。<br />
• 在 未 選 取 DVD/CD 和 按 下 SHIFT+USB REC 時 顯 示 。<br />
TRAYLOCK • 碟 盤 鎖 啟 動 。 請 參 閱 第 53 頁 的 故 障 排 除 的 一 般 問 題 。<br />
56<br />
Zhtw
其 他 資 訊 13<br />
訊 息<br />
STEREO<br />
重 新 設 置 系 統<br />
請 運 用 此 程 序 將 所 有 的 系 統 設 定 值 回 復 成 原 廠<br />
的 預 設 值 。<br />
1 系 統 開 機 後 , 按 下 SHIFT+SETUP。<br />
2 使 用 / 選 取 INITIAL, 然 後 按 下 ENTER。<br />
3 使 用 / 選 取 ALL INIT, 然 後 按 ENTER。<br />
• 顯 示 INIT OK。<br />
4 INIT OK 閃 爍 時 , 按 下 ENTER。 1<br />
說 明<br />
• 在 TUNER、LINE 或 AD<strong>AP</strong>TER PORT 輸 入 模 式 中 按 下 SURROUND 或 AUTO/STEREO<br />
時 , 顯 示 STEREO。<br />
• 按 鍵 鎖 啟 用 。 請 參 閱 第 52 頁 的 設 定 按 鍵 鎖 (Key Lock)。<br />
KEYLOCK<br />
USB ERR • 如 需 更 多 與 此 相 關 的 資 訊 , 請 參 閱 第 31 頁 的 使 用 USB 介 面 的 重 要 提 示 。<br />
HDMI ERR<br />
• 請 參 閱 上 述 HDMI 連 接 的 故 障 排 除 提 示 。 若 仍 有 問 題 , 則 請 參 閱 第 42 頁 的 重 新 設<br />
定 HDMI 連 接 。<br />
EEP ERR • 維 修 事 宜 請 洽 詢 您 的 先 鋒 授 權 服 務 中 心 或 您 的 經 銷 商 。<br />
EXIT<br />
• 輸 入 禁 止 的 訊 號 或 在 顯 示 選 單 畫 面 時 接 上 麥 克 風 即 會 顯 示 , 然 後 畫 面 會 返 回 正 常 畫<br />
面 。<br />
NO MIC<br />
• 在 未 插 入 麥 克 風 時 , 按 SHIFT+KARAOKE、SHIFT+ECHO、SHIFT+、SHIFT+ 或<br />
MIC VOL +/– 即 會 顯 示 。<br />
OC ERR 1<br />
OC ERR 2<br />
OVER TEMP<br />
BT ERR<br />
• 檢 查 揚 聲 器 連 接 線 是 否 短 路 。 如 果 持 續 顯 示 錯 誤 訊 息 , 請 洽 詢 您 的 先 鋒 授 權 服 務 中<br />
心 或 您 的 經 銷 商 進 行 維 修 。<br />
• 嘗 試 降 低 音 量 。 如 果 拔 下 和 插 入 電 源 線 無 法 修 正 此 問 題 , 表 示 本 機 可 能 已 損 壞 。 在<br />
此 情 況 中 , 請 洽 詢 先 鋒 授 權 服 務 中 心 或 離 您 最 新 的 經 銷 商 。<br />
• Bluetooth 傳 輸 器 的 消 耗 功 率 太 高 , 以 致 於 無 法 供 應 電 源 。 重 新 連 接 Bluetooth 傳 輸<br />
器 。<br />
TV AUDIO 如 果 聆 聽 模 式 在 設 定 供 電 視 使 用 的 HDMI 音 訊 模 式 時 變 更 , 則 顯 示 燈 會 亮 起 兩 秒 。<br />
KARAOKE<br />
PHONESIN<br />
• 插 上 麥 克 風 時 , 在 您 按 下 SURROUND、SOUND、AUTO/STEREO 或 MP3 EXP/V.ENH<br />
時 顯 示 。<br />
• 插 上 耳 機 時 , 在 您 按 下 SURROUND、SOUND、AUTO/STEREO 或 MP3 EXP/V.ENH<br />
時 顯 示 。<br />
使 用 語 言 代 碼 清 單<br />
有 些 語 言 選 項 ( 請 參 閱 第 36 頁 的 語 言 設 定 值 )<br />
能 讓 您 從 下 列 語 言 代 碼 清 單 的 136 種 語 言 當<br />
中 設 定 個 人 喜 好 的 語 言 。<br />
1 選 取 「Other Language ( 其 他 語 言 )」。<br />
2 使 用 / 以 選 取 字 母 代 碼 或 是 數 字 代 碼 。<br />
3 使 用 / 以 選 取 字 母 代 碼 或 是 數 字 代 碼 。<br />
請 參 閱 下 列 語 言 代 碼 清 單 , 列 有 完 整 語 言 種 類<br />
及 代 碼 的 清 單 。<br />
English Español Español<br />
附 註<br />
1 請 勿 因 為 系 統 電 源 自 動 開 啟 , 就 隨 意 亂 使 用 本 機 或 拉 扯 電 源 線 。<br />
57<br />
Zhtw
13<br />
其 他 資 訊<br />
語 言 代 碼 清 單<br />
語 言 ( 語 言 字 母 代 碼 )、 語 言 代 碼<br />
Japanese (ja), 1001<br />
English (en), 0514<br />
French (fr), 0618<br />
German (de), 0405<br />
Italian (it), 0920<br />
Spanish (es), 0519<br />
Dutch (nl), 1412<br />
Russian (ru), 1821<br />
Chinese (zh), 2608<br />
Korean (ko), 1115<br />
Greek (el), 0512<br />
Afar (aa), 0101<br />
Abkhazian (ab), 0102<br />
Afrikaans (af), 0106<br />
Amharic (am), 0113<br />
Arabic (ar), 0118<br />
Assamese (as), 0119<br />
Aymara (ay), 0125<br />
Azerbaijani (az), 0126<br />
Bashkir (ba), 0201<br />
Byelorussian (be), 0205<br />
Bulgarian (bg),0207<br />
Bihari (bh), 0208<br />
Bislama (bi), 0209<br />
Bengali (bn), 0214<br />
Tibetan (bo), 0215<br />
Breton (br), 0218<br />
Catalan (ca), 0301<br />
Corsican (co), 0315<br />
Czech (cs), 0319<br />
Welsh (cy), 0325<br />
Danish (da), 0401<br />
Bhutani (dz), 0426<br />
Esperanto (eo), 0515<br />
Estonian (et), 0520<br />
Basque (eu), 0521<br />
Persian (fa), 0601<br />
Finnish (fi), 0609<br />
Fiji (fj), 0610<br />
Faroese (fo), 0615<br />
Frisian (fy), 0625<br />
Irish (ga), 0701<br />
Scots-Gaelic (gd), 0704<br />
Galician (gl), 0712<br />
Guarani (gn), 0714<br />
Gujarati (gu), 0721<br />
Hausa (ha), 0801<br />
Hindi (hi), 0809<br />
Croatian (hr), 0818<br />
Hungarian (hu), 0821<br />
Armenian (hy), 0825<br />
Interlingua (ia), 0901<br />
Interlingue (ie), 0905<br />
Inupiak (ik), 0911<br />
Indonesian (in), 0914<br />
Icelandic (is), 0919<br />
Hebrew (iw),0923<br />
Yiddish (ji), 1009<br />
Javanese (jw), 1023<br />
Georgian (ka), 1101<br />
Kazakh (kk), 1111<br />
Greenlandic (kl), 1112<br />
Cambodian (km), 1113<br />
Kannada (kn), 1114<br />
Kashmiri (ks), 1119<br />
Kurdish (ku), 1121<br />
Kirghiz (ky), 1125<br />
Latin (la), 1201<br />
Lingala (ln), 1214<br />
Laothian (lo), 1215<br />
Lithuanian (lt), 1220<br />
Latvian (lv), 1222<br />
Malagasy (mg), 1307<br />
Maori (mi), 1309<br />
Macedonian (mk), 1311<br />
Malayalam (ml), 1312<br />
Mongolian (mn), 1314<br />
Moldavian (mo), 1315<br />
Marathi (mr), 1318<br />
Malay (ms), 1319<br />
Maltese (mt), 1320<br />
Burmese (my), 1325<br />
Nauru (na), 1401<br />
Nepali (ne), 1405<br />
Norwegian (no), 1415<br />
Occitan (oc), 1503<br />
Oromo (om), 1513<br />
Oriya (or), 1518<br />
Panjabi (pa), 1601<br />
Polish (pl), 1612<br />
Pashto, Pushto (ps), 1619<br />
Portuguese (pt), 1620<br />
Quechua (qu), 1721<br />
Rhaeto-Romance (rm), 1813<br />
Kirundi (rn), 1814<br />
Romanian (ro), 1815<br />
Kinyarwanda (rw), 1823<br />
Sanskrit (sa), 1901<br />
Sindhi (sd), 1904<br />
Sangho (sg), 1907<br />
Serbo-Croatian (sh), 1908<br />
Sinhalese (si), 1909<br />
Slovak (sk), 1911<br />
Slovenian (sl), 1912<br />
Samoan (sm), 1913<br />
Shona (sn), 1914<br />
Somali (so), 1915<br />
Albanian (sq),1917<br />
Serbian (sr), 1918<br />
Siswati (ss), 1919<br />
Sesotho (st), 1920<br />
Sundanese (su), 1921<br />
Swedish (sv), 1922<br />
Swahili (sw), 1923<br />
Tamil (ta), 2001<br />
Telugu (te), 2005<br />
Tajik (tg), 2007<br />
Thai (th), 2008<br />
Tigrinya (ti), 2009<br />
Turkmen (tk), 2011<br />
Tagalog (tl), 2012<br />
Setswana (tn), 2014<br />
Tonga (to), 2015<br />
Turkish (tr), 2018<br />
Tsonga (ts), 2019<br />
Tatar (tt), 2020<br />
Twi (tw), 2023<br />
Ukrainian (uk), 2111<br />
Urdu (ur), 2118<br />
Uzbek (uz), 2126<br />
Vietnamese (vi), 2209<br />
Volapük (vo), 2215<br />
Wolof (wo), 2315<br />
Xhosa (xh), 2408<br />
Yoruba (yo), 2515<br />
Zulu (zu), 2621<br />
國 家 / 地 區 代 碼 清 單<br />
國 家 / 地 區 、 國 家 / 地 區 代 碼 、 國 家 / 地 區 字 母 代 碼<br />
阿 根 廷 , 0118, ar<br />
澳 洲 , 0121, au<br />
奧 地 利 , 0120, at<br />
比 利 時 , 0205, be<br />
巴 西 , 0218, br<br />
加 拿 大 , 0301, ca<br />
智 利 , 0312, cl<br />
中 國 , 0314, cn<br />
丹 麥 , 0411, dk<br />
芬 蘭 , 0609, fi<br />
法 國 , 0618, fr<br />
德 國 , 0405, de<br />
香 港 , 0811, hk<br />
印 度 , 0914, in<br />
印 尼 , 0904, id<br />
義 大 利 , 0920, it<br />
日 本 , 1016, jp<br />
韓 國 , 1118, kr<br />
馬 來 西 亞 , 1325, my<br />
墨 西 哥 , 1324, m x<br />
荷 蘭 , 1412, nl<br />
紐 西 蘭 , 1426, nz<br />
挪 威 , 1415, no<br />
巴 基 斯 坦 , 1611, pk<br />
菲 律 賓 , 1608, ph<br />
葡 萄 牙 , 1620, pt<br />
俄 國 ( 俄 羅 斯 聯 邦 ) , 1821, ru<br />
新 加 坡 , 1907, sg<br />
西 班 牙 , 0519, es<br />
瑞 士 , 0308, ch<br />
瑞 典 , 1905, se<br />
台 灣 , 2023, tw<br />
泰 國 , 2008, th<br />
英 國 , 0702, gb<br />
美 國 , 2119, us<br />
58<br />
Zhtw
其 他 資 訊 13<br />
規 格<br />
• 擴 大 器 部 分<br />
RMS 功 率 輸 出 :<br />
前 置 、 中 置 、 環 繞 聲 . . . . . 每 個 聲 道 60 W<br />
(1 kHz,10 % T.H.D.,4 Ω)<br />
重 低 音<br />
. . . 60 W (100 Hz,10 % T.H.D.,4 Ω)<br />
• 碟 片 部 分<br />
類 型 . . . . . . . . . .DVD 系 統 ,VCD/ 超 級 VCD<br />
系 統 及 碟 片 數 位 音 響 系 統<br />
• FM 調 諧 器 部 分<br />
頻 率 範 圍 . . . . . . . . . . 87.5 MHz 至 108 MHz<br />
天 線 . . . . . . . . . . . . . . . . . . 75 Ω, 不 平 衡 式<br />
• AM 調 諧 器 部 分<br />
頻 率 範 圍 :<br />
沙 烏 地 阿 拉 伯 、 以 色 列 、 南 非 、 其 他 中 東 國 家 與<br />
免 稅 機 型 . . . . . . . . . . . 531 kHz 到 1602 kHz<br />
其 他 機 種<br />
採 用 9 kHz 間 距 . . . . 531 kHz 至 1602 kHz<br />
採 用 10 kHz 間 距 . . . 530 kHz 至 1700 kHz<br />
天 線 . . . . . . . . . . . . . . . . . . . . . . . 環 型 天 線<br />
• 其 他<br />
電 源 需 求 :<br />
新 加 坡 、 印 尼 、 香 港 、 馬 來 西 亞 、 菲 律 賓 機 種<br />
. . . . . . AC 220 V 至 240 V,50 Hz/60 Hz<br />
其 他 機 種<br />
. . . . . . AC 110 V 至 240 V,50 Hz/60 Hz<br />
消 耗 功 率 . . . . . . . . . . . . . . . . . . . . . . . 55 W<br />
待 機 消 耗 功 率<br />
用 於 HTZ180/181DVD . . . . . . . . . 0.48 W<br />
其 他<br />
KURO LINK ON. . . . . . . . . . . . . . 0.73 W<br />
KURO LINK OFF . . . . . . . . . . . . . 0.48 W<br />
尺 寸<br />
. . . 420 mm ( 寬 )x 62 mm ( 高 )x 331 mm ( 深 )<br />
重 量 . . . . . . . . . . . . . . . . . . . . . . . . . 2.8 kg<br />
• 配 件 (DVD/CD 接 收 器 )<br />
遙 控 器 . . . . . . . . . . . . . . . . . . . . . . . . . . . . 1<br />
AA/R6 乾 電 池 ( 用 以 確 認 系 統 操 作 ). . . . . . 2<br />
視 頻 連 接 線 ( 黃 色 插 頭 ). . . . . . . . . . . . . . . 1<br />
AM 環 型 天 線 . . . . . . . . . . . . . . . . . . . . . . . 1<br />
FM 天 線 . . . . . . . . . . . . . . . . . . . . . . . . . . . 1<br />
電 源 線 . . . . . . . . . . . . . . . . . . . . . . . . . . . . 1<br />
安 裝 指 南<br />
操 作 手 冊 ( 本 文 件 )<br />
S-DV180 揚 聲 器 系 統<br />
• 前 置 揚 聲 器<br />
外 箱 . . . . . . . . . . . . . 封 閉 式 書 架 型 ( 防 磁 )<br />
系 統 . . . . . . . . . . . . . . . . 7.7 cm 1-way 系 統<br />
揚 聲 器 . . . . . . . . . . . . . . . . .7.7 cm 圓 錐 體 型<br />
阻 抗 . . . . . . . . . . . . . . . . . . . . . . . . . . . 4 Ω<br />
頻 率 範 圍 . . . . . . . . . . . . . . .90 Hz 至 20 kHz<br />
最 大 輸 入 功 率 . . . . . . . . . . . . . . . . . . . . 60 W<br />
尺 寸<br />
. . . 105 mm ( 寬 ) x 115 mm ( 高 ) x 114 mm ( 深 )<br />
重 量 . . . . . . . . . . . . . . . . . . . . . . . . . 0.6 kg<br />
• 中 置 揚 聲 器<br />
外 箱 . . . . . . . . . . . . . 封 閉 式 書 架 型 ( 防 磁 )<br />
系 統 . . . . . . . . . . . . . . . . 7.7 cm 1-way 系 統<br />
揚 聲 器 . . . . . . . . . . . . . . . . .7.7 cm 圓 錐 體 型<br />
阻 抗 . . . . . . . . . . . . . . . . . . . . . . . . . . . 4 Ω<br />
頻 率 範 圍 . . . . . . . . . . . . . . .90 Hz 至 20 kHz<br />
最 大 輸 入 功 率 . . . . . . . . . . . . . . . . . . . . 60 W<br />
尺 寸<br />
. . . 115 mm ( 寬 ) x 105 mm ( 高 ) x 114 mm ( 深 )<br />
重 量 . . . . . . . . . . . . . . . . . . . . . . . . . 0.6 kg<br />
• 環 繞 揚 聲 器<br />
外 箱 . . . . . . . . . . . . . 封 閉 式 書 架 型 ( 防 磁 )<br />
系 統 . . . . . . . . . . . . . . . . 7.7 cm 1-way 系 統<br />
揚 聲 器 . . . . . . . . . . . . . . . . .7.7 cm 圓 錐 體 型<br />
阻 抗 . . . . . . . . . . . . . . . . . . . . . . . . . . . 4 Ω<br />
頻 率 範 圍 . . . . . . . . . . . . . . .98 Hz 至 20 kHz<br />
最 大 輸 入 功 率 . . . . . . . . . . . . . . . . . . . . 60 W<br />
尺 寸<br />
. . . 105 mm ( 寬 ) x 118 mm ( 高 ) x 114 mm ( 深 )<br />
重 量 . . . . . . . . . . . . . . . . . . . . . . . . . 0.6 kg<br />
• 重 低 音<br />
外 箱 . . . . . . . . . . . . . . . . . . 低 音 反 射 落 地 型<br />
系 統 . . . . . . . . . . . . . . . . 16 cm 1-way 系 統<br />
揚 聲 器 . . . . . . . . . . . . . . . . . 16 cm 圓 錐 體 型<br />
阻 抗 . . . . . . . . . . . . . . . . . . . . . . . . . . . 4 Ω<br />
頻 率 範 圍 . . . . . . . . . . . . . . . .28 Hz 至 1 kHz<br />
最 大 輸 入 功 率 . . . . . . . . . . . . . . . . . . . 60 W<br />
尺 寸<br />
. . . 190 mm ( 寬 ) x 360 mm ( 高 ) x 317 mm ( 深 )<br />
重 量 . . . . . . . . . . . . . . . . . . . . . . . . . 3.8 kg<br />
• 配 件<br />
小 型 防 滑 墊 . . . . . . . . . . . . . . . . . . . . . . . . 12<br />
English Español Español<br />
59<br />
Zhtw
13<br />
其 他 資 訊<br />
大 型 防 滑 墊 . . . . . . . . . . . . . . . . . . . . . . . . 4<br />
固 定 托 架 . . . . . . . . . . . . . . . . . . . . . . . . . . 4<br />
螺 絲 ( 用 於 固 定 托 架 ) . . . . . . . . . . . . . . . . 4<br />
S-DV585 揚 聲 器 系 統<br />
• 前 置 / 環 繞 揚 聲 器<br />
外 箱 . . . . . . . . . . . . 封 閉 式 書 架 型 ( 防 磁 )<br />
系 統 . . . . . . . . . . . . . . . 6.6 cm 1-way 系 統<br />
揚 聲 器 . . . . . . . . . . . . . . . 6.6 cm 圓 錐 體 型<br />
阻 抗 . . . . . . . . . . . . . . . . . . . . . . . . . . 4 Ω<br />
頻 率 範 圍 . . . . . . . . . . . . . 82 Hz 至 20 kHz<br />
最 大 輸 入 功 率 . . . . . . . . . . . . . . . . . 100 W<br />
尺 寸<br />
. . .96 mm ( 寬 )x 96 mm ( 高 )x 96 mm ( 深 )<br />
重 量 . . . . . . . . . . . . . . . . . . . . . . . . 0.5 kg<br />
• 中 置 揚 聲 器<br />
外 箱 . . . . . . . . . . . . 封 閉 式 書 架 型 ( 防 磁 )<br />
系 統 . . . . . . . . . . . . . . . 6.6 cm 1-way 系 統<br />
揚 聲 器 . . . . . . . . . . . . . . . 6.6 cm 圓 錐 體 型<br />
阻 抗 . . . . . . . . . . . . . . . . . . . . . . . . . . 8 Ω<br />
頻 率 範 圍 . . . . . . . . . . . . . 82 Hz 至 20 kHz<br />
最 大 輸 入 功 率 . . . . . . . . . . . . . . . . . . 50 W<br />
尺 寸<br />
. . .96 mm ( 寬 )x 96 mm ( 高 )x 96 mm ( 深 )<br />
重 量 . . . . . . . . . . . . . . . . . . . . . . . . 0.5 kg<br />
• 重 低 音<br />
外 箱 . . . . . . . . . . . . . . . . . 低 音 反 射 落 地 型<br />
系 統 . . . . . . . . . . . . . . . 16 cm 1-way 系 統<br />
揚 聲 器 . . . . . . . . . . . . . . . 16 cm 圓 錐 體 型<br />
阻 抗 . . . . . . . . . . . . . . . . . . . . . . . . . . 4 Ω<br />
頻 率 範 圍 . . . . . . . . . . . . . . 34 Hz 至 1 kHz<br />
最 大 輸 入 功 率 . . . . . . . . . . . . . . . . 100 W<br />
尺 寸<br />
. . . 230 mm ( 寬 ) x 380 mm ( 高 )x 360 mm ( 深 )<br />
重 量 . . . . . . . . . . . . . . . . . . . . . . . . 5.4 kg<br />
• 配 件<br />
揚 聲 器 連 接 線 . . . . . . . . . . . . . . . . . . . . . 5<br />
托 架 . . . . . . . . . . . . . . . . . . . . . . . . . . . . 2<br />
固 定 托 架 . . . . . . . . . . . . . . . . . . . . . . . . 6<br />
螺 絲 ( 用 於 托 架 和 固 定 托 架 ). . . . . . . . . . 8<br />
小 型 防 滑 墊 . . . . . . . . . . . . . . . . . . . . . . 18<br />
大 型 防 滑 墊 . . . . . . . . . . . . . . . . . . . . . . . 4<br />
S-DV280T 揚 聲 器 系 統<br />
• 前 置 揚 聲 器<br />
外 箱 . . . . . . . . . . . . 封 閉 式 落 地 型 ( 防 磁 )<br />
系 統 . . . . . . . . . . . . . . . . . . . . 2-way 系 統<br />
揚 聲 器 :<br />
低 音 . . . . . . . . . . . . . . . . 7.7 cm 圓 錐 體 型<br />
高 音 . . . . . . . . . . . . . . . . . .2.6 cm 半 圓 型<br />
阻 抗 . . . . . . . . . . . . . . . . . . . . . . . . . . 4 Ω<br />
頻 率 範 圍 . . . . . . . . . . . . . 62 Hz 至 20 kHz<br />
最 大 輸 入 功 率 . . . . . . . . . . . . . . . . . . 60 W<br />
尺 寸<br />
. . . . 260 mm ( 寬 ) x 1097 mm ( 高 ) x 260 mm ( 深 )<br />
重 量 . . . . . . . . . . . . . . . . . . . . . . . . 3.8 kg<br />
• 中 置 揚 聲 器<br />
外 箱 . . . . . . . . . . . . 封 閉 式 書 架 型 ( 防 磁 )<br />
系 統 . . . . . . . . . . . . . . . 7.7 cm 1-way 系 統<br />
揚 聲 器 . . . . . . . . . . . . . . . 7.7 cm 圓 錐 體 型<br />
阻 抗 . . . . . . . . . . . . . . . . . . . . . . . . . . 4 Ω<br />
頻 率 範 圍 . . . . . . . . . . . . . 72 Hz 至 20 kHz<br />
最 大 輸 入 功 率 . . . . . . . . . . . . . . . . . . 60 W<br />
尺 寸<br />
. . . 220 mm ( 寬 )x 90 mm ( 高 )x 100 mm ( 深 )<br />
重 量 . . . . . . . . . . . . . . . . . . . . . . . . 0.7 kg<br />
• 環 繞 揚 聲 器<br />
外 箱 . . . . . . . . . . . . 封 閉 式 書 架 型 ( 防 磁 )<br />
系 統 . . . . . . . . . . . . . . . 7.7 cm 1-way 系 統<br />
揚 聲 器 . . . . . . . . . . . . . . . 7.7 cm 圓 錐 體 型<br />
阻 抗 . . . . . . . . . . . . . . . . . . . . . . . . . . 4 Ω<br />
頻 率 範 圍 . . . . . . . . . . . . . 84 Hz 至 20 kHz<br />
最 大 輸 入 功 率 . . . . . . . . . . . . . . . . . 100 W<br />
尺 寸<br />
. . . . 100 mm ( 寬 )x 100 mm ( 高 )x 100 mm ( 深 )<br />
重 量 . . . . . . . . . . . . . . . . . . . . . . . . 0.5 kg<br />
60<br />
Zhtw
其 他 資 訊 13<br />
• 配 件<br />
揚 聲 器 連 接 線 . . . . . . . . . . . . . . . . . . . . . 5<br />
小 型 防 滑 墊 . . . . . . . . . . . . . . . . . . . . . . . 8<br />
大 型 防 滑 墊 . . . . . . . . . . . . . . . . . . . . . . . 8<br />
揚 聲 器 基 座 . . . . . . . . . . . . . . . . . . . . . . . 2<br />
螺 絲 ( 用 於 底 座 ). . . . . . . . . . . . . . . . . . 6<br />
S-DV282T 揚 聲 器 系 統<br />
• 前 置 / 環 繞 揚 聲 器<br />
與 S-DV280T 中 置 揚 聲 器 相 同 ( 如 上 述 )。<br />
• 中 置 揚 聲 器<br />
與 S-DV280T 中 置 揚 聲 器 相 同 ( 如 上 述 )。<br />
• 配 件<br />
揚 聲 器 連 接 線 . . . . . . . . . . . . . . . . . . . . . . . 5<br />
大 型 防 滑 墊 . . . . . . . . . . . . . . . . . . . . . . . . 16<br />
揚 聲 器 基 座 . . . . . . . . . . . . . . . . . . . . . . . . . 4<br />
螺 絲 ( 用 於 底 座 ). . . . . . . . . . . . . . . . . . . 12<br />
S-DV5SW 揚 聲 器 系 統<br />
• 重 低 音<br />
外 箱 . . . . . . . . . . . . . . . . . . 低 音 反 射 落 地 型<br />
系 統 . . . . . . . . . . . . . . . . 16 cm 1-way 系 統<br />
揚 聲 器 . . . . . . . . . . . . . . . . . 16 cm 圓 錐 體 型<br />
阻 抗 . . . . . . . . . . . . . . . . . . . . . . . . . . . 4 Ω<br />
頻 率 範 圍 . . . . . . . . . . . . . . . .34 Hz 至 1 kHz<br />
最 大 輸 入 功 率 . . . . . . . . . . . . . . . . . . 100 W<br />
尺 寸<br />
. . . 230 mm ( 寬 ) x 380 mm ( 高 ) x 360 mm ( 深 )<br />
重 量 . . . . . . . . . . . . . . . . . . . . . . . . . 5.4 kg<br />
• 配 件<br />
大 型 防 滑 墊 . . . . . . . . . . . . . . . . . . . . . . . . . 4<br />
附 註<br />
• 為 求 產 品 改 良 , 規 格 及 設 計 如 有 變 更 , 恕 不<br />
另 行 通 知 。<br />
NEC<br />
FontAvenue ® FontAvenue<br />
NEC<br />
<br />
Macrovision<br />
Corporation <br />
Macrovision<br />
Corporation<br />
Macrovision Corporation<br />
<br />
<br />
DRM()<br />
<br />
()<br />
<br />
<br />
<br />
<br />
由 Dolby Laboratories 授 權 製 造 。「 杜 比 」、<br />
「Dolby」、「Pro Logic」 與 雙 D 標 誌 是 Dolby<br />
Laboratories 的 商 標 。<br />
本 機 係 根 據 美 國 專 利 編 號 5,451,942、<br />
5,956,674、5,974,380、5,978,762、<br />
6,487,535 和 已 核 准 與 申 請 中 之 其 他 美 國 和 世<br />
界 專 利 的 授 權 製 造 。DTS 和 DTS Digital<br />
Surround 是 DTS, Inc. 的 註 冊 商 標 ,DTS 標<br />
誌 和 符 號 是 DTS, Inc. 的 商 標 。 版 權 所 有<br />
©1996-2008 DTS, Inc.。 保 留 所 有 權 利 。<br />
English Español Español<br />
日 本 先 鋒 公 司 出 版 。<br />
版 權 ©2009 日 本 先 鋒 公 司 。<br />
版 權 所 有 。<br />
61<br />
Zhtw
Published by Pioneer Corporation.<br />
Coppyright © 2009 Pioneer Corporation.<br />
All rights reserved.<br />
PIONEER CORPORATION<br />
4-1, Meguro 1-Chome, Meguro-ku, Tokyo 153-8654, Japan<br />
PIONEER ELECTRONICS (USA) INC.<br />
P.O. BOX 1540, Long Beach, California 90801-1540, U.S.A. TEL: (800) 421-1404<br />
PIONEER ELECTRONICS OF CANADA, INC.<br />
300 Allstate Parkway, Markham, Ontario L3R 0P2, Canada TEL: 1-877-283-5901, 905-479-4411<br />
PIONEER EUROPE NV<br />
Haven 1087, Keetberglaan 1, B-9120 Melsele, Belgium TEL: 03/570.05.11<br />
PIONEER ELECTRONICS ASIACENTRE PTE. LTD.<br />
253 Alexandra Road, #04-01, Singapore 159936 TEL: 65-6472-7555<br />
PIONEER ELECTRONICS AUSTRALIA PTY. LTD.<br />
178-184 Boundary Road, Braeside, Victoria 3195, Australia, TEL: (03) 9586-6300<br />
PIONEER ELECTRONICS DE MEXICO S.A. DE C.V.<br />
Blvd.Manuel Avila Camacho 138 10 piso Col.Lomas de Chapultepec, Mexico,D.F. 11000 TEL: 55-9178-4270<br />
K002_B_En<br />
Printed in<br />