ExpoDisc Custom White Balance Procedures Sony ... - ExpoImaging
ExpoDisc Custom White Balance Procedures Sony ... - ExpoImaging
ExpoDisc Custom White Balance Procedures Sony ... - ExpoImaging

Create successful ePaper yourself
Turn your PDF publications into a flip-book with our unique Google optimized e-Paper software.
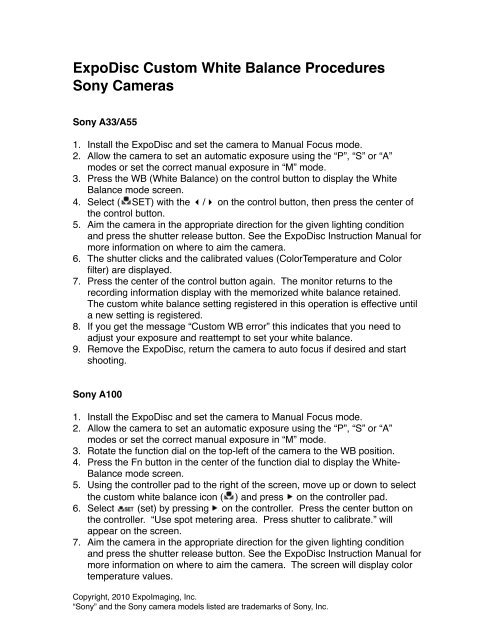
<strong>ExpoDisc</strong> <strong>Custom</strong> <strong>White</strong> <strong>Balance</strong> <strong>Procedures</strong><br />
<strong>Sony</strong> Cameras<br />
<strong>Sony</strong> A33/A55<br />
1. Install the <strong>ExpoDisc</strong> and set the camera to Manual Focus mode.<br />
2. Allow the camera to set an automatic exposure using the “P”, “S” or “A”<br />
modes or set the correct manual exposure in “M” mode.<br />
3. Press the WB (<strong>White</strong> <strong>Balance</strong>) on the control button to display the <strong>White</strong><br />
<strong>Balance</strong> mode screen.<br />
4. Select ( SET) with the �/� on the control button, then press the center of<br />
the control button.<br />
5. Aim the camera in the appropriate direction for the given lighting condition<br />
and press the shutter release button. See the <strong>ExpoDisc</strong> Instruction Manual for<br />
more information on where to aim the camera.<br />
6. The shutter clicks and the calibrated values (ColorTemperature and Color<br />
filter) are displayed.<br />
7. Press the center of the control button again. The monitor returns to the<br />
recording information display with the memorized white balance retained.<br />
The custom white balance setting registered in this operation is effective until<br />
a new setting is registered.<br />
8. If you get the message “<strong>Custom</strong> WB error” this indicates that you need to<br />
adjust your exposure and reattempt to set your white balance.<br />
9. Remove the <strong>ExpoDisc</strong>, return the camera to auto focus if desired and start<br />
shooting.<br />
<strong>Sony</strong> A100<br />
1. Install the <strong>ExpoDisc</strong> and set the camera to Manual Focus mode.<br />
2. Allow the camera to set an automatic exposure using the “P”, “S” or “A”<br />
modes or set the correct manual exposure in “M” mode.<br />
3. Rotate the function dial on the top-left of the camera to the WB position.<br />
4. Press the Fn button in the center of the function dial to display the <strong>White</strong>-<br />
<strong>Balance</strong> mode screen.<br />
5. Using the controller pad to the right of the screen, move up or down to select<br />
the custom white balance icon ( ) and press on the controller pad.<br />
6. Select (set) by pressing on the controller. Press the center button on<br />
the controller. “Use spot metering area. Press shutter to calibrate.” will<br />
appear on the screen.<br />
7. Aim the camera in the appropriate direction for the given lighting condition<br />
and press the shutter release button. See the <strong>ExpoDisc</strong> Instruction Manual for<br />
more information on where to aim the camera. The screen will display color<br />
temperature values.<br />
Copyright, 2010 <strong>ExpoImaging</strong>, Inc.<br />
“<strong>Sony</strong>” and the <strong>Sony</strong> camera models listed are trademarks of <strong>Sony</strong>, Inc.
8. Press the center button on the controller to store the white balance recorded.<br />
9. Remove the <strong>ExpoDisc</strong>, place camera in desired shooting mode and start<br />
shooting.<br />
<strong>Sony</strong> A200/A300/A350<br />
1. Install the <strong>ExpoDisc</strong> and set the camera to Manual Focus mode.<br />
2. Allow the camera to set an automatic exposure using the “P”, “S” or “A”<br />
modes or set the correct manual exposure in “M” mode.<br />
3. Press the Fn button to select the <strong>White</strong> <strong>Balance</strong> icon ( ).<br />
4. Select ( SET) with the �/� on the controller.<br />
5. Aim the camera in the appropriate direction for the given lighting condition<br />
and press the shutter release button. See the <strong>ExpoDisc</strong> Instruction Manual for<br />
more information on where to aim the camera.<br />
6. Press the center of the controller. The monitor returns to the recording<br />
information display with the memorized custom white balance setting<br />
retained. This white balance setting will stay in effect until a new custom<br />
white balance is registered.<br />
7. If you get the message “<strong>Custom</strong> WB error” this indicates that you need to<br />
adjust your exposure and reattempt to set your white balance.<br />
8. Remove the <strong>ExpoDisc</strong>, return the camera to auto focus if desired and start<br />
shooting.<br />
<strong>Sony</strong> A700<br />
1. Install the <strong>ExpoDisc</strong> and set the camera to Manual Focus mode.<br />
2. Allow the camera to set an automatic exposure using the “P”, “S” or “A”<br />
modes or set the correct manual exposure in “M” mode.<br />
3. Press the WB (<strong>White</strong> <strong>Balance</strong>) Button to display the <strong>White</strong> <strong>Balance</strong> mode<br />
screen.<br />
4. Select a custom white balance item ( ) using the �/� on the multi-selector.<br />
5. Select ( SET), then press the center of the multi-selector to display the<br />
register screen.<br />
6. The message “Use spot metering area. Press shutter to calibrate.” will<br />
appear on the screen.<br />
7. Aim the camera in the appropriate direction for the given lighting condition<br />
and press the shutter release button. See the <strong>ExpoDisc</strong> Instruction Manual for<br />
more information on where to aim the camera.<br />
8. The register selection screen appears. Select a memory number with �/�<br />
( 1), then press the center of the multi-selector. The <strong>Sony</strong> A700 allows you<br />
to save up to 3 custom white balance references. This white balance setting<br />
will stay in effect until a new custom white balance is registered under the<br />
same memory number.<br />
9. Make sure that the number you registered (ie 1), is the same white<br />
Copyright, 2010 <strong>ExpoImaging</strong>, Inc.<br />
“<strong>Sony</strong>” and the <strong>Sony</strong> camera models listed are trademarks of <strong>Sony</strong>, Inc.
alance that you are set to on the <strong>White</strong> <strong>Balance</strong> mode screen.<br />
10.If you get the message “<strong>Custom</strong> WB error” this indicates that you need to<br />
adjust your exposure and reattempt to set your white balance.<br />
11.Remove the <strong>ExpoDisc</strong>, return the camera to auto focus if desired and start<br />
shooting.<br />
<strong>Sony</strong> A900<br />
1. Install the <strong>ExpoDisc</strong> and set the camera to Manual Focus mode.<br />
2. Allow the camera to set an automatic exposure using the “P”, “S” or “A”<br />
modes or set the correct manual exposure in “M” mode.<br />
3. Press the WB (<strong>White</strong> <strong>Balance</strong>) Button to display the <strong>White</strong> <strong>Balance</strong> mode<br />
screen.<br />
4. Select a custom white balance item ( *) using the �/� on the multiselector,<br />
then press the center of the multi-selector.<br />
5. Select ( SET) with the �/� on the multi-selector, then press the center of<br />
the multi-selector.<br />
6. Aim the camera in the appropriate direction for the given lighting condition<br />
and press the shutter release button. See the <strong>ExpoDisc</strong> Instruction Manual for<br />
more information on where to aim the camera.<br />
7. The shutter clicks and the calibrated values (ColorTemperature and Color<br />
filter) are displayed.<br />
8. Select a memory number with �/� ( 1), then press the center of the multiselector.<br />
The <strong>Sony</strong> A900 allows you to save up to 3 custom white balance<br />
references. This white balance setting will stay in effect until a new custom<br />
white balance is registered under the same memory number.<br />
9. Make sure that the number you registered (ie. 1), is the same white<br />
balance that you are set to on the <strong>White</strong> <strong>Balance</strong> mode screen.<br />
10.If you get the message “<strong>Custom</strong> WB error” this indicates that you need to<br />
adjust your exposure and reattempt to set your white balance.<br />
11.Remove the <strong>ExpoDisc</strong>, return the camera to auto focus if desired and start<br />
shooting.<br />
<strong>Sony</strong> DSC-F828<br />
1. Install the <strong>ExpoDisc</strong> and set the camera to Manual Focus mode.<br />
2. Allow the camera to set an automatic exposure using the “P”, “S” or “A”<br />
modes or set the correct manual exposure in “M” mode.<br />
3. Set your camera to the Standard Color mode. Press Menu. When the menu<br />
appears, use the Multi-Selector to select Color and then select Standard.<br />
4. Press and hold the WB Button and select the WB Set setting with the<br />
Command Dial. The WB Set indicator appears in the LCD monitor.<br />
5. Aim the camera in the appropriate direction for the given lighting condition<br />
and press the shutter release button. See the <strong>ExpoDisc</strong> Instruction Manual for<br />
Copyright, 2010 <strong>ExpoImaging</strong>, Inc.<br />
“<strong>Sony</strong>” and the <strong>Sony</strong> camera models listed are trademarks of <strong>Sony</strong>, Inc.
more information on where to aim the camera.<br />
6. Press the center of the Multi-Selector. The screen momentarily turns black<br />
and the WB Set indicator flashes quickly. DO NOT SHAKE OR STRIKE THE<br />
CAMERA WHILE THE WB INDICATOR IS FLASHING QUICKLY.<br />
7. When the custom white balance has been adjusted and stored in memory, the<br />
WB indicator lights up.<br />
8. If the WB indicator flashes slowly, the white balance is not set or was not able<br />
to be set. In this case, adjust the exposure settings and recalibrate.<br />
9. Remove the <strong>ExpoDisc</strong>, place camera in desired shooting mode and start<br />
shooting.<br />
Copyright, 2010 <strong>ExpoImaging</strong>, Inc.<br />
“<strong>Sony</strong>” and the <strong>Sony</strong> camera models listed are trademarks of <strong>Sony</strong>, Inc.