PROWLER DROP-AWAY ARROW REST INSTRUCTIONS 4 5 6 7 8
PROWLER DROP-AWAY ARROW REST INSTRUCTIONS 4 5 6 7 8
PROWLER DROP-AWAY ARROW REST INSTRUCTIONS 4 5 6 7 8
You also want an ePaper? Increase the reach of your titles
YUMPU automatically turns print PDFs into web optimized ePapers that Google loves.
<strong>PROWLER</strong> TM<br />
<strong>DROP</strong>-<strong>AWAY</strong> <strong>ARROW</strong> <strong>REST</strong> <strong>INSTRUCTIONS</strong><br />
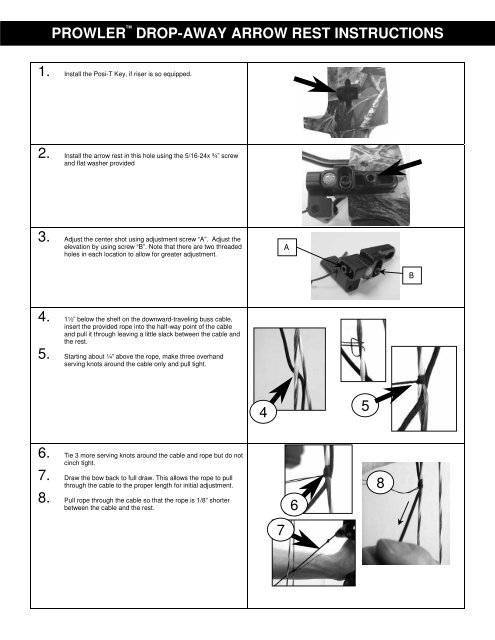
1. Install the Posi-T Key, if riser is so equipped.<br />
2. Install the arrow rest in this hole using the 5/16-24x ¾” screw<br />
and flat washer provided<br />
3. Adjust the center shot using adjustment screw “A”. Adjust the<br />
elevation by using screw “B”. Note that there are two threaded<br />
holes in each location to allow for greater adjustment.<br />
A<br />
B<br />
4. 1½” below the shelf on the downward-traveling buss cable,<br />
insert the provided rope into the half-way point of the cable<br />
and pull it through leaving a little slack between the cable and<br />
the rest.<br />
5. Starting about ¼” above the rope, make three overhand<br />
serving knots around the cable only and pull tight.<br />
4<br />
5<br />
6. Tie 3 more serving knots around the cable and rope but do not<br />
cinch tight.<br />
7. Draw the bow back to full draw. This allows the rope to pull<br />
through the cable to the proper length for initial adjustment.<br />
8. Pull rope through the cable so that the rope is 1/8” shorter<br />
between the cable and the rest.<br />
7<br />
6<br />
8
9. Continue the serving over the cable and rope until the serving<br />
is about an inch long.<br />
10. Lift the rope out of the way and tie three additional serving<br />
knots around the cable only. Separate the individual line of the<br />
serving and tie an overhand knot to finish.<br />
11. Cut the serving line and the rope leaving about ¼” and burn<br />
the ends being very careful not to damage the string or cable<br />
with the flame.<br />
9 11<br />
1”<br />
10<br />
12. Draw the bow to see if the launcher lifts to its most upright position. The rest should come to its full upright position no sooner than 2” from<br />
full draw.<br />
13. After the arrow rest is set up and the center shot is set, mount<br />
the arrow holder on the shelf, cleaning the area thoroughly<br />
with alcohol and gluing it in place with cyanoacrylate glue.<br />
Note: If the arrow holder has double-side tape, remove the<br />
tape and clean thoroughly with alcohol before apply glue.<br />
.<br />
Note: A right-hand rest is<br />
shown. Left hand is<br />
opposite.<br />
Precision Shooting Equipment<br />
P.O. Box 5487<br />
Tucson, Arizona 85703<br />
PN 8866 Rev 8/08


