Ankh-Morpork Rules - Treefrog Games
Ankh-Morpork Rules - Treefrog Games
Ankh-Morpork Rules - Treefrog Games

Create successful ePaper yourself
Turn your PDF publications into a flip-book with our unique Google optimized e-Paper software.
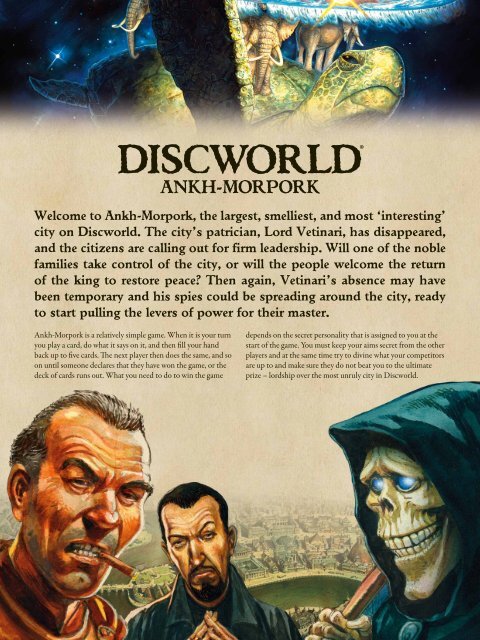
DISCWORLD<br />
®<br />
ANKH-MORPORK<br />
Welcome to <strong>Ankh</strong>-<strong>Morpork</strong>, the largest, smelliest, and most ‘interesting’<br />
city on Discworld. The city’s patrician, Lord Vetinari, has disappeared,<br />
and the citizens are calling out for firm leadership. Will one of the noble<br />
families take control of the city, or will the people welcome the return<br />
of the king to restore peace? Then again, Vetinari’s absence may have<br />
been temporary and his spies could be spreading around the city, ready<br />
to start pulling the levers of power for their master.<br />
<strong>Ankh</strong>-<strong>Morpork</strong> is a relatively simple game. When it is your turn<br />
you play a card, do what it says on it, and then fill your hand<br />
back up to five cards. The next player then does the same, and so<br />
on until someone declares that they have won the game, or the<br />
deck of cards runs out. What you need to do to win the game<br />
depends on the secret personality that is assigned to you at the<br />
start of the game. You must keep your aims secret from the other<br />
players and at the same time try to divine what your competitors<br />
are up to and make sure they do not beat you to the ultimate<br />
prize – lordship over the most unruly city in Discworld.
Components<br />
As well as the rule book and the playing board you should also have the following pieces:<br />
four sets of twelve<br />
minion pieces,<br />
four sets of<br />
six buildings,<br />
four demon pieces,<br />
three troll pieces,<br />
twelve trouble<br />
markers,<br />
one twelve<br />
sided die,<br />
thirty-five silver coins worth<br />
$1 each, seventeen gold<br />
coins worth $5 each,<br />
four Player Aid cards,<br />
twelve Random<br />
Event cards,<br />
seven Personality<br />
cards,<br />
twelve City Area<br />
cards,<br />
forty-eight green<br />
bordered Player<br />
cards,<br />
and fifty-three<br />
brown bordered<br />
Player cards.<br />
The board shows the city of <strong>Ankh</strong>-<strong>Morpork</strong>. The city has been<br />
divided into twelve areas. Each area is bordered either by a line or<br />
the River <strong>Ankh</strong>. Every area has a nameplate, a number and a cost<br />
for building there. The number in an area is used to determine<br />
where random events occur. Areas are adjacent if they share a<br />
common border or are connected by bridge.
Starting the game<br />
Each player should select a set of playing pieces of the<br />
same colour. A set consists of twelve minion pieces<br />
and six building pieces. Each player should place one<br />
of their minions in The Shades, The Scours, and<br />
Dolly Sisters. One trouble marker should also be<br />
placed in each of these three areas.<br />
Place the remaining trouble markers<br />
by the side of the board.<br />
Place the money by the side of the<br />
board to form a bank. Each player<br />
starts with ten <strong>Ankh</strong>-<strong>Morpork</strong> dollars.<br />
During the game players cannot hide<br />
how much money they have from<br />
other players.<br />
Place the demon and troll pieces<br />
by the side of the board.<br />
Shuffle the Personality cards and deal<br />
one to each player. You keep your<br />
Personality card secret until you either<br />
achieve the victory conditions on it or<br />
the game ends. Place the remaining<br />
Personality cards to one side, without<br />
examining them.<br />
Shuffle the Random Event cards and<br />
place in a deck face down by the side<br />
of the board.<br />
Separate the Player cards into two decks, the green bordered<br />
deck and the brown bordered deck. Shuffle the brown deck<br />
and place it on the table, face down. Then shuffle the green<br />
deck and place it on top of the brown deck, face down.<br />
Deal out five cards from the top of the deck to each player.<br />
Place the remaining cards by the side<br />
of the board to form a draw pile.<br />
Place the City Area cards face up<br />
on display by the side of the map so<br />
that they can be clearly seen by all<br />
of the players.<br />
Each player should also take one<br />
Player Aid card. This card helps to<br />
remind you about important rules.<br />
Use the die to randomly<br />
determine who will be the<br />
first player.<br />
Playing with just two players<br />
– You will need to remove the<br />
Chrysoprase card before<br />
shuffling and dealing out<br />
Personality cards. You will also<br />
need to remove the Hubert and<br />
Cosmos Lavish cards from the<br />
draw pile (both are brown<br />
bordered cards).<br />
Playing the game<br />
Players will take it in turn to have their ‘go’, starting<br />
with the first player.<br />
When it’s your turn you choose one of your cards to play.<br />
You do whatever it tells you to do on the card. You may have<br />
the option to play another card. When you have finished<br />
playing cards you then take enough cards from the draw pile<br />
to bring your hand size back to five cards. It may be that<br />
during your turn you picked up more cards, bringing your<br />
hand size up to more than five. This is fine, you just do not<br />
pick up any more cards at the end of your turn and neither<br />
do you have to discard any.<br />
Now the player to your left has his or her turn. Play continues<br />
in this manner until either one player declares that he or she<br />
has won (which depends on their Personality card) or the<br />
draw pile is exhausted. At this point if a player is Commander<br />
Vimes then they have won, otherwise the player with the most<br />
points wins the game.<br />
It is very important for all players to be aware of what all<br />
of the potential victory conditions are. You must be careful<br />
not to ‘gift’ the game to another player by not keeping an eye<br />
on what they are doing. The victory conditions are detailed<br />
towards the end of this rule book. Please make sure you read<br />
them carefully before you start to play the game.
The key to this game is learning how the Player cards<br />
work. Nearly every such card has one or more<br />
symbols at the top. These symbols tell you what<br />
actions you can do and the order in which they can<br />
be performed.<br />
When you play a card you may carry out some or all of the<br />
actions indicated. The order in which the actions can be<br />
performed goes from left to right along the top of the card.<br />
You are not forced to perform an individual action, so you<br />
could choose one or more not to perform. The only action<br />
that you must perform is the Random Event action. Once<br />
you have finished with the card you place it next to the draw<br />
pile, face-up. This is the discard pile.<br />
Example: If you played the Bursar card then you<br />
would first draw a Random Event card, you<br />
would then have the option to swap the positions<br />
of two minions (as written at the bottom of the<br />
card). Finally, you would have the option to play<br />
another card.<br />
You complete one action before you start the next action.<br />
Each of the actions is explained on this and the following<br />
page. Note that there are two ‘asides’, one to explain trouble<br />
markers and the other to explain City Area cards.<br />
Place a minion<br />
You take one of your minion pieces and you place<br />
it in an area on the board. You must place it in<br />
either an area that you already have a minion in or in an<br />
adjacent area. There is no limit on the number of minions<br />
that can be placed in an area. If you already have all of your<br />
minions on the board then you can remove one and then<br />
place it somewhere else (making sure you follow the other<br />
rules above). These rules apply whenever you have to place a<br />
minion, including due to the play of an interrupt card. If you<br />
do not have a minion on the board then you can place your<br />
minion in any area.<br />
Example: Let’s assume that you are the red player ( for this<br />
and all other examples) and you have just played a card with<br />
the ‘Place a minion’ symbol on it. As you already have a minion<br />
in Dolly Sisters you can legally place one in any area indicated<br />
by the arrows. Note that areas that are connected by bridges are<br />
adjacent to each other.<br />
Trouble markers<br />
Whenever a minion is placed or moved into an area that<br />
already has one or more minions in it then you must place<br />
a trouble marker in that area. An area can only contain one<br />
trouble marker. As soon as a minion is moved or removed<br />
from an area, any trouble marker in the area is also removed<br />
(even if there are two or more minions remaining). Placing a<br />
building in an area does not cause trouble. There are two main<br />
effects of trouble. Firstly, you can only assassinate a minion if<br />
there is a trouble marker in that area. Secondly, you cannot<br />
build a building in an area that contains a trouble marker.<br />
Trolls and demons are regarded as being minions and so will<br />
affect trouble in the same way as a player’s minion.<br />
Example: Here is an example of what happens when you place<br />
a minion in an area that already contains a minion. The picture<br />
to the left shows the board before you have your turn, the one on<br />
the right after you’ve had it. As there was already a minion in<br />
Dimwell you must also place a trouble marker in the area.<br />
Place a building<br />
You can place one of your building pieces in an<br />
area that you have a minion in. You cannot build<br />
in an area that already contains either a building or<br />
a trouble marker. The cost of placing the building<br />
is shown in the area and on the matching City Area card.<br />
You pay this amount of money to the bank. You then take<br />
the matching City Area card into your possession. If, for any<br />
reason, the building is removed later on then you must return<br />
the City Area card to the display. Place the card in front of<br />
your position, face up.<br />
You can have up to six buildings on the board. If you already<br />
have six buildings on the board then you can choose one to<br />
remove and place in the area you wish to build in. Make sure<br />
you return the City Area card for the area that you remove<br />
your building from.
Small Gods – Whenever one of your minions or buildings is<br />
affected by a random event you can pay $3 to ignore the effect.<br />
If more than one piece is affected then you must pay $3 for<br />
each piece you wish to protect.<br />
Seven Sleepers – Once per turn you can take $3 from<br />
the bank.<br />
Unreal Estate – Once per turn you can draw one card and<br />
then discard a card.<br />
Example: In the part of the map shown you can only place a<br />
building in Nap Hill. Dolly Sisters has a trouble marker in it,<br />
Seven Sleepers already has a building, and you do not have a<br />
minion in either Unreal Estate or Dragon’s Landing. If you do<br />
go ahead and build in Nap Hill then you must pay $12 to the<br />
bank. Note that even though the yellow player has more minions<br />
than you in Nap Hill you can still place a building there. Once<br />
you have placed your building you take the Nap Hill card.<br />
City Area Cards<br />
Every area on the board has a City Area card. Each card grants<br />
you a particular ability. In most cases you can use this ability<br />
once per turn and you choose when you wish to use it. What<br />
you cannot do is use the ability on a card in the same turn that<br />
you gained it. The Small Gods card is the exception and can be<br />
used when it is not your turn to react to the result of a random<br />
event. Here is a more detailed description of each of the card<br />
abilities:<br />
The Shades – At any point in your turn you can place one<br />
trouble marker in The Shades or an adjacent area (area must<br />
contain at least one minion).<br />
Dolly Sisters – Once per turn you can pay $3 and place one<br />
of your minions in Dolly Sisters or an adjacent area.<br />
The Scours – Once per turn you can discard one card and<br />
take $2 from the bank.<br />
Dimwell – Once per turn you can pay $3 and place one of<br />
your minions in Dimwell or an adjacent area.<br />
Nap Hill – Once per turn you can take $1 from the bank.<br />
Longwall – Once per turn you can take $1 from the bank.<br />
The Hippo – Once per turn you can take $2 from the bank.<br />
Dragon’s Landing – Once per turn you can take $2 from<br />
the bank.<br />
Isle of Gods – Once per turn you can pay $2 to remove one<br />
trouble marker from the board.<br />
Assassination – You remove one minion<br />
(but not your own) or troll or demon of your choice<br />
from an area that contains a trouble marker.<br />
Remember that this will also remove the trouble<br />
marker from the area.<br />
Remove one trouble marker<br />
– You remove one trouble marker from an area<br />
of your choice.<br />
Take money – The gold circle has an amount<br />
of money shown in it. You take this amount from<br />
the bank.<br />
Scroll – Perform the action described in the text<br />
at the bottom of the card.<br />
Random Event – This is the only action that<br />
isn’t optional. You must draw the top card from the<br />
Random Event deck. This will tell you which event<br />
occurs. You must then check the back of the rule<br />
book to see the effect of that event. Once you have<br />
completed the event you place the Random Event<br />
card to one side (i.e. each event can only occur once<br />
in the entire game).<br />
Play another card – You play another card<br />
from your hand. You could end up playing a<br />
succession of cards that have this symbol on.<br />
Interrupt – A card with this symbol on can be<br />
played at any time, even if it is not your turn.<br />
Most interrupt cards protect you from something<br />
bad happening to you. You may play this card at any<br />
time, even if it is not your turn. For example,<br />
somebody might try to assassinate one of your<br />
minions and you could play the ‘Gaspode’ card to<br />
stop them. Playing an interrupt card in your turn<br />
does not count as an action, Please make sure you<br />
play such a card promptly. If you forget to use a card<br />
to negate the effect of another card played against<br />
you then you cannot ‘go back in time’ and play the<br />
card retrospectively.
Ending and winning the game<br />
The game ends when either a player achieves the<br />
victory conditions on his or her Personality card<br />
OR if the ‘Riot’ Random Event card is drawn and<br />
the conditions on the card are met OR as soon as<br />
one player takes the last card from the draw pile.<br />
All of the Personality cards apart from Commander Vimes<br />
state that the conditions on the card must occur at the start<br />
of your turn, not the end of it.<br />
Lord Vetinari – you win if at the<br />
beginning of your turn you have a certain<br />
number of minions in different areas on<br />
the board (think of them as your spies).<br />
With two players you need to have<br />
minions in at least eleven different areas.<br />
With three players you need to have<br />
minions in at least ten different areas.<br />
With four players you need to have<br />
minions in at least nine different areas.<br />
Areas must be free of demons.<br />
Lord Selachii, Lord Rust, Lord de Worde – you win if at<br />
the beginning of your turn you control a certain number of<br />
areas. If there are only two of you playing then you need to<br />
control seven areas, if there are three of you then you need to<br />
control five areas, and if there are four of you then you need<br />
to control four areas. You control an area if you have more<br />
playing pieces in it than any single other player (a playing<br />
piece being a minion or a building). You would also have to<br />
have more pieces there than the total number of trolls in the<br />
area. You cannot control an area that contains one or more<br />
demons. The presence of a trouble marker does not affect<br />
the control of an area.<br />
Example: The Green player controls Seven Sleepers. The yellow<br />
player controls Nap Hill, even though there is a trouble marker<br />
there. The red player does not control Dolly Sisters as there is a<br />
demon there. The blue player does not control Unreal Estate as<br />
there is one troll there. If blue had another piece there, either<br />
another minion or a building, then he or she would control<br />
the area. Neither yellow nor green control Dragon’s Landing.<br />
Dragon King of Arms – If at the beginning of your turn<br />
there are eight trouble markers on the board then you win.<br />
The rationale is that the city has fallen into more chaos than<br />
normal and people want the king back (who would be<br />
controlled by you).<br />
Chrysoprase – If at the beginning of your turn your net worth<br />
(your cash plus the monetary cost of each building you have)<br />
is $50 or more then you win the game. Please note that any<br />
loans you have taken out count as $12 against your total<br />
worth (certain cards allow you to take out loans).<br />
Commander Vimes – you win if nobody else wins by the<br />
time the draw pile has been exhausted.<br />
If the game ends due to the draw pile running out AND<br />
nobody has the Commander Vimes Personality card, then<br />
the winner is the player with the most points. Each minion<br />
on the board is worth five points. Each building is worth a<br />
number of points equal to its monetary cost. Each $1 in hand<br />
is worth one point. If you have the Dent card or the Bank card<br />
then you must pay back the amount noted on the card. If you<br />
cannot do so then you lose fifteen points each. In the case of a<br />
tie the tied player with the highest monetary value City Area<br />
card is the winner. If there is still a tie then the tied players<br />
shared the honours of a joint win.
®<br />
Frequently asked questions<br />
Q. What exactly happens if I play Ponder Stibbons<br />
or Drumknott?<br />
A. You choose any two cards from your hand to play. You<br />
should treat each card you play as a separate set of actions.<br />
Thus, if one of the cards allows you to play another card then<br />
you can do so, following on from that particular card. Once<br />
you have completed all of the actions associated with one of<br />
the cards you can then play the second card, which may also<br />
result in you being able to play additional cards. If you play<br />
all of your cards then your turn ends.<br />
Q. If somebody plays the Death card against me can<br />
I use an interrupt card, such as Gaspode, to protect<br />
two of my minions?<br />
A. No. An interrupt card will only protect one minion. You<br />
may block the first attempt to remove one of your minions,<br />
but the player who played the Death card could use the<br />
second assassination symbol to remove the minion that you<br />
just protected. You would have to play another interrupt card<br />
to stop the second attempt to remove your minion.<br />
Q. What exactly does the Wallace Sonky card do?<br />
A. Wallace Sonky protects you against the text effect of<br />
another card. It does not protect you against symbols on<br />
other cards, so it would not protect one of your minions<br />
being removed by a card with an assassination symbol on<br />
it. However, it would protect one of your minions being<br />
removed due to somebody playing the Carcer card, as the<br />
effect of the card is described in the text area. Other examples<br />
of cards it would protect against are The Fire Brigade,<br />
Dr Whiteface, and The Thieves' Guild. It cannot be used to<br />
protect another player, only you benefit from its use. It does<br />
not protect against random events. If you do use the card then<br />
the card you block cannot then be used against another player.<br />
Q. Can the Small Gods card protect you against<br />
demons?<br />
A. Yes. You can pay $3 to stop a demon piece being placed in<br />
an area. The demon piece should be placed to one side, it is<br />
not placed on the board.<br />
Q. Can Carcer remove troll or demon pieces?<br />
A. Yes, troll and demon pieces should be treated just like<br />
player minion pieces.<br />
Q. What happens if I cannot play a card during<br />
my turn?<br />
A. You are forced to pass. You would still draw cards<br />
as normal.<br />
Q. If you place one of your minions in an area that<br />
only contains minions of your own colour do you still<br />
place a trouble marker?<br />
A. Yes, you still place a trouble marker.<br />
Q. Do I have to control an area to be able to build<br />
a building?<br />
A. No, you need to have at least one minion there, and there<br />
cannot be a trouble marker in the area.<br />
Q. If I use a card that allows me to move a minion can<br />
that cause trouble?<br />
A. Yes. Whenever you add or move a minion into an area that<br />
already has one or more minions in it then you place a trouble<br />
marker in there (unless it already contains one).<br />
Q. Can I get rid of the Fools’ Guild or Dr Whiteface?<br />
A. No, once you have accepted one<br />
of these cards you are stuck with<br />
it for the rest of the game. Each of<br />
these cards counts towards your hand<br />
size, so the effect is to reduce your<br />
hand size by one. You cannot discard<br />
it using The Scours or Unreal Estate.<br />
Credits<br />
Game designed by Martin Wallace<br />
Artwork by Peter Dennis, Ian Mitchell, Paul Kidby, and Bernard Pearson<br />
Graphic design by Solid Colour<br />
Playtesters: Hannah Bryan, Mike Bryan, Abby O’Rourke, Jerry Elsmore, Chris Boote,<br />
Richard and Jan Dewsbery, Richard Pingree, Simon Goodway, Jess Wylde, Max Michael,<br />
Simon Bracegirdle, Andy Ogden, Geoff Brown, Chris Dearlove, David Dearlove,<br />
Catherine McManus, Alan McClenahan, Henry Proctor, Stewart Pilling, Jen Petruccio,<br />
Don Oddy, various people at the Convention of Wargamers, Manorcon, Sorcon,<br />
Beyond Monopoly, Kublacon, Hogswatch, and Spring Watch.<br />
Thanks to Sir Terry Pratchett, Julia Wallace, Bernard and Isobel Pearson, Reb Voyce,<br />
Ian Mitchell, Colin Smythe, Neil Kendrick, Chris Boote, Jerry Elsmore, Ian and Jo Drury,<br />
Rob and Rob at Sigma, Robert Flach, Rob Mulholland, Sanders Bol, Pete Chapman,<br />
Charles Bishop, Steve Rohan-Jones, David Gatheral, Jason Anthony, Helen and Chris Smith<br />
and load and loads of Discworld fans.<br />
© Terry Pratchett 2011.<br />
Discworld is a registered trademark belonging to Terry Pratchett. <strong>Ankh</strong>-<strong>Morpork</strong>®<br />
is an official<br />
DISCWORLD®<br />
board game and as such is protected by a worldwide copyright.<br />
www.treefroggames.com<br />
www.mayfairgames.com
Random events<br />
Many of the events have an effect on buildings. If you<br />
lose a building then you must hand back the City Area<br />
card that goes with it.<br />
The Dragon<br />
Roll the die to determine which area on the board will be hit<br />
by the dragon. Remove all minions (including demons and<br />
trolls), any trouble marker, and any building from the area<br />
affected.<br />
Flood<br />
Roll the die twice to see which areas are affected by flood.<br />
Areas rolled that are adjacent to the river are affected by flood.<br />
In player order, starting with the active player, each player<br />
must move their minions from the affected areas to adjacent<br />
areas. You cannot move your minion to another area affected<br />
by flood. You can still move to an area adjacent to the river.<br />
Buildings, trolls, and demons remain in the areas and are not<br />
affected by flooding.<br />
Fire<br />
Roll the die to establish the area of the fire. If there is no<br />
building in the rolled area then the random event ends<br />
without effect. If there is a building in the area then remove it<br />
from the board and roll the die again. If the next area rolled is<br />
adjacent to the previous area and there is a building in it then<br />
remove that building too (the fire has spread). You continue<br />
rolling in this manner until you roll an area that either does<br />
not contain a building or that is not adjacent to the last area<br />
you rolled.<br />
Fog<br />
Draw and discard the top five cards from the draw pile. Make<br />
sure you and the rest of the players can see which cards have<br />
been discarded.<br />
Riots<br />
If there are eight or more trouble markers on the board then<br />
the game ends immediately. You now work out who has won<br />
by adding up points (see page 6). Please note that if a player<br />
is Commander Vimes then they do not win at this stage,<br />
although they may still win on points.<br />
Explosion<br />
Roll the die and remove any building in the area of the<br />
same number.<br />
Mysterious Murders!<br />
You roll one die and remove a minion of your choice from the<br />
area of the same number. You then pass the die to the player<br />
to your left, who rolls it and removes a minion of their choice<br />
from the area of the same number. Repeat this procedure until<br />
all players have rolled the die once. If you roll an area and only<br />
you have minions there then you must remove one of them.<br />
Demons from the Dungeon Dimensions<br />
Roll the die four times and place one demon minion piece in<br />
each of the areas matching the numbers rolled. More than one<br />
demon can end up in an area. If there is not a trouble marker<br />
in the area that a demon is placed in then place such a marker,<br />
even if there is no other minion in the area. While there are<br />
one or more demons in an area the power on the City Area<br />
card cannot be used and any building there has a value of zero.<br />
The area also cannot be controlled by any player nor does it<br />
count as an occupied area for Vetinari. If an area still has one<br />
or more demons in it at the end of the game then nobody<br />
scores any points for minions or buildings there. Demons<br />
can be moved or removed from the board in the same way<br />
as minions.<br />
Subsidence<br />
All players must pay $2 for each building they have on the<br />
board. If they cannot pay for a building then it is removed<br />
from the board.<br />
Bloody Stupid Johnson<br />
Roll the die. If the City Area Card of the same number is<br />
in play then it is set to one side and is no longer in the game,<br />
i.e. the power on the card is not in effect. Also, the owner<br />
of the card must remove one minion from the same area as<br />
the card. The building still counts towards control of the<br />
area and retains its monetary value at the end of the game.<br />
Trolls<br />
Roll the die three times and place one troll piece in each<br />
area of the same number. More than one troll can end up<br />
in an area. Remember to place a trouble marker if there<br />
is already one or more minions in the area. Trolls are like<br />
minions, except they do not belong to any player. They affect<br />
your ability to control an area, in that you must treat them as<br />
belonging to ‘another player’. You can move or remove them<br />
from the board in the same way as a minion.<br />
Earthquake<br />
Roll the die twice and remove any buildings from the areas<br />
of the same number, if any.