download PDF - Switchover Help Scheme
download PDF - Switchover Help Scheme
download PDF - Switchover Help Scheme

You also want an ePaper? Increase the reach of your titles
YUMPU automatically turns print PDFs into web optimized ePapers that Google loves.
1<br />
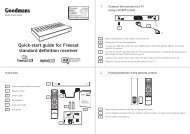
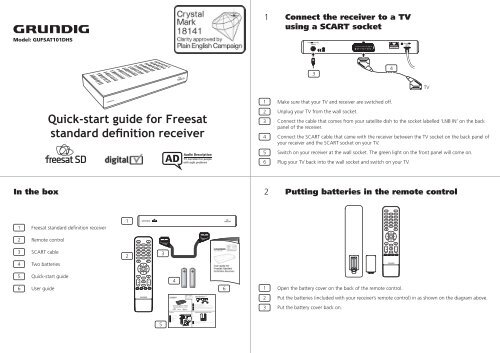
Connect the receiver to a TV<br />
using a SCART socket<br />
Model: GUFSAT101DHS<br />
3<br />
4<br />
TV<br />
Quick-start guide for Freesat<br />
standard definition receiver<br />
1<br />
2<br />
3<br />
4<br />
5<br />
6<br />
Make sure that your TV and receiver are switched off.<br />
Unplug your TV from the wall socket.<br />
Connect the cable that comes from your satellite dish to the socket labelled ‘LNB IN’ on the back<br />
panel of the receiver.<br />
Connect the SCART cable that came with the receiver between the TV socket on the back panel of<br />
your receiver and the SCART socket on your TV.<br />
Switch on your receiver at the wall socket. The green light on the front panel will come on.<br />
Plug your TV back into the wall socket and switch on your TV.<br />
In the box<br />
2<br />
Putting batteries in the remote control<br />
1<br />
Freesat standard definition receiver<br />
1<br />
2<br />
Remote control<br />
3<br />
SCART cable<br />
2<br />
3<br />
4<br />
Two batteries<br />
5<br />
6<br />
Quick-start guide<br />
User guide<br />
4<br />
6<br />
1<br />
Open the battery cover on the back of the remote control.<br />
2<br />
Put the batteries (included with your receiver’s remote control) in as shown on the diagram above.<br />
3<br />
Put the battery cover back on.<br />
5<br />
GUFSAT101DHS-QSG_rev2-180909.indd 1 18/09/2009 15:41:26
3<br />
Using your remote control<br />
4<br />
First-time installation<br />
Turns the receiver volume off<br />
Selects options on the on-screen menu<br />
The first time you switch on your receiver, you will see a screen like the one below.<br />
Switches the receiver on and off (into<br />
standby)<br />
Gives digital text<br />
(You may need to press ‘AV’ on your remote control before<br />
you see this screen.)<br />
to<br />
Chooses channel numbers and numbers<br />
on menus that relate to different options<br />
Switches subtitles on and off<br />
Adjusts the aspect ratio (height and width)<br />
of the screen when using 4:3 display<br />
modes<br />
Switches the audio description on or off<br />
Enters and exits the menu screen<br />
Increases or reduces the receiver volume<br />
Exits the menu system and electronic programme<br />
guide (EPG), and goes back to the last<br />
programme you were watching<br />
Returns to the previous menu screen in the<br />
menu system<br />
Enters and exits the electronic programme guide<br />
(EPG)<br />
Enters and exits the channel list screen<br />
Switches between the channel you’re watching<br />
and the channel you were previously watching<br />
This is used to go up and down the channel list<br />
at a page at a time and for going up and down a<br />
channel when viewing a programme<br />
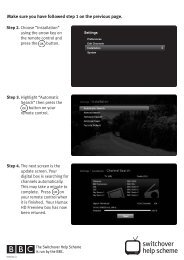
Make sure that your digital box has been installed correctly before<br />
continuing the installation.<br />
If signal strength is less than 50% check the dish<br />
position and cable connections.<br />
Network ID<br />
Signal Strength<br />
Press<br />
Transport ID<br />
to Continue<br />
92%<br />
• If the signal strength is above 50%, press the button on your<br />
remote control. If the signal strength is below 50%, you may need<br />
to reposition your satellite dish and check the connecting cables.<br />
• The receiver will search for the Network ID and Transport ID.<br />
When these have been found, press the<br />
control.<br />
button on your remote<br />
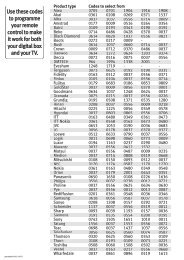
• Enter your postcode using the ‘number’ buttons on the remote<br />
control. Each time you press a number button, it scrolls through<br />
the available numbers and letters shown on that button. You do<br />
not have to enter a space in the postcode, as the receiver will<br />
automatically do this when you press the ‘OK’ button.<br />
• You will also need to select the type of TV screen you have by<br />
pressing the button on your remote control.<br />
• Press the button on your remote control and wait for the receiver to autotune. This may take a few minutes.<br />
• When the autotune has finished, the first available channel will be shown.<br />
Moves around the on-screen menus<br />
Gives programme information on the TV<br />
screen<br />
Green, blue<br />
yellow and<br />
red buttons<br />
Changes or goes to different options when on<br />
digital text pages. These buttons also are used in<br />
the electronic programme guide (EPG)<br />
This button turns off the signal from the<br />
reciever’s SCART socket. The TV will go back to<br />
its previous mode for example, Analogue TV<br />
5<br />
Channels and volume<br />
6<br />
Audio description and subtitles<br />
To change the volume<br />
• The volume buttons on the remote control change the receiver volume only. You may also need to change your TV<br />
volume.<br />
• To increase the volume, press the ‘Vol +’ button.<br />
• To reduce the volume, press the ‘Vol -’ button.<br />
To select a specific channel<br />
• To enter the channel number, press the to number buttons.<br />
To change the channel<br />
• Press the ‘Ch +’ button to move up a channel.<br />
• Press the ‘Ch -’ button to move down a channel.<br />
This receiver has audio description and subtitle services. Many programmes have audio description<br />
and subtitles available, for people with hearing or sight problems.<br />
Press the `Info’ button at any time to view the information display. If the or icons are<br />
displayed, audio description or subtitles are available for the current programme.<br />
Audio descriptions<br />
• To switch on audio description, press the button. Audio description on will be shown on the screen and you<br />
will hear a high-pitched beep if AD is available. When AD is not available you will hear a low-pitched beep.<br />
• To switch off audio description, press the button. Audio description off will be shown on screen and you will<br />
hear a low-pitched beep.<br />
For more information on audio descriptions, please read the user guide. (See page 27.)<br />
Subtitles<br />
• Press the button to turn on subtitles. Your TV will display ‘subtitles on’ for a short time.<br />
• Press the button to turn off subtitles. Your TV will display ‘subtitles off’ for a short time.<br />
For more information on subtitles, please read the user guide. (See page 27.)<br />
dcs/GUFSAT101DHS/Rev218-09-09<br />
GUFSAT101DHS-QSG_rev2-180909.indd 2 18/09/2009 15:41:27