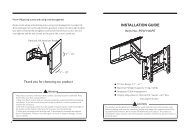
Instruction Manual for the "26inch-50inch tilting mount ... - Loctek
Instruction Manual for the "26inch-50inch tilting mount ... - Loctek
Instruction Manual for the "26inch-50inch tilting mount ... - Loctek

You also want an ePaper? Increase the reach of your titles
YUMPU automatically turns print PDFs into web optimized ePapers that Google loves.
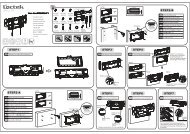
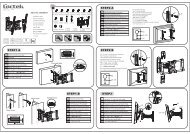
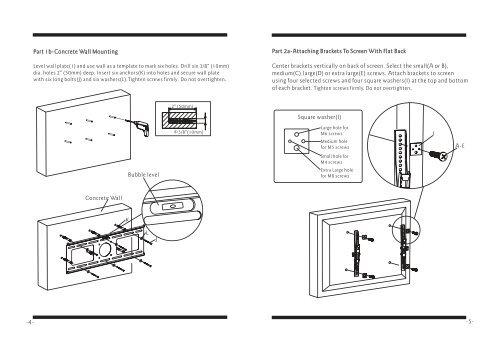
Part 1b-Concrete Wall Mounting<br />
Level wall plate(1) and use wall as a template to mark six holes. Drill six 3/8 ” (10mm)<br />
dia. holes 2 ” (50mm) deep. Insert six anchors(K) into holes and secure wall plate<br />
with six long bolts(J) and six washers(L).Tighten screws firmly. Do not overtighten.<br />
Part 2a-Attaching Brackets To Screen With Flat Back<br />
Center brackets vertically on back of screen. Select <strong>the</strong> small(A or B),<br />
medium(C),large(D) or extra large(E) screws. Attach brackets to screen<br />
using four selected screws and four square washers(I) at <strong>the</strong> top and bottom<br />
of each bracket. Tighten screws firmly. Do not overtighten.<br />
2 ” ( 50mm)<br />
Square washer(I)<br />
Φ3/8 ”(10mm)<br />
Large hole <strong>for</strong><br />
M6 screws<br />
Medium hole<br />
<strong>for</strong>M5screws<br />
I<br />
A-E<br />
Small hole <strong>for</strong><br />
M4 screws<br />
Bubble level<br />
Extra Large hole<br />
<strong>for</strong>M8screws<br />
Concrete Wall<br />
K<br />
L<br />
J<br />
-4- -5-