Integration of RACS 4 and INTEGRA intruder alarm system ... - Roger
Integration of RACS 4 and INTEGRA intruder alarm system ... - Roger
Integration of RACS 4 and INTEGRA intruder alarm system ... - Roger

Create successful ePaper yourself
Turn your PDF publications into a flip-book with our unique Google optimized e-Paper software.
<strong>Roger</strong> Access Control System<br />
<strong>Integration</strong> <strong>of</strong> <strong>RACS</strong> 4 <strong>and</strong><br />
<strong>INTEGRA</strong> <strong>intruder</strong> <strong>alarm</strong> <strong>system</strong> (SATEL)<br />
User manual<br />
Document version: Rev. A
Contents<br />
1. Introduction ................................................................................................................. 3<br />
2. Scenario <strong>of</strong> operation ................................................................................................... 3<br />
3. Installation .................................................................................................................. 4<br />
4. Configuration <strong>of</strong> Integra <strong>alarm</strong> <strong>system</strong> ........................................................................ 6<br />
5. Configuration <strong>of</strong> <strong>RACS</strong> 4 <strong>system</strong> .................................................................................. 6<br />
5.1 Configuration <strong>of</strong> CPR32-NET by web browser ...................................................................... 6<br />
5.2 Configuration <strong>of</strong> sub<strong>system</strong> in PR Master s<strong>of</strong>tware ............................................................... 7<br />
5.3 Definition <strong>and</strong> association <strong>of</strong> <strong>alarm</strong> zones ........................................................................... 8<br />
6. Use <strong>of</strong> <strong>RACS</strong> 4 <strong>and</strong> Integra <strong>alarm</strong> <strong>system</strong> integration .................................................. 9<br />
Page 2 <strong>of</strong> 10
1. INTRODUCTION<br />
This manual contains minimum information that is necessary to configure s<strong>of</strong>tware integration <strong>of</strong><br />
<strong>RACS</strong> 4 <strong>system</strong> with <strong>alarm</strong> control panels <strong>of</strong> <strong>INTEGRA</strong> series made by SATEL company. Full<br />
functional description <strong>of</strong> <strong>RACS</strong> 4 <strong>system</strong>, PR Master s<strong>of</strong>tware <strong>and</strong> CPR32-NET network controller is<br />
specified in following documents, which are available at www.roger.pl:<br />
PRxx2 series controllers, Functional description <strong>and</strong> programming guide<br />
PRxx1 series controllers, Functional description <strong>and</strong> programming guide<br />
PR Master User manual<br />
CPR32-NET User manual<br />
The integration concerns all available models <strong>of</strong> controllers <strong>and</strong> readers made by <strong>Roger</strong> if at least<br />
single CPR32-NET network controller is also installed.<br />
The configuration <strong>of</strong> <strong>INTEGRA</strong> <strong>alarm</strong> <strong>system</strong> is described in producer’s instructions.<br />
Note: The integration <strong>of</strong> <strong>RACS</strong> 4 <strong>and</strong> <strong>INTEGRA</strong> <strong>alarm</strong> <strong>system</strong>s requires PR Master s<strong>of</strong>tware in<br />
version 4.5.4 or newer.<br />
2. SCENARIO OF OPERATION<br />
In general perspective, the integration with <strong>INTEGRA</strong> <strong>alarm</strong> <strong>system</strong> consists in concurrent arming<br />
<strong>and</strong> disarming <strong>of</strong> <strong>alarm</strong> zones both in <strong>INTEGRA</strong> <strong>system</strong> <strong>and</strong> in <strong>RACS</strong> 4 <strong>system</strong>. Alarm zones can be<br />
associated with each <strong>and</strong> their arming can be based on administrator defined schedule. Arming <strong>and</strong><br />
disarming <strong>of</strong> <strong>alarm</strong> zones can be executed both from <strong>RACS</strong> 4 <strong>system</strong> <strong>and</strong> <strong>INTEGRA</strong> <strong>system</strong> but it<br />
also assumed that <strong>INTEGRA</strong> is superior in regard <strong>of</strong> arming <strong>and</strong> disarming. General diagram <strong>of</strong><br />
<strong>RACS</strong> 4 <strong>and</strong> <strong>INTEGRA</strong> connection is shown in fig. 1.Moreover, <strong>RACS</strong> 4 <strong>system</strong> can collect critical<br />
events from <strong>alarm</strong> <strong>system</strong> <strong>and</strong> display them in its log so the operator <strong>of</strong> both <strong>system</strong>s could limit<br />
monitoring to single <strong>system</strong> with common log.<br />
The integration <strong>of</strong> <strong>RACS</strong> 4 <strong>and</strong> <strong>INTEGRA</strong> <strong>alarm</strong> <strong>system</strong> requires installation <strong>of</strong> CPR32-NET network<br />
controller. Both, UT-2 communication interface <strong>and</strong> INT-RS converter act as intermediary devices<br />
between CPR32-NET <strong>and</strong> <strong>INTEGRA</strong> <strong>alarm</strong> control panel. Single <strong>INTEGRA</strong> control panel can operate<br />
with single CPR32-NET network controller or with many CPR32-NET network controllers. Multiple<br />
<strong>INTEGRA</strong> control panels can operate with multiple CRP32-NET units but the number <strong>of</strong> <strong>INTEGRA</strong><br />
panels cannot exceed the number <strong>of</strong> CPR32-NET units.<br />
CPR32-NET operates with maximum number <strong>of</strong> <strong>INTEGRA</strong> <strong>alarm</strong> zones based on license, which can<br />
be purchased from <strong>Roger</strong> company.<br />
Note: Default, free <strong>of</strong> charge licence for CPR32-NET enables operation with maximum 2 <strong>alarm</strong><br />
zones <strong>of</strong> <strong>INTEGRA</strong> <strong>alarm</strong> panel.<br />
<strong>Integration</strong> procedure:<br />
1. Configure <strong>INTEGRA</strong> <strong>system</strong> according to end user requirements, Satel’s manuals <strong>and</strong> section 4<br />
<strong>of</strong> present manual.<br />
2. Connect CPR32-NET network controller, UT-2 communication interface, INT-RS converter <strong>and</strong><br />
<strong>INTEGRA</strong> series <strong>alarm</strong> control panel according to fig. 2.<br />
3. Select the operating mode for INT-RS converter according to fig. 3.<br />
4. Configure <strong>RACS</strong> 4 Access Control System according to end user requirements, <strong>Roger</strong>’s manuals<br />
<strong>and</strong> section 5 <strong>of</strong> present manual.<br />
5. Configure the connection <strong>of</strong> <strong>RACS</strong> 4 <strong>system</strong> with <strong>INTEGRA</strong> <strong>alarm</strong> control panel by means <strong>of</strong> PR<br />
Master s<strong>of</strong>tware in accordance with section 5.3 <strong>of</strong> present manual.<br />
6. After successful configuration, the integration can be used in accordance with section 6 <strong>of</strong><br />
present manual.<br />
Page 3 <strong>of</strong> 10
Fig. 1 General diagram <strong>of</strong> <strong>RACS</strong> 4 <strong>and</strong> <strong>INTEGRA</strong> <strong>alarm</strong> control panel integration<br />
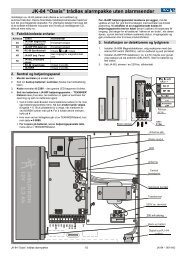
3. INSTALLATION<br />
The installation consists in connection <strong>of</strong> CPR32-NET network controller, UT-2 communication<br />
interface, INT-RS converter <strong>and</strong> <strong>INTEGRA</strong> series <strong>alarm</strong> control panel in accordance with fig. 2.<br />
CPR32-NET network controller is equipped with two separate RS-485 buses. The first one is used<br />
for communication with access controllers within <strong>RACS</strong> 4 <strong>system</strong>, while the second one can be used<br />
for communication with <strong>INTEGRA</strong> series <strong>alarm</strong> control panel.<br />
Maximal distance between CPR32-NET <strong>and</strong> UT-2 equals to 1200m, between UT-2 <strong>and</strong> INT-RS<br />
equals to 15 m while between INT-RS <strong>and</strong> <strong>INTEGRA</strong> <strong>alarm</strong> control panel equals to 300m (according<br />
to producer manual).<br />
According to SATEL instructions, the address <strong>of</strong> INT-RS converter to be connected to the keypad<br />
bus in the <strong>INTEGRA</strong> 24 <strong>and</strong> <strong>INTEGRA</strong> 32 <strong>alarm</strong> control panels must be in range 0 - 3 (up to 4<br />
keypads/other devices can be connected) <strong>and</strong> in case <strong>of</strong> <strong>INTEGRA</strong> 64, <strong>INTEGRA</strong> 128 <strong>and</strong> <strong>INTEGRA</strong><br />
128-WRL <strong>alarm</strong> control panels the address <strong>of</strong> INT-RS converter must be in range 0 – 7. Each<br />
keypad /device to be connected to the keypad bus must have its own individual address (addresses<br />
cannot be duplicated). Dip switches are used for address configuration. The integration with <strong>RACS</strong><br />
4 <strong>system</strong> requires selection <strong>of</strong> operating mode i.e. dip switch no. 5 must be on. The configuration<br />
<strong>of</strong> INT-RS converter with exemplary address is shown in fig. 3.<br />
The <strong>INTEGRA</strong> control panel requires 18VAC power supply, the interface <strong>and</strong> the converter require<br />
12VDC power supply, while CPR32-NET can be supplied both with 18VAC <strong>and</strong> 12VDC. <strong>INTEGRA</strong> <strong>and</strong><br />
CPR32-NET are equipped with 12VDC outputs, which can be used for providing power supply to the<br />
interface <strong>and</strong> converter. Detailed specification <strong>of</strong> terminals for all mentioned devices is given in their<br />
respective manuals.<br />
Page 4 <strong>of</strong> 10
Fig. 2 Typical connection diagram for the integration<br />
Page 5 <strong>of</strong> 10
Fig. 3 INT-RS dip switch setting with exemplary address<br />
4. CONFIGURATION OF <strong>INTEGRA</strong> ALARM SYSTEM<br />
The configuration <strong>of</strong> whole <strong>INTEGRA</strong> <strong>alarm</strong> <strong>system</strong> is not the subject <strong>of</strong> present manual. It is<br />
assumed that the installer can configure <strong>alarm</strong> zones <strong>and</strong> users based on the information given in<br />
<strong>INTEGRA</strong> manuals. It is also necessary to indicate that <strong>INTEGRA</strong> <strong>and</strong> <strong>RACS</strong> 4 <strong>system</strong>s do not<br />
synchronize automatically their settings. Therefore it is possible to enter contradictory settings in<br />
both <strong>system</strong>s. It is responsibility <strong>of</strong> installer to configure both <strong>system</strong>s in accordance with good<br />
practice <strong>and</strong> present manual.<br />
In this section there are mentioned only guidelines concerning integration <strong>of</strong> <strong>RACS</strong> 4 <strong>and</strong> <strong>INTEGRA</strong><br />
<strong>alarm</strong> <strong>system</strong>.<br />
Note: When configuring <strong>INTEGRA</strong> <strong>alarm</strong> control panel by means <strong>of</strong> DLOADX s<strong>of</strong>tware select the<br />
option Data->Options->Times <strong>and</strong> in the new window enter 0 for the option No armed<br />
indication after:<br />
5. CONFIGURATION OF <strong>RACS</strong> 4 SYSTEM<br />
5.1 Configuration <strong>of</strong> CPR32-NET by web browser<br />
The configuration <strong>of</strong> communication parameters for CPR32-NET is conducted by means <strong>of</strong> web<br />
browser <strong>and</strong> it requires entering <strong>of</strong> CPR32-NET IP address. Default CPR32-NET parameters are as<br />
follows:<br />
IP address=192.168.0.80<br />
Subnet mask=255.255.255.0<br />
Default gateway=192.168.0.1<br />
Administrator login: admin<br />
Administrator password: admin<br />
UDP port = 3544<br />
Events recorded in internal flash memory<br />
Encrypted communication with default password<br />
It is assumed that mentioned above parameters will be changed in particular access control<br />
installation, specifically IP address <strong>and</strong> administrator password. These parameters can be modified<br />
by means <strong>of</strong> CPR32-NET webpage started with web browser e.g. Internet Explorer.<br />
Note: In order to connect with CPR32-NET in local area network (LAN), the computer must be in<br />
the same subnet. In case <strong>of</strong> CPR32-NET with default IP address, the IP address <strong>of</strong> computer should<br />
be 192.168.0.xxx.<br />
Note: More information on CPR32-NET settings is given in its User Manual.<br />
Page 6 <strong>of</strong> 10
5.2 Configuration <strong>of</strong> sub<strong>system</strong> in PR Master s<strong>of</strong>tware<br />
The integration with <strong>INTEGRA</strong> <strong>system</strong> requires the installation <strong>of</strong> CPR32-NET unit. After the<br />
connection in accordance with diagram shown in fig. 2 it is necessary to download <strong>and</strong> install PR<br />
Master s<strong>of</strong>tware, which is available at www.roger.pl. System setup requires following steps:<br />
creating sub<strong>system</strong><br />
enabling the integration in CPR32-NET properties<br />
defining <strong>and</strong> associating <strong>of</strong> <strong>alarm</strong> zones in both <strong>system</strong>s<br />
Procedure for <strong>system</strong> setup:<br />
1. Select the option Networks <strong>and</strong> then click the button Add Network<br />
2. In the opened window (see fig. 4), select the option Communication port <strong>and</strong> then select<br />
CPR32-NET.<br />
3. By means <strong>of</strong> the option Interface select if CPR32-NET operates in LAN – CPR32-NET UDP<br />
LAN or in WAN – CPR32-NET UDP WAN.<br />
4. In the field Server IP enter IP address <strong>of</strong> your CPR32-NET (default address is 192.168.0.80)<br />
5. In the field Server port enter UDP port <strong>of</strong> your CPR32-NET (default port is 3455).<br />
6. Close the window by means <strong>of</strong> OK button.<br />
Note: In case <strong>of</strong> operation in the same LAN subnet, IP address <strong>and</strong> port <strong>of</strong> CPR32-NET can be<br />
automatically detected by PR Master s<strong>of</strong>tware in window shown in fig. 4.<br />
7. Click the button CPR in the window shown in fig. 5.<br />
8. In the new window select the option Configuration <strong>and</strong> then Integra.<br />
9. In the next window (see fig. 6) activate the option Enable Integra control <strong>and</strong> enter the<br />
password <strong>of</strong> <strong>INTEGRA</strong> administrator user in the field Enter Integra administrator password<br />
<strong>and</strong> in the field Retype Integra administrator password. There is also option which enables<br />
time synchronization between CPR32-NET <strong>and</strong> <strong>INTEGRA</strong> panel in both ways i.e. CPR32-NET -><br />
<strong>INTEGRA</strong> or <strong>INTEGRA</strong> -> CPR32-NET.<br />
10. Click the button OK <strong>and</strong> then send your settings to CPR32-NET by clicking the button<br />
Configure.<br />
11. In window shown in fig. 5 press the button Controllers.<br />
12. In the newly opened window click the button Add<br />
13. PR Master shall search for <strong>Roger</strong> controllers in range <strong>of</strong> 0-99 addresses. When controllers are<br />
detected then they shall be shown in PR Master s<strong>of</strong>tware.<br />
14. Close the window <strong>and</strong> return to the main window <strong>of</strong> PR Master s<strong>of</strong>tware.<br />
Fig. 4 Configuration <strong>of</strong> communication channel<br />
Page 7 <strong>of</strong> 10
Fig. 5 Networks window<br />
Fig. 6 <strong>INTEGRA</strong> window in PR Master<br />
5.3 Definition <strong>and</strong> association <strong>of</strong> <strong>alarm</strong> zones<br />
The primary advantage <strong>of</strong> the integration is concurrent arming <strong>and</strong> disarming <strong>of</strong> <strong>alarm</strong> zones in<br />
both <strong>system</strong>s i.e. <strong>INTEGRA</strong> <strong>and</strong> <strong>RACS</strong> 4. Such arming <strong>and</strong> disarming requires definition <strong>and</strong><br />
association <strong>of</strong> <strong>alarm</strong> zones. Therefore, configure <strong>alarm</strong> zones in <strong>INTEGRA</strong> <strong>system</strong> according to<br />
producer’s manuals. In the main window <strong>of</strong> PR Master s<strong>of</strong>tware select the option Alarm Zones. In<br />
the newly opened window use the button Add <strong>and</strong> in the window shown in fig. 7 create new <strong>alarm</strong><br />
zone in <strong>RACS</strong> 4 <strong>system</strong>.<br />
Page 8 <strong>of</strong> 10
Fig. 7 Add new Alarm Zone window<br />
The option Arm/Disarm schedule can be used for assigning previously defined schedule to the<br />
<strong>alarm</strong> zone <strong>and</strong> the schedule can be defined by means <strong>of</strong> the option Schedules in the main<br />
window <strong>of</strong> PR Master s<strong>of</strong>tware. The option Assign Integra zone can be used for connecting<br />
<strong>INTEGRA</strong> <strong>alarm</strong> zone with <strong>RACS</strong> 4 <strong>alarm</strong> zone.<br />
When <strong>RACS</strong> 4 <strong>alarm</strong> zone is created then it is necessary to assign access controllers to zones. Such<br />
assignment can be done in the properties <strong>of</strong> particular controller by means <strong>of</strong> option, which is<br />
available in Arming tab (PRxx2 series controllers) or Advanced tab (PRxx1 series controllers).<br />
Note: More information on options listed in Arming tab <strong>of</strong> controller properties is given in the<br />
instruction: PRxx2 series controllers, Functional description <strong>and</strong> programming guide. The instruction<br />
is available at www.roger.pl.<br />
6. USE OF <strong>RACS</strong> 4 AND <strong>INTEGRA</strong> ALARM SYSTEM <strong>INTEGRA</strong>TION<br />
After proper connection <strong>of</strong> <strong>RACS</strong> 4 <strong>and</strong> <strong>INTEGRA</strong> <strong>alarm</strong> control panel according to section 3 <strong>and</strong><br />
adequate configuration <strong>of</strong> both <strong>system</strong>s according to sections 4 <strong>and</strong> 5, the user can proceed to<br />
apply it in practical applications.<br />
As a result <strong>of</strong> <strong>RACS</strong>4 <strong>and</strong> <strong>INTEGRA</strong> <strong>alarm</strong> control panel integration, which in general perspective<br />
consists in concurrent arming <strong>and</strong> disarming <strong>of</strong> <strong>alarm</strong> zones, both from access control <strong>and</strong> <strong>alarm</strong><br />
<strong>system</strong>s, the new monitor is added in Online monitoring mode – see fig. 8. The exemplary view <strong>of</strong><br />
<strong>INTEGRA</strong> status monitor is shown in fig. 9. The monitor can be used for real time displaying <strong>of</strong><br />
armed/disarmed modes <strong>and</strong> <strong>alarm</strong>s. The window <strong>of</strong> monitor is patterned upon the respective<br />
Partitions State window within DLOADX s<strong>of</strong>tware for configuration <strong>of</strong> <strong>INTEGRA</strong> <strong>alarm</strong> control panel<br />
(Satel). Size <strong>of</strong> the window depends on the number <strong>of</strong> <strong>alarm</strong> zones created in <strong>INTEGRA</strong> panel <strong>and</strong><br />
detected by CPR32-NET. The maximal displayed number <strong>of</strong> zones is 32. The green indicator<br />
<strong>INTEGRA</strong> status signifies correct communication between CPR32-NET <strong>and</strong> <strong>INTEGRA</strong> <strong>alarm</strong> control<br />
panel.<br />
As a result <strong>of</strong> the integration some new events are added in PR Master s<strong>of</strong>tware. These new <strong>alarm</strong><br />
events enable signalling <strong>of</strong> <strong>alarm</strong> <strong>and</strong> fire detection, arming problems <strong>and</strong> communication status.<br />
Page 9 <strong>of</strong> 10
Fig. 8 <strong>INTEGRA</strong> status monitor in Online monitoring mode<br />
Fig. 9 <strong>INTEGRA</strong> status monitor<br />
Contact:<br />
<strong>Roger</strong> sp.j.<br />
82-400 Sztum<br />
Gościszewo 59<br />
Tel.: +48 55 272 0132<br />
Fax: +48 55 272 0133<br />
Tech. support: +48 55 267 0126<br />
E-mail: biuro@roger.pl<br />
Web: www.roger.pl<br />
Page 10 <strong>of</strong> 10