

HQ Open-Toe Hopping Foot Instructions - Handi Quilter
HQ Open-Toe Hopping Foot Instructions - Handi Quilter
HQ Open-Toe Hopping Foot Instructions - Handi Quilter

Create successful ePaper yourself
Turn your PDF publications into a flip-book with our unique Google optimized e-Paper software.
<strong>Open</strong>-<strong>Toe</strong> <strong>Hopping</strong> <strong>Foot</strong><br />
Installation <strong>Instructions</strong><br />
Overview<br />
These instructions and the <strong>Open</strong>-<strong>Toe</strong> <strong>Hopping</strong> <strong>Foot</strong><br />
Kit include everything you need to replace the existing<br />
hopping foot with the open-toe hopping foot.<br />
Follow these steps to ensure that there is sufficient<br />
clearance to completely remove the existing hopping<br />
foot and thread the new one into the presser bar<br />
without interference.<br />
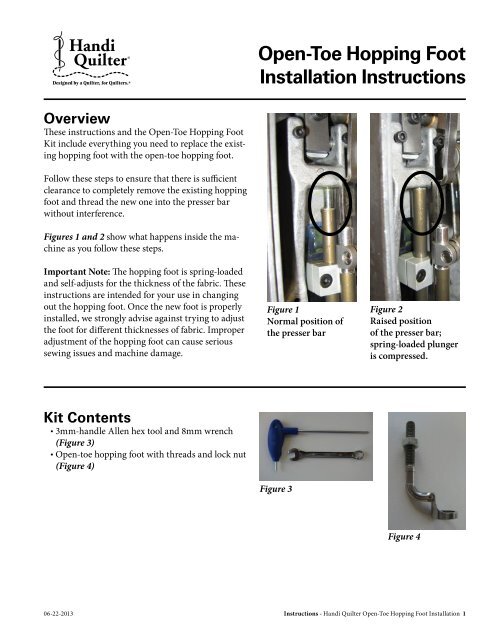
Figures 1 and 2 show what happens inside the machine<br />
as you follow these steps.<br />
Important Note: The hopping foot is spring-loaded<br />
and self-adjusts for the thickness of the fabric. These<br />
instructions are intended for your use in changing<br />
out the hopping foot. Once the new foot is properly<br />
installed, we strongly advise against trying to adjust<br />
the foot for different thicknesses of fabric. Improper<br />
adjustment of the hopping foot can cause serious<br />
sewing issues and machine damage.<br />
Figure 1<br />
Normal position of<br />
the presser bar<br />
Figure 2<br />
Raised position<br />
of the presser bar;<br />
spring-loaded plunger<br />
is compressed.<br />
Kit Contents<br />
• 3mm-handle Allen hex tool and 8mm wrench<br />
(Figure 3)<br />
• <strong>Open</strong>-toe hopping foot with threads and lock nut<br />
(Figure 4)<br />
Figure 3<br />
Figure 4<br />
06-22-2013<br />
<strong>Instructions</strong> - <strong>Handi</strong> <strong>Quilter</strong> <strong>Open</strong>-<strong>Toe</strong> <strong>Hopping</strong> <strong>Foot</strong> Installation 1
To Change (or Remove) the<br />
Original <strong>Hopping</strong> <strong>Foot</strong><br />
A<br />
C<br />
B<br />
Please read all instructions before replacing the<br />
hopping foot.<br />
1. Remove the needle.<br />
2. Lower the needle bar to its lowest position. In<br />
this position the spring-loaded presser bar is at<br />
its lowest position. The hopping foot is nearly<br />
touching the needle plate (Figure 5).<br />
3. Place the handle of the 3mm Allen hex tool<br />
through the adjustment access hole (Figure 6)<br />
and loosen the screw “C” (Figure 7) by turning<br />
it counterclockwise.<br />
D<br />
Figure 5<br />
A: Spring-loaded Presser Bar<br />
B: Needle Bar<br />
C: Lock Nut<br />
D: <strong>Hopping</strong> <strong>Foot</strong><br />
E: Needle Clamp<br />
E<br />
Adjustment<br />
Access Hole for<br />
Screw “C”<br />
Screw “C”<br />
Figure 6<br />
Figure 7 Inside view of Screw “C” (cover to be only<br />
removed by authorized Hanid <strong>Quilter</strong> retailer).<br />
2 <strong>Instructions</strong> - <strong>Handi</strong> <strong>Quilter</strong> <strong>Open</strong>-<strong>Toe</strong> <strong>Hopping</strong> <strong>Foot</strong> Installation www.<strong>Handi</strong><strong>Quilter</strong>.com
Keep the hex tool in screw “C” and while holding the<br />
tool firmly down, use your other hand to wiggle or<br />
twist the hopping foot and presser bar up (Figure 8)<br />
to raise them until the hopping foot is as high as it<br />
will go above the needle plate, almost ¾” (Figure 9).<br />
Then retighten screw “C” by turning it clockwise.<br />
This essential step raises the hopping foot high<br />
enough that it can be unscrewed completely in a<br />
later step.<br />
4. Raise the needle bar to its highest position by<br />
turning the handwheel (Figure 11, on next page).<br />
While holding the hopping foot firmly, loosen the<br />
lock nut by turning it clockwise with the 8mm<br />
wrench (Figure 10).<br />
Note: If necessary, use a wrench or pliers to aid in<br />
holding the hopping foot firmly in place. Be careful<br />
not to scratch the hopping foot with tool.<br />
Figure 8<br />
Figure 9<br />
<strong>Hopping</strong> foot is raised to 3/4” above the needle<br />
plate. The needle bar is at its highest position.<br />
Figure 10<br />
06-22-2013<br />
<strong>Instructions</strong> - <strong>Handi</strong> <strong>Quilter</strong> <strong>Open</strong>-<strong>Toe</strong> <strong>Hopping</strong> <strong>Foot</strong> Installation 3
5. Note: In this step the existing hopping foot is<br />
removed. For reference when replacing the foot,<br />
count the number of complete turns it takes to<br />
remove it. It will typically take about 12 clockwise<br />
turns to fully remove the hopping foot<br />
from the presser bar.<br />
Remove the hopping foot by turning it clockwise.<br />
Do not allow the bottom of the foot to<br />
drag across the needle plate while removing the<br />
hopping foot as this may scratch the needle plate.<br />
Remove the needle plate if necessary.<br />
6. Attach the open-toe hopping foot by turning it<br />
counterclockwise into the presser bar the same<br />
number of revolutions it took to remove the<br />
existing foot (usually 12 counterclockwise turns).<br />
Be careful to start it straight into the presser bar<br />
threads. If it starts to go crooked or is too hard to<br />
turn, remove the foot and try again making sure<br />
it goes in straight and with reasonable effort.<br />
Figure 11<br />
7. Lower the needle bar to its lowest position by<br />
turning the handwheel (Figure 11).<br />
8. Hold the open-toe hopping foot securely and<br />
firmly tighten the lock nut by turning it counterclockwise<br />
using the 8mm wrench. Use another<br />
tool to hold the foot if necessary (Figure 12).<br />
Important Note: If the lock nut is not firmly tightened<br />
and the hopping foot gets loose, it can rotate,<br />
allowing the needle to collide with it and cause<br />
problems.<br />
Figure 12<br />
9. To lower the open-toe hopping foot back down<br />
to the needle plate, use the 3mm Allen hex tool<br />
to again loosen screw “C” by turning it counterclockwise<br />
(Figure 13). Then wiggle or twist the<br />
foot until it makes contact with the needle plate<br />
(Figure 14, next page). Do not tighten screw<br />
“C” yet.<br />
10. To set the open-toe hopping foot’s final height,<br />
lift the foot and place a .5mm feeler gauge or<br />
a business card under the open-toe hopping<br />
foot (Figure 15, next page). Wiggle or twist the<br />
presser foot until it rests firmly on the business<br />
card or gauge.<br />
Figure 13<br />
4 <strong>Instructions</strong> - <strong>Handi</strong> <strong>Quilter</strong> <strong>Open</strong>-<strong>Toe</strong> <strong>Hopping</strong> <strong>Foot</strong> Installation www.<strong>Handi</strong><strong>Quilter</strong>.com
11. Carefully move the business card or gauge aside<br />
and center the open-toe hopping foot ring over<br />
the needle plate hole. Use the 3mm Allen hex<br />
tool to tighten screw “C” clockwise. Push down<br />
lightly on the hex tool blade while tightening.<br />
(Figure 16).<br />
Figure 17 is an inside view of machine. There<br />
should be no gap between the lifting link and<br />
the hopping block mechanism. Firmly tighten<br />
screw “C” (Figure 18).<br />
Important Note: If screw “C” is not tightened firmly,<br />
the foot could rotate and the presser bar height could<br />
change and cause sewing problems and safety issues.<br />
12. Reinstall the needle.<br />
Figure 14<br />
Push down<br />
while tightening<br />
Figure 15 Figure 16<br />
No Gap<br />
here<br />
Screw “C”<br />
Figure 17 Inside view of “no-gap” area (cover to be<br />
only removed by authorized <strong>Handi</strong> <strong>Quilter</strong> retailer).<br />
06-22-2013<br />
Figure 18 Inside view of Screw “C” (cover to be only<br />
removed by authorized <strong>Handi</strong> <strong>Quilter</strong> retailer).<br />
<strong>Instructions</strong> - <strong>Handi</strong> <strong>Quilter</strong> <strong>Open</strong>-<strong>Toe</strong> <strong>Hopping</strong> <strong>Foot</strong> Installation 5
Final Quality Check: If hopping foot is properly<br />
installed,<br />
• The hand wheel will turn freely through an entire<br />
stitch cycle.<br />
• When the needle and hopping foot are in their<br />
lowest position, the hopping foot will be no more<br />
than .5mm above the needle plate. It is allowable<br />
for the hopping foot to lightly touch the needle<br />
plate.<br />
• The hopping foot ring will be centered over the<br />
needle plate hole.<br />
Too much gap between the hopping foot and needle<br />
plate may cause sewing issues, including skipped<br />
stitches. Figures 19 and 20 show correct height<br />
setting.<br />
Figure 19 (Shows correct height setting)<br />
Figure 19 (Shows correct height setting)<br />
6 <strong>Instructions</strong> - <strong>Handi</strong> <strong>Quilter</strong> <strong>Open</strong>-<strong>Toe</strong> <strong>Hopping</strong> <strong>Foot</strong> Installation www.<strong>Handi</strong><strong>Quilter</strong>.com


