Can't Connect to 4800 - dbx
Can't Connect to 4800 - dbx
Can't Connect to 4800 - dbx

Create successful ePaper yourself
Turn your PDF publications into a flip-book with our unique Google optimized e-Paper software.
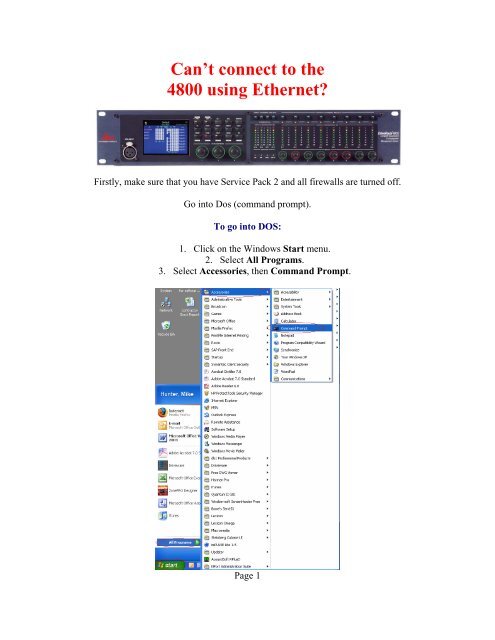
Can’t connect <strong>to</strong> the<br />
<strong>4800</strong> using Ethernet?<br />
Firstly, make sure that you have Service Pack 2 and all firewalls are turned off.<br />
Go in<strong>to</strong> Dos (command prompt).<br />
To go in<strong>to</strong> DOS:<br />
1. Click on the Windows Start menu.<br />
2. Select All Programs.<br />
3. Select Accessories, then Command Prompt.<br />
Page 1
Type “ipconfig”, then press Enter.<br />
Your IP address along with the subnet mask will be displayed. Make sure <strong>to</strong> look at<br />
the IP address for the network card that is connected <strong>to</strong> the <strong>4800</strong>.<br />
Page 2
On the Driverack <strong>4800</strong>:<br />
1. Press the UTILITY but<strong>to</strong>n.<br />
2. Turn the # 1 ENCODER until you have selected “Network”.<br />
3. Press the # 1 ENCODER in.<br />
4. Turn the # 1 ENCODER until you have selected “DHCP Enabled”.<br />
5. Turn the # 3 ENCODER until it reads “DHCP Disabled”.<br />
6 . Turn the # 1 ENCODER until the first section of the IP address is highlighted in<br />
blue.<br />
7. You must change the IP address so that it matches your network address. For<br />
example: The network ID in the above Dos window is 10.0 because the subnet<br />
m ask identifies the network ID with the # “255”. The “.1.4” is the computer ID.<br />
Your <strong>4800</strong> should contain different #s for this field (i.e. “.1.5” would work as this<br />
means the <strong>4800</strong> ID is “15”). They can be any # between 1 and 255, but they<br />
should not be the same as any other device on the network.<br />
8. Turn the # 3 ENCODER <strong>to</strong> change the IP address of the <strong>4800</strong>. You can press the<br />
# 3 ENCODER in <strong>to</strong> <strong>to</strong>ggle between course (red ring) and fine (green ring)<br />
adjustments.<br />
9. Use the # 1 ENCODER <strong>to</strong> select the different sections.<br />
10. Change the subnet mask in the <strong>4800</strong> <strong>to</strong> match the computers subnet mask<br />
(in the above example it is 255.255.0.0).<br />
11. Once you have changed the IP address and subnet mask, press and hold<br />
the STORE but<strong>to</strong>n until the prompt appears and then disappears.<br />
Note: You may have <strong>to</strong> wait a moment for the <strong>4800</strong> <strong>to</strong> change the IP address. Just<br />
wait a moment then press and hold the STORE but<strong>to</strong>n (multiple times if needed) until<br />
you see the prompt.<br />
Page 3
Re-open System Architect. The <strong>4800</strong> should now appear in the upper left corner of<br />
the Venue View window. If you are still not connected, make sure the network is<br />
active in the bot<strong>to</strong>m left corner of the window. If it says “Network Inactive” left click<br />
on the but<strong>to</strong>n <strong>to</strong> activate it.<br />
If you are still not connected select Tools then Options.<br />
Page 4
Select Manage Network <strong>Connect</strong>ions.<br />
If the IP address does not appear in the “Ethernet Interfaces” box, select Add<br />
<strong>Connect</strong>ion.<br />
Page 5
Select the Ethernet Interface that you would like <strong>to</strong> use for connecting <strong>to</strong> the <strong>4800</strong> then<br />
select Add <strong>Connect</strong>ion.<br />
Select OK.<br />
Page 6
The <strong>4800</strong> should now appear in the upper left corner of the Venue View window.<br />
If you still cannot connect, please take a look at the owners manual or contact <strong>dbx</strong><br />
Technical Support.<br />
Page 7