Jackfruit extension manual.pdf - Crops for the Future
Jackfruit extension manual.pdf - Crops for the Future
Jackfruit extension manual.pdf - Crops for the Future

You also want an ePaper? Increase the reach of your titles
YUMPU automatically turns print PDFs into web optimized ePapers that Google loves.
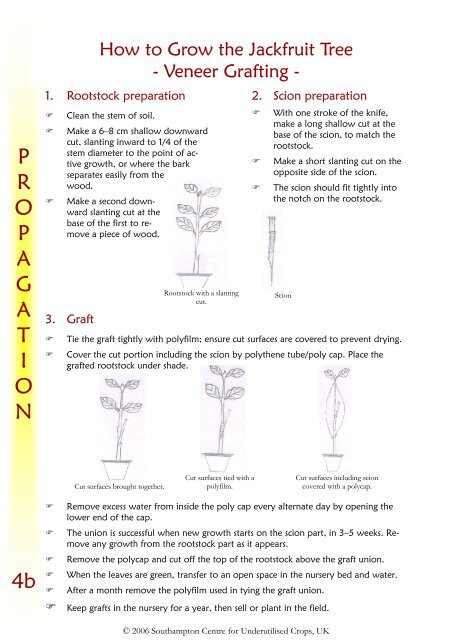
How to Grow <strong>the</strong> <strong>Jackfruit</strong> Tree<br />
- Veneer Grafting -<br />
P<br />
R<br />
O<br />
P<br />
A<br />
G<br />
A<br />
T<br />
I<br />
O<br />
N<br />
1. Rootstock preparation<br />
<br />
<br />
<br />
Clean <strong>the</strong> stem of soil.<br />
Make a 6–8 cm shallow downward<br />
cut, slanting inward to 1/4 of <strong>the</strong><br />
stem diameter to <strong>the</strong> point of active<br />
growth, or where <strong>the</strong> bark<br />
separates easily from <strong>the</strong><br />
wood.<br />
Make a second downward<br />
slanting cut at <strong>the</strong><br />
base of <strong>the</strong> first to remove<br />
a piece of wood.<br />
3. Graft<br />
<br />
<br />
Rootstock with a slanting<br />
cut.<br />
2. Scion preparation<br />
<br />
<br />
<br />
With one stroke of <strong>the</strong> knife,<br />
make a long shallow cut at <strong>the</strong><br />
base of <strong>the</strong> scion, to match <strong>the</strong><br />
rootstock.<br />
Make a short slanting cut on <strong>the</strong><br />
opposite side of <strong>the</strong> scion.<br />
The scion should fit tightly into<br />
<strong>the</strong> notch on <strong>the</strong> rootstock.<br />
Tie <strong>the</strong> graft tightly with polyfilm; ensure cut surfaces are covered to prevent drying.<br />
Scion<br />
Cover <strong>the</strong> cut portion including <strong>the</strong> scion by poly<strong>the</strong>ne tube/poly cap. Place <strong>the</strong><br />
grafted rootstock under shade.<br />
Cut surfaces brought toge<strong>the</strong>r.<br />
Cut surfaces tied with a<br />
polyfilm.<br />
Cut surfaces including scion<br />
covered with a polycap.<br />
4b<br />
<br />
<br />
<br />
<br />
<br />
Remove excess water from inside <strong>the</strong> poly cap every alternate day by opening <strong>the</strong><br />
lower end of <strong>the</strong> cap.<br />
The union is successful when new growth starts on <strong>the</strong> scion part, in 3–5 weeks. Remove<br />
any growth from <strong>the</strong> rootstock part as it appears.<br />
Remove <strong>the</strong> polycap and cut off <strong>the</strong> top of <strong>the</strong> rootstock above <strong>the</strong> graft union.<br />
When <strong>the</strong> leaves are green, transfer to an open space in <strong>the</strong> nursery bed and water.<br />
After a month remove <strong>the</strong> polyfilm used in tying <strong>the</strong> graft union.<br />
Keep grafts in <strong>the</strong> nursery <strong>for</strong> a year, <strong>the</strong>n sell or plant in <strong>the</strong> field.<br />
© 2006 Southampton Centre <strong>for</strong> Underutilised <strong>Crops</strong>, UK