RelyX⢠ARC Adhesive Resin Cement - Dale Dental
RelyX⢠ARC Adhesive Resin Cement - Dale Dental
RelyX⢠ARC Adhesive Resin Cement - Dale Dental
Create successful ePaper yourself
Turn your PDF publications into a flip-book with our unique Google optimized e-Paper software.
22<br />
Technique Guides<br />
CROWN AND BRIDGE CEMENTATION<br />
RelyX <strong>ARC</strong><br />
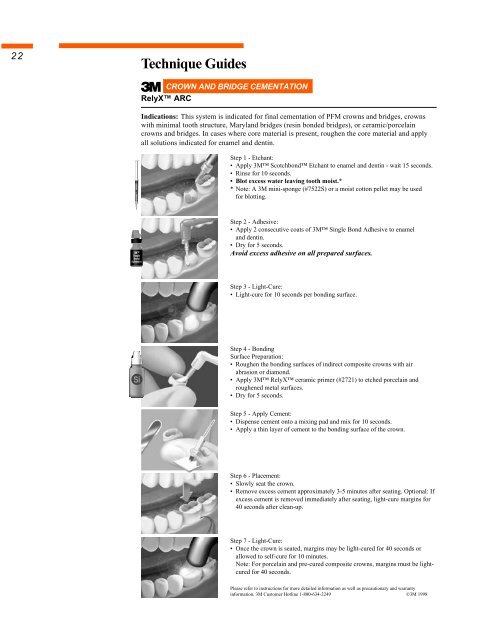
Indications: This system is indicated for final cementation of PFM crowns and bridges, crowns<br />
with minimal tooth structure, Maryland bridges (resin bonded bridges), or ceramic/porcelain<br />
crowns and bridges. In cases where core material is present, roughen the core material and apply<br />
all solutions indicated for enamel and dentin.<br />
Step 1 - Etchant:<br />
• Apply 3M Scotchbond Etchant to enamel and dentin - wait 15 seconds.<br />
• Rinse for 10 seconds.<br />
• Blot excess water leaving tooth moist.*<br />
* Note: A 3M mini-sponge (#7522S) or a moist cotton pellet may be used<br />
for blotting.<br />
Step 2 - <strong>Adhesive</strong>:<br />
• Apply 2 consecutive coats of 3M Single Bond <strong>Adhesive</strong> to enamel<br />
and dentin.<br />
• Dry for 5 seconds.<br />
Avoid excess adhesive on all prepared surfaces.<br />
Step 3 - Light-Cure:<br />
• Light-cure for 10 seconds per bonding surface.<br />
Step 4 - Bonding<br />
Surface Preparation:<br />
• Roughen the bonding surfaces of indirect composite crowns with air<br />
abrasion or diamond.<br />
• Apply 3M RelyX ceramic primer (#2721) to etched porcelain and<br />
roughened metal surfaces.<br />
• Dry for 5 seconds.<br />
Step 5 - Apply <strong>Cement</strong>:<br />
• Dispense cement onto a mixing pad and mix for 10 seconds.<br />
• Apply a thin layer of cement to the bonding surface of the crown.<br />
Step 6 - Placement:<br />
• Slowly seat the crown.<br />
• Remove excess cement approximately 3-5 minutes after seating. Optional: If<br />
excess cement is removed immediately after seating, light-cure margins for<br />
40 seconds after clean-up.<br />
Step 7 - Light-Cure:<br />
• Once the crown is seated, margins may be light-cured for 40 seconds or<br />
allowed to self-cure for 10 minutes.<br />
Note: For porcelain and pre-cured composite crowns, margins must be lightcured<br />
for 40 seconds.<br />
Please refer to instructions for more detailed information as well as precautionary and warranty<br />
information. 3M Customer Hotline 1-800-634-2249 ©3M 1998


