
You also want an ePaper? Increase the reach of your titles
YUMPU automatically turns print PDFs into web optimized ePapers that Google loves.
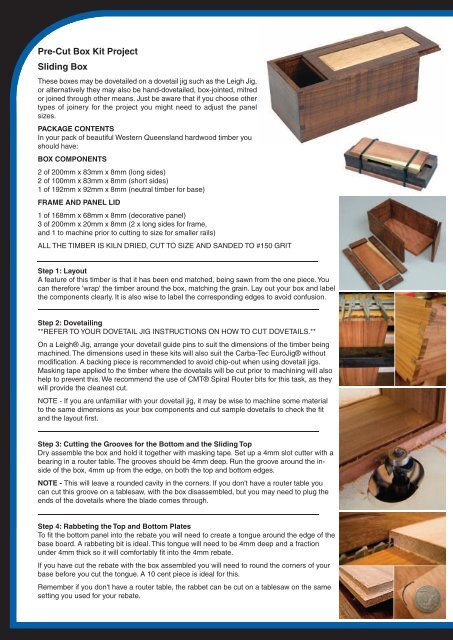
Pre-Cut Box Kit Project<br />
Sliding Box<br />
These boxes may be dovetailed on a dovetail jig such as the Leigh Jig,<br />
or alternatively they may also be hand-dovetailed, box-jointed, mitred<br />
or joined through other means. Just be aware that if you choose other<br />
types of joinery for the project you might need to adjust the panel<br />
sizes.<br />
PACKAGE CONTENTS<br />
In your pack of beautiful Western Queensland hardwood timber you<br />
should have:<br />
BOX COMPONENTS<br />
2 of 200mm x 83mm x 8mm (long sides)<br />
2 of 100mm x 83mm x 8mm (short sides)<br />
1 of 192mm x 92mm x 8mm (neutral timber for base)<br />
FRAME AND PANEL LID<br />
1 of 168mm x 68mm x 8mm (decorative panel)<br />
3 of 200mm x 20mm x 8mm (2 x long sides for frame,<br />
and 1 to machine prior to cutting to size for smaller rails)<br />
ALL THE TIMBER IS KILN DRIED, CUT TO SIZE AND SANDED TO #150 GRIT<br />
Step 1: Layout<br />
A feature of this timber is that it has been end matched, being sawn from the one piece. You<br />
can therefore 'wrap' the timber around the box, matching the grain. Lay out your box and label<br />
the components clearly. It is also wise to label the corresponding edges to avoid confusion.<br />
Step 2: Dovetailing<br />
**REFER TO YOUR DOVETAIL JIG INSTRUCTIONS ON HOW TO CUT DOVETAILS.**<br />
On a Leigh® Jig, arrange your dovetail guide pins to suit the dimensions of the timber being<br />
machined. The dimensions used in these kits will also suit the <strong>Carba</strong>-<strong>Tec</strong> EuroJig® without<br />
modification. A backing piece is recommended to avoid chip-out when using dovetail jigs.<br />
Masking tape applied to the timber where the dovetails will be cut prior to machining will also<br />
help to prevent this. We recommend the use of CMT® Spiral <strong>Router</strong> bits for this task, as they<br />
will provide the cleanest cut.<br />
NOTE - If you are unfamiliar with your dovetail jig, it may be wise to machine some material<br />
to the same dimensions as your box components and cut sample dovetails to check the fit<br />
and the layout first.<br />
Step 3: Cutting the Grooves for the Bottom and the Sliding Top<br />
Dry assemble the box and hold it together with masking tape. Set up a 4mm slot cutter with a<br />
bearing in a router table. The grooves should be 4mm deep. Run the groove around the inside<br />
of the box, 4mm up from the edge, on both the top and bottom edges.<br />
NOTE - This will leave a rounded cavity in the corners. If you don't have a router table you<br />
can cut this groove on a tablesaw, with the box disassembled, but you may need to plug the<br />
ends of the dovetails where the blade comes through.<br />
Step 4: Rabbeting the Top and Bottom Plates<br />
To fit the bottom panel into the rebate you will need to create a tongue around the edge of the<br />
base board. A rabbeting bit is ideal. This tongue will need to be 4mm deep and a fraction<br />
under 4mm thick so it will comfortably fit into the 4mm rebate.<br />
If you have cut the rebate with the box assembled you will need to round the corners of your<br />
base before you cut the tongue. A 10 cent piece is ideal for this.<br />
Remember if you don't have a router table, the rabbet can be cut on a tablesaw on the same<br />
setting you used for your rebate.