How to Set Up Exchange E-mail on Android Phone
How to Set Up Exchange E-mail on Android Phone
How to Set Up Exchange E-mail on Android Phone

You also want an ePaper? Increase the reach of your titles
YUMPU automatically turns print PDFs into web optimized ePapers that Google loves.
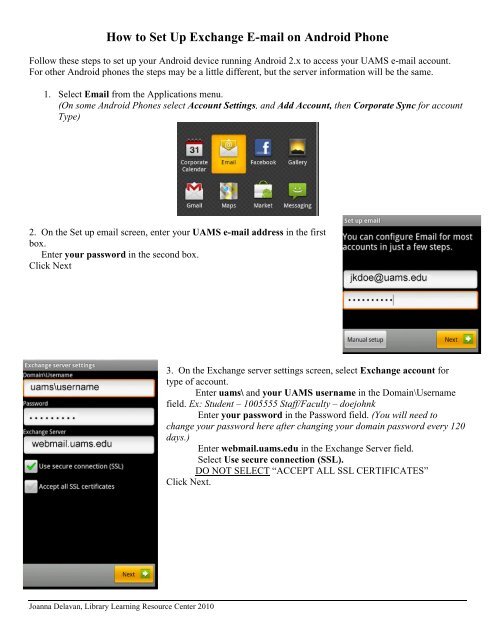
<str<strong>on</strong>g>How</str<strong>on</strong>g> <str<strong>on</strong>g>to</str<strong>on</strong>g> <str<strong>on</strong>g>Set</str<strong>on</strong>g> <str<strong>on</strong>g>Up</str<strong>on</strong>g> <str<strong>on</strong>g>Exchange</str<strong>on</strong>g> E-<str<strong>on</strong>g>mail</str<strong>on</strong>g> <strong>on</strong> <strong>Android</strong> Ph<strong>on</strong>e<br />
Follow these steps <str<strong>on</strong>g>to</str<strong>on</strong>g> set up your <strong>Android</strong> device running <strong>Android</strong> 2.x <str<strong>on</strong>g>to</str<strong>on</strong>g> access your UAMS e-<str<strong>on</strong>g>mail</str<strong>on</strong>g> account.<br />
For other <strong>Android</strong> ph<strong>on</strong>es the steps may be a little different, but the server informati<strong>on</strong> will be the same.<br />
1. Select E<str<strong>on</strong>g>mail</str<strong>on</strong>g> from the Applicati<strong>on</strong>s menu.<br />
(On some <strong>Android</strong> Ph<strong>on</strong>es select Account <str<strong>on</strong>g>Set</str<strong>on</strong>g>tings, and Add Account, then Corporate Sync for account<br />
Type)<br />
2. On the <str<strong>on</strong>g>Set</str<strong>on</strong>g> up e<str<strong>on</strong>g>mail</str<strong>on</strong>g> screen, enter your UAMS e-<str<strong>on</strong>g>mail</str<strong>on</strong>g> address in the first<br />
box.<br />
Enter your password in the sec<strong>on</strong>d box.<br />
Click Next<br />
3. On the <str<strong>on</strong>g>Exchange</str<strong>on</strong>g> server settings screen, select <str<strong>on</strong>g>Exchange</str<strong>on</strong>g> account for<br />
type of account.<br />
Enter uams\ and your UAMS username in the Domain\Username<br />
field. Ex: Student – 1005555 Staff/Faculty – doejohnk<br />
Enter your password in the Password field. (You will need <str<strong>on</strong>g>to</str<strong>on</strong>g><br />
change your password here after changing your domain password every 120<br />
days.)<br />
Enter web<str<strong>on</strong>g>mail</str<strong>on</strong>g>.uams.edu in the <str<strong>on</strong>g>Exchange</str<strong>on</strong>g> Server field.<br />
Select Use secure c<strong>on</strong>necti<strong>on</strong> (SSL).<br />
DO NOT SELECT “ACCEPT ALL SSL CERTIFICATES”<br />
Click Next.<br />
Joanna Delavan, Library Learning Resource Center 2010
4. On the Account opti<strong>on</strong>s screen, select the frequency you wish <str<strong>on</strong>g>to</str<strong>on</strong>g> sync your<br />
ph<strong>on</strong>e with the web<str<strong>on</strong>g>mail</str<strong>on</strong>g> server in the E<str<strong>on</strong>g>mail</str<strong>on</strong>g> checking frequency secti<strong>on</strong>.<br />
Choose the length of time/amount of messages you wish <str<strong>on</strong>g>to</str<strong>on</strong>g> in the<br />
Amount <str<strong>on</strong>g>to</str<strong>on</strong>g> synchr<strong>on</strong>ize secti<strong>on</strong>.<br />
Check Send e<str<strong>on</strong>g>mail</str<strong>on</strong>g> from this account by default if you want your<br />
UAMS e<str<strong>on</strong>g>mail</str<strong>on</strong>g> <str<strong>on</strong>g>to</str<strong>on</strong>g> be the default account <strong>on</strong> your ph<strong>on</strong>e.<br />
Select Notify me when e<str<strong>on</strong>g>mail</str<strong>on</strong>g> arrives,<br />
Select Sync c<strong>on</strong>tacts from this account.<br />
Click Next.<br />
5. On the <str<strong>on</strong>g>Set</str<strong>on</strong>g> up e<str<strong>on</strong>g>mail</str<strong>on</strong>g> screen, enter a name for the account (example:<br />
UAMS) in the Give this account a name (opti<strong>on</strong>al) box.<br />
Enter your name in the next box.<br />
Click D<strong>on</strong>e.<br />
Joanna Delavan, Library Learning Resource Center 2010