
You also want an ePaper? Increase the reach of your titles
YUMPU automatically turns print PDFs into web optimized ePapers that Google loves.
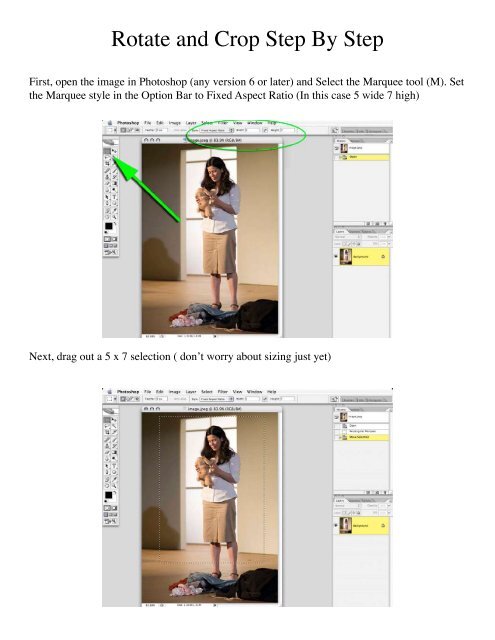
<strong>Rotate</strong> <strong>and</strong> <strong>Crop</strong> <strong>Step</strong> <strong>By</strong> <strong>Step</strong><br />
First, open the image in Photoshop (any version 6 or later) <strong>and</strong> Select the Marquee tool (M). Set<br />
the Marquee style in the Option Bar to Fixed Aspect Ratio (In this case 5 wide 7 high)<br />
Next, drag out a 5 x 7 selection ( don’t worry about sizing just yet)
Next, we will scale <strong>and</strong> rotate the selection. Go to Select>Transform Selection.<br />
You will now see a control box (8 h<strong>and</strong>led bounding box). Moving your cursor outside of the<br />
box <strong>and</strong> will give you the rotate tool
Click <strong>and</strong> drag with your mouse outside of the control box to rotate the selection only. Once you<br />
have the rotation correct hold down the Option <strong>and</strong> Shift keys on Mac (Alt <strong>and</strong> Shift on PC) <strong>and</strong><br />
drag one of the corner h<strong>and</strong>les of the control box to scale the selection. Holding the Option (Alt)<br />
key scales from the center while the Shift key retains the original proportions.<br />
Once you have your selection correct press the enter key by your number pad to accept the<br />
changes
Next go to Layer>New>Layer via Copy to copy the contents of the selecion to it’s own layer.
Select the background layer in the layer palette ( if you want to effect it you must select it!) then<br />
go to Edit>Fill<br />
Fill the background layer with White from the drop down menu
Next we will flatten the image by going to Layer>Flatten Image. Finally we will go crop the<br />
image out by going to File>Automate><strong>Crop</strong> & Straighten Photos (Photoshop CS <strong>and</strong> CS2 Only)