FINESSE A-RH (reduced height) - FINO
FINESSE A-RH (reduced height) - FINO
FINESSE A-RH (reduced height) - FINO

You also want an ePaper? Increase the reach of your titles
YUMPU automatically turns print PDFs into web optimized ePapers that Google loves.
<strong>FINESSE</strong><br />
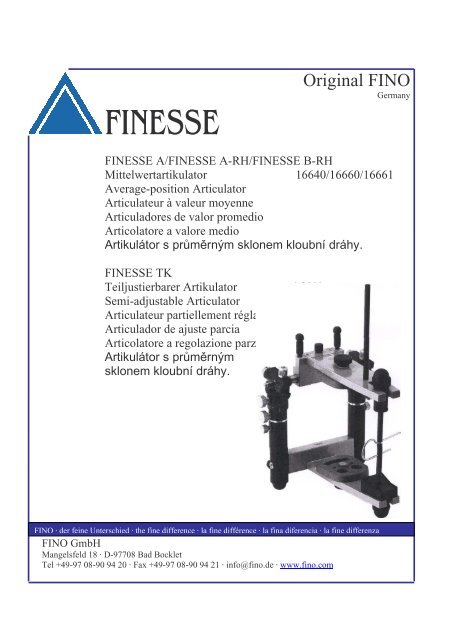
Original <strong>FINO</strong><br />
Germany<br />
<strong>FINESSE</strong> A/<strong>FINESSE</strong> A-<strong>RH</strong>/<strong>FINESSE</strong> B-<strong>RH</strong><br />
Mittelwertartikulator 16640/16660/16661<br />
Average-position Articulator<br />
Articulateur à valeur moyenne<br />
Articuladores de valor promedio<br />
Articolatore a valore medio<br />
Artikulátor s průměrným sklonem kloubní dráhy.<br />
<strong>FINESSE</strong> TK<br />
Teiljustierbarer Artikulator 16641<br />
Semi-adjustable Articulator<br />
Articulateur partiellement réglable<br />
Articulador de ajuste parcia<br />
Articolatore a regolazione parziale<br />
Artikulátor s průměrným<br />
sklonem kloubní dráhy.<br />
<strong>FINO</strong> · der feine Unterschied · the fine difference · la fine différence · la fina diferencia · la fine differenza<br />
<strong>FINO</strong> GmbH<br />
Mangelsfeld 18 · D-97708 Bad Bocklet<br />
Tel +49-97 08-90 94 20 · Fax +49-97 08-90 94 21 · info@fino.de · www.fino.com
1. The Articulator<br />
The articulator is the most important device for the fabrication of dental restorations.<br />
Thereby the function as well as the aesthetic of prosthetic work is closely related to the<br />
quality of the articulator that was used. Different types of restorations as well as the individual<br />
intraoral situation of the patient make high demands on the used articulators.<br />
ARCON and NON ARCON articulators: ARCON stands for articulator condyle. In<br />
ARCON articulators, the condylar balls are attached to the lower part of the articulator.<br />
In NON ARCON articulators they are in the upper part. Thus upper and lower parts of<br />
an articulator form a single unit. The condylar ball is design-related guided in the lower<br />
part of the articulator. This prevents malfunctions, which might be caused by an insufficient<br />
guidance while working.<br />
2. <strong>FINESSE</strong> Articulators<br />
The articulators <strong>FINESSE</strong> A, <strong>FINESSE</strong> A-<strong>RH</strong>, <strong>FINESSE</strong> B-<strong>RH</strong> and <strong>FINESSE</strong> TK have<br />
the same basic design. Upper and lower parts of the articulators are adjusted centrally to<br />
each other.<br />
Compared to the types <strong>FINESSE</strong> A und <strong>FINESSE</strong> TK the articulators <strong>FINESSE</strong> A-<strong>RH</strong><br />
and <strong>FINESSE</strong> B-<strong>RH</strong> have been <strong>reduced</strong> in total <strong>height</strong>. Thus the articulators with the<br />
additional designation <strong>RH</strong> correspond to the mounting <strong>height</strong>s of the earlier Artex ® -<br />
articulators. Because also the base as well as the Splitex ® plates of the Artex®articulators<br />
can be used, both systems are compatible.<br />
Upper and lower parts of the articulators are varnished. All screws are made of stainless<br />
steel. Delivery includes: <strong>FINESSE</strong> articulator complete with base plates, incisal support,<br />
incisal table and incisal guidance pin.<br />
The incisal guidance pin has a millimetre scale. The deepest groove corresponds to the<br />
zero position. (Upper and lower part of the articulator are parallel). The incisal guidance<br />
pin is locked with a screw. The boreholes at the incisal guidance pin serve for positioning<br />
the incisal pointer. The hole in the middle is used to position the incisal pointer. The<br />
tip of the incisal pointer marks the incisal point, which is the tip of the Bonwill triangle.<br />
In the <strong>FINESSE</strong> articulators it has an edge length of 110 mm.<br />
2
The incisal table can be changed. The incisal table must be poisoned in a way that the<br />
incisal support in its zero position is standing exactly in the middle.<br />
The articulator columns have a groove. It is in the <strong>height</strong> of the incisal pointer. Grooves<br />
and incisal pointer serve as orientation for an average position mounting.<br />
At the rear side of the articulator there is an inclined support, which facilitates the slant<br />
positioning of the articulator and thus enables a visual control of the dental technical<br />
work.<br />
13
<strong>FINESSE</strong> A<br />
Non-Arcon Semi-adjustable Articulator<br />
Technical Data:<br />
• Benett angle 15°<br />
• Incisal table 15°<br />
• Condylar inclination 35°<br />
• Intercondylar distance 110 mm<br />
• Weight 820 g<br />
<strong>FINESSE</strong> A-<strong>RH</strong> (<strong>reduced</strong> <strong>height</strong>)<br />
Non-Arcon Semi-adjustable articulator<br />
Technical Data:<br />
• Benett angle 15°<br />
• Incisal table 15°<br />
• Condylar inclination 35°<br />
• Intercondylar distance 110 mm<br />
• Weight 820 g<br />
14
<strong>FINESSE</strong> B-<strong>RH</strong> (<strong>reduced</strong> <strong>height</strong>)<br />
Non-Arcon Semi-adjustable articulator<br />
Benett angle adjustable<br />
Technical Data:<br />
• Benett angle infinitely adjustable<br />
from 0 to 20°<br />
• Incisal table 15°<br />
• Condylar inclination 35°<br />
• Intercondylar distance 110 mm<br />
• Weight 820 g<br />
<strong>FINESSE</strong> TK<br />
Semi-adjustable non-arcon articulator<br />
Technical Data:<br />
• Benett angle infinitely adjustable<br />
from 0 to 20°<br />
• Incisal table 15°<br />
• Condylar inclination infinitely<br />
adjustable from 10 - 60°<br />
• Infinitely variable protrusion up to<br />
5 mm, retrusion up to -2 mm.<br />
• Intercondylar distance 110 mm<br />
• Weight 830 g<br />
15
3. Product description<br />
1 Upper articulator part<br />
2 Lower articulator part<br />
3 Synchronisation column<br />
4 Condylar guidance<br />
5 Bennett angle<br />
6 Incisal support<br />
7 Incisal guidance pin<br />
8 Incisal pointer<br />
Adjustment of Benett angle Condylar inclination Protrusion, retrusion<br />
6
4. Accessories for<br />
<strong>FINESSE</strong> Articulators<br />
1 Splitcast matrix (16649)<br />
2 Bite fork support (16646)<br />
3 Mounting plates, screwable (16652)<br />
4 Occlusal plane template (16647)<br />
5 Magnetic Splitcast system (16648)<br />
6 Transfer stand (16645)<br />
7 Synchronisation column (16644)<br />
The transfer stand is used to insert the<br />
bite fork, which is mounted on the joint<br />
support, into the <strong>FINESSE</strong> articulator. With use of a synchronisation column,<br />
the transport of <strong>FINESSE</strong> articulators<br />
between dental clinic and<br />
dental laboratory can be waived.<br />
17
5. <strong>FINESSE</strong> Facebow<br />
The <strong>FINESSE</strong> TK facebow guarantees a safe transfer of the jaw relationship.<br />
It is transferred to the <strong>FINESSE</strong> TK articulator. Reference plane is the Frankfurt<br />
horizontal.<br />
1 Porus buttons (ear olives)<br />
2 Orbital pointer<br />
3 Locking screw<br />
4 Bite fork<br />
5 Hinged fixation for bite fork<br />
6 Locking screw of registration hinge<br />
7 Nasal bar<br />
Delivery includes:<br />
1 Facebow<br />
1 Nasal bar<br />
1 Bite fork<br />
1 Hinged fixation for bite fork<br />
1 Leather case<br />
Additional space provided for bite fork or<br />
hinged fixation.<br />
18
6. Working with Facebow and<br />
<strong>FINESSE</strong> TK<br />
First a thin layer of wax or thermo-plastic material is applied on the bite fork (4). In case<br />
of insufficient support in a partial dentition it is recommended to build-up the impression<br />
material up to tooth length. The bite fork is now adapted to the upper teeth of the<br />
patient (Pic. 1). It must be observed that sufficient material has been applied so that the<br />
patient cannot bite through on the metal of the bite fork. Subsequently the facebow is<br />
set. This has to be done with an open mouth after the bite fork has been adapted to the<br />
upper teeth (Pic. 2). The procedure is as follows: The bite fork is guided in the facebow<br />
using the hinged fixation (5). Then the Porus buttons (1) – also called ear olives – are<br />
inserted into the acoustic meatus of the patient and the locking screws (3) of the facebow<br />
are tightened for fixation. The nasal bar (7) of the facebow is now set on the Glabella<br />
(bony protuberance of the frontal bone above the root of the nose between the eye<br />
brows) and adapted. The bite fork is inserted into the mouth of the patient and attached<br />
to the teeth of the upper jaw. Then the locking screw of the registration joint is tightened.<br />
19
1. Remove incisal guidance pin, screw incisal<br />
guidance table to the upper part of the<br />
articulator, insert support for bite fork (1)<br />
and place the transfer stand (2) in the articulator.<br />
2. Insert the hinged fixation for the bite fork (5)<br />
into the transfer stand and support the bite<br />
fork with the bite fork support.<br />
3. Screw the incisal guidance pin in the upper<br />
part of the articulator. Insert Splitcast. Open<br />
articulator and position the upper model on<br />
the bite fork (4).<br />
4. Before plastering of the upper model, close<br />
articulator again to estimate the required<br />
quantity of plaster.<br />
10
5. Apply base model plaster on the mounting<br />
plates (Splitcast) and the upper model and<br />
close the articulator.<br />
6. Open articulator after hardening of the<br />
plaster. Insert incisal table in the lower part,<br />
screw in incisal guidance pin and set to<br />
zero position. Attach mounting plates<br />
(Splitcast) to the lower part of the articulator<br />
and place lower jaw model (after registration).<br />
7. Mix base model plaster and apply to<br />
mounting plate (Splitcast) and lower<br />
model.<br />
8. Close articulator.<br />
21