How to Make a Duct Tape Wallet - USAA.com
How to Make a Duct Tape Wallet - USAA.com
How to Make a Duct Tape Wallet - USAA.com

Create successful ePaper yourself
Turn your PDF publications into a flip-book with our unique Google optimized e-Paper software.
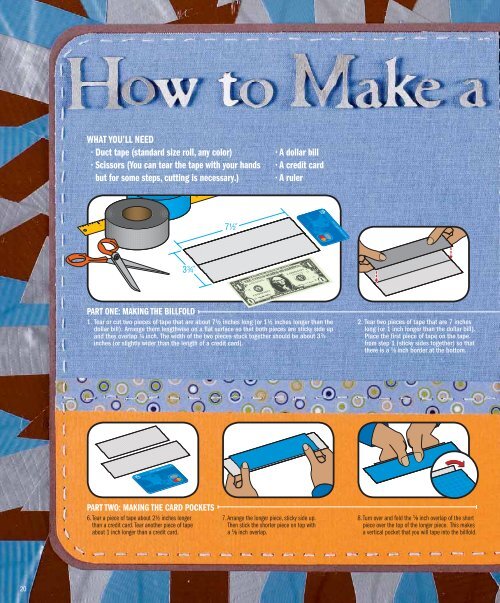
WHAT YOU’LL NEED<br />
· <strong>Duct</strong> tape (standard size roll, any color)<br />
· Scissors (You can tear the tape with your hands<br />
but for some steps, cutting is necessary.)<br />
· A dollar bill<br />
· A credit card<br />
· A ruler<br />
PART ONE: MAKING THE BILLFOLD<br />
1. Tear or cut two pieces of tape that are about 7½ inches long (or 1½ inches longer than the<br />
dollar bill). Arrange them lengthwise on a flat surface so that both pieces are sticky side up<br />
and they overlap ¼ inch. The width of the two pieces stuck <strong>to</strong>gether should be about 3 3 / 4<br />
inches (or slightly wider than the length of a credit card).<br />
2. Tear two pieces of tape that are 7 inches<br />
long (or 1 inch longer than the dollar bill).<br />
Place the first piece of tape on the tape<br />
from step 1 (sticky sides <strong>to</strong>gether) so that<br />
there is a 1 / 8 inch border at the bot<strong>to</strong>m.<br />
PART TWO: MAKING THE CARD POCKETS<br />
6. Tear a piece of tape about 2½ inches longer<br />
than a credit card. Tear another piece of tape<br />
about 1 inch longer than a credit card.<br />
7. Arrange the longer piece, sticky side up.<br />
Then stick the shorter piece on <strong>to</strong>p with<br />
a 1 / 8 inch overlap.<br />
8. Turn over and fold the 1 / 8 inch overlap of the short<br />
piece over the <strong>to</strong>p of the longer piece. This makes<br />
a vertical pocket that you will tape in<strong>to</strong> the billfold.<br />
20
By Katie McCorkell, Team U-TURN member from Washing<strong>to</strong>n<br />
Scrapbook illustrations by Amy T. & Amy S. from Texas<br />
3. Place the other piece so that it is even with<br />
the <strong>to</strong>p. You should have a piece with a<br />
sticky border on three sides. Repeat steps 1<br />
through 3 <strong>to</strong> create a second identical piece.<br />
4. Now stick these two pieces <strong>to</strong>gether using<br />
the sticky borders on the three sides <strong>to</strong><br />
make the billfold. There should be an<br />
opening along one of the long edges.<br />
5. Trim the shorter sides (where the tape is<br />
ragged) so the ends of the billfold are even.<br />
Reinforce by folding a piece of tape over<br />
the ends or any spot that feels fl imsy.<br />
<br />
<br />
<br />
PART THREE: TURNING IT ALL INTO A WALLET<br />
9. Fold billfold in half horizontally so it looks like a wallet (fi gure A). Unfold it (fi gure B). Attach vertical pocket by<br />
placing tape sticky side down about 1 / 8 inch away from the crease (fi gure C). Fold the sticky ends: One on<strong>to</strong> the<br />
outside of the wallet and the other in<strong>to</strong> the inside opening of the billfold (fi gure D). Repeat until you have as<br />
many pockets as you want.<br />
<br />
10. Use layers of duct tape <strong>to</strong> cover any rough edges<br />
or creases in your wallet. Now personalize <strong>to</strong><br />
make it your own.<br />
UTURN@<strong>USAA</strong>.COM | WINTER 2006<br />
*Safer and much less messy than dropping Men<strong>to</strong>s in soda.<br />
21