Afterburner Instruction Manual - High Definition Radio Control
Afterburner Instruction Manual - High Definition Radio Control
Afterburner Instruction Manual - High Definition Radio Control

Create successful ePaper yourself
Turn your PDF publications into a flip-book with our unique Google optimized e-Paper software.
®<br />
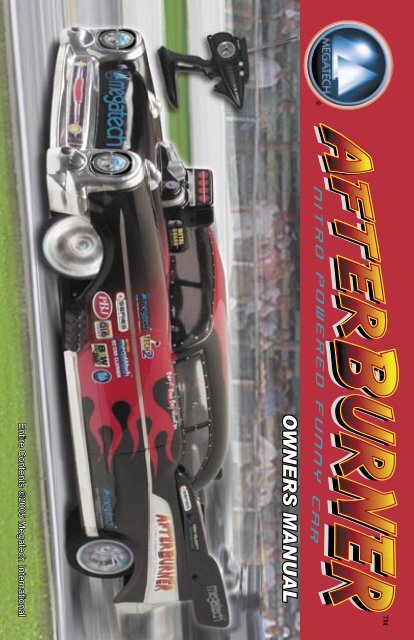
OWNERS MANUAL<br />
Entire Contents ©2005 Megatech International
2<br />
Introduction<br />
If you have questions about operating or installing your new Megatech<br />
product, or if you are missing parts... Please Call Megatech First!<br />
DO NOT RETURN THIS PRODUCT TO THE STORE<br />
Call our Customer Service Department at:<br />
(201) 662-2800<br />
10:30am - 4:30pm, EST Monday through Friday (except holidays)<br />
Technical assistance is also available on-line at www.megatech.com<br />
or by e-mail to info@megatech.com<br />
Congratulations on your purchase of a Megatech ® Nitro-Powered<br />
<strong>High</strong>-Speed Funny Car. Racing has never been more fun! Get ready<br />
to speed into a new world of racing excitement! Your new After<br />
Burner is so easy to prepare, within minutes of opening the<br />
box, it will be ready to race at speeds over 60 MPH.<br />
Please read through these directions before you proceed any<br />
further. If for some reason you think the AfterBurner is not<br />
what you want, do not continue any further. Your hobby dealer<br />
absolutely cannot accept a AfterBurner for return or exchange after<br />
it has been run, or after any of the parts bags have been opened.<br />
If you experience any problems, DO NOT take your AfterBurner back to<br />
the store! Call one of our MegaTechnicians at 1-201-662-2800 or send<br />
an e-mail to: info@megatech.com<br />
TABLE OF CONTENTS<br />
Getting Acquainted with Your AfterBurner .....................................3<br />
Safety Warnings ...............................................................................3<br />
The <strong>Radio</strong> System ............................................................................4<br />
Fuel & Preparations .........................................................................5<br />
Installing Antenna & Batteries .........................................................6<br />
Steering Trim & Operation ..............................................................7<br />
Engine Break In ...............................................................................8<br />
Starting Your Engine ........................................................................9<br />
Your First Run ................................................................................10<br />
Brakes & Throttle Trim ..................................................................11<br />
Maintenance ...................................................................................12<br />
Limited Warranty ...........................................................................13<br />
Exploded Parts View .......................................................................14<br />
Parts List ........................................................................................16
Review the components of the AfterBurner to ensure that your kit<br />
is complete before you begin final assembly. (See Figure 1)<br />
B<br />
Getting Acquainted with Your AfterBurner<br />
C<br />
A<br />
3<br />
Your New AfterBurner<br />
Figure 1 - AfterBurner Contents<br />
Kit Contents:<br />
A. AfterBurner Nitro-Powered <strong>High</strong>-Speed Funny Car<br />
B. 2-Channel <strong>Radio</strong> Transmitter<br />
C. Body Washers and Clips<br />
D. Decal Sheet (Not Shown)<br />
Make sure that you have received all parts shown.<br />
If something is missing, call Megatech toll-free at 1-201-662-2800<br />
Safety Warnings<br />
This is a high-speed vehicle and should be treated with care and respect!<br />
Use extreme caution when operating your AfterBurner. Keep your hands,<br />
fingers and any article of clothing away from the wheels and gears.<br />
Model engine fuel is almost invisible when it burns. Always keep a fire<br />
extinguisher nearby when using model engine fuel. This fuel is dangerous,<br />
poisonous, and highly flammable. Use a fuel dispenser with a fueling probe<br />
to fill the fuel tank. Do not pour fuel into the tank directly from a can or<br />
any other method which can spill raw fuel.
4<br />
The <strong>Radio</strong> System<br />
This vehicle is not a toy and must be operated by an adult who will<br />
handle this car safely and take responsibility to avoid any injury.<br />
This model is designed to be operated only in appropriate areas.<br />
If all of the precautions are followed and your AfterBurner is operated<br />
in a safe and responsible manner, it is an exciting, safe and fun<br />
hobby for you and all who watch.<br />
Required Running Equipment<br />
To operate your AfterBurner, you will need the following items, which<br />
should be available from your local hobby shop.<br />
1. 12 AA alkaline batteries: 8 “AA” alkaline batteries for the<br />
transmitter and 4 “AA” alkaline batteries for the receiver*<br />
2. Glow plug ignitor*<br />
3. Glow plug wrench*<br />
4. Racing Fuel (We recommend<br />
Megatech’s <strong>High</strong> Velocity<br />
Racing Fuel)*<br />
5. Fuel-filler bottle*<br />
6. Flat head screw driver<br />
* These items are available in Megatech’s<br />
Gas Car/Truck Completer Kit, #MTC 7500<br />
(Pictured right).<br />
The AfterBurner <strong>Radio</strong> System<br />
Figure 2 - Completer Kit<br />
The AfterBurner comes with a two-channel radio completely installed. The<br />
transmitter has one channel for digital proportional steering and one channel<br />
for digital proportional throttle control. The receiver and receiver batteries<br />
sit in the sealed radio box. Before running the vehicle, always turn on the<br />
transmitter first and then the receiver. When finished running your After-<br />
Burner for the day, always turn the receiver off first, then the transmitter.<br />
WARNING/CAUTION<br />
THE TRANSMITTER IS ALWAYS THE FIRST TO BE SWITCHED<br />
ON AND THE LAST TO BE SWITCHED OFF. NEVER TURN THE<br />
TRANSMITTER OFF WHILE OPERATING THE CAR. THIS WILL<br />
CAUSE THE AfterBurner TO RUN OUT OF CONTROL AND CAUSE<br />
A DANGEROUS CONDITION.
Fuel<br />
Fuel is the most critical component for making your engine perform<br />
properly. Improper fuels will cause hard starting, poor performance,<br />
and excessive wear on the engine. Fuel for your vehicle must<br />
contain a blend of BOTH synthetic oil and castor oil. Use a highquality<br />
blended fuel. We only recommend Megatech’s <strong>High</strong><br />
Velocity Racing Fuel or another premium quality car/truck fuel with<br />
25% Nitro content.<br />
CAUTION: ALWAYS FOLLOW THE PRECAUTIONS<br />
PRINTED ON THE CONTAINER OF FUEL. KEEP IT AWAY<br />
FROM OPEN FLAMES AND CHILDREN. THE MIXTURE<br />
IS FLAMMABLE AND POISONOUS.<br />
Your AfterBurner features a competition fuel tank and priming<br />
system. The tank uses a spring-loaded filler cap over a wide filler<br />
neck for fast, easy fueling. Simply pull open the lid and it will spring<br />
closed when you remove the nozzle. Remember to use a fuel filler<br />
bottle with an attached long nozzle that can be inserted into the filler<br />
neck. Never pour fuel from an open can into the tank or use a funnel.<br />
Preparing to Race<br />
5<br />
Fuel & Preparations<br />
Your AfterBurner<br />
comes fully assembled and nearly ready to race right<br />
from the box. Very little setup is required, however, proper<br />
preparation is crucial to maximizing the performance and enjoyment<br />
of your vehicle.<br />
First we do recommend that you<br />
tighten down all of the bolts, as they<br />
may have come lose in transit. Be<br />
especially careful with the engine<br />
mounting bolts as shown in<br />
Figure 3. Because the engine has<br />
such high RPMs, it is important to<br />
make sure the bolts have not<br />
vibrated loose after every use.<br />
Figure 3 - Tighten engine mounting bolts
6<br />
Installing the Antenna<br />
Installing Antenna & Batteries<br />
Figure 4 - Install Antenna<br />
Installing the Batteries<br />
Remove the antenna from the slot on top<br />
of the transmitter. Slide it into the hole<br />
on top of the transmitter and turn clock<br />
wise until snug. Do not over-tighten.<br />
A. Be sure that both the transmitter and receiver switches are in the<br />
“off” position.<br />
B. Install 8 fresh “AA” alkaline dry<br />
cell batteries in the transmitter<br />
(see Figure 5) paying careful<br />
attention to proper “+” and “-”<br />
polarity. Turn the transmitter on to<br />
make sure the LED light glows<br />
green. Fresh batteries will provide<br />
2 hours of power to the<br />
transmitter. When the red LED<br />
light glows, immediately install<br />
fresh batteries. Failure to do so will result Figure 5 - Transmitter Batteries<br />
in loss of control and (most likely) a crash.<br />
C. To install the receiver batteries, lift<br />
up on the clasp and gently lift the<br />
cover to the battery box. Then, lift<br />
out the battery guard and the<br />
battery case. Install 4 fresh “AA”<br />
alkaline dry cell batteries and<br />
carefully put everything back into<br />
the battery box (see Figure 6).<br />
Figure 6 - Vehicle Batteries<br />
D. Turn on the transmitter power switch, located<br />
inside the door on the back of the transmitter<br />
(see Figure 7). Next turn on the vehicle’s power<br />
switch and listen for the servos to move slightly.<br />
Move the steering control wheel and the throttle<br />
trigger on the transmitter, making sure that the<br />
steering control operates the front wheels and<br />
Figure 7 - Power Switch
the throttle trigger operates the slide carburetor. If the servos do not<br />
respond, remove the batteries and make sure they are installed<br />
correctly.<br />
E. Turn off the power switch on the car and then on the transmitter.<br />
Steering Trim<br />
Although your AfterBurner<br />
comes factory-assembled, it is<br />
important to finely adjust the steering trim before operating.<br />
1. Turn on the transmitter and<br />
Neutral<br />
then the receiver, but do not<br />
start the engine. Position the<br />
steering trim knob into the<br />
neutral (center) position<br />
(see Figure 8).<br />
2. On a smooth, level, paved<br />
surface, roll the car forward a<br />
few feet at a time. Make sure<br />
it rolls straight, not veering left Figure 8 - Set Trim to Neutral<br />
or right. If it does not roll<br />
straight, adjust the steering knob until the vehicle rolls straight on<br />
its own.<br />
3. It’s also a good idea to test the steering functions while you are checking<br />
the trim. Just like in a car, turning the wheel on the transmitter to the left<br />
makes the vehicles wheels turn left and vice versa.<br />
4. Range Check: Turn on the transmitter and extend the antenna fully then<br />
switch on the model. walk about 150 feet away and make sure the vehicle<br />
responds reliably to the controls.<br />
Operating your AfterBurner<br />
Remember, the AfterBurner<br />
is a high-performance vehicle capable of<br />
reaching speeds of over 60 MPH. It is capable of causing serious injury or<br />
damage if not operated properly. Your AfterBurner is not a toy. It is<br />
designed for operation by or under close supervision of a responsible adult.<br />
Finding the Right Location<br />
Always drive your car in a wide open area, free from trees, cars and other<br />
obstructions. Do not operate this vehicle on highways or in large crowds of<br />
people. Never operate in heavy winds, rainy weather or after dark. Do not<br />
operate your AfterBurner at times or in locations where the engine’s noise<br />
will be objectionable. Wear hearing protection if you are sensitive to engine<br />
noise. Never operate any Nitro- or gas-powered vehicle in dry bush, dry<br />
grass or dry leaves! This creates a very dangerous fire hazard.<br />
7<br />
Steering Trim & Operation
8<br />
Breaking In Your Engine<br />
Engine Break In<br />
Important! For best performance, maximum enjoyment and longest<br />
service, your Q 1.6 HP engine must be properly broken in before you<br />
adjust it for maximum power. Breaking in your engine enables matching<br />
surfaces and parts to establish the correct running tolerances. Properly<br />
breaking in the engine during the first tanks of fuel will<br />
determine how well your engine will run for its entire life.<br />
Breaking in simply requires you<br />
to run three tanks of fuel<br />
through the engine at reduced<br />
power. It’s a great opportunity<br />
to get used to driving your<br />
AfterBurner before it<br />
reaches maximum speed. After<br />
the break in, you may adjust<br />
your engine for maximum<br />
power.<br />
The engine is adjusted at the<br />
factory for the correct break in<br />
settings. If your settings somehow Figure 9 - Closing the high speed valve<br />
get changed, simply close both the high speed and slow speed needle valves<br />
by turning them clockwise, then:<br />
• open the high speed needle valve three<br />
complete turns<br />
counterclockwise<br />
• open the slow speed needle valve four full<br />
turns<br />
NOTE: Never force the needle valves closed .<br />
Only close them until you feel slight resistance.<br />
Shutting Off Your Engine<br />
Figure 10- slow speed valve<br />
Before you start the engine, it’s important to<br />
know the correct way of shutting it off. To do<br />
this, carefully use needle nose pliers or your<br />
fingers to squeeze the fuel supply line closed. If<br />
you use your fingers to squeeze the tube, use<br />
care or you might get burned. You should wrap<br />
thick tape around the jaws of the pliers to<br />
prevent damaging the fuel line. Squeezing this<br />
tube closed for a few seconds is the only method<br />
you should use to stop the engine.<br />
Figure 11- stop the engine
Starting Your Engine<br />
NOTE: Read the “Shutting Off Your<br />
Engine” Section Before Continuing!<br />
9<br />
First, fully extend your antenna and turn the transmitter on. If the<br />
green light ever goes dark or the red light comes on, your transmitter<br />
batteries are low. You should replace them right away. Next turn on<br />
the car’s receiver.<br />
After filling the fuel tank, prime the<br />
engine by pressing the priming button<br />
three times. Then pull the engine starter<br />
handle two or three times to circulate the<br />
fuel into the engine.<br />
Attach a fully charged 1.5 volt glow<br />
Figure 12- Priming the engine<br />
plug ignitor to the engine and wait three<br />
seconds to allow the glow plug to heat up (See Figure 13). During<br />
break in, it may be necessary to leave<br />
the glow plug ignitor attached to the<br />
engine to keep it running while the<br />
air-fuel mixture is adjusted.<br />
Figure 13- Glow plug ignitor<br />
Important: Start the engine using short quick<br />
pulls on the starter handle straight away from<br />
the engine. Do not pull the handle all the way<br />
out or at an angle. Always let the starter handle<br />
back in slowly after each pull. Do not let the<br />
handle go and snap back into the engine.<br />
Once the engine is running, make sure the<br />
throttle trigger is set at idle. If the speed is<br />
too high, open the low speed valve<br />
Megatech’s MegaNitor rechargeable glow<br />
plug ignitor allows easy starting, and can be<br />
left on the engine to keep it running reliably<br />
during break in.<br />
Figure 14- Use short, quick<br />
pulls<br />
(counterclockwise) until the engine speed slows to a safe idle. If the<br />
engine stops or runs too rich (lots of smoke and liquid fuel droplets<br />
coming from the exhaust), then close the low speed needle valve<br />
(clockwise) until the engine reaches a reliable idle speed. Adjust the low<br />
speed needle valve so the engine idles as rich as possible while still<br />
running. If the engine will not keep running consistently at idle, turn the<br />
idle speed screw 1/4 turn clockwise to increase minimum speed.<br />
Racers, Start Your Engines
10<br />
Once you are able to keep the engine running (with the glow plug<br />
ignitor attached if necessary) at a reliable ultra-rich idle, run two full<br />
tanks of fuel through the engine at the rich idle setting.<br />
If the cylinder head temperature gets too hot (260 degrees F), shut<br />
down the engine, let it cool completely and start again.<br />
Your First Run<br />
After you complete the break in, the low speed needle valve can now<br />
be adjusted for performance. Start by running the throttle at idle<br />
for 2 seconds. Then apply full throttle briefly and carefully listen<br />
to the engine. If it accelerates slowly with lots of smoke and liquid<br />
drops of fuel, your air-fuel mix is too rich and you should turn the<br />
low speed needle valve clockwise 1/8 of a turn at a time until the<br />
engine accelerates briskly and reliably. Retest the throttle after each<br />
adjustment.<br />
After this is set correctly, slowly increase the engine speed to<br />
approximately 50% of full throttle. Adjust the high speed needle<br />
valve so the engine again runs as richly as possible. (You actually<br />
want it to be producing lots of oily smoke and spitting oil droplets<br />
from the exhaust).<br />
Run your AfterBurner on a smooth surface at low to medium speed<br />
for another full tank of fuel. Be careful not to maneuver it too harshly or<br />
use any more than half throttle.<br />
To adjust the high speed needle valve, carefully turn the high speed needle<br />
valve clockwise 1/8 of a turn at a time. This allows the engine to run<br />
faster and at a higher pitch sound. Your vehicle will now run faster and<br />
smoother.<br />
Your First Run<br />
Steering<br />
When you begin operating your AfterBurner, it might be wise to hold the<br />
radio horizontal to the ground with the wheel side up. Then the wheel acts<br />
like a steering wheel in a car (see Figure 15). Turn the wheel right and the<br />
car goes right. Turn the wheel left and the car goes left. If you find your<br />
AfterBurner going to one direction or another without any steering input,<br />
you will need to adjust the steering trim. Simply turn the steering trim<br />
knob in the opposite direction that the AfterBurner is pulling (See Steering<br />
Trim on page 7). If the vehicle requires excessive amounts of trim, check<br />
for damage, loose parts or excessive wear in the steering parts.
11<br />
Figure 15- Turn the wheel<br />
right and the car goes right.<br />
Turn the wheel left and the<br />
car goes left.<br />
Brakes and Throttle Trim<br />
The Brake System<br />
Before running your AfterBurner, be<br />
sure to do a brake check. With the car<br />
runing at idle, roll it forward. It should roll<br />
freely. Now roll the car forward again and<br />
push the throttle trigger forward. The car<br />
should come to a stop almost immediately.<br />
If it does not stop instantly, adjust the brake<br />
actuation rod to give more grip to the brake<br />
pads. If the vehicle does not roll freely, then<br />
adjust the rod in the opposite direction.<br />
Figure 16- brake actuation rod<br />
Adjusting the Throttle Trim<br />
If your AfterBurner accelerates or stalls while in the neutral position, you<br />
will need to adjust the throttle trim control. The throttle trim adjusts the<br />
center point of the throttle servo, allowing you to fine tune the<br />
operation of the transmitter throttle trigger.
12<br />
Maintenance<br />
Proper care and simple maintenance should keep your AfterBurner<br />
running well for a long time.<br />
Maintenance<br />
Make sure you thoroughly check your vehicle after each run to<br />
make sure no parts were bent or broken. Also check to make sure<br />
the screws, fasteners, bolts and hardware are secure and tight after<br />
each run. Should you find that any parts are bent, broken or show<br />
excessive wear, you must repair or replace them immediately before<br />
attempting to operate your AfterBurner again. See your local hobby<br />
dealer first for replacement parts. The list on page 3 provides a handy<br />
guide.<br />
Thoroughly clean your AfterBurner after each run to remove oil, fuel<br />
and dirt. We recommend Megatech’s MegaWash, a safe and effective<br />
spray cleaner.<br />
Important: Never leave any fuel in the vehicle’s fuel tank or engine.<br />
The Nitro fuels used in these high-performance vehicles may cause<br />
corrosion and damage your engine. Whenever possible, use up the<br />
fuel in the engine by running the vehicle until it quits, leaving no<br />
fuel in the tank, fuel tube or engine.<br />
Always remove the used batteries from the transmitter and the receiver<br />
box if the vehicle is going to be stored for more than a few days. Also<br />
place two drops of Mega Metal-Guard (after-run oil) down the carburetor<br />
and two drops down the glow plug hole and turn the engine over by pulling<br />
on the pull-starter a few times.
Parts Listing<br />
13<br />
Part# Description<br />
1685 5*8*2.5 Premium Bearing (2 Pack)<br />
16109 Side Exhaust Header<br />
780201 Air Filter<br />
780203 Flywheel<br />
780204 <strong>Radio</strong> Box<br />
780205 2-speed Spur Gear 42t<br />
780206 2-speed Spur Gear 38t<br />
780207 Suspension Hinge Pins (50mm)<br />
780215 Brake Pads (Pr)<br />
780218 Brake Disc<br />
780222 Suspension Arms<br />
780224 Upper Arms (Pr.)<br />
780225 Gearbox Shell<br />
780226 Gear Case Sides<br />
780227 Drive Shafts (45mm)<br />
780234 100cc Quick-fill Fuel Tank<br />
780238 Adjustable Engine Mount<br />
780239 Center Diff Drive Joints<br />
780241 Rear Body Mount Set<br />
780242 Clutch Spring<br />
780243 Center Diff Mounts W/ Brake Cam<br />
780245 Servo Mount Set<br />
780248 2-speed One-way Bearing<br />
780279 2-speed Clutch Assembly<br />
780293 Suspension Hinge Pins 13.5mm (4)<br />
780294 Suspension Hinge Pins 23mm (4)<br />
780296 Inner Diff Joints F/R Gearbox<br />
780297 Hex Drive Washers (4)<br />
780299 3mm Copper Ball (4)<br />
780301 Brake Actuator Cam<br />
780304 Center Drive Shafts (2)<br />
780305 Rear Hubs (2)<br />
780310 2 Speed Transmition<br />
781013 Muffer Gasket (2)<br />
781014 Clutch Nut<br />
781018 Air Filter Refill<br />
781019 Ball End (8)<br />
781021 Aluminum Brake Spacer<br />
781026 Rear Wing<br />
781027 Tuned Pipe<br />
781029 Front Axle<br />
781030 Steering Servo Mount (2)<br />
781031 Tie Rod Set (2)<br />
781033 Front Steering Knuckles (2)<br />
781035 Front Coil Spring<br />
781040 Center Ring Gear & Pinion<br />
781043 <strong>Radio</strong> Tray<br />
781044 King Pin (2)<br />
781045 Front Suspension Arms<br />
781046 Front Tire O-ring (2)<br />
781048 Servo Saver<br />
781053 2 Speed Clutch Bell<br />
781060 Rear Axle Shafts (2)<br />
781072 <strong>Radio</strong> Plate Stabilizer (2)<br />
781073 Engine Mount Spacer Plates (2)<br />
781101 Aluminum Front Rims (2-chrome)<br />
781102 Front Bumper<br />
781103 Front Body Mount Set<br />
781104 Main Chassis<br />
781105 Rear Rim/tire Set<br />
781106 Servo Linkage Rod Set<br />
781107 AfterBurner Body Unpainted (w/ Decals)<br />
781107 AfterBurner Body Painted (w/ Decals)<br />
7802100 Clutch Shoes (3)<br />
AfterBurner Upgrade Parts<br />
781080 42t 2-speed Steel Spur Gear<br />
781081 38t 2-speed Steel Spur Gear<br />
781082 16t Pinion Gear<br />
781083 17t Pinion Gear<br />
781084 18t Pinion Gear<br />
781085 19t Pinion Gear<br />
781086 20t Pinion Gear<br />
781087 21t Pinion Gear<br />
781088 22t Pinion Gear<br />
781089 43t 2 Speed Main Gear<br />
781090 43t Steel 2-speed Main Gear<br />
Parts Listing
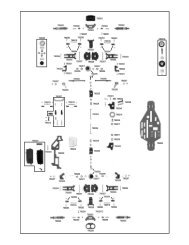
14<br />
Exploded Parts View<br />
780207<br />
780225<br />
781032<br />
781032<br />
780293<br />
780241<br />
780226<br />
780224<br />
780225<br />
781043<br />
781032<br />
780293<br />
780243<br />
780243<br />
780204<br />
780294<br />
780226<br />
780239<br />
780304<br />
780297<br />
781060<br />
780305<br />
780227<br />
780222<br />
780296<br />
780218<br />
781105<br />
781073<br />
781040<br />
781104<br />
780205<br />
780206<br />
780310
15<br />
EXPLODED VIEW<br />
780204<br />
Exploded Parts View<br />
781048<br />
205<br />
780299<br />
781106<br />
780234<br />
780215<br />
780243<br />
781019<br />
781019<br />
781031<br />
781030<br />
781019<br />
781031<br />
781045<br />
781031<br />
781035<br />
781044<br />
781031<br />
781031<br />
781033<br />
781029<br />
781046<br />
781103<br />
781035<br />
781044<br />
781033<br />
781103<br />
781045<br />
781029<br />
781046<br />
781102<br />
781101<br />
©2005 Megatech International
16 Limited Warranty<br />
Megatech Product Support<br />
Limited Warranty<br />
If you have questions about your model, or you’re having a problem with your model<br />
simply call us at 1-201-662-2800. Our customer support team is available from 10:30am<br />
to 4:30pm eastern standard time to answer your questions. You can also e-mail us at<br />
support@megatech.com anytime. We stand behind our products 100% and will do our<br />
best to make sure you are satisfied with this product.<br />
Warranty<br />
This product is warranted to be free from defects in materials and workmanship for a<br />
period of thirty (30) days from the date of purchase.<br />
No warranties are expressed or implied that cover damage caused by normal use or<br />
wear, or cover or imply how long any part will last before requiring replacement due to<br />
wear. Parts will wear from use and occasionally require replacement. Components are<br />
only covered against manufacturer’s defects in materials, workmanship or assembly<br />
when they are new and unused.<br />
If any component is found to be defective, incorrectly made, or incorrectly assembled<br />
within the warranty coverage time period, it will be repaired or replaced at Megatech’s<br />
discretion.<br />
Limitations<br />
Any and all warranty coverage does not cover replacement of parts and components<br />
damaged by abuse, neglect, improper or unreasonable use, crash damage, water or<br />
excessive moisture, chemical damage, improper or infrequent maintenance, accident,<br />
unauthorized alteration or modification, use of improper fuels, or items that are considered<br />
consumable.<br />
All warranty claims are handled directly by Megatech. The place of purchase can assist<br />
you in contacting Megatech and determining which components might be defective, but<br />
he is under no obligation to provide free replacement parts or service. Megatech does not<br />
authorize over-the-counter exchanges or refunds for Megatech products that have been<br />
used. Megatech will make the sole and final determination if a product or component can<br />
be covered under warranty.<br />
Megatech will NOT pay for the cost of shipping or transportation of a defective component<br />
from you to us.<br />
Limitations of Liability<br />
Megatech makes no other warranties expressed or implied. Megatech shall not be liable<br />
for any special, indirect, incidental or consequential damages arising out of the assembly,<br />
installation, or use of their products or any accessory or chemical required to use their<br />
products. By the act of operating/using the product, the user accepts all the resulting<br />
liability. In no case shall Megatech’s liability exceed the actual purchase price paid for<br />
the product. All warranty claims will be handles directly by Megatech. The Megatech<br />
warranty gives the customer specific legal rights and possibly other rights that vary from
state to state. Megatech is not obligated to provide upgraded products at a reduced rate<br />
when a previous product’s production cycle has ended. Megatech reserves the right to<br />
modify warranty provisions without notice.<br />
17<br />
Obtaining Warranty and Repair Service<br />
Call us first! Before you begin the process of obtaining warranty or repair service,<br />
please call us at 1-201-662-2800 and speak with one of our friendly and knowledgeable<br />
Support Team Technicians. Often a product might appear defective, or to malfunction,<br />
only because it is being used improperly or requires a simple adjustment. One phone call<br />
to our experienced support team just might get you back and running!<br />
If any component is found to be defective, it will be repaired or replaced and returned.<br />
Any needed repairs that are not covered under warranty will be estimated on an individual<br />
basis, prior to any work being done.<br />
The package shipped to Megatech Service Department should be insured to cover the<br />
value of a new replacement. Megatech will not be responsible for items lost in transit to<br />
us.<br />
When you return a product to Megatech, please provide the following:<br />
• Return address (No PO Boxes)<br />
• Note describing the problem<br />
• Proof of purchase indicating the date of purchase<br />
Shipping to Service Department Guidelines<br />
• Remove all batteries from the model including NiCd packs and AA batteries.<br />
• If the transmitter is being returned, remove the AA batteries.<br />
• DO NOT SEND fuel, batteries, chargers, glow plug igniters, instructions manuals,<br />
bodies or any other accessories you use to run your model. This will save shipping cost<br />
and prevent the possibility of those items becoming lost. Megatech will not be liable for<br />
accessory items lost during the repair process.<br />
• If your model is equipped with aftermarket accessories and has a replacement value<br />
higher than a stock new model, consider removing the accessories prior to shipment. In<br />
case of loss during transit from Megatech to you, Megatech can only be responsible for<br />
the replacement cost of a new stock model.<br />
• Package the product in the most efficient size box possible. Loose product in oversize<br />
boxes can increase the risk of loss or additional damage in route to Megatech.<br />
• Include a note with a brief description of the problem<br />
• Include a daytime and evening phone number or e-mail address that the service<br />
department may use to contact you with questions or estimates regarding the repair.<br />
• Include a return shipping address. We cannot ship to Post Office boxes.<br />
Ship Items Freight prepaid to:<br />
Megatech International<br />
Attn: Service Department<br />
8300 Tonnelle Avenue<br />
North Bergen NJ 07047
LOOK FOR THESE OTHER FINE MEGATECH PRODUCTS<br />
MTC7810<br />
DARK THUNDER NITRO POWERED<br />
HIGH SPEED DRAGSTER<br />
MTC7501<br />
CHRIS CHIANELLI SIGNATURE<br />
Q-SERIES COMPLETER PACK<br />
FOR AUTO START VEHICLES<br />
MTC16161<br />
CHRIS CHIANELLI SIGNATURE SERIES<br />
MEGANITOR DELUXE GLOW PLUG<br />
IGNITOR W/ METER AND AC ADAPTOR<br />
MTC16192<br />
CHRIS CHIANELLI<br />
SIGNATURE SERIES<br />
Q-SERIES OFF-ROAD<br />
GLOW PLUG<br />
MTC7502<br />
CHRIS CHIANELLI SIGNATURE<br />
Q-SERIES COMPLETER PACK<br />
FOR PULL START VEHICLES
MTC7805<br />
TEMPEST GLADIATOR<br />
4WD RTR TRUCK W/<br />
RADIO AND M16 ENGINE<br />
MTC5720 PINT<br />
MTC5721 QUART<br />
MTC5722 GALLON<br />
AIR POWER 15%<br />
AIRPLANE FUEL<br />
MTC510 PINT<br />
MTC511 QUART<br />
MTC512 GALLON<br />
Q-SERIES 20%<br />
OFF-ROAD FUEL<br />
MTC502 PINT<br />
MTC503 QUART<br />
MTC504 GALLON<br />
HIGH VELOCITY 25%<br />
RACING FUEL<br />
MTC6802<br />
WICKED ANGEL 2<br />
NITRO SPEED BOAT
Megatech International - 8300 Tonnelle Avenue<br />
North Bergen NJ 07047 - (201) 662-2800<br />
www.megatech.com