Entire contents © 2003 Megatech MTC8209 ORANGE MTC8210 ...
Entire contents © 2003 Megatech MTC8209 ORANGE MTC8210 ...
Entire contents © 2003 Megatech MTC8209 ORANGE MTC8210 ...
- No tags were found...

Create successful ePaper yourself
Turn your PDF publications into a flip-book with our unique Google optimized e-Paper software.
<strong>MTC8209</strong> <strong>ORANGE</strong><strong>MTC8210</strong> GREEN<strong>Entire</strong> <strong>contents</strong> © <strong>2003</strong> <strong>Megatech</strong>HeliChopper Manual.indd 110/14/<strong>2003</strong>, 12:37:29 PM
2Table of ContentsIf you have questions about operating or installing your new <strong>Megatech</strong>product, or if you are missing parts... Please Call <strong>Megatech</strong> First!DO NOT RETURN THIS PRODUCT TO THE STORECall our Customer Service Department at:(201) 662-280010:00am - 5:00pm, EST Monday through Friday (except holidays)Technical assistance is also available on-line at www.megatech.comor by e-mail to info@megatech.comCongratulations on your purchase of a <strong>Megatech</strong> ® HeliChopper TM . Theself-stabilizing GyroHelix rotor design makes the HeliChopper theeasiest to fly radio-control helicopter ever offered. Flying has neverbeen more fun! Get ready to launch into a new world of high-flyingexcitement! Your new HeliChopper comes completely assembled andwithin minutes of opening the box, it will be ready to soar through thesky at heights up to 60 feet. You simply charge the batteries and takeoff on your new adventure.Please read this entire flight manual carefully before you attemptto fly your HeliChopper.If you experience any problems, DO NOT take your HeliChopperback to the store! Call one of our MegaTechnicians at1-888-MEGA-911 or send an e-mail to: info@megatech.com10:00am-5:00pm EST, Monday through Friday (except holidays)Technical assistance is also available on-line at www.megatech.comor by e-mail to info@megatech.comDO NOT RETURN THIS PRODUCT TO THE STORETABLE OF CONTENTSSafety Warnings ................................................................................... 3Getting Acquainted with your HeliChopper........................................... 4Installing the Batteries ......................................................................... 5Charging the Batteries ......................................................................... 5Preparing For Your First Flight ............................................................. 6Flying Your HeliChopper ..................................................................... 6Landing Your HeliChopper .................................................................. 7Troubleshooting .................................................................................. 8Ordering Spare Parts ........................................................................ 10Crash Warranty ................................................................................. 10Limited Warranty................................................................................ 11HeliChopper Manual.indd 210/14/<strong>2003</strong>, 12:39:15 PM
Important! Before you begin, please read the warningslisted on the following page. Failure to comply with thefollowing recommendations could lead to bodily harm or injury.The <strong>Megatech</strong> HeliChopper is not intended for those under 12years of age without proper adult supervision.Safety WarningsPlease read these before operating your HeliChopper.•manner. When flying, you are responsible for your own safety andthe safety of others around you. Follow these basic safety guidelinesat all times.• The spinning main rotor and tail rotor on this aircraft can bedangerous! When operating/flying, always be aware of the spinningrotors. Be careful not to let them come close to your body, other peopleor loose clothing. Keep your hands, fingers and any article of clothingaway from the rotors. Keep spectators behind you when flying.• Fly only on calm days. Gusty winds and winds over 5 MPH will make itdifficult (if not impossible) to control your helicopterproperly.• Do not attempt to disassemble or modify any of the HeliChopper’scomponents or allow them to get wet. Electrical damage may occur that couldaffect safe operation.• Only use the rechargeable battery pack provided with your HeliChopper. Usingany other type of battery will damage your helicopter and possibly make it dangerousto operate.• Since your HeliChopper is controlled by a radio link, it may be subject to interferencefrom outside radio sources. Do not fly your helicopter if other models arebeing operated on the same frequency in the area. (27Mhz)• It is very important to always use fresh alkaline batteries in the transmitter. Werecommend <strong>Megatech</strong>’s Golden Power battery series, designed specifically forR/C products.• Always fly your helicopter in a wide-open area, free from wires, trees, buildingsand other obstructions.• Never fly your HeliChopper after dark.• Always take off from the heliport base. Never hold the HeliChopper whenlaunching. A sudden wind shift could send the helicopter in your direction, possiblyresulting in injury.• Avoid flying in very hot or very cold weather. Your HeliChopper features anautomatic temperature guard. When the helicopter gets too hot, it will automaticallyshut down and land to prevent overheating and protect the internal circuitry.3Safety WarningsHeliChopper Manual.indd 310/14/<strong>2003</strong>, 12:40:18 PM
4Your HeliChopper Package• Always have an adult install the batteries into the transmitter andcharger/heliport. Never mix old and new batteries. Do not userechargeable batteries for the charger/heliport or the transmitter.Avoid mixing alkaline and other types of batteries.• After every two or three flights, let your HeliChopper cool downfor 10-15 minutes. This will help prolong the life of yourhelicopter.• Always remove the batteries from your charger when you finishflying for the day. Do not store batteries inside the charger ortransmitter.HELICOPTERAGetting Acquainted with Your HeliChopperBA. Radio ControlTransmitterB. Charger/HeliportC. HeliChopperC1. Fuselage2. Main Rotor3. Landing Gear4. Charging Port5. Charging/Off/OnSwitch6. Tail Rotor653241214CHARGER/HELIPORT1. Launch Pad2. On/Off Switch3. Charger Link4. Battery Compartment3TopBottomHeliChopper Manual.indd 410/14/<strong>2003</strong>, 12:41:42 PM
CONTROLLER1. Antenna2. Power Light3. Battery Hatch4. On/Off Switch5. Trigger/Throttle6. Directional Control KnobNOTE:Keep the box and packaging tosafely store your HeliChopperBottombetween flights. Proper storage4will prevent the rotors from warping and help maintain flightperformance.Installing the Batteries1Using a Philips screwdriver, unscrew the battery hatch. Paying carefulattention to their direction, install 8 D-size alkaline batteries. Reattachthe battery hatch and securely tighten the screws.NOTE: For best results, replace the 8 D-size alkaline batteries in theCharger/Heliport after every 15-20 flights.The Radio ControllerUsing a Philips screwdriver,unscrew the battery hatch. Install6 AA alkaline batteries. Be surethe batteries are properlyarranged or your controller willnot function. Reattach the batteryhatch and securely tighten thescrews.25635Installing/Charging BatteriesCharging Your HeliChopperhydride) battery that must be charged before each flight.1. Begin by moving the Off/On switch on your HeliChopper to the “Off”position (all the way to the left, or toward the tail of the helicopter). Ifthe switch is in the “On” position, your helicopter will not charge.2. Plug the Charger Link into the charge port beneath your HeliChopper.Make sure it is securely connected or charging will not occur.HeliChopper Manual.indd 510/14/<strong>2003</strong>, 12:43:34 PM
6Preparing for Flight3. Place the HeliChopper onto the Charger/Heliport.4. Move the switch on the Charger/Heliport to the “On”position. The red light should start blinking. This indicates thatit is charging the batteries on your HeliChopper.5. When the red light stops flashing and a green light begins toglow, your battery is fully charged.6. You may now disconnect the HeliChopper from the Charger/Heliport.Switch in Off Charger Link Charger lightsposition. plugged in. show charging isin progress.Preparing For Your First Flight347least twice.Here’s how: Charge the battery pack as instructed on page 5. Fully extend thetransmitter antenna. Next, turn on the radio control transmitter first and thenthe receiver. Always remember to turn on the transmitter first. Firmly holdthe helicopter at the center of the fuselage so the main rotor and tail rotor areunobstructed and away from fingers, loose clothing, etc. Now slowly squeezethe throttle trigger on the transmitter to start the rotors spinning. Continue torun the motor until it stops. Allow the battery pack to cool, and then rechargeit again. Perform this process of running the motor until the battery is drainedat least twice. The battery pack will now supply more power and your firstflights will be much easier and safer!Flying Your HeliChopper1the radio control transmitter.2 Switch on the radio controltransmitter. A red light onthe transmitter will glow toindicate power. Never attemptto fly if the red light on thetransmitter is not glowing.Radio turned on.Power LightHeliChopper Manual.indd 610/14/<strong>2003</strong>, 12:45:31 PM
3. Slide the switch on the HeliChopper to the “On” position (allthe way to the right or front of the helicopter). Always switchon the transmitter before you switch on the helicopter.4. Center the helicopter on theCharger/Heliport with the landinggear straddling the “H” as shown.This is important. It keeps theHeliChopper from sliding beforeit lifts off.5. Step back at least 5 yards and facethe helicopter.6. Double check to make sure thatyour flying area is clear of people,trees, buildings, electric lines orother obstructions.7. Grip the transmitter in your left hand, so that the trigger/throttleis controlled by your left index finger. Use your right hand tooperate the Directional Control Knob.8. Squeeze the trigger/throttle gradually until the rotors beginto spin. The rotors need to spin for 1.5-2 seconds to build upenergy before lifting off.9. As the helicopter lifts off, it may be shaky. Allow the HeliChopper tostabilize before attempting to turn. Trying to turn while your helicopteris unbalanced will make it difficult to control and may lead to a crash.10. You determine how high your HeliChopper will fly with theproportional trigger/throttle. The harder you squeeze the trigger, thehigher your helicopter will fly.11. Turn your HeliChopper by using the Directional Control Knob like asteering wheel. Turn it left to turn to the left, right to turn to the right.Be careful not to turn too much. Small turns should be all you needto hold your HeliChopper in a stable hover. NOTE: Any wind willmake your HeliChopper move, so be ready to correct.12. HeliChopper average flight time on a full charge is between 3 and 6minutes. If your flight times are less than this, you should change the 8D-size alkaline batteries in your Charger/Heliport.Landing Your HeliChopper1. Find a soft, grassy area to land. Although built to be incredibly tough,your HeliChopper may be damaged by harsh landings.2. To land, slowly ease off on the throttle trigger until your HeliChopperstarts to slowly descend in a spiral. Do not ease off too much or the rotorswill stop and your HeliChopper may crash.7Flying and LandingHeliChopper Manual.indd 710/14/<strong>2003</strong>, 12:47:30 PM
8TroubleshootingPROBLEM CAUSE RECOMMENDATIONNo power to radio control 1. Power switch is 1. Move switch to the “on”transmitter or charger. in the “off” position.position.2. Batteries are 2. Make sure batteries areincorrectly installed correctly.installed.3. Batteries are 3. Replace the batteries withexhausted. new alkaline batteries.No blinking red light when 1. Charge nozzle is 1. Double check thecharging. not properly connection.plugged into thecharge port on theHeliChopper.2. Power switch on 2. Set switch to “on”charger is in the position.“off” position.3. Batteries are 3. Replace all 8exhausted. D-Size Batteries.Chopper is not under control. 1. Radio control 1. Slide the switch to thetransmitter is not “on” position.turned on.2. Transmitter 2. Fully extend the antenna.HeliChopper Manual.indd 810/14/<strong>2003</strong>, 12:49:14 PM
9turned on.2. Transmitter 2. Fully extend the antenna.antenna is not fullyextended.3. Windy or bad 3. Stop flying at once andweather. try again on another day.Chopper is not flying high enough. 1. Charger Battery 1. Replace with newlife is nearly batteries.exhausted.2. Battery pack is 2. Recharge the HeliChopper.not fully charged.Helicopter can not rotate left or 1. HeliChopper needs 1. Pause and let the helicopterright. time to steady and steady itself and then trybalance itself. again. If it does not steady,the wind may be too strongto fly.2. Battery is losing 2. Land immediately andpower. recharge the battery.HeliChopper crashed to the 1. You may have 1. Try again and release theground while landing. released the trigger more slowly tothrottle/trigger too allow the helicopter toquickly or too far. slow and spiraldown for a landing.TroubleshootingHeliChopper Manual.indd 910/14/<strong>2003</strong>, 12:50:39 PM
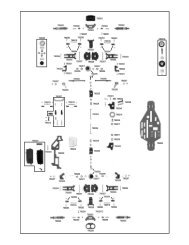
10Ordering Spare PartsObtaining Spare PartsSpare, repair and replacement parts are readily available for youraircraft. Should you need parts, visit your local hobby dealer first. Ifunavailable, you may contact <strong>Megatech</strong>. Use this sheet as a guide.Part NumberDescription8209-01 Main Rotor Blade Orange8210-01 Main Rotor Blade Green8209-02 Tail Rotor Blade Orange8210-02 Tail Rotor Blade Green8209-03 Transmitter Orange8210-03 Transmitter Green8210-04 Rechargeable Ni-MH Heli Battery Pack8209-05 Landing Gear Orange8210-05 Landing Gear Green8210-06 Transmitter Battery Hatch8209-07 Base/Heliport Orange8210-07 Base/Heliport Green8210-08 Base/Heliport Battery HatchpContact us at:<strong>Megatech</strong> Parts Department8300 Tonnelle AvenueNorth Bergen, NJTelephone: (201) 662-2800Fax: (201) 662-1450E-mail: info@megatech.compHeliChopper Manual.indd 1010/14/<strong>2003</strong>, 12:52:20 PM
<strong>Megatech</strong> ® Limited Warranty11period of 90 days from date of purchase. If any component of this productfails to function properly due to defects in materials ormanufacturing process during this 90 day period, the manufacturer’sobligations are limited and manufacturer can choose to either repair orreplace the item.This warranty is void if the product in question has been altered orrepaired by anyone other than <strong>Megatech</strong> International or an authorizedagent.Under no circumstances will <strong>Megatech</strong> International or any of itsrepresentatives be held liable for injury to persons or property damageresulting from assembly or use of the product. <strong>Megatech</strong> is not liableif any outside radio frequencies interfere with the product’s frequencycausing loss of control. <strong>Megatech</strong> International will not be held liablefor any personal injury or property damage resulting from an out-ofcontrolmodel caused by use or misuse of the product. <strong>Megatech</strong>International expressly excludes any and all express warranties notspecifically stated here and all implied warranties of merchantabilityand fitness for a particular purpose. There are no warranties whichextend beyond the description of the warranties contained herein.Contact the <strong>Megatech</strong> International Service department before returningany item that is defective according to the limitations listed above.Please be sure to pack the returned item(s) carefully. The customer mustreturn the product along with proof of purchase, a letter stating the problem,the customer’s address and telephone number. At this point in timewe will either repair the defective part or replace it and return it to thecustomer. Return shipping and handling in the 48 contiguous states is$12.99. Shipping outside of the 48 states will be quoted by location.This warranty does not cover any damage caused by use, misuse, alteration,accident, or neglect, nor does it cover normal wear and tear of theproduct. Product returned to us which falls under this category will besubmitted to our service department for repair. We reserve the right tocharge any service and parts fees incurred when repairing the item.Limited Warranty<strong>Megatech</strong> International8300 Tonnelle AvenueNorth Bergen NJ 07047(201) 662-2800www.megatech.comHeliChopper Manual.indd 1110/14/<strong>2003</strong>, 12:53:46 PM
LOOK FOR THESE OTHER FINE MEGATECH PRODUCTSMTC9932COSMIC FLYER R/C EASY FLYERMTC7702OCEAN EXPLORER 1 R/C SUBMARINEMTC7701H2O ELECTRIC MINI R/C SPEEDBOAT<strong>Megatech</strong> International8300 Tonnelle Avenue, North Bergen, NJ 07047(201) 662-2800www.megatech.comHeliChopper Manual.indd 1210/14/<strong>2003</strong>, 12:55:26 PM