
Create successful ePaper yourself
Turn your PDF publications into a flip-book with our unique Google optimized e-Paper software.
<strong>English</strong><br />
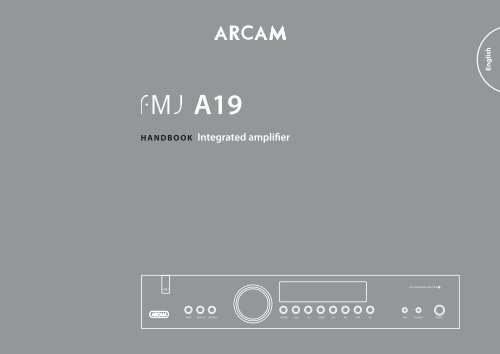
A19<br />
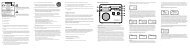
HANDBOOK Integrated amplifier<br />
A19 INTEGRATED AMPLIFIER<br />
MUTE<br />
DISPLAY<br />
BALANCE<br />
PHONO<br />
AUX<br />
CD<br />
TUNER<br />
SAT<br />
BD<br />
PVR<br />
AV<br />
AUX<br />
PHONES<br />
POWER
safety<br />
guidelines<br />
<br />
<br />
<br />
<br />
<br />
<br />
CAUTION: To reduce the risk of electric shock, do not remove cover (or back). No user serviceable parts inside. Refer servicing to qualified<br />
service personnel.<br />
WARNING: To reduce the risk of fire or electric shock, do not expose this apparatus to rain or moisture.<br />
The lightning flash with an arrowhead symbol within an equilateral triangle, is intended to alert the user to the presence of<br />
uninsulated ‘dangerous voltage’ within the product’s enclosure that may be of sufficient magnitude to constitute a risk of electric<br />
shock to persons.<br />
The exclamation point within an equilateral triangle is intended to alert the user to the presence of important operating and<br />
maintenance (servicing) instructions in the literature accompanying the product.<br />
CAUTION: In Canada and the USA, to prevent electric shock, match the wide blade of the plug to the wide slot in the socket and insert the<br />
plug fully into the socket.<br />
Class II product<br />
This equipment is a Class II or double<br />
insulated electrical appliance. It has been<br />
designed in such a way that it does not<br />
require a safety connection to electrical earth<br />
(‘ground’ in the U.S.).<br />
Warning<br />
Mains plug/appliance coupler is used to disconnect<br />
device and it shall remain readily operable.<br />
Important safety instructions<br />
1. Read these instructions.<br />
2. Keep these instructions.<br />
3. Heed all warnings.<br />
4. Follow all instructions.<br />
5. Do not use this apparatus near water.<br />
6. Clean only with dry cloth.<br />
7. Do not block any ventilation openings. Install in<br />
accordance with the manufacturer’s instructions.<br />
8. Do not install near any heat sources such as<br />
radiators, heat registers, stoves, or other apparatus<br />
(including amplifiers) that produce heat.<br />
9. Do not defeat the safety purpose of the polarized or<br />
grounding-type plug.<br />
A polarized plug has two blades with one wider than the<br />
other. A grounding type plug has two blades and a third<br />
grounding prong. The wide blade or the third prong are<br />
provided for your safety. If the provided plug does not fit<br />
into your outlet, consult an electrician for replacement<br />
of the obsolete outlet.<br />
10. Protect the power cord from being walked<br />
on or pinched particularly at plugs, convenience<br />
receptacles, and the point where they exit from the<br />
apparatus.<br />
11. Only use attachments/accessories specified by the<br />
manufacturer.<br />
12. Use only with the cart, stand,<br />
tripod, bracket, or table specified by<br />
the manufacturer, or sold with the<br />
apparatus.<br />
When a cart is used, use caution when<br />
moving the cart/apparatus combination<br />
to avoid injury from tip-over.<br />
13. Unplug this apparatus during lightning storms or<br />
when unused for long periods of time.<br />
14. Refer all servicing to qualified service personnel.<br />
Servicing is required when the apparatus has been<br />
damaged in any way, such as power-supply cord or plug<br />
is damaged, liquid has been spilled or objects have fallen<br />
into the apparatus, the apparatus has been exposed to<br />
rain or moisture, does not operate normally, or has been<br />
dropped.<br />
15. Object or liquid entry<br />
WARNING – Take care that objects do not fall and<br />
liquids are not spilled into the enclosure through any<br />
openings. The equipment shall not be exposed to<br />
dripping or splashing. Liquid-filled objects such as vases<br />
should not be placed on the equipment.<br />
16. Climate<br />
The equipment has been designed for use in moderate<br />
climates and in domestic situations.<br />
17. Cleaning<br />
Unplug the unit from the mains supply before cleaning.<br />
The case should normally only require a wipe with a<br />
soft, lint-free cloth. Do not use chemical solvents for<br />
cleaning.<br />
We do not advise the use of furniture cleaning sprays or<br />
polishes as they can cause permanent white marks.<br />
18. Power sources<br />
Only connect the equipment to a power supply of<br />
the type described in the operating instructions or as<br />
marked on the equipment.<br />
The primary method of isolating the equipment from<br />
the mains supply is to remove the mains plug. The<br />
equipment must be installed in a manner that makes<br />
disconnection possible.<br />
19. Abnormal smell<br />
If an abnormal smell or smoke is detected from the<br />
equipment, turn the power off immediately and unplug<br />
the equipment from the wall outlet. Contact your dealer<br />
and do not reconnect the equipment.<br />
20. Damage requiring service<br />
The equipment should be serviced by qualified service<br />
personnel when:<br />
A. the power-supply cord or the plug has been<br />
damaged, or<br />
B. objects have fallen, or liquid has spilled into the<br />
equipment, or<br />
C. the equipment has been exposed to rain, or<br />
D. the equipment does not appear to operate normally<br />
or exhibits a marked change in performance, or<br />
E. the equipment has been dropped or the enclosure<br />
damaged.<br />
Safety compliance<br />
This equipment has been designed to meet the IEC/EN<br />
60065 international electrical safety standard.<br />
This device complies with Part 15 of the FCC Rules.<br />
Operation is subject to the following two conditions:<br />
(1) This device may not cause harmful interference, and<br />
(2) this device must accept any interference received,<br />
including interference that may cause undesired<br />
operation.<br />
The building installation shall be regarded as providing<br />
protection in accordance with the rating of the wall<br />
socket outlet.<br />
E-2
Thank you and congratulations for purchasing your <strong>Arcam</strong> FMJ Amplifier.<br />
welcome…<br />
<strong>Arcam</strong> has been producing specialist audio products of remarkable quality for over three<br />
decades and the new A19 amplifier is the latest in a long line of award winning HiFi. The design<br />
of the FMJ range draws upon all of <strong>Arcam</strong>’s experience as one of the UK’s most respected audio<br />
companies, to produce <strong>Arcam</strong>’s best performing range of stereo amplifiers yet – designed and<br />
built to give you years of listening enjoyment.<br />
<strong>English</strong><br />
This handbook is a guide to installing and using the A19 Integrated Amplifier, including<br />
information on the more advanced features. Use the contents list shown on this page to guide<br />
you to the section of interest.<br />
We hope that your FMJ amplifier will give you years of trouble-free operation. In the unlikely<br />
event of any fault, or if you simply require further information about <strong>Arcam</strong> products, our<br />
network of dealers will be happy to help you. Further information can also be found on the<br />
<strong>Arcam</strong> website at www.arcam.co.uk.<br />
The FMJ development team<br />
Contents<br />
safety guidelines........................................E-2<br />
Important safety instructions..............................E-2<br />
Safety compliance...................................................E-2<br />
welcome…..................................................E-3<br />
overview......................................................E-4<br />
Placing the unit ........................................................E-5<br />
Power............................................................................E-5<br />
Interconnect cables.................................................E-5<br />
A19 connections........................................E-6<br />
Audio inputs...............................................................E-7<br />
Phono input...............................................................E-7<br />
Record output...........................................................E-7<br />
Pre-amplifier output...............................................E-7<br />
remote control............................................E-8<br />
The CR108 remote control...................................E-8<br />
Amplifier commands..............................................E-8<br />
loudspeakers..............................................E-9<br />
Single wiring..............................................................E-9<br />
Bi-amping....................................................................E-9<br />
operation.................................................. E-10<br />
Switching on........................................................... E-10<br />
Selecting an audio source................................. E-10<br />
Listening................................................................... E-10<br />
Adjusting the balance......................................... E-11<br />
Recording an audio source............................... E-11<br />
Troubleshooting.................................................... E-11<br />
specifications........................................... E-12<br />
product guarantee................................. E-13<br />
E-3
overview<br />
<strong>Arcam</strong>’s A19 Integrated Amplifier provides class-leading<br />
sound quality.<br />
Drawing on the many years of amplifier design<br />
experience at <strong>Arcam</strong>, the A19 uses the best quality<br />
components and engineering practice to produce a<br />
product that will give many years of musical pleasure<br />
and reliable service.<br />
With a torrodial power supply, acoustically damped<br />
chassis and very low levels of noise and distortion, the<br />
A19 reproduces music with all its original authority and<br />
detail.<br />
The A19 Integrated Amplifier is designed to produce a<br />
level of performance that will truly bring music to life.<br />
PHONO 20<br />
A19 INTEGRATED AMPLIFIER<br />
MUTE<br />
DISPLAY<br />
BALANCE<br />
PHONO<br />
AUX<br />
CD<br />
TUNER<br />
SAT<br />
BD<br />
PVR<br />
AV<br />
AUX PHONES POWER<br />
E-4
<strong>English</strong><br />
Placing the unit<br />
< < Place the amplifier on a level, firm surface, avoiding<br />
direct sunlight and sources of heat or damp.<br />
< < Do not place the A19 on top of a power amplifier or<br />
other source of heat.<br />
< < Do not place the amplifier in an enclosed space<br />
such as a bookcase or closed cabinet unless there is<br />
good provision for ventilation. The A19 is designed<br />
to run warm during normal operation.<br />
< < Do not place any other component or item on top<br />
of the amplifier as this may obstruct airflow around<br />
the heat-sink, causing the amplifier to run hot. (The<br />
unit placed on top of the amplifier would become<br />
hot, too.)<br />
< < Make sure the remote-control receiver to the<br />
right of the front panel display is unobstructed,<br />
otherwise this will impair the use of the remotecontrol.<br />
< < Do not place your record deck on top of this<br />
unit. Record decks are very sensitive to the noise<br />
generated by mains power supplies which will be<br />
heard as a background ‘hum’ if the record deck is<br />
too close.<br />
< < The normal function of the unit may be disturbed<br />
by strong electromagnetic interference. If this<br />
occurs, simply reset the unit with the power button,<br />
or move the unit to another location.<br />
Power<br />
The amplifier is supplied with a moulded mains plug<br />
already fitted to the lead. Check that the plug supplied<br />
fits your supply – should you require a new mains lead,<br />
please contact your <strong>Arcam</strong> dealer.<br />
If your mains supply voltage or mains plug is different,<br />
please contact your <strong>Arcam</strong> dealer immediately<br />
Push the IEC plug end of the power cable into the<br />
socket on the back of the amplifier, making sure that it<br />
is pushed in firmly. Plug the other end of the cable into<br />
your mains socket and, if necessary, switch the socket<br />
on.<br />
Interconnect cables<br />
We recommend the use of high-quality screened cables<br />
that are designed for the particular application. Other<br />
cables will have different impedance characteristics<br />
that will degrade the performance of your system (for<br />
example, do not use cabling intended for video use to<br />
carry audio signals). All cables should be kept as short as<br />
is practically possible.<br />
It is good practice when connecting your equipment to<br />
make sure that the mains power-supply cabling is kept<br />
as far away as possible from your audio cables. Failure to<br />
do so may result in unwanted noise in the audio signals.<br />
E-5
A19<br />
connections<br />
Power inlet<br />
Connect the correct<br />
mains cable here.<br />
Phono earth terminal<br />
For connecting your turntable<br />
earth lead, if required.<br />
Note that this terminal must<br />
not be used as a safety earth.<br />
Speaker terminals<br />
See page 9 for information on<br />
connecting loudspeakers.<br />
Aux input<br />
Analogue 3.5mm stereo jack socket,<br />
intended for connecting a portable<br />
MP3 player.<br />
A19 INTEGRATED AMPLIFIER<br />
POWER INLET<br />
110-120V/220-240V ~ 50-60 Hz<br />
350W MAX<br />
SWITCH POSITIONS<br />
115 = 110 - 120V~<br />
230 = 220 - 240V~<br />
SUPPLY<br />
VOLTAGE<br />
ACCESSORY<br />
POWER<br />
OUTPUT: 6V DC 1A<br />
AV PVR BD SAT<br />
TUNER<br />
CD<br />
PHONO<br />
(MM)<br />
RECORD<br />
OUT<br />
PRE<br />
OUT<br />
PHONO<br />
GROUND<br />
ONLY<br />
4–16 OHMS. CLASS 2 WIRING<br />
AUX PHONES POWER<br />
Voltage select<br />
Ensure that the voltage selected<br />
matches your local power supply.<br />
Accessory Power<br />
3.5mm mono jack socket for<br />
accessory power cable (supplied).<br />
The cable provides two 2.1mm DC<br />
jacks to power rLink and/or rBlink<br />
accessories.<br />
Audio inputs<br />
The labels above the connectors give<br />
suggested audio inputs, although any<br />
suitable device may be connected to the<br />
line-level inputs. (Note, however, that the<br />
name of the input shown on the frontpanel<br />
display cannot be changed.)<br />
AV, PVR, BD, SAT, TUNER and CD are all linelevel<br />
inputs.<br />
The PHONO (MM) input has different<br />
characteristics. See page 7 for more<br />
information and page 12 for the phono<br />
input specification.<br />
Pre-amplifier output<br />
PRE OUT provides the pre-amp output for<br />
use in a bi-amplified system (for example,<br />
with a P38 power amplifier).<br />
See page 9 for more information.<br />
Record output<br />
RECORD OUT is a line level output for use in<br />
recording from other sources.<br />
See page 7 for more information.<br />
Phones<br />
3.5mm stereo jack socket,<br />
intended for use with a set of<br />
headphones.<br />
See page 10 for more<br />
information.<br />
Note<br />
Please read the ‘Placing the unit’, ‘Power’ and<br />
‘Interconnect cables’ sections on page 5 before<br />
connecting up your A19 integrated amplifier!<br />
E-6
<strong>English</strong><br />
Audio inputs<br />
Although the inputs are labelled for specific devices, all<br />
have the same characteristics and each may be used with<br />
any line-level product. The exception is the PHONO (MM)<br />
input (see page 12 for the specification).<br />
AV<br />
Intended for the analogue outputs from general audiovisual<br />
equipment, such as a VCR or digital TV/satellite<br />
receiver<br />
PVR<br />
Intended for the analogue outputs from a Personal<br />
Video Recorder, or similar device.<br />
BD<br />
Intended for the analogue outputs from a Blu-ray or<br />
DVD-player.<br />
SAT<br />
Intended for the analogue outputs from a satellite TV<br />
receiver or cable TV box.<br />
TUNER<br />
Intended for the analogue outputs from an FM, AM or<br />
DAB radio tuner.<br />
CD<br />
Intended for the analogue outputs from a CD player.<br />
AUX<br />
This is a 3.5mm analogue input on the front panel<br />
intended for use with devices such as MP3 players. To<br />
connect an MP3 player (or other portable audio device)<br />
you will need a 3.5mm to 3.5mm cable connected<br />
between the AUX input and the headphone output socket<br />
of the player.<br />
Phono input<br />
Phono-level input<br />
The A19 provides a pre-amplification stage to treat<br />
the low-voltage output from a MM (moving magnet)<br />
cartridge. Input specifications are given on page 12.<br />
Output volume is shown on the front display as<br />
PHONO 20, for example.<br />
Line-level phono input<br />
The phono input may be changed from phono-level to<br />
line-level. Press the front panel PHONO and BALANCE<br />
buttons simultaneously and use the control knob to<br />
change the setting. The front panel display shows<br />
LINE- OFF (i.e. phono) or LINE- ON respectively.<br />
If you wish to use an external phono amplifier, connect<br />
its output to the PHONO (MM) input, but make sure that<br />
LINE- ON is selected, since a phono amplifier produces<br />
line-level input.<br />
With the input defined in this way, output volume is<br />
shown on the front display as LINE 20, for example.<br />
Record output<br />
The A19 is equipped with an audio recording loop<br />
which may be used with recording devices such as a CD<br />
recorder, DAT recorder, cassette recorder, VCR or PVR.<br />
Connect the RECORD OUT output socket to the input<br />
socket of your recording device (usually labelled RECORD<br />
or IN).<br />
To record from a particular source, press the appropriate<br />
source button (for example, TUNER).<br />
Pre-amplifier output<br />
To use your A19 as a dedicated pre-amplifier, or as part<br />
of a bi-amp’ed system, connect the PRE OUT sockets to<br />
the input sockets of your power amplifier.<br />
See page 9 for connection details and see page 12 for the<br />
output specification.<br />
E-7
The CR108 remote<br />
control<br />
remote<br />
control<br />
The CR108 is pre-programmed for use with the A19.<br />
Make sure you have fitted the two AAA batteries<br />
supplied before attempting to use the remote control.<br />
1. With the CR108 remote face-down, press down<br />
on the non-slip indentations of the battery<br />
compartment cover and slide the cover off.<br />
2. Insert the two ‘AAA’ batteries supplied. Take<br />
care to insert the batteries in the right direction<br />
by following the ‘+’ and ‘–’ marks in the battery<br />
compartment.<br />
3. Slide the battery compartment cover back and lock<br />
it in place with a click.<br />
The CR108 requires a clear line of sight to the front<br />
panel display of A19 to ensure reliable operation.<br />
+<br />
DISP BAL -<br />
BD<br />
PVR AV<br />
AUX<br />
CD<br />
Amplifier commands<br />
2<br />
This toggles a powered-on A19 amplifier<br />
between ‘standby’ and ‘on’ modes.<br />
- Toggles the mute function to silence<br />
speaker output. The source is displayed on<br />
screen followed by Mt (mute), when active.<br />
VOL –<br />
VOL +<br />
Source<br />
keys<br />
Decrease (VOL–) and increase (VOL+)<br />
amplifer volume<br />
Selects the amplifier input:<br />
BD Blu-ray Disc or DVD input<br />
PVR Personal Video Recorder input<br />
TUN DAB/FM/AM tuner input<br />
AV AV (television sound) input<br />
PHONO Phono input<br />
TUN PHONO SAT<br />
AUX<br />
Auxiliary line input<br />
CD<br />
CD input<br />
SAT<br />
Satellite decoder input<br />
BAL Adjust balance levels (using – and +<br />
controls) between L9 (left), through 0, to<br />
R9 (right)<br />
DISP<br />
Cycles through display panel brightness<br />
options (bright, off, dim)<br />
CR108<br />
E-8
loudspeakers<br />
Single wiring<br />
Single wiring is the conventional wiring method of<br />
running a single cable per channel between the amplifier<br />
and the speaker; this is the easiest technique.<br />
If each speaker has more than one pair of connecting<br />
terminals, use the terminals labelled LF or ‘Low<br />
Frequency’ for each speaker.<br />
Connect the positive terminal of the right speaker<br />
connection on the amplifier (coloured red and labelled<br />
+R) to the positive terminal of your right speaker.<br />
Similarly, connect the negative terminal of the amplifier<br />
(coloured black and labelled with R–) to the negative<br />
terminal of your speaker. Repeat the process for the left<br />
speaker, using the amplifier terminals labelled +L and L–.<br />
If your speakers support bi-wiring, then there is a strip<br />
of conductive metal on the speakers connecting the lowfrequency<br />
terminals to those for the higher-frequencies;<br />
this MUST NOT BE REMOVED in a single-wired<br />
system.<br />
<strong>Arcam</strong> A19<br />
Notes on making speaker<br />
connections<br />
< < Do not make any connections to any amplifier<br />
while it is switched on. We recommend that<br />
your amplifier is completely disconnected from<br />
the mains supply before starting.<br />
< < Before switching your amplifier(s) on for the<br />
first time after connecting to speakers, please<br />
check all connections thoroughly. Ensure that<br />
bare wires or cables are not touching each other<br />
or the amplifier’s chassis (which could cause<br />
short circuits), and that you have connected<br />
positive (+) to positive and negative (–) to<br />
negative. Be sure to check the wiring for both<br />
the amplifier and the speaker.<br />
< < After making connections: switch the<br />
amplifier(s) on, select a source signal, then<br />
gradually increase the volume to the required<br />
listening level.<br />
< < If you are unsure as to how your system should<br />
be connected, or need advice on bi-amping,<br />
please contact your <strong>Arcam</strong> dealer who will be<br />
happy to help you.<br />
<strong>English</strong><br />
An A19 connected to speakers using single wiring<br />
Bi-amping<br />
Bi-amping is the separation of the amplification of lowand<br />
high-frequency signals over two amplifiers.<br />
Bi-amping requires the use of two amplifiers per<br />
channel. Normally, your A19 is used to drive the highfrequency<br />
(treble) speakers, with a P38 used for the<br />
lower (bass) frequencies.<br />
Connect your A19 to the speakers as described for<br />
single wiring, with the exception that the A19 should<br />
be connected to the speaker terminals labelled HF or<br />
‘High Frequency’. Then connect the power amplifier<br />
(an <strong>Arcam</strong> P38 for example) to the LF or ‘Low<br />
Frequency’ terminals, as in the diagram. A pair of audio<br />
interconnect cables are also required to connect the<br />
pre-amp outputs of the A19 to the power amp inputs of<br />
the P38.<br />
Note that the strip of metal on the speakers connecting<br />
the lower terminals to the upper terminals MUST BE<br />
REMOVED. Failure to do so will result in damage to<br />
both amplifiers, which will not normally be covered<br />
under warranty.<br />
<strong>Arcam</strong> A19<br />
<strong>Arcam</strong> P38<br />
An A19 and P38 connected to speakers using bi‐amping<br />
E-9
AUX 31<br />
A19 INTEGRATED AMPLIFIER<br />
operation<br />
MUTE<br />
DISPLAY<br />
BALANCE<br />
PHONO<br />
AUX<br />
CD<br />
TUNER<br />
SAT<br />
BD<br />
PVR<br />
AV<br />
AUX PHONES POWER<br />
Switching on<br />
The front panel POWER button switches the unit on and<br />
off.<br />
The power light (next to the ‘A19 Integrated Amplifier’<br />
text) indicates the state of the amplifier: it changes from<br />
red to orange then green if mains power is connected<br />
and the unit is switched on.<br />
If the unit is left unused for an extended period of time<br />
it will go into standby to reduce power consumption.<br />
Press AUX & BALANCE to adjust the time of this<br />
feature.<br />
Display<br />
The front panel DISPLAY button (or DISP on the remote<br />
control) changes the display brightness between ‘on’,<br />
‘dimmed’ and ‘off ’. If the A19 is powered off with the<br />
display brightness set to ‘off ’, the display resumes to<br />
‘dimmed’ when the unit is powered on again.<br />
Selecting an audio source<br />
The audio source may be selected from the front panel<br />
(PHONO, AUX, CD, TUNER, SAT, BD, PVR or AV), or the remote<br />
control (BD, PVR, TUN, AV, PHONO, AUX, CD or SAT).<br />
In each case, the source is selected from the input<br />
sockets with the corresponding name.<br />
Listening<br />
Volume control<br />
Use the control knob (or the +/– buttons on the remote)<br />
to change the volume. Turn the knob clockwise to<br />
increase the volume, anti-clockwise to reduce it.<br />
Listening using headphones<br />
The headphones socket (PHONES) accepts headphones<br />
with an impedance rating between 8Ω and 2kΩ, fitted<br />
with a 3.5mm stereo jack plug.<br />
The pre-amp outputs and speakers are muted when<br />
headphones are plugged in and the front panel display<br />
shows Headphone.<br />
The headphones socket is always active, unless output<br />
has been muted.<br />
Muting output<br />
The output of the A19 can be silenced by pressing MUTE<br />
on the front panel (or - on the remote control). If the<br />
unit is muted, the power light changes to orange and<br />
the source is shown on the front display panel (e.g.<br />
PVR MT).<br />
Press MUTE/- for a second time (or change the volume)<br />
to cancel mute.<br />
E-10
<strong>English</strong><br />
Adjusting the balance<br />
The balance setting allows you to increase the volume of<br />
one channel (left or right) relative to the other. Altering<br />
the balance may help to restore the stereo image for an<br />
off-centre listening position.<br />
Balance can be adjusted from the front panel or from the<br />
remote control. Click the BALANCE button (or BAL on the<br />
CR108) to view the current setting, then use the control<br />
knob (or the +/– buttons on the remote) to change the<br />
setting – from L9 to R9, via the neutral value 0.<br />
Recording an audio source<br />
The A19 allows you to record and monitor the sound<br />
from any connected source.<br />
The back panel REC OUT socket can be connected to the<br />
input sockets of your recording device (these are usually<br />
labelled RECORD or IN).<br />
To record from a particular source, press the appropriate<br />
source button (for example, TUNER).<br />
Troubleshooting<br />
If you are having trouble with your amplifier, check the<br />
following items.<br />
No sound<br />
Check the following:<br />
< < The A19 amplifier is powered up and switched on.<br />
< < The amplifier is not muted (i.e. MT (mute) is not<br />
shown on the display panel; the power light is<br />
showing green, not orange or red).<br />
< < The selected source is generating audio (e.g., if CD<br />
is selected, then the CD is playing).<br />
< < The speaker outputs are connected on the A19 (or<br />
on the power amplifier, in the case of a bi-amping<br />
arrangement).<br />
Sound cuts-out unexpectedly<br />
If the temperature of the internal heatsink rises above<br />
a safe level, then a thermal cut-out inside the amplifier<br />
operates to protect the unit and the protection system<br />
temporarily removes power to the speakers. The system<br />
will reset itself as the heatsink cools down.<br />
< < With two pairs of low-impedance speakers<br />
connected (6Ω or less), overloads are more likely.<br />
Overloading the amplifier may cause it to shut<br />
down because of overheating.<br />
< < Note that, due to the high output voltage from some<br />
CD players, it is possible to drive your amplifier<br />
at full power even though the volume is not set at<br />
maximum.<br />
E-11
specifications<br />
Continuous power output (20Hz—20kHz at 0.5% THD), per channel<br />
Both channels, 8Ω, 20Hz—20kHz<br />
Single channel, 4Ω, at 1kHz<br />
E-12<br />
50W<br />
90W<br />
Harmonic distortion, 80% power, 8Ω at 1kHz 0.003%<br />
Inputs<br />
Phono (MM) cartridge:<br />
Input sensitivity at 1kHz<br />
Input impedance<br />
Frequency response (ref. RIAA curve)<br />
Signal/noise ratio (Awtd) 50W, ref. 5mV input<br />
Overload margin, 50mV at 1kHz<br />
Line and AV inputs:<br />
Nominal sensitivity<br />
Input impedance<br />
Maximum input<br />
Frequency response<br />
Signal/noise ratio (Awtd) 50W, ref. 1V input<br />
Preamplifier output<br />
Nominal output level<br />
Output impedance<br />
Headphone output<br />
Maximum output level into 600Ω<br />
Output impedance<br />
Load range<br />
Accessory power output<br />
Using accessory power cable supplied, provides two<br />
2.1mm DC connectors<br />
General<br />
Mains voltage<br />
Power consumption (maximum)<br />
Dimensions W x D x H (including feet)<br />
Weight (net)<br />
Weight (packed)<br />
Supplied accessories<br />
E&OE<br />
NOTE: All specification values are typical unless otherwise stated.<br />
5mV<br />
47kΩ + 100pF<br />
20Hz—20kHz ± 1dB<br />
80dB<br />
20dB<br />
1V<br />
10kΩ<br />
4.6Vrms<br />
20Hz—20kHz ± 0.2dB<br />
105dB<br />
630mV<br />
230Ω<br />
4V<br />
1Ω<br />
16Ω—2kΩ<br />
6V, 1A<br />
110–120V~ or 220–240V~<br />
350W<br />
432 x 275 x 85mm<br />
8.5kg<br />
10.2kg<br />
Mains lead<br />
CR108 remote control<br />
2 x AAA batteries<br />
Accessory power cable<br />
Continual improvement policy<br />
<strong>Arcam</strong> has a policy of continual improvement for its<br />
products. This means that designs and specifications<br />
are subject to change without notice.
product<br />
guarantee<br />
Worldwide Guarantee<br />
This entitles you to have the unit repaired free of charge, during the first two years after<br />
purchase, provided that it was originally purchased from an authorised <strong>Arcam</strong> dealer.<br />
The <strong>Arcam</strong> dealer is responsible for all after-sales service. The manufacturer can take no<br />
responsibility for defects arising from accident, misuse, abuse, wear and tear, neglect or<br />
through unauthorised adjustment and/or repair, neither can they accept responsibility<br />
for damage or loss occurring during transit to or from the person claiming under the<br />
guarantee.<br />
The warranty covers:<br />
Parts and labour costs for two years from the purchase date. After two years you must pay<br />
for both parts and labour costs. The warranty does not cover transportation costs at any<br />
time.<br />
<strong>English</strong><br />
Claims under guarantee<br />
This equipment should be packed in the original packing and returned to the dealer from<br />
whom it was purchased. It should be sent carriage prepaid by a reputable carrier – not<br />
by post. No responsibility can be accepted for the unit whilst in transit to the dealer or<br />
distributor and customers are therefore advised to insure the unit against loss or damage<br />
whilst in transit.<br />
For further details contact <strong>Arcam</strong> at:<br />
<strong>Arcam</strong> Customer Support Department,<br />
Unit 15, Pembroke Avenue, Waterbeach, CAMBRIDGE, CB25 9QP, England<br />
or via www.arcam.co.uk.<br />
Problems?<br />
If your <strong>Arcam</strong> dealer is unable to answer any query regarding this or any other <strong>Arcam</strong><br />
product please contact <strong>Arcam</strong> Customer Support at the above address and we will do our<br />
best to help you.<br />
On-line registration<br />
You can register your product on-line at www.arcam.co.uk.<br />
Correct disposal of this product<br />
This marking indicates that this<br />
product should not be disposed<br />
with other household waste<br />
throughout the EU.<br />
To prevent possible harm to the<br />
environment or human health from<br />
uncontrolled waste disposal and to<br />
conserve material resources, this product should be<br />
recycled responsibly.<br />
To dispose of your product, please use your local<br />
return and collection systems or contact the retailer<br />
where the product was purchased.<br />
E-13