PASSLOCK-SL2 Guide D'Installation - Fortin Electronic Systems
PASSLOCK-SL2 Guide D'Installation - Fortin Electronic Systems
PASSLOCK-SL2 Guide D'Installation - Fortin Electronic Systems

You also want an ePaper? Increase the reach of your titles
YUMPU automatically turns print PDFs into web optimized ePapers that Google loves.
<strong>PASSLOCK</strong>-<strong>SL2</strong><br />
Copyright © 2006, FORTIN AUTO RADIO INC - ALL RIGHTS RESERVED<br />
INSTALLATION GUIDE<br />
Made in Canada - Rev. T - 21 / 01 / 2011<br />
W e b s i t e : h t t p : / / w w w . i f a r . c a<br />
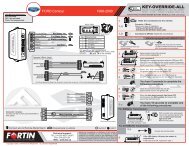
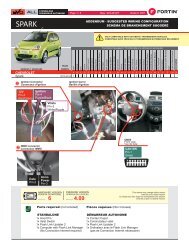
BYPASS MODULE FOR <strong>PASSLOCK</strong> I AND <strong>PASSLOCK</strong> II, SATURN, HUMMER H2, VATS AND NEW GENERATION<br />
WIRING / CONNECTION GUIDE<br />
See wiring schematic configuration<br />
Programming<br />
Button<br />
LED<br />
Green<br />
Blue<br />
Orange/Black<br />
Orange<br />
Purple/White<br />
Purple<br />
Yellow/Black<br />
Yellow<br />
Red<br />
Black<br />
Blue<br />
White<br />
2Bulb test Out<br />
Ground (-)<br />
(-) While running<br />
Data In Barillet<br />
Data from BCM<br />
Key sense Out<br />
Starter or accessory<br />
Ignition or accessory<br />
12V Batterie (+)<br />
N.C.<br />
Data-Link<br />
Data-Link<br />
Connect wire to<br />
vehicle<br />
OUTPUT<br />
Connect wire to Remote-<br />
Starter/Alarm<br />
INPUT<br />
1<br />
1.A<br />
1.B<br />
START HERE<br />
INSTALLATION AND PROGRAMMATION INSTRUCTIONS<br />
Make the connections of the <strong>PASSLOCK</strong>-<strong>SL2</strong><br />
to the vehicle:<br />
Connector 1 (Black):<br />
Determine the type of installation:<br />
INSTALLATION WITH DATA-LINK (See plan 1, Below).<br />
INSTALLATION WITHOUT DATA-LINK (See plan 2, Below).<br />
Connector 2 (White):<br />
(I) Locate the wiring type for the vehicle on the<br />
VEHICLE FIT GUIDE (P.3)<br />
(II) Make the connections associated with the vehicle in the<br />
WIRING SCHEMATIC CONFIGURATION (P.3)<br />
5<br />
6<br />
7<br />
OFF<br />
IGN<br />
START<br />
Release the programming button.<br />
Turn the key to the ignition<br />
position.<br />
The LED will flash rapidly.<br />
2<br />
2<br />
Press and hold the programming<br />
button. Plug the connector 2<br />
(white) into the <strong>PASSLOCK</strong>-<strong>SL2</strong><br />
interface.<br />
8<br />
OFF<br />
You have 4 seconds to:<br />
IGN<br />
START<br />
Start the vehicle with the key.<br />
3<br />
1<br />
Plug in the connector 1<br />
(black) on the <strong>PASSLOCK</strong>-<strong>SL2</strong><br />
interface.<br />
9<br />
The LED will flash (1-6 times).<br />
4<br />
INSTALLATION WITH DATA-LINK<br />
Plan 1<br />
In Data-Link mode the<br />
analog Inputs (Unlock,<br />
ground out) are disable<br />
for security.<br />
2<br />
The LED will turn on, indicating<br />
the beginning of programming.<br />
1<br />
Starter or alarm<br />
Data Link Port<br />
10<br />
INSTALLATION WITHOUT DATA-LINK<br />
Plan 2<br />
Cut off one plug of<br />
the Data-Link<br />
connector, connect<br />
the red wire to +12V.<br />
OFF<br />
IGN<br />
START<br />
2<br />
1<br />
Turn the key OFF.<br />
THE <strong>PASSLOCK</strong>-<strong>SL2</strong> IS<br />
PROGRAMMED.<br />
Red +12V<br />
Starter or alarm<br />
TECHNICAL SUPPORT / INFORMATION<br />
Neither the manufacturer or distributor of this module is responsible of<br />
damages of any kind indirectly or directly caused by this module, except<br />
for the replacement of this module in case of manufacturing defects. This<br />
module must be install by qualified technician. This instruction guide may<br />
change without notice. Visit www.ifar.ca to get latest version.<br />
Technical support:<br />
TEL: 514-255-HELP (4357)<br />
FAX: 514-255-1367<br />
Web: www.ifar.ca<br />
P.1<br />
7 7 0 3 5 0 0 0 1 4 9 0
2<br />
<strong>PASSLOCK</strong>-<strong>SL2</strong><br />
Copyright © 2006, FORTIN AUTO RADIO INC - TOUS DROITS RÉSERVÉS<br />
GUIDE D’ INSTALLATION<br />
Fabriqué au Canada - Rev.S - 05 / 01 / 2010<br />
S i t e I n t e r n e t : h t t p : / / w w w . i f a r . c a<br />
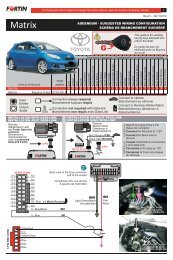
Interface de branchement Auto-Apprentissage pour Système de Sécurité et /ou Démarreur à distance.<br />
MODULE DE CONTOURNEMENT <strong>PASSLOCK</strong> I, <strong>PASSLOCK</strong> II, SATURN, HUMMER H2, VATS ET NEW GENERATION<br />
CÂBLAGE / GUIDE DE CONNEXION<br />
Vert<br />
Bleu<br />
Orange/Noir<br />
Orange<br />
Mauve/Blanc<br />
Mauve<br />
Jaune/Noir<br />
Jaune<br />
Rouge<br />
Noir<br />
Bleu<br />
Blanc<br />
Masse (-)<br />
2IGNITION ou ACC.<br />
Masse d'activation<br />
Data In Barillet<br />
Data du BCM<br />
Bulb test OUT<br />
Key sense OUT<br />
Démarreur ou acc.<br />
1<br />
12V Batterie (+)<br />
N.C.<br />
Data-Link<br />
Data-Link<br />
Voir les SCHÉMA DE BRANCHEMENT<br />
Branchement du filage au démarreur à distance/Alarme<br />
Branchement du filage au véhicule<br />
SORTIE ENTRÉE<br />
1<br />
COMMENCEZ<br />
ICI<br />
INSTRUCTIONS D’INSTALLATION ET DE PROGRAMMATION<br />
Effectuez les connexions du <strong>PASSLOCK</strong>-<strong>SL2</strong> :<br />
5<br />
Relâchez le bouton de programmation.<br />
1.A<br />
Connecteur 1 (Noir):<br />
Déterminez le type d’installation (Data-Link ou non Data-Link).<br />
Pour l’installation Data-Link assurez vous de la présence du<br />
connecteur Data-Link sur le démarreur. (Voir schéma 1(ci-dessous)).<br />
Pour installation non Data-Link voir schéma 2 (ci-dessous).<br />
6<br />
OFF<br />
IGN<br />
START<br />
Tournez la clef en position ignition.<br />
2<br />
1.B<br />
Connecteur 2 (Blanc):<br />
Déterminez le type de branchement selon votre véhicule<br />
(Voir GUIDE DES VOITURES, P.3).<br />
Effectuez les branchements selon le type d’installation<br />
(Voir SCHÉMA DE BRANCHEMENT, P.3).<br />
Maintenez le bouton de programmation<br />
enfoncé.<br />
Branchez le connecteur 2 (blanc)<br />
dans le module <strong>PASSLOCK</strong>-<strong>SL2</strong> .<br />
7<br />
8<br />
VOUS AVEZ 4 SECONDES POUR:<br />
OFF<br />
IGN<br />
START<br />
Le DEL clignote rapidement.<br />
Démarrez le véhicule avec la clef.<br />
3<br />
1<br />
Branchez le connecteur 1 (noir) dans le<br />
module <strong>PASSLOCK</strong>-<strong>SL2</strong> .<br />
9<br />
Le DEL clignote lentement (1 à 6 fois).<br />
4<br />
Le DEL s’allume pour indiquer le début de la<br />
programmation.<br />
10<br />
OFF<br />
IGN<br />
START<br />
Tournez la clef à OFF.<br />
LE <strong>PASSLOCK</strong>-<strong>SL2</strong> EST PROGRAMMÉ.<br />
INSTALLATION SUR SYSTÈME AVEC DATA-LINK<br />
Schéma 1<br />
Démarreur ou alarme<br />
INSTALLATION SUR SYSTÈME SANS DATA-LINK<br />
Schéma 2<br />
Démarreur ou alarme<br />
En data-link les<br />
entrées analogues<br />
(déverrouillé, ground<br />
out) sont désactivées<br />
pour augmenter la<br />
sécurité.<br />
2<br />
1<br />
Port Data Link<br />
Coupez les 4 fils à<br />
l’extrémité de l’un des<br />
deux connecteurs<br />
Data-Link.<br />
Connectez le fil rouge<br />
au 12V.<br />
2<br />
1<br />
Rouge +12V<br />
INFORMATIONS / SUPPORT TECHNIQUE<br />
Ni le manufacturier, ni le distributeur ne se considèrent responsables des dommages causés ou ayant pu<br />
être causés, indirectement ou directement, par ce module, excepté le remplacement de ce module en cas<br />
de défectuosité de fabrication. Ce module doit être installé par un technicien qualifié. Ce guide<br />
d'instruction peut faire l’objet de changement sans préavis. consultez le www.ifar.ca pour voir la plus<br />
récente version.<br />
Support Technique:<br />
TEL: 514-255-HELP (4357)<br />
FAX: 514-255-1367<br />
Web: www.ifar.ca<br />
P.2
<strong>PASSLOCK</strong>-<strong>SL2</strong><br />
Copyright © 2006, FORTIN AUTO RADIO INC - ALL RIGHTS RESERVED<br />
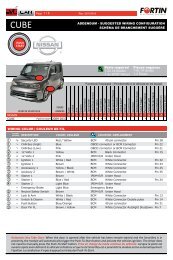
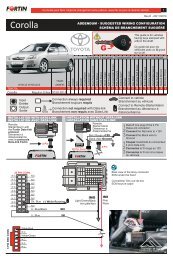
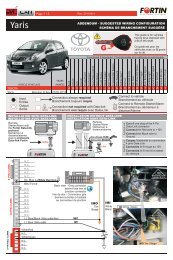
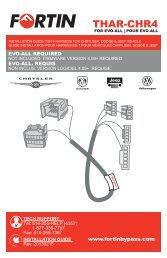
VEHICLES / VÉHICULES<br />
Vehicles<br />
Véhicules<br />
Buick<br />
Century<br />
LeSabre<br />
Park Avenue<br />
Rainier<br />
Regal<br />
Riviera<br />
Roadmaster<br />
Skylark<br />
Cadillac<br />
Allante<br />
Brougham<br />
Concours<br />
DeVille<br />
Eldorado<br />
Escalade<br />
Fleetwood<br />
Seville<br />
Seville SLS<br />
Seville STS<br />
Chevrolet<br />
Astro<br />
Avalanche<br />
Blazer<br />
CK Pickup<br />
Camaro<br />
Caprice<br />
Cavalier<br />
Cavalier<br />
Cobalt<br />
Colorado<br />
Corvette<br />
Equinox<br />
Express Van<br />
Impala<br />
Lumina<br />
Malibu<br />
Monte Carlo<br />
S10 - S15<br />
Silverado<br />
SSR<br />
Tahoe<br />
TrailBlazer<br />
GMC<br />
Canyon<br />
Envoy<br />
Jimmy<br />
Safari<br />
Savana<br />
Sierra<br />
Sonoma<br />
Suburban<br />
Yukon<br />
Years<br />
Années<br />
Wiring<br />
schematic<br />
Hummer<br />
H2<br />
2003-2007<br />
4<br />
H3 2008-2009 6<br />
Isuzu<br />
Ascender<br />
2003-2007<br />
4<br />
Hombre<br />
1998-2000<br />
4<br />
I-280<br />
2005-2006<br />
6<br />
I-290<br />
2007-2008<br />
6<br />
I-350<br />
2005-2006<br />
6<br />
I-370<br />
2007-2008<br />
6<br />
Oldsmobile<br />
Achieva<br />
Alero<br />
Aurora<br />
Bravada<br />
Cutlass<br />
Eighty-Eight<br />
Intrigue<br />
LSS<br />
Nighty-Eight<br />
Regency<br />
Pontiac<br />
Bonneville<br />
Firebird<br />
Grand Am<br />
Grand Am<br />
Grand Prix<br />
Pursuit<br />
Sunfire<br />
Sunfire<br />
Torrent<br />
Saturn<br />
Ion<br />
S Series<br />
Vue<br />
1997-2005<br />
1993-1999<br />
1991-1996<br />
2004-2007<br />
1996-2004<br />
1994-2000<br />
1995-1996<br />
1996-1998<br />
1991-1993<br />
1990-1996<br />
1994-1999<br />
1989-1999<br />
1988-2001<br />
1999-2006<br />
1990-1996<br />
1991<br />
1992-1997<br />
1992-1997<br />
1998-2005<br />
2002-2006<br />
1998-2005<br />
1996-2006<br />
1993-2002<br />
1994-1996<br />
1995-1999<br />
2000-2005<br />
2005<br />
2004-2009<br />
1989-2003<br />
2005-2006<br />
1998-2007<br />
2000-2005<br />
1995-2000<br />
1997-2003<br />
1995-2006<br />
1998-2004<br />
2000-2007<br />
2004-2006<br />
1997-2006<br />
2002-2008<br />
2004-2009<br />
1998-2007<br />
1998-2005<br />
1998-2005<br />
1998-2007<br />
1999-2007<br />
1998-2004<br />
1998-2007<br />
1998-2006<br />
1996-1998<br />
1999-2004<br />
1995-1999<br />
1998-2004<br />
1994-1999<br />
1995-1999<br />
1997-2001<br />
1997-1999<br />
1995-1996<br />
1997-1998<br />
1992-1999<br />
1993-2002<br />
1995-1998<br />
1999-2005<br />
1994-1996<br />
2005<br />
1995-1999<br />
2000-2005<br />
2006<br />
2003-2007<br />
1998-2004<br />
2002-2007<br />
Schema de<br />
Branchement<br />
1<br />
1<br />
1<br />
4<br />
1<br />
1<br />
1<br />
2<br />
1<br />
1<br />
1<br />
1<br />
1<br />
4<br />
1<br />
1<br />
1<br />
1<br />
4<br />
4<br />
4<br />
4<br />
1<br />
1<br />
2<br />
4<br />
6<br />
6<br />
1<br />
5<br />
4<br />
4<br />
1<br />
4<br />
4<br />
4<br />
4<br />
4<br />
4<br />
4<br />
6<br />
4<br />
4<br />
4<br />
4<br />
4<br />
4<br />
4<br />
4<br />
2<br />
3<br />
1<br />
4<br />
1<br />
1<br />
3<br />
1<br />
1<br />
1<br />
1<br />
1<br />
2<br />
4<br />
1<br />
6<br />
2<br />
4<br />
5<br />
6<br />
4<br />
5<br />
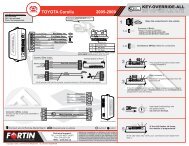
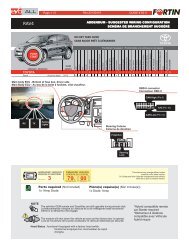
WIRING SCHEMATIC CONFIGURATION / SCHÉMA DE BRANCHEMENT<br />
1<br />
2<br />
VATS<br />
<strong>PASSLOCK</strong> 1<br />
<strong>PASSLOCK</strong> 2A<br />
<strong>PASSLOCK</strong> 2B<br />
<strong>PASSLOCK</strong> 2C<br />
White Ground<br />
White (1V to 5V)<br />
Note: Bulb test is a small black wire next to the 2 red 12V main<br />
power wires.<br />
Note: Buld test est un petit fil noir à côté des 2 fils rouge 12 V<br />
dans le connecteur noir.<br />
3<br />
4<br />
5<br />
6<br />
Black or Yellow<br />
Black<br />
Black/White or White<br />
Yellow<br />
Black or Orange/Black<br />
White or Red/White<br />
Yellow<br />
Black or Orange/Black<br />
White or Red/White<br />
Yellow<br />
Black or Orange/Black<br />
White or Red/White<br />
NEW GENERATION<br />
White or White/Blue (V DATA)<br />
Accessory<br />
Ignition<br />
INSTALLATION GUIDE<br />
Made in Canada - Rev. T - 21 / 01 / 2011<br />
W e b s i t e : h t t p : / / w w w . i f a r . c a<br />
(-) While running<br />
Data<br />
Data<br />
Ignition 12 V<br />
(-) While running<br />
1<br />
Data<br />
Data<br />
Bulb Test Out<br />
Starter +12V<br />
Ignition +12V<br />
(-) While running<br />
1<br />
Data In Barrel<br />
Data from BCM<br />
Starter +12V<br />
Ignition +12V<br />
(-) While running<br />
1<br />
Data In Barrel<br />
Data from BCM<br />
Ignition +12V<br />
(-) While running<br />
1<br />
Data In Barrel<br />
Data from BCM<br />
Key sense Out<br />
Ignition +12V<br />
(-) While running<br />
1<br />
Data In Barrel<br />
Data from BCM<br />
Accessory+12V<br />
Ignition +12V<br />
N.C.<br />
N.C.<br />
N.C.<br />
N.C.<br />
N.C.<br />
N.C.<br />
N.C.<br />
N.C.<br />
N.C.<br />
N.C.<br />
N.C.<br />
N.C.<br />
N.C.<br />
Green<br />
Blue<br />
Orange/Black<br />
Orange<br />
Purple/White<br />
Purple<br />
Yellow/Black<br />
Yellow<br />
Green<br />
Blue<br />
Orange/Black<br />
Orange<br />
Purple/White<br />
Purple<br />
Yellow/Black<br />
Yellow<br />
Green<br />
Blue<br />
Orange/Black<br />
Orange<br />
Purple/White<br />
Purple<br />
Yellow/Black<br />
Yellow<br />
Green<br />
Blue<br />
Orange/Black<br />
Orange<br />
Purple/White<br />
Purple<br />
Yellow/Black<br />
Yellow<br />
Green<br />
Blue<br />
Orange/Black<br />
Orange<br />
Purple/White<br />
Purple<br />
Yellow/Black<br />
Yellow<br />
Green<br />
Blue<br />
Orange/Black<br />
Orange<br />
Purple/White<br />
Purple<br />
Yellow/Black<br />
Yellow<br />
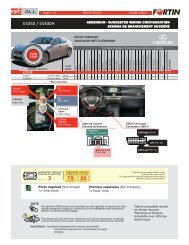
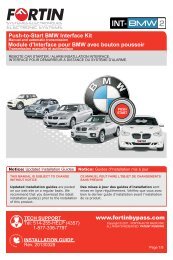
WHAT IS DATA-LINK? / QU’EST-CE QUE LE DATA-LINK?<br />
Starter<br />
Alarm/<br />
Dem.<br />
Alarme<br />
2 way<br />
Data-Link<br />
Bypass<br />
/module<br />
de<br />
dérivation<br />
Ground (-)<br />
Ground (-)<br />
Ground (-)<br />
Ground (-)<br />
Ground (-)<br />
Ground (-)<br />
The Data-Link is a connection between the remote-Starter/Alarm and the Bypass/Interface module.<br />
This connection eliminates all other connections between devices by using bidirectionnal communication.<br />
It reduces the number of connections thus reducing installation error, and eliminates the risk of theft. It<br />
very easy to install and saves up 60% of the installation time.<br />
Le Data-Link est un connecteur entre le démarreur à distance/alarme et le module de contournent qui<br />
élimine tous les branchements entre ceux-ci, par le biais d'une communication bidirectionnelle. Il diminue<br />
les branchements et les erreurs d'installation. Il réduit les risques de vol. Il est facile à installer et sauve<br />
jusqu'à 60% du temps à l'installation.<br />
P.3