

HOW TO BACK UP VIDEO FOR DVR SYSTEMS - Q-See
HOW TO BACK UP VIDEO FOR DVR SYSTEMS - Q-See
HOW TO BACK UP VIDEO FOR DVR SYSTEMS - Q-See

You also want an ePaper? Increase the reach of your titles
YUMPU automatically turns print PDFs into web optimized ePapers that Google loves.
<strong>HOW</strong> <strong>TO</strong> <strong>BACK</strong> <strong>UP</strong> <strong>VIDEO</strong> <strong>FOR</strong><br />
MODEL NUMBERS:<br />
QT426<br />
<strong>DVR</strong> <strong>SYSTEMS</strong><br />
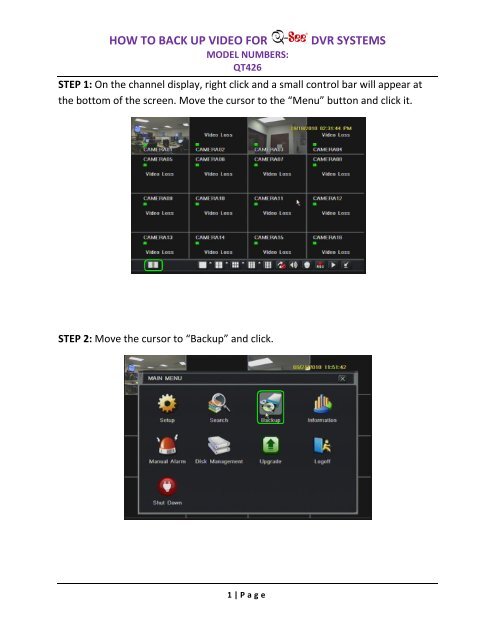
STEP 1: On the channel display, right click and a small control bar will appear at<br />
the bottom of the screen. Move the cursor to the “Menu” button and click it.<br />
STEP 2: Move the cursor to “Backup” and click.<br />
1 | P a g e
<strong>HOW</strong> <strong>TO</strong> <strong>BACK</strong> <strong>UP</strong> <strong>VIDEO</strong> <strong>FOR</strong><br />
MODEL NUMBERS:<br />
QT426<br />
<strong>DVR</strong> <strong>SYSTEMS</strong><br />
STEP 3: Move the cursor to the calendar next to “Start Time” and select the date<br />
of the files you are looking to back up onto a USB flashdrive. The dates in blue<br />
have recorded footage.<br />
STEP 4: Select the start time of the files you are looking to back up onto a USB<br />
flashdrive.<br />
2 | P a g e
<strong>HOW</strong> <strong>TO</strong> <strong>BACK</strong> <strong>UP</strong> <strong>VIDEO</strong> <strong>FOR</strong><br />
MODEL NUMBERS:<br />
QT426<br />
<strong>DVR</strong> <strong>SYSTEMS</strong><br />
STEP 5: Move the cursor to the calendar next to “End Time” and select the date of<br />
the files you are looking to back up onto a USB flashdrive.<br />
STEP 6: Select the end time of the files you are looking to back up onto a USB<br />
flashdrive.<br />
3 | P a g e
<strong>HOW</strong> <strong>TO</strong> <strong>BACK</strong> <strong>UP</strong> <strong>VIDEO</strong> <strong>FOR</strong><br />
MODEL NUMBERS:<br />
QT426<br />
<strong>DVR</strong> <strong>SYSTEMS</strong><br />
STEP 7: Check the boxes next to the channels of the files you are looking to back<br />
up onto the flashdrive.<br />
STEP 8: Move the cursor to “Search” and click.<br />
4 | P a g e
<strong>HOW</strong> <strong>TO</strong> <strong>BACK</strong> <strong>UP</strong> <strong>VIDEO</strong> <strong>FOR</strong><br />
MODEL NUMBERS:<br />
QT426<br />
STEP 9: Check the boxes next to the files you wish to back up.<br />
<strong>DVR</strong> <strong>SYSTEMS</strong><br />
STEP 10: Move the cursor to “Backup” and click.<br />
5 | P a g e
<strong>HOW</strong> <strong>TO</strong> <strong>BACK</strong> <strong>UP</strong> <strong>VIDEO</strong> <strong>FOR</strong><br />
MODEL NUMBERS:<br />
QT426<br />
<strong>DVR</strong> <strong>SYSTEMS</strong><br />
STEP 11: Select the storage media device you wish to back up to.<br />
STEP 12: Check the box next to “Backup Player” if you wish to attach a program<br />
for viewing the files.<br />
6 | P a g e
<strong>HOW</strong> <strong>TO</strong> <strong>BACK</strong> <strong>UP</strong> <strong>VIDEO</strong> <strong>FOR</strong><br />
MODEL NUMBERS:<br />
QT426<br />
<strong>DVR</strong> <strong>SYSTEMS</strong><br />
STEP 13: Select which file type you want to back up your videos to.<br />
STEP 14: Move the cursor to “Start” and click.<br />
7 | P a g e
<strong>HOW</strong> <strong>TO</strong> <strong>BACK</strong> <strong>UP</strong> <strong>VIDEO</strong> <strong>FOR</strong><br />
MODEL NUMBERS:<br />
QT426<br />
<strong>DVR</strong> <strong>SYSTEMS</strong><br />
STEP 15: The progress bar at the bottom will show how much of the file has been<br />
backed up to the flashdrive.<br />
STEP 16: Move the cursor to “OK” and click.<br />
8 | P a g e
<strong>HOW</strong> <strong>TO</strong> <strong>BACK</strong> <strong>UP</strong> <strong>VIDEO</strong> <strong>FOR</strong><br />
MODEL NUMBERS:<br />
QT426<br />
STEP 17: Move the cursor to “Exit” and click<br />
<strong>DVR</strong> <strong>SYSTEMS</strong><br />
9 | P a g e


